Tag: calibrate

  • Pressure Spikes and Relief Valves on Air-Assist Sprayers

    Pressure Spikes and Relief Valves on Air-Assist Sprayers

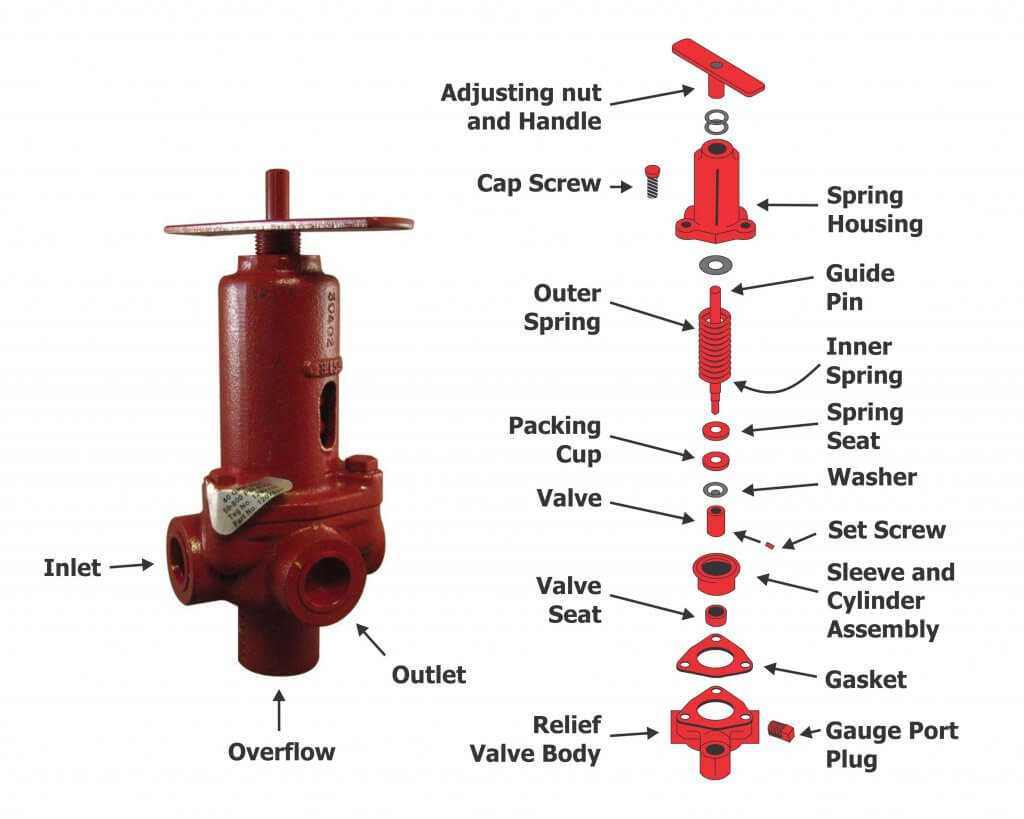
    A properly-sized pump should produce more flow than is needed and work in conjunction with the atomizers to regulate that flow. Typical to high pressure pumps, a piston relief valve (aka regulator) should maintain the desired system pressure through the normal speed range of the sprayer, regardless of the number of booms (or boom-sections) that are on or off. This is achieved by balancing the sprayer pressure against the relief valve spring, which must move freely across a range of flows.

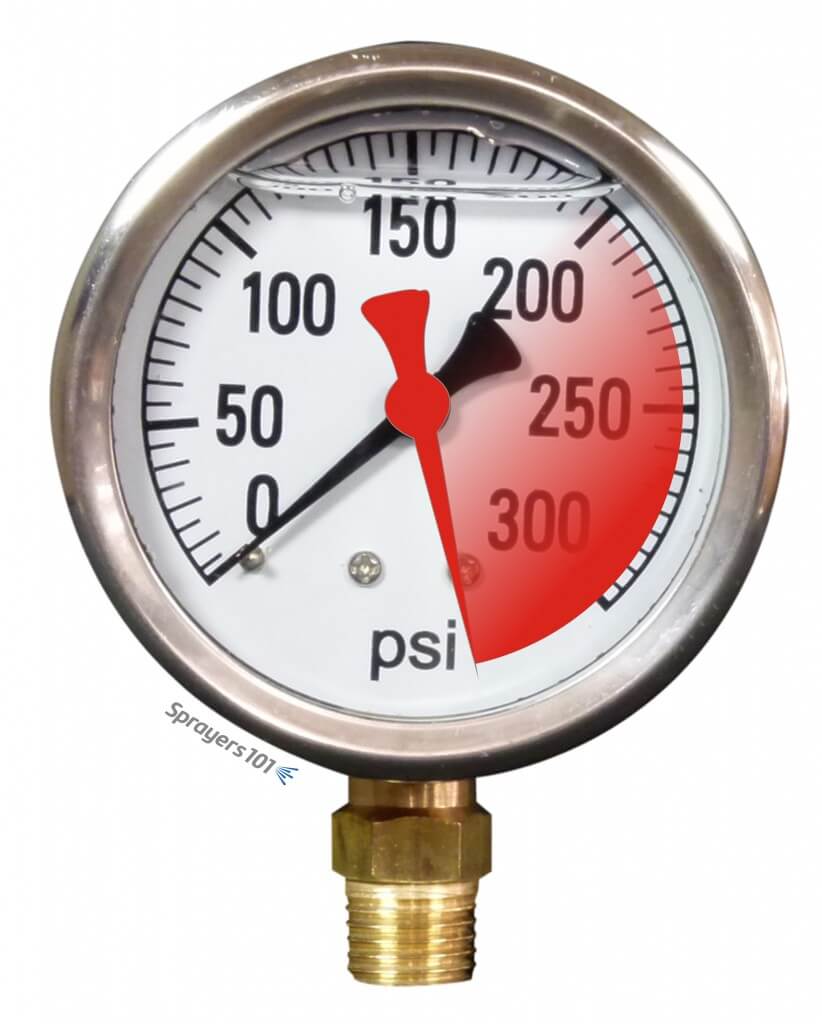
    But what does it mean when the pressure gauge briefly spikes off-scale when boom are turned on or off? This is bad for the gauge and will eventually cause it to fail. Quite often, pressure spikes are an indication of one of two things:

    • A dirty or stuck valve
    • An inappropriate spring size
    A pressure gauge spiking beyond its range.
    A pressure gauge spiking beyond its range.

    Relief valve maintenance

    Sometimes, pressure spikes indicate a need for valve cleaning and maintenance.

    • The regulator spring cavity may be packed with dirt, which limits valve travel. Clean the housing and spring, and then lubricate and adjust.
    • The regulator may be partially seized or sticky. If the regulator piston and cylinder bores are caked with spray they will ‘hold’ the valve until the pressure/spring balance overcomes the friction.
    • Sometimes valve, and/or the valve guide pin are seized. Disassemble them, clean all sliding surfaces, then lubricate and adjust.
    • Valve/seat wear may have created a leak. You may have already tightened the spring to compensate, but this loads the spring past the pressure balance point you want to spray at. This means that when the booms are shut off, the pressure increases until it reaches the ‘new’ spring balance point. Repair (or replace) the regulator, then lubricate and adjust. Be aware that any leak (external or internal) can contribute to this condition and tightening the spring isn’t the solution.
    • The spring may be damaged (e.g. bent, corroded, etc.). Replace the spring, lubricate and adjust.

    Note: Be sure to read the operator’s manual before you do anything. You should understand your sprayer’s design before you perform any maintenance, adjustments or calibration.

    Spring size

    Sometimes, the relief valve may be mechanically sound, but the spring may not be sized to match a reduced operating pressure. Relief valve springs match the maximum pressure range of the pump. Sprayers operated at lower pressure may be unable to compress the spring. This is common when people switch from disc-core nozzles operated at higher pressure to molded nozzles operated at lower pressure.

    This would manifest when one boom is shut off for single-boom operation; there may not be enough pressure to open the bypass. As a result, flow increases over the remaining boom.

    Recognizing this problem, some operators have teed-in a second relief valve capable of finer adjustments at lower pressures. Make sure you know what you’re doing if you’re considering this option.

    Technically, a spring can either be too weak, or too heavy:

    • The spring may be too weak for the pressure being used (i.e. any adjustment bottoms out). In order to obtain sufficient pressure the operator tightens the spring until it is virtually collapsed, essentially creating a fixed orifice. When the booms are closed the ‘fixed orifice’ doesn’t compensate and pressure rises to force the increased flow through that small orifice.
    • If the spring is too heavy for the pressure being used (any adjustment barely touches the spring when pump is turned off). In this case, the pressure being used will not deflect the spring, so the operator closes the regulator until the ‘fixed orifice’ creates sufficient restriction to flow to achieve the desired pressure. When the booms are closed the ‘fixed orifice’ doesn’t compensate and pressure rises to force the increased flow through, or until the spring begins to deflect.
    • In either situation the spring must be sized so it is in the centre-third of its flex range (i.e. rest state > fully collapsed) at the desired pressure. You can buy springs from the sprayer dealer or hardware supply. Try to maintain original length and diameter of the coil, while varying the diameter of the wire.

    Engineering

    In some cases, it is not a matter of valve maintenance, or spring size, but poor engineering. Consider the following:

    • The valve supply and return may be too small for the pump flow. Consult hose and fitting catalogs for flow capacities and lengths. Re-size the hoses and fittings appropriately, and then adjust the regulator.
    • There may be kinks or sharp bends in in the supply and return lines. Re-route the hoses and/or fittings to avoid kinks and sharp bends, and then adjust the regulator.
    • The relief valve may be too small for the pump flow. Consult a regulator catalog for flow capacities and replace the regulator with an appropriate size. Calibrate the regulator spring and adjust.
    • Relief valves have a ‘cracking’ pressure (that’s when the valve just starts to open). Well-designed regulators have small pressure changes from ‘cracking’ to full flow. That information is in their catalogs. Poorly designed regulators have large pressure changes between these two ratings and these regulators should be avoided.
    • The pump may be too big for system. This often happens when sprayers are upgraded and pumps are replaced. Consult the catalogs and reduce pump size or speed, or increase the sizes of the hoses, fittings and regulator.
    • There may be a hydraulic agitator jet on the regulator ‘tank’ line. An agitator jet applies considerable back pressure to a system, and when booms are closed the increased flow causes more than a linear increase in pressure.
    • Broadly, the sprayer system as a whole may be poorly engineered. Inspect and draw a flow path of the sprayer system. Examine where everything is going (or not going). Is it possible someone made changes that the manufacturer did not intend? Consult the manufacturer if you are uncertain. Sometimes, it will have to be re-engineered, which may require expert consultation.

    Note: Your pressure gauge can tell you a lot more than your operating pressure – it can indicate a problem with your regulator, pump, lines or overall sprayer engineering. Don’t ignore it – address it.

    Thanks to Murray Thiessen, Consulting Agricultural Mechanic, for his contribution to this article.

  • Sprayer Math for Banded Applications

    Sprayer Math for Banded Applications

    Where crops are planted in rows, growers can save on chemical costs and reduce potentially wasted spray by performing banded applications. A banded application is treating parallel bands (Figure one), unlike a broadcast application where the entire area is treated (Figure two). This means only a portion of the field or orchard/vineyard floor receives spray, so the total amount of product applied per hectare (or per acre) should be less for banded than for broadcast.

    Figure 1
    Figure 1
    Figure 2
    Figure 2

    Banded applications are used in many situations, including:

    • Applying herbicides right over a crop during planting, both for pre-emergent or post-emergent crops.
    • Applying insecticides/fungicides by “directed spraying” using drop hoses or row kits; the latter is pictured in Figure three.
    • Carefully spraying herbicide between the rows to control weeds in the alleys of an established crop (Figure one).
    • Applying herbicide under fruit trees or grape vines to control weeds (Figure four).
    Figure 3
    Figure 3
    Figure 4
    Figure 4

    It’s easy to make mistakes when calculating product rates for banded applications and these can be costly errors: too little means poor control and too much means wasted product and possible crop injury. This article describes how to calculate sprayer output and product rate for common banded applications.

    Step One: Determine broadcast volume

    Pesticide labels typically list broadcast product rates (e.g. amount of formulated product per hectare or acre). In this example, let’s say the label recommends a broadcast product rate of 500 ml of formulated herbicide applied using 100 litres of spray mix per hectare (i.e. added to 99.5 L water).

    Step Two: Establish sprayer settings

    Select a travel speed that is safe, gives decent efficiency and doesn’t compromise coverage. For this example, we’ll say the sprayer moving is at 8.0 km/h.

    Select a band width that completely covers the target row and some of the adjacent area where control is desired. Band width should be measured along the ground for soil-applied products or along the top of plants for post-emergence products. We’ll use Figure one for our settings: bands are 50 cm wide on 100 cm centres. We’ll say that a single nozzle swath can treat the band, and that we’re spraying 2 hectares of planted area.

    Step Three: Calculate the banded sprayer output

    We can calculate how much of the planted area actually receives spray using this formula:

    [band width (cm) ÷ row width (cm)] x total planted area (ha) = actual sprayed area (ha)
    [50 cm ÷ 100 cm] x 2 ha = 1 ha

    For completeness, here’s the US formula:
    [band width (in) ÷ row width (in)] x total planted area (ac) = actual sprayed area (ac)

    From this we now know that we should be able to go twice as far on a tank spraying a banded application as we would a broadcast, because we’re only spraying half the planted area.

    Step four: Calculate the nozzle output

    Use the following formula to convert the broadcast output into the banded output:

    [broadcast output (L/ha) x travel speed (km/h) x (swath width (cm) ÷ number of nozzles per swath)] ÷ 60,000 = nozzle output (L/min)
    [100 L/ha x 8 km/h x (50 ÷ 1)] ÷ 60,000 = 0.67 L/min

    For completeness, here’s the US formula:
    [broadcast output (gal/ac) x travel speed (mph) x (swath width (in) ÷ number of nozzles per swath)] ÷ 5,940 = nozzle output (gal/min)

    If multiple nozzles were contributing to the swath, such as in figure three or figure four, this formula will account for it. You still mix the labelled product rate at a ratio of 500 ml of herbicide to 99.5 L water, but as we determined in step three, we should be able to spray twice the planted area using a banded application as we would a broadcast application.

    Warning! Watch your units. You may be familiar with other formulae for calculating your output. Do not mix and match formulae or parts of formulae. For example, here is another Metric option for determining L/min. It employs different units so it requires a different constant:

    [broadcast output (L/ha) x travel speed (m/min) x (swath width (m)) ÷ number of nozzles per swath)] ÷ 10,000 (m2/ha) = nozzle output (L/min)

    Step Five: Use the nozzle catalogue to find the right nozzle

    Using a nozzle manufacturer’s catalogue, select a nozzle that gives the desired spray quality (usually coarser for herbicides) and will produce the 50 cm swath we’re looking for (which can be adjusted a little using boom height). Always choose to operate a nozzle in the middle of its pressure range.

    Step Six: Calibrate the sprayer (i.e. double-check)

    Follow your typical calibration process and make minor adjustments until the nozzle discharge per minute results in the desired banded output. A rate controller will handle this on larger sprayers, but if you don’t have one you can make small adjustments to speed and pressure until the desired output is achieved. Ideally, if your math was right, these changes won’t be needed.

    When performed correctly, banded applications are a great way to focus your efforts on the target, saving time and money.

    Here are a few additional resources if you’d like to learn more, or work with a few online calculators:

  • Validate Airblast Output – Nozzle Calibration

    Validate Airblast Output – Nozzle Calibration

    Sprayer math is important. It ensures the operator applies the correct product rate and has enough to complete the job. But, it assumes the airblast sprayer is behaving as expected… and it often doesn’t. After confirming the airblast travel speed, use one of the following methods to assess sprayer output. There are pros and cons to each.

    The area method

    Operators that claim the sprayer empties in the same place every time assume everything’s alright. They are performing a variation on the area method.

    Essentially, you fill the sprayer with enough water to spray one hectare (or acre) and then spray that area. If the tank empties where expected, you know your output rate (i.e. volume / area). But, there are a few problems with this method:

    • Most operators don’t have an accurate test area marked off, and even when they think they know the area, measurements prove otherwise. They’re always amazed when this happens.
    • The area method has poor resolution. It reveals the total output but does not assess individual nozzles. For example, partially-blocked nozzles and worn nozzles average out (we’ve seen it). Rate controllers provide whatever pressure is required to match the desired output, masking individual nozzle problems.

    The dip stick method

    Another method is to fill the sprayer to a known volume using a flow meter, while observing a sight level or a graduated dip stick. Then, while parked, the operator sprays for a given amount of time and determines the difference in the volume remaining in the tank.

    This method can be defeated if volume is misread. It’s an easy error to make if the sprayer is parked on a grade, or the dipstick shifts in a tank with a rounded bottom. And, of course, it also masks individual nozzle problems.

    Sight levels can be misleading when the sprayer is parked on a grade. They are often opaque and hard to read.

    The timed output method

    The preferred method is to measure the output of each nozzle individually. We performed a review on several timed output methods here. It can be messy and time consuming, but it’s accurate. Appropriate personal protective equipment is required to perform the timed output method – expect to get wet.

    1. Fill the rinsed sprayer half-full with clean water and park it on a level surface.

    2. With the fan(s) off, bring the sprayer up to operating pressure. Start spraying with all nozzles open (closing any will change the pressure).

    3. You will need 1 meter (3 feet) of 2.5 cm (1″) diameter braided hose (have a second, longer hose to reach the top of a tower sprayer). It should be stiff enough that you can slip it over a nozzle body while holding the other end. Use it to guide flow into a collection vessel, held with your other hand. The hose not only reaches the top nozzle on towers, but it lets foam dissipate before it gets to the vessel.

    4. When the flow from the hose is steady, direct it into the collection vessel for 30 seconds (a partner with a stopwatch is very helpful). It is preferable to collect for a minute because it improves the accuracy.

    5. Determine and record the nozzle output per minute. Graduations on plastic collection vessels are unreliable. It’s preferable to weigh the output on a cheap, digital kitchen scale. One milliliter of clean water weighs one gram. Don’t forget to subtract the weight of the vessel (this is called taring) and double the output if you only collected for 30 seconds.

    Interpreting the results

    Once you have recorded all the outputs, you will have to convert the output to U.S. gallons or liters per minute, depending on units in the nozzle manufacturer’s catalogue (see common conversions below).

    Replace any nozzles that are 10% (or preferably 5%) more or less than the rated output. This not only indicates a rate problem, but likely a problem with droplet size as well. If enough nozzles are worn, consider replacing all of them. Nozzles should go on as a set, and come off as a set (unless replacing a broken tip, of course). This can be an expensive proposition for large airblast sprayers, but it is part of operational costs.

    Don’t assume new nozzles are accurate. We’ve found +/- 5% flow variation right off the shelf. Keep your receipts.

    Testing and replacing nozzles is an important part of sprayer operation, no matter how many there are. This Air-O-Fan is nozzled for Australian almonds.

    Helpful conversions

    Anyone that has tried the timed output method in Canada knows the pain of our Metric-esque (Mocktric?) units. We’re an odd hybrid because our label rates are in metric, but our nozzles and many of our sprayers are US Imperial. You can find a complete collection of conversion tables here, but the most common calculations are reproduced below:

    If collecting in ounces, converting to U.S. Gallons per minute:

    us-gallons-per-minute

    If collecting in millilitres or grams converting to U.S. Gallons per minute:

    us-gallons-per-minute

    If collecting in ounces, converting to litres per minute:

    liters-per-minute

    If collecting in millilitres or grams converting to litres per minute:

    liters-per-minute

    If collecting in ounces, converting to Imperial gallons per minute:

    imperial-gallons-per-minute

    If collecting in millilitres or grams converting to Imperial gallons per minute:

    imperial-gallons-per-minute

    A more sophisticated option

    The timed output method is slow and requires math. You can avoid both problems by using electronic calibration vessels like the Innoquest SpotOn SC-4. We’ve tested both, and they are as accurate as weighing the output – but much faster.

    They can, however, be fooled by foam. We’ve had good results using a length of braided hose to direct the flow and dissipate most of the foam. Typically, foaming means the sprayer wasn’t rinsed enough.

    The SpotOn SC-4 calibration vessel is much easier, faster and more accurate than the classic pitcher-and-stopwatch approach to timed output tests.
    The SpotOn calibration vessel is easier, faster and more accurate than the classic pitcher-and-stopwatch approach to timed output tests. The SC-4 (pictured) is for airblast and SC-1 is for field sprayers.

    Another approach is to hose-clamp multiple hoses over nozzle bodies and spray all at once. This is tricky and takes time. Plus, if you suffocate the nozzle’s exit orifice (creating back pressure) or block the air inlets on AI nozzles, you will get a false reading.

    Be careful not to plug air inlets on air induction nozzles – you may get a false reading.

    We prefer nozzle clamps over hose clamps (see the AAMS-Salvarani nozzle clamp pictured below). There are pincers designed to latch behind the nut of the nozzle body, but compatibility can sometimes be an issue (e.g. with Turbomist sprayers).

    Passive flow meters (also pictured below) remove the need for a collection vessel, but they’re a better fit for field sprayers since they have to be held in place manually. They are difficult to source in North America because their accuracy is questionable, but they are fine for comparing relative flow from tip to tip.

    Nozzle clamp or flow meter, avoid suffocating the nozzle exit orifice or AI nozzle air inlets.

    2016_nozzle_flow_meters
    Left: Nozzle body hose clamp. Right: Passive flow meter.

    Some grower groups, or professional consultants, spring for very sophisticated and accurate units, such as AAMS-Salvarani flow measurement system pictured below.

    AAMS-Salvarani flow measurement system. We used these on a pumpkin sprayer in New Hampshire, but they work with airblast too.

    No matter your preferred method, take the time to confirm your sprayer output at the beginning of the season and whenever you make repairs or significant changes to your sprayer.

  • How to Calibrate an Airblast Sprayer Operator

    How to Calibrate an Airblast Sprayer Operator

    Checking coverage on water-sensitive paper with some of the Grape Growers of Ontario members in 2012
    Checking coverage on water-sensitive paper with some of the Grape Growers of Ontario members in 2012
    Press play to hear the audio version of this article.

    When an extension specialist, equipment retailer or consultant is asked to calibrate an airblast sprayer, they would be well advised to calibrate the sprayer operator as well.

    Consider this: you and the operator are each investing three hours (average) to optimize the sprayer for a specific set of circumstances: the crop dimensions, density, and the weather conditions at the time of calibration. Depending on the reason for the application, you may even account for the product(s) mode of action and the pest location. This means that once you leave, the circumstances will change and the benefits of your efforts will quickly diminish.

    Calibrations, like milk, have an expiry date.

    There are three possible outcomes from a single, stand-alone calibration:

    1. The operator manages efficacious applications throughout the season because the variability in weather, crop and pest isn’t significant. This is generally not the case.
    2. Not recognizing that sprayer settings need constant adjustments (or being unable to make the changes) the operator experiences only modest results and decides calibration isn’t worthwhile.
    3. The operator experiences failures and lays the fault with you (as the last person the touch the sprayer) and/or the agrichemical rep that sold the chemical. Few sprayer operators blame timing or spray coverage.
    Explaining how to place water-sensitive paper and ribbons in an apple tree
    Explaining how to place water-sensitive paper and ribbons in an apple tree

    The solution lies in the proverb “Give a man a fish and you feed him for a day; teach a man to fish and you feed him for a lifetime.” It is the sprayer calibrator’s responsibility to involve the sprayer operator and ensure they understand what is being done, why it is being done, and how to do it when you leave. Otherwise, expect to calibrate that sprayer again… soon.

    Personally, I have had the most success educating and empowering sprayer operators to make their own seasonal adjustments based on a formulaic approach. Depending what you are trying to accomplish, you may not need all of the following steps, or you may perform some on your own and others as part of the education:

    1) You could be working one-on-one, or you may be presenting to a large group. When it’s the latter, I like to arrive the day before to meet the host or owner of the sprayer(s). You can scope out the operation and triage the equipment so you know what parts you might need the next day. It also helps to see the space you will be working in.

    2) Perform a pre-calibration inspection of the equipment with the sprayer operator. They know their equipment and can tell you about usage, history and maintenance. It also opens a dialogue between you and helps the operator to relax. Remember: from their perspective they may feel they are being judged and they will take criticisms and corrections personally. Do your best to reassure them that you are trying to make a good thing better – not to correct failings.

    3) If you’re working at a large operation, educate the manager (decision maker) and the operators (drivers) at the same time. If you teach the manager, they might not effectively communicate the lessons to their operators. Likewise, if you teach the operators, they may not be able to convince the manager to let them spend money, or time, on making changes to the sprayer program. Get everyone on the same page, at the same time.

    4) With the operator, perform a basic maintenance check. Specifically, confirm sprayer ground speed, evaluate pressure gauge accuracy and evaluate nozzles. Explain what you are doing, and ask the operator questions. This is where you learn about their attitude. Are they open-minded about changing how they do things? How has their efficacy been in the past? Will they spring for new parts? Do they need convincing that this process must be repeated regularly?

    Demonstrating how deflectors aim air, and spray, into the target using some scrap wood.
    Demonstrating how deflectors aim air, and spray, into the target using some scrap wood.

    5) With the sprayer in the crop, have the operator tie wind-indicator ribbons in the canopy (or better, use lengths pre-tied to springback clips). Explain what they are doing and why. Tell them these ribbons should be monitored, maintained and replaced season-long.

    Here’s a tip: If you are working with a large audience, keeping them focused is critical. Growers will take the opportunity to catch up with each other while you are occupied with the sprayer. They are also inclined to wander away to answer cell phones. If they are not focused, you are on a service call and are not really educating. If you feel you are losing control, single out the ringleaders or wayward students and give them jobs, such as holding tools, or placing/removing water sensitive papers. When they have a responsibility, they pay closer attention.

    A convenient, weather proof calibration kit for flagging tape, clips and water sensitive paper.

    6) Discuss where water-sensitive papers should go, and how they should face. Give the operator a latex glove and after you write on the back of each card (position and trial number) have them clip them in place. Tell them how much they cost, where to buy them and the benefits of using them regularly.

    7) Have the operator spray the target crop using their typical set-up (i.e. ground speed, pressure, rate, air settings, etc.) Have attendees and the operator watch the ribbons as the sprayer passes. Spray from one side with both booms on and then stop to discuss results. Then spray from the other side and explore the cumulative impact.

    8) The operator will be very surprised to learn they have drenched or missed the papers. They may or may not be surprised to have seen the ribbons stood straight out (indicating too much air). If you like, you can even set up papers in the next alley (or alleys) to show how much spray blew through the target. When the papers are dry enough, collect them and store them somewhere safe for later comparison. They tend to blow away, so stick them to a whiteboard with two-sided tape, or clip them there with paperclips. Explain that they can (potentially) save a lot of money and lost fill-time by improving their efficiency. Get them on-board for the big change to come.

    9) Optimize sprayer ground speed, air direction (i.e. deflectors) and air speed/volume (i.e. fan speed). Then re-nozzle the sprayer using brass disc and core tips to reduce output in areas that were drenched or increase output in areas of sparse coverage. Quite often, I turn off the lowest (and sometimes, highest) nozzle positions. A piece of water-sensitive paper at the top and bottom of the canopy will confirm the wisdom in this. Label a new set of papers and have the growers position them in the same locations. Spray again. This entire process should take about 1/2 an hour and is described in detail in the Airblast101 handbook.

    Tying flagging tape in trees to indicate prevailing wind and to calibrate airblast air settings.
    Tying flagging tape in trees to indicate prevailing wind and to calibrate airblast air settings.

    10) The goal is 85 medium droplets per square centimetre and 10-15% coverage on 80% of the target surfaces for most insecticides and fungicides. If there are still drenches or misses, or if you’ve gone too far in a few positions, correct them and try once more. This is iterative. Make sure the sprayer operator will not be spraying in particularly hot or windy conditions, or your calibration at the top of the target can be compromised. Once you are both satisfied, work out the new sprayer output per area (e.g. US gpa or L/ha). You will have to discuss whether the operator plans to concentrate the tank mix to maintain the labelled “per area” rate (not recommended by me) or will continue to mix the tank as always and simply drive further on it (recommended by me). The later is called “Crop-Adapted Spraying“. Don’t push because it’s their livelihood, and therefore their choice.

    11) The final step relies on how well you’ve earned the sprayer operator’s trust throughout this process. Once you have an output and spray distribution that you are both happy with, the operator should invest in molded ceramic tips that emit similar rates to replace the brass disc-core. Then, they must be willing to repeat the process on any crops that are significantly different to ensure they have the right settings. Sometimes only modest changes are required between blocks. Perhaps they will dedicate certain sprayers to certain blocks to reduce the number of changes required. In either case, they will have to revisit these settings as the season progresses to compensate for denser and/or larger canopies.

    A few examples

    The following figures illustrate three airblast calibrations in Ontario apple orchards from spring 2014. Some required one attempt; others required a few trial settings before we achieved reasonable coverage. In all three cases, the sprayer operators reduced per-area rates, bought new nozzles and planned to buy water-sensitive paper. Further, they indicated they would continue to monitor ribbons (as long as they could be seen) and would review coverage after petal-fall.

    Several nozzles shut off, spray re-distributed. Targets still drenched in two locations with a 24% savings in spray mix.
    Several nozzles shut off, spray re-distributed. Targets still drenched in two locations with a 24% savings in spray mix.
    Three successive re-calibrations were required. Output was reduced in the first trial, but poor coverage in position 3. Top nozzles turned off and spray re-distributed in trial 2, but a gust of wind reduced coverage at the top of the tree. Bottom nozzles turned off and spray redistributed to top nozzles for a 40% savings in spray mix.
    Three successive re-calibrations were required. Output was reduced in the first trial, but poor coverage in position 3. Top nozzles turned off and spray re-distributed in trial 2, but a gust of wind reduced coverage at the top of the tree. Bottom nozzles turned off and spray redistributed to top nozzles for a 40% savings in spray mix.
    Output reduced in all nozzle positions and sprayer fan speed reduced. The high humidity greatly reduced droplet evaporation and increased the spread on the papers. In this case, it was decided not to reduce output any further to account for anticipated growth and the high humidity. There was a 27% savings in spray mix.
    Output reduced in all nozzle positions and sprayer fan speed reduced. The high humidity greatly reduced droplet evaporation and increased the spread on the papers. In this case, it was decided not to reduce output any further to account for anticipated growth and the high humidity. There was a 27% savings in spray mix.

    Conclusion

    So, the next time you calibrate an airblast sprayer, be sure to teach the sprayer operator (and audience) what you are doing and why. Involve and engage them. Answer their questions. Encourage them to perform the same calibration for each significantly different block and make mid-season changes. With luck they will only call back to report success and savings, and not to condemn your efforts, or worse: to ask you to re-calibrate their sprayer!

  • Diagnosing Airblast Coverage

    Diagnosing Airblast Coverage

    Assuming there are no mechanical or maintenance problems, water-sensitive paper can be used to diagnose sprayer performance. Go here to read more about water-sensitive paper. Interpreting the results and knowing what changes to make is the critical part of the process. Observing no coverage, or a sodden paper, make for obvious conclusions… but what about everything in between? Here are the ground rules:

    First: Only ever test coverage in environmental conditions you would normally spray in. Temperature, humidity and wind speed can make or break an airblast calibration.

    Second: When altering sprayer settings, only make one change at a time for each test pass so you can isolate what’s wrong.

    Third: Each pass requires a new set of papers located in the same place, oriented the same way, distributed throughout the canopy. Mark their locations with bright flagging tape and write the pass number and canopy position on the back of paper prior to placement. This helps you to compare the passes later on. Don’t collect papers until they’ve had an opportunity to dry a little, or they will smear and stick together.

    Fourth: Pass down one alley first. Have a look at the papers without removing them. Then, spray the target canopy from the other side. Now the papers can be removed for analysis. This order is important because it reveals the impact of wind direction and the cumulative effect of spraying from both sides. In some cases, the sprayer operator may wish to travel an additional upwind alley to reflect the cumulative coverage on a typical spray day. Alternate row applications are not recommended.

    This Turbomist has been outfitted with sensors that detect the presence of a canopy. Each eye corresponds to a boom section, turning the section on and off as required and improving efficiency. If it’s not there, why spray it?
    This Turbomist has been outfitted with sensors that detect the presence of a canopy. Each eye corresponds to a boom section, turning the section on and off as required and improving efficiency. If it’s not there, why spray it?

    Once the papers are retrieved, it’s time to diagnose the coverage. The following situations are typical in calibrations, and possible fixes are suggested. Remember, this is a process that takes time. Several passes may be required before satisfactory coverage is obtained. Once the correct settings are determined for the block, continue to use them until there is a significant change in the crop staging or weather. At that point, repeat the process.

    Seven Situations

    Situation One:

    <15% coverage and <85 Fine/Medium droplets/cm2 at top of target (e.g. tall targets such as hops or trees). Suggested Fixes:

    • Wind might be stealing fine droplets. Try Coarser droplets (e.g. using air induction nozzles). Be aware that you may have to increase volume to compensate for reduced droplet counts and that they may fall out of the airstream before reaching distant targets.
    • Deflectors may not be channelling air and spray correctly – extrapolate air direction using ribbons on deflectors.
    • Fan may have to be set to higher gear, or if using GUTD, return to 540 rpm to increase fan speed. If still insufficient, you may need a sprayer with higher air capacity.

    Situation Two:

    <15% coverage and <85 Fine/Medium droplets/cm2 deep in canopy – sometimes papers on outside of canopy are visibly wet. Suggested Fixes:

    • Ground speed may be too high. Use flagging tape indicator on far side of target and see if air is getting through.
    • Canopy maintenance may be required (e.g. pruning, hedging, leaf stripping, etc.). No sprayer can consistently penetrate really dense canopies.
    • Fan may have to be set to higher gear, or if using GUTD, return to 540 rpm to increase fan speed. If still insufficient, you may need a sprayer with higher air capacity.
    • Increase carrier volume.

    Situation Three:

    Papers are drenched, dripping or show channels of running liquid. Suggested Fixes:

    • Reduce spray volume, either overall or in key locations on the boom corresponding to the drenched papers.
    • Ground speed may be too low. Use flagging tape indicator on far side of target and see if too much air is getting through. If so, increase ground speed.

    Situation Four:

    Considerable overspray beyond target row. Suggested Fixes:

    • Turn off upper nozzles until spray JUST clears target.
    • Deflectors may not be channelling air and spray correctly – extrapolate air direction using ribbons on deflectors.

    Situation Four:

    Considerable blow-through beyond target row. Suggested Fixes:

    • Slow the fan speed by shifting to low gear, or using GUTD method
    • Ground speed may be increased as long as coverage is not compromised. Use flagging tape indicator on far side of target and see if air is getting through.

    Situation Five:

    Ground under target row is drenched. Suggested Fixes:

    • Rotate lower nozzles slightly upward, but do not shut them off. If ground remains drenched, turn them off entirely. Each hollow cone produces up to an 80º spray angle, so the next higher nozzle often compensates by spraying lower than expected.
    • Deflectors may not be channelling air and spray correctly – extrapolate air direction using ribbons on deflectors.

    Situation Six:

    <15% coverage and <85 Fine/Medium droplets/cm2. Remember that this coverage threshold is only a point of reference, not a hard fact. It does not apply when using Coarser droplets. Suggested Fixes:

    • Increase spray volume, either overall or in key locations on the boom corresponding to the under-sprayed papers.
    • Wind might be stealing fine droplets. Try coarser droplets (e.g. using air induction nozzles). Be aware that you may have to increase volume to compensate for reduced droplet counts.
    • Ground speed may be too high. Use flagging tape indicator on far side of target and see if enough air is getting through. If not, decrease ground speed.
    • Canopy maintenance may be required (e.g. pruning, hedging, leaf stripping, etc.). No sprayer can consistently penetrate really dense canopies.

    Situation Seven:

    Inconsistent coverage on outer edge of canopy (e.g. one spot never seems to get spray.) Suggested Fixes:

    • Nozzle spray angle may be too acute (e.g. full cones), and spray is not overlapping before reaching target. Try wider spray angles.
    • Some tower sprayers have ‘dead spots’ in their air. Check for limp or flagging ribbons tied to nozzle bodies and/or deflectors. Deflectors may need to be adjusted, or adjacent nozzle body angles repositioned to compensate. Try an air induction nozzle in the dead zone.
    • Canopy may be brushing against nozzles as the sprayer passes, temporarily blocking them. Canopy management required.
    Some sprayers, such as Rears, Turbomist, FMC or this Durand Wayland have an option for electronic ‘eyes’ that detect spray targets. The boom will shut off completely if there is a gap in the planting. This can save a great deal of wasted spray. It is less applicable in trellised plantings where it has been known to be “fooled” by wires and posts.
    Some sprayers, such as Rears, Turbomist, FMC or this Durand Wayland have an option for electronic ‘eyes’ that detect spray targets. The boom will shut off completely if there is a gap in the planting. This can save a great deal of wasted spray. It is less applicable in trellised plantings where it has been known to be “fooled” by wires and posts.

    If you still are unable to achieve satisfactory coverage, you may have to consider more extreme solutions. You may have an under- or over-powered sprayer. You may have to perform significant canopy management. Or, you may be trying to spray in poor weather conditions.