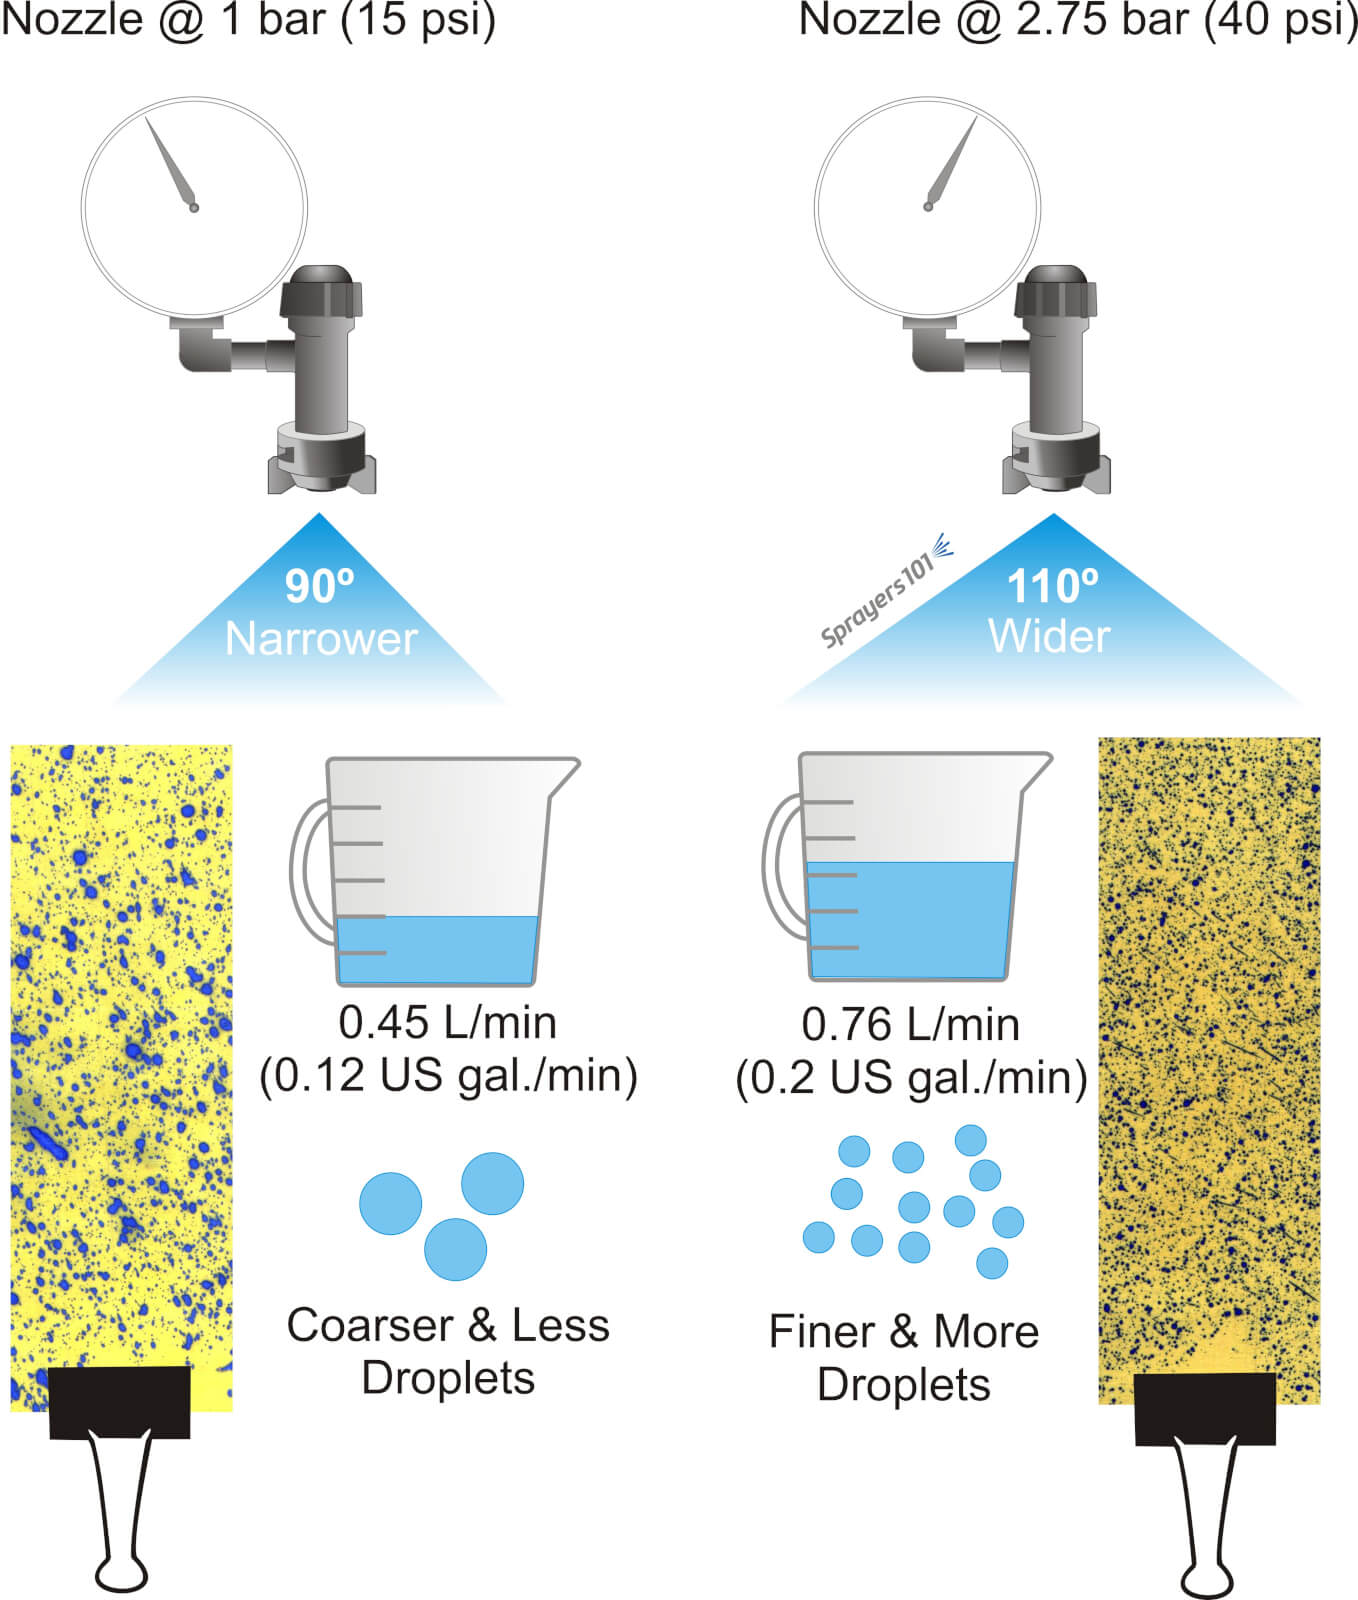
Pressure is integral to nozzle performance. Reducing hydraulic pressure reduces nozzle flow rate, increases median droplet size, and typically reduces spray fan angle. Increasing pressure increases nozzle flow rate, reduces median droplet size and typically increases spray fan angle.
You can watch this Exploding Sprayer Myths video to learn how pressure, boom height and nozzle spacing interact. In extreme cases, too low a pressure can collapse the fan angle enough to reduce overlap and compromise coverage, as explained in the video at the end of this article.
Using a flat fan nozzle as an example, a lower pressure increases the median droplet diameter, reduces the droplet count, reduces the nozzle flow rate and typically reduces the spray angle. Alternately, a higher pressure decreases the median droplet diameter, increases the droplet count, increases the nozzle flow rate and typically increases the spray angle.
Always plan to operate a nozzle in the middle of its recommended range so it can handle small changes in pressure during spraying (such as from a rate controller, or when changing PTO speeds on hilly terrain). Don’t operate an air induction nozzle below 2 bar (30 psi), even if it’s rated lower in the manufacturer’s nozzle table. Most AI nozzles perform best at >4 bar (60 psi).
Pressure can be used on-the-fly to make minor changes to flow rate while spraying. This is how rate-controllers work to compensate for changes in ground speed and maintain a constant overall rate per planted area.
However, pressure should not be used to make significant changes to flow rate. It takes a 4x change in pressure for a 2x change in flow rate, so it’s inefficient. Operating pressures at the upper or lower limit of a nozzle’s range can have undesirable impacts on nozzle wear, median droplet size and swath uniformity.
For a more in-depth discussion of the relationship between spray pressure and nozzle performance, and how rate controllers work, check out this article.
Note: It is far better to simply switch nozzles when a significant change in flow rate is required.
In 2015, we ran demonstrations at Ontario’s Southwest Agriculture Crop Diagnostic Days. The 20 minute sessions were designed to explain:
Although manufacturers of air induction nozzles often rate their performance as low as 15 psi, such a low pressure collapses the spray pattern and the resulting gaps reduce coverage. Additionally, the spray quality at such low pressures is coarser than at higher pressures, reducing the number of droplets available. This further reduces coverage potential.
This video covers the key speaking points from that demonstration.
What’s the most underused active ingredient when creating a proper tank mixture in a sprayer?
Patience.
Spray season is never long enough. The days which are most conducive to spraying are hard to come by. Therefore, the ingredient we need the most when spraying as well as tankmixing is patience. Without it, we are setting ourselves up for failure.
Successful bakers will tell you that patience mattered when perfecting their most decadent creations. By taking their time, adding ingredients slowly and mixing them carefully, those professionals create stunning masterpieces.
We can achieve a masterpiece as well, if we remember to slow down and apply the same principles.
1. Take your time
Take 7-10 minutes between product additions to a spray mixture (especially dry formulations). Have a mini-vacation after each addition! This time allows each product to dissolve into solution and you can complete your spray records!
Extra time allows pesticides to be fully integrated into the spray solution before another product is added, which could impede either formulation from mixing successfully.
Each ingredient must be uniformly mixed before adding the next component. E.g. A soluble powder must be completely dissolved before adding the next item.
2. Add ingredients slowly
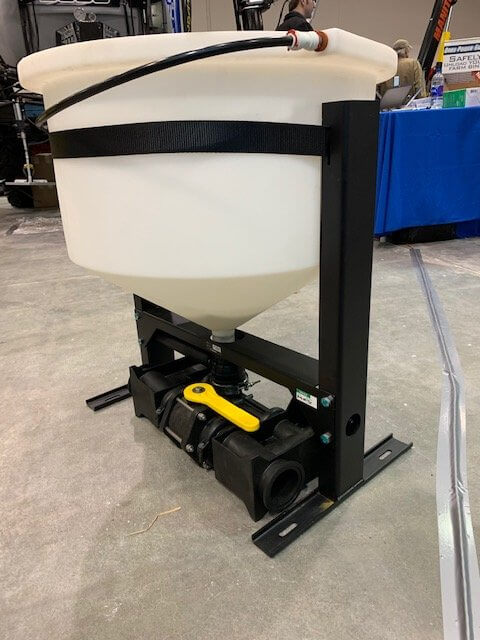
Add products, one at a time, in the mix cone or inductor. If you’re adding product directly via shuttles and dedicated lines, the same principle applies.
Rinse mix cone or inductor and lines with clean water between product additions.
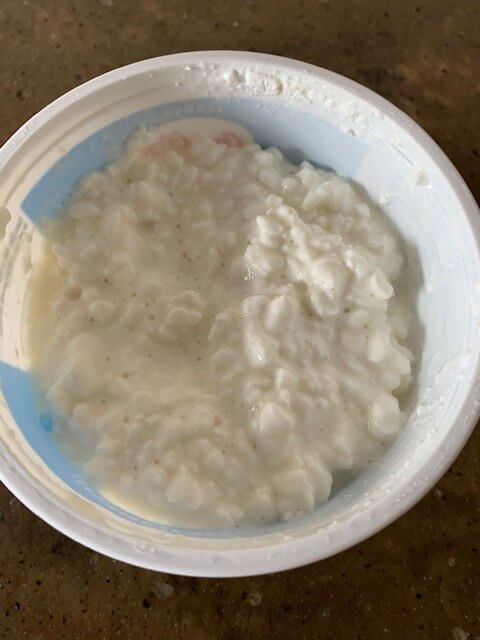
Tank, cone or inductor, mix products one at a time and rinse between additions.Anything resembling cottage cheese in your spray mixture is not a spray masterpiece.
Never “stack” ingredients on top of each other in the mix cone or inductor. Much like oil and water don’t mix, chem-on-chem doesn’t mix either. Active ingredients need water in order transition into solution. It’s vital to not pile products into a mix cone or inductor where they can form cottage cheese instead of a liquid solution.
In my neighborhood, 3″ fill lines are not uncommon. They are a source of time savings when filling but they also bring additional cautions. Be aware of the problems over agitation can bring to what might have been a successful tankmix.
3. Mix carefully
Start with sprayer tank 1/3-1/2 full to allow enough water to create a great solution.
Pre-slurry dry flowables in warm water whenever possible. Yes, it takes additional time and effort but it can prevent having to wash out individual nozzles and strainers later. Or worse, there’s the possibility that the tiny grains of an active ingredient that did not blend into the solution may cause injury to a off target crop.
Mix ingredients in the right order! Typically, crop protection products have a mixing order specified on their labels. Read the label and be familiar with the correct formulations you are currently spraying.
Adjuvants are added in the same sequence as pesticides, e.g., ammonium sulfate is a soluble powder, oil adjuvants are emulsifiable concentrates; and most surfactants are solutions.
Within each group, it is common practice to add the pesticide before the adjuvant, e.g., a soluble-powder pesticide before ammonium sulfate.
Final thoughts
Taking the extra 30 minutes now to load the sprayer carefully will save you the potential of 4 hours of having to clean out an entire tank later!
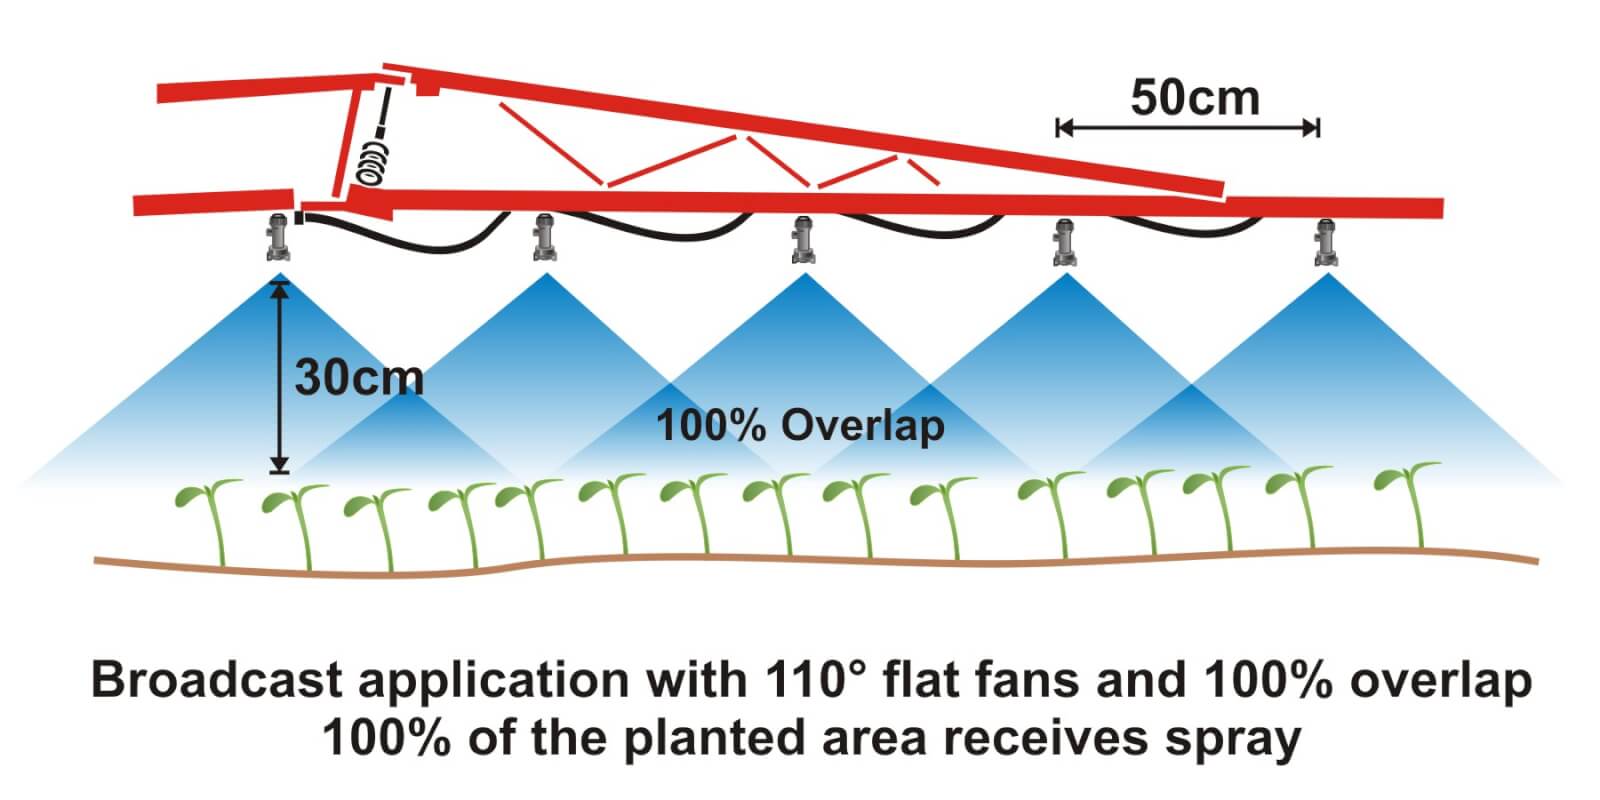
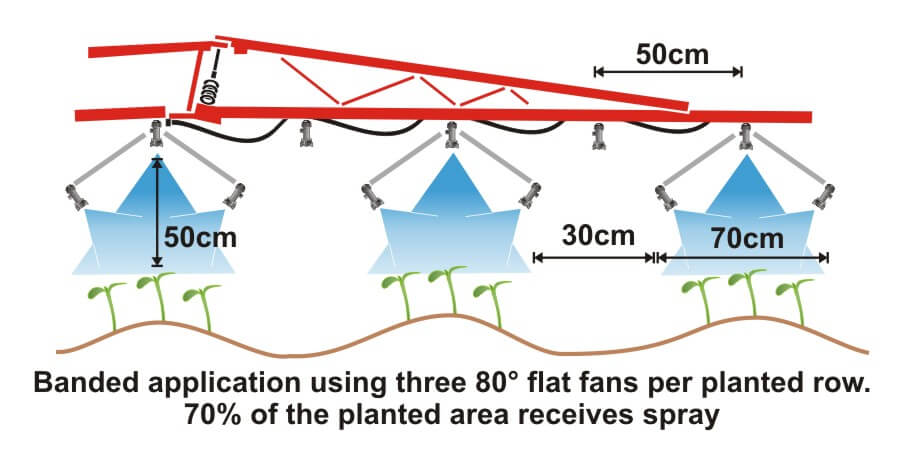
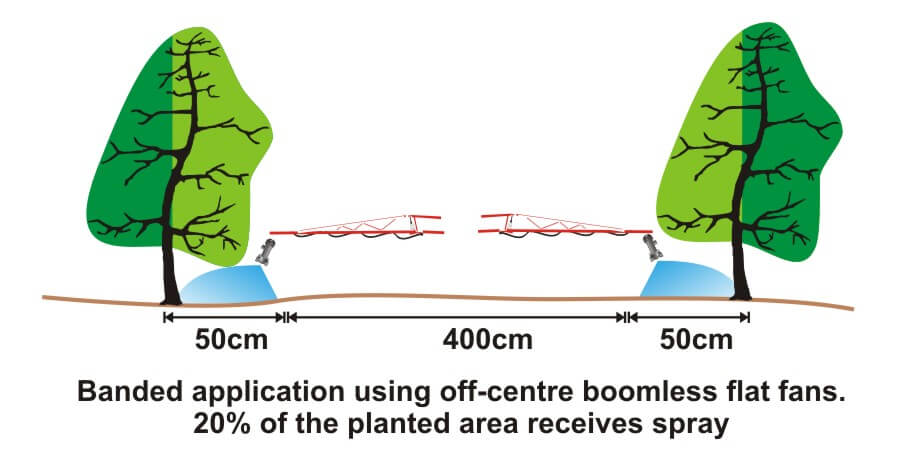
Where crops are planted in rows, growers can save on chemical costs and reduce potentially wasted spray by performing banded applications. A banded application is treating parallel bands (Figure one), unlike a broadcast application where the entire area is treated (Figure two). This means only a portion of the field or orchard/vineyard floor receives spray, so the total amount of product applied per hectare (or per acre) should be less for banded than for broadcast.
Figure 1Figure 2
Banded applications are used in many situations, including:
Applying herbicides right over a crop during planting, both for pre-emergent or post-emergent crops.
Applying insecticides/fungicides by “directed spraying” using drop hoses or row kits; the latter is pictured in Figure three.
Carefully spraying herbicide between the rows to control weeds in the alleys of an established crop (Figure one).
Applying herbicide under fruit trees or grape vines to control weeds (Figure four).
Figure 3Figure 4
It’s easy to make mistakes when calculating product rates for banded applications and these can be costly errors: too little means poor control and too much means wasted product and possible crop injury. This article describes how to calculate sprayer output and product rate for common banded applications.
Step One: Determine broadcast volume
Pesticide labels typically list broadcast product rates (e.g. amount of formulated product per hectare or acre). In this example, let’s say the label recommends a broadcast product rate of 500 ml of formulated herbicide applied using 100 litres of spray mix per hectare (i.e. added to 99.5 L water).
Step Two: Establish sprayer settings
Select a travel speed that is safe, gives decent efficiency and doesn’t compromise coverage. For this example, we’ll say the sprayer moving is at 8.0 km/h.
Select a band width that completely covers the target row and some of the adjacent area where control is desired. Band width should be measured along the ground for soil-applied products or along the top of plants for post-emergence products. We’ll use Figure one for our settings: bands are 50 cm wide on 100 cm centres. We’ll say that a single nozzle swath can treat the band, and that we’re spraying 2 hectares of planted area.
Step Three: Calculate the banded sprayer output
We can calculate how much of the planted area actually receives spray using this formula:
[band width (cm) ÷ row width (cm)] x total planted area (ha) = actual sprayed area (ha) [50 cm ÷ 100 cm] x 2 ha = 1 ha
For completeness, here’s the US formula: [band width (in) ÷ row width (in)] x total planted area (ac) = actual sprayed area (ac)
From this we now know that we should be able to go twice as far on a tank spraying a banded application as we would a broadcast, because we’re only spraying half the planted area.
Step four: Calculate the nozzle output
Use the following formula to convert the broadcast output into the banded output:
[broadcast output (L/ha) x travel speed (km/h) x (swath width (cm) ÷ number of nozzles per swath)] ÷ 60,000 = nozzle output (L/min) [100 L/ha x 8 km/h x (50 ÷ 1)] ÷ 60,000 = 0.67 L/min
For completeness, here’s the US formula: [broadcast output (gal/ac) x travel speed (mph) x (swath width (in) ÷ number of nozzles per swath)] ÷ 5,940 = nozzle output (gal/min)
If multiple nozzles were contributing to the swath, such as in figure three or figure four, this formula will account for it. You still mix the labelled product rate at a ratio of 500 ml of herbicide to 99.5 L water, but as we determined in step three, we should be able to spray twice the planted area using a banded application as we would a broadcast application.
Warning! Watch your units. You may be familiar with other formulae for calculating your output. Do not mix and match formulae or parts of formulae. For example, here is another Metric option for determining L/min. It employs different units so it requires a different constant:
[broadcast output (L/ha) x travel speed (m/min) x (swath width (m)) ÷ number of nozzles per swath)] ÷ 10,000 (m2/ha) = nozzle output (L/min)
Step Five: Use the nozzle catalogue to find the right nozzle
Using a nozzle manufacturer’s catalogue, select a nozzle that gives the desired spray quality (usually coarser for herbicides) and will produce the 50 cm swath we’re looking for (which can be adjusted a little using boom height). Always choose to operate a nozzle in the middle of its pressure range.
Step Six: Calibrate the sprayer (i.e. double-check)
Follow your typical calibration process and make minor adjustments until the nozzle discharge per minute results in the desired banded output. A rate controller will handle this on larger sprayers, but if you don’t have one you can make small adjustments to speed and pressure until the desired output is achieved. Ideally, if your math was right, these changes won’t be needed.
When performed correctly, banded applications are a great way to focus your efforts on the target, saving time and money.
Here are a few additional resources if you’d like to learn more, or work with a few online calculators:
Sprayer math is important. It ensures the operator applies the correct product rate and has enough to complete the job. But, it assumes the airblast sprayer is behaving as expected… and it often doesn’t. After confirming the airblast travel speed, use one of the following methods to assess sprayer output. There are pros and cons to each.
The area method
Operators that claim the sprayer empties in the same place every time assume everything’s alright. They are performing a variation on the area method.
Essentially, you fill the sprayer with enough water to spray one hectare (or acre) and then spray that area. If the tank empties where expected, you know your output rate (i.e. volume / area). But, there are a few problems with this method:
Most operators don’t have an accurate test area marked off, and even when they think they know the area, measurements prove otherwise. They’re always amazed when this happens.
The area method has poor resolution. It reveals the total output but does not assess individual nozzles. For example, partially-blocked nozzles and worn nozzles average out (we’ve seen it). Rate controllers provide whatever pressure is required to match the desired output, masking individual nozzle problems.
The dip stick method
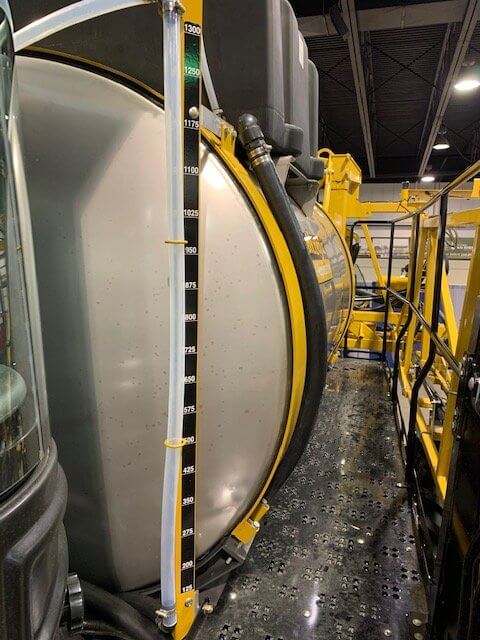
Another method is to fill the sprayer to a known volume using a flow meter, while observing a sight level or a graduated dip stick. Then, while parked, the operator sprays for a given amount of time and determines the difference in the volume remaining in the tank.
This method can be defeated if volume is misread. It’s an easy error to make if the sprayer is parked on a grade, or the dipstick shifts in a tank with a rounded bottom. And, of course, it also masks individual nozzle problems.
Sight levels can be misleading when the sprayer is parked on a grade. They are often opaque and hard to read.
The timed output method
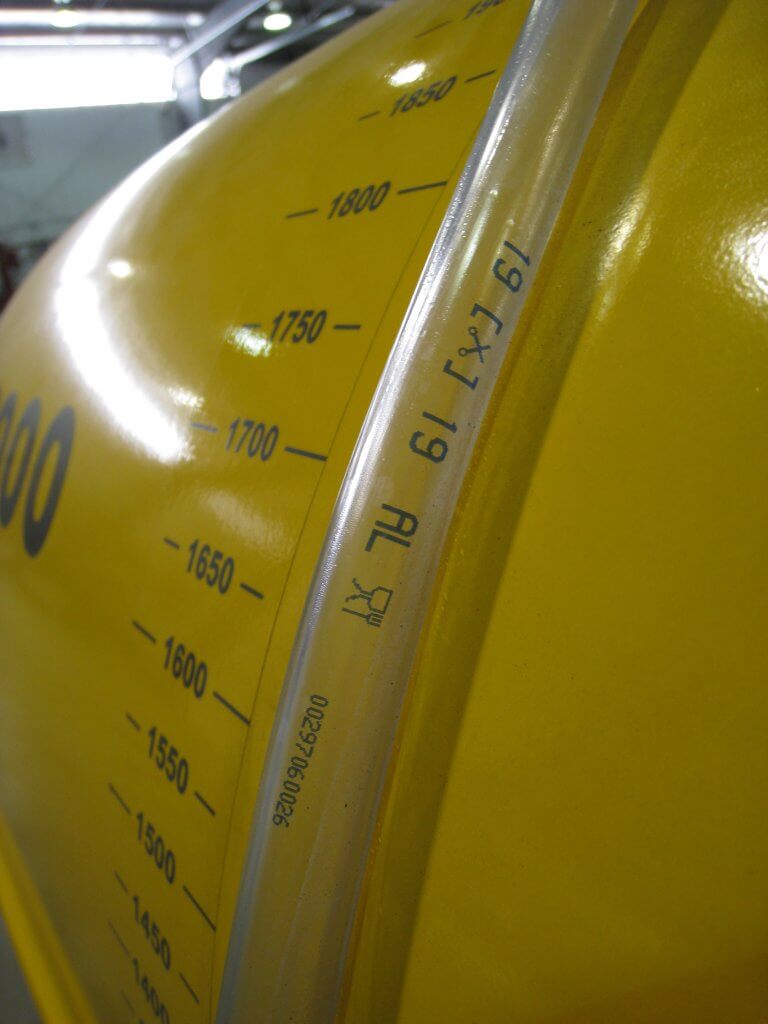
The preferred method is to measure the output of each nozzle individually. We performed a review on several timed output methods here. It can be messy and time consuming, but it’s accurate. Appropriate personal protective equipment is required to perform the timed output method – expect to get wet.
1. Fill the rinsed sprayer half-full with clean water and park it on a level surface.
2. With the fan(s) off, bring the sprayer up to operating pressure. Start spraying with all nozzles open (closing any will change the pressure).
3. You will need 1 meter (3 feet) of 2.5 cm (1″) diameter braided hose (have a second, longer hose to reach the top of a tower sprayer). It should be stiff enough that you can slip it over a nozzle body while holding the other end. Use it to guide flow into a collection vessel, held with your other hand. The hose not only reaches the top nozzle on towers, but it lets foam dissipate before it gets to the vessel.
4. When the flow from the hose is steady, direct it into the collection vessel for 30 seconds (a partner with a stopwatch is very helpful). It is preferable to collect for a minute because it improves the accuracy.
5. Determine and record the nozzle output per minute. Graduations on plastic collection vessels are unreliable. It’s preferable to weigh the output on a cheap, digital kitchen scale. One milliliter of clean water weighs one gram. Don’t forget to subtract the weight of the vessel (this is called taring) and double the output if you only collected for 30 seconds.
Interpreting the results
Once you have recorded all the outputs, you will have to convert the output to U.S. gallons or liters per minute, depending on units in the nozzle manufacturer’s catalogue (see common conversions below).
Replace any nozzles that are 10% (or preferably 5%) more or less than the rated output. This not only indicates a rate problem, but likely a problem with droplet size as well. If enough nozzles are worn, consider replacing all of them. Nozzles should go on as a set, and come off as a set (unless replacing a broken tip, of course). This can be an expensive proposition for large airblast sprayers, but it is part of operational costs.
Don’t assume new nozzles are accurate. We’ve found +/- 5% flow variation right off the shelf. Keep your receipts.
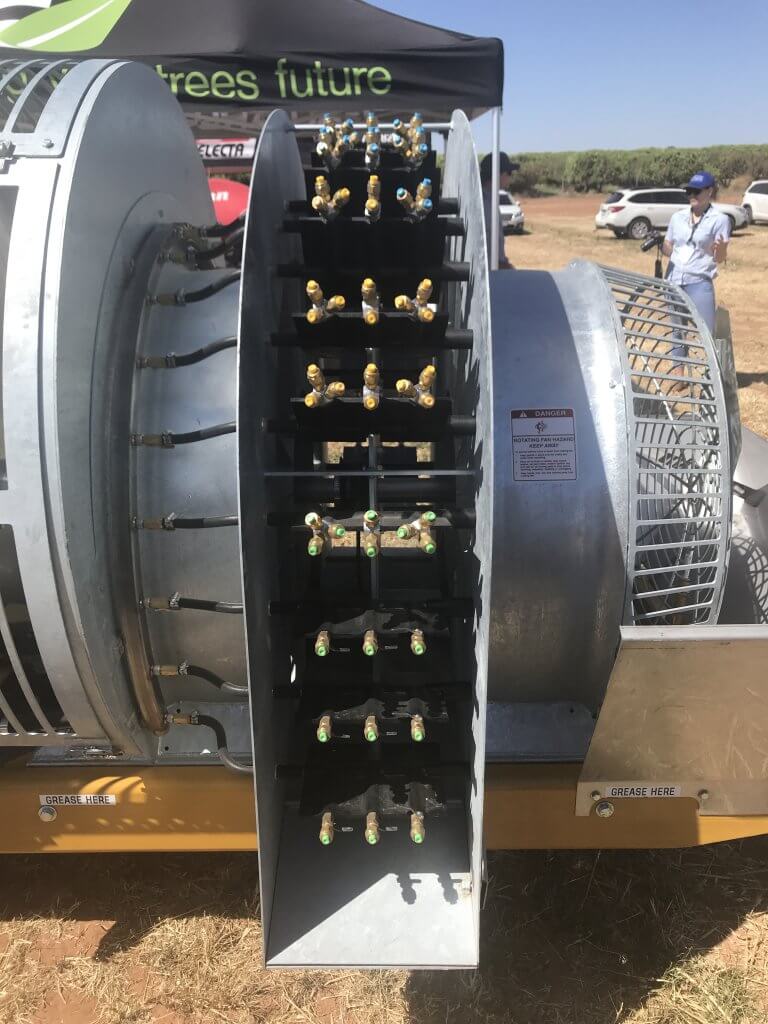
Testing and replacing nozzles is an important part of sprayer operation, no matter how many there are. This Air-O-Fan is nozzled for Australian almonds.
Helpful conversions
Anyone that has tried the timed output method in Canada knows the pain of our Metric-esque (Mocktric?) units. We’re an odd hybrid because our label rates are in metric, but our nozzles and many of our sprayers are US Imperial. You can find a complete collection of conversion tables here, but the most common calculations are reproduced below:
If collecting in ounces, converting to U.S. Gallons per minute:
If collecting in millilitres or grams converting to U.S. Gallons per minute:
If collecting in ounces, converting to litres per minute:
If collecting in millilitres or grams converting to litres per minute:
If collecting in ounces, converting to Imperial gallons per minute:
If collecting in millilitres or grams converting to Imperial gallons per minute:
A more sophisticated option
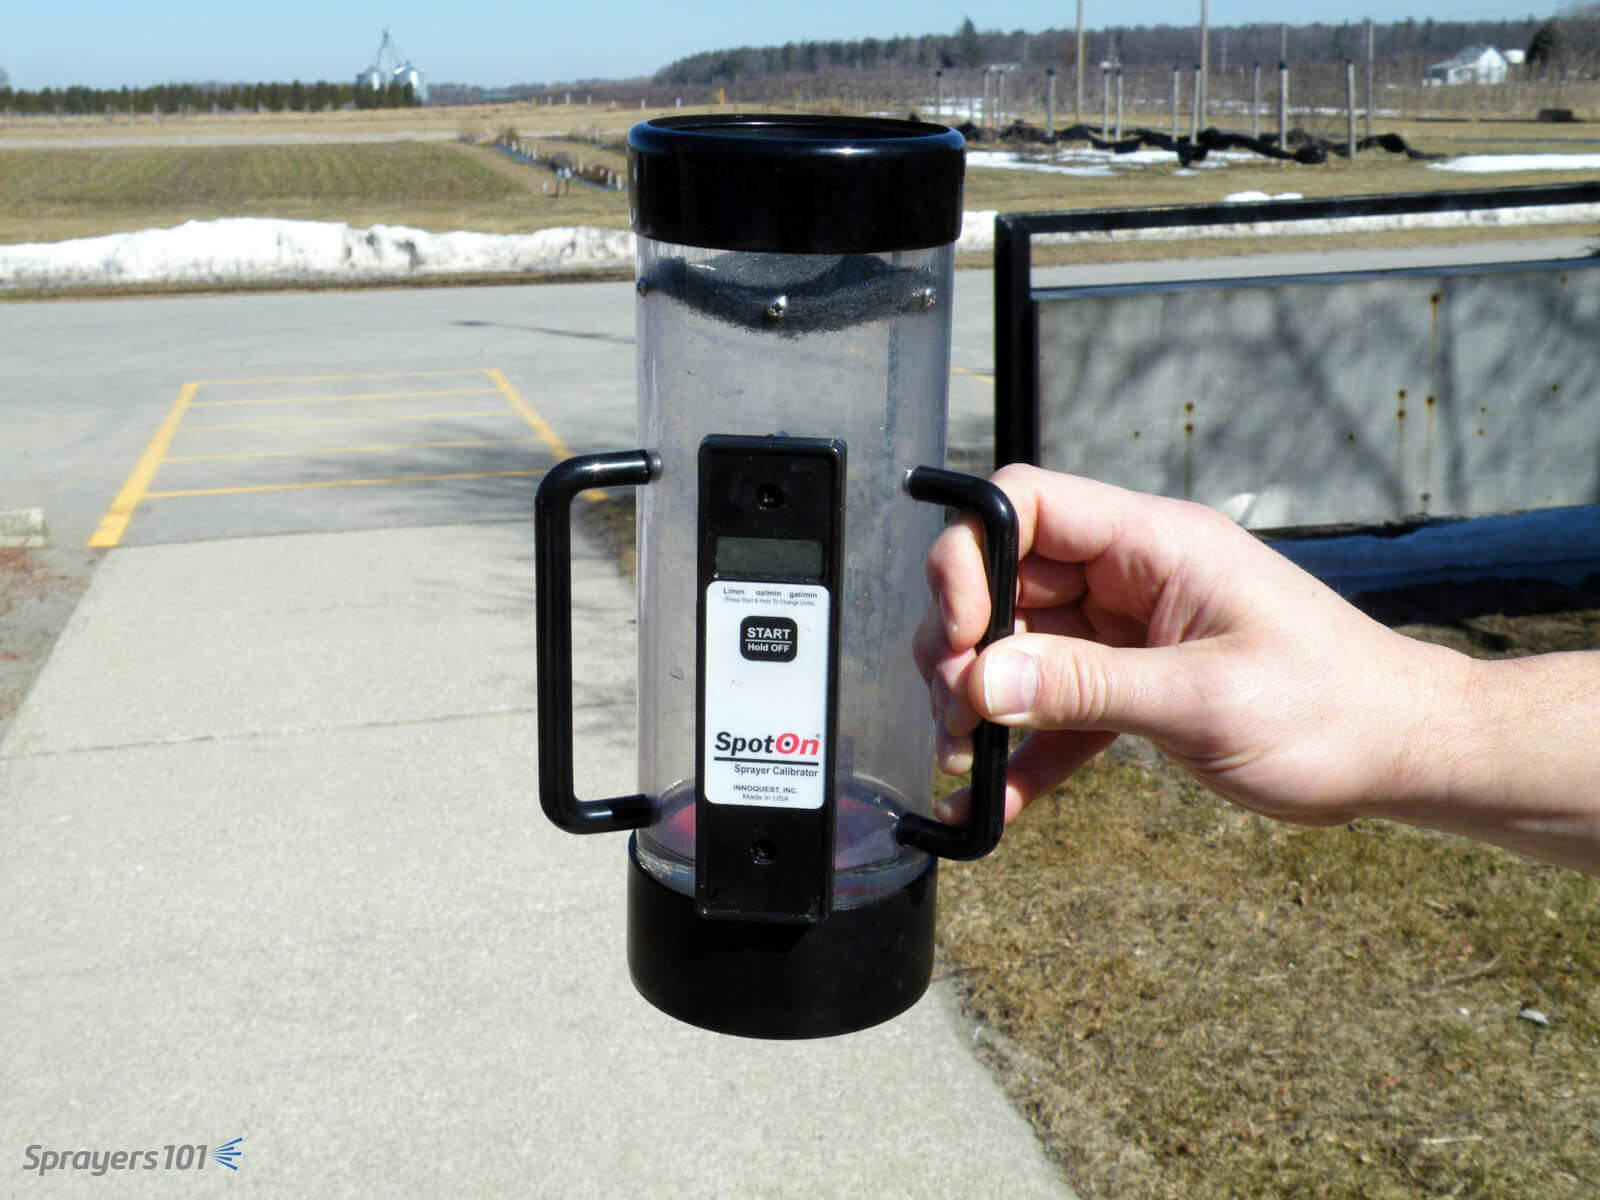
The timed output method is slow and requires math. You can avoid both problems by using electronic calibration vessels like the Innoquest SpotOn SC-4. We’ve tested both, and they are as accurate as weighing the output – but much faster.
They can, however, be fooled by foam. We’ve had good results using a length of braided hose to direct the flow and dissipate most of the foam. Typically, foaming means the sprayer wasn’t rinsed enough.
The SpotOn calibration vessel is easier, faster and more accurate than the classic pitcher-and-stopwatch approach to timed output tests. The SC-4 (pictured) is for airblast and SC-1 is for field sprayers.
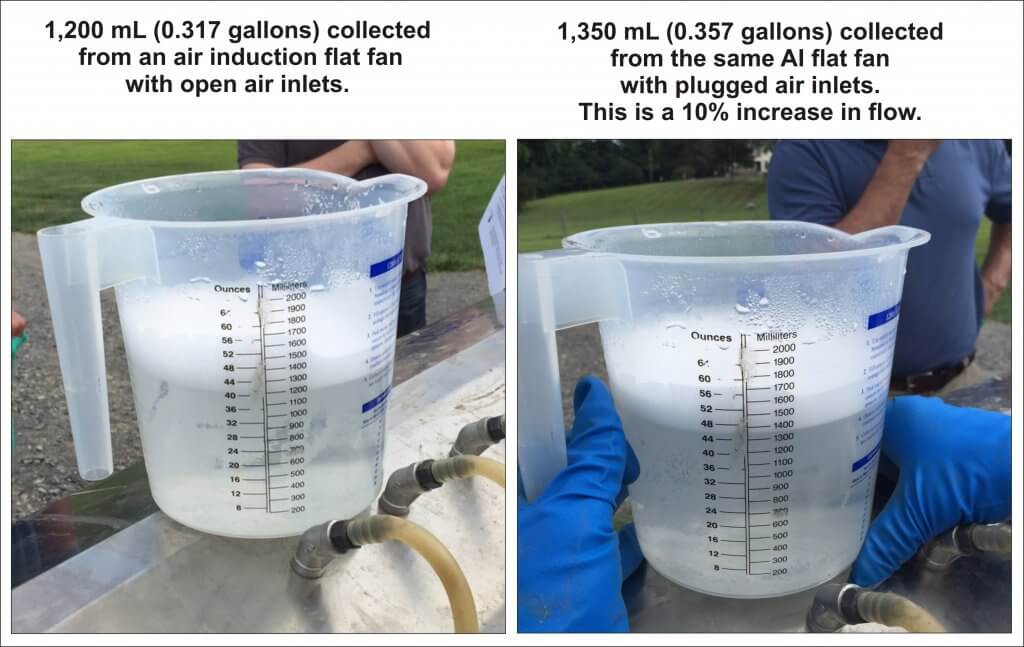
Another approach is to hose-clamp multiple hoses over nozzle bodies and spray all at once. This is tricky and takes time. Plus, if you suffocate the nozzle’s exit orifice (creating back pressure) or block the air inlets on AI nozzles, you will get a false reading.
Be careful not to plug air inlets on air induction nozzles – you may get a false reading.
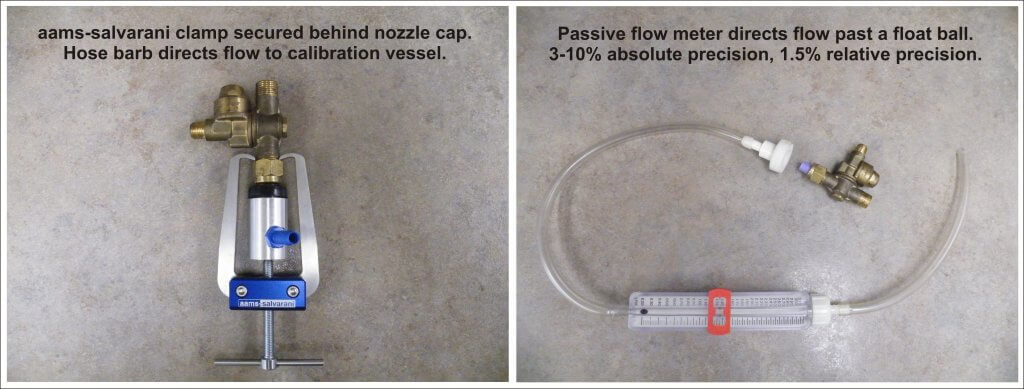
We prefer nozzle clamps over hose clamps (see the AAMS-Salvarani nozzle clamp pictured below). There are pincers designed to latch behind the nut of the nozzle body, but compatibility can sometimes be an issue (e.g. with Turbomist sprayers).
Passive flow meters (also pictured below) remove the need for a collection vessel, but they’re a better fit for field sprayers since they have to be held in place manually. They are difficult to source in North America because their accuracy is questionable, but they are fine for comparing relative flow from tip to tip.
Nozzle clamp or flow meter, avoid suffocating the nozzle exit orifice or AI nozzle air inlets.
Left: Nozzle body hose clamp. Right: Passive flow meter.
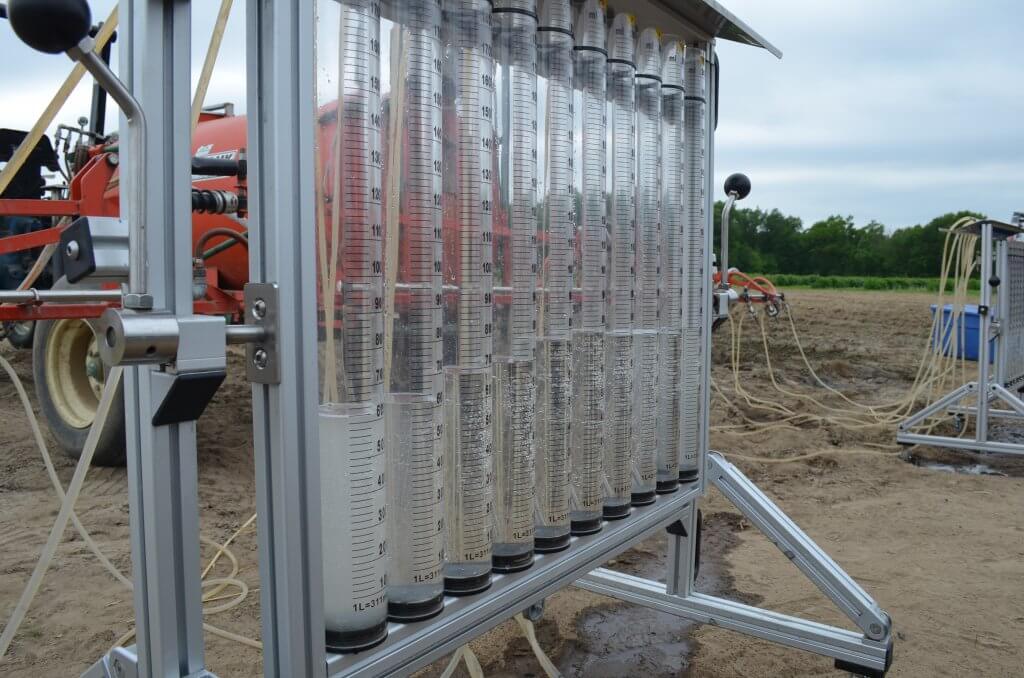
Some grower groups, or professional consultants, spring for very sophisticated and accurate units, such as AAMS-Salvarani flow measurement system pictured below.
AAMS-Salvarani flow measurement system. We used these on a pumpkin sprayer in New Hampshire, but they work with airblast too.
No matter your preferred method, take the time to confirm your sprayer output at the beginning of the season and whenever you make repairs or significant changes to your sprayer.