Submitted while Dustin was the Commercial Horticulture Specialist with Alberta Agriculture and Forestry.
Horticultural chemicals and pesticides often have the dubious distinction of being more expensive than their field crop cousins. In order to reduce costs, growers may sometimes buy and use chemicals which have the same active ingredient, but are not registered for the crop they’re being used on. This practice of “off-label” spraying is not only illegal and can result in severe fines, but can also be incredibly dangerous for your clients, your livelihood, and the environment.
Health Canada’s Pest Management Regulatory Agency (PMRA) is the sector of the federal government that is responsible for overseeing the registration and regulation of pesticides in Canada. This includes products that producers are more familiar with such as herbicides and fungicides, as well as less thought about products such as animal repellents, rodenticides, and disinfectants. These products are all rigorously tested to compile data on residue, efficacy and long term effects, all of which is reviewed by Health Canada prior to registration. Furthermore, the PMRA is the body in charge of monitoring and enforcing appropriate use of these chemicals to ensure public safety.
When reviewed by Health Canada, all chemicals have specified rates, target pests, and the crops on which they can be applied. ‘Off-label’ spraying can include spraying above the appropriate rate, or spraying the chemical for a pest that it is not registered for or on a crop not on the chemical’s label.
Throughout the year, the PMRA randomly selects growers for pesticide use inspections in order to ensure compliance. These inspections could be random ones, arising from increased incorrect spraying because of a label change, the need to update information or a neighbour’s complaint. The purpose of inspections is twofold in that they serve as a deterrent to off-label spraying but also as an educational tool to encourage growers to follow labels.
In an inspection, samples of vegetative material or soil are collected and sent away for testing. Should these come back showing incorrect use of chemicals, growers may be subject to increased monitoring, financial penalty or even prosecution under the Pest Control Products Act. If somebody producing food is found to be non-compliant, it could even result in the Canadian Food Inspection Agency (CFIA) becoming involved and product being recalled or destroyed.
No grower wants to purposefully put themselves, their clients or the environment at risk, so how to avoid the temptation of spraying off-label? When possible, avoid the need to altogether! Good scouting and appropriate record keeping allows growers to track outbreaks over time and better plan for them in their operating cycle. Furthermore, a good chemical inventory will give producers a better idea of how much they have of needed chemicals and whether they have enough to deal with problems when they come up. Adopting biological controls in their operation may also allow growers to nip some problems in the bud before they become full blown issues.
As with all chemicals, proper storage, labelling and disposal are all part and parcel in running a safe, effective operation. By being aware of the process and how best to handle these chemicals, growers can ensure they grow a safe healthy crop without running afoul of the law.
If you have a limited amount of clean water to rinse your sprayer, this can help you decide how to make the best use of it. Simple enter two values – the amount of pesticide remaining in your tank sump (including the suction line to the pump and the return line to the tank), and the amount of clean water you want to add. The units (gal, L) are not important as long as they are the same for both entries.
The app allows you to calculate the dilution power of up to 5 sequential rinses.
Water is one of the main inputs into a spray operation. The amount of water applied per acre is closely related to spray coverage and pesticide performance. But water quality – a term encompassing its cleanliness and chemical composition – is also critical to the performance of pesticides. Ensuring good performance means testing water and understanding the results.
There are four main water quality indicators related to pesticide performance:
Water Hardness. Water hardness is caused by positively charged minerals, primarily calcium and magnesium, but also sodium and iron. These cations can bind to some herbicides (glyphosate is the best-known example, also 2,4-D amine), reducing its performance. Hardness is usually named “Total Hardness (calculated)”, based on the concentration of calcium and magnesium in the sample, and is expressed in ppm or mg/L of CaCO3 equivalent. Some tests refer to the older unit “Grains”, which is ppm divided by 17. Bayer suggests that total water hardness should be below 350 ppm (20 grains) for the low rate (1/2 L/acre equivalent) of glyphosate, and below 700 ppm for the higher rates.
Bicarbonate. Sometimes referred to as alkalinity, the bicarbonate ion can inhibit herbicide activity, and also make some herbicides more difficult to mix. The most commonly affected herbicides are members of the Group 1 modes of action, products like clethodim, sethoxydim, and others, as well as MCPA amine and 2,4-D amine. Definite guidelines are hard to find because the antagonistic effect of the bicarbonate ion depends on the presence of other ions such as sodium and calcium.
pH. This is a complex parameter because it is related to pesticide solubility, hard water antagonism, and pesticide degradation. In most cases, pH values between 4 and 7 are considered acceptable. But some herbicides, notably those in the Group 2 modes of action, have specific pH needs to dissolve properly. For example, the sulfonylureas (FMC products such as Refine, Express), triazolopyrimidines (Corteval products such as Frontline, Simplicity), Triazolones (Bayer products such as Varro, Velocity M3) and Sulfonylaminocarbonyltriazolinone (UPL products such as Everest) dissolve better at higher pH, whereas the imidazolinones (Odyssey, Pursuit, Ares) tend to require lower pH. Some Group 14 products such as saflufenacil (BASF products Heat, Eragon) also prefer higher pH values for solubility. Label directions are important, sometimes calling for specific adjuvants to adjust the pH prior to adding the pesticide. Some pesticides, particularly insecticides, can break down rapidly in higher pH water. The rate of breakdown is usually not of importance on a spray day but may matter if a mixed tank needs to be stored for many hours or days.
Cleanliness / turbidity. Water may contain suspended solids such as clay. Glyphosate and diquat (Reglone) are sensitive to this, as these chemicals are readily adsorbed to soil particles, and turbid water can reduce their effectiveness. This is also why dust generated by the sprayer can reduce these herbicides’ performance.
Ensuring good performance
Select clean water sources and conduct a water test to identify possible problems. Well water is more likely to be hard than surface water. If a laboratory water test is not available, then some quick home testing can provide the necessary guidance. First, use a conductivity meter to test the electrical conductivity (EC) of the spray water. Although this test does not identify the ions present, it shows if a potential problem exists. EC values less than 500 µS/cm are considered safe. For values above 500, a hardness test is necessary to confirm the presence of antagonizing cations. Paper test strips compared to a colour scale are a quick way to determine hardness.
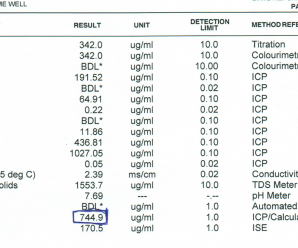
If you have done a water test and want to know what all the numbers mean, have a look here.
If the water is hard, a generally accepted solution is to add ammonium sulphate (AMS) fertilizer at rates between 1 – 3% w/v of 21-0-0-24 to the spray tank, preferably before adding the herbicide. Spray grade liquid concentrate AMS product is available from Bayer CropScience, Winfield United, and some other suppliers. The sulphate anions tie up the hard water cations, preventing them from antagonizing the herbicide. Liquid urea-ammonium nitrate (UAN, 28-0-0) has also been shown to improve herbicide activity for some products, but because it does not contain the sulphate ion, it is not as effective as AMS.
Certain weak organic acids can also function as water conditioners. For example, citric acid can chelate hard water ions so long as the pH is not too low, that is, the necessary dissociable groups are ionic. If the pH is very low, these groups will be protonated and the chelating action is suppressed.
Be careful when lowering pH. It does affect the solubility of many herbicides and possibly the function of some formulations. The outcome may be an unusable tank mix.
Caution is also advised when adding foliar fertilizer specialty products. Adding a blend of fertilizer salts, combined with associated changes in pH, can result in unpredictable interactions with pesticides and water, resulting in sticky precipitates that may be very difficult to clean out of tanks and plumbing. Ask for compatibility data, and always conduct a jar test to be sure that the planned mixture mixes as expected. A recent study shows the effects of adding herbicides to UAN and ammonium thio-sulphate (ATS) plus nitrate stabilizers, where mixing order is critical.
Turbidity is a problem with surface waters, especially in areas of clay soils and after surface runoff. If spray water is taken from a pond, its turbidity can be reduced by adding aluminum sulphate at rates between 10 to 60 mg/L of pond water. Thorough agitation is required, and 80 to 95% removal of turbidity is achieved within 24 to 48 h (technical information here).
Pesticide manufacturers are usually aware of potential problems when their products are used in poor quality water. Consult with your local rep to learn of know issues and solutions before spraying.
Check out this 2022 Real Agriculture interview with Tom and Greg Dahl of Winfield United. Pan ahead to the 16 minute mark for a discussion on water quality.
Low water volumes can mean less effort to apply pesticides. But there is a limit to how low water volumes can go before problems appear. To understand the reasons why, and help applicators use the right volume for a given situation, we briefly outline what happens to a spray cloud as it reaches the crop canopy.
Basic Principles
To choose the right water volume, we have to remember three criteria for sprays to be effective.
First, the spray must reach the target.
Second, there must be enough droplets to sufficiently cover the target.
Third, the droplets have to be in a form (size and pesticide concentration) that allows the pesticide to be efficiently taken up by the target.
Reaching the target
Let’s start with the first criteria, reaching the target. Droplet size is important for minimizing both spray drift and droplet evaporation. Small droplets move off-target easily, they also evaporate to dryness very quickly and may not have the expected performance as a result. Larger droplets clearly reduce drift, but may bounce off the target and offer less coverage per water volume.
Droplets of various sizes are actually important to cover all parts of a target, so we shouldn’t eliminate all the small ones. For example, penetration of dense broadleaf canopies, or coverage of small targets like stems is best achieved with smaller droplets, while larger droplets are useful for penetrating grassy canopies or targeting the top of a broadleaf canopy.
Target coverage
We need to get the right number of droplets to the target. The more leaf area to be covered (i.e., the taller or denser the crop canopy), the more droplets will be required. Leaf Area Index (LAI), defined as the total leaf area per unit ground area, is a good indicator of canopy density.
To put this in perspective, consider a pre-seed burnoff or an early post-emergent herbicide spray vs. a late season fungicide. In the first case, the canopy can be described as being in a single plane near ground level, with leaf areas of target plants fully exposed and with an LAI of <1. High droplet density on the leaves will be achievable with relatively low volumes.
In the second case, the canopy will have more depth, and will contain large leaf areas in each of the lower, mid, and upper canopy regions, with LAI >>1. Providing the same droplet number to each of the regions in the second case will require more droplets, and therefore more volume.
Taken as a whole, the exclusive use of finer droplets can be counterproductive due to evaporation and drift. Higher water volumes have the advantage of allowing larger average droplet sizes to be used, minimizing evaporation, drift, and enhancing deposition.
Deposit efficacy
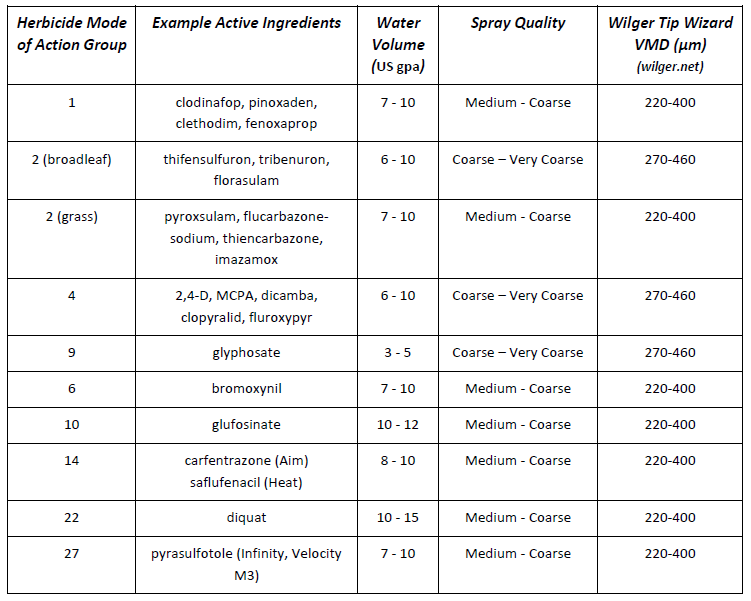
The third criteria, maximizing the performance of specific pesticides with droplet size, is more complicated. Typically, contact modes of action and grassy or difficult-to-wet targets require somewhat finer sprays and higher water volumes (Table 1). With tank mixes, such as glyphosate and Heat or AIM, the higher water volume and finer spray criteria should be used. For any specific herbicide, use the higher volume with coarser sprays.
Table 1. Herbicide modes of action, minimum water volumes with low-drift nozzles, and maximum spray quality
In practice, an applicator rarely encounters just one type of targeting situation. Most herbicides are either broad-spectrum, or are tank mixed to target both grass and broadleaf weeds. As a result, the same spray operation has to be effective on grass weeds and broadleaf weeds, some of which may be near the top of the canopy, or be more mature, whereas others may be just emerging. In these cases, a number of different droplet sizes will be required.
Low-drift nozzles
A low-drift nozzle can be used for most applications, as long as small adjustments are made for specific conditions. Increases in pressure above 60 psi (for finer droplets, Medium to Coarse spray quality) and volume to at least 7 to 10 US gpa (for better penetration) with this nozzle optimizes performance for grassy weeds. Lower pressures (down to 40 psi, Coarse to Very Coarse spray quality) are sufficient for systemic broadleaf products or when additional drift control is necessary. Higher volumes (12 – 15 US gpa) may be needed to obtain coverage in dense canopies. Always check with nozzle manufacturer information to learn what spray quality is produced by the nozzle you’re using – this will vary with nozzle type, flow rate, and spray pressure.
Droplet sizes in sprays
All nozzles produce a wide variety of droplet sizes ranging from 5 µm to 1000 µm in diameter. The main difference between sprays is the proportion of their volume in any given size fraction, with low-drift sprays having less of their volume in the drift-prone sizes.
Size distribution (by volume) of two spray qualities. Not that both of these sprays contain small and large droplets. The difference is the volume (=dosage) in each of these size fractions. Shaded areas highlight drift-prone droplets (left) and bounce-prone droplets (right).
But even low-drift nozzles produce small droplets, and these provide sufficient coverage in most cases. Low-drift sprays do create more larger droplets, and these do not contribute to coverage due to their relatively low number and poor retention.
Our main tools for droplet size selection are spray pressure (higher pressure reduces droplet size) or nozzle choice.
Spray Pressure
Higher pressures are sometimes thought to increase canopy penetration because they force the spray into the canopy. This is not true. While higher pressures create faster moving droplets, this speed quickly diminishes. By the time the spray enters the canopy, the faster velocity is lost, especially for the smaller droplets, and the only effect that remains is the finer spray. Finer droplets will penetrate many canopies further, but only if they are protected from wind. On a windy day, the finer sprays are more likely to blow downstream, or perhaps evaporate. The main benefit of higher pressure is better operation of the nozzle, especially air-induced nozzles, leading to more uniform patterns and better overall results.
Large Droplet Advantages
Although coarser sprays are often thought to work less well, they offer certain advantages.
One advantage is that a coarser spray tends to provide the air assist mentioned above (dragging air into the canopy, and giving smaller droplets a greater chance of moving where they’re needed).
Larger droplets also take longer to evaporate, increasing opportunities for uptake and translocation within the plant.
Larger droplets are more efficient at targeting the exposed, large leaves of plants requiring disease protection, leading to greater deposition and fungicide performance.
Most importantly, coarser sprays produce less drift, enabling application under windier conditions and thus ensuring that the timing of the application with respect to the crop or disease stage can be optimized.
Water Volume
Higher water volumes are the single most effective way of increasing dense canopy penetration. Higher volumes will deliver a greater number of droplets to the lower canopy, leading to greater performance when lower canopy coverage is of importance. When used in combination with lower travel speeds, the downward air flow created by sprays can provide significant benefits in forcing the smaller droplets further down. Larger volumes also decrease sensitivity to droplet size, permitting coarser sprays that reduce spray drift.
Nozzle Angling
Research has shown that exposed (upper canopy) vertical targets such as heads or stems will benefit from an angled spray. Forward-pointed sprays offer a slight advantage over backward-pointed sprays. Since angled sprays must maintain this trajectory to be useful, it is recommended that coarser spray qualities be used to minimize fine droplet production. Angled fine droplets will quickly deflect from their initial angled path and move with prevailing winds. Low booms heights also help in maximizing the benefit of angled sprays. Canopy penetration has not been shown to be improved with forward angled sprays, but backward angled sprays can help place some spray deeper into grassy canopies.
Broadleaf vs Grassy Canopies
How can an applicator decide the most appropriate water volume and spray quality for a specific application scenario? The following guides should help.
First determine the canopy density and form (broadleaf or grassy), and the target site within it (upper, mid, or lower). If the canopy is dense, but fairly vertical (i.e., a cereal), and a significant portion of it needs to be protected, the best strategy is to apply a higher water volume using a reasonably slow ground speed to allow the spray’s built-in air assist to work. If, on the other hand, only the upper layer of leaves, or the heads, are to be targeted, slightly less water can be used. If the water volume is appropriately high for the canopy, larger droplet sizes do not significantly diminish coverage or pesticide performance.
If the canopy is dense but more horizontally oriented (broadleaf crops), similar rules apply for water volume and travel speed, but now the use of a somewhat finer spray may be of benefit. The smaller droplets will be better able to move around and through the leaves to reach deeper into the canopy. Ensuring a downward trajectory of the spray through travel speed and water volume selections will be important.
Nozzle suggestions
A very good starting point for a conventional rate-controlled sprayer is any one of the low-pressure air-induced tips that now form the majority of the market. These tips are similar enough in terms of pressure range (30 – 100 psi), spray quality (Medium-Coarse-Very Coarse, depending on pressure), and spray pattern fan angle (about 100 degrees) to have comparable performance with most pesticides. Such tips are best operated in the middle of their pressure range, which is about 50 – 70 psi, offering some room to move as travel speeds change.
For those with Pulse-Width Modulation (PWM), where most air-induced tips cannot be used, nozzle choice is more limited but growing