It seems simple: The faster you drive the sprayer, the more area you cover. This makes higher travel speeds a seductive method for improving productivity. Sprayer manufacturers knew this 25 years ago when pull-type sprayers first received bigger, suspended outrigger wheels. Since then they’ve delivered more powerful engines, better hydraulic motors, smoother suspension and cruise control.
Each of these innovations still required the operator to consider the relationship between travel speed, pressure, nozzle choice and the desired output per acre. But now we have rate controllers, and we don’t have to think about such mundane things anymore… do we? Do we still do a good job if we go faster? What exactly happens when we speed up?
Before considering the role of the rate controller, you have to decide on an overall target-speed range. Charts, apps, or online tools can help you select nozzles sized to deliver your application volume at a given speed and pressure. This initial travel-speed decision requires an understanding of how spray gets delivered to the target. Let’s start with the spray boom.
As the boom moves through air, the oncoming air does three things to the spray:
It shears the spray, making it a bit finer.
It scrubs the smallest droplets from the pattern, leaving them in the wake of the boom.
Finally, negative pressure behind the pattern sucks even more fine spray into the sprayer wake.
Collectively, these create the dreaded “spray plume” that hangs behind the spray boom… and we’ve lost control over it. The faster we move, the greater the proportion of the spray that ends up in the plume. This can be anywhere from one to 15% of the spray. Once formed, that plume moves with the prevailing winds.
Today’s sprayers have wide booms, and faster speeds often require us to keep these booms higher than we have in the past to prevent impacts. But higher booms reduce our control over the spray’s direction. For example, when spraying vertical targets (e.g. wheat heads) we have begun to employ angled sprays. But droplets lose momentum quickly. The further they are from the target, the more likely they are to slow or even fall vertically before they reach the target. That means that higher booms often negate the benefit of angled sprays.
Still not convinced of the perils of high speeds? Well, think about the aerodynamics of the sprayer itself. As travel speed increases, the sprayer, the boom, and even the spray pattern itself disrupt the air around it. Visualize a sprayer in a wind tunnel with smoke tracer lines. The nice pattern created by the boom gets really messy in a turbulent environment. This can cause a loss of deposit uniformity, resulting in a reduction of overall effectiveness.
So far, we’ve talked about average speeds – choosing to travel eight, 12 or 16 mph overall, and then choosing the nozzle that will suit. Now let’s talk about changes in your travel speed within your target-speed range.
Operators know that even small travel speed changes can result in large pressure changes. That’s because travel speed and pressure enjoy a “square-root relationship”. If you double travel speed, your rate controller needs to quadruple the spray pressure to meet the new flow need!
Even minor changes in speed (to adapt to field conditions) can lead to big fluctuations in pressure, changing average droplet size, and affecting coverage and drift potential. Severe pressure fluctuations are more likely with a faster average travel speed. That’s perhaps why pulse-width modulation, which decouples spray pressure from travel speed and replaces it with a solenoid duty cycle, has a growing role in fast self-propelled sprayers.
To minimize pressure fluctuations, use the pressure gauge as your speedometer. Have the boom pressure displayed prominently in your sprayer cab, and try to operate at speeds that result in a pressure which is optimal for the job you’re trying to do.
So, let’s summarize the effects of fast travel speeds.
Pros:
More area covered per hour
Better contact with vertical targets (if the booms are kept low)
Cons:
More drift
Less uniform deposition
Wider pressure fluctuations
So, how fast is too fast? We won’t draw a line in the sand, but we will emphasize how important it is to consider as much information as you can before deciding on a travel speed. Don’t rely on the rate-controller to think for you – it doesn’t have all the information.
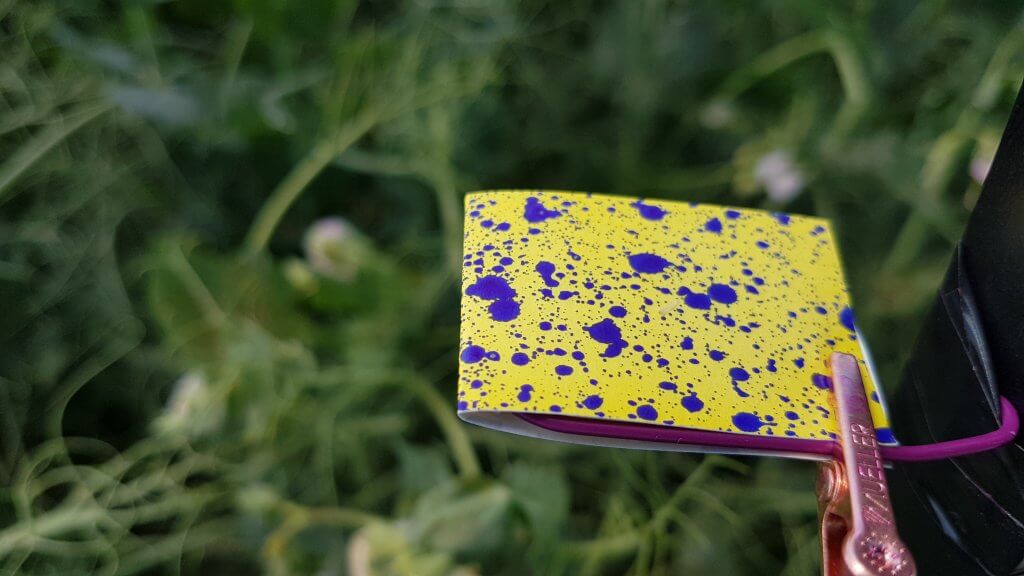
Water-sensitive paper is a useful tool for assessing spray coverage. Here are a few tips for making it work for you.
Water-sensitive paper is manufactured by a number of companies, including Syngenta, Spot On, and WS Paper and is available for purchase (see here for comparisons). The papers are a useful tool for helping calibrate aerial and ground sprayers because spray deposition becomes visible immediately after spraying. With the proper equipment, droplet size and coverage can be estimated from scanned images.
Simply place the paper on or near the target of interest. On most cases for herbicide application, it can be placed on the ground. It can also be attached to leaves or stems using paperclips.
When water comes in contact with the paper, it turns blue, and spray droplets as small as 50 µm become visible. Avoid touching the paper with bare hands except from the edges – you’ll see your fingerprints. Wearing gloves helps if you plan to handle many of them. Wait for the paper to dry before storing or stacking.
If left exposed to air, they will soon turn completely blue from atmospheric humidity. The same will happen if stored in a plastic bag before they are completely dry.
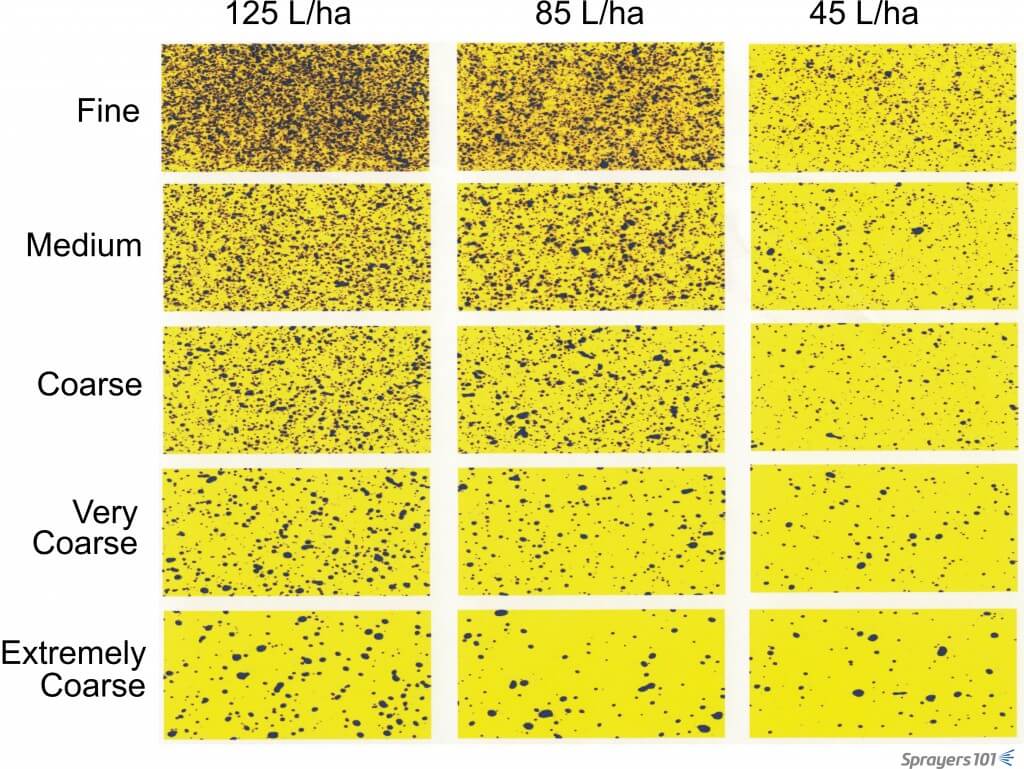
To show how these cards can be useful for an applicator, we prepared 15 cards (five spray qualities at three water volumes each). They can be used as a guide to assess the quality of the spray job. As a start, aim for a Coarse spray quality, and use enough water to achieve coverage about in the middle of the matrix. Avoid low water volumes in combination with extremely coarse sprays.
These water-sensitive papers were sprayed under controlled conditions and they demonstrate the role droplet size plays in coverage. As the droplets get finer, there are more of them, increasing coverage. However, this is really only hypothetical as many drift off target before impinging. As the droplets get coarser, there are less of them, and coverage may be compromised. To compensate for this, higher volumes are used. Credit – Dr. T. Wolf, Saskatchewan.
This matrix can be used as a guide to assess approximate coverage of a spray under field conditions.
A high-res pdf of the matrix (in US units) can be downloaded here.
The spray deposits spread out after they hit the paper, and as a result the deposit diameter is about twice the actual droplet diameter. This ratio is known as the spread factor, and it must be known before an accurate droplet size measurement can be done. That’s easier said than done because the spread factor depends on the properties of the spray liquid (surface tension, for example), the diameter of the droplet, and also the humidity at the time of the trial. On humid days, the spread factor increases and in fact the papers may turn entirely blue just from exposure to that humidity.
A practical water volume limit for making an accurate measurement is about 10 US gpa or 100 L/ha. At higher volumes, the droplets coalesce and it’s hard to tell how many droplets for any given deposit.
Note: This article was written before significant changes occurred in the marketplace in 2016. While it still explains how the system works, a more current account can be found here.
Pulse-Width-Modulation (PWM) refers to a method for controlling the flow rate of fluids. How does it work? Does it have a fit on your farm? We explain in this article.
Case Aim Command, Capstan PinPoint, Raven Hawkeye, TeeJet DynaJet, John Deere ExactApply, WEEDit Quadro, and Agrifac StrictSprayPlus are Pulse-Width-Modulation (PWM) technologies, where a pulsing solenoid controls flow rate through the nozzles. The solenoid is installed in place of the diaphragm check valve, and shuts off the nozzle flow for a split second exactly 10 times per second.
How it Works
All PWM systems employs the duty cycle of a pulsing solenoid instead of spray pressure to control nozzle output. The pulse width, also known as the duty cycle, is the proportion of time that the solenoid is open, and can range from 10% to 100%, although 20% to 100% is more realistic. Duty cycle is closely related to the nozzle flow. Pressure (and droplet size) stays fairly constant throughout the duty cycle range. This means that a wider range of travel speeds can be used without any change in spray pressure. Pressure can still be changed if necessary, to control droplet size.
The Tip Wizard
If using ComboJet nozzles, use the Tip Wizard to identify the best nozzle. Select “Canada”, and “US gal/acre”. Select “Tip Wizard” on the left side of the screen, and choose “Blended Pulse System, Search for Tips”.
Enter your information in the boxes. For example, 10 (gpa), 350 (µm, VMD), 15 (mph, max speed), 20 (inches nozzle spacing), 110 (degrees, fan angle). Always select 110 for use with Aim Command or Capstan.
Click “Search for Spray Tips”. The pressure that matches your droplet size criteria will be highlighted for each nozzle. In this example, the SR11006 nozzle is highlighted at 52 psi, giving about 349 µm VMD. If you choose the SR11008, the pressure goes up to 73 psi to get the same droplet size, and your minimum and maximum speeds increase as a result. Note that the numbers are calculated and do not always agree exactly with published nozzle charts. Allow for some leeway, and double check with manufacturer flow charts to be sure you’re in the ballpark.
If using TeeJet style bodies, use any wide-angle spray tip that is not air-induced. Good candidates are the TurboTeeJet, the TurboTwinJet, and the Hypro Guardian. Other pre-orifice flat fans can also be used.
Pressure Drop
Also note that the system should not be used at very high pressures – about 60 psi max. Finally, pay attention to the pressure drop across the solenoids. The manufacturer publishes charts that show the drop at various flow rates. For a 11004 tip, the drop is about 3 psi. For a 11008 tip, it’s between 6 at 30 psi and 13 psi at 60 psi. Add these values to your rate controller pressure reading, i.e., if you want to spray at 40 psi, have the rate controller read 40 & pressure drop.
Calculating Duty Cycle
Your expected average speed should be 60 – 80% of the maximum speed that the nozzle is capable of in these charts (100% duty cycle). For example, if you expect to travel 14 mph, select a solution whose maximum speed is 20 mph. This way, the system will be averaging 70% duty cycle at 14 mph (20 mph x 70% = 14 mph), allowing you to increase your application rate (or speed) by 30% where necessary (system moves to 100% duty cycle), or reduce your travel speed to 5 mph (system moves to 25% duty cycle). Slowing down further is an option, but a very coarse spray at low duty cycle may introduce skips under some conditions (low booms, fast speeds). This option also gives you maximum flexibility to change pressure to manage droplet size in both directions. Using a higher average duty cycle (say 80%) increases your flexibility to slow down, but limits your top speed more.
Picking the Right Droplet Size and Pressure
The right nozzle pressure depends on the choice of nozzle. For low-drift tips such as the Wilger SR and MR, higher pressures (>40) are recommended to ensure the spray pattern develops fully. Drift remains acceptably low. The %<200 columns in the Tip Wizard is a drift index. It identifies the proportion of the total spray volume in droplets <200 µm. Use the number to compare drift potential of various nozzles and pressures, making sure you also pay attention to the %<600 µm column. When values in that column are subtracted from 100, the result is volume in droplets >600 µm, an indication of the volume in droplets that are possibly too large to contribute much to coverage or efficacy.
It’s not easy to pick the best droplet size for each application because various pesticides and pests each have their own response. Typically, a Volume Median Diameter (VMD) ranging from 350 to 450 µm is ideal for most pesticides. Choose smaller VMDs for low water volumes, grassy weeds, and contact products, but use these only when drift is manageable. Choose larger VMDs for systemic products, broadleaf weeds, and higher water volumes, or when drift must be avoided. If you aim for 375 µm to start, that will be relatively low-drift and work well for most products.
If using nozzles other than the Wilger ComboJets, the Tip Wizard is still useful for identifying the flow rate and pressure of nozzle that you need. The Tip Wizard’s droplet size feature will not be usable, and instead, reference to the specific nozzle manufacturers’ spray quality data will be necessary. Choose nozzles that have a “Coarse” spray quality on average, and allow some movement into “Medium” and “Very Coarse” to suit a specific application need. Avoid “Fine” (not necessary for any pesticide, and too drift-prone) and “Extremely Coarse” (possibly insufficient coverage) unless specifically instructed by the pesticide manufacturer. Always select 110 degree nozzles, and do not use air-induced nozzles.
Advantages:
Constant pressure (and droplet size) over a wide range of travel speeds.
Ability to change droplet size with pressure adjustments on-the-go, without changing travel speed (depends on where you are in the duty-cycle range).
Ability to change application volume on-the-go, without changing travel speed or pressure (again, depends on where you are in the duty cycle range).
Instant response to shut-off, turn-on. Sprays at full pressure immediately. Does not drip.
The new AIM Command Pro or Sharpshooter PinPoint allows for individual nozzle flow control. This enables nozzle-by-nozzle sectional control as well as turn compensation.
Considerations:
Must keep water clean to avoid malfunctioning of tappet seal.
Operator needs to understand system to take advantage. For example, at max travel speed (100% duty cycle), one cannot increase application volume or reduce drift by lowering pressure without first slowing down. Most flexibility is available at 70% duty cycle, and nozzles should be selected so that at average travel speed, system is near 70% duty cycle.
Must use wider fan angle nozzles or higher boom height to get 100% overlap.
The system’s primary purpose is to increase the consistency and accuracy of spraying by maintaining constant pressure over a wide travel speed range. It does not have a unique ability to reduce drift or water volume over a conventional system.
A conventional nozzle system can still do a very good job. However, using a conventional system with low-drift nozzles often reduces the available pressure range by raising the effective minimum pressure, usually to about 30 psi depending on the tip. Since many sprayers cannot produce pressures over 100 psi, this limits the travel speed range (max speed:min speed) to about 1.8. The Aim Command system removes this limitation by using duty cycle, not pressure, to control flow.
Automatic rate controllers are standard equipment on almost all new sprayers. They ensure consistent application volumes, but they don’t do all the thinking for you. We explore how to make them work properly.
A rate controller needs to know the boom width (entered by the user), the total spray liquid flow rate (from a flow meter), and the sprayer speed (gps, radar). It controls the spray liquid pressure by opening or closing a bypass valve. More pressure equals more flow to the boom.
The rate controller allows the applicator to enter a desired application volume and the controller sets the spray pressure that gives the necessary flow for the application volume and sprayer travel speed being used. In practice, this means that higher travel speeds result in higher spray pressure, and vice versa.
But it’s not that simple. Rate controllers aren’t smart enough to know how pressure affects nozzle performance. Some nozzles don’t work well at low pressures. Others do a poor job at high pressures. Some sprayer pumps may even have a problem generating some of the higher pressures a rate controller calls for. What does that mean for the available travel speed range that’s possible with any given nozzle? To answer that question, we first have to have a closer look at how pressure affects nozzle performance.
Spray Pressure and Nozzle Performance
Nozzle performance depends on a number of factors. Of these, the most critical is spray pressure. Pressure affects the flow rate of the nozzle, the spray pattern (fan angle) and the spray quality (droplet size range). The last two of these affect coverage, overlap, and spray drift, so it’s important to get them right. Each nozzle model has a unique spray pressure range and unique spray qualities within that range, so one must obtain information that is specific to the nozzles on the spray boom from the nozzle manufacturer.
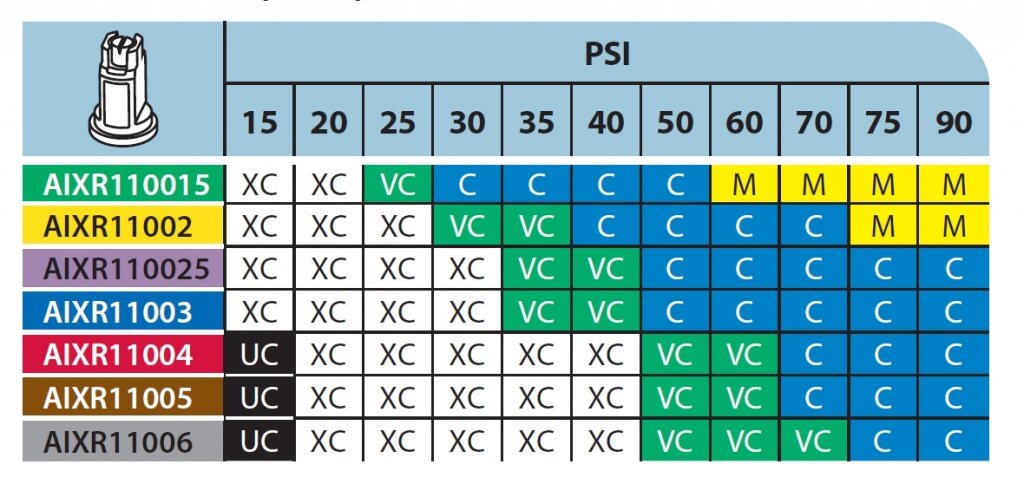
ASABE spray quality for the TeeJet AIXR nozzle.
Catalogues Contain Important Information
Nozzle manufacturer catalogues identify the pressure range over which the nozzle should be operated. At low pressures, engineers look for a uniform pattern that meets the advertised fan angle. The upper pressure limits are kept low enough to prevent the formation of excessively fine sprays. Manufacturers now publish tables containing “Spray Quality”, a broad categorization of droplet size, for their various nozzles and spray pressures in their product line. Common spray qualities for agricultural nozzles are Fine (orange), Medium (yellow), Coarse (blue), Very Coarse (green), and Extremely Coarse (white). An example table from a catalogue is shown in Figure 1. Note that for any given nozzle flow rate (left column), the spray quality changes with spray pressure. For example, the TT110025 nozzle can produce a Very Coarse or a Fine spray, depending on the pressure. Also note that for any given pressure, higher flow rate nozzles produce coarser sprays. At 40 psi, the TT nozzle can produce a Medium, Coarse, or Very Coarse spray, depending on its nominal flow. Both of these relationships depend on the nozzle model and manufacturer.
Speed-Pressure-Spray Quality Relationship
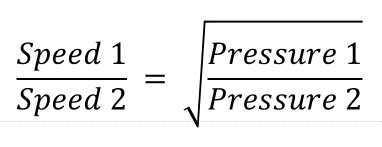
As we increase spray pressure, flow rate increases with a square-root relationship.
The square root relationship between travel speed (or flow rate) and spray pressure for hydraulic nozzles
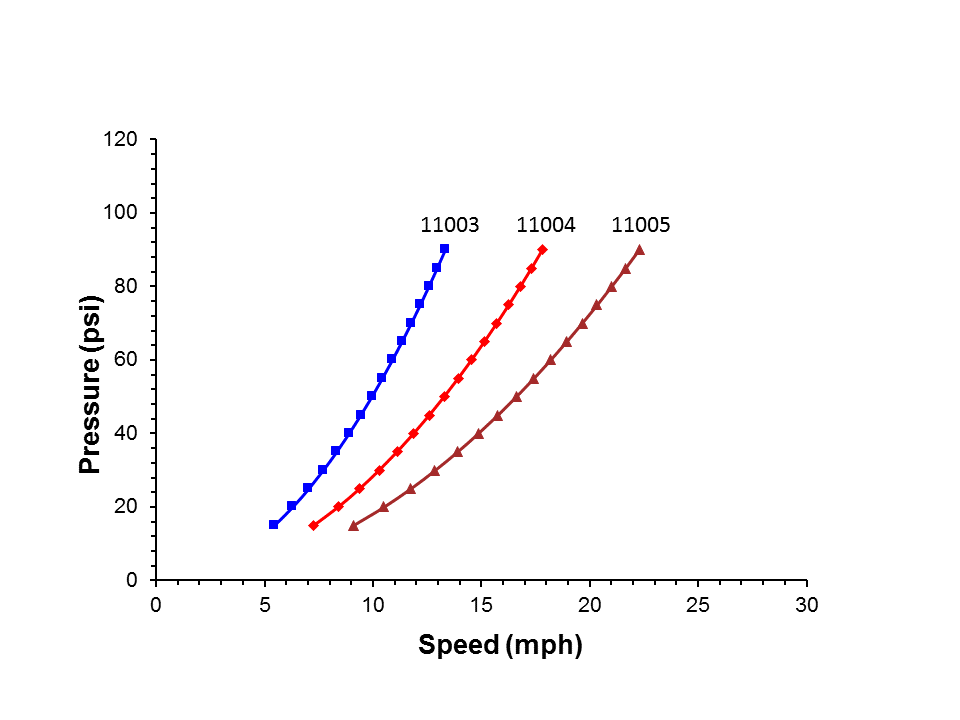
This means that in order to double the flow rate, we need to increase spray pressure by a factor of four. Figure 2 shows three different flow rate tips, each applying 10 US gpa at a range of travel speeds. Assume the operator uses a AIXR11004 to apply 10 US gpa at 12 mph. The nozzle would operate at about 40 psi, producing an Extremely Coarse spray quality. If the sprayer slows down to 7 mph to initiate a turn, spray pressure will drop to 15 psi, producing an Ultra Coarse spray. The spray pattern would likely become noticeably narrower, and poor pest control performance is likely in this situation due to the coarseness of the spray.
Relationship between travel speed and spray pressure for three nozzles applying 10 US gpa
It would have been better to use the AIXR11003 nozzle. At 12 mph, this nozzle would have operated at about 70 psi, producing a Coarse spray. Slowing down to 7 mph would drop the pressure to 25 psi, producing an Extremely Coarse spray. If the pesticide being used is sensitive to spray quality, then perhaps such slow speeds should be avoided in order to maintain a higher pressure and finer spray.
The lesson from this exercise is three-fold: (a) size the nozzle to operate at a higher pressure at your target speed to avoid dropping the pressure too low when you slow down, (b) avoid going as slow as 7 mph to prevent the pressure from dropping too low (c) compromise by setting a minimum spray pressure on the rate controller, in which case you’d over-apply product somewhat when their speed dropped too low.
Spray Pattern Overlap
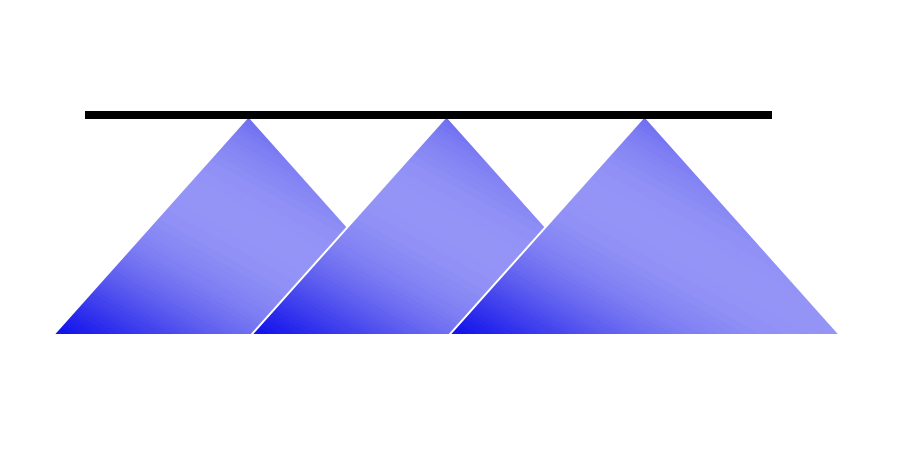
Flat fan nozzle patterns need the correct overlap in order to achieve a uniform spray pattern under the boom. Research has shown that the amount of overlap for low-drift nozzles needs to be at least 100% to achieve optimum nozzle performance. In other words, the edge of a fan should reach into the centre of the adjacent fan (Figure 3), with each fan covering twice the nozzle spacing at target height. This amount of overlap assures that not only the spray volume is uniformly distributed, but that the droplet density is equally uniform. Less overlap may result in fewer droplets depositing in the overlap region, resulting in poor coverage and reduced pesticide performance.
100% overlap means that all areas under the boom receive spray from two adjacent nozzles.
Adjust the boom height so that at the lowest expected spray pressure (slowest planned travel speed), the nozzles still achieve 100% overlap. There is no disadvantage with greater than 100% overlap, but higher booms will lead to greater drift. When a choice exists, choose 110º fan angle nozzles. Most air-induced nozzles are produced at one (usually wide) fan angle only, but actual angles often differ from those advertised. It is important to visually check the overlap before spraying.
Recommendations
What does this mean in practice? Spray operators need to know the right spray quality for the job, and should consult with the pesticide product manufacturer. They also need to use nozzle manufacturers’ charts to identify the spray quality their nozzle will likely produce at their expected application volume and travel speed. If it’s a poor match, a different nozzle may need to be found. Here are some rules of thumb:
Choose a nozzle that produces a Coarse spray over most of the operating pressures you expect to use. Although Very Coarse sprays can work in most situations, avoid them when using lower water volumes, controlling grassy weeds, or using contact modes of action.
Minimize spray drift by avoiding nozzles or pressures that produce Medium or Fine spray qualities.
Make your pressure gauge your speedometer. First, choose a pressure that is in the middle of the nozzle’s recommended operating range. If the range is 15 to 90 psi, select 50 psi. If it’s 40 to 100 psi, select 70 psi. This allows you slow down or speed up somewhat without breaching the nozzle’s capabilities.
Identify the travel speeds that are possible without creating spray qualities that could compromise your application goals.
Visually inspect the spray pattern at the pressure extremes you expect to spray at. At the lowest pressure, your nozzle should still produce 100% overlap (the edge of the spray fan should come to the middle of the next nozzle at target height). If it doesn’t, choose a wider fan angle nozzle, increase spray pressure or elevate the boom.
Make sure your pump can produce the higher spray pressures you expect to need. Pressure limitations are greatest at high flow rates (fast travel speeds applying large water volumes).
Be prepared to compromise. It’s rarely possible to travel at the exact speed, obtain the perfect pressure, and apply the desired water volume that’s been worked out in the office or using manufacturer’s charts. If in doubt, choose slower speeds or higher water volumes to make things work out.
Nozzle manufacturers are getting much better at producing information that helps applicators produce good spraying outcomes. Learning how to use this information is the first step.
Low water volumes can mean less effort to apply pesticides. But there is a limit to how low water volumes can go before problems appear. To understand the reasons why, and help applicators use the right volume for a given situation, we briefly outline what happens to a spray cloud as it reaches the crop canopy.
Basic Principles
To choose the right water volume, we have to remember three criteria for sprays to be effective.
First, the spray must reach the target.
Second, there must be enough droplets to sufficiently cover the target.
Third, the droplets have to be in a form (size and pesticide concentration) that allows the pesticide to be efficiently taken up by the target.
Reaching the target
Let’s start with the first criteria, reaching the target. Droplet size is important for minimizing both spray drift and droplet evaporation. Small droplets move off-target easily, they also evaporate to dryness very quickly and may not have the expected performance as a result. Larger droplets clearly reduce drift, but may bounce off the target and offer less coverage per water volume.
Droplets of various sizes are actually important to cover all parts of a target, so we shouldn’t eliminate all the small ones. For example, penetration of dense broadleaf canopies, or coverage of small targets like stems is best achieved with smaller droplets, while larger droplets are useful for penetrating grassy canopies or targeting the top of a broadleaf canopy.
Target coverage
We need to get the right number of droplets to the target. The more leaf area to be covered (i.e., the taller or denser the crop canopy), the more droplets will be required. Leaf Area Index (LAI), defined as the total leaf area per unit ground area, is a good indicator of canopy density.
To put this in perspective, consider a pre-seed burnoff or an early post-emergent herbicide spray vs. a late season fungicide. In the first case, the canopy can be described as being in a single plane near ground level, with leaf areas of target plants fully exposed and with an LAI of <1. High droplet density on the leaves will be achievable with relatively low volumes.
In the second case, the canopy will have more depth, and will contain large leaf areas in each of the lower, mid, and upper canopy regions, with LAI >>1. Providing the same droplet number to each of the regions in the second case will require more droplets, and therefore more volume.
Taken as a whole, the exclusive use of finer droplets can be counterproductive due to evaporation and drift. Higher water volumes have the advantage of allowing larger average droplet sizes to be used, minimizing evaporation, drift, and enhancing deposition.
Deposit efficacy
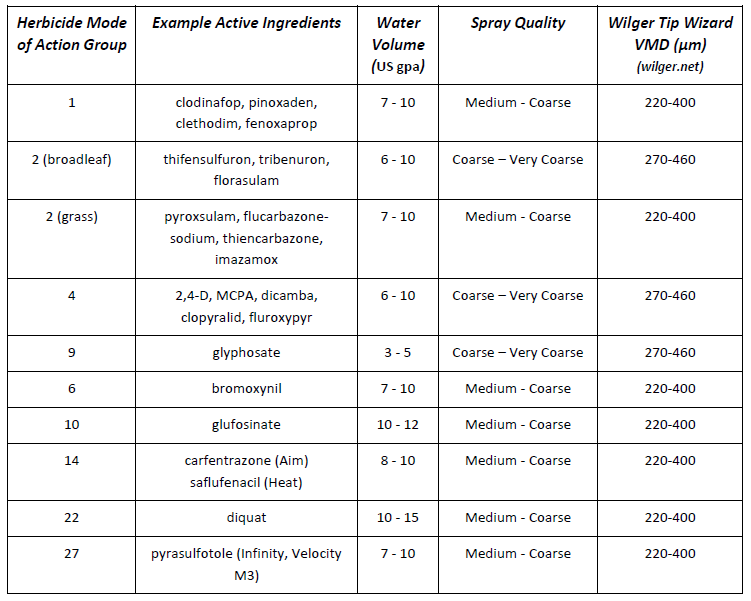
The third criteria, maximizing the performance of specific pesticides with droplet size, is more complicated. Typically, contact modes of action and grassy or difficult-to-wet targets require somewhat finer sprays and higher water volumes (Table 1). With tank mixes, such as glyphosate and Heat or AIM, the higher water volume and finer spray criteria should be used. For any specific herbicide, use the higher volume with coarser sprays.
Table 1. Herbicide modes of action, minimum water volumes with low-drift nozzles, and maximum spray quality
In practice, an applicator rarely encounters just one type of targeting situation. Most herbicides are either broad-spectrum, or are tank mixed to target both grass and broadleaf weeds. As a result, the same spray operation has to be effective on grass weeds and broadleaf weeds, some of which may be near the top of the canopy, or be more mature, whereas others may be just emerging. In these cases, a number of different droplet sizes will be required.
Low-drift nozzles
A low-drift nozzle can be used for most applications, as long as small adjustments are made for specific conditions. Increases in pressure above 60 psi (for finer droplets, Medium to Coarse spray quality) and volume to at least 7 to 10 US gpa (for better penetration) with this nozzle optimizes performance for grassy weeds. Lower pressures (down to 40 psi, Coarse to Very Coarse spray quality) are sufficient for systemic broadleaf products or when additional drift control is necessary. Higher volumes (12 – 15 US gpa) may be needed to obtain coverage in dense canopies. Always check with nozzle manufacturer information to learn what spray quality is produced by the nozzle you’re using – this will vary with nozzle type, flow rate, and spray pressure.
Droplet sizes in sprays
All nozzles produce a wide variety of droplet sizes ranging from 5 µm to 1000 µm in diameter. The main difference between sprays is the proportion of their volume in any given size fraction, with low-drift sprays having less of their volume in the drift-prone sizes.
Size distribution (by volume) of two spray qualities. Not that both of these sprays contain small and large droplets. The difference is the volume (=dosage) in each of these size fractions. Shaded areas highlight drift-prone droplets (left) and bounce-prone droplets (right).
But even low-drift nozzles produce small droplets, and these provide sufficient coverage in most cases. Low-drift sprays do create more larger droplets, and these do not contribute to coverage due to their relatively low number and poor retention.
Our main tools for droplet size selection are spray pressure (higher pressure reduces droplet size) or nozzle choice.
Spray Pressure
Higher pressures are sometimes thought to increase canopy penetration because they force the spray into the canopy. This is not true. While higher pressures create faster moving droplets, this speed quickly diminishes. By the time the spray enters the canopy, the faster velocity is lost, especially for the smaller droplets, and the only effect that remains is the finer spray. Finer droplets will penetrate many canopies further, but only if they are protected from wind. On a windy day, the finer sprays are more likely to blow downstream, or perhaps evaporate. The main benefit of higher pressure is better operation of the nozzle, especially air-induced nozzles, leading to more uniform patterns and better overall results.
Large Droplet Advantages
Although coarser sprays are often thought to work less well, they offer certain advantages.
One advantage is that a coarser spray tends to provide the air assist mentioned above (dragging air into the canopy, and giving smaller droplets a greater chance of moving where they’re needed).
Larger droplets also take longer to evaporate, increasing opportunities for uptake and translocation within the plant.
Larger droplets are more efficient at targeting the exposed, large leaves of plants requiring disease protection, leading to greater deposition and fungicide performance.
Most importantly, coarser sprays produce less drift, enabling application under windier conditions and thus ensuring that the timing of the application with respect to the crop or disease stage can be optimized.
Water Volume
Higher water volumes are the single most effective way of increasing dense canopy penetration. Higher volumes will deliver a greater number of droplets to the lower canopy, leading to greater performance when lower canopy coverage is of importance. When used in combination with lower travel speeds, the downward air flow created by sprays can provide significant benefits in forcing the smaller droplets further down. Larger volumes also decrease sensitivity to droplet size, permitting coarser sprays that reduce spray drift.
Nozzle Angling
Research has shown that exposed (upper canopy) vertical targets such as heads or stems will benefit from an angled spray. Forward-pointed sprays offer a slight advantage over backward-pointed sprays. Since angled sprays must maintain this trajectory to be useful, it is recommended that coarser spray qualities be used to minimize fine droplet production. Angled fine droplets will quickly deflect from their initial angled path and move with prevailing winds. Low booms heights also help in maximizing the benefit of angled sprays. Canopy penetration has not been shown to be improved with forward angled sprays, but backward angled sprays can help place some spray deeper into grassy canopies.
Broadleaf vs Grassy Canopies
How can an applicator decide the most appropriate water volume and spray quality for a specific application scenario? The following guides should help.
First determine the canopy density and form (broadleaf or grassy), and the target site within it (upper, mid, or lower). If the canopy is dense, but fairly vertical (i.e., a cereal), and a significant portion of it needs to be protected, the best strategy is to apply a higher water volume using a reasonably slow ground speed to allow the spray’s built-in air assist to work. If, on the other hand, only the upper layer of leaves, or the heads, are to be targeted, slightly less water can be used. If the water volume is appropriately high for the canopy, larger droplet sizes do not significantly diminish coverage or pesticide performance.
If the canopy is dense but more horizontally oriented (broadleaf crops), similar rules apply for water volume and travel speed, but now the use of a somewhat finer spray may be of benefit. The smaller droplets will be better able to move around and through the leaves to reach deeper into the canopy. Ensuring a downward trajectory of the spray through travel speed and water volume selections will be important.
Nozzle suggestions
A very good starting point for a conventional rate-controlled sprayer is any one of the low-pressure air-induced tips that now form the majority of the market. These tips are similar enough in terms of pressure range (30 – 100 psi), spray quality (Medium-Coarse-Very Coarse, depending on pressure), and spray pattern fan angle (about 100 degrees) to have comparable performance with most pesticides. Such tips are best operated in the middle of their pressure range, which is about 50 – 70 psi, offering some room to move as travel speeds change.
For those with Pulse-Width Modulation (PWM), where most air-induced tips cannot be used, nozzle choice is more limited but growing