Water is one of the main inputs into a spray operation. The amount of water applied per acre is closely related to spray coverage and pesticide performance. But water quality – a term encompassing its cleanliness and chemical composition – is also critical to the performance of pesticides. Ensuring good performance means testing water and understanding the results.
There are four main water quality indicators related to pesticide performance:
- Water Hardness. Water hardness is caused by positively charged minerals, primarily calcium and magnesium, but also sodium and iron. These cations can bind to some herbicides (glyphosate is the best-known example, also 2,4-D amine), reducing its performance. Hardness is usually named “Total Hardness (calculated)”, based on the concentration of calcium and magnesium in the sample, and is expressed in ppm or mg/L of CaCO3 equivalent. Some tests refer to the older unit “Grains”, which is ppm divided by 17. Bayer suggests that total water hardness should be below 350 ppm (20 grains) for the low rate (1/2 L/acre equivalent) of glyphosate, and below 700 ppm for the higher rates.
- Bicarbonate. Sometimes referred to as alkalinity, the bicarbonate ion can inhibit herbicide activity, and also make some herbicides more difficult to mix. The most commonly affected herbicides are members of the Group 1 modes of action, products like clethodim, sethoxydim, and others, as well as MCPA amine and 2,4-D amine. Definite guidelines are hard to find because the antagonistic effect of the bicarbonate ion depends on the presence of other ions such as sodium and calcium.
- pH. This is a complex parameter because it is related to pesticide solubility, hard water antagonism, and pesticide degradation. In most cases, pH values between 4 and 7 are considered acceptable. But some herbicides, notably those in the Group 2 modes of action, have specific pH needs to dissolve properly. For example, the sulfonylureas (FMC products such as Refine, Express), triazolopyrimidines (Corteval products such as Frontline, Simplicity), Triazolones (Bayer products such as Varro, Velocity M3) and Sulfonylaminocarbonyltriazolinone (UPL products such as Everest) dissolve better at higher pH, whereas the imidazolinones (Odyssey, Pursuit, Ares) tend to require lower pH. Some Group 14 products such as saflufenacil (BASF products Heat, Eragon) also prefer higher pH values for solubility. Label directions are important, sometimes calling for specific adjuvants to adjust the pH prior to adding the pesticide. Some pesticides, particularly insecticides, can break down rapidly in higher pH water. The rate of breakdown is usually not of importance on a spray day but may matter if a mixed tank needs to be stored for many hours or days.
- Cleanliness / turbidity. Water may contain suspended solids such as clay. Glyphosate and diquat (Reglone) are sensitive to this, as these chemicals are readily adsorbed to soil particles, and turbid water can reduce their effectiveness. This is also why dust generated by the sprayer can reduce these herbicides’ performance.
Ensuring good performance
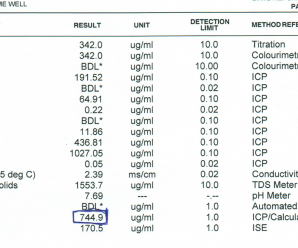
Select clean water sources and conduct a water test to identify possible problems. Well water is more likely to be hard than surface water. If a laboratory water test is not available, then some quick home testing can provide the necessary guidance. First, use a conductivity meter to test the electrical conductivity (EC) of the spray water. Although this test does not identify the ions present, it shows if a potential problem exists. EC values less than 500 µS/cm are considered safe. For values above 500, a hardness test is necessary to confirm the presence of antagonizing cations. Paper test strips compared to a colour scale are a quick way to determine hardness.
If you have done a water test and want to know what all the numbers mean, have a look here.
If the water is hard, a generally accepted solution is to add ammonium sulphate (AMS) fertilizer at rates between 1 – 3% w/v of 21-0-0-24 to the spray tank, preferably before adding the herbicide. Spray grade liquid concentrate AMS product is available from Bayer CropScience, Winfield United, and some other suppliers. The sulphate anions tie up the hard water cations, preventing them from antagonizing the herbicide. Liquid urea-ammonium nitrate (UAN, 28-0-0) has also been shown to improve herbicide activity for some products, but because it does not contain the sulphate ion, it is not as effective as AMS.
Certain weak organic acids can also function as water conditioners. For example, citric acid can chelate hard water ions so long as the pH is not too low, that is, the necessary dissociable groups are ionic. If the pH is very low, these groups will be protonated and the chelating action is suppressed.
Be careful when lowering pH. It does affect the solubility of many herbicides and possibly the function of some formulations. The outcome may be an unusable tank mix.
Caution is also advised when adding foliar fertilizer specialty products. Adding a blend of fertilizer salts, combined with associated changes in pH, can result in unpredictable interactions with pesticides and water, resulting in sticky precipitates that may be very difficult to clean out of tanks and plumbing. Ask for compatibility data, and always conduct a jar test to be sure that the planned mixture mixes as expected. A recent study shows the effects of adding herbicides to UAN and ammonium thio-sulphate (ATS) plus nitrate stabilizers, where mixing order is critical.
Turbidity is a problem with surface waters, especially in areas of clay soils and after surface runoff. If spray water is taken from a pond, its turbidity can be reduced by adding aluminum sulphate at rates between 10 to 60 mg/L of pond water. Thorough agitation is required, and 80 to 95% removal of turbidity is achieved within 24 to 48 h (technical information here).
Pesticide manufacturers are usually aware of potential problems when their products are used in poor quality water. Consult with your local rep to learn of know issues and solutions before spraying.
Check out this 2022 Real Agriculture interview with Tom and Greg Dahl of Winfield United. Pan ahead to the 16 minute mark for a discussion on water quality.