Category: Speciality Sprayers

Main category for all sprayers that are not horizontal booms

  • An Easier Way to Clean Your Sprayer

    An Easier Way to Clean Your Sprayer

    Farming can be divided into pleasant and unpleasant tasks.  Seeding is pleasant.  Hauling oats or barley not so much.  Sprayer cleaning is…not.  And yet it’s the unpleasant tasks that are often the most important.  How can we make them better?

    We all know the need for a properly cleaned sprayer.  Herbicide residue can harm a sprayed crop, and the damage might not show up for over a week.  When it does, it usually takes a while to identify the symptoms and damage patterns to be sure.  And then we wait for the inevitable yield loss.

    It wasn’t long after the introduction of the Group 2 Mode of Action that producers started noticing how even small residues of these products in sprayer tanks could damage crop yields, most noticeably canola, but also other broadleaf species.

    Thirty years later, the problems persist.  Let’s look at ways of preventing them.

    Cleaning a sprayer is a lot like doing the dishes.  Using the right detergent, soaking the hard stuff, being thorough, and rinsing properly – they all matter.

    It all starts, though, with preventing the problem.

    The main culprits that cause sprayer contamination have the following properties:

    • They are typically dry formulations,
    • they typically have poor water-solubility, and
    • they are potent in low doses.

    Many products in herbicide Group 2 MOA fit that bill.  The ones that rise to the top of the list have an additional characteristic:

    As a subgroup within the Group 2 MOA, the sulfonyl ureas are a top concern, with products like Refine, Express, and Ally on the most-wanted list. Another problem subgroup is the triazolopyrimidines, containing products like Frontline and Simplicity, which, like the SUs, have very pH-dependent solubilities (better solubility at higher pH). Other Group 2s have fewer issues. Everest and Varro have good overall water solubility, for example.  The solubility of imidazolinones like Odyssey, Pursuit, Raptor increases with low pH. We tend to see fewer problems with these products.

    Instances that add to the problem involve tank mixing with weak acid herbicides, including glyphosate, but especially those that are formulated as emulsifiable concentrates (oils, EC), appearing milky when mixed with water.  Most of our herbicides are weak acids.

    Two problems occur with these:

    • The weak-acid herbicide lowers the pH of the spray mix, possibly reducing the solubility of the problematic Group 2s.
    • Then, oily formulation can adhere the herbicide to plastic and rubber sprayer parts such as tanks, connectors, and hoses.

    The best advice on preventing a cleanout problem, is, therefore, to make sure the product is fully dissolved or suspended.   Proper mixing technique and time are the key components.  Some products, like Simplicity, can benefit from a pH increase (adding ammonia) prior to mixing the product.

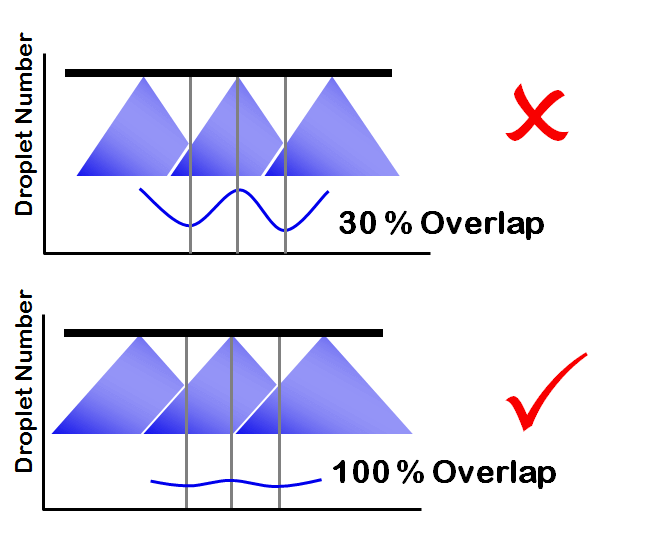
    Once properly mixed, we can still have problems at the screens. Dry formulations require a screen mesh of 50 or coarser according to their labels.  But many sprayers contain 80 mesh screens, some even have 100 mesh.  All screens should be inspected both before, during, and after spraying these products.  Screen residues cause longer-term contamination, and their cleaning is an important part of this whole process.

    After spraying, the cleaning process relies on three main things:

    1. We need to remove as much of the problem mixture as possible.
    2. We need to dilute the remainder as much as possible and use it to clean the boom plumbing.
    3. Ensure anything that came in contact with spray mix has been cleaned.

    Removing the mixture

    The best way to remove the remainder is to spray it out in the field you’ve just treated.  You can overspray some products again, or if you have any land set aside it can be used for this purpose.  It’s never a good idea to drain the tank on any land.  Obviously, some experience and math is helpful to make sure the last tank empties nicely on the field.

    Diluting the remainder

    The next step is to dilute the remainder, using tank cleaning adjuvants like ammonia (this raises the pH and helps remove those products whose solubility benefits from this) and detergent (this removes the oily layer formed by EC formulations).  Commercial cleaners like All Clear or Cleanout combine these properties in one jug.

    Diluting is most effective when done in multiple smaller batches, as long as we can ensure the tank walls are reached.  Wash-down nozzles installed in the tank can do this for us.

    Let’s assume the sprayer has a 150 gallon clean water reservoir.  It’s tempting to empty the whole thing into the tank.  We can calculate the diluting power of this:  if we had a 10 gallon remainder in the tank and added 150 gallons water, the remainder would be diluted by a factor of 16.  After spraying this out, we’d then have to re-fill the rinse tank if we wanted to do more.

    If we rinsed in two 75 gallon batches (add 75 gallons, agitate via wash-down nozzle, spray out, repeat), we would dilute by a factor of 72.  If we did three rinses of 50 gallons each, our final dilution factor would be 216.  That’s the same dilution as adding about 2150 gallons to the first 10 gal spray tank remainder, and is about 14 times better than dumping the whole 150 gallons in at the beginning!

    An improvement in diluting power can be achieved by adding a separate clean water pump.  Introducing clean water to the tank as rinsate is sprayed out the boom reduces water use even further.

    Cleaning all spray mix contact points

    The last step is to pay attention to the things you can’t see: Screens, boom lines and boom ends. The total interior surface area of black rubber boom hoses on a 100 ft sprayer with 7 sections can be as much as several square metres, and this surface can bind residues. Seven sections, each with boom ends, can hold several gallons, as well as accumulated debris. Scrubbing screens, soaking boom lines, and flushing boom ends is the necessary detail that this job requires.

    A few final pointers:

    • Adding a surfactant or a commercial cleaner can generate a lot of foam. Have de-foamer handy, it will save a lot of frustration.
    • A bucket helps collect and clean screens and nozzles.
    • Consider upgrading to more steel components on your next sprayer – tanks and booms. Stainless steel cleans faster than plastic.
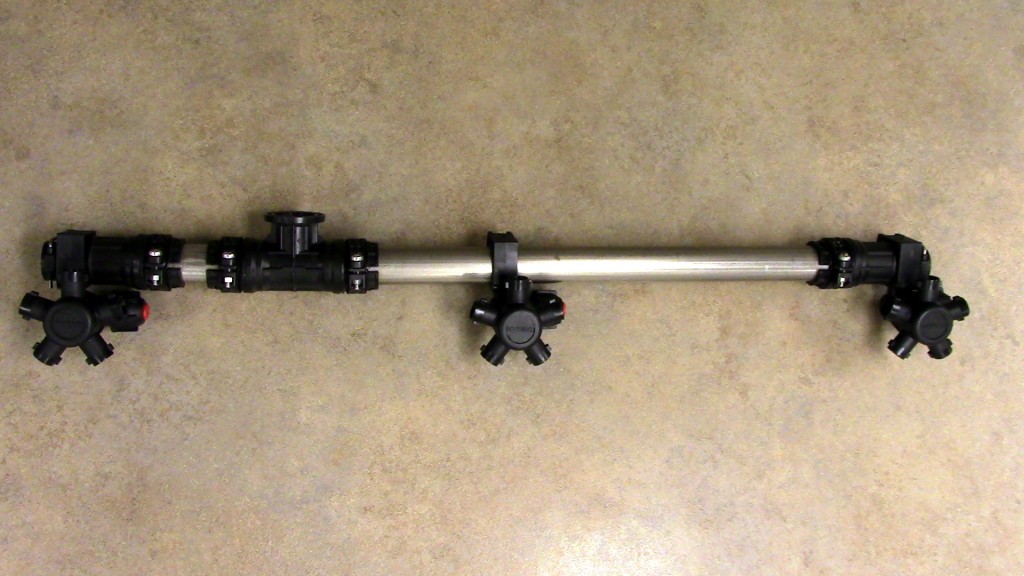
    • Install a way to flush your boom ends. Traditional ball valves do the job, but Hypro’s Express Nozzle Body End Caps do it automatically. These inexpensive units eliminate the dead space in boom ends and as a bonus, bleed air from the lines on the go.
    Hypro's Express Nozzle Body End Caps on a short length of stainless boom.
    Hypro’s Express Nozzle Body End Caps on a short length of stainless boom.

    Done well, sprayer cleaning doesn’t have to be unpleasant. And it certainly results in a better night’s sleep.

  • Water Sensitive Paper for Assessing Spray Coverage

    Water Sensitive Paper for Assessing Spray Coverage

    Water Sensitive Paper

    Water-sensitive paper is a useful tool for assessing spray coverage.  Here are a few tips for making it work for you.

    Water-sensitive paper is manufactured by a number of companies, including Syngenta, Spot On, and WS Paper and is available for purchase (see here for comparisons). The papers are a useful tool for helping calibrate aerial and ground sprayers because spray deposition becomes visible immediately after spraying.  With the proper equipment, droplet size and coverage can be estimated from scanned images.

    Simply place the paper on or near the target of interest.  On most cases for herbicide application, it can be placed on the ground. It can also be attached to leaves or stems using paperclips.

    When water comes in contact with the paper, it turns blue, and spray droplets as small as 50 µm become visible.  Avoid touching the paper with bare hands except from the edges – you’ll see your fingerprints. Wearing gloves helps if you plan to handle many of them.  Wait for the paper to dry before storing or stacking.

    If left exposed to air, they will soon turn completely blue from atmospheric humidity. The same will happen if stored in a plastic bag before they are completely dry.

    To show how these cards can be useful for an applicator, we prepared 15 cards (five spray qualities at three water volumes each).  They can be used as a guide to assess the quality of the spray job. As a start, aim for a Coarse spray quality, and use enough water to achieve coverage about in the middle of the matrix. Avoid low water volumes in combination with extremely coarse sprays.

    These water-sensitive papers were sprayed under controlled conditions and they demonstrate the role droplet size plays in coverage. As the droplets get finer, there are more of them, increasing coverage. However, this is really only hypothetical as many drift off target before impinging. As the droplets get coarser, there are less of them, and coverage may be compromised. To compensate for this, higher volumes are used. Credit – Dr. T. Wolf, Saskatchewan.
    These water-sensitive papers were sprayed under controlled conditions and they demonstrate the role droplet size plays in coverage. As the droplets get finer, there are more of them, increasing coverage. However, this is really only hypothetical as many drift off target before impinging. As the droplets get coarser, there are less of them, and coverage may be compromised. To compensate for this, higher volumes are used. Credit – Dr. T. Wolf, Saskatchewan.

    This matrix can be used as a guide to assess approximate coverage of a spray under field conditions.

    A high-res pdf of the matrix (in US units) can be downloaded here.

    The metric version is here.

    The spray deposits spread out after they hit the paper, and as a result the deposit diameter is about twice the actual droplet diameter.  This ratio is known as the spread factor, and it must be known before an accurate droplet size measurement can be done.  That’s easier said than done because the spread factor depends on the properties of the spray liquid (surface tension, for example), the diameter of the droplet, and also the humidity at the time of the trial.  On humid days, the spread factor increases and in fact the papers may turn entirely blue just from exposure to that humidity.

    A practical water volume limit for making an accurate measurement is about 10 US gpa or 100 L/ha.  At higher volumes, the droplets coalesce and it’s hard to tell how many droplets for any given deposit.

  • Rate Controllers and Spray Pressure

    Rate Controllers and Spray Pressure

    Automatic rate controllers are standard equipment on almost all new sprayers. They ensure consistent application volumes, but they don’t do all the thinking for you.  We explore how to make them work properly.

    A rate controller needs to know the boom width (entered by the user), the total spray liquid flow rate (from a flow meter), and the sprayer speed (gps, radar).  It controls the spray liquid pressure by opening or closing a bypass valve. More pressure equals more flow to the boom.

    The rate controller allows the applicator to enter a desired application volume and the controller sets the spray pressure that gives the necessary flow for the application volume and sprayer travel speed being used. In practice, this means that higher travel speeds result in higher spray pressure, and vice versa.

    But it’s not that simple. Rate controllers aren’t smart enough to know how pressure affects nozzle performance. Some nozzles don’t work well at low pressures. Others do a poor job at high pressures. Some sprayer pumps may even have a problem generating some of the higher pressures a rate controller calls for. What does that mean for the available travel speed range that’s possible with any given nozzle? To answer that question, we first have to have a closer look at how pressure affects nozzle performance.

    Spray Pressure and Nozzle Performance

    Nozzle performance depends on a number of factors. Of these, the most critical is spray pressure. Pressure affects the flow rate of the nozzle, the spray pattern (fan angle) and the spray quality (droplet size range). The last two of these affect coverage, overlap, and spray drift, so it’s important to get them right. Each nozzle model has a unique spray pressure range and unique spray qualities within that range, so one must obtain information that is specific to the nozzles on the spray boom from the nozzle manufacturer.

    ASABE spray quality for the TeeJet AIXR nozzle.

     Catalogues Contain Important Information

    Nozzle manufacturer catalogues identify the pressure range over which the nozzle should be operated. At low pressures, engineers look for a uniform pattern that meets the advertised fan angle. The upper pressure limits are kept low enough to prevent the formation of excessively fine sprays. Manufacturers now publish tables containing “Spray Quality”, a broad categorization of droplet size, for their various nozzles and spray pressures in their product line. Common spray qualities for agricultural nozzles are Fine (orange), Medium (yellow), Coarse (blue), Very Coarse (green), and Extremely Coarse (white). An example table from a catalogue is shown in Figure 1. Note that for any given nozzle flow rate (left column), the spray quality changes with spray pressure. For example, the TT110025 nozzle can produce a Very Coarse or a Fine spray, depending on the pressure. Also note that for any given pressure, higher flow rate nozzles produce coarser sprays. At 40 psi, the TT nozzle can produce a Medium, Coarse, or Very Coarse spray, depending on its nominal flow. Both of these relationships depend on the nozzle model and manufacturer.

    Speed-Pressure-Spray Quality Relationship

    As we increase spray pressure, flow rate increases with a square-root relationship.

    Speed-Pressure resize
    The square root relationship between travel speed (or flow rate) and spray pressure for hydraulic nozzles

    This means that in order to double the flow rate, we need to increase spray pressure by a factor of four. Figure 2 shows three different flow rate tips, each applying 10 US gpa at a range of travel speeds. Assume the operator uses a AIXR11004 to apply 10 US gpa at 12 mph. The nozzle would operate at about 40 psi, producing an Extremely Coarse spray quality. If the sprayer slows down to 7 mph to initiate a turn, spray pressure will drop to 15 psi, producing an Ultra Coarse spray. The spray pattern would likely become noticeably narrower, and poor pest control performance is likely in this situation due to the coarseness of the spray.

    Relationship between travel speed and spray pressure for three nozzles applying 10 US gpa

    It would have been better to use the AIXR11003 nozzle.  At 12 mph, this nozzle would have operated at about 70 psi, producing a Coarse spray.  Slowing down to 7 mph would drop the pressure to 25 psi, producing an Extremely Coarse spray.  If the pesticide being used is sensitive to spray quality, then perhaps such slow speeds should be avoided in order to maintain a higher pressure and finer spray.

    The lesson from this exercise is three-fold: (a) size the nozzle to operate at a higher pressure at your target speed to avoid dropping the pressure too low when you slow down, (b) avoid going as slow as 7 mph to prevent the pressure from dropping too low (c) compromise by setting a minimum spray pressure on the rate controller, in which case you’d over-apply product somewhat when their speed dropped too low.

    Spray Pattern Overlap

    Flat fan nozzle patterns need the correct overlap in order to achieve a uniform spray pattern under the boom. Research has shown that the amount of overlap for low-drift nozzles needs to be at least 100% to achieve optimum nozzle performance. In other words, the edge of a fan should reach into the centre of the adjacent fan (Figure 3), with each fan covering twice the nozzle spacing at target height. This amount of overlap assures that not only the spray volume is uniformly distributed, but that the droplet density is equally uniform. Less overlap may result in fewer droplets depositing in the overlap region, resulting in poor coverage and reduced pesticide performance.

    Nozzle Pattern Overlap
    100% overlap means that all areas under the boom receive spray from two adjacent nozzles.

    Adjust the boom height so that at the lowest expected spray pressure (slowest planned travel speed), the nozzles still achieve 100% overlap. There is no disadvantage with greater than 100% overlap, but higher booms will lead to greater drift. When a choice exists, choose 110º fan angle nozzles. Most air-induced nozzles are produced at one (usually wide) fan angle only, but actual angles often differ from those advertised. It is important to visually check the overlap before spraying.

    Recommendations

    What does this mean in practice? Spray operators need to know the right spray quality for the job, and should consult with the pesticide product manufacturer. They also need to use nozzle manufacturers’ charts to identify the spray quality their nozzle will likely produce at their expected application volume and travel speed. If it’s a poor match, a different nozzle may need to be found. Here are some rules of thumb:

    1. Choose a nozzle that produces a Coarse spray over most of the operating pressures you expect to use. Although Very Coarse sprays can work in most situations, avoid them when using lower water volumes, controlling grassy weeds, or using contact modes of action.
    2. Minimize spray drift by avoiding nozzles or pressures that produce Medium or Fine spray qualities.
    3. Make your pressure gauge your speedometer. First, choose a pressure that is in the middle of the nozzle’s recommended operating range. If the range is 15 to 90 psi, select 50 psi. If it’s 40 to 100 psi, select 70 psi. This allows you slow down or speed up somewhat without breaching the nozzle’s capabilities.
    4. Identify the travel speeds that are possible without creating spray qualities that could compromise your application goals.
    5. Visually inspect the spray pattern at the pressure extremes you expect to spray at. At the lowest pressure, your nozzle should still produce 100% overlap (the edge of the spray fan should come to the middle of the next nozzle at target height). If it doesn’t, choose a wider fan angle nozzle, increase spray pressure or elevate the boom.
    6. Make sure your pump can produce the higher spray pressures you expect to need. Pressure limitations are greatest at high flow rates (fast travel speeds applying large water volumes).
    7. Be prepared to compromise. It’s rarely possible to travel at the exact speed, obtain the perfect pressure, and apply the desired water volume that’s been worked out in the office or using manufacturer’s charts. If in doubt, choose slower speeds or higher water volumes to make things work out.

    Nozzle manufacturers are getting much better at producing information that helps applicators produce good spraying outcomes. Learning how to use this information is the first step.

  • Selecting the Right Water Volume

    Selecting the Right Water Volume

    Low water volumes can mean less effort to apply pesticides. But there is a limit to how low water volumes can go before problems appear. To understand the reasons why, and help applicators use the right volume for a given situation, we briefly outline what happens to a spray cloud as it reaches the crop canopy.

    Basic Principles

    To choose the right water volume, we have to remember three criteria for sprays to be effective.

    • First, the spray must reach the target.
    • Second, there must be enough droplets to sufficiently cover the target.
    • Third, the droplets have to be in a form (size and pesticide concentration) that allows the pesticide to be efficiently taken up by the target.

    Reaching the target

    Let’s start with the first criteria, reaching the target. Droplet size is important for minimizing both spray drift and droplet evaporation. Small droplets move off-target easily, they also evaporate to dryness very quickly and may not have the expected performance as a result. Larger droplets clearly reduce drift, but may bounce off the target and offer less coverage per water volume.

    Droplets of various sizes are actually important to cover all parts of a target, so we shouldn’t eliminate all the small ones. For example, penetration of dense broadleaf canopies, or coverage of small targets like stems is best achieved with smaller droplets, while larger droplets are useful for penetrating grassy canopies or targeting the top of a broadleaf canopy.

    Target coverage

    We need to get the right number of droplets to the target. The more leaf area to be covered (i.e., the taller or denser the crop canopy), the more droplets will be required. Leaf Area Index (LAI), defined as the total leaf area per unit ground area, is a good indicator of canopy density.

    To put this in perspective, consider a pre-seed burnoff or an early post-emergent herbicide spray vs. a late season fungicide. In the first case, the canopy can be described as being in a single plane near ground level, with leaf areas of target plants fully exposed and with an LAI of <1. High droplet density on the leaves will be achievable with relatively low volumes.

    In the second case, the canopy will have more depth, and will contain large leaf areas in each of the lower, mid, and upper canopy regions, with LAI >>1. Providing the same droplet number to each of the regions in the second case will require more droplets, and therefore more volume.

    Taken as a whole, the exclusive use of finer droplets can be counterproductive due to evaporation and drift. Higher water volumes have the advantage of allowing larger average droplet sizes to be used, minimizing evaporation, drift, and enhancing deposition.

    Deposit efficacy

    The third criteria, maximizing the performance of specific pesticides with droplet size, is more complicated. Typically, contact modes of action and grassy or difficult-to-wet targets require somewhat finer sprays and higher water volumes (Table 1). With tank mixes, such as glyphosate and Heat or AIM, the higher water volume and finer spray criteria should be used. For any specific herbicide, use the higher volume with coarser sprays.

    Table 1. Herbicide modes of action, minimum water volumes with low-drift nozzles, and maximum spray quality

    Mode of Action and Spray Quality

    In practice, an applicator rarely encounters just one type of targeting situation. Most herbicides are either broad-spectrum, or are tank mixed to target both grass and broadleaf weeds. As a result, the same spray operation has to be effective on grass weeds and broadleaf weeds, some of which may be near the top of the canopy, or be more mature, whereas others may be just emerging. In these cases, a number of different droplet sizes will be required.

    Low-drift nozzles

    A low-drift nozzle can be used for most applications, as long as small adjustments are made for specific conditions. Increases in pressure above 60 psi (for finer droplets, Medium to Coarse spray quality) and volume to at least 7 to 10 US gpa (for better penetration) with this nozzle optimizes performance for grassy weeds. Lower pressures (down to 40 psi, Coarse to Very Coarse spray quality) are sufficient for systemic broadleaf products or when additional drift control is necessary. Higher volumes (12 – 15 US gpa) may be needed to obtain coverage in dense canopies. Always check with nozzle manufacturer information to learn what spray quality is produced by the nozzle you’re using – this will vary with nozzle type, flow rate, and spray pressure.

    Droplet sizes in sprays

    All nozzles produce a wide variety of droplet sizes ranging from 5 µm to 1000 µm in diameter. The main difference between sprays is the proportion of their volume in any given size fraction, with low-drift sprays having less of their volume in the drift-prone sizes.

    Spray Quality Comparison
    Size distribution (by volume) of two spray qualities. Not that both of these sprays contain small and large droplets. The difference is the volume (=dosage) in each of these size fractions. Shaded areas highlight drift-prone droplets (left) and bounce-prone droplets (right).

    But even low-drift nozzles produce small droplets, and these provide sufficient coverage in most cases. Low-drift sprays do create more larger droplets, and these do not contribute to coverage due to their relatively low number and poor retention.

    Our main tools for droplet size selection are spray pressure (higher pressure reduces droplet size) or nozzle choice.

    Spray Pressure

    Higher pressures are sometimes thought to increase canopy penetration because they force the spray into the canopy. This is not true. While higher pressures create faster moving droplets, this speed quickly diminishes. By the time the spray enters the canopy, the faster velocity is lost, especially for the smaller droplets, and the only effect that remains is the finer spray. Finer droplets will penetrate many canopies further, but only if they are protected from wind. On a windy day, the finer sprays are more likely to blow downstream, or perhaps evaporate. The main benefit of higher pressure is better operation of the nozzle, especially air-induced nozzles, leading to more uniform patterns and better overall results.

    Large Droplet Advantages

    Although coarser sprays are often thought to work less well, they offer certain advantages.

    • One advantage is that a coarser spray tends to provide the air assist mentioned above (dragging air into the canopy, and giving smaller droplets a greater chance of moving where they’re needed).
    • Larger droplets also take longer to evaporate, increasing opportunities for uptake and translocation within the plant.
    • Larger droplets are more efficient at targeting the exposed, large leaves of plants requiring disease protection, leading to greater deposition and fungicide performance.
    • Most importantly, coarser sprays produce less drift, enabling application under windier conditions and thus ensuring that the timing of the application with respect to the crop or disease stage can be optimized.

    Water Volume

    Higher water volumes are the single most effective way of increasing dense canopy penetration. Higher volumes will deliver a greater number of droplets to the lower canopy, leading to greater performance when lower canopy coverage is of importance. When used in combination with lower travel speeds, the downward air flow created by sprays can provide significant benefits in forcing the smaller droplets further down. Larger volumes also decrease sensitivity to droplet size, permitting coarser sprays that reduce spray drift.

    Nozzle Angling

    Research has shown that exposed (upper canopy) vertical targets such as heads or stems will benefit from an angled spray. Forward-pointed sprays offer a slight advantage over backward-pointed sprays. Since angled sprays must maintain this trajectory to be useful, it is recommended that coarser spray qualities be used to minimize fine droplet production. Angled fine droplets will quickly deflect from their initial angled path and move with prevailing winds. Low booms heights also help in maximizing the benefit of angled sprays.  Canopy penetration has not been shown to be improved with forward angled sprays, but backward angled sprays can help place some spray deeper into grassy canopies.

    Broadleaf vs Grassy Canopies

    How can an applicator decide the most appropriate water volume and spray quality for a specific application scenario? The following guides should help.

    First determine the canopy density and form (broadleaf or grassy), and the target site within it (upper, mid, or lower). If the canopy is dense, but fairly vertical (i.e., a cereal), and a significant portion of it needs to be protected, the best strategy is to apply a higher water volume using a reasonably slow ground speed to allow the spray’s built-in air assist to work. If, on the other hand, only the upper layer of leaves, or the heads, are to be targeted, slightly less water can be used. If the water volume is appropriately high for the canopy, larger droplet sizes do not significantly diminish coverage or pesticide performance.

    If the canopy is dense but more horizontally oriented (broadleaf crops), similar rules apply for water volume and travel speed, but now the use of a somewhat finer spray may be of benefit. The smaller droplets will be better able to move around and through the leaves to reach deeper into the canopy. Ensuring a downward trajectory of the spray through travel speed and water volume selections will be important.

    Nozzle suggestions

    A very good starting point for a conventional rate-controlled sprayer is any one of the low-pressure air-induced tips that now form the majority of the market. These tips are similar enough in terms of pressure range (30 – 100 psi), spray quality (Medium-Coarse-Very Coarse, depending on pressure), and spray pattern fan angle (about 100 degrees) to have comparable performance with most pesticides. Such tips are best operated in the middle of their pressure range, which is about 50 – 70 psi, offering some room to move as travel speeds change.

    For those with Pulse-Width Modulation (PWM), where most air-induced tips cannot be used, nozzle choice is more limited but growing

    All these tips are described in more detail here.

  • Four Rules of Nozzle Selection

    Four Rules of Nozzle Selection

    Nozzle choice can be overwhelming due to the large selection available from many suppliers.  But nozzles are the most important part of the sprayer, being responsible for metering the liquid, atomizing it into droplets, and distributing it across the boom. Review this list for what’s available, then follow these general recommendations.

    1. Choose a Coarse spray quality for a multi-purpose spray

    All sprayer manufacturers voluntarily publish the spray quality of their nozzles at various flow rates and operating pressures.  This information is available here from their websites, catalogues, or apps. The most popular tips for field sprayers are the air-induced and pre-orifice low-drift style, and these are typically operated between 30 and 90 psi.  As a starting point, look for tips that produce a Coarse spray quality at an intermediate pressure of 60 to 70 psi.  This seemingly high pressure is normal for air-induction style tips and provides some necessary travel speed range for self-propelled sprayers.

    The name, symbol and colour code used to describe the spray quality produced by nozzles, according to the ASABE standard S572.2.

    2. Match water volume to spray quality and crop canopy

    Spray quality is a useful way to manage spray drift and coverage. The coarser your spray, the higher your water volume must be because you must have enough droplets per unit area to hit your target and provide enough droplet density on the leaves. This is most critical for pre-seed burnoff, where weeds are smallest, and where low-volume, very coarse sprays will likely miss weeds entirely. It is also important for contact herbicides (that require high droplet densities) and for grassy weeds, most of which have a hard time retaining very large droplets. Use at least 7 to 10 gpa for in-crop herbicides, 10 to 15 gpa for fungicides. The taller your crop canopy, the more leaves there are to cover and the more water is required.

    Relationship between spray quality and water volume. The consequence of coarser sprays is fewer droplets per unit area. The real question is what the density threshold is for any given application.

    3. Know and use the right pressure for your nozzle

    Even a good nozzle won’t work well at the wrong pressure. Air-induced nozzles and some pre-orifice nozzles require higher pressures to operate properly. The most common reason for performance complaints is when the spray pressure of a low-drift nozzle is too low, resulting in poor spray distribution between nozzles (see next point).   If your sprayer cannot produce sufficiently high pressures, you should not be using these nozzles. Use your spray pressure gauge as your speedometer, and aim for pressures in the middle of the nozzle’s recommended operating range. Higher pressures increase drift potential, but less so for pre-orifice and air-induced nozzles. These tables help size your nozzles for your travel speeds.

    Pressure gauge
    Your spray pressure is the most important measurement while spraying. It determines droplet size (and therefore drift potential and coverage) as well as fan angle, which affects overlap and pattern uniformity.

    4. Ensure good patterns

    Whereas finer sprays from conventional nozzles can re-distribute themselves with wind or turbulence, covering up poor patterns, the coarser droplets produced by low-drift sprays will go where they’re pointed. Therefore, there is only one chance to get uniform coverage across the boom. Before spraying, set your sprayer to your lowest expected spray pressure (say 30 psi) and your lowest expected boom height and inspect the spray pattern overlap. For low-drift sprays, try to achieve a nozzle pattern width that is twice your nozzle spacing at the target height. If necessary, adjust your boom height, increase pressure, or select wider angle nozzles. This will ensure that the coarsest droplets at the pattern edge are mixed in with the more abundant, finer droplets found in the middle of a pattern.

    Pattern Overlap