There’s a call that I’ve been getting for 20 years now. It came again this week. Someone has a twincap with two small air-induced tips, and they’re applying herbicides and fungicides with low water volumes, often 5 gpa, sometimes less. They call because they want to know how much wind they can spray in. Is 30 km/h OK? They want my blessing.
I don’t need to hear much more. Some nozzles are sold entirely on the premise that they provide superior coverage – more droplets per square inch – and that this improved coverage permits the reduction of water volumes. Furthermore, the claim goes, when water is reduced, the spray concentration increases and the whole darn package just works a lot faster and better.
This line of thinking is as old as spraying itself. Applicators seek pesticide performance as well as productivity, and this approach gives them both. The proponents are well aware of their customers’ desires, and sell into it. “Use these tips and cut back on water. Any more than this just runs off anyways. You’ll get better coverage and better performance, get more spraying done.” It’s a convincing argument. Get an edge on your neighbour, the person who’s not in on the secret and is wasting time and water.
Why don’t I embrace it? There are a few reasons.
First, it doesn’t tell the whole story. Invariably it involves a twin nozzle setup. Use two nozzles, get more droplets, right? If that were true, believe me, I’d be advocating for quintuples.
Fact is that the only factors that change droplet numbers are droplet size (spray quality) and water volume. Want more droplets at the same water volume? Make the spray finer. Want to keep spray quality and add droplets? Add water (not nozzles).
The easiest way to improve coverage at the same volume is to use a finer nozzle, or to increase spray pressure. Depending on how far you go, you could make the spray finer and cut water, and still have more droplets per square inch.
The hardest way to improve coverage is to purchase a twincap and buy two nozzles, each of them half the size. True, within any given nozzle type, smaller sized tips usually generate finer sprays. But why bother with two tips? They’re more expensive and plug more.
If someone asks me how to improve coverage without changing water volume, I usually tell them to speed up a few mph. The rate controller will increase pressure and the spray gets finer. If speeding up is not possible, get one size smaller nozzle and run at higher pressure, same speed. Or keep nozzle and speed, and add some gpa, pressure will go up. It’s that easy. No twins necessary.
Second, the twin nozzle/low volume approach exaggerates the value of the twin nozzle for herbicides. With small plants and relatively open canopies in the early season, plus our high booms and travel speeds, the twin tips are not adding a lot, if anything at all, to coverage. It remains a sum of droplet size and water volume, the angle is not important at this stage. Deposit is by turbulence and wind, most of the time.
Third, low volume believers ignore a few potential problems. Drift is a big one. Low volume, fine spray operators are surrounded by nervous neighbours. They have fewer hours per day during which drift is acceptably low. And they definitely should not be on the field when wind is at 30 km/h. Basically, they’re a bit uncomfortable (at least they should be) and get less done per day.
Another potential problem is evaporation. Most sprays, even when applied at lower volumes, are still 90% or more water. The same volume of water evaporates much quicker when atomized into smaller droplets. This has two main downsides: On their way to the canopy, small droplets evaporate and become even more drift prone, and may not impact at all. Those that impact evaporate shortly thereafter. Research has shown that pesticide uptake is better from wet than dry deposits.
When Delta T (dry bulb minus wet bulb temperature) is high, evaporation can be so strong that it reduces pesticide performance or causes solvent burn. Fine sprays make it worse.
I also hear about the use of oily adjuvants to control evaporation from small droplets. This could be even more dangerous. Small droplets drift, and evaporation to dryness is actually helpful in reducing the impact of that drift. How? It makes the small droplets disappear, with their remnants dispersing into the turbulent atmosphere. With oily adjuvants, the small droplets stick around and stay potent and their drift damage is much worse.
Lastly, the practice is possibly off label. Water volume and spray quality label statements are designed to offer good performance and acceptable drift risk. While that part of the label is often a bit dated, it does provide better support from the manufacturer should something go wrong.
If you’re spraying under hot, dry and windy conditions, the low volume, fine spray approach is irresponsible. Use sufficient water (7 to 12 gpa) to allow low-drift sprays, at least Coarse to Very Coarse, in some case, even coarser.
Agronomists provide the best possible information for their clients, based on scientific evidence and experience and in accordance with their professional code of ethics. Sometimes the news we deliver aren’t what the customer wants to hear. But we have to represent the interests of all of us, collectively. I find that pretty important.
Press play to listen to an audio version of this article
Agronomists help farmers manage their crop with advice on everything from crop cultivars to fertilizer rates to marketing. It’s challenging to be an expert on everything, but a few core competencies can go a long way to improving the level of service.
Agronomists are also responsible for communicating environmental
best practices. Along with fertilizer rates come messages of source, time, and
place, the 4R principles. The same is true for spraying, with messages of spray
drift, resistance management, and economic thresholds part of the consultation.
Let’s remember that we should not be indifferent to the potential consequences
of our recommendations.
Here are six skills that an agronomist should know about spray technology.
1. Recognizing major nozzle models and their spray quality and pressure requirements.
Application technologists are often asked to identify
nozzles and recommend spray pressures for clients. It’s a skill that anyone can
develop with just a bit of homework.
First, learn the colour-coding of nozzles – colours identify
flow rates and follow an international standard that all manufacturers have
adopted.
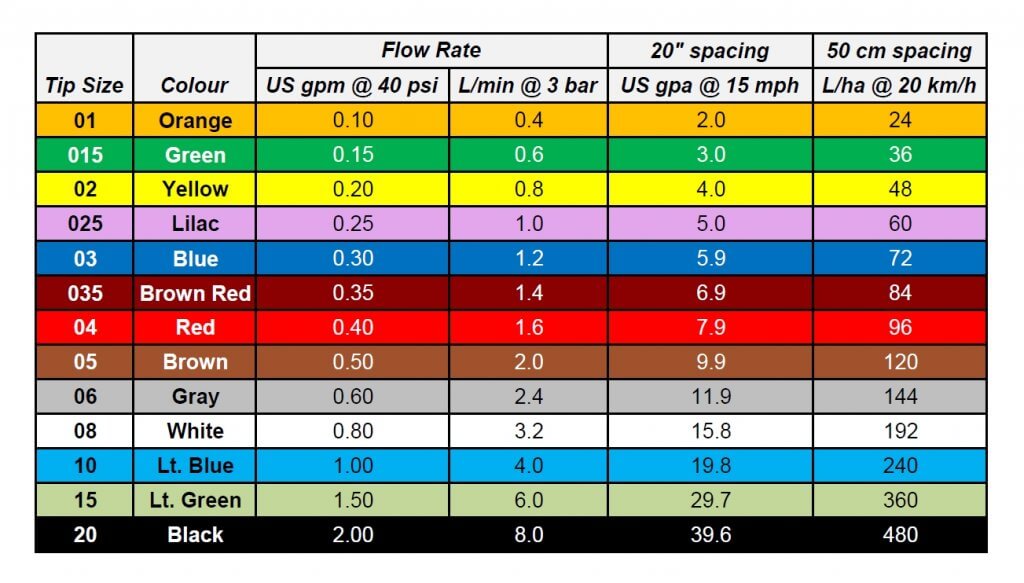
ISO Colour coding of major nozzle sizes, as well as application volumes at benchmark speeds.
Next, focus on the common nozzles on the major sprayers. John Deere sprayers will typically have three main air-induced nozzles, made for John Deere by Hypro, the Low-Drift Air (LDA), the Ultra Low-Drift (ULD), and the GuardianAIR Twin (GAT). Those with ExactApply, John Deere’s PWM system, will see the non air-induced 3D, the Guardian (LDX), and the Low-Drift Max (LDM). Recall that PWM flow control should not be used with air-induction tips.
Almost all Case sprayers have PWM, called AIM Command. Case uses Wilger ComboJet bodies and nozzles, with the ComboJet ER, SR, and MR most common, sometimes the DR or UR for dicamba.
New Holland/Miller with PWM (called IntelliSpray) are also likely to have these tips, but because these brands have TeeJet bodies on their booms, they require an adaptor for the proprietary ComboJet caps.
Otherwise, PWM units often use TeeJet’s TurboTeeJet (TT), Turbo
TwinJet (TTJ60), and Air-Induced TurboTwinJet (AITTJ60), the only air-induced
tip approved for PWM use by TeeJet.
Conventional spray systems (i.e., no PWM), will commonly
have (in alphabetical order) the Air Bubble Jet (ABJ, actually labelled BFS for
their manufacturer, Billericay Farm Systems), the Greenleaf AirMix (AM), the
Hypro GuardianAIR (GA), and the TeeJet AIXR.
Many sprayers will have a twin fan for fungicides, primarily for fusarium headblight (FHB) management. The Greenleaf Turbo Asymmetric Dual Fan (TADF), the Hypro GuardianAIR Twin (GAT), and the TeeJet AI3070 dominate, as well as a number of custom configurations using splitters and twincaps.
Where dicamba is applied on Xtend trait soybeans, some special nozzles may be used to meet label requirements for coarseness. The TeeJet TTI is very common, but Greenleaf developed a special set of tips called the TurboDrop XL-D and the TADF-D. Wilger’s version, mentioned earlier, is the UR. John Deere has just announced their new ULDM.
That covers 95% of what you’ll encounter in the North American market. In Europe, add some Lechler nozzles (ID3, IDTA, IDK, IDKT) to the mix. In Australia, Arag is gaining ground.
Identifying the nozzles on sight is the prerequisite to
finding out their average droplet size, called spray quality. Often, the
inscriptions are worn off, so visual recognition is required to get there.
We’ve published a visual identification guide with pictures of the major nozzles here.
Knowing the relative spray qualities produced by these
various nozzles will get you bonus points, but you’ll need to do some extra
research to get there.
2. Using a spray calibration chart
This skill will make you popular on the farm and at the office. A very frequent question is “what size nozzle do I need for this new sprayer?”. The best way to approach the answer is to ask several questions.
Does the sprayer have 20” nozzle spacing? (90% of sprayers do).
What is the desired water volume?
What is the expected average travel speed?
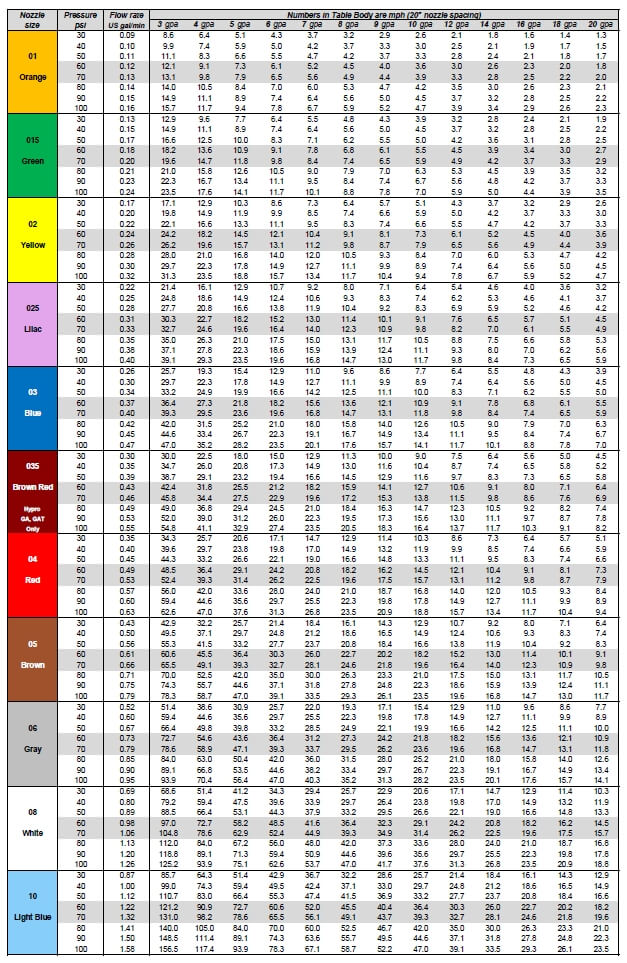
The first question guides you to the appropriate calibration chart, which can be downloaded here or can also be found in all sprayer catalogues. We explain how to use these charts here.
Calibration chart for 20: spacing, in US units.
If you don’t have a chart handy, use this shortcut: on a boom with 20” spacing, at 5 mph, every 0.1 US gpm capacity at 40 psi delivers 6 US gpa. So if you need to apply 12 gpa at 15 mph, an 06 size will get you there at 40 psi. That’s ballpark.
In metric, with 50 cm spacing, at 10 km/h every 400 mL/min (01 size) at 3 bar delivers about 50 L/ha. To deliver 200 L/ha at 20 km/h would require an 08 (white) tip.
Of course, if the tip is air-induced, make adjustments to speed or size to accommodate the higher pressure requirement of these types of nozzles.
Remember that spray pressure is key to performance, therefore the operator needs to drive at a speed, or use a volume, that results in the correct spray pressure.
3. Understanding Pulse Width Modulation
PWM technology has been on the North American and Australian market for two decades, but it remains poorly understood by those who do not use it. PWM will continue to gain popularity and has implications for nozzle selection and sizing.
Traditional rate control in the field involves the use of spray pressure to match liquid flow rates to travel speed. The rate controller knows the width of the boom (entered by the user), the travel speed (from gps), and the desired application volume (entered by the user). It does some math to identify the flow rate it needs, and compares that to the sprayer’s current flow meter reading. If the current flow is less than what’s needed, the sprayer increases pressure to increase flow. This happens continuously in the background.
When an operator speeds up, the pressure increases, and vice versa. As a result, the pressure (and therefore droplet size) will fluctuate with travel speed, and that can result in inconsistent spray patterns, coverage and drift.
PWM involves the installation of electronic solenoid valves at each nozzle body. These valves pulse on and off at 10, 15, 50, or 100 Hz, depending on the manufacturer. Each pulse contains a brief, complete shutoff of the flow. The proportion of the time the valve is open during a pulse is called the Duty Cycle (DC), and this is proportional to the flow through the nozzle.
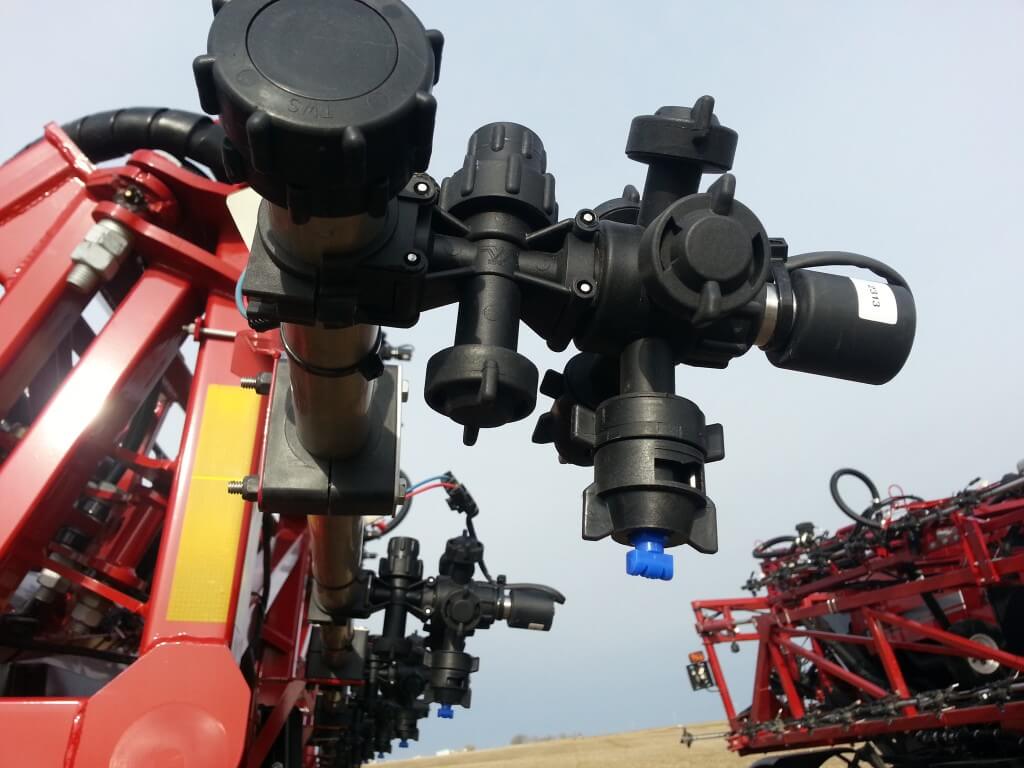
Capstan PWM solenoid on Case AIM Command
When the system requires more flow, it no longer increases pressure. Instead, it increases the DC. The advantage of this approach is that nozzle pressure can now stay constant, ensuring consistent coverage and drift.
There are other advantages of these systems. Each nozzle can be controlled independently, offering high resolution sectional control and turn compensation.
Nozzle selection and sizing are both affected by this technology. Nozzles need to be sized larger, with about 30 to 40% more flow capacity ideal. The DC will therefore run at 60 to 70%, optimal for speed fluctuations and turn compensation. Air-Induced tips are not usually recommended because their pattern deteriorates with pulsing.
We’ve written about PWM here, here and here to get you started.
4. Validating coverage of the target
A very useful indicator of the success of a spray operation is an assessment of “coverage”. This term refers to a qualitative combination of droplet density and percent area covered, and can be quickly assessed using water sensitive paper. We’ve explained the use of WSP here and here.
It’s very useful to have some of this paper on hand (available from any retailer that sells TeeJet or Hypro products, or on-line from Sprayer Parts Warehouse in Winnipeg or Nozzle Ninja in Stettler, AB). The coverage can be assessed in four different ways:
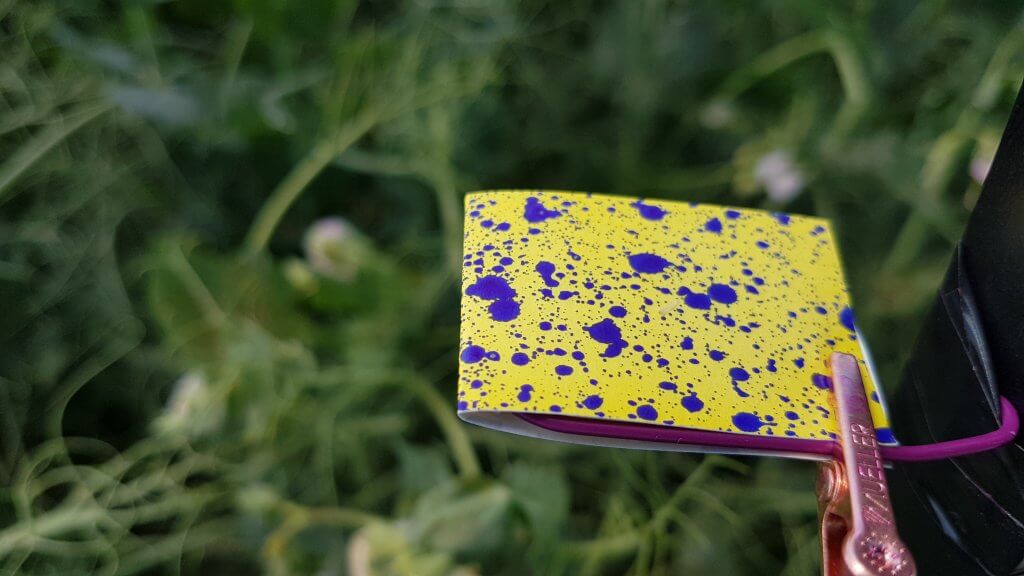
Water-sensitive paper being used to assess spray coverage.
using the “DropScope” scanner (gives a comprehensive assessment of coverage, density, size, plus image editing tools);
using a template of coverage examples;
using experience built on years of doing this.
Water-sensitive paper is also useful as a record, for
quality assurance. A spray application is conducted and part of the record is
an image of the deposit. Should a performance issue arise, this will help
settle it.
5. Understand basic sprayer plumbing
Often, a sprayer problem can be traced back to an issue with
its plumbing. There could be mysterious sources of contamination. The pump might
not be building pressure. The agitation isn’t running. Or you need to drain all
the remaining liquid from the tank.
Sprayer plumbing seems intimidating for a number of reasons.
It’s become complex on most modern sprayers. It’s hidden under the sprayer
belly. All the lines are the same black colour, so they’re hard to tell apart.
But it’s not as bad as it seems. Basic plumbing is the same
on all sprayers. The pump draws the spray mix from the bottom of the tank, the
sump. It may also have options to draw clean water from an external supply, or
from the clean water tank for wash-down.
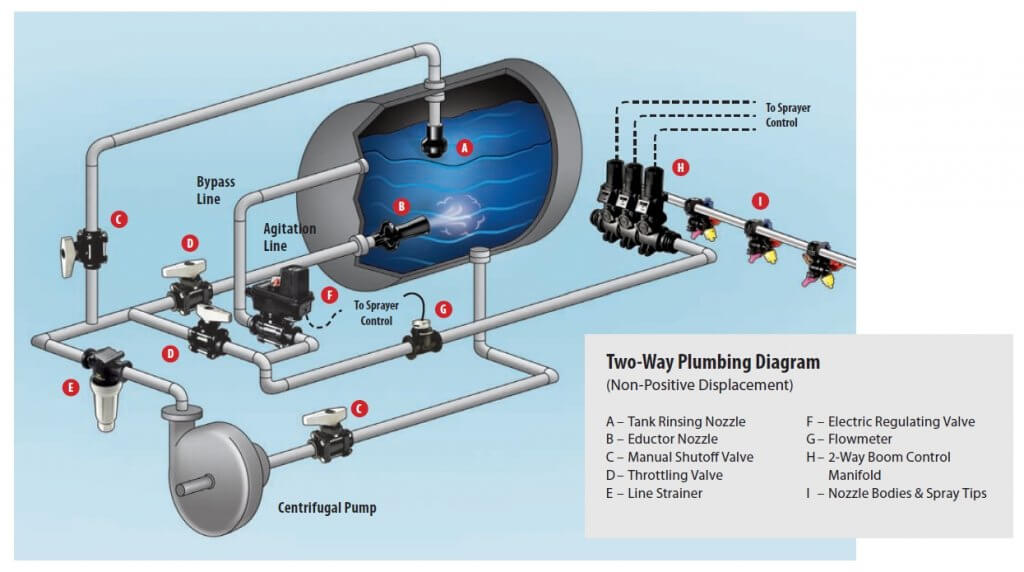
The pressurized supply goes to three places:
to the booms, via sectional valves;
back to the tank, via a control valve that can be used to adjust the spray pressure;
to the wash-down nozzles.
Typical sprayer plumbing for a centrifugal pump (Courtesy TeeJet).
When spraying, the less is returned to the tank, the higher the boom pressure. There may be several ways back to the tank, via agitation, via bypass (sparge), or via wash-down (used only when the pump draws water from the wash-down tank). Usually engineers can’t help themselves and introduce several what-if features that complicate the situation. But with a bit of know-how, and a flashlight, the plumbing system can be deciphered.
Pro tip: A centrifugal pump’s inlet (suction) is always the centre of the pump, its outlet (pressure) is at the periphery.
6. Matching a pesticide recommendation with application advice
It’s commonplace to recommend a specific crop protection product that matches the crop and pest situation. Recommending an ideal crop or pest stage improves the recommendation. But a truly successful outcome requires one additional step, advice on the application method. The customer may need to know if product performance depends on water volume and droplet size. Some products are more sensitive to this than others. Perhaps there is a specific nozzle type that may be helpful.
The classic example for application method is Fusarium headblight in wheat. The basics are straightforward. An agronomist recommends the fungicide, and guides the tight application window with a field visit to stage the crop, plus a look at the disease risk forecast map. But true application success requires an angled spray, with a coarser spray quality plus relatively low boom height to make it all worthwhile. That’s a full-featured recommendation.
Common herbicide applications also benefit from additional
information. Some tank mixes and weed spectra allow for coarser sprays than
others, and the ability to spray coarser means a wider application window and
therefore more accurate timing. Other tank mixes may pose a significant risk to
drift damage, requiring special measures to prevent a problem. Identifying
those opportunities adds value.
Water volume and spray quality recommendations for major herbicide mode of action groups.
Newer labels for dicamba (Xtendimax, Engenia, Fexapan) and 2,4-D
(Enlist Duo) have very specific instructions for drift prevention. This
information must be shared with customers to ensure that their drift liability
is covered.
Are there other skills that you feel agronomists should have?
Please share them with us by contacting us at the bottom of this page.
This research was performed with Dennis Van Dyk, OMAFA Vegetable Crop Specialist.
In 2018, MS Gregson introduced a line of electrostatic sprayers (the Ecostatik) in Canada. While electrostatic technology has been used in agriculture since the 1980’s, this is the first time ground rigs have been so readily available to Ontario (possibly Canadian) growers.
The 3-point hitch Ecostatik can be configured for vertical booms or for banded/broadcast applications. The largest version has a 150 gallon tank, 10 gallon rinse tank and 72 nozzles on 7.5″ centres on a 60 foot boom. That model requires a 75 HP tractor, but 100 HP is preferred. The manufacturer claims the Ecostatik uses 50% less spray mix, gives superior underleaf coverage, and loses less spray to the soil compared to conventional methods.
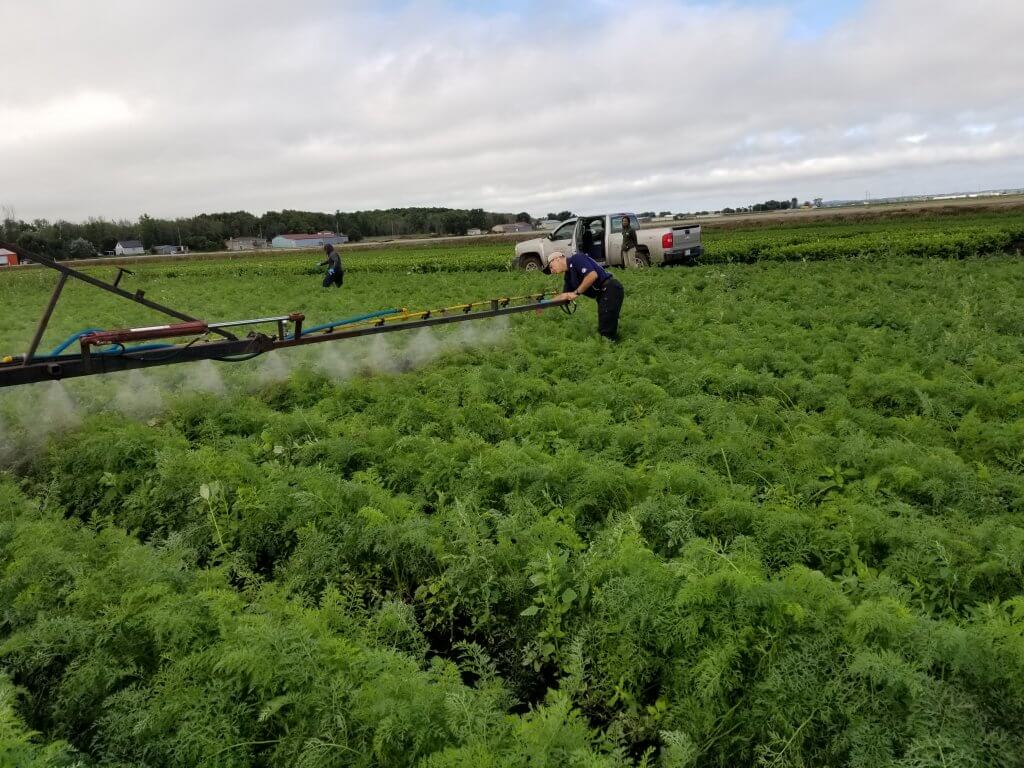
Ecostatik 3-point hitch electrostatic sprayer. 14′ boom model pictured.
Objective
In the summer of 2018 we evaluated and compared the electrostatic sprayer to conventional application methods at the University of Guelph’s Holland Marsh Research Station. Our goal was to assess spray coverage and physical drift in a vegetable crop.
Treatment 2: Conventional Air Induction (AI) flat fan tip at 50 gpa (468 L/ha).
Treatment 3: Ecostatik at 11.8 gpa (110 L/ha): electric charge on.
Treatment 4: Ecostatik at 11.8 gpa (110 L/ha): electric charge off.
Sprayer set-ups
Conventional Sprayer
11.5 ft (3.5 m) boom with 20” (50 cm) nozzle spacing set 18” (45 cm) from nozzle to top of crop.
Treatment 1: D3-DC25 HC @ 140 psi and 3 km/h. SC-1 SpotOn calibration vessel (SC-1) gave an average flow of 1.36 L/min (0.36 gpm). Very Fine spray quality.
Treatment 2: AI11003 AI @ 80 psi and 4 km/h. At 50 psi, SC-1 gave an average flow of 1.21 L/min (0.32 gpm). Very Coarse spray quality.
Ecostatik Sprayer
15 ft (~4.5 m) boom with 7.5” (19 cm) nozzle spacing set 18” (45 cm) from nozzle to top of crop.
With tractor set to 2,100 rpms, avg. air speed was measured using a Kestrel wind meter. The turbulent nature of the air precluded testing with a Pitot meter. At 5″ from the nozzle: 71.5 mph (32 m/s). At 10″: 37.5 mph (16.6 m/s). At 18″ (target distance): 21 mph (9.4 m/s).
The MaxCharge nozzles contained TeeJet CP4916-16 flow regulator orifice plates. At 25 psi they should have emitted 0.020 gpm. However, the SC-1 indicated a consistent 0.034 gpm from multiple nozzles. We postulate that the air assist created a low pressure environment that increased flow. Extremely Fine spray quality.
Treatment 3: Electric charge of -16 µA (tested using a voltmeter set to 200 µA) and speed of 3.7 km/h.
Treatment 4: Electric charge off and speed of 3.7 km/h.
The Ecostatik boomTesting electrostatic charge with a voltmeter. Hair standing on end was a fun extra.
Experimental Design
Fluorimetry
We used the fluorescent dye Rhodamine WT as a coverage indicator. This allowed us to take tissue samples to evaluate deposition, rather than rely on analogs like water sensitive paper. Further, the dye is detectable in parts per billion concentrations, making it sensitive enough for detection in drift studies.
The conventional sprayer received 40 gallons (151.5L) of water dosed with 303.5 mL dye (i.e. 2 mL / L).
The electrostatic sprayer 20 gallons (75.75 L) of water dosed with 151.5 mL dye (i.e. 2 mL / L).
A sample of the tank mix was collected from the nozzle prior to each application. It was later used to calibrate the fluorimeter for samples taken during that application.
Tissue samples were removed and dried to establish their dry weight.
Rhodamine WT pooling on carrot (and weeds) as boom charged prior to application.
Spray Coverage
We chose to spray carrot on 20″ (50 cm) spacing on August 30, when the crop canopy was densest and represented the most challenging target. Our targets were leaflets located about mid canopy depth, and 1″ lengths of stem just above the crown. A diagram illustrating the experimental design appears later in the article.
Fluorimetry lab station. Inset: A typical length of stem and a leaflet with a Sharpie for scale.Drawing a tank sample prior to application. Carrot canopy was mature and very dense.
12 m blocks were randomly flagged for each treatment. There were 3 blocks per treatment. 4 treatments * 3 replications = 12 blocks.
Temperature, windspeed, humidity and time were recorded prior to each application.
Three plants were randomly sampled from each block. These sub samples were averaged to get a single data point. 3 replicated blocks x 4 treatments x 6 subsamples = 72 tissue samples (36 leaflets and 36 stems).
Samples were collected 60 seconds after spraying ended, placed in sample tubes pre-filled with 40 mL of water and immediately placed in the dark.
Drift
We also performed an analysis of physical drift for each treatment.
4″ lengths of pipecleaner mounted vertically ~12″ above the crop canopy as drift collectors.
They were placed in a straight line from the middle of the boom at 1 m, 2 m, 4 m, 8 m and 16 m downwind.
Samples were collected 60 seconds after spraying ended, placed in sample tubes pre-filled with 40 mL of water and immediately placed in the dark.
Spray coverage spray drift trial block design.
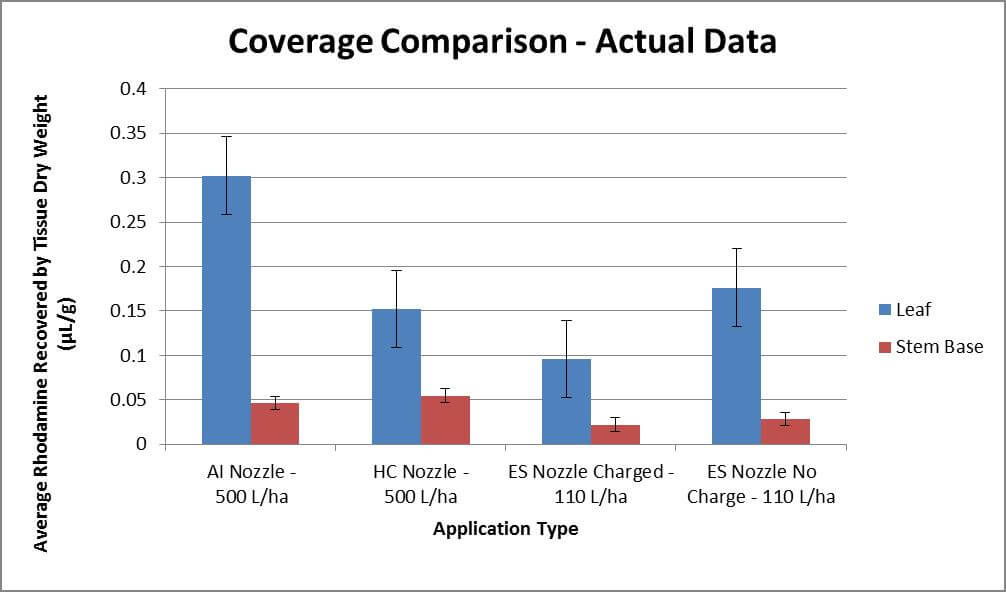
The following graph shows the coverage observed in µL rhodamine per dry weight of tissue sampled. Bars represent standard error. Each treatment represents three passes (n=3) where each pass included three sub-samples averaged to offset the high variability inherit to spraying. While statistical analysis did not prove significant, there were strong trends. The AI nozzle deposited more dye on the leaves, while the HC and both electrostatic applications were par. Stem coverage achieved in conventional applications was approximately double that of the electrostatic. However, note that the electrostatic system only applied 1/5 of the volume sprayed conventionally.
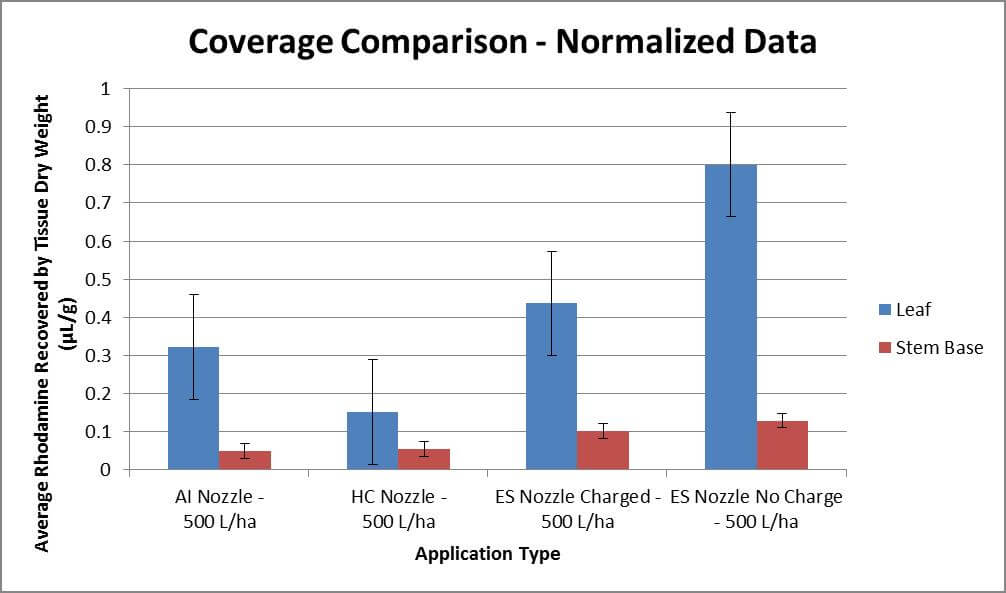
When the data is normalized to depict a 500 L/ha application for all treatments, a different story emerges (see below). Now foliar coverage is 25-100% better for electrostatic applications than conventional. Stem coverage is twice that of conventional. Unexpectedly, the uncharged electrostatic treatment outperformed the charged treatment on the leaves. This might be the result of variability in the application, or the result of coronal discharge which can occur when pointy leaves repel charged droplets. This suspicion might be supported by the similar coverage achieved on the stems in both Treatment 3 and 4. You can read more about the Corona Discharge Effect in this article.
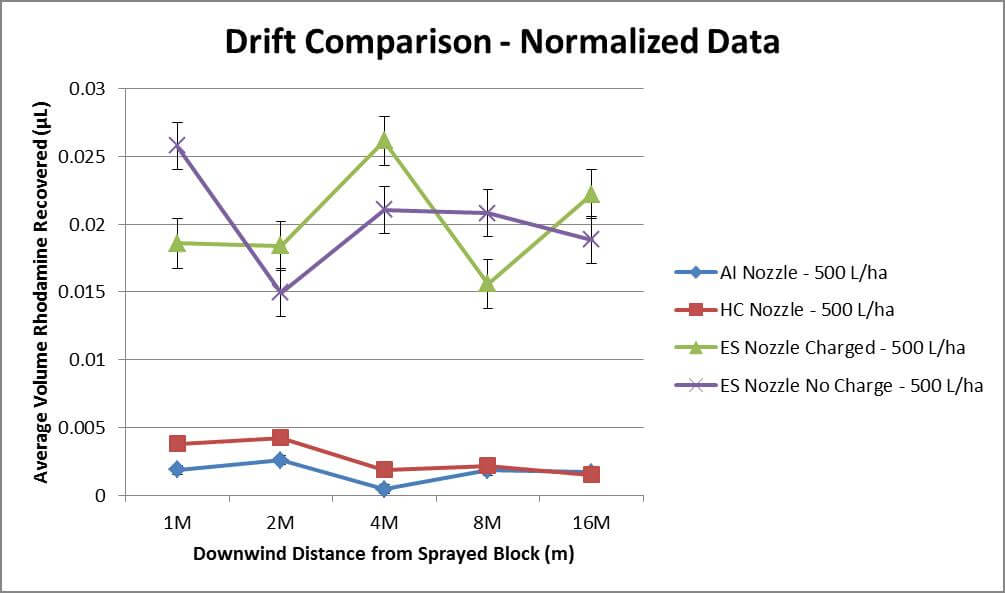
Regarding drift, we will focus on the normalized data (where all treatments are adjusted to 500 L/ha). An analysis of variance indicated with 95% confidence that the electrostatic treatments drifted significantly more than conventional (approximately 5x more rhodamine detected). Particle drift follows an inverse square rule, where levels decline with distance, but the decline is only minor in all treatments. This may be a function of weather conditions, coupled with the limited distance investigated.
Winds averaged 6.5 km/h gusting up to 10 km/h at boom height. Temperatures were between 15-17°C and relative humidity at ~70%. These conditions are conducive to drift as droplets are less likely to evaporate and in the case of Very Fine droplets, travel great distances. Many drift studies extend to 300 m from the point of application, whereas we were unable to monitor beyond 16 m. The downward trend would likely have been observed were we able to sample further downwind.
Observations
Our data supports the manufacturer’s claim that the electrostatic sprayer has the potential to match the coverage from a conventional application while using 50% less water and pesticide. It is unclear whether the electrostatic charge plays a role in this coverage, or if it is the result of the Very Fine spray quality and air assist (which have been demonstrated to improve canopy penetration). Further, it is unclear whether the charge may actually have been detrimental in the carrot crop. Claims of improved coverage uniformity were not explored in this study, but observations of water-sensitive paper in soybean (see image below) did indicate consistent under-leaf coverage, even at 50% application volume.
The five-fold increase in drift potential is a significant barrier for this technology. The spray cloud is comprised of like-charged particles that expand in three dimensions, which improves coverage uniformity and penetration into the canopy, but also causes droplets to expand up and out of the canopy. Air assist is used to propel them downward, but the turbulent 9.4 m/s windspeed seemed excessive, even for a dense carrot crop.
It is possible that focussing and reducing that airspeed may also reduce drift without compromising coverage. Presently, the air shear design of the Ecostatik’s MaxCharge nozzles prevent the operator from reducing the air speed without compromising spray quality. And, even if air speed could be reduced, the spray quality must remain Very Fine to achieve an optimal mass-to-charge ratio, and will therefore always carry an inherently high drift potential.
Thanks to Kevin Van der Kooi for spraying, and Laura Riches, Tamika Bishop, Terisa Set, Christine Dervaric, Claire Penstone and Aki Shimizu for sample collection.Special thanks to Cora Loucks for assistance with statistical analysis and Martin Brunelle of MS Gregson for providing the Ecostatik for evaluation.
Dear reader: This article is intended to provide basic information on how electrostatic sprayers work in an agricultural setting. The author does not sell or manufacture sprayers. If your interest is related to spraying disinfectant in private or commercial settings, please contact retailers or manufacturers of electrostatic sprayers.
Listen to article
Electrostatic nozzles have been tested in agriculture since the late 1970’s. Predominantly used in aerial applications, they are sometimes employed on airblast sprayers in orchard and berry operations, and on horizontal booms in vegetable crops. To a lesser extent, they are even mounted on wands for low acreage applications.
Claims
Independent research, manufacturer claims and user testimonials are intriguing:
Improved retention (>50% better than conventional) and/or potential savings of 50% spray mix.
Reduction in losses to soil.
Improved efficacy with both insect and disease control.
So it begs the question: “Why doesn’t everyone have an electrostatic sprayer?” We performed a study in carrot in Ontario’s Holland Marsh to explore some of the claims and to get a first-hand experience with the technology. That article might help answer the question. But first, read this article which explores the basic principles behind how electrostatic applications work.
Charging the Droplet
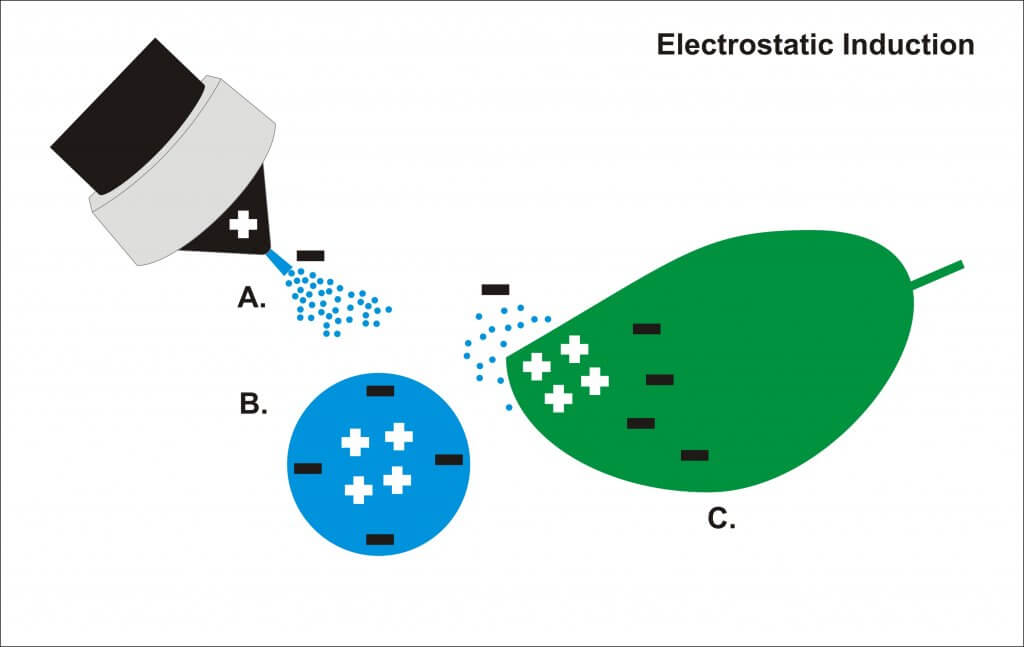
Spray is charged by a high voltage supercharger. Commonly, the charge is induced by an electrode positioned close to the atomizing spray plume as droplets begin to form. This is referred to as coronal discharge. An intense electric field imparts a positive or negative charge depending on the polarity of the DC power used. Think of it as high-voltage static electricity.
Sometimes the spray is atomized by a hydraulic nozzle (e.g. a hollow cone) and sometimes using an air-shear nozzle. The latter has the added advantage of blowing droplets away from the electrode and projecting them into the canopy.
Let’s consider a negatively-charged droplet (see diagram below). The droplet becomes polarized when it passes through the electric field. The field attracts electrons to the droplet surface and repels positrons towards the centre. The droplet now has its own field that electrically motivates it to land on neutral objects. As they approach such an object, the negative charge on the droplet surface repels mobile electrons on the surface of the target, which redistribute, creating a relative positive charge on the surface and attract the droplet.
Another style of electrostatic technology employs a highly charged plate along the air outlet of the sprayer, generally attached just inside the duct. The clearance between the droplets and the plates is quite large in relation to that in a twin-fluid atomizer, coil-type charging system.
Droplet Size
Droplet size is a critical factor. Droplets must be large enough to resist evaporation and drift but small enough that the charge can change their trajectory when it comes close to a target (I.e., the Charge-to-Mass Ratio). Most electrostatic nozzles produce ~50 µm droplets, categorized in agriculture as Very Fine. For comparison, a human hair ranges from 20 to 180 µm. Fog is about 5 µm. Such a small droplet means that the distance between nozzle and canopy is a determining factor for the spray depositing, or drifting.
Droplet Behaviour
Many forces influence droplet behaviour (E.g., inertia, wind, gravity, etc.). Very Fine droplets have a low terminal velocity causing them to fall slowly (~40 seconds to fall 3 m). This makes them highly drift-prone. However, simulations have shown that a charged droplet released close to a grounded target would be “pulled” faster than an uncharged droplet. Further, their trajectories would be less affected by air movement and they have the potential to move upwards against gravity towards the underside of a leaf.
Of course the droplets must reach the canopy before any of these potential advantages can be realized. Even with air-assist to project the spray into the canopy, it has been shown that the droplet must be within two centimetres of the target before attraction improves deposition. There are many physical phenomena that influence this process:
The Faraday Cage Effect can occur when spraying dense canopies. The spray deposits on the first grounded object it encounters. This is the outer surfaces of the canopy and the spray can be prevented from moving deeper into dense canopies. Regarding arable crops, there is often a naturally occurring negative charge on the earth’s surface that repels negatively charged spray. This may be why studies often report reduced loss to soil.
The Corona Effect is a very complicated relationship between the shape, density and spacing of the crop and it’s influence on charged spray. Research has shown that deposition is better for rounded targets than pointed. The gaseous exchange of charges between leaf tips and spray can neutralize or even repel droplets. This may be why electrostatic demonstrations so often include fruit or spheres.
The Expansion Cloud Effect (or cooler, the “Space Cloud” Effect) describes how charged droplets are repelled by objects with a like charge. Coulomb’s Law describes how objects with an opposite charge attract, but it also says objects with a like charge repel. Since the droplets all have the same charge, they repel each other. While this causes the plume to expand into the canopy and helps to distribute the droplets to give uniform coverage, it also causes droplets to expand upwards away from the crop, making them susceptible to drift.
Observations
The opportunity for reduced pesticide use is appealing and it may entice consumers to consider the electrostatic sprayer as a more environmentally-conscious choice. However, we have found very few studies relating to drift, and opinions are mixed whether electrostatic applications are any more drift-prone than conventional applications.
Considered collectively, electrostatic applications seem to perform well in controlled conditions, but the complications arising from variability in a natural environment coupled with the cost of equipment has slowed adoption. The current rules for practical adoption are poorly defined. More fulsome drift studies are required and coverage uniformity and canopy penetration (particularly from ground rig systems) must be consistent in real world settings.
Nevertheless, electrostatic applications have a lot of “potential”.
Assuming there are no mechanical or maintenance problems, water-sensitive paper can be used to diagnose sprayer performance. Go here to read more about water-sensitive paper. Interpreting the results and knowing what changes to make is the critical part of the process. Observing no coverage, or a sodden paper, make for obvious conclusions… but what about everything in between? Here are the ground rules:
First: Only ever test coverage in environmental conditions you would normally spray in. Temperature, humidity and wind speed can make or break an airblast calibration.
Second: When altering sprayer settings, only make one change at a time for each test pass so you can isolate what’s wrong.
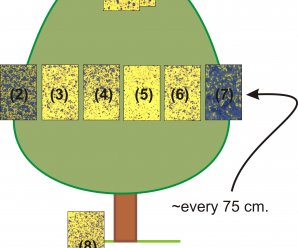
Third: Each pass requires a new set of papers located in the same place, oriented the same way, distributed throughout the canopy. Mark their locations with bright flagging tape and write the pass number and canopy position on the back of paper prior to placement. This helps you to compare the passes later on. Don’t collect papers until they’ve had an opportunity to dry a little, or they will smear and stick together.
Fourth: Pass down one alley first. Have a look at the papers without removing them. Then, spray the target canopy from the other side. Now the papers can be removed for analysis. This order is important because it reveals the impact of wind direction and the cumulative effect of spraying from both sides. In some cases, the sprayer operator may wish to travel an additional upwind alley to reflect the cumulative coverage on a typical spray day. Alternate row applications are not recommended.
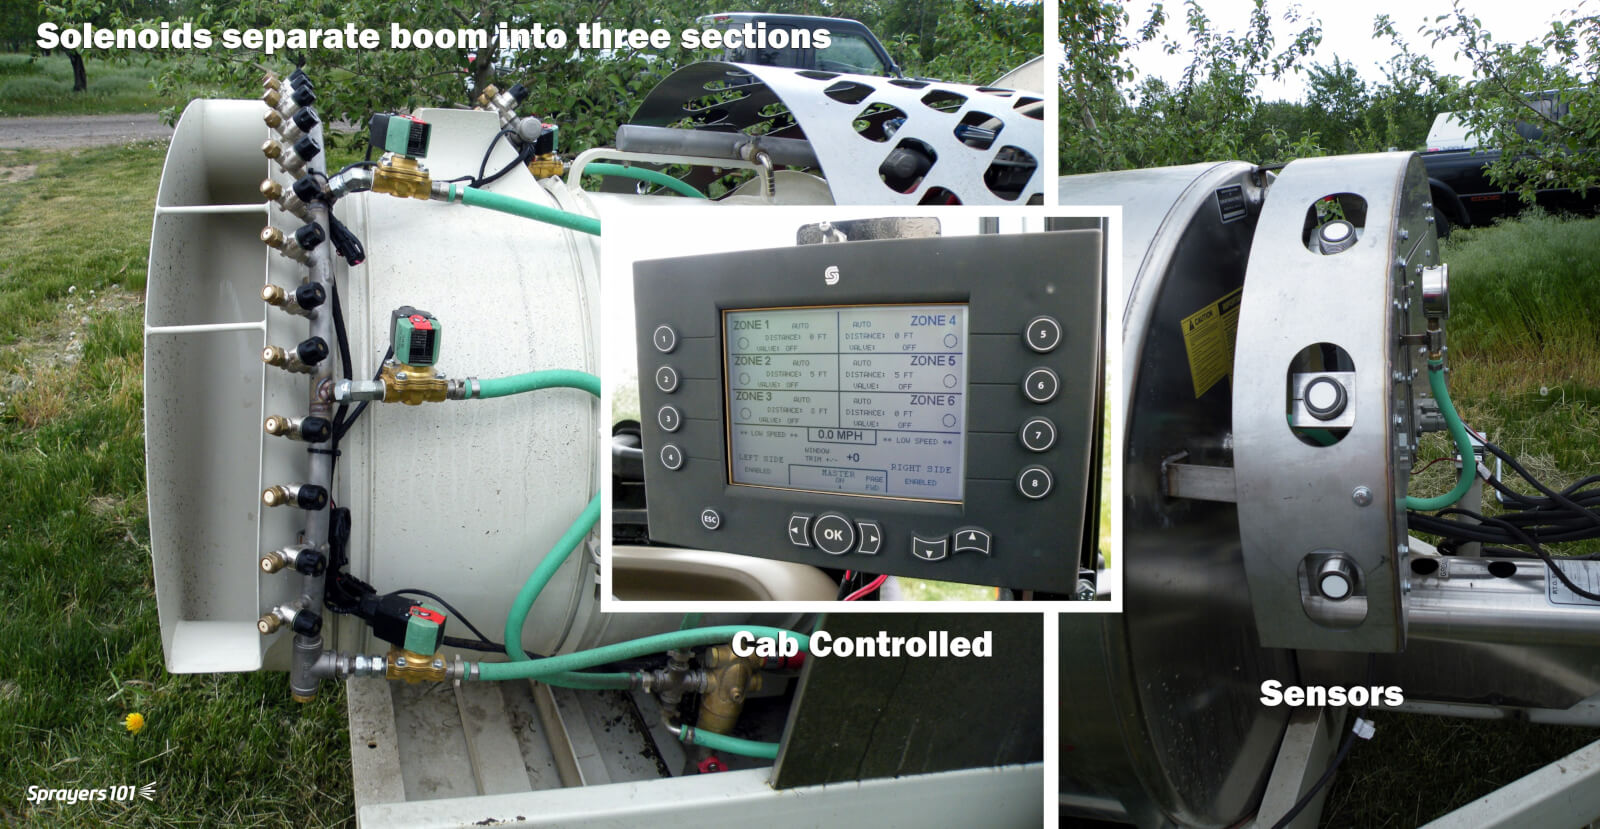
This Turbomist has been outfitted with Gillison’s Sonic Spray sensors that detect the presence of a canopy. Each eye corresponds to a boom section, turning the section on and off as required and improving efficiency. If it’s not there, why spray it?
Once the papers are retrieved, it’s time to diagnose the coverage. The following situations are typical in calibrations, and possible fixes are suggested. Remember, this is a process that takes time. Several passes may be required before satisfactory coverage is obtained. Once the correct settings are determined for the block, continue to use them until there is a significant change in the crop staging or weather. At that point, repeat the process.
Seven Situations
Situation One:
<15% coverage and <85 Fine/Medium droplets/cm2 at top of target (e.g. tall targets such as hops or trees). Suggested Fixes:
Wind might be stealing fine droplets. Try Coarser droplets (e.g. using air induction nozzles). Be aware that you may have to increase volume to compensate for reduced droplet counts and that they may fall out of the airstream before reaching distant targets.
Deflectors may not be channelling air and spray correctly – extrapolate air direction using ribbons on deflectors.
Fan may have to be set to higher gear, or if using GUTD, return to 540 rpm to increase fan speed. If still insufficient, you may need a sprayer with higher air capacity.
Situation Two:
<15% coverage and <85 Fine/Medium droplets/cm2 deep in canopy – sometimes papers on outside of canopy are visibly wet. Suggested Fixes:
Ground speed may be too high. Use flagging tape indicator on far side of target and see if air is getting through.
Canopy maintenance may be required (e.g. pruning, hedging, leaf stripping, etc.). No sprayer can consistently penetrate really dense canopies.
Fan may have to be set to higher gear, or if using GUTD, return to 540 rpm to increase fan speed. If still insufficient, you may need a sprayer with higher air capacity.
Increase carrier volume.
Situation Three:
Papers are drenched, dripping or show channels of running liquid. Suggested Fixes:
Reduce spray volume, either overall or in key locations on the boom corresponding to the drenched papers.
Ground speed may be too low. Use flagging tape indicator on far side of target and see if too much air is getting through. If so, increase ground speed.
Slow the fan speed by shifting to low gear, or using GUTD method
Ground speed may be increased as long as coverage is not compromised. Use flagging tape indicator on far side of target and see if air is getting through.
Situation Five:
Ground under target row is drenched. Suggested Fixes:
Rotate lower nozzles slightly upward, but do not shut them off. If ground remains drenched, turn them off entirely. Each hollow cone produces up to an 80º spray angle, so the next higher nozzle often compensates by spraying lower than expected.
Deflectors may not be channelling air and spray correctly – extrapolate air direction using ribbons on deflectors.
Situation Six:
<15% coverage and <85 Fine/Medium droplets/cm2. Remember that this coverage threshold is only a point of reference, not a hard fact. It does not apply when using Coarser droplets. Suggested Fixes:
Increase spray volume, either overall or in key locations on the boom corresponding to the under-sprayed papers.
Wind might be stealing fine droplets. Try coarser droplets (e.g. using air induction nozzles). Be aware that you may have to increase volume to compensate for reduced droplet counts.
Ground speed may be too high. Use flagging tape indicator on far side of target and see if enough air is getting through. If not, decrease ground speed.
Canopy maintenance may be required (e.g. pruning, hedging, leaf stripping, etc.). No sprayer can consistently penetrate really dense canopies.
Situation Seven:
Inconsistent coverage on outer edge of canopy (e.g. one spot never seems to get spray.) Suggested Fixes:
Nozzle spray angle may be too acute (e.g. full cones), and spray is not overlapping before reaching target. Try wider spray angles.
Some tower sprayers have ‘dead spots’ in their air. Check for limp or flagging ribbons tied to nozzle bodies and/or deflectors. Deflectors may need to be adjusted, or adjacent nozzle body angles repositioned to compensate. Try an air induction nozzle in the dead zone.
Canopy may be brushing against nozzles as the sprayer passes, temporarily blocking them. Canopy management required.
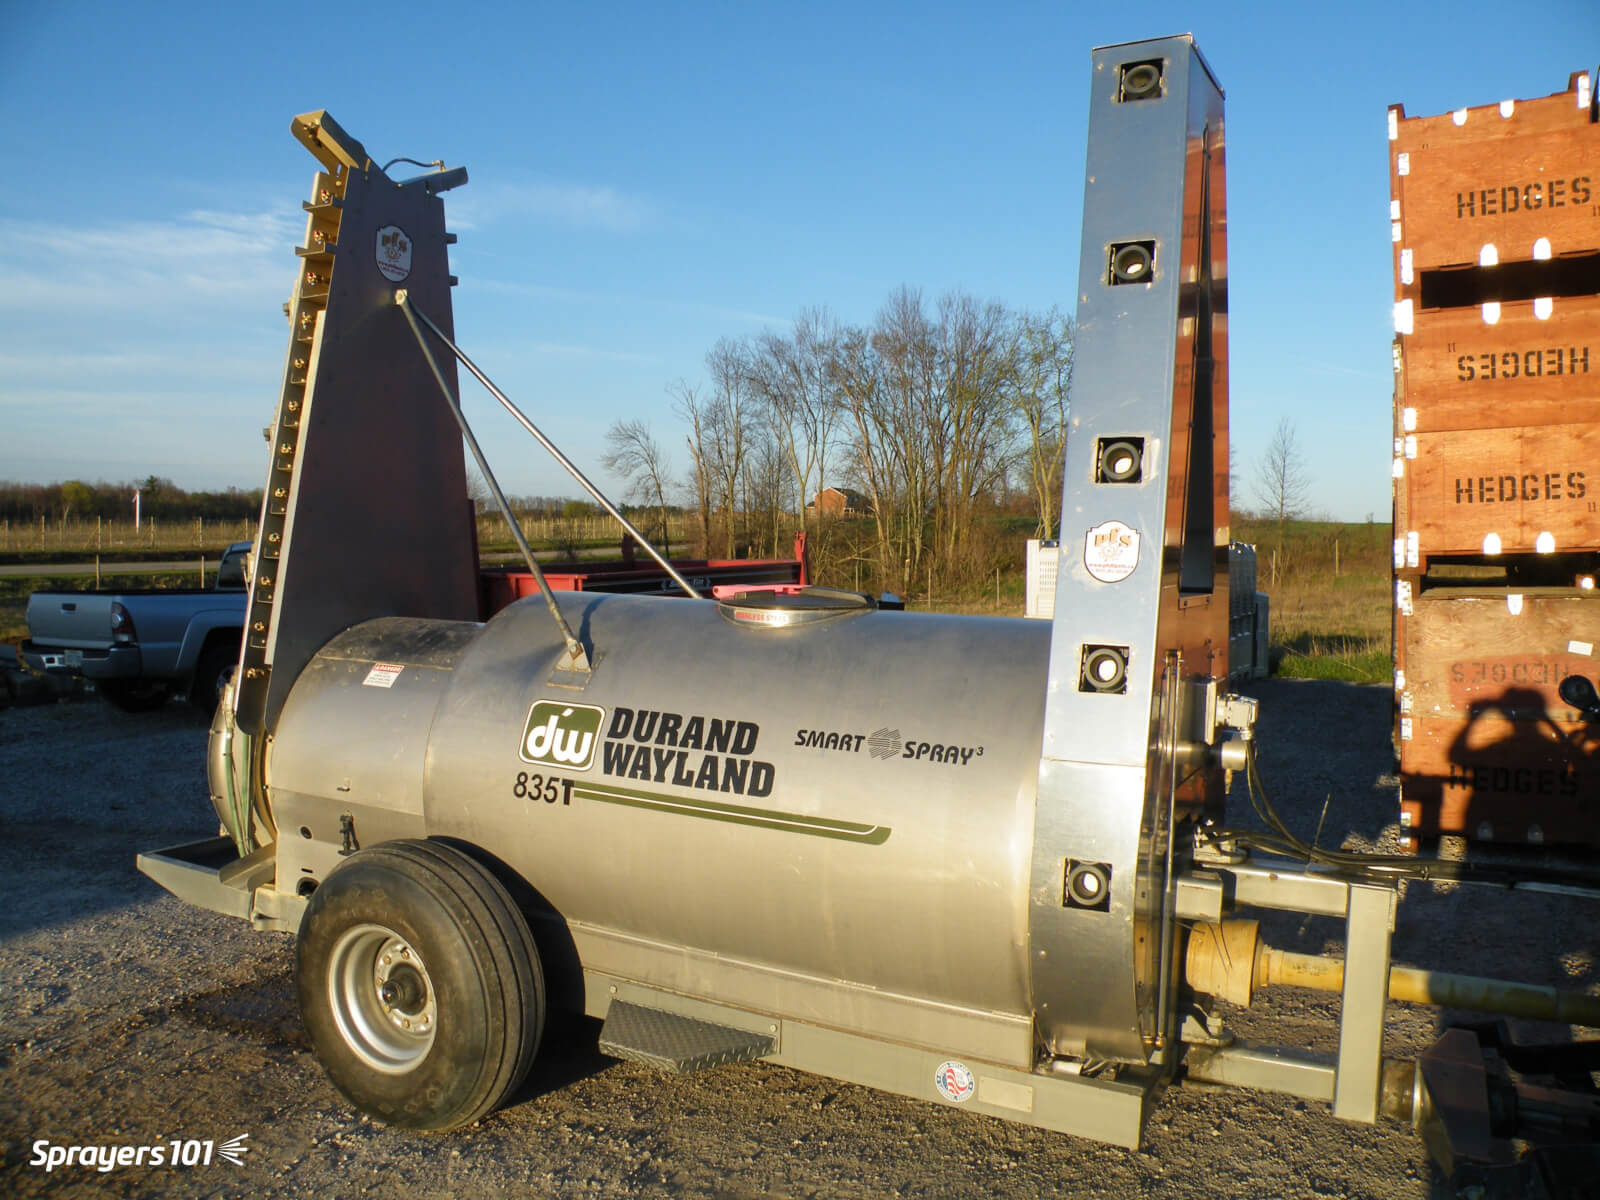
Some sprayers, such as Rears, Turbomist, FMC or this Durand Wayland have an option for electronic ‘eyes’ that detect spray targets. The boom will shut off completely if there is a gap in the planting. This can save a great deal of wasted spray. It is less applicable in trellised plantings where it has been known to be “fooled” by wires and posts.
If you still are unable to achieve satisfactory coverage, you may have to consider more extreme solutions. You may have an under- or over-powered sprayer. You may have to perform significant canopy management. Or, you may be trying to spray in poor weather conditions.