Should you really get up before the birds to spray? There are a lot of good reasons for early morning and night spraying, but if you’re in a strong inversion, you might be in a world of hurt. Here’s episode 5 in our series of short, educational and irreverent videos made with Real Agriculture.
Category: Speciality Sprayers
Main category for all sprayers that are not horizontal booms

What’s my Spray Quality, in 3 Simple Steps
The introduction of dicamba and 2,4-D tolerance traits in corn and soybeans was accompanied by an unprecedented emphasis on spray drift management by the registrants. Product label statements for 2,4-D choline and the new formulations of dicamba emphasize spray drift control to a greater degree than previous products.

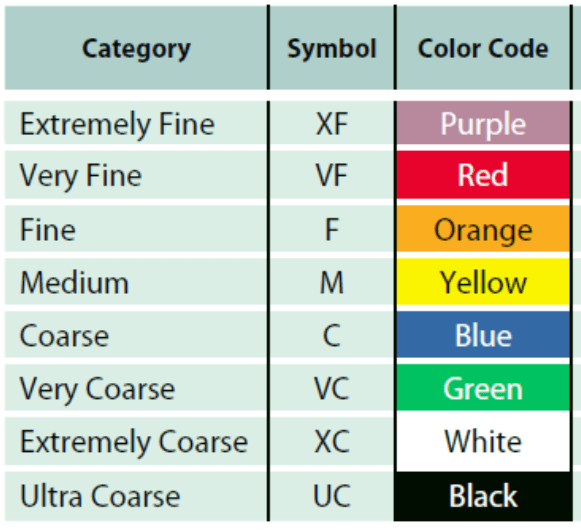
In Canada, labels make prominent reference to the appropriate “spray quality”, a term referring to an internationally standardized droplet size classification (ASABE S572.2). In this standard, the droplet size spectrum produced by a nozzle is communicated using terms such as “Medium”, “Coarse”, “Very Coarse” etc., and used to describe the potential for spray coverage and spray drift. Spray qualities are colour coded for easy recognition.
An example of this label language is shown for Enlist Duo below:
“Droplet Size: Apply as a coarse to extremely coarse spray (ASABE S572 Standard). Use drift reducing nozzle tips in accordance with manufacturer directions that produce a droplet classification of coarse to extremely coarse to significantly reduce the potential for drift.”
Although spray qualities are voluntarily measured and published by most nozzle manufacturers, their appearance on the label makes their use a legal requirement. This is because the Pest Management Regulatory Agency (PMRA) conducts a risk assessment which assumes, in this case, that a Coarse spray quality supports certain calculated buffer zones (15 m in this case) to protect sensitive ecosystems from Enlist Duo damage.
The use of coarser sprays can be used to reduce this buffer zone somewhat, in accordance with an on-line “Site-Specific Buffer Zone Calculator” published by the PMRA.
The challenge for applicators will be to determine the spray quality of their current application method. Here’s a relatively simple three-step process to find out.
Step 1: Identify the nozzles currently on the sprayer.
It seems basic, but it’s surprising how many applicators can not name their spray nozzle. If unsure, closely inspect the nozzle, looking for the manufacturer’s name, the nozzle model, and its flow rate. Most nozzles will have this information printed right on them. Here are pictures of the most common nozzles. Can’t find the info? Have a look at this article for websites with pictures.
Major manufacturers include Hypro (John Deere via private label), Agrotop (marketed by Greenleaf in North America), Hardi, Lechler, TeeJet, Wilger, and Billericay Farm Systems (Air Bubble Jet). Manufacturers produce many models, but most are easily identified by a series of letters and numbers. For example, all nozzles will be offered in several fan angles (80º and 110º are most common), and flow rates (in US gpm).

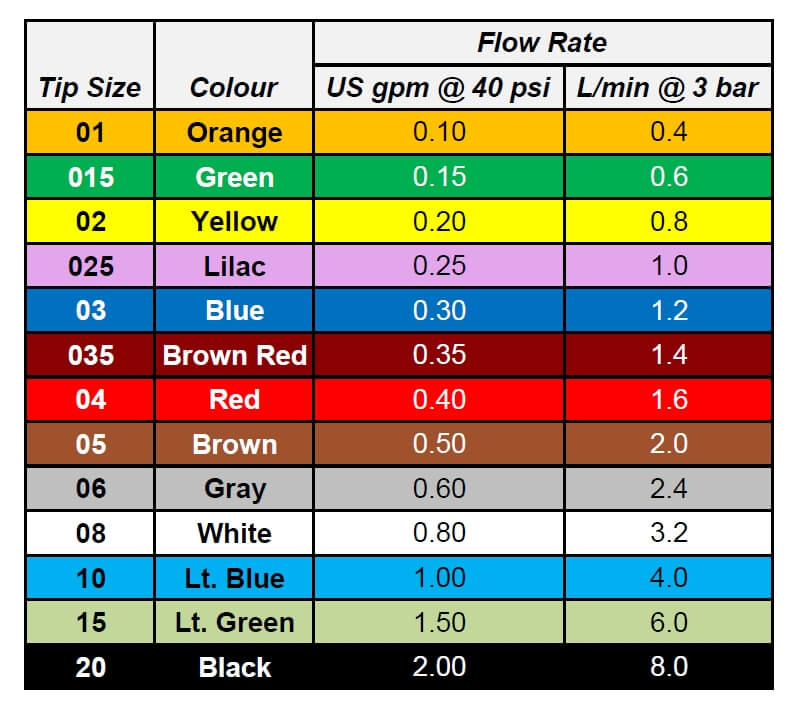
To be more helpful, flow rates are colour coded according to an international standard. This table shows the colours and lists flow in US units in (gpm at 40 psi) and metric (L/min at 3 bar).
The combination of series of letters or numbers shown on nozzles follows a relatively consistent pattern: Fan angle and flow rate arranged as 11003 or 03-110. In this case, the nozzle produces a 110 degree fan and has a flow rate of 0.3 US gpm. The use of US gpm at 40 psi to designate flow rate is an international standard.
The nozzle model is frequently inserted into this stamp, and is manufacturer specific. For example, TeeJet may include “AIXR” in its stamp, and Agrotop may include “TDXL”. Hardi’s MiniDrift is abbreviated MD. Some nozzles may not list their fan angle. Others (Air Bubble Jet) are blank, creating a mystic aura of superiority. Others leave the information printed on the nozzle cap.
A bit of experience is very helpful, especially with John Deere nozzles, where the nomenclature inexplicably eliminates the first digit of the 110 or 120 degree fan angle. So the JD 11004 is labelled “1004”. That’s a bit like saying “my truck sas a 50 engine”, when you mean it has a 350. How’s a city person supposed to know you don’t mean the trusty old 250 straight 6?

Step 2: Obtain spray quality information on the nozzle.
Most manufacturers publish the recommended pressure range and the spray quality of their nozzles. This information can be found in their product catalogues, or on their websites, or in smartphone apps.
Although the designation of Spray Quality is governed by an international standard that is designed to standardize droplet sizing among various labs, we do see some variation in results. Part of this is due to the continued evolution of the standard, requiring manufacturers to re-do some tests, or at least re-analyze their data. For example, ASABE S572.3 was released in conjunction with ISO25358 which changed the boundaries for the coarser sprays. These changes are beginning to be seen in the newer catalogues.

Another problem is that testing is done with plain water. It is well known that the use of certain formulations or adjuvants can affect spray quality. Currently, the standard does not address these effects, and data should be used with some caution.
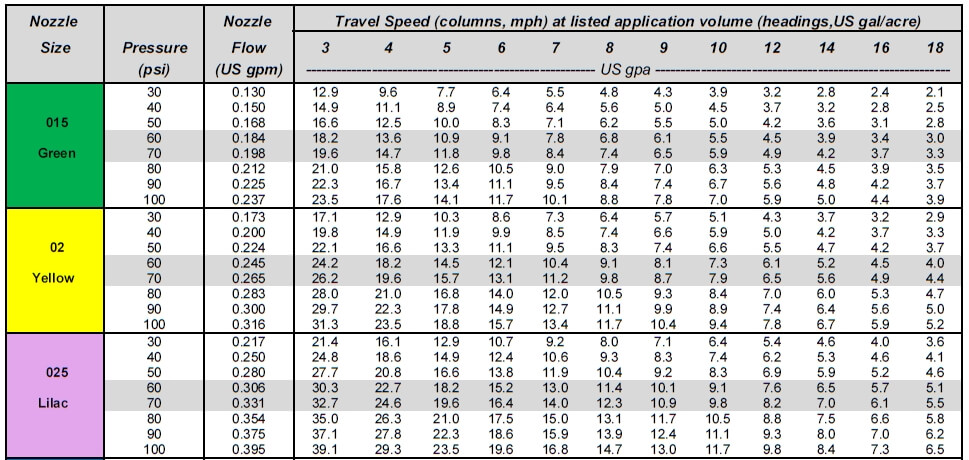
Step 3: Identify the expected pressure for a given travel speed and water volume.
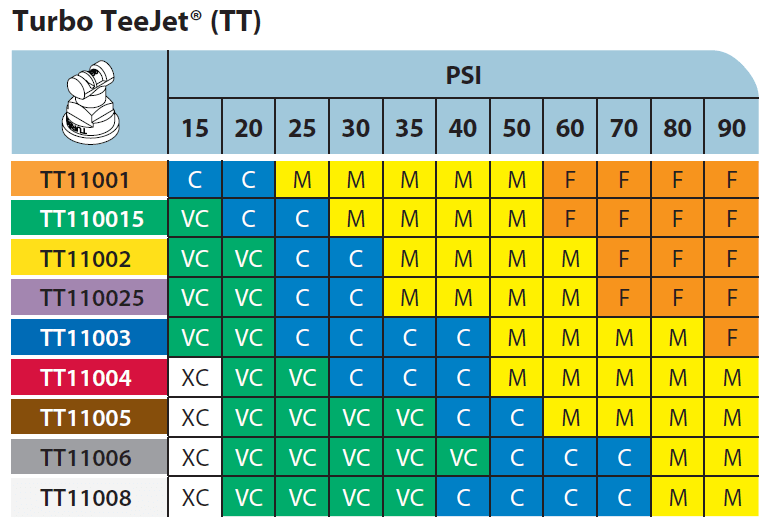
The same catalogues or websites that publish spray quality also produce charts that list the expected spray pressures at various travel speeds and water volumes.
Becoming familiar with using these charts enables the applicator to predict the spray pressure the nozzle will be operating at. For example, if an applicator intends to apply 10 gpa using a yellow (02) nozzle, this table shows the following: The nozzle will be operating at 30 psi at 5 mph, at 40 psi at 6 mph, at 60 psi at 7 mph, at 70 psi at 8 mph, and at 90 psi at 9 mph. The applicator should know the nozzle’s spray quality at each of those pressures.
Nozzle sizing follows a slightly different procedure for Pulse-Width-Modulation (PWM) systems, requiring the nozzle to be over-sized about 30% or so. Since the majority of new sprayer sales now include PWM, we’ve prepared a special article just for this system here.

Travel speed and/or spray volume should be adjusted to ensure the sprayer operates at a pressure which creates the desired spray quality. In other words, the pressure gauge should be used as a speedometer. If the nozzle model or size doesn’t produce the desired results, the applicator should consider changing nozzles. Once the right combination of factors has been determined, the spray pressures that created the label-required spray quality should be noted. From that point, the applicator can choose travel speeds that maintain the necessary pressure range.
Summary
It is up to applicators and industry representatives to ensure that herbicide products are applied according to label requirements. We expect significant scrutiny on spray drift from new products and need to ensure that proper application methods are used at all times. It’s important that everyone understands just how to do it.
Dr. Scott Bretthauer (U. Illinois) gives a nice summary in this video by Precision Labs:

When is Fungicide Coverage Critical? Always!
Introduction
A local strawberry producer was just beginning his harvest when the entire field was suddenly stricken with anthracnose. He would have done almost anything to save it, but he could only watch in frustration as the disease quickly devastated his crop. While he was telling me this story, he was wringing his hands; I’m sure he didn’t realize he was doing it. It had been more than a month since the crop was lost and he was obviously still very upset. Let’s put on our deerstalker hats and consider what might have caused the trouble.

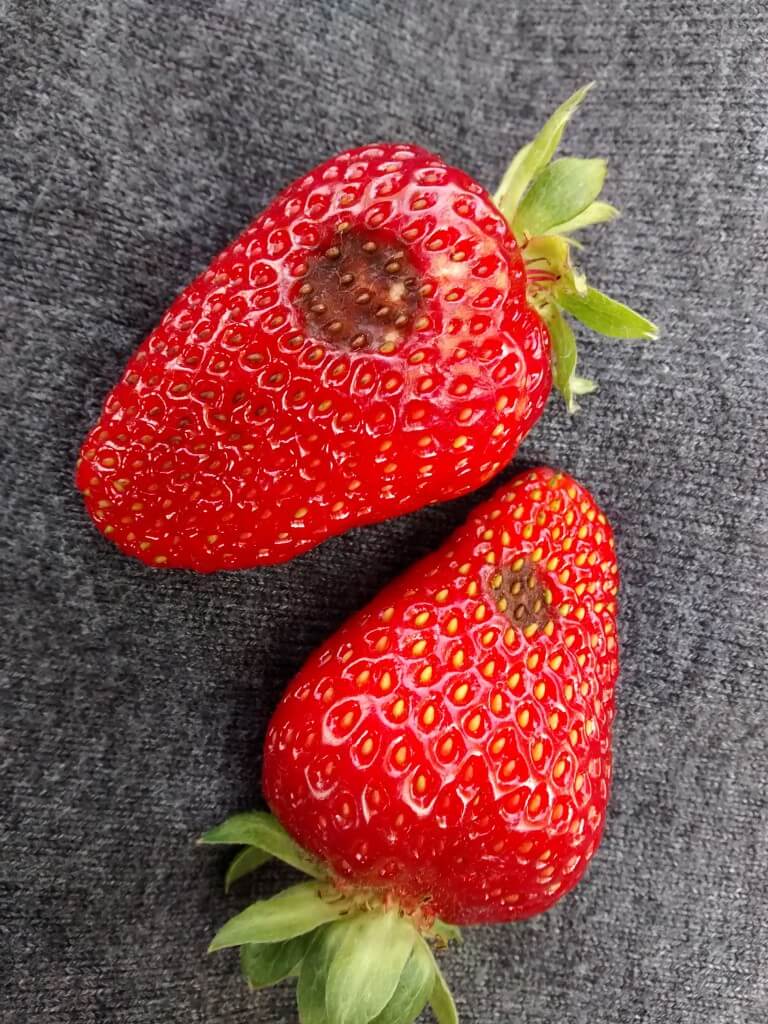
Strawberry anthracnose. Photo by Pam Fisher, former berry specialist with OMAFRA. Most of the fungicides we apply in horticulture are protectants, not curatives. What that means is that the fungicide has to be in place before disease has a chance to take hold. Once it establishes a beachhead, you can typically only hold it at bay, not eradicate it. So, if you’re guilty of waiting too long between fungicide applications, the problems may have already begun. This is exacerbated when you don’t achieve the necessary spray coverage. Put the two together and mix in rainy and warm conditions and diseases like anthracnose can spread at alarming speed.
Method
I focus on the sprayer part of disease management, so I have to assume that inoculum is being controlled as much as possible (e.g. culling infected plants, drip irrigation, etc.). I asked the grower about his sprayer and his spraying schedule. He admitted to pushing the limits between fungicide applications, and being uncertain about the spray coverage he was achieving with his conventional flat fan nozzles.

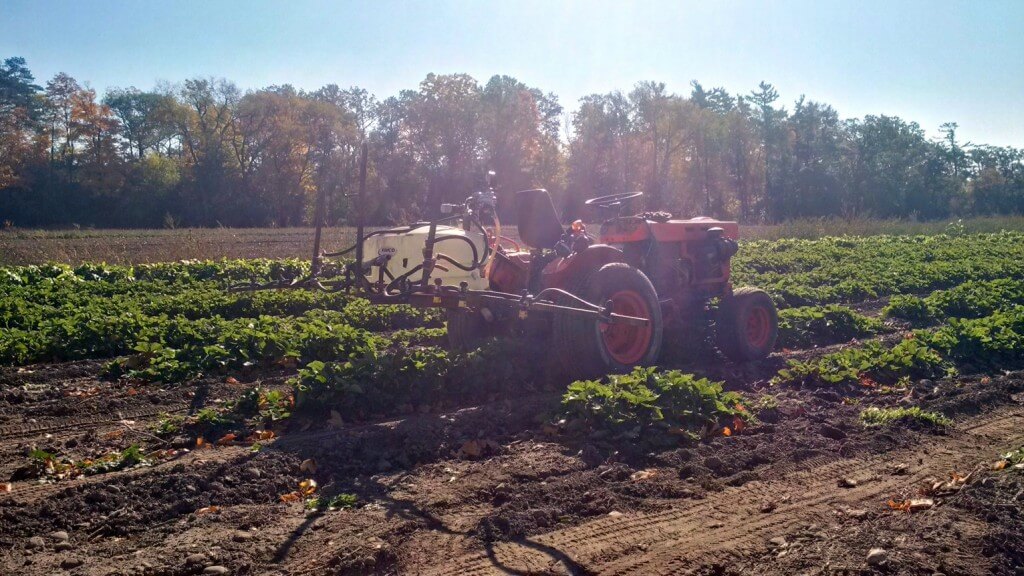
Strawberry Sprayer In cases like this I try to find gentle ways of introducing the idea of using more water, increasing the frequency of applications, or buying new nozzles, because there is time and expense involved and many growers don’t want to hear that. However, when I started my soft sell routine, he looked me straight in the eye and said he’d lost tens of thousands of dollars in revenue so a few nozzles or a couple more applications were not a pressing concern. There’s a point in any endeavour when you’ve committed so much time and money that you’ll do pretty much anything to see it come to fruition (pun intended). He was willing to do whatever it took. This was my kind of guy.
So, in preparation for next year, we diagnosed spray coverage from five different sprayer set ups. Let me point out, as I always do, that spray coverage analysis does not necessarily extend to control. They correlate well, but if you aren’t using the right product or your timing is off, even the best coverage won’t help you. Caveats aside, here’s what we tested:
Setup1:
Broadcast application using a horizontal boom with TeeJet Twinjet 8006’s at 8.3 bar (120 psi) on 50 cm (20 in) centres. We calculated a nozzle rate of 3.9 L/min (1.03 gpm), so at 5.0 km/h (3.1 mph) that’s 923 L/ha (98.7 g/ac).
Setup 2:
Banded application on a horizontal boom equipped with a row kits suspending three TeeJet XR 8002’s at 8.3 bar (120 psi). We angled the two side nozzles so the fans were not perpendicular or parallel with ground. This kept more spray on the raised row and out of the alleys. The swath covered 50 cm (18 in) and we calculated a nozzle rate of 1.29 L/min (0.34 gpm), so at 5.0 km/h (3.1 mph) that’s 1,016 L/ha (108.6 g/ac).
Setup 3:
Banded application on a horizontal boom equipped with a row kits suspending three TeeJet XR 8002’s at 6.2 bar (90 psi). We angled the two side nozzles so the fans were not perpendicular or parallel with ground. This kept more spray on the raised row and out of the alleys. The swath covered 50 cm (18 in) and we calculated a nozzle rate of 1.14 L/min (0.3 gpm), so at 5.0 km/h (3.1 mph) that’s 896 L/ha (95.8 g/ac).
Setup 4:
Broadcast application using a horizontal boom with TeeJet Twinjet 8004’s at 6.2 bar (90 psi) on 38 cm (15 in) centres. We calculated a nozzle rate of 2.27 L/min (0.6 gpm) so at 5.0 km/h (3.1 mph) that’s 717 L/ha (76.5 g/ac).
Set up 5:
Broadcast application using a horizontal boom with TeeJet Twinjet 8006’s at 6.2 bar (90 psi) on 38 cm (15 in) centres. We calculated a nozzle rate of 3.4 L/min (0.9 gpm) so at 5.0 km/h (3.1 mph) that’s 1,076 L/ha (115 g/ac).
Protocol and Conditions
It was late September, so the weather was a cool 8 °C, humidity was low and winds averaged 5 to 15 km/h. We timed our passes to correspond with lighter wind wherever possible. Three sets of water-sensitive paper were placed in a single row, but only one pass was made per sprayer setup. One paper was placed at the top of the canopy which is always very easy to hit, so we oriented it sensitive-face-down. The second paper was placed midway down the canopy, oriented facing up. The final paper was also oriented facing up, but placed at the very bottom of the canopy, more or less on the ground. Collectively, we spanned the depth of the canopy.
Following each application, papers were collected for digital analysis using “DepositScan” which determines the percent of the paper covered with spray, and the droplet density. Both of these factors contribute to overall coverage. This wasn’t intended to be a rigorous experiment, so the means are presented here with standard error for the sake of comparison. There was no statistical analysis. In the case of papers located face-down, when only trace amounts of spray were discernible they were assigned a percent coverage of 1% and droplet density of 25 droplets/cm2.
Results
A few observations before we get to the results. Research has demonstrated that row kits and higher volumes improve spray coverage, and that’s why we tried banding the applications using row kits in Setups 2 and 3. However, this grower didn’t use GPS to plant his rows, and while they weren’t too crooked, they made it challenging to apply in a band. Further, there is some concern that a banded application would miss any inoculum in the alleys. These are important points to factor in when considering methods to control disease.
The keen reader might notice we sprayed using pressures that exceed the manufacturer’s recommendations. In fact, none of these tips were rated over 60 psi and I used a formula to calculate their output at our high pressures. I have been heard to say (many times) never to exceed the manufacturer’s rates because it makes a mess out of the spray quality: droplets get much finer and pressure does not cause finer drops to penetrate a dense canopy. Better to switch to larger nozzles and stay within the pressures indicated on the manufacturer’s rate tables. I maintain that assertion. However, the grower was assured by fellow growers and custom applicators that this was the way to go and he wanted to try it. So, that’s where Setups 1, 4 and 5 came from.
Be aware that a small sprayer like the one in this study needs considerable pump capacity to support such high pressure and flow to the boom and maintain effective agitation. For more information on pumps, check out this article.
The following table expresses the coverage obtained by setup:
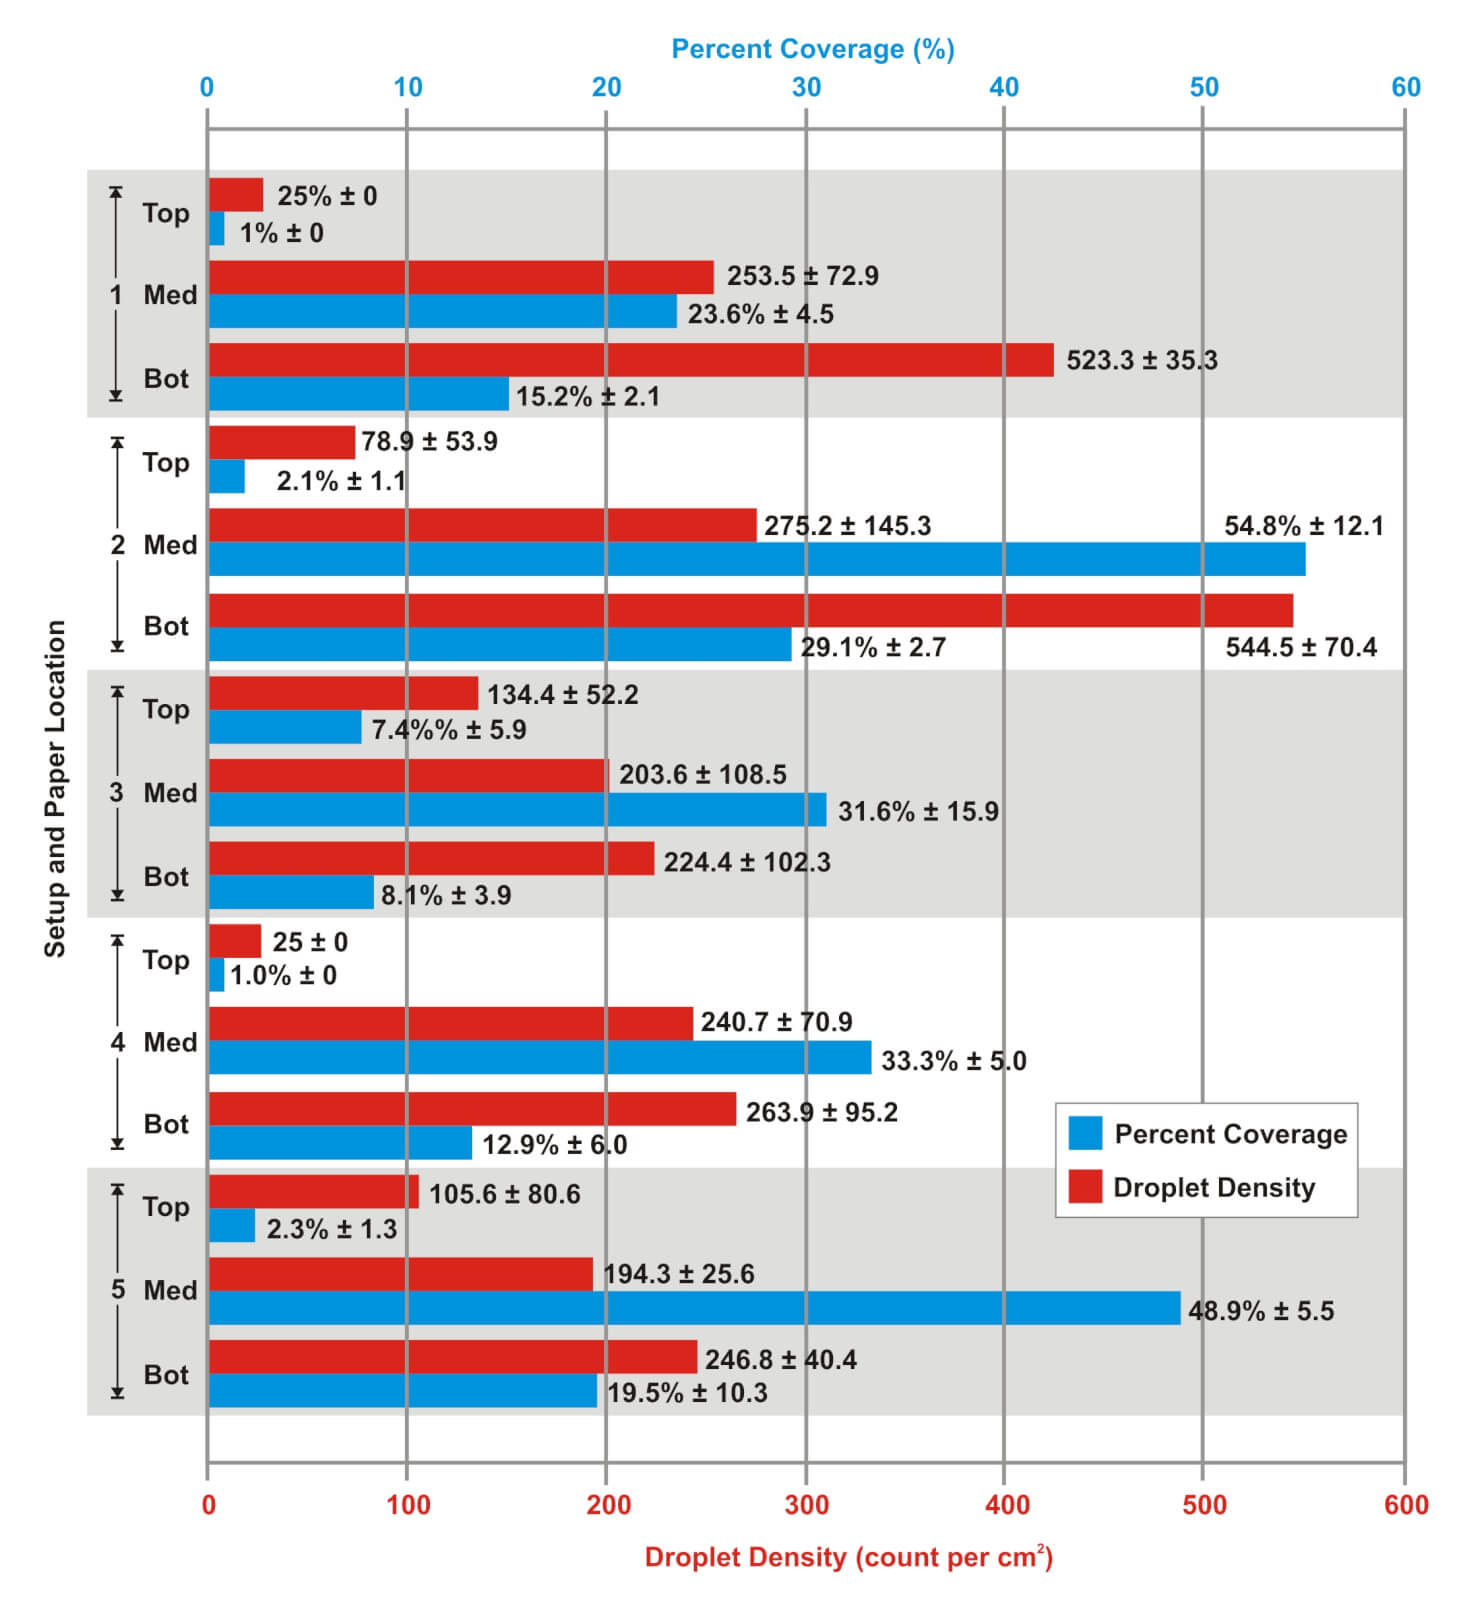
Set up Paper Position Mean % Coverage (±SE) Mean Deposits/cm2 (±SE) Setup 1 – Broadcast XR 8006’s on 20” centres at 120 psi for 98.7 gpa Top 1.0 ± 0 25.0 ± 0 Middle 23.6 ± 4.5 253.5 ± 72.9 Bottom 15.2 ± 2.1 423.2 ± 35.3 Setup 2 – Three banded XR 8002’s at 120 psi for 108.6 gpa Top 2.1 ± 1.1 78.9 ± 53.9 Middle 54.8 ± 12.1 275.2 ± 145.3 Bottom 29.1 ± 2.7 544.5 ± 70.4 Setup 3 – Three banded XR 8002’s at 90 psi for 95.8 gpa Top 7.4 ± 5.9 134.4 ± 52.2 Middle 31.6 ± 15.9 203.6 ± 108.5 Bottom 8.1 ± 3.9 224.4 ± 102.3 Setup 4 – Broadcast Twinjet 8004’s on 15” centres at 90 psi for 76.5 gpa Top 1.0 ± 0 25.0 ± 0 Middle 33.3 ± 5.0 240.7 ± 70.9 Bottom 12.9 ± 6.0 263.9 ± 95.2 Setup 5 – Broadcast Twinjet 8006’s on 15” centres at 90 psi for 115 gpa Top 2.3 ± 1.3 105.6 ± 80.6 Middle 48.9 ± 5.5 194.3 ± 25.6 Bottom 19.5 ± 10.3 246.8 ± 40.4 The results may be easier to compare and contrast in the following graph.

Strawberry coverage results for all five setups. Observations
According to the results, Setup 2 appeared to provide the best overall coverage. This is no surprise given that it was the second highest volume and employed a row kit. This corresponds with findings that have been published elsewhere. However, the excessively high pressure did create a lot of drift and the row kit didn’t always line up with the planted row. Further still, there’s the potential for missing anything that might harbour inoculum in the alleys, like runners. This setup wasn’t appropriate for this particular situation.
The second-best overall coverage was obtained from Setup 5. This represented the highest volume, and a preferably lower pressure on twinjets, which may have allowed the spray to penetrate the canopy from multiple angles. This broadcast application is more reliable for hitting meandering rows and covers the alleys as well. So, the grower plans to employ this setup for the 2016 season, spraying at shorter intervals and confirming his coverage with water-sensitive paper. Let’s hope it works out.
End-of-Season Update
The grower that volunteered his time to this study has reported that his strawberries at the end of the 2016 season were absolutely beautiful. Granted, it is always difficult to draw a direct correlation between sprayer calibration and control. For example, 2016 was a very dry growing season and disease pressure was lower than in 2015. Nevertheless, spray coverage plays an important role in crop protection and our work to improve sprayer performance definitely played it’s part. His success is great news!

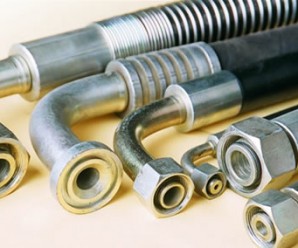
Hydraulic Fittings: A Galling Metallurgical State of Affairs
So it’s been a long spraying season and as you perform your annual maintenance you grudgingly admit that the hoses have given their all. Before you run out to get more of the same, give some thought to the hydraulic fittings (i.e. hose adaptors and couplers). Many feel that stainless steel (SS) is the best choice for hydraulic fittings: It must be, because it’s certainly the shiniest and most expensive choice! But before you opt for stainless, here are a few things you should know.
SS requires surface oxidization to resist corrosion. Oxidation forms a protective barrier called a “passivation layer”, but it’s susceptible to mechanical damage. It can be penetrated as abrasive powders flow past. The layer will reform when it dries, only to be sanded off again during the next spray. The wear is on-going. If the newly-exposed SS remains submerged in a liquid, the passivation layer will not reform. Without it, SS surfaces corrode at a high rate, and in extreme cases SS will even corrode inside of itself and become a hollow shell.
When two pieces of stainless steel are forced together, the passivation layer gets scraped off, allowing parts to gall (or ‘weld’). In fact, any similar metals in physical contact will naturally gall to each other, but stainless steel is especially susceptible. When disassembled, the ‘welded’ material must be torn apart. This destructive galling can be reduced with lubrication during assembly and avoided altogether by mating dissimilar materials (e.g. bronze and stainless steel). Technically, mating different types of stainless steels (e.g. martensitic against austenitic) could work, but it is possible that two different alloys electrically connected in a humid environment may act as a voltaic pile and corrode even faster. This is probably a moot point because many do not have access to different SS alloys when choosing fittings.
Sometimes we see black or galvanized pipe fittings on sprayers, but I don’t recommend either. Galvanizing is only slightly better than black pipe and since the threads are cut after being galvanized the threads are essentially black pipe, anyway.
So what about plated steel fittings? They’re available with swivels and can seal on faces and seats (rather than on the thread – which is much easier to assemble and disassemble). They can be crimped onto the hoses, eliminating the need for hose clamps that fail or snag and cut the operator. (As a related aside, hydraulic hose is not really compatible with most spray products – the steel wire inside the rubber begins to corrode and unexpected failure is common. Even when spraying above 200 psi there are better high pressure-rated choices than hydraulic hose.) Mechanically, these fittings are a great option, but unfortunately the plating is designed for oil, not pesticide. Within a year they rust internally and seize up. To add insult to injury, the flaking rust is notorious for plugging nozzles.
A better choice is brass (or even bronze) fittings (e.g. pipe, SAE 45° and hose barb). Just like the crimped plated steel fittings, brass SAE 45° fittings can swivel and seal on seats and they are easily assembled and disassembled over many seasons. Brass fittings are more costly than black or galvanized pipe but cost less than hydraulic or SS fittings. Conveniently, they’re available at most hardware stores.
While brass may be the best metal material for the sprayer fittings, I feel that plastic is the most economical and in many applications is superior to metal. But, that’s a topic for a follow-up article. So, before you spring for SS hydraulic fittings, consider cheaper and more effective alternatives like brass or plastic. And, if only for the sake of your mechanic, please don’t over tighten fittings. It is unnecessary and causes endless damage and frustration.

Exploding Sprayer Myths (ep.3): Nozzle Pressure
Here’s the third in our series of short, educational and irreverent videos made with Real Agriculture.
We wanted to explain where pressure readings are taken on a sprayer and why it’s so important to know what pressure your nozzle is experiencing, rather than what the screens in your cab are telling you. Not only does pressure affect your application rate, but it affects your spray quality, which can be critical if your rate controller allows the pressure to drop below 30 psi.IT’S MY TURN TO DRIVE!