An airblast sprayer inspection is part of preventative maintenance. This daily activity identifies small problems before they become big ones. You can do it at the filling station, so it’s fairly convenient.
Don’t think of it as stealing time from your spray day… it’s part of your spray day. Don’t skip it. If time is tight there are many other ways to improve your work rate.
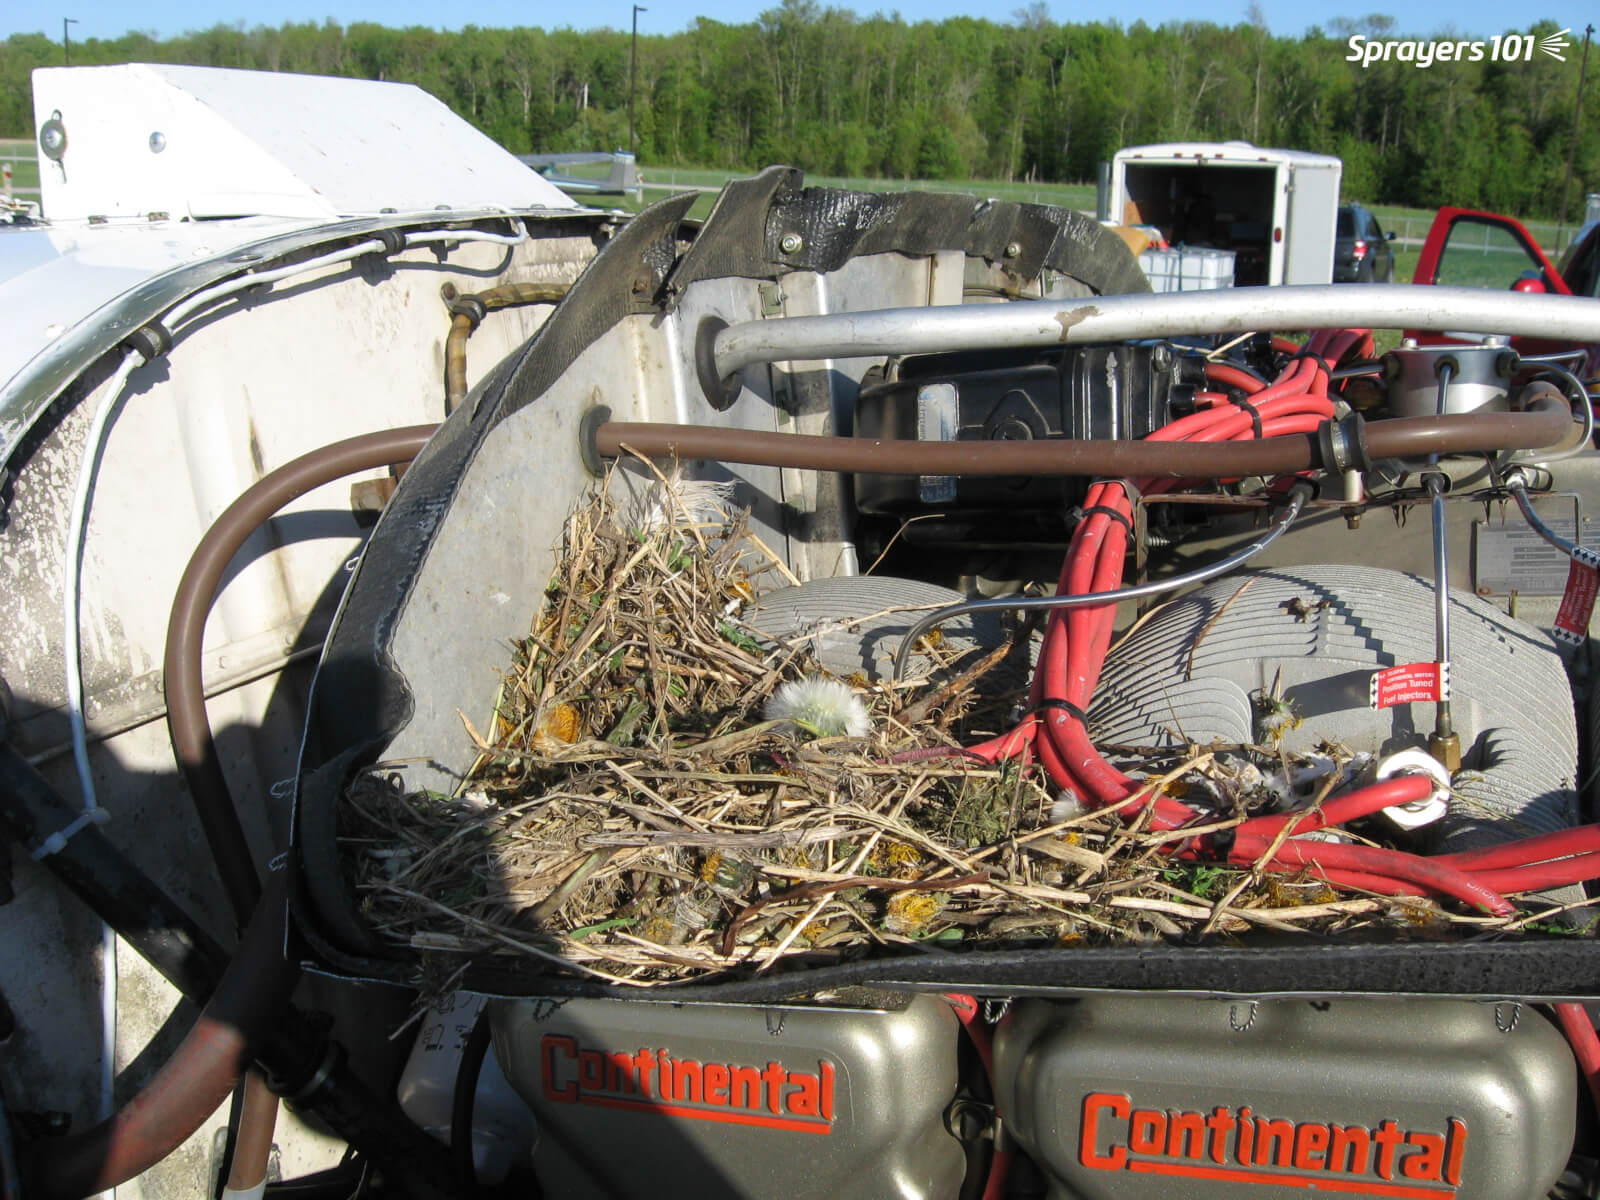
This spray plane was left on the runway with the engine exposed for less than four hours. When the owners returned they found a precocious bird had built a nest! Perform regular sprayer inspections – you never know what you’ll find. Photo Credit – S. Richard, New Brunswick.
Note: Always wear appropriate personal protective equipment (as indicated on the product label), including hearing protection.
Inspection steps
Follow this generic inspection process. If your sprayer manufacturer or manager advises additional steps, be sure to perform them.
Before filling
1. Work with a rinsed sprayer parked on level ground (e.g. the filling station).
2. Check lines/hoses and fittings for signs of wear or cracking. Leaks or bulging may only become apparent under pressure (see Test spray).
3. Filters, screens, strainers and nozzles are clean and unbroken. Leaks may only become apparent under pressure (see Test spray).
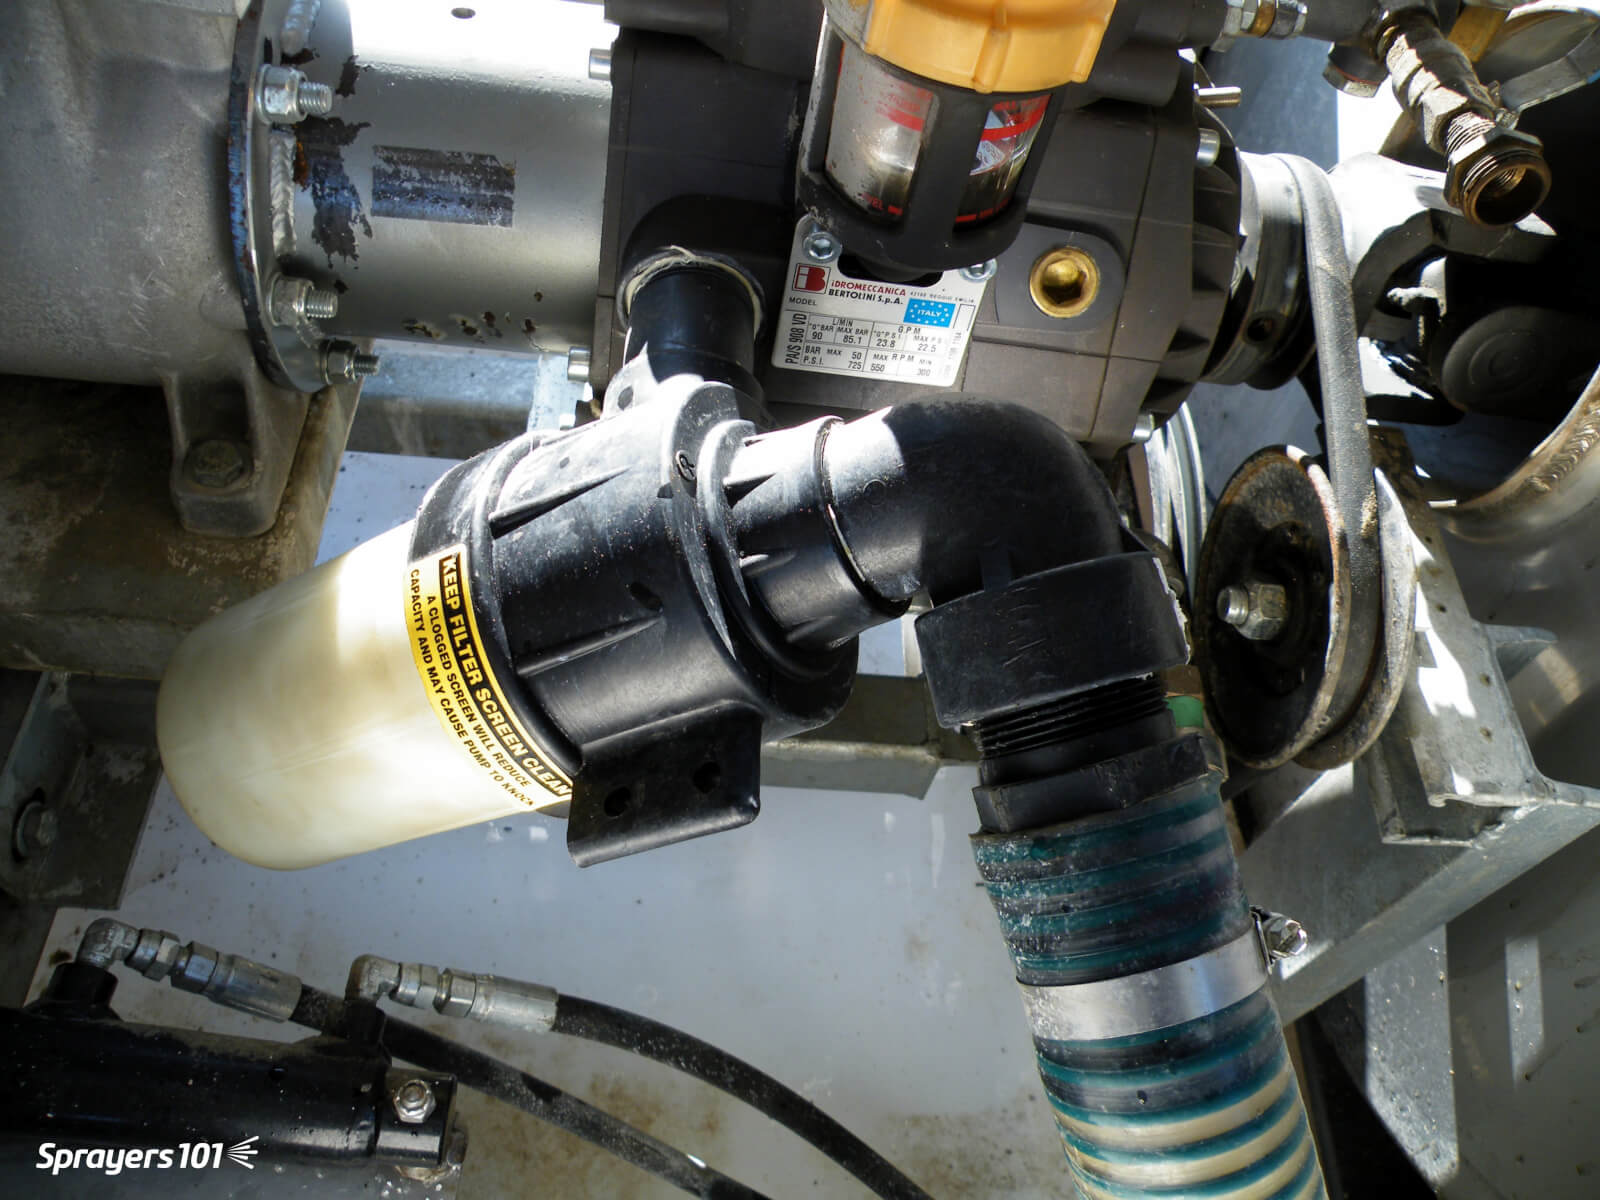
As a plastic suction filter ages, it can warp or become brittle. When this happens, the O-ring may no longer sit correctly and the unit may allow air to be drawn into the lines. They should be cleaned and inspected when the sprayer is rinsed.
4. Engage each nozzle shut-off valve or nozzle body flip position. They can seize or loosen with time.
Begin filling
5. Begin filling the sprayer 1/2 full with water.
6. For PTO-driven sprayers, confirm universal joint(s), sprayer-tractor hitch and all connections are clean, lubricated and secure.
7. Check that all guards (e.g. PTO shaft shield) are in place and intact.
8. Ensure fan blades are unbroken and scraped clean. Intake grill(s) must also be clean and unbroken.
9. When 1/2 full, stop filling and check tire pressure (tractor and sprayer).
Test spray
For multi-row sprayers, you may have to move the sprayer off the fill pad for the test spray; it’s easier with the air off, if possible. Perform the following steps:
10. Open the manifold valve to fill the lines and begin spraying clean water.
11. Ensure each nozzle sprays correctly. Get out of the cab to inspect, don’t just shoulder-check. This gives the opportunity to double-check for line-bulges and leaks.
12. Ensure the agitation / bypass system is functioning properly.
13. Check that the tank is secure on the chassis and both crack and leak-free.
Complete filling
Continue filling. Once the sprayer is back up to 1/2 full, mix products per usual. If your sprayer manufacturer advises contrary or additional steps for a sprayer inspection, be sure to perform them.
Sprayer inspections become repetitive, so it’s easy to accidentally miss things. Have you ever driven home while preoccupied, only to discover you don’t remember how you got there? Download our checklist to keep you engaged and to help ensure accuracy. Consider printing and laminating it for repeated use with a dry-erase marker.
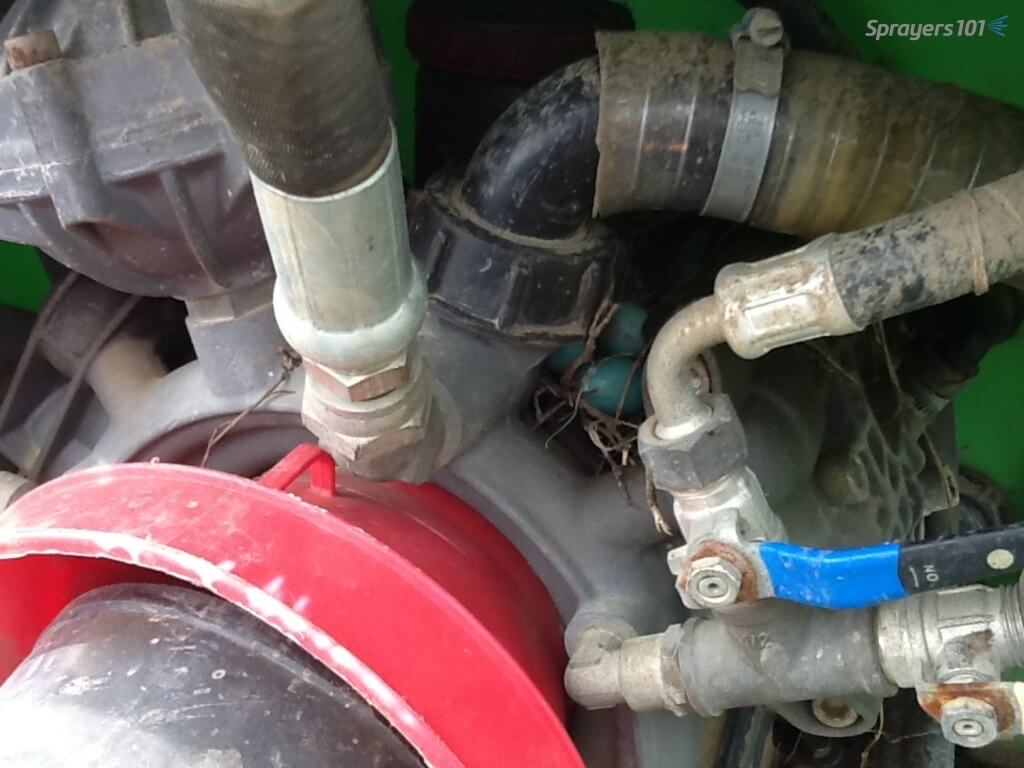
You never know what you’ll find during an inspection. I found a robin’s nest hidden on this vineyard sprayer’s pump.
Anyone that operates heavy machinery should perform a preventative maintenance inspection before using the equipment. It’s no different for airblast sprayer operators; embrace the daily walkaround.
“Sprayer calibration is an important part of any crop protection program.” Everyone says so, so it must be important. But what exactly are they asking you to do, and why?
When delivering presentations I often take the opportunity to ask audiences to define airblast sprayer calibration. Their responses cover a wide range of activities that can be rolled up into three related, but quite different, definitions:
Sprayer maintenance inspection
Adjusting sprayer configuration
Validating sprayer output
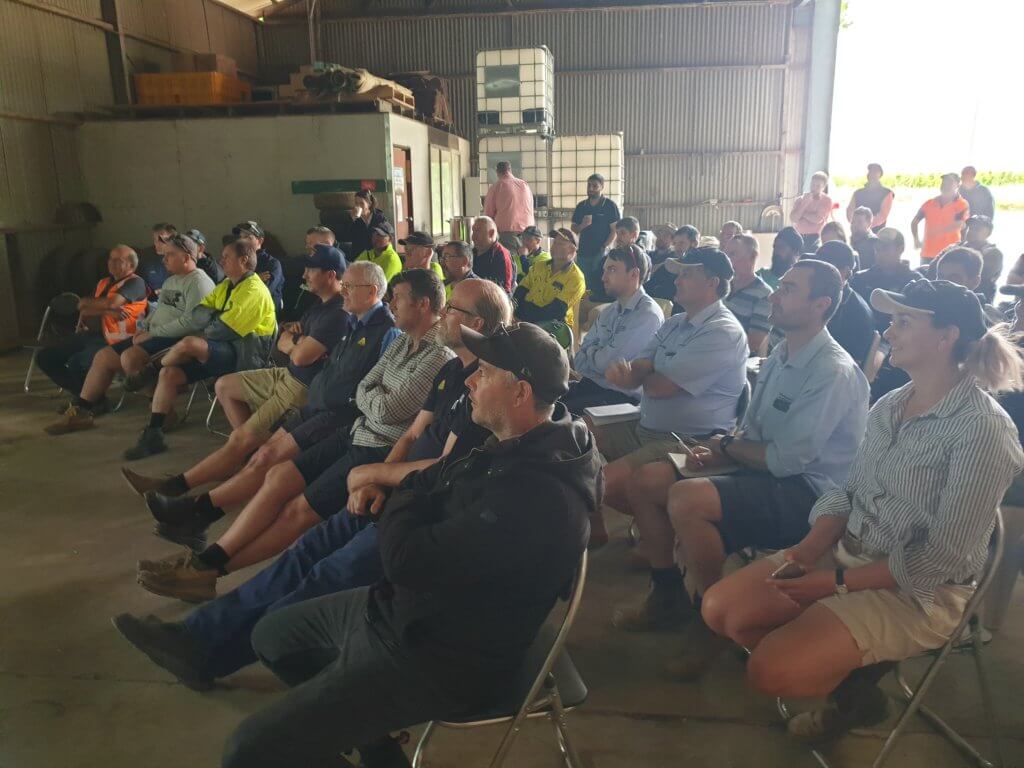
Ask a group of managers, sprayer operators, agrichemical reps, gov’t regulators and equipment manufacturers to define “calibration”. Be prepared for very different answers.
Traditionally, calibration refers to Number 3: Validating sprayer output, but all three are required to ensure a safe, effective and efficient application. Don’t panic – your workload didn’t just triple.
There is a time and a place for each of these activities. Some should be performed more often than others, but none of them are difficult. This is easier to accept when you realize that only a portion of the spray-day is actually spent spraying. Filling, travel time, cleaning and calibration-related activities are all essential components.
Let’s consider each activity.
Sprayer maintenance inspection
This is more maintenance than calibration (e.g. is it properly connected, is it worn out, is it plugged, is it leaking?). It should not be confused with spring start-up or winterization. For those lucky readers in temperate regions, “winterization” is preparing the sprayer for long-term storage post season… we just use antifreeze.
The maintenance inspection is the morning walk-around, no different from what any operator of heavy machinery must do before starting their work day. Learn more about sprayer inspection and download a helpful checklist in this article.
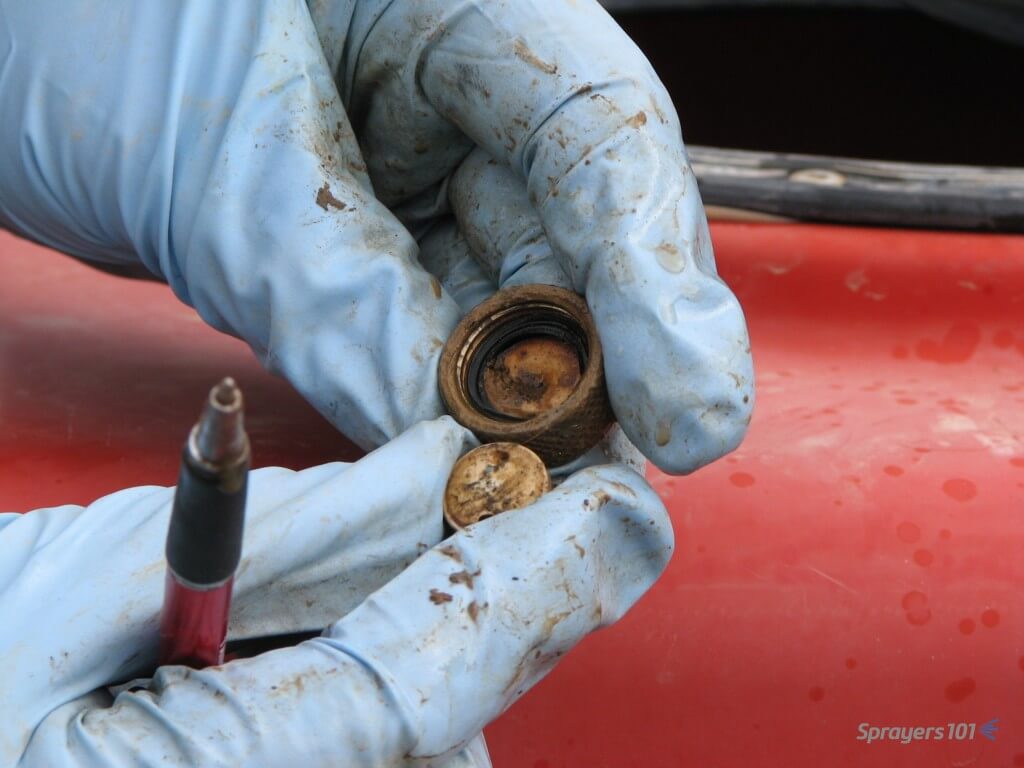
Here are some nasty disc & cores revealed during a calibration workshop. It certainly explained the poor performance the operator was complaining about. Is it time to replace yours? Photo credit – Dr. H. Zhu, Ohio.
Adjusting sprayer configuration
This is an ongoing process whereby an operator makes minor sprayer adjustments (e.g. pressure, travel speed, air settings) to reflect environmental conditions, the product’s mode of action and the nature of the target. Would you apply an insecticide to semi-dwarf pears in high wind using the same sprayer settings to apply a fungicide to nursery whips in high humidity? I hope not.
The process is more intensive at the beginning of the spray season and again around mid-season (e.g. petal fall or whenever the crop changes sufficiently to require a reassessment). It’s described step-by-step in many articles on this website as well as in Airblast101.
Yes, it requires an investment of time and effort, but the feedback makes subsequent adjustments faster, easier and more intuitive. There are strategies to reduce the number of adjustments required. Large operations can assign sprayers to blocks with similar crop architecture (e.g. one sprayer works large orchards, another sprayer works young or high-density orchards). Smaller operations can change the order in which crops are sprayed.
Validating sprayer output
This accounting activity ensures the sprayer is applying the intended rate at the intended speed. “Sprayer math” is really only theoretical; It helps the operator plan for how much pesticide and water must go in the tank and how long the job will require. How the sprayer actually performs may be a different story.
According to 1992’s “Tools for Agriculture” a horse can deliver 500 watts of power over 10 hours, but the camel can deliver 650 watts over six. And you thought establishing tractor speed was difficult. Photo Credit – R. Derksen, Ohio. Date and location of photograph is unknown.
Validating output, or calibrating, confirms that each nozzle delivers the desired rate and that the sprayer travels at the desired speed, so the crop receives the correct dose with no unexpected left-overs or shortages.
The operator should perform these activities at the beginning of the season and after any significant change to the sprayer set-up. Examples include new nozzles, new tractor tires, using a different tractor or after replacing a pump or any lines/hoses.
The validation (i.e. calibration) process is explained in our articles on testing airblast sprayer sprayer output and travel speed.
Conclusion
Be sure to perform all three calibration-related activities as required. This will keep records up-to-date, improve your spray coverage, and save you from unexpected sprayer malfunctions – almost all of which are preventable.
Here in Episode 10 of Exploding Sprayer Myths we’ve coaxed @Nozzle_Guy back into the orchard. This is part two of a two-part mini series on airblast calibration. In Episode 9 we talked about air settings and travel speed, and now we’re tackling nozzling and coverage.
But here’s the twist: Rather than use spray math to determine the required nozzles to achieve ideal coverage, we do it backwards. This process uses ideal coverage to determine nozzles and finishes with sprayer math.
Confused? Watch the video and this surprisingly simple and versatile approach will become clear. See if you catch the subtle visual joke about “coverage” realize that to pull this off, we had to film it backwards.
Special thanks to the @RealAgriculture team, the Simcoe Research Station and Don Murdoch.
Press play to listen to an audio version of this article
Agronomists help farmers manage their crop with advice on everything from crop cultivars to fertilizer rates to marketing. It’s challenging to be an expert on everything, but a few core competencies can go a long way to improving the level of service.
Agronomists are also responsible for communicating environmental
best practices. Along with fertilizer rates come messages of source, time, and
place, the 4R principles. The same is true for spraying, with messages of spray
drift, resistance management, and economic thresholds part of the consultation.
Let’s remember that we should not be indifferent to the potential consequences
of our recommendations.
Here are six skills that an agronomist should know about spray technology.
1. Recognizing major nozzle models and their spray quality and pressure requirements.
Application technologists are often asked to identify
nozzles and recommend spray pressures for clients. It’s a skill that anyone can
develop with just a bit of homework.
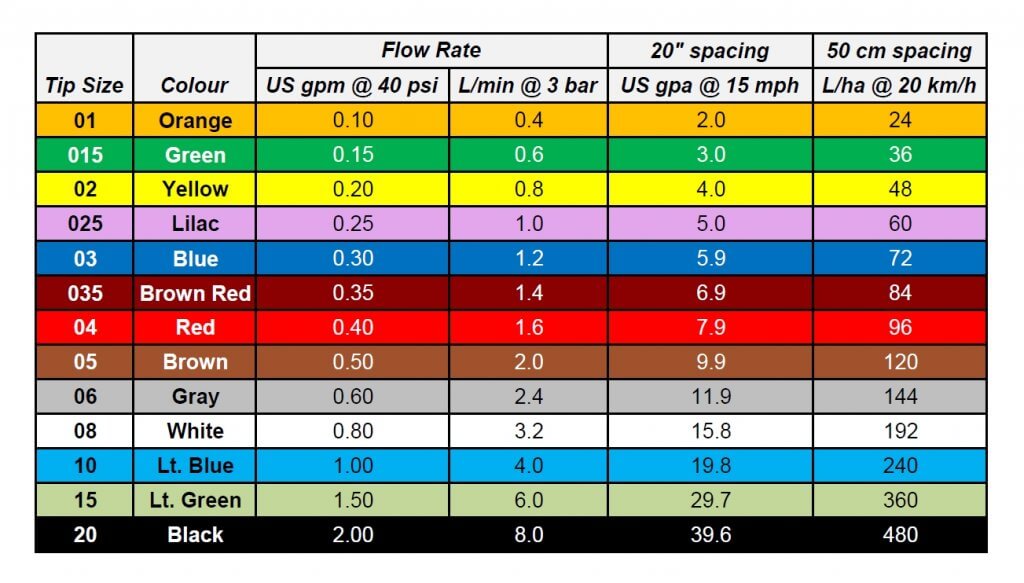
First, learn the colour-coding of nozzles – colours identify
flow rates and follow an international standard that all manufacturers have
adopted.
ISO Colour coding of major nozzle sizes, as well as application volumes at benchmark speeds.
Next, focus on the common nozzles on the major sprayers. John Deere sprayers will typically have three main air-induced nozzles, made for John Deere by Hypro, the Low-Drift Air (LDA), the Ultra Low-Drift (ULD), and the GuardianAIR Twin (GAT). Those with ExactApply, John Deere’s PWM system, will see the non air-induced 3D, the Guardian (LDX), and the Low-Drift Max (LDM). Recall that PWM flow control should not be used with air-induction tips.
Almost all Case sprayers have PWM, called AIM Command. Case uses Wilger ComboJet bodies and nozzles, with the ComboJet ER, SR, and MR most common, sometimes the DR or UR for dicamba.
New Holland/Miller with PWM (called IntelliSpray) are also likely to have these tips, but because these brands have TeeJet bodies on their booms, they require an adaptor for the proprietary ComboJet caps.
Otherwise, PWM units often use TeeJet’s TurboTeeJet (TT), Turbo
TwinJet (TTJ60), and Air-Induced TurboTwinJet (AITTJ60), the only air-induced
tip approved for PWM use by TeeJet.
Conventional spray systems (i.e., no PWM), will commonly
have (in alphabetical order) the Air Bubble Jet (ABJ, actually labelled BFS for
their manufacturer, Billericay Farm Systems), the Greenleaf AirMix (AM), the
Hypro GuardianAIR (GA), and the TeeJet AIXR.
Many sprayers will have a twin fan for fungicides, primarily for fusarium headblight (FHB) management. The Greenleaf Turbo Asymmetric Dual Fan (TADF), the Hypro GuardianAIR Twin (GAT), and the TeeJet AI3070 dominate, as well as a number of custom configurations using splitters and twincaps.
Where dicamba is applied on Xtend trait soybeans, some special nozzles may be used to meet label requirements for coarseness. The TeeJet TTI is very common, but Greenleaf developed a special set of tips called the TurboDrop XL-D and the TADF-D. Wilger’s version, mentioned earlier, is the UR. John Deere has just announced their new ULDM.
That covers 95% of what you’ll encounter in the North American market. In Europe, add some Lechler nozzles (ID3, IDTA, IDK, IDKT) to the mix. In Australia, Arag is gaining ground.
Identifying the nozzles on sight is the prerequisite to
finding out their average droplet size, called spray quality. Often, the
inscriptions are worn off, so visual recognition is required to get there.
We’ve published a visual identification guide with pictures of the major nozzles here.
Knowing the relative spray qualities produced by these
various nozzles will get you bonus points, but you’ll need to do some extra
research to get there.
2. Using a spray calibration chart
This skill will make you popular on the farm and at the office. A very frequent question is “what size nozzle do I need for this new sprayer?”. The best way to approach the answer is to ask several questions.
Does the sprayer have 20” nozzle spacing? (90% of sprayers do).
What is the desired water volume?
What is the expected average travel speed?
The first question guides you to the appropriate calibration chart, which can be downloaded here or can also be found in all sprayer catalogues. We explain how to use these charts here.
Calibration chart for 20: spacing, in US units.
If you don’t have a chart handy, use this shortcut: on a boom with 20” spacing, at 5 mph, every 0.1 US gpm capacity at 40 psi delivers 6 US gpa. So if you need to apply 12 gpa at 15 mph, an 06 size will get you there at 40 psi. That’s ballpark.
In metric, with 50 cm spacing, at 10 km/h every 400 mL/min (01 size) at 3 bar delivers about 50 L/ha. To deliver 200 L/ha at 20 km/h would require an 08 (white) tip.
Of course, if the tip is air-induced, make adjustments to speed or size to accommodate the higher pressure requirement of these types of nozzles.
Remember that spray pressure is key to performance, therefore the operator needs to drive at a speed, or use a volume, that results in the correct spray pressure.
3. Understanding Pulse Width Modulation
PWM technology has been on the North American and Australian market for two decades, but it remains poorly understood by those who do not use it. PWM will continue to gain popularity and has implications for nozzle selection and sizing.
Traditional rate control in the field involves the use of spray pressure to match liquid flow rates to travel speed. The rate controller knows the width of the boom (entered by the user), the travel speed (from gps), and the desired application volume (entered by the user). It does some math to identify the flow rate it needs, and compares that to the sprayer’s current flow meter reading. If the current flow is less than what’s needed, the sprayer increases pressure to increase flow. This happens continuously in the background.
When an operator speeds up, the pressure increases, and vice versa. As a result, the pressure (and therefore droplet size) will fluctuate with travel speed, and that can result in inconsistent spray patterns, coverage and drift.
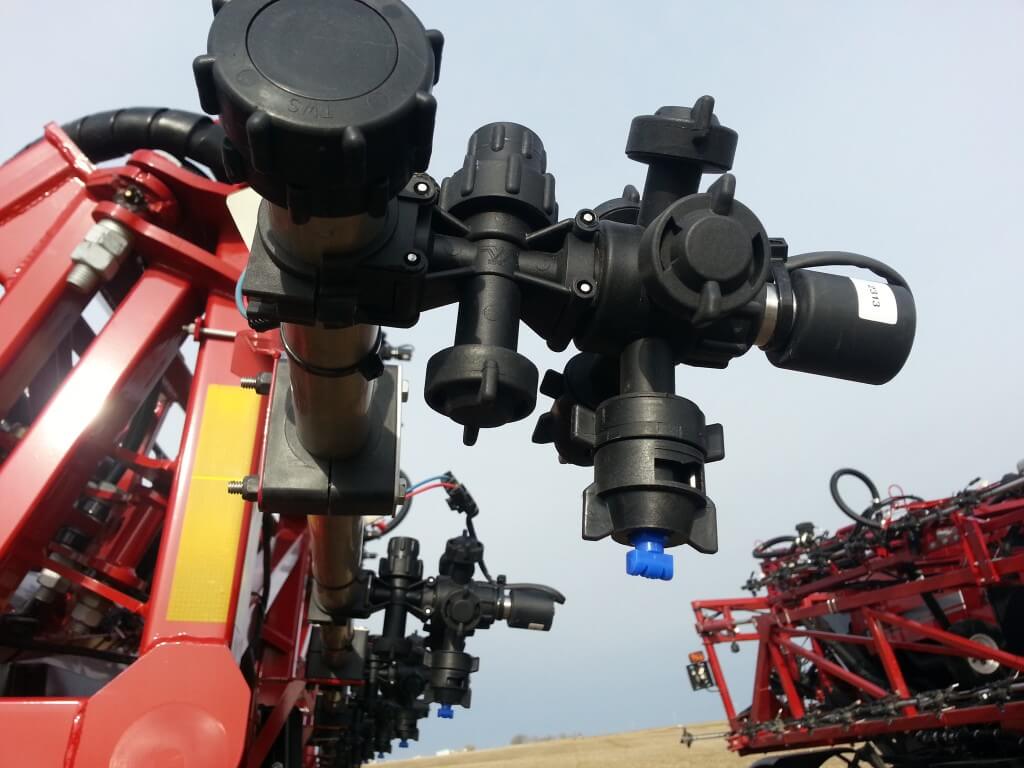
PWM involves the installation of electronic solenoid valves at each nozzle body. These valves pulse on and off at 10, 15, 50, or 100 Hz, depending on the manufacturer. Each pulse contains a brief, complete shutoff of the flow. The proportion of the time the valve is open during a pulse is called the Duty Cycle (DC), and this is proportional to the flow through the nozzle.
Capstan PWM solenoid on Case AIM Command
When the system requires more flow, it no longer increases pressure. Instead, it increases the DC. The advantage of this approach is that nozzle pressure can now stay constant, ensuring consistent coverage and drift.
There are other advantages of these systems. Each nozzle can be controlled independently, offering high resolution sectional control and turn compensation.
Nozzle selection and sizing are both affected by this technology. Nozzles need to be sized larger, with about 30 to 40% more flow capacity ideal. The DC will therefore run at 60 to 70%, optimal for speed fluctuations and turn compensation. Air-Induced tips are not usually recommended because their pattern deteriorates with pulsing.
We’ve written about PWM here, here and here to get you started.
4. Validating coverage of the target
A very useful indicator of the success of a spray operation is an assessment of “coverage”. This term refers to a qualitative combination of droplet density and percent area covered, and can be quickly assessed using water sensitive paper. We’ve explained the use of WSP here and here.
It’s very useful to have some of this paper on hand (available from any retailer that sells TeeJet or Hypro products, or on-line from Sprayer Parts Warehouse in Winnipeg or Nozzle Ninja in Stettler, AB). The coverage can be assessed in four different ways:
Water-sensitive paper being used to assess spray coverage.
using the “DropScope” scanner (gives a comprehensive assessment of coverage, density, size, plus image editing tools);
using a template of coverage examples;
using experience built on years of doing this.
Water-sensitive paper is also useful as a record, for
quality assurance. A spray application is conducted and part of the record is
an image of the deposit. Should a performance issue arise, this will help
settle it.
5. Understand basic sprayer plumbing
Often, a sprayer problem can be traced back to an issue with
its plumbing. There could be mysterious sources of contamination. The pump might
not be building pressure. The agitation isn’t running. Or you need to drain all
the remaining liquid from the tank.
Sprayer plumbing seems intimidating for a number of reasons.
It’s become complex on most modern sprayers. It’s hidden under the sprayer
belly. All the lines are the same black colour, so they’re hard to tell apart.
But it’s not as bad as it seems. Basic plumbing is the same
on all sprayers. The pump draws the spray mix from the bottom of the tank, the
sump. It may also have options to draw clean water from an external supply, or
from the clean water tank for wash-down.
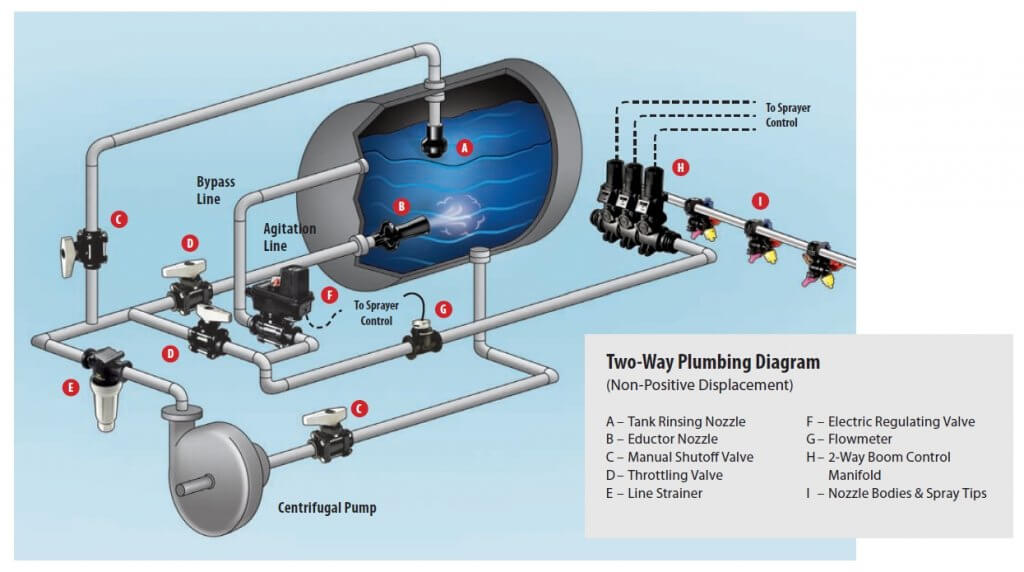
The pressurized supply goes to three places:
to the booms, via sectional valves;
back to the tank, via a control valve that can be used to adjust the spray pressure;
to the wash-down nozzles.
Typical sprayer plumbing for a centrifugal pump (Courtesy TeeJet).
When spraying, the less is returned to the tank, the higher the boom pressure. There may be several ways back to the tank, via agitation, via bypass (sparge), or via wash-down (used only when the pump draws water from the wash-down tank). Usually engineers can’t help themselves and introduce several what-if features that complicate the situation. But with a bit of know-how, and a flashlight, the plumbing system can be deciphered.
Pro tip: A centrifugal pump’s inlet (suction) is always the centre of the pump, its outlet (pressure) is at the periphery.
6. Matching a pesticide recommendation with application advice
It’s commonplace to recommend a specific crop protection product that matches the crop and pest situation. Recommending an ideal crop or pest stage improves the recommendation. But a truly successful outcome requires one additional step, advice on the application method. The customer may need to know if product performance depends on water volume and droplet size. Some products are more sensitive to this than others. Perhaps there is a specific nozzle type that may be helpful.
The classic example for application method is Fusarium headblight in wheat. The basics are straightforward. An agronomist recommends the fungicide, and guides the tight application window with a field visit to stage the crop, plus a look at the disease risk forecast map. But true application success requires an angled spray, with a coarser spray quality plus relatively low boom height to make it all worthwhile. That’s a full-featured recommendation.
Common herbicide applications also benefit from additional
information. Some tank mixes and weed spectra allow for coarser sprays than
others, and the ability to spray coarser means a wider application window and
therefore more accurate timing. Other tank mixes may pose a significant risk to
drift damage, requiring special measures to prevent a problem. Identifying
those opportunities adds value.
Water volume and spray quality recommendations for major herbicide mode of action groups.
Newer labels for dicamba (Xtendimax, Engenia, Fexapan) and 2,4-D
(Enlist Duo) have very specific instructions for drift prevention. This
information must be shared with customers to ensure that their drift liability
is covered.
Are there other skills that you feel agronomists should have?
Please share them with us by contacting us at the bottom of this page.
Back in 2011 we toured a few vegetable greenhouses in Southern Ontario. I wanted to learn more about how greenhouses used hydraulic sprayers (i.e. not misting or fogging systems) to apply pesticides to tomatoes, cucumbers and peppers. It was an eye-opening experience for me, because like every commodity group I’ve encountered, they had their own unique way of doing things.
Manually-towed sprayers
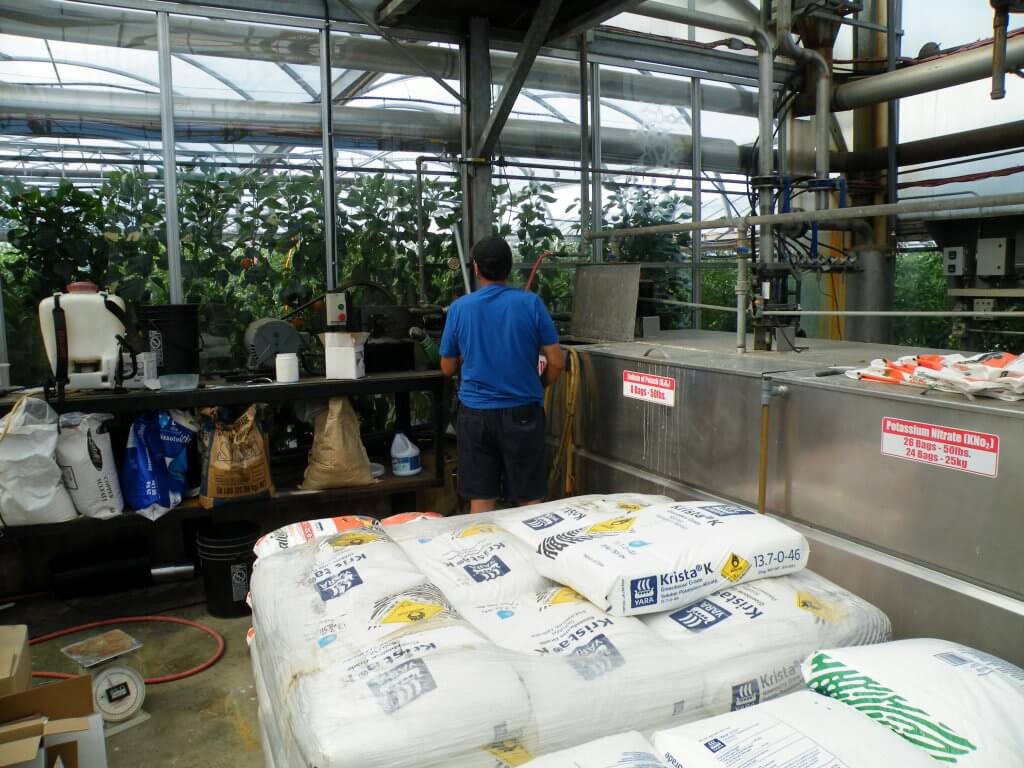
The first operation employed a system that I’ve come to learn is fairly common in greenhouses. There is a centralized tank and pump, located outside the growing area. Products are mixed and pumped from there.
Mixing area
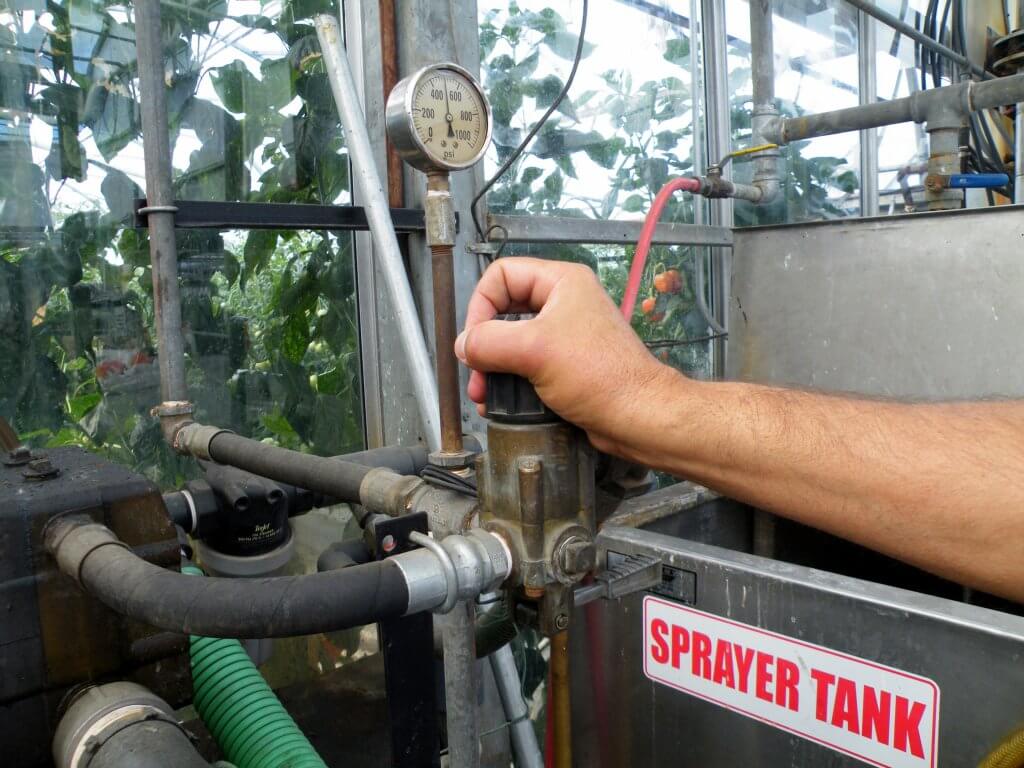
The pressure is set at the source so the spray mix is pumped to the rest of the greenhouse where the sprayer can be quick-connected to one of a number of outlets along a central line. I’ve been surprised in the past to see airblast sprayers set as high as 300 psi, so it really surprised me to see the pressure set to 500 psi! I was told this was necessary to counter the pressure-drop experienced at the far reaches of the greenhouse (see below).
Pressure regulator on a clearly-labeled tank.
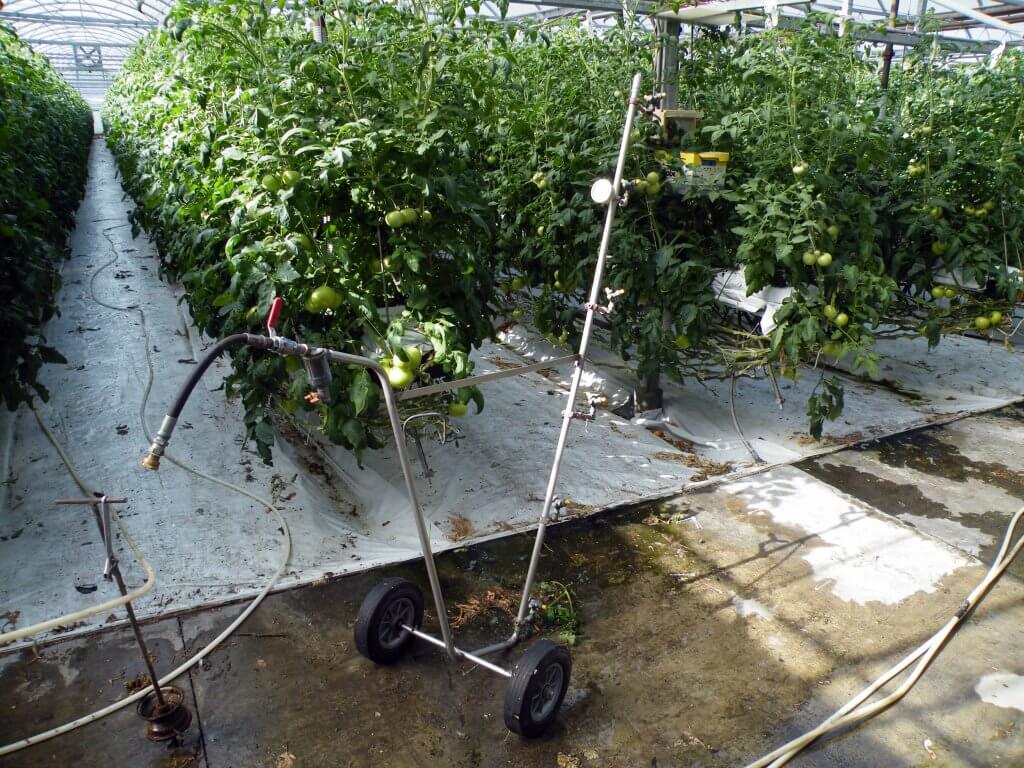
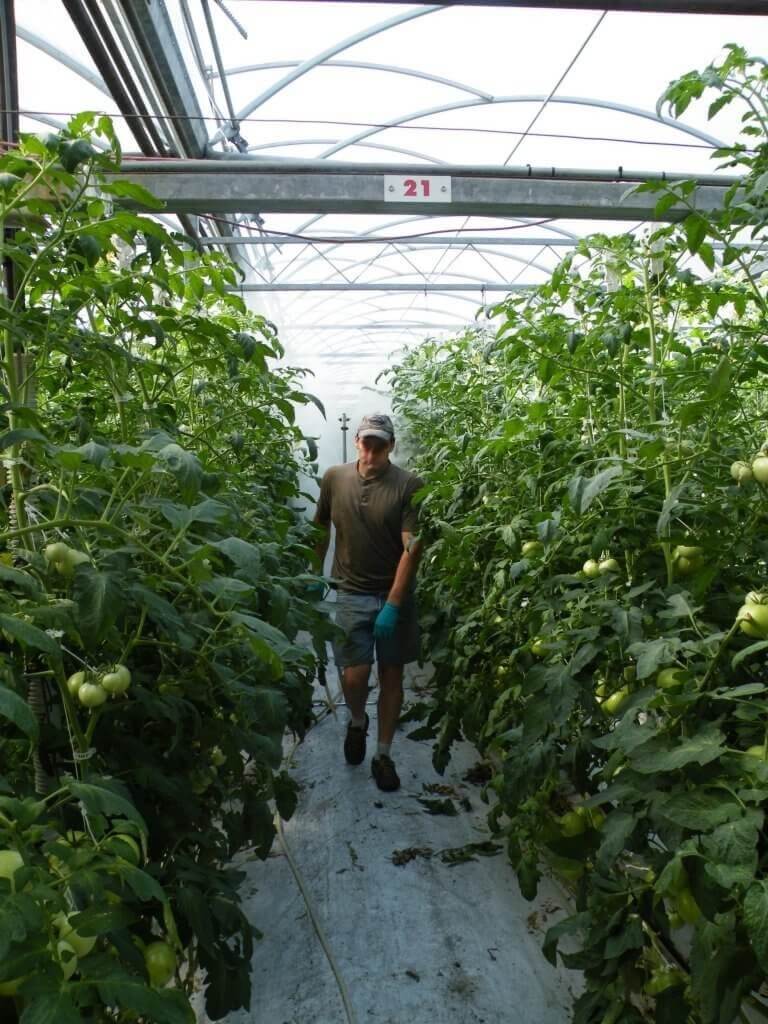
The sprayer itself was a manually-towed vertical boom and a coil of hose. The operator would wear appropriate personal-protective equipment and tow the sprayer between the rows at a constant speed. They may or may not have the ability to control the pressure with a regulator on the boom – the nozzle selection and travel speed dictate the rate.
Manually-towed vertical boom.Demonstrating how an operator spays greenhouse tomatoes with a towed vertical boom. This was just water, so no PPE required.
In this demo, the operator was using yellow TeeJet VisiFlo hollow cones (TX-VK3) which, despite the pressure-drop, were still operating at >300 psi and therefore beyond what the manufacturer lists in their rate charts. The resultant spray quality was Very Fine. We’ve said before that increasing the pressure does not increase the speed of tiny droplets appreciably, but that’s when we’re talking about going from, say, 60 to 90 psi. At pressures as high as 300 psi the droplets are moving fast enough to generate some air movement (i.e. making their own light wind) and there was a visible distortion of the outer potion of the crop canopy. The resultant coverage, even on the underside of a leaf (see below), was hard to fault.
Under-leaf coverage
However, as one would expect with Very Fine spray, a lot of the mist didn’t go anywhere. So while the coverage was very good, it was not terribly efficient. I was left thinking there might be an opportunity to find a savings in spray mix and reduce the potential for operator exposure by lowering the pressure. Unfortunately the regulator would not allow us to reduce the source pressure appreciably, so we weren’t able to experiment.
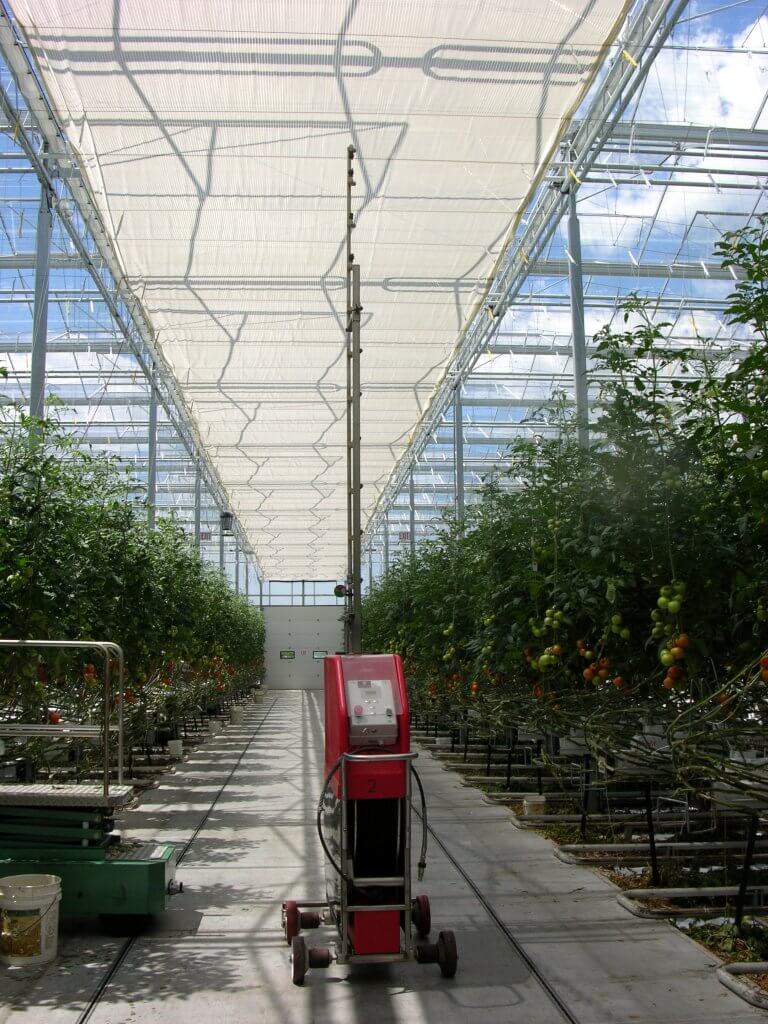
Automated sprayers
The next greenhouse we toured used a far more sophisticated method for applying pesticides. While they still used a centralized tank and pump, the sprayers were not hand-pulled trolleys; They were robots! Well, they were automated vertical booms that rode along the hot water pipes in the alleys between the crops. The operator would stand in the corridor and send one sprayer hurdling down the left-hand alley. The sprayer sprayed from only one side of the boom as it went. When it reached the end of the alley, the boom would rotate 180°. Just as it began the return trip, spraying the other side of the alley, the operator would send a second sprayer down the right-hand alley. As the second sprayer reached the end of it’s run, the operator would retrieve the first sprayer, and set it rocketing down the next left-hand alley. In that fashion, alternating back and forth, the greenhouse got sprayed.
Automated vertical boom sprayer
The automated sprayer was set to operate at ~350 psi, traveling at a rate of 75 meters per minute, spraying from a vertical boom equipped with five flat fan nozzles oriented vertically. Water sensitive paper (which has one face that goes from yellow to blue when water contacts it) was placed in three locations in the tomato canopy.
One was placed directly behind the fruit with the sensitive face square to the sprayer.
One was placed with the sensitive face facing the ground (this upside-down orientation exposed only the edge of the card to the sprayer).
The last was oriented with the sensitive face aimed into the direction of the sprayer’s travel, again only exposing the thin edge of the card to the sprayer.
Water-sensitive paper shielded by a fruit. Sprayed with flat fan nozzles.
Flat fan nozzles
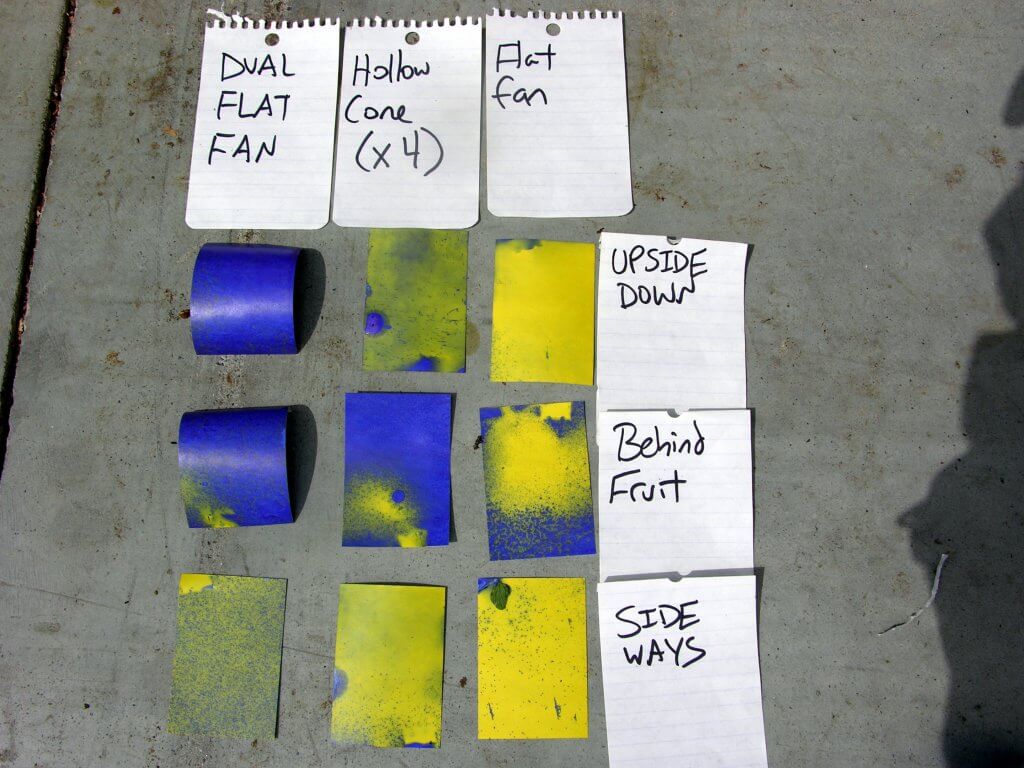
The sprayer was released to spray the 125 metre row using the flat fans. To the observer, it produced a cloud of spray that appeared to completely envelop the target row. Very little was seen to escape through the tomato canopy into the next row. When the cards were retrieved, however, the coverage was disappointing. See the right-hand column of papers entitled “Flat fan” in the image below. This goes to show that a spray cloud can fool you – always use water-sensitive paper to confirm spray coverage.
Coverage from three sets of nozzles. Papers oriented in three different ways in a tomato vine.
Hollow cone nozzles
Now, don’t look at the centre column of papers just yet (you just did, didn’t you?).
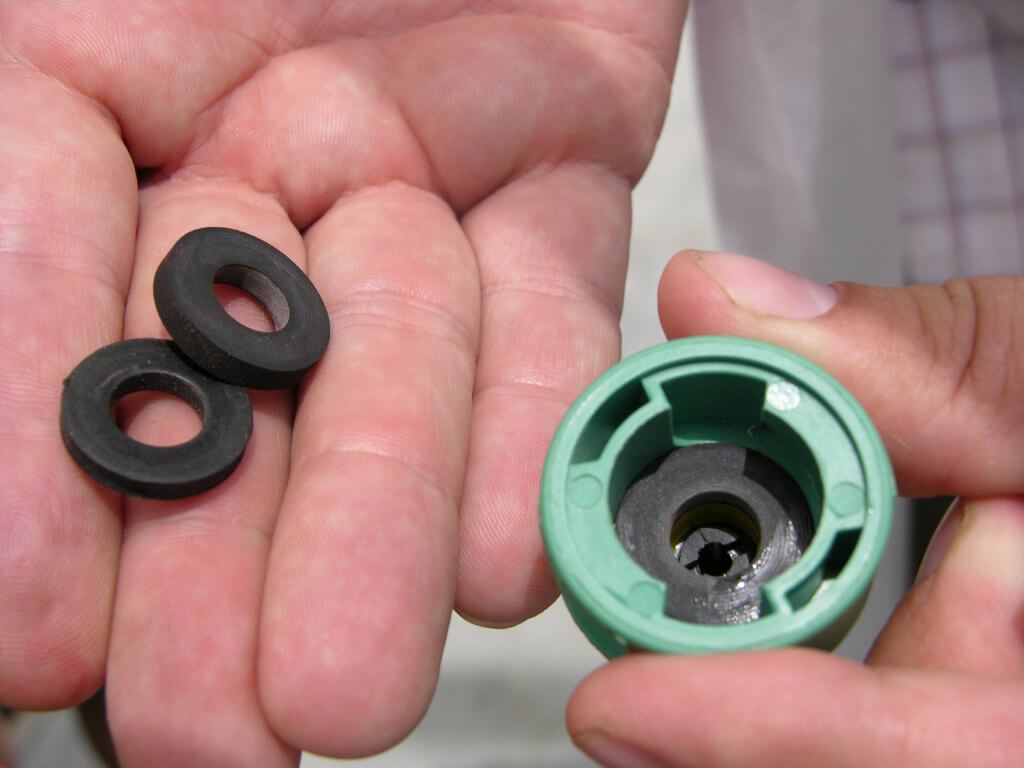
We chose to switch from the vertically-aligned flat fans to hollow cones. The concept was that the spray would be emitted from so many new angles that it would penetrate the canopy more effectively and hopefully cover more of the targets. I’ll note that we had to use extra gaskets to hold the nozzles firmly in place. The sprayer was re-nozzled, the paper targets replaced, and the sprayer sent back down the alley. Once again, the spray swath looked good to us, but when we retrieved the papers, there was almost no coverage; It was far worse than the flat fans.
Multiple gaskets were required to hold hollow cone nozzle tightly in place.
Finer droplets have very little inertia, so perhaps the high pressure made the droplets too fine for them to move very far. To test this, we reduced the pressure to 100 psi and re-sprayed the same cards, which were simply left in place. The resultant coverage was not improved.
We left the papers in place for a third pass. This time we thought perhaps the spray was still too fine because of the nozzle itself. We replaced the hollow cones with a different set of hollow cones that produced coarser droplets and the same cards were re-sprayed. Still no practicable improvement.
We were getting desperate, now. Cards were left for a fourth pass. It has been demonstrated that a slower travel speed can improve canopy penetration in orchards, berry crops and and grapes, so perhaps the sprayer was moving too quickly? The sprayer was slowed to 50 metres per minute and the cards sprayed for a fourth time. Now look at the centre column entitled “Hollow Cone (x4)” in the figure below. This coverage is the result of four passes with hollow cones. It was disappointing.
Note: a greenhouse is a very hot and humid place. Water-sensitive paper begins to discolour quickly, so don’t leave them out for longer than you have to. That’s why the top paper is cloudy-looking.
Coverage from three sets of nozzles. Papers oriented in three different ways in a tomato vine.
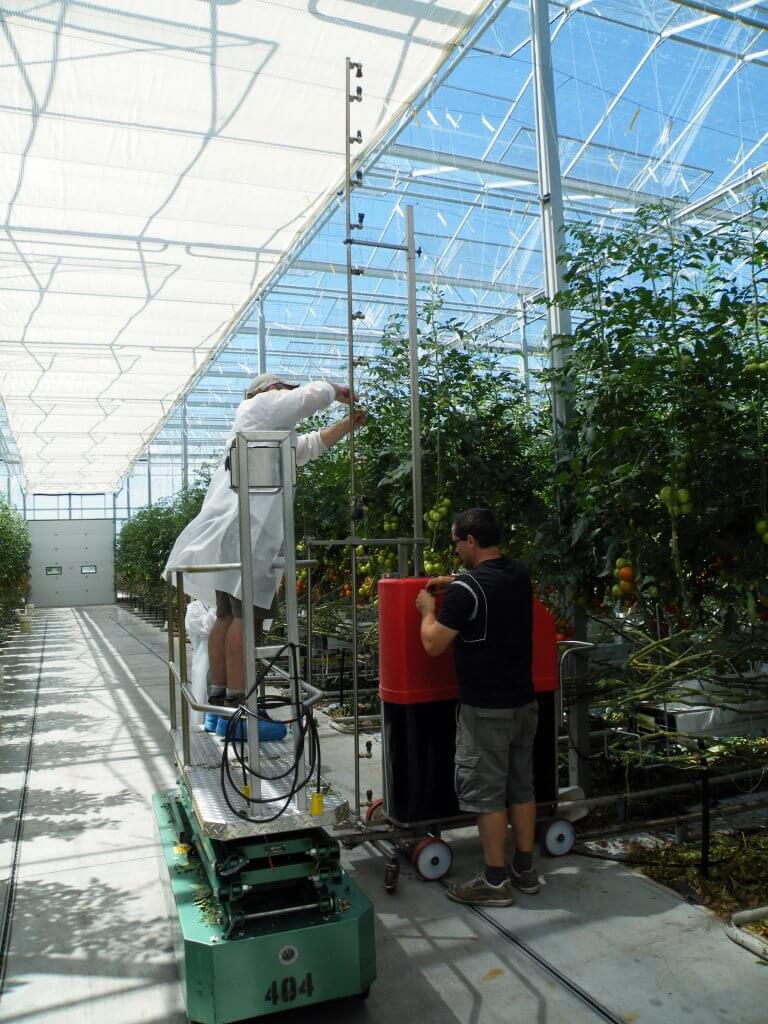
Twin-fan nozzles
Finally, and only because I had them with me, we decided to try dual flat fans (in this case, TeeJet DG TwinJets). Symmetrical and asymmetrical dual fans are often used to spray vertical targets in field crops (e.g. to control fusarium in wheat heads). We oriented the nozzles so they alternated 45° left, then 45° right. We also turned off every second nozzle. The idea was to prevent the fans from physically intersecting, but still create an overlapping swath. The paper targets were replaced and the sprayer was returned to its original settings (i.e. 350 psi and 75 m/sec). We managed to twist them into that orientation by using a cap with a circular opening and additional gaskets to hold the nozzle snugly. Plus, at 350 psi, we had to get the nozzles extra tight to prevent leaks.
Nozzling a vertical boom.
The result was spectacular. Here are the results once more (below). See the left-hand column entitled “Dual Flat Fan”. The cards received so much coverage that two became drenched and curled. Even the card with the worst coverage received more than enough. I will point out that this was achieved with about 2/3 the spray volume the operator typically used to spray with flat fans.
Coverage from three sets of nozzles. Papers oriented in three different ways in a tomato vine.
And, this is where the tour and our trials ended. The operator was happy with the improved coverage and so was I. I was sure to tell them that now that more spray was hitting the target, they should explore reducing the spray volume (either via reduced pressure or lower-rate nozzles) until all the papers looked more like the one in the bottom-left. I suggested a goal of about 85 drops per square centimetre (a benchmark for good coverage) rather than the drench/run-off we were currently getting. The spray mix would continue to be the same ratio of formulated product-to-carrier, but a judicious reduction in overall volume would result in reduced pesticide costs and reduced wastage as long as coverage was never compromised.
And now, a warning…
Unfortunately, as I heard two years later from a miffed agrichemical dealer, the operator did not follow through with the volume reduction. I was told the tomatoes began to exhibit symptoms that looked like blossom end-rot but he suspected it might be chemical burn. His hypothesis was that so much spray was getting to the tomatoes that it was accumulating at the bottom of the fruit during run-off, concentrating as the spray dried, and damaging the area. We may never know what really happened.
And so, it’s important to remember that whenever you adjust or calibrate your sprayer to improve spray coverage, you should reconsider how much spray you need to accomplish your goals. If you were getting poor control before the adjustment, improved coverage might help. If your level of control was already satisfactory, and your adjustments were intended to reduce wastage, consider reducing how much spray volume you use. This is called crop-adapted spraying.
Note: If you are concerned that changes to your spray practices might cause unwanted side effects, always perform trials on small test-plots and monitor the crop closely to ensure there are no negative impacts.
Take home
Greenhouse vegetable producers should consider using water-sensitive paper to test nozzle arrangement on their high volume sprayers. From our preliminary work here, dual flat fans at alternating angles might be worth exploring in hanging tomatoes. And, because it cannot be overstated, consider making changes in small test plots first and monitor the results closely.