Category: Spray Basics

  • Application Recordkeeping: Focus on Environmental Conditions

    Application Recordkeeping: Focus on Environmental Conditions

    Note: This article was written by Bob Wolf of Wolf Consulting and Research, and first appeared as an NDSU Extension Service publication. Bob has agreed to reproduce the article on our website.

    When applying crop protection products, a good steward is one who can identify and record the environmental factors that may negatively impact making an application; particularly, the possibility of spray drift.

    New label language states: “Avoiding spray drift at the application site is the responsibility of the applicator.” A wise sprayer operator must possess the ability to assess the environmental conditions at the field location to determine how best to spray the field, or maybe decide it would be best not to spray that field, or part of that field, at that time. Instruments that assess environmental conditions are available to assist applicators in making good decisions.

    Making the correct measurement is the critical first step. Record the information measured to document the application conditions. Quality records help mitigate against any misapplication allegations, such as a drift complaint. Many of the items listed below are based on past legal experiences with applications involving spray drift litigation.

    The following guidelines should help you measure and accurately record environmental conditions at the application site.

    1- Document any instrument used by recording the manufacturer and model number. Accurate portable weather instruments are recommended. Portable weather instruments are available that log and store data, and aid in auditing and recordkeeping. Some will have Bluetooth/wireless capabilities.

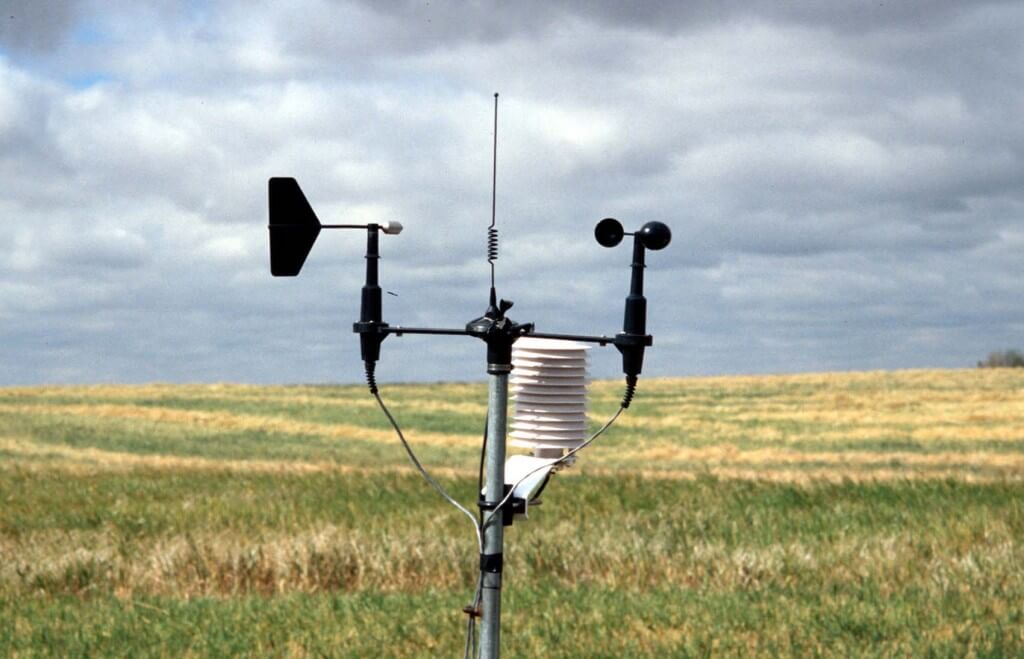
    2- Environmental measurements include wind speed and direction, temperature, and relative humidity.

    3- At a minimum, record data at the start and finish of the job. Consider more often as conditions change or for a job that lasts over a longer period. For example, make observations when tank refilling for larger fields. Time stamp all observations with a.m., p.m., or military time.

    4- Take meteorological readings as close to the application site as possible. Be advised that the weather data received via a smart phone or local weather station may not be accurate for the location being sprayed.

    Note the specific location where the measurement was made, such as GPS coordinates, field entry point, field location, etc. Check the label to see if it requires a specific observation location in relation to the treatment area.

    5- Make all measurements as close as possible to the nozzle release height (boom height) and in an area not protected from the wind by the spray machine or your body. For aerial applications, six feet is suggested when using a hand held instrument.

    6- Record wind speed averaged over a 1 to 2 minute time span. Note the time the observation was recorded. Most instruments give an average over a period of time. Make sure the instrument’s anemometer is facing directly into the wind.

    Do not record winds as variable or with a range i.e. 4 to 8 mph – an average gives a better indication of the transport energy. Light and variable winds, where directions may change several times over a short period, can be more problematic than higher speed winds in a sustained direction. Observe any label restrictions on wind speed.

    Wind direction requires a similar averaged measurement. Record direction in degrees magnetic from a compass (0-360°). The use of alphabetic characters, i.e., N, S, NW, to indicate wind direction is discouraged. The key for determining direction is to have an accurate assessment method: trees moving, dust, smoke, a ribbon on a short stake, etc. Face directly into the wind and record the direction from which the wind is coming. A ribbon on a stake with the ribbon blowing directly at your body is a simple fail safe approach. Movement of smoke, particularly from moving aircraft, or dust may help determine direction.

    7- Record temperature and humidity since they can be helpful in determining temperature inversion potential. It may be advisable to record both temperature and humidity well before and after the application for this purpose. In fact, recording a morning low and an afternoon high would be useful regarding determining the potential for an inversion. Take temperature measurements with the instrument out of direct sunlight. Shade the instrument with your body or spray equipment. This is especially critical if you are trying to assess temperature differentials for determining if an inversion is in place.

    8- Be alert to field level temperature inversion conditions which typically occur from late afternoon, can be sustained through the night, and into the next morning. Beware, inversions can start mid-afternoon. Observe conditions such as the presence of ground fog, smoke layers hanging parallel to the ground, dust hanging over the field/gravel road, heavy dew, frost, or intense odors (i.e., smells from manure or stagnant water from ponds are held close to the surface when inversion conditions exist). Inversions commonly occur with low (less than 3 mph) to no wind speeds. Spraying in calm air is not advised. If a mechanical smoker is used note wind direction and smoke dissipation with a time stamp.

    9- Note any variances due to terrain or vegetation differences, tree lines, buildings, etc.

    10- Initial or sign all recordings to indicate who made the observation(s).

  • The Agitation over Agitation

    The Agitation over Agitation

    Sprayers101 recently received a couple of seemingly unrelated questions about airblast sprayers:

    What are the advantages and disadvantages of mechanical versus hydraulic agitation? Why would someone want a stainless tank versus the cheaper poly or fiberglass options?

    Recognizing that each manufacturer has their own reasons for the features and materials used in their sprayers, we posed these questions to Mr. Kim Blagborne (formerly of Slimline Manufacturing). The following article was written from Kim’s response, and it turns out these two questions are very much related. Kim writes:

    This is a great debate among customers and manufacturers, and it’s difficult to stay neutral. Let’s consider the following:

    Hydraulic Agitation

    The flow required for hydraulic agitation requires about 30% of the pumps total capacity. This is very important because many sprayers cannot achieve, or maintain, this minimum requirement whilst spraying. This may be why it’s rare for a sales person to demonstrate agitation while the sprayer is spraying; quite often, the agitation slows or even stops. And, of course, because everyone gets wet.

    Let’s say an airblast sprayer has a pump with a manufacturer-listed capacity of 26 gallons per minute (gpm) (Click to download the spec sheet for the pump). The figure in that output chart is determined on a bench at 540 rpm and at 50 psi. However, when an operator uses that pump in the field, they run it at ~150 psi, and that brings the pump capacity down a bit to 25.5 gpm.

    Now we build in the line pressure drop associated with the sprayer’s plumbing. Effectively, another 8-10% of the pump’s output is lost to plumbing (a figure easily measured by collecting the total output capacity of the pump). Let’s say we are now down to a practical capacity of 23 gpm.

    If the operator’s crops are on 14 foot rows, it would be reasonable to spray 200 gpa at a travel speed of 3 mph at 150 psi. With both booms spraying that’s a required flow of 16.8 gpm.

    Remember, our hypothetical 26 gpm pump can only provide 23 gpm in the field. When we subtract the 16.8 gpm required for spraying, we’re left with 6.3 gpm excess capacity for agitation. But, we said we needed 30% of the pump’s 26 gpm capacity, and that comes out to 7.8 gpm. We’re short by 1.5 gpm, or stated differently, we’re about 20% short of what we need.

    Why don’t we see that deficit? Because the flow to the booms is prioritized, and therefore the sprayer output matches the calibration, so everything seems OK. But no one sees the reduced return flow through the regulator, and certainly no one peeks into the tank while spraying to see that the hydraulic agitation is greatly reduced.

    And so, while everything looked great during loading, the spray mix (especially SC and WDG formulations) may not stay suspended correctly during spraying. In extreme cases, that could lead to burning a crop (high concentration) at the start of a spray job, and reduced efficacy (low concentration) at the end. We’re quick to blame the chemical, but no one ever thinks to question hydraulic agitation.

    Let’s consider it from another angle: TeeJet suggests a model number 62905c-5 jet agitator for a sprayer with a 250 US gallon tank. To correctly agitate the contents of this tank, we will need 30 psi and 7.6 gpm (see the chart below).

    Unfortunately, there is no simple way for an operator to measure the agitation pressure or the flow, so it goes unchecked. The only way to determine if the flow demand is satisfied is to apply the generic rule of 30% of pump capacity and make an estimate. That’s pretty loose math since we’ve already established that the listed capacity may not reflect reality.

    Still another angle: Many operators now employ the Gear Up, Throttle Down (GUTD) approach to match their sprayer air settings to the crop canopy. However, when we reduce PTO input speed we also reduce pump capacity. Remember our piston diaphragm pump with the 26 gpm capacity at 540 rpm? We still need 16.8 gpm to spray, but reducing the rpm’s by 100, per GUTD, drops our pump output to only 23.16 gpm.

    23.16 minus 16.8 equals 6.36, and we needed 7.8 gpm to maintain sufficient hydraulic agitation. Oops.

    Mechanical Agitation and Tank Material

    There are definite advantages to mechanical agitation. It is not affected by the PTO speed because it is already excessive at 540 rpm. This means there is no pump capacity issue and it allows the operator to take advantage of GUTD.

    There are also a few disadvantages. Unlike a hydraulic system, mechanical agitation requires maintenance, such as regular (daily?) greasing. The packing where the the system inserts into the spray tank also requires occasional inspection and adjustment to prevent leaks.

    And of course there’s sticker shock. Many European manufacturers offer hydraulic agitation because it is ~$500.00 CAD less expensive. Further, mechanical agitation creates vibrational stress on tanks walls, which fiberglass or plastic tanks can’t handle for long. The solution is stainless tanks, which is a more expensive material. Further, stainless cannot be moulded around pumps and rotating parts, so more steel is required, adding to expense and weight.

    In my opinion, there is sufficient benefit to stainless to easily recover the investment. Beyond permitting mechanical agitation, there’s durability. We have stainless tanks built in 1948 that are still operating today, and we’ve never found a plastic or fiberglass tank that can claim that. There’s also sprayer sanitation. It has long been know that stainless cleans more easily and more reliably that plastic or fiberglass, especially as the tanks begin to age.

    Closing

    The decision to buy a sprayer with hydraulic agitation or mechanical agitation lies, ultimately, with the consumer. But be sure to look past the price tag, and under the hood. Ensure that you have sufficient agitation to properly suspend your tank mix, and give you the flexibility to Gear Up and Throttle Down to improve your spray coverage and efficacy.

  • Unit conversion tables

    Unit conversion tables

    Canada, like most of the world, is officially Metric. Our American friends are US Imperial. It sounds very cut and dried, doesn’t it?

    Anyone that’s tried to calibrate a sprayer in Canada quickly discovers that we’re really a horrible amalgam of the two systems. Our sprayers and nozzles often hail from the states, and that means US Imperial. Our pesticide labels hail from Health Canada’s Pest Management Regulatory Agency, and that means Metric

    And so, when speaking with applicators about their sprayer practices, we’re often treated to mind-rending sentences like:

    Well, I drive 12 mph, spraying about 150 L/ha and my pressure is about 40 psi. How many ml/min should my nozzles emit for a product that wants 6 oz/acre acid equivalent?

    Cue the quiet sobbing…

    Well, your smoking calculators are in for a treat! In a fit of frustration we created the ultimate set of conversion tables that should set you right for almost any Imperial/Metric emergency! Find one we missed -We DARE you! (update: Tip of the hat to D. Wiens of Saskatchewan, who found one! We added it.)

    Simply find your current units in the left-hand column. Then find the units you are converting to in the upper row. Now multiply by the conversion figure where they intersect in the table.

    Yes, they’re ugly, but they’re absolutely complete! If the tiny ones are too tiny to read, right click and download the image so you can zoom in. It’s a limitation of this website that we can’t make them larger.

  • Plumbing Projects That Make Spraying Easier and Safer

    Plumbing Projects That Make Spraying Easier and Safer

    Some of our biggest struggles in spraying involve the start and end of each spray day.

    When starting a new field after the sprayer is cleaned, we need to prime the boom. If it’s full of water, that water has to be purged and the question is always for how long and where to do this (pro tip at bottom of article).

    At the end of the day, we should ideally clean the sprayer. During that process, we may struggle with waste disposal, including large rinsate amounts, and course, the uncertainty of whether the job is actually done (since clean water looks exactly the same as contaminated water).

    If not cleaning the entire sprayer plumbing, we should at least rinse the boom, even if we’re returning to the same product the following day. It can prevent future problems.

    These tasks are complicated by the increasingly convoluted plumbing featured on modern sprayers. Ask someone to explain their sprayer’s plumbing system to you one day. It’s a long story! A bright spot is the well-engineered, compact, and accessible Agrifac system.

    Fortunately, virtually any sprayer can be modified to suit your needs. Let’s talk about a few ideas for a winter project:

    1. Boom flush. It’s good practice to flush clean water through your boom at the end of spraying even if the main tank remains full of product. Some sprayers have an air purge system to eliminate liquid from the plumbing and that is a great feature. A water flush should follow that purge so that any residual pesticide is diluted and removed before it can dry on and become hard to remove later.  First you’ll need a clean water tank on the sprayer (150 gal is enough). Second, plumb a feed so that this clean tank can be the sole source of the water supplied to the solution pump. Select this source, shut return lines down or off, and pump clean water through boom.  Sprayers that have an auto-rinse cycle will likely be able to draw clean water, but may not be able to push it to the boom, directing it to the wash-down nozzles instead. Check to see what’s possible, and make the changes you need.
    2. Clean water pump. Installing a second pump dedicated to the clean water tank has several advantages. We’ve talked about continuous rinsing before, here, and here, as a way to dilute the tank remainder faster. It requires installation of a second pump dedicated to clean water. Additionally, give this pump the option to deliver water to the boom, not just the wash-down nozzles. Now it can be used to rinse water through the boom. The main challenge is to obtain a pump capacity that can match the needs of the boom and/or the wash-down nozzles.
    3. Boom ends. We’ve mentioned this part of the boom many times. Boom ends must be flushed regularly to get rid of product and possibly debris that gets stuck there. A simple way to achieve this is to use the Express Nozzle Body End Caps from Hypro. These bleed air continuously, and also prevent accumulation of dead-end contamination. They do need to be flushed, and this can be done by pulling a plug or rotating the turret to an open (no nozzle ) position.
    1. Recirculating boom. This is a significant change, but worth considering. Conventional plumbed booms are separated into five to 13 sections. Each has two ends at which the spray stops and where air and contamination can accumulate (see point #3). Each section feed has a shutoff valve.  Once the spray mixture leaves the pump and bypass valve, it is committed to leaving the sprayer.  In a recirculating boom, the boom becomes a part of the tank and the liquid can return to the tank if desired. Spray is pressurized at one or both ends, and valve positions determine its flow. Sectional control is achieved with individual nozzle shutoff, air or electric.
      1. Three advantages:
        (a) the boom can be primed with new product without spraying. The surplus goes back to the tank.
        (b) the boom can be flushed with water without spraying while material is still in tank, and without spilling anything on the ground. Again, the surplus goes back to the tank.
        (c)  high resolution sectional control with individual nozzle shutoff is a byproduct of this design. Fast response, high res, saves money.
    2. Steel lines. Steel cleans easier than plastic, and this material makes a lot of sense for booms. But it also makes sense for the boom feeds, currently handled by black rubber hose.  This hose is a literal black box. We can’t see inside it, and we don’t know if and where potential contamination resides. It has considerable surface area. Consider replacing portions of your feed lines with steel. The boom is the obvious candidate. Aside from easier cleanout, it also helps with faster nozzle shutoff because it doesn’t expand with pressure.

    A word about dumping the tank on the ground. It’s a bad practice for many reasons. Let’s examine just one of those. When you spray a product at 10 gpa, you actually cover each square meter with about 10 mL, or 1/3 oz, of spray mix. When you flush your boom ends on the ground, you’re probably dropping 2 or 3 gallons in the same area. That’s 1000 times the label rate at each boom end, 10 to 26 times per boom. If you dump your tank remainder and all the hoses, say 20 or 30 gallons, that’s 10,000 times the label rate if it covers 1 sq meter. That’s leaching, runoff, residual potential, and not a good story.

    Many of the changes we outlined above help prevent that from being necessary.

    Pro Tip: To find out how much water your plumbing (from the pump to the boom ends) holds, do this: After cleaning with water and before spraying an EC formulation (white milky appearance in tank, some crop oils are ECs) reset your sprayed gallons on your rate controller. Start spraying and watch for the last nozzle on your furthest and longest section to spray white. Stop spraying and check your sprayed gallons. That’s your volume. No matter the size of nozzle or application volume, it stays constant. To be sure the boom is primed with a new mix, spray until those gallons are reached and you’re set.

  • Question of the Week: Fine Sprays for Fungicides?

    Question of the Week: Fine Sprays for Fungicides?

    The following question arrived from one of our prairie clients last week:

    “A retailer is promoting the use of hollow cone nozzles to be used on field sprayers (20” spacing) to apply fungicides which he claims out-perform any regular and twin fan tips. Claims:

    • create an extra fine droplet for maximum coverage on the canopy
    • use less water, less time spent filling
    • apply at 3.5 gpa
    • add vegetable oil to reduce drift

    “So his direction to a specific customer was to use the TEEJET CONEJET TXA8001VK nozzle at  80 psi – travelling at 10 – 12 mph to achieve a 3.4 gpa application rate with a ‘very fine’ droplet size.

    “What are your thoughts?”

    Here’s how I answered (edited for clarity):

    That recommendation sounds familiar – it originates from a consultant with experience in South America, where this idea is promoted to improve (aerial) spray productivity.

    I fundamentally disagree with his approach. Adopting and promoting it is not only illegal (contravenes every modern label’s water volume and spray quality requirements), it also puts a generation’s worth of stewardship efforts on drift management at risk.

    To be balanced, let’s explore the attractiveness of this approach. Finer sprays do provide superior coverage and save water. Every child knows this. Finer sprays also go places in the canopy where the coarser sprays can’t, for example very dense lentil canopies.

    Over the years, we’ve explored the performance of fine fungicide sprays in canola, pulses, and cereals in research trials with the U of S and AAFC. To our surprise, droplet size played only a small role in fungicide performance. Water volume was much more important. Droplet size management with pressure through a low-drift nozzle was enough to get the best disease control.

    The main drawbacks of very fine sprays are:

    1. The fine droplets evaporate to dryness very quickly, in seconds. As they shrink, their drift potential is increased even more, and once dry, the remaining particles work much less well. The proponent corrects for this by adding an oily adjuvant as an evaporation retardant. With oil, the fines remain liquid much longer. Although many products become more effective this way, they also become more phytotoxic and less safe for the applicator and bystander. Completely off label, completely risky for crop safety, unknown effects on MRLs, extremely unsafe for the environment and humans. Remember when people dissolved 2,4-D ester in diesel, back in the 40s and 50s and sprayed it with their brass 6501 tips? That’s what this is.
    2. Cone nozzles are designed for airblast sprayers and do not produce good pattern overlaps for boom sprayers. The proponent of this method actually recommends that the boom be raised to overcome the bad patterns and to (believe it or not) simulate aerial application. If this were done, the spray would be re-distributed by air-currents and come down wherever the wind blows it. Probably far away.  The concept of on-target, uniform application, the practice that makes product use acceptable, and the thing we try to achieve with flat fans at a low boom height, is completely lost.
    3. Producers will not have the support of pesticide manufacturers should a performance issue arise. Even worse, if regulators find out about this off-label practice, significant fines (fines for fines, get it?) can be charged under the Pest Control Products Act.
    4. Airborne spray drift with an air-induced spray like the AirMix, GuardianAir, AIXR and the like, applying 10 gpa, is about 1% of the applied amount, measured at 5 m downwind of the downwind edge of the swath in a 20 km/h wind. We’ve never measured hollow cone drift from a boom sprayer, but when we used a flat fan at 5 gpa, drift increased to about 8% of applied. I’d guess a high pressure hollow cone would easily double or triple that. Illegal and irresponsible.
    5. Travel and boom turbulence is a part of faster travel speeds. This would affect the finer droplets much more than the coarser ones, as we can imagine. It’s similar to drift. With a low-drift spray, the proportion of the total spray volume that is “fine”, say less than 150 microns, is about 5%. For a very fine hollow cone, it might by 50 to 75%. So a much greater proportion of the sprayed dosage would be susceptible to uncontrollable movement. This could be good, when turbulence redirects the spray to places that are unreachable by larger droplets. Or it could be bad, as turbulence pushes droplets away from an important target, creating a miss. On balance, bad. Very bad.

    These types of recommendations are concocted by people who want to tell a unique story that is popular with some. Their approach differentiates them from the rest of the crowd, an old and effective marketing trick. But these proponents do not have the best interests of the industry in mind.

    Our individual and collective agricultural practices must be respectful of others. Of safety. Of the law. Of the environment. We have lots of opportunities to make shortcuts…nobody’s watching most of the time. But that doesn’t make it right. It’s certainly not in ag’s long-term interest.

    When considering our agricultural practices, imagine describing them to a young non-farming person. Can you justify your actions? Do your practices make you proud? If not, you have work to do.

    Here’s a task: If your boom sprayer has nozzles that produce very fine sprays, take them off and throw them in the garbage. Might sound radical, but it’s the right thing to do.