Category: Coverage

Articles related to horizontal boom sprayer coverage

  • Air-Assisted Boom Sprayers

    Air-Assisted Boom Sprayers

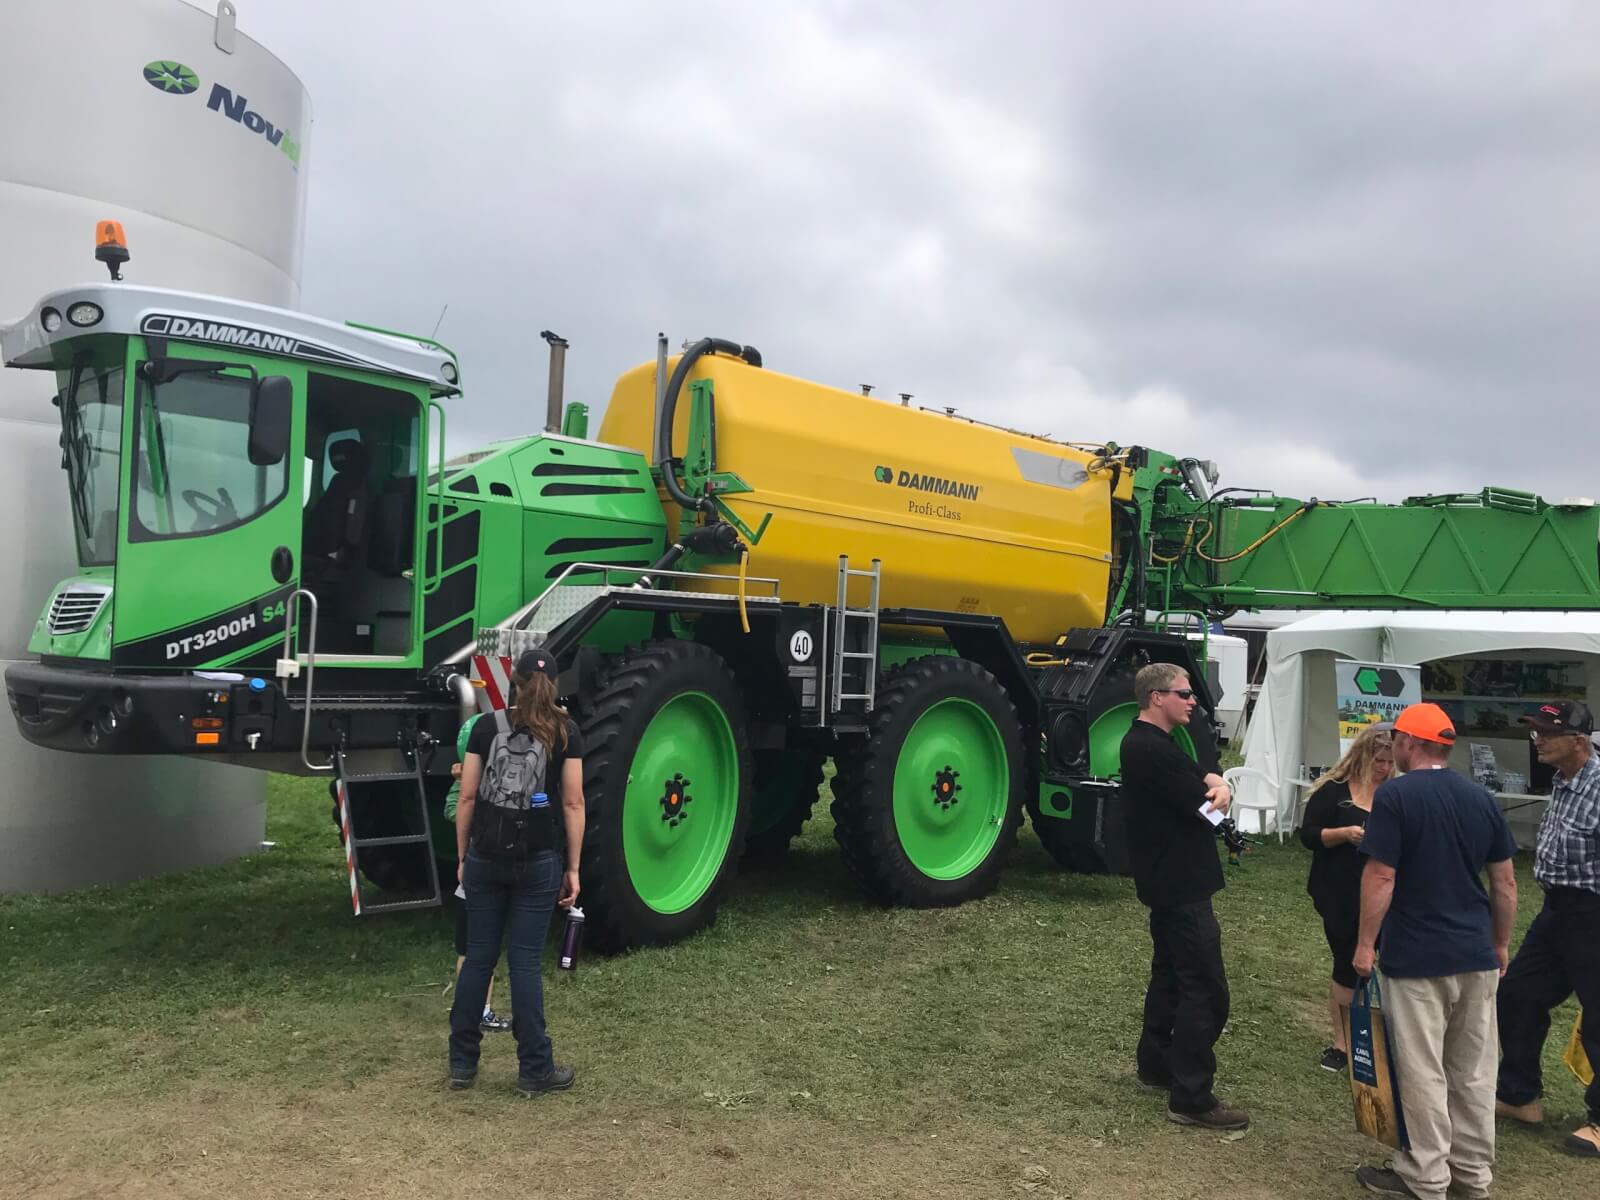
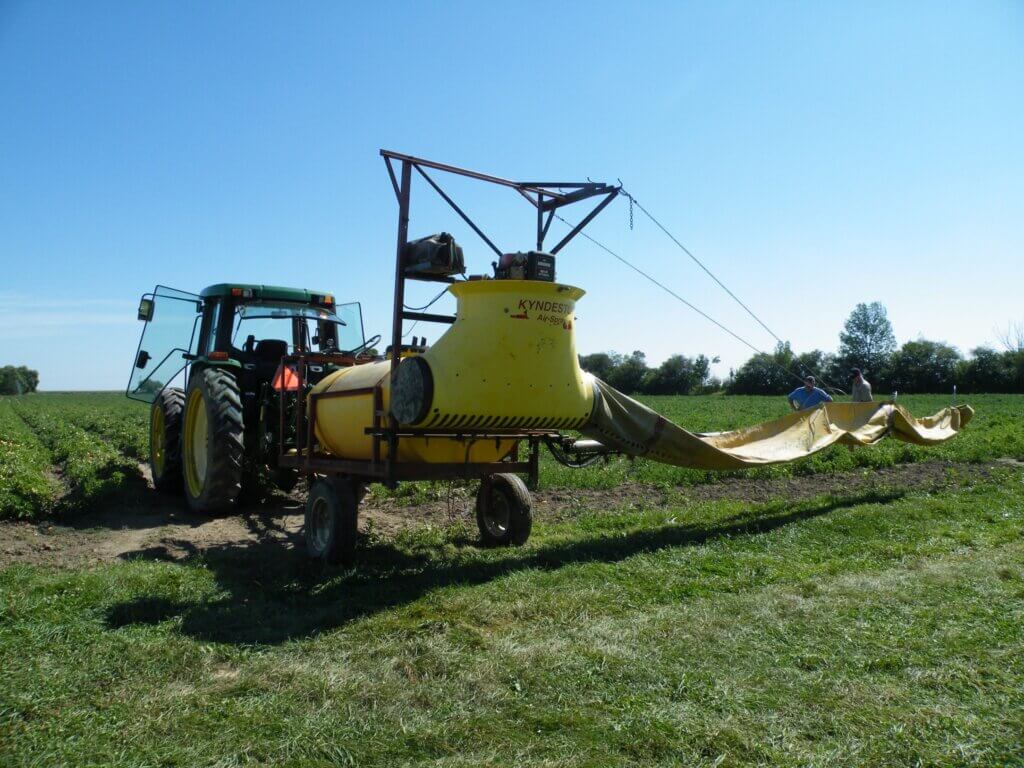
    Air-assisted boom sprayers have been around since the 70s. More common in Europe than North America, they have demonstrated value in mitigating drift and improving canopy penetration. The majority of air-assist systems are found on three-point-hitch or trailed sprayers, which is fine (and perhaps even preferable) as long as clearance, travel speed and acreage aren’t limiting factors. In North America, trailed air-assist sprayers are used by some vegetable and strawberry growers, but air-assist in general is rare among field croppers. There are a few possible reasons for this:

    • North American field croppers are predominantly concerned with work rate and prefer the larger, faster, self-propelled option.
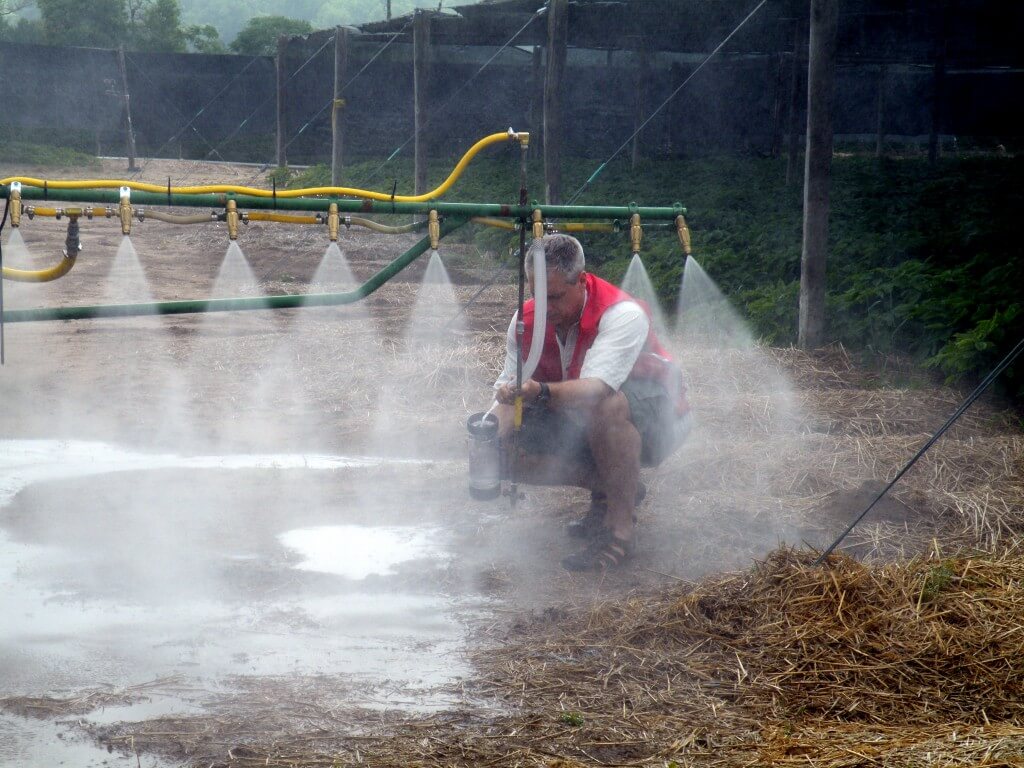
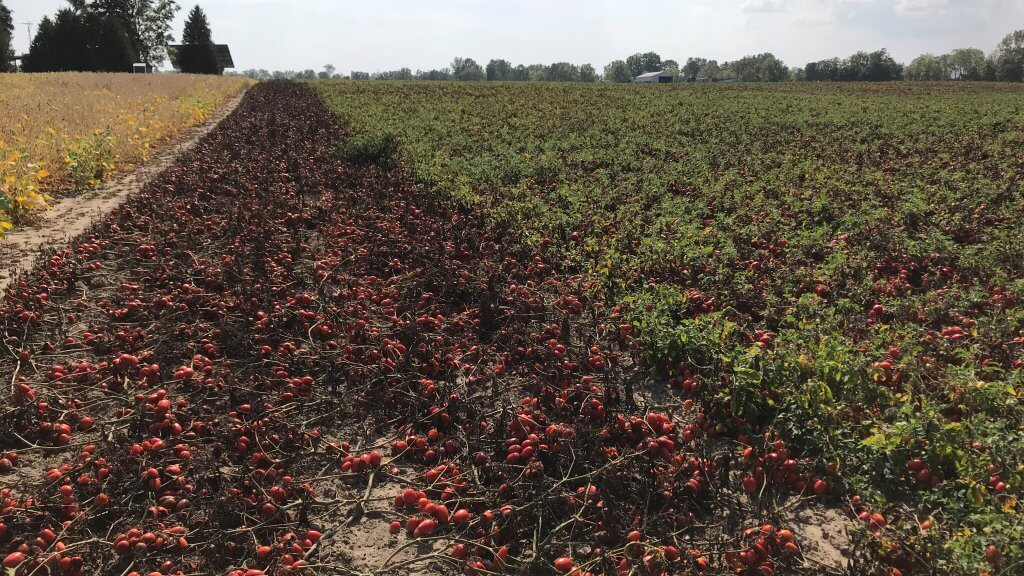
    • Air-assist is not ideal for herbicide applications to bare soil because unless it’s perfectly adjusted, it tends to bounce spray off the ground. A canopy is preferred to capture the spray and exhaust the air energy. This reduces the overall utility of air-assist.
    • The air-assist feature is expensive and growers are either unaware or unconvinced of its value.
    • There are few, if any, after-market air-assist upgrade kits available. This is because installations are bespoke; The apparatus is heavy, adds load to existing electrical and hydraulic systems and can interfere with boom folding. So, getting air-assist means purchasing a new (and perhaps unfamiliar) brand of self-propelled sprayer… and there aren’t many on offer.
    Figure 1 – Dammann’s massive three-axel DT3200H S4 self-propelled air-assist sprayer at Canada’s Outdoor Farm Show in 2018.
    Figure 2 – Agrifac’s AirFlowPlus (Image from Agrifac website)
    Figure 3 – Agrifac’s AirFlowPlus depicting adjustable angle (Image from Agrifac website)
    Figure 4 – This photo of a John Deere with air-assist was taken at a dealer’s lot in Southwestern Ontario in 2014. We have no idea what the history is, or who added the air-assist feature (it looks similar to a Miller Spray-Air with two blowers).

    Air assist booms came to Western Canada in the early 1980s in the form of the “Spray-Foil” sprayer, later renamed Spray-Air. This sprayer was developed and manufactured in Carseland, Alberta. It used a shear-atomizer nozzle, a “foil”, that required a strong airblast to properly atomize a liquid feed that was introduced on the foil’s leading edge. As a result, it created a powerful airblast and a very fine spray. It was marketed as a way to reduce herbicide rates, an attractive feature during the times of drought, high interest rates, low commodity prices, and general economic malaise of farming on the prairies during the 1980s. Neighbours of Spray-Foils didn’t like the drift potential of the machines, and chemical companies objected to the claims of reduced water volumes (2 gpa) and lower product rates which contravened label directions. An unflattering test report of the sprayer by PAMI in Lethbridge resulted in a protracted lawsuit which helped cast the fate of the company. A Danish company licensed the design and sold it in Europe under the name Danfoil, where it continues to exist and @Nozzle_Guy saw it in person during the 2019 Agritechnica.

    Figure 5 – A Spray-Air Trident pull-type made in Carseland, Alberta, for sale.

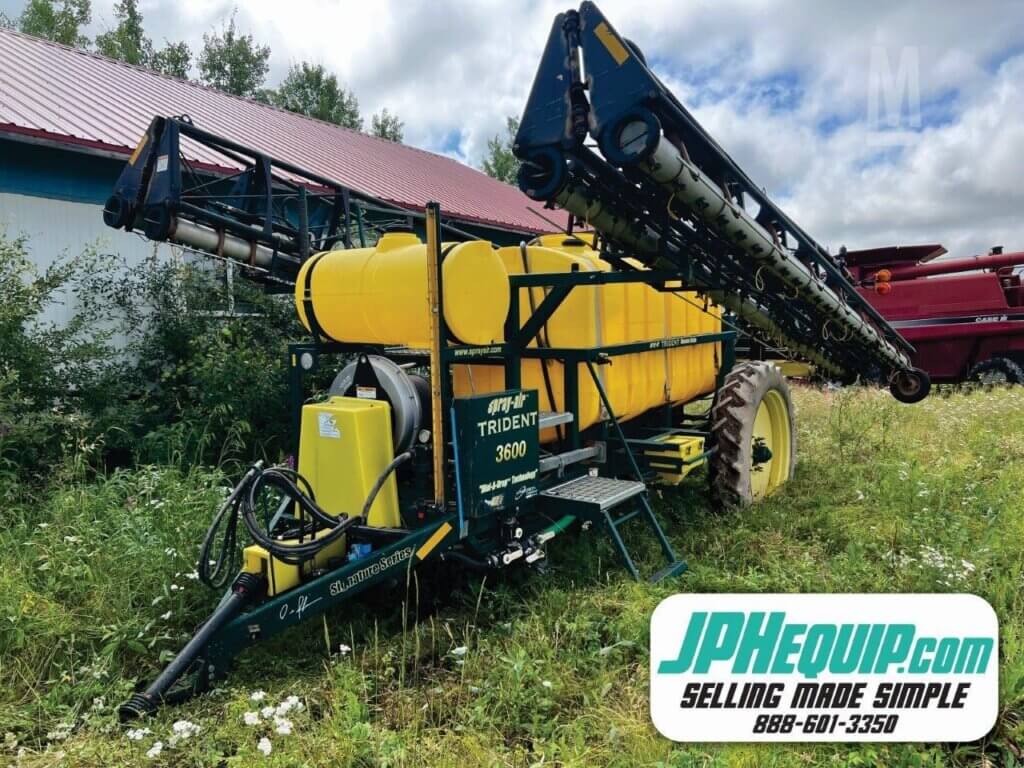
    Eventually, Spray-Air rose from litigation and developed an improved nozzle with the assistance of the National Research Council (the “Shear Guard”) and introduced the Trident boom which gave users the option of atomizing spray with a conventional boom with or without air assistance, in addition the the native choice of shear-atomization. The sprayer chassis itself also continued to improve with a better overall design. Nonetheless, it was sold to Miller in the 2000s after a period of sales stagnation.

    Figure 6 – A trailed one-sided Kyndestoft Air-Sprayer in Ontario field tomatoes (c. 2010)
    Figure 7 – Everyone’s favourite sprayer, the Spra-Coupe, sporting a Kyndestoft Air-Spray system (1996, PAMI)
    Figure 8 – An innovative prototype out of Alberta, the “Kaletsch fan sprayer” used pulleys to power the fans (1996, PAMI)

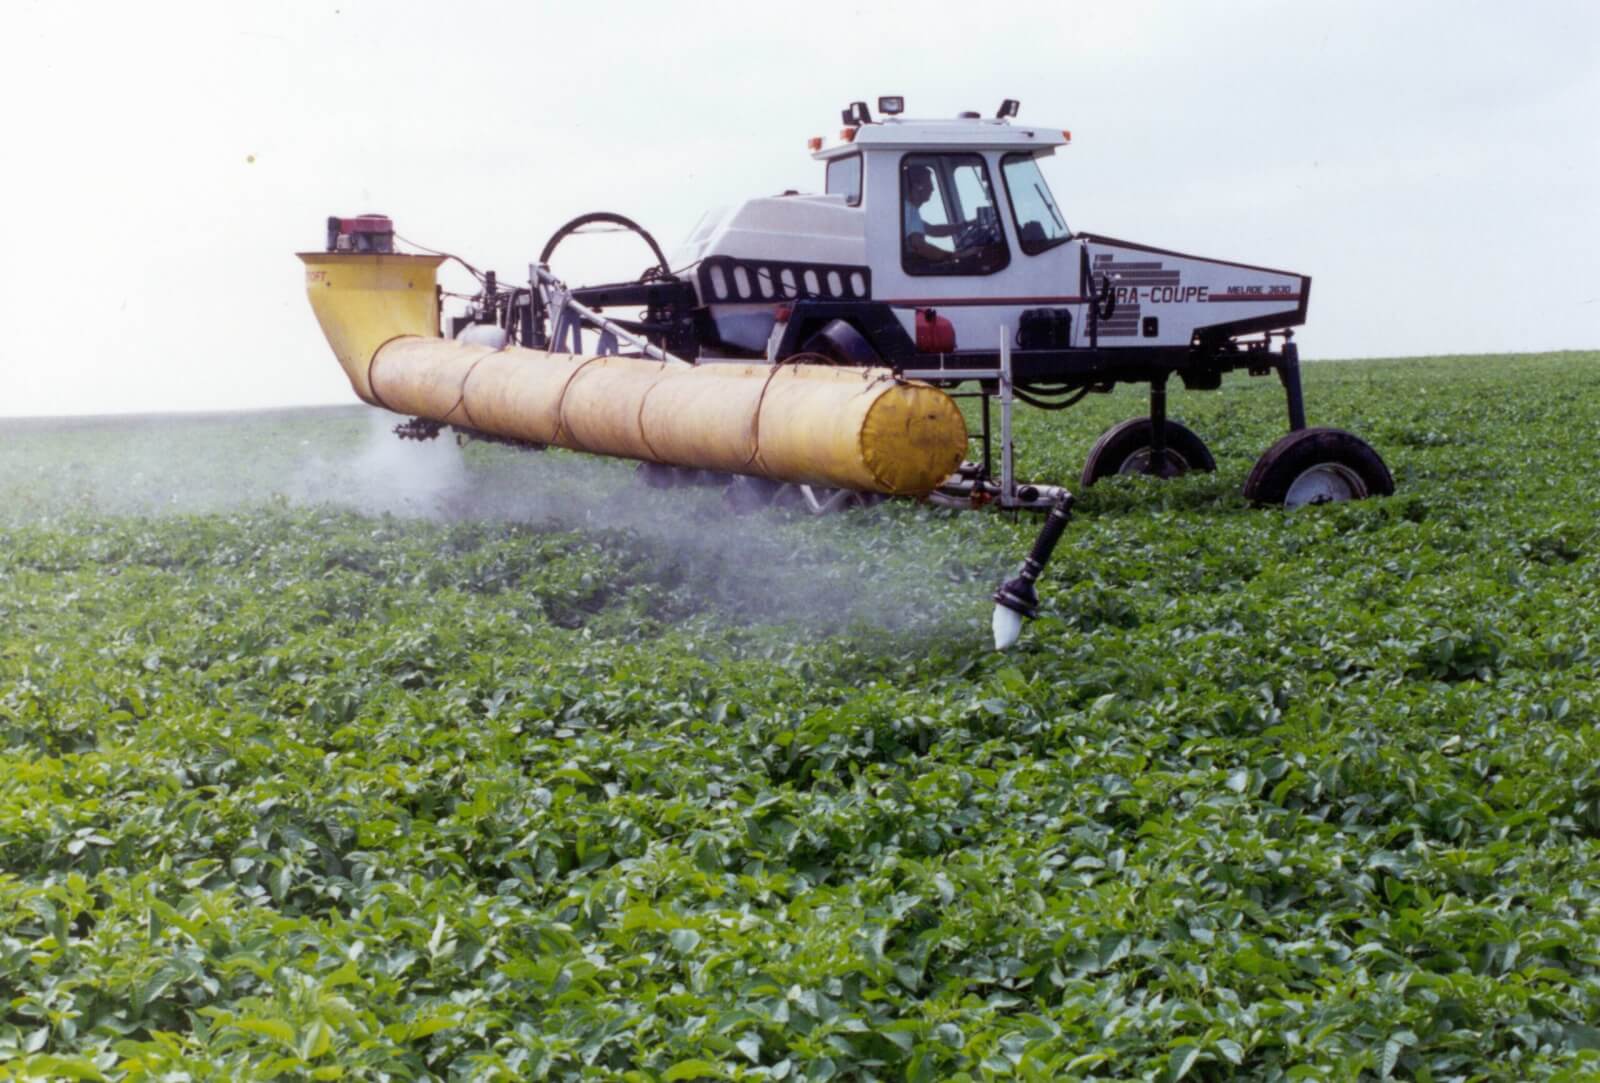
    A fundamental problem with shear-atomization on sprayers like the Spray-Air is the requirement for significant air velocity for the atomization to occur properly. When the canopy cannot absorb that energy, air rebounds and creates drift. And if the operator cannot reduce the airblast strength without adversely affecting atomization, it leads to problems.

    This photo (Figure 9) was submitted by Mr. L. Jones, a cash-cropper in ND, USA. It’s his JD4710 (circa 2004), which has 100′ booms and an 800 gallon tank. What’s interesting is that it has a Miller’s Spray-Air. This air-assist system is available on Miller’s Nitro and Condor line as well as New Holland sprayers (which are built by Miller). @spray_guy did some work with it on a Condor in field corn. It comes with their dual-flow nozzle system (Shear Guard™ PLUS Air Nozzles plus Dial-A-Drop™) for fungicides (applied at low volume) but you can also use conventional tips for coarser herbicide work.

    Figure 9 – A JD4710 with Miller’s Spray-Air and conventional nozzles.

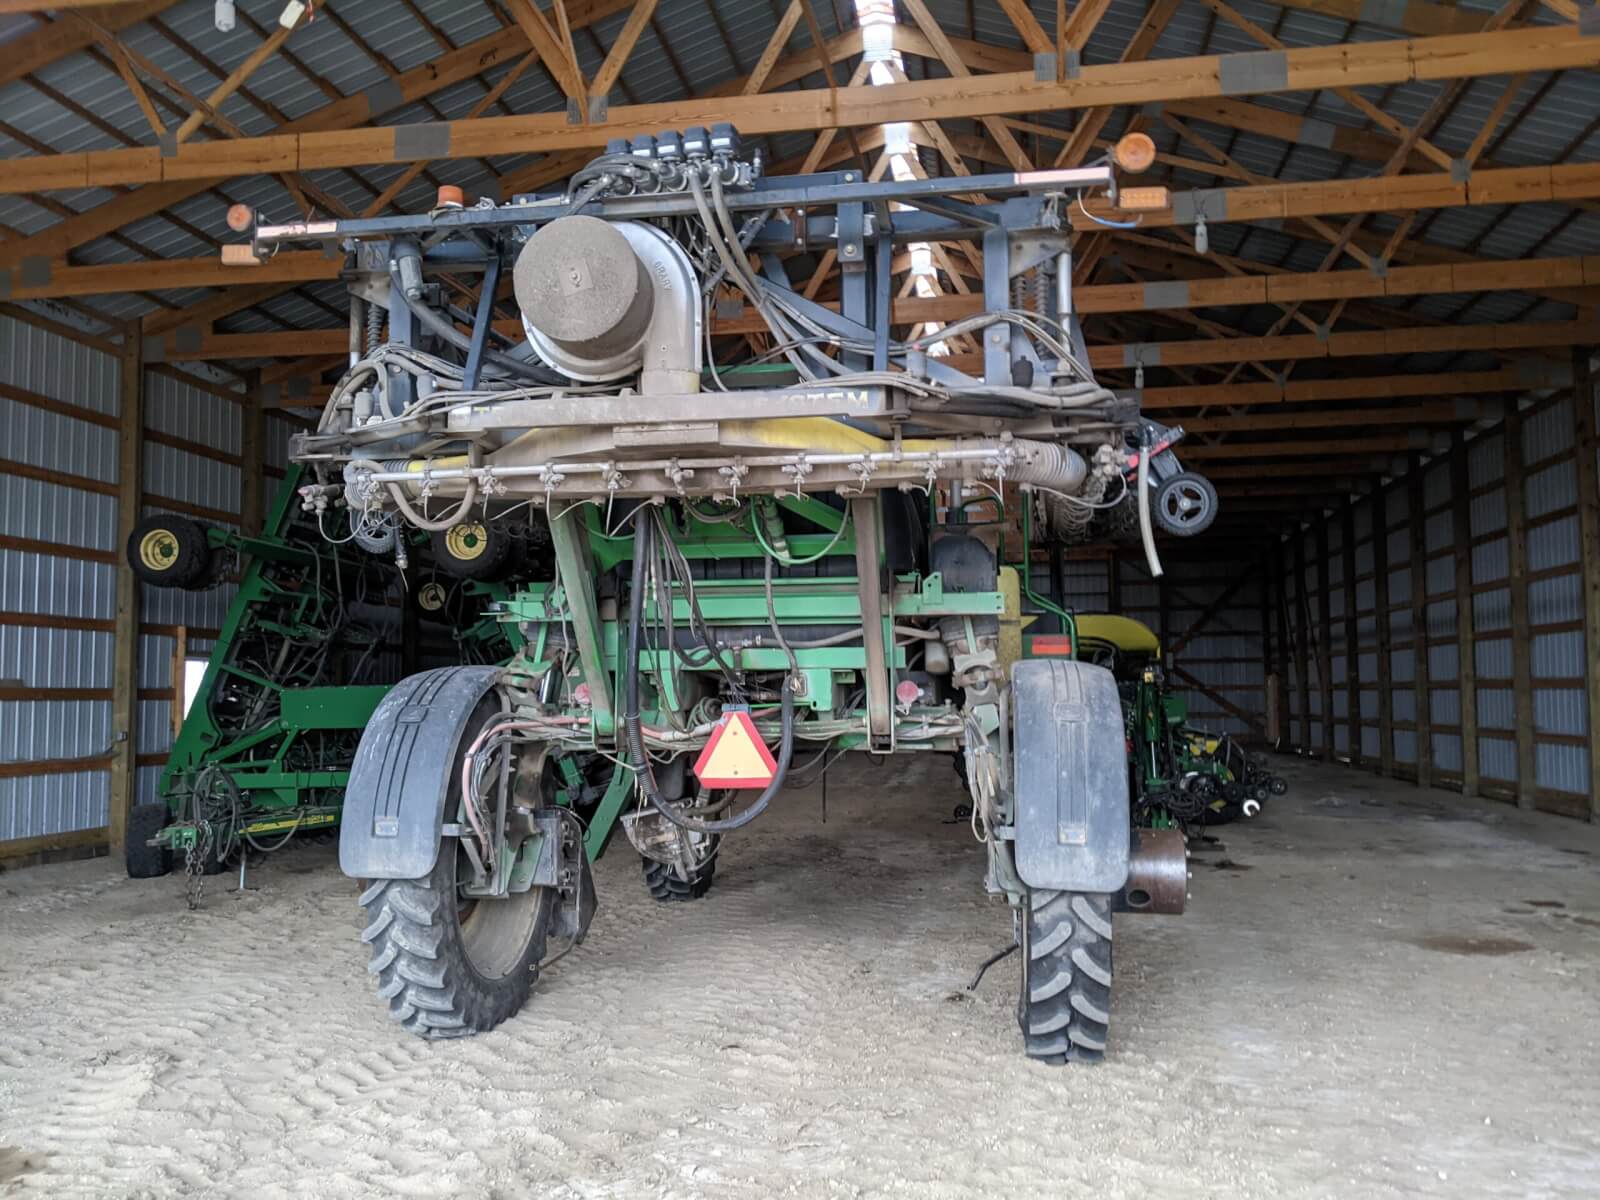
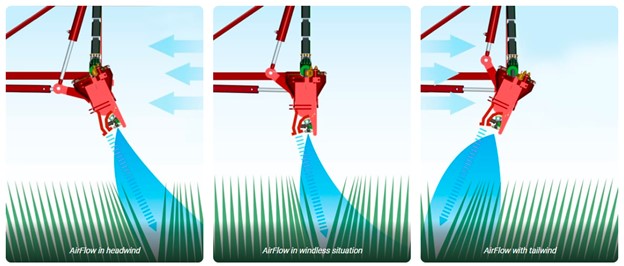
    Mr. Jones says they use the flat fans when spraying a soil-applied herbicide. If it’s moderately windy, they engage the air to reduce drift. When they apply fungicide on wheat they use only enough air to move the heads as they pass over. Bystanders can see the spray enter the canopy and a portion rebounds, which they suggest (and hope) provides some underside coverage. That’s possible, but it’s generally better to keep all the spray in the canopy. This can be achieved by further reducing air speed, increasing travel speed, and/or aiming the air slightly backwards to increase the cross-sectional distance the spray has to travel and slow the spray velocity relative to the sprayer speed.

    Generally, we’re proponents of using air when spraying. It opens the crop canopy, exposes otherwise-hidden surfaces, entrains and carries droplets to the target (reducing drift and improving coverage) and it extends the spray window by out-competing moderate winds. We have no proof, but wonder if it might also help alleviate the negative impact of tire and chassis turbulence on coverage uniformity under the boom. And, before you feel we’ve ignored a big benefit, we’d would be very cautious about using air-assist as a means for reducing carrier volume. The debate about finer sprays at less volume giving greater efficacy continues. While true at times, any benefit needs to be balanced with the downsides of potentially more drift and evaporation.

    Here’s some 2018 footage from an assessment of canopy penetration in field pea using a Miller Nitro with Spray-Air. We see coverage extends deeply into the canopy, the degree of which shares an inverse relationship with depth (fairly classic). Note the heterogeneous mix of smaller and larger deposits from the air-shear nozzles. While some heterogeneity is good, this extreme span represents waste. The product tied up in the largest droplets could have been more gainfully employed as several smaller droplets. This pattern may be the result of using insufficient air energy, preventing the air-shear nozzle from fully atomizing the spray liquid.

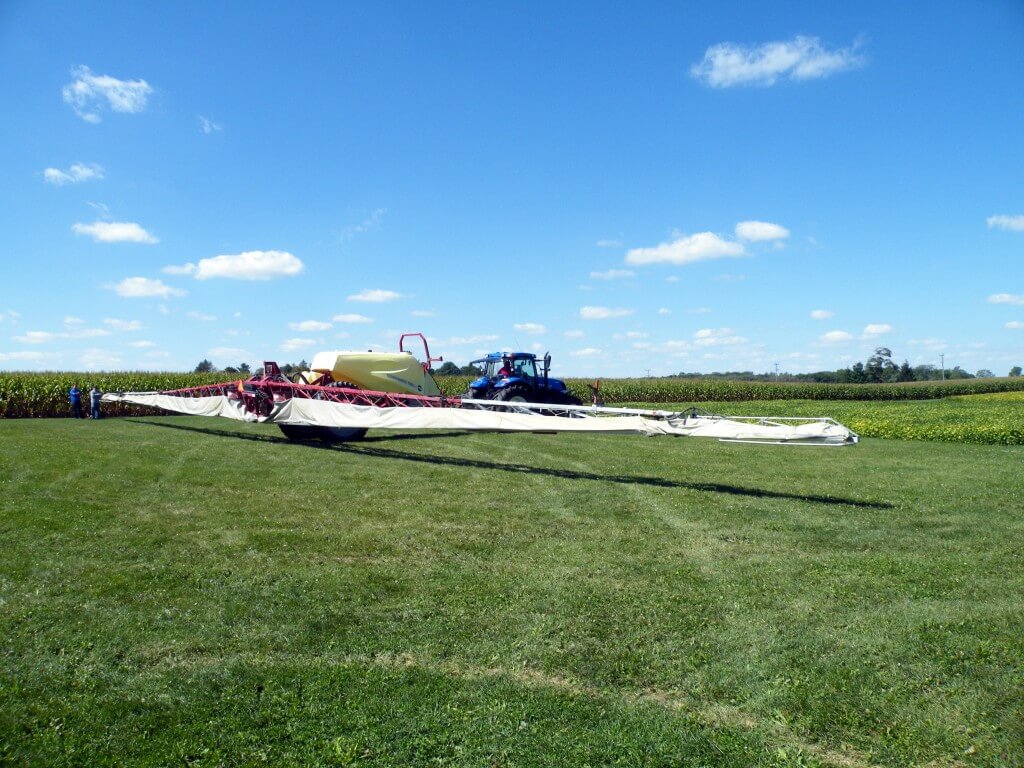
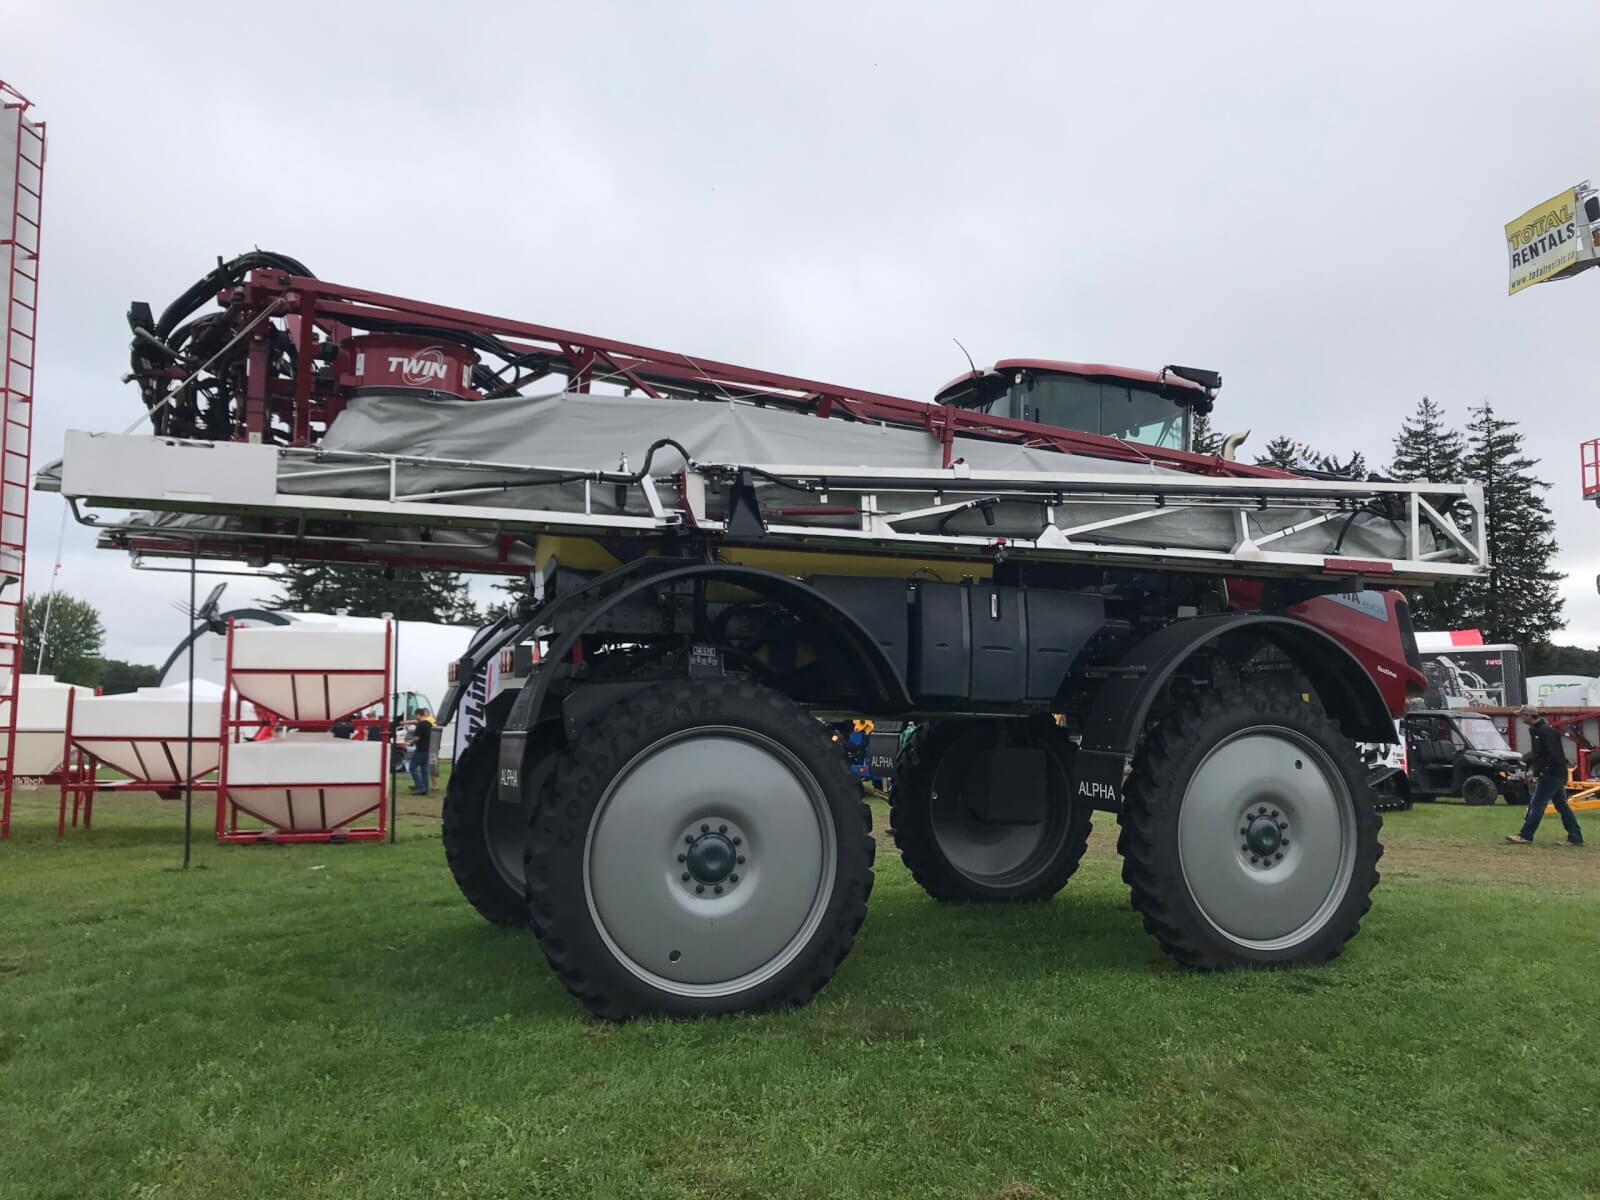
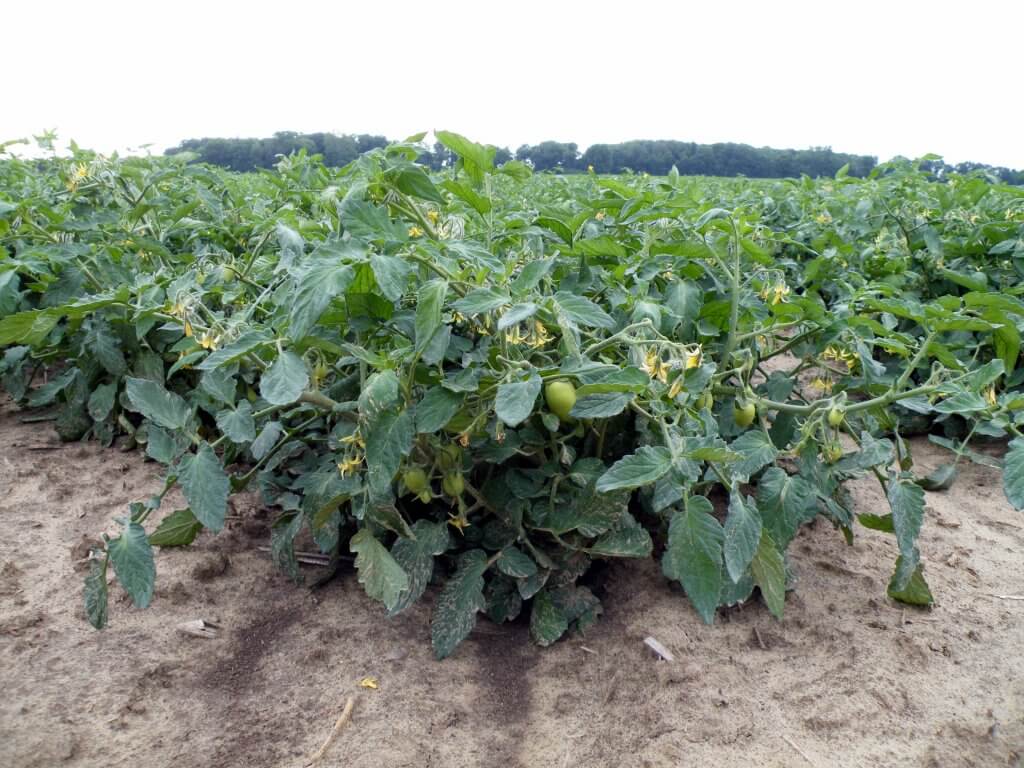
    In 2015 we felt air-assist needed some exposure, so we held a demonstration at Canada’s Outdoor Farm Show. Over three days we used water-sensitive paper to evaluate coverage in a soybean canopy (moderately dense, planted on seven inch centres) from a Hardi Commander (Figure 10) with and without air-assistance. We originally wanted to get our hands on a self-propelled Hardi Alpha Evo (Figure 11), but there were only two in North America at the time and neither were available. By the way, the Alpha Evo is now on the third iteration, but still uses the Twin Force air-assist system which allows the operator to change the angle of the air and the air speed. Each blower can be steplessly adjusted to a maximum output of 2,000 m³/h per m of boom and a maximum (and we’d wager, often excessive) air speed of 35 m/sec. You can watch a video explaining how to dial-in a Twin Force sprayer here.

    Hardi Commander (118 foot boom) with TWIN air-assist
    Figure 10 – The Hardi Commander (118 foot boom) with Twin Force air-assist used in a spray demo at Canada’s Outdoor Farm Show.
    Figure 11 – Hardi’s Alpha Evo self-propelled sprayer employs their their Twin Force air-assist system.
    Figure 12 – Looking up from under the Hardi Alpha Evo boom. Air angle and speed can be adjusted.

    The demo treatments

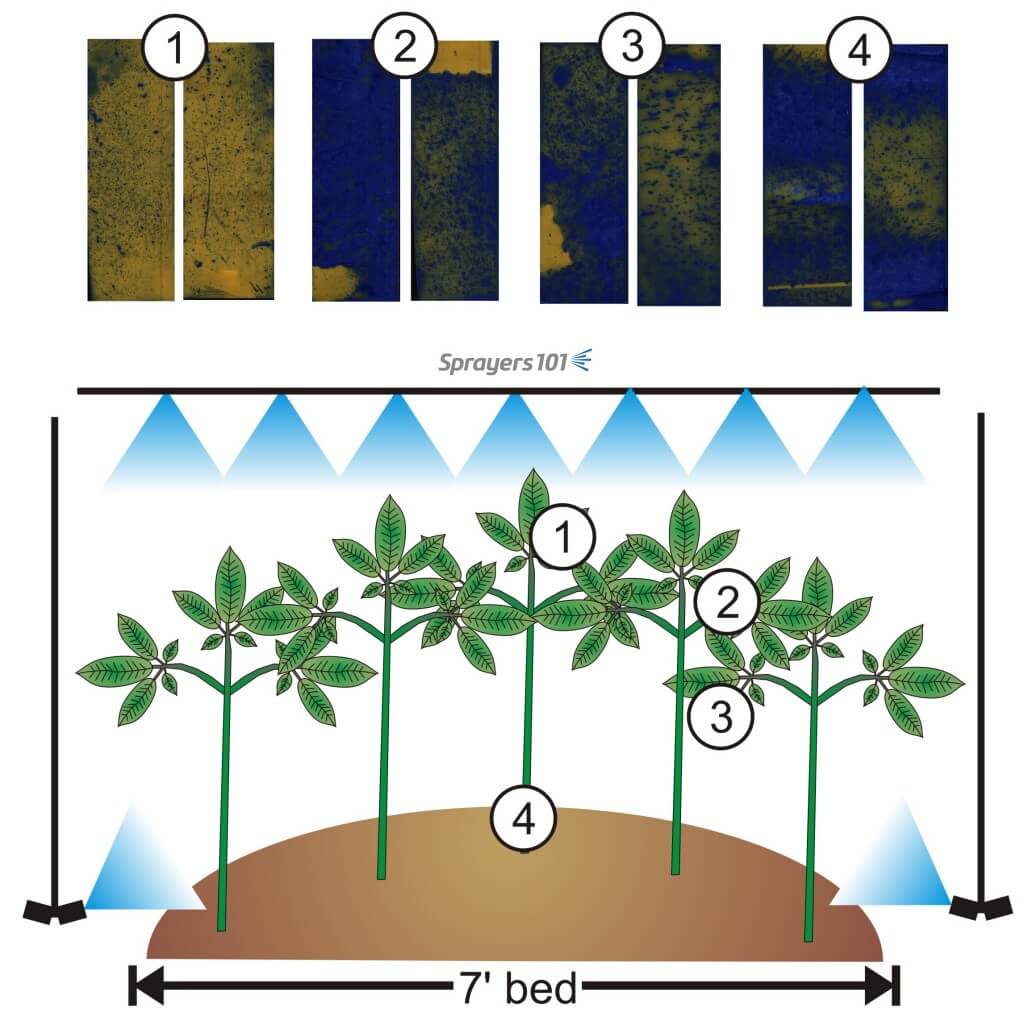
    The sprayer was calibrated for 93.5 L/ha (10 gpa) at 2.75 bar (40 psi) at 9.7 km/h (6 mph). The boom was suspended 50 cm (20 inches) above the top of the canopy. On one side of the boom, we ran yellow mini drift nozzles (MD 11002’s) to create a Coarse spray quality, and on the other side we ran conventional yellow flat fans (F 11002’s) to produce a Fine spray quality.

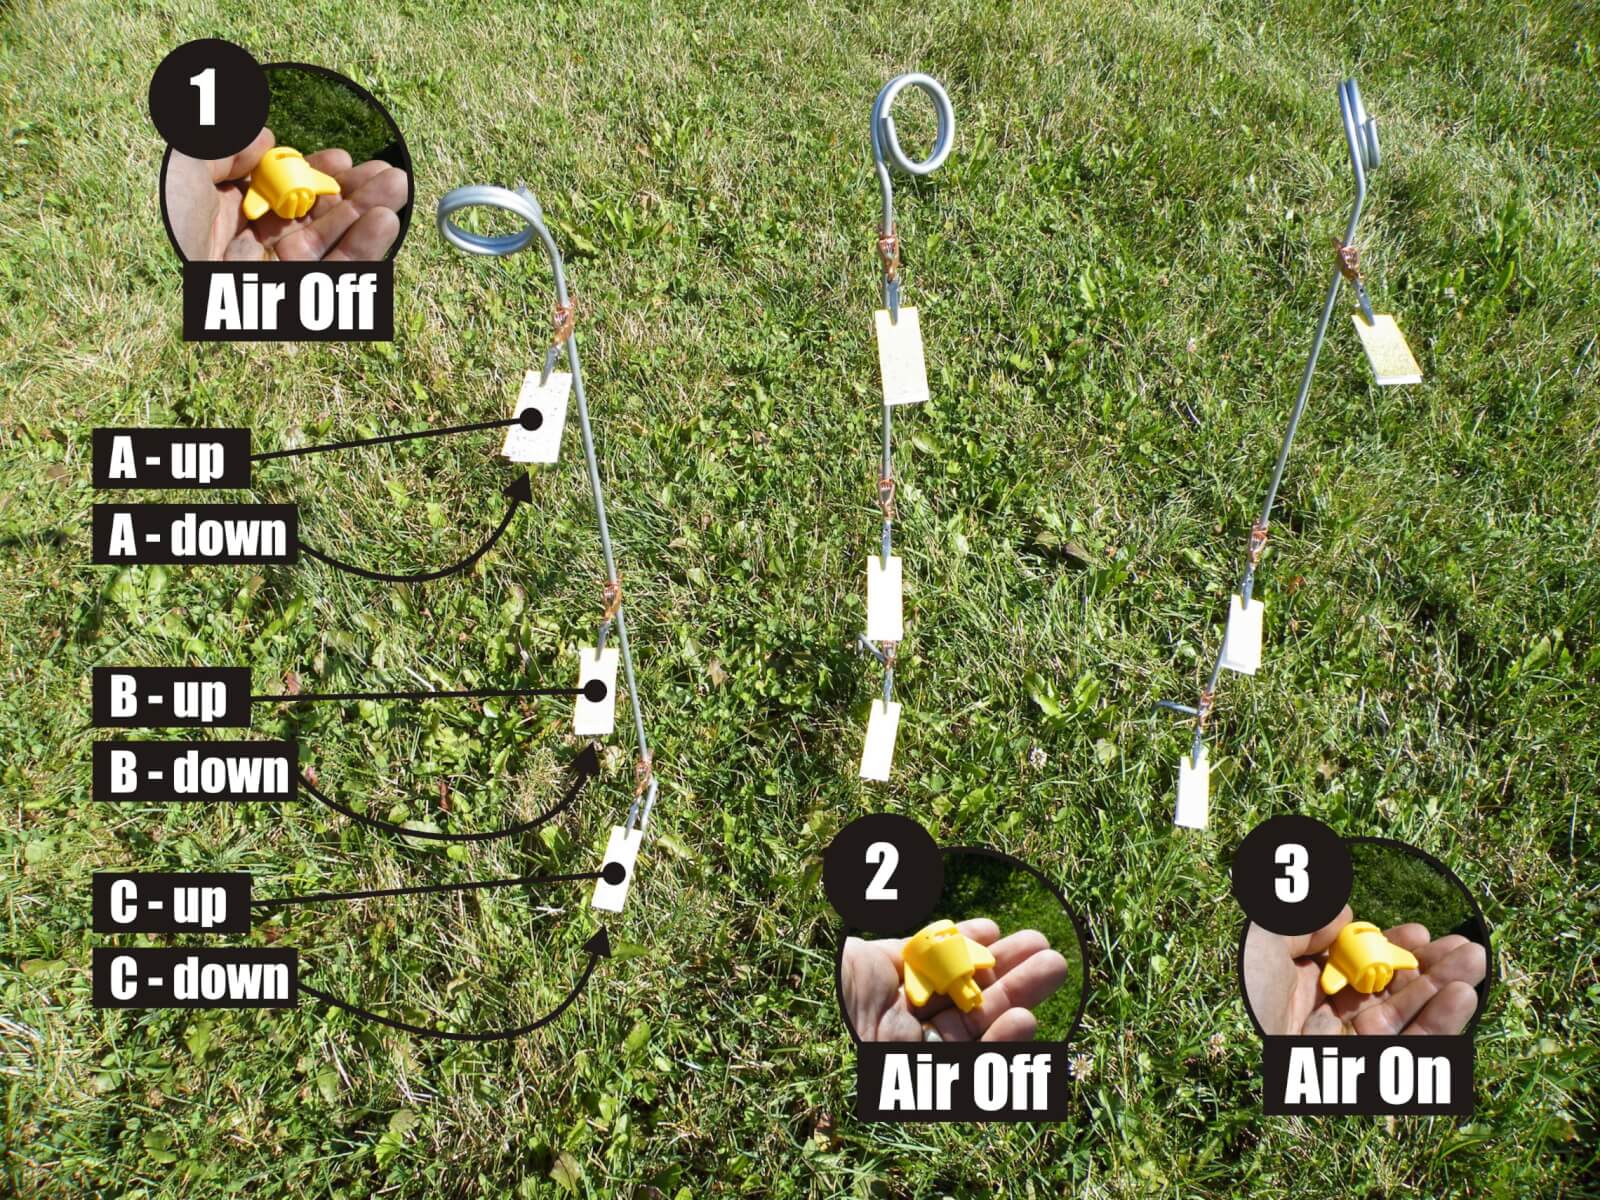
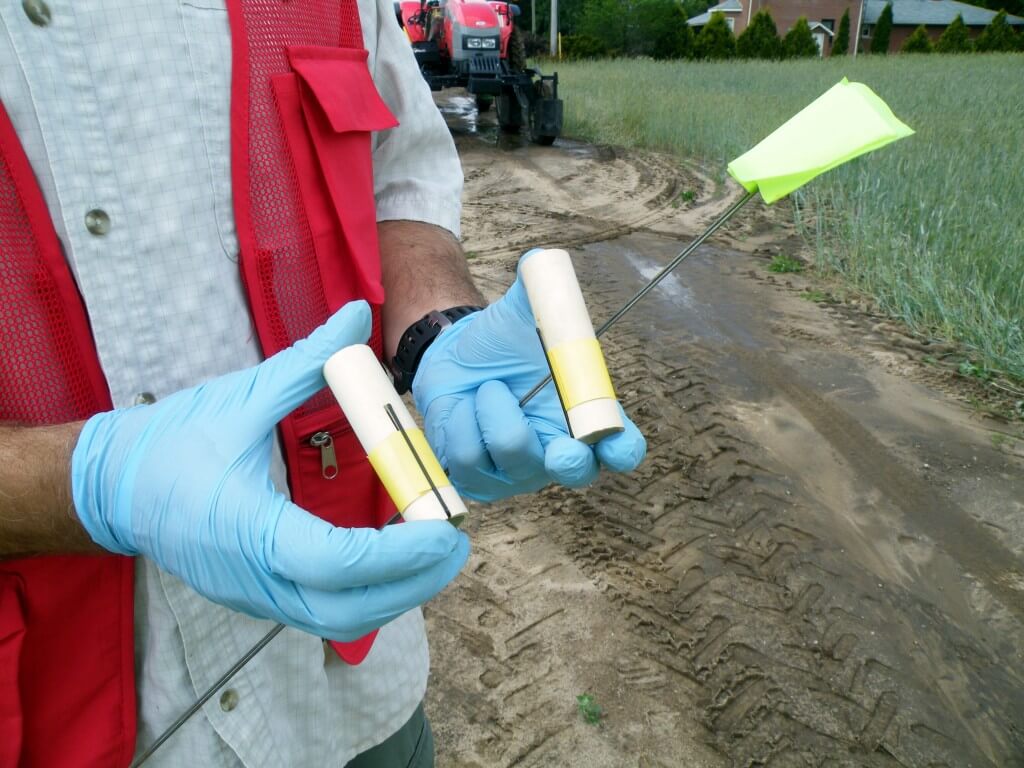
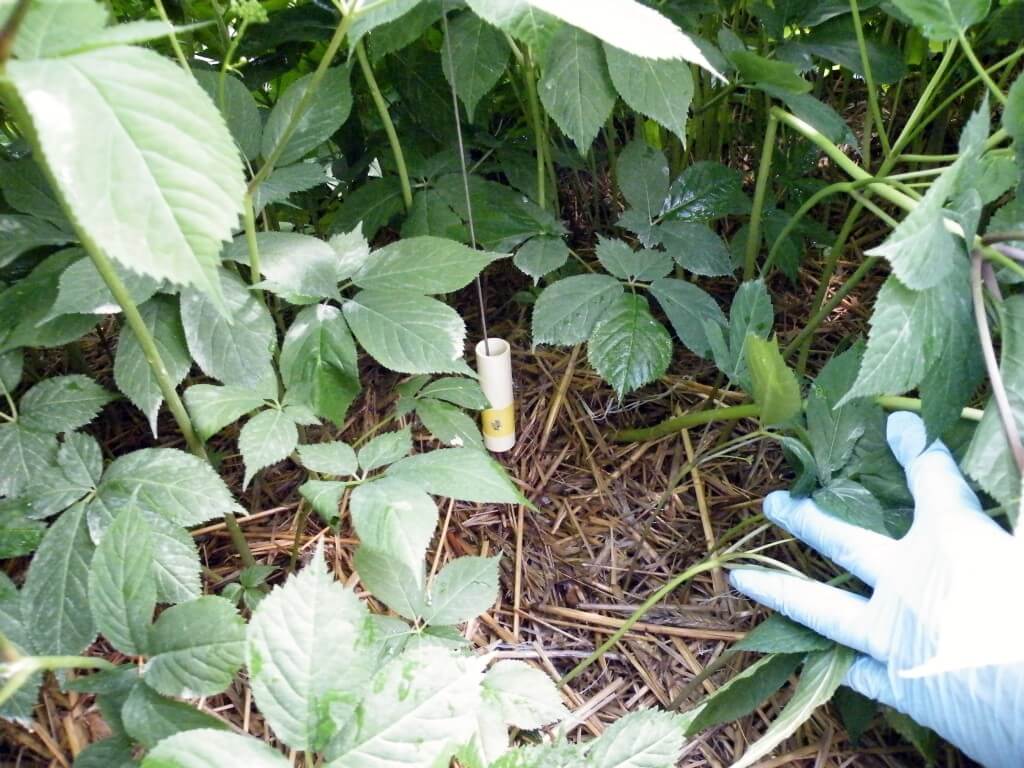
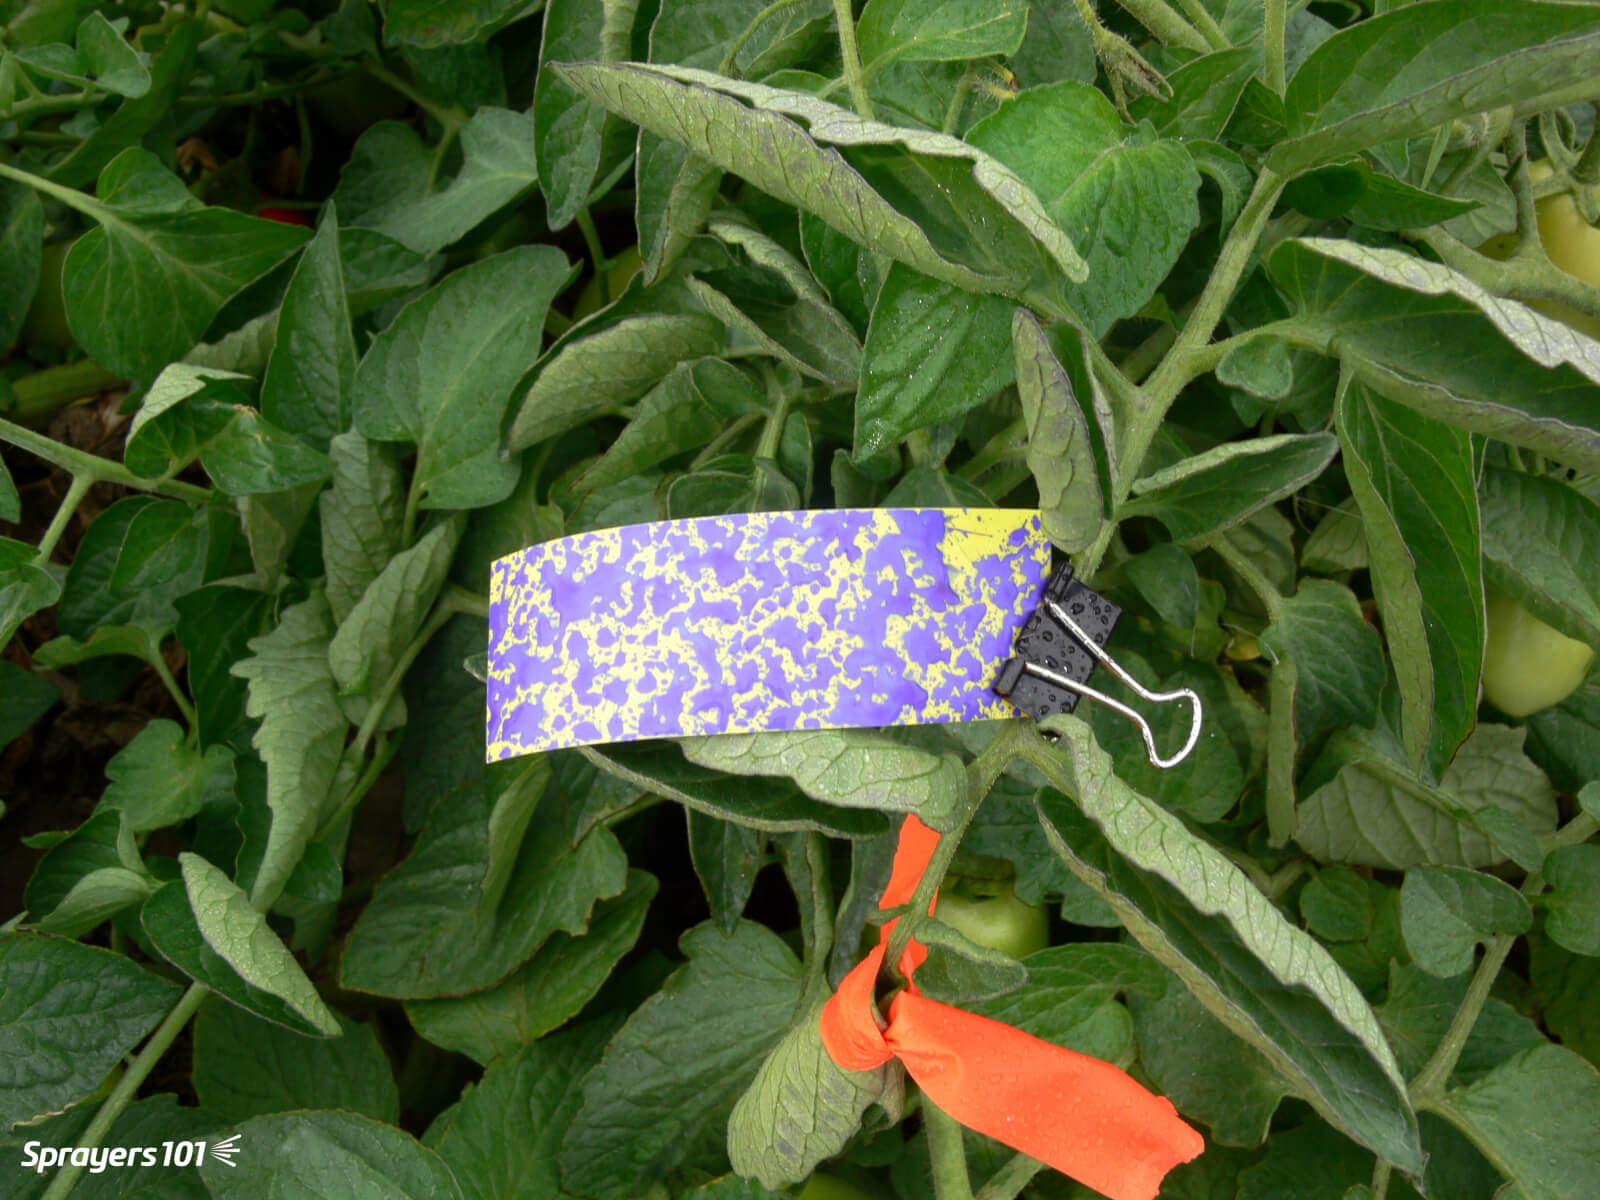
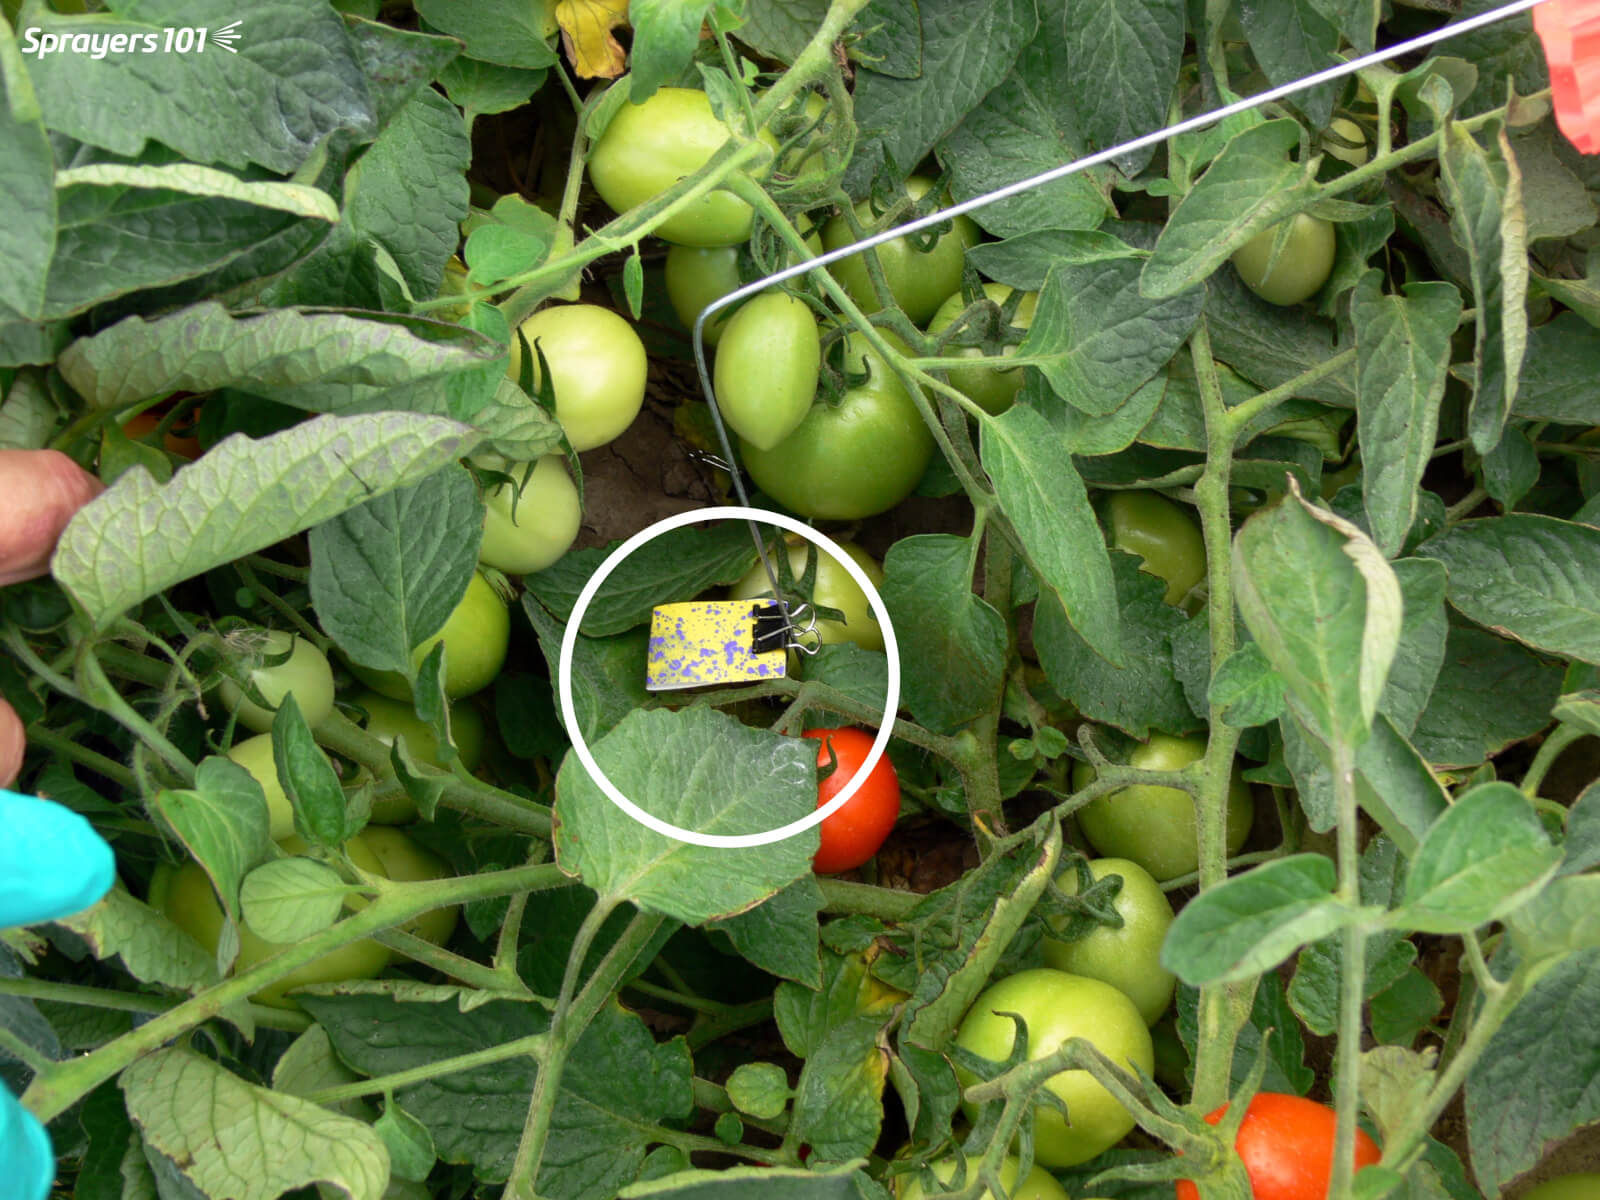
    Water-sensitive paper was attached to rods at three canopy depths: at the top, midway down and at the bottom of the canopy. Papers were oriented both face-up and face-down (Figure 13). Following each application, papers were collected for digital analysis using “DepositScan” which calculates the percent surface coverage and the deposit density. Both of these factors contribute to overall coverage.

    We collected papers from three treatments:

    1. Fine spray quality, No air assist
    2. Coarse spray quality, No air assist
    3. Fine spray quality, Air assist
    Figure 2 - Water-sensitive papers were placed at three levels in a dense soybean canopy, facing up and down, for three conditions. Condition 1 - Air off, conventional 11002’s (medium-fine spray quality). Condition 2 - Air off, mini drift AI11002’s (very coarse spray quality). Condition 3 - Air on, conventional 11002’s (medium-fine spray quality).
    Figure 13 – Water-sensitive papers were placed at three levels in a dense soybean canopy, facing up and down, for three treatments. Treatment 1 (Fine spray quality, No air assist). Treatment 2 (Coarse spray quality, No air assist). Treatment 3 (Fine spray quality, Air assist).

    We held two demos per day at noon and 3:00 pm for three days, giving us six sets of papers to analyze for each treatment. The weather ranged from 25-29°C, 30-58% relative humidity and winds of variable direction from 3-11 km/h.

    This was a simple randomized complete block design, but it was not a rigorous experiment. We simply took the opportunity to gather numbers from the demonstration. A more fulsome experiment would require many, many more passes under more stable conditions. For example, we set the angle of the air and nozzles to about 30° forward and the air speed at maximum, which wasn’t necessarily correct. Ideally, these settings should have been fine-tuned to match the forward speed of the sprayer, the density of the crop and the weather conditions. There was a lot of boom sway (watch the video below).

    And so, caveats aside, the following graph illustrates the mean percent coverage and mean deposit density for papers in each treatment, for papers that were facing up (Figure 14). Standard error of the mean is presented alongside the average (x% ± y).

    Results

    Figure 3 – Average percent coverage (red) and droplet density (blue) for upward-facing water-sensitive papers in three canopy depths for each of three conditions. Averages rounded to the nearest 0.5 and Standard Error is indicated. * indicates significance with 95% confidence.
    Figure 14 – Average percent coverage (red) and deposit density (blue) for upward-facing water-sensitive papers in three canopy depths for each of three treatments. Averages rounded to the nearest 0.5 +/- standard error. “*” indicates significance with 95% confidence. Condition 1: Fine, No Air. Condition 2: Coarse, No Air. Condition 3: Fine, Air Assist.

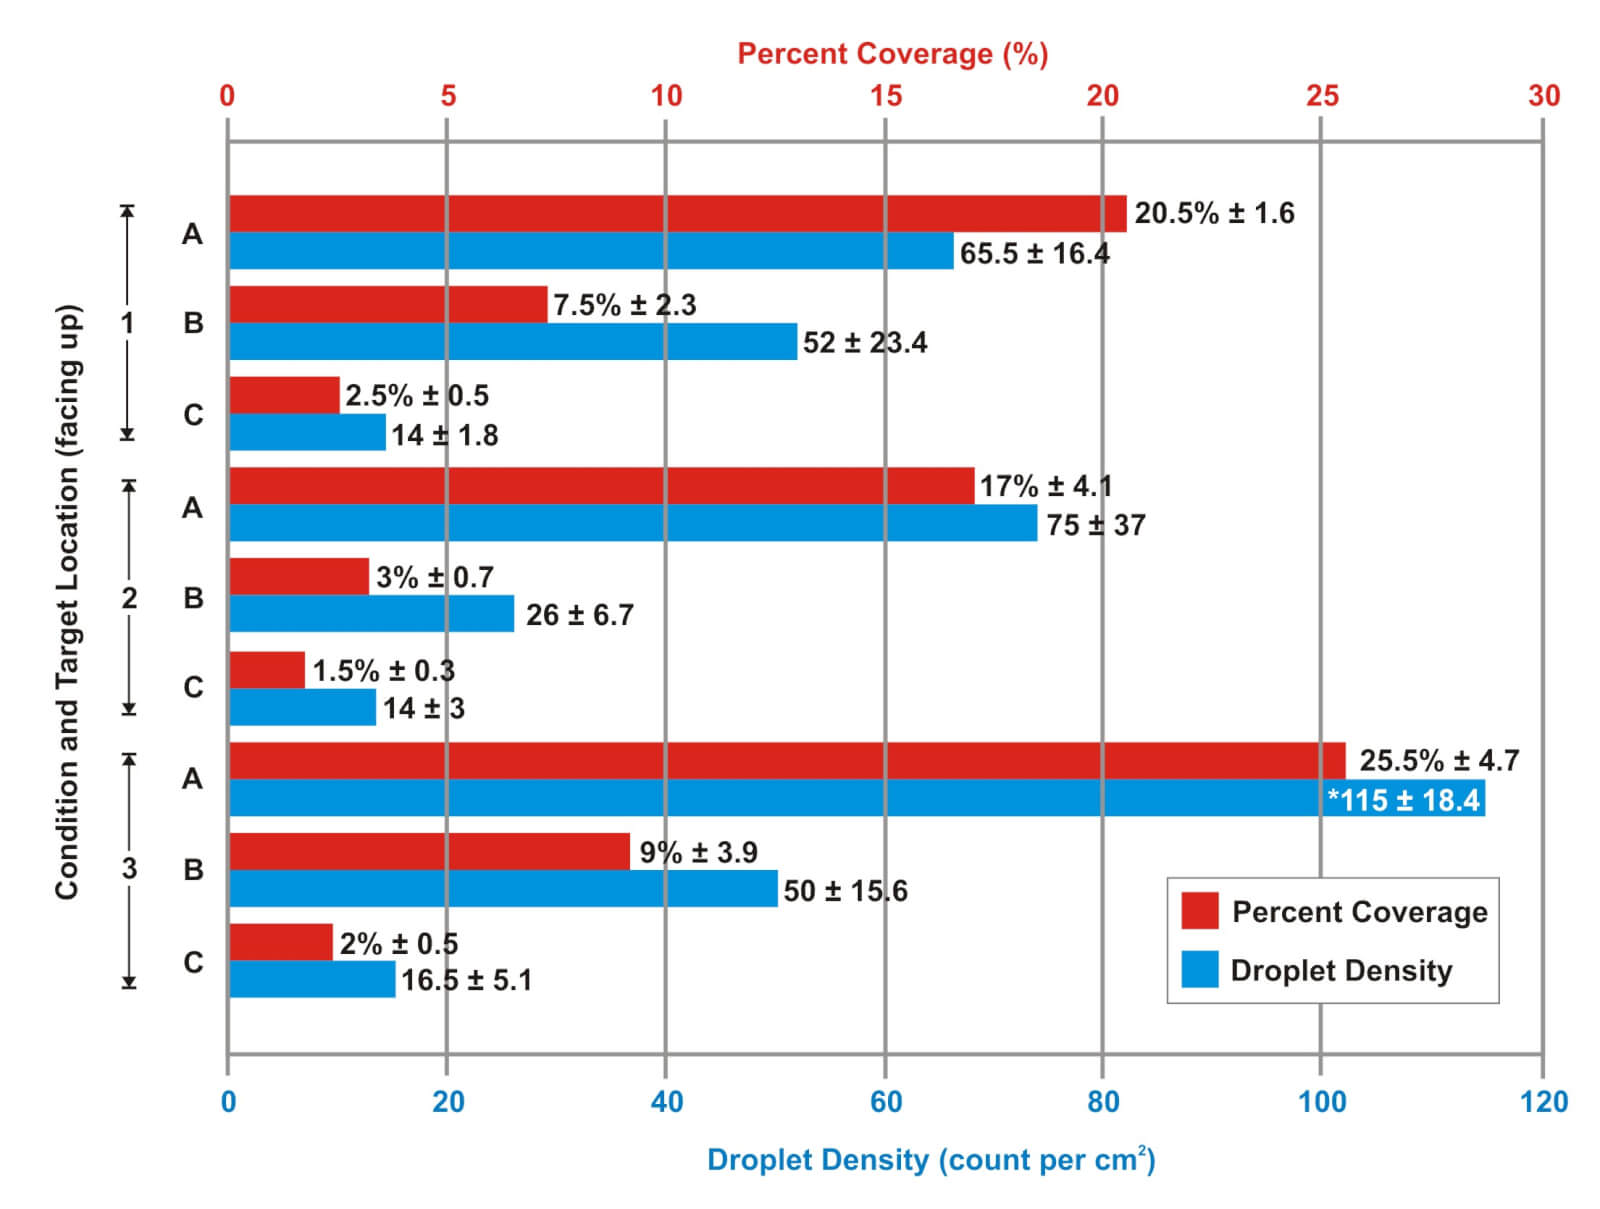
    Treatment 1 (Fine, No Air) reflects a typical coverage pattern for a dense canopy. Coverage declines as a function of canopy depth because spray droplets are intercepted by plant material before they reach the ground. This is particularly evident with broadleaf canopies that create shading. The coverage data doesn’t show it, but there was an obvious (and unacceptable) plume of spray drift during these applications (see Figure 15).

    Figure 4 – The effect of air-assist on downwind drift from a medium-fine spray quality. Note that the nozzles and air are directed 30° forward. When sprayed over bare ground, the air-assist bounces spray back up, as pictured here. However, when sprayed into a canopy with the correct air settings, bounce (and drift) is virtually eliminated.
    Figure 15 – The effect of air-assist on downwind drift from a Medium-Fine spray quality. Note that the nozzles and air are directed 30° forward. When sprayed over relatively bare ground, the air-assist bounces spray back up, as pictured here. However, when sprayed into a canopy with the correct air settings, bounce is virtually eliminated.

    Treatment 2 (Coarse, No Air) follows the same coverage trend as Treatment 1. This treatment represents much larger, and fewer, droplets than Treatment 1, and yet the only obvious difference is reduced coverage in the middle of the canopy. There was little or no plume of spray drift during these applications.

    Treatment 3 (Fine, Air) also followed the trend of reduced coverage as a function of canopy depth. Mean coverage was higher at the top of the canopy compared to the other two treatments. In fact, according to an ANOVA, deposit density was significantly higher in this canopy position than the other treatments, with 95% confidence. While mean coverage in the middle of the canopy was more than 2x that of Treatment 2, it was not statistically significant. There was no apparent difference at the bottom of the canopy. It is important to note that unlike Treatment 1, there was little or no spray drift plume during these applications.

    Figure 5 – Upward-facing water-sensitive paper from mid-way into the canopy (position B) for condition 2 (very coarse droplets, air off) and condition 3 (medium-fine droplets, air on). The difference in coverage is obvious.
    Figure 16 – Upward-facing water-sensitive paper from mid-way into the canopy (position B) for Treatment 2 (Coarse spray quality, no air assist) and Treatment 3 (fine spray quality, Air assist). The difference in coverage is obvious.

    DepositScan was unable to detect coverage on any of the downward-facing papers. However, close visual inspection did reveal differences. Unsurprisingly, Treatment 2 (Coarse, No air)  did not produce any underside coverage; Large droplets do not change direction mid-flight unless acted upon by some other force. Droplets can bounce and shatter, but that did not occur here. The Medium-Fine droplets created in Treatment 1 (Fine, No Air) and Treatment 3 (Fine, Air) did leave trace coverage on the downward-facing surfaces. Generally no more than 10-30 deposits on the entire 1 x 3″ surface, representing less than 1% total surface coverage. It could not be determined if the air used in Treatment 3 improved underside coverage over that of Treatment 1.

    Did air-assist make a difference?

    Let’s start with the literature. Many experiments in peer-reviewed journals show that it does. A perfunctory literature review reveals improved coverage in the middle and lower portions of cotton, potato, soybean and wheat canopies. Some of these experiments were based on coverage using fluorescent dyes, and some with water-sensitive paper. Others were based on efficacy and report improved crop protection. The actual implementation was highly variable with some authors recommending angling the air and nozzles forward 20-25°. Others proposed 30° backwards. Most agreed (as do I) that the air speed should be set relative to the canopy density where higher speeds improved coverage deeper in the canopy, but did so at the expense of coverage in the higher canopy. Picture a bell curve on it’s side where the Y axis is canopy depth and the X axis is coverage; More air shifts the peak of the curve down the Y axis, into the canopy.

    As for our demonstration, some interpretation is required. If an operator is spraying a contact product with limited or no translocative properties, then coverage becomes especially important. In order to improve coverage, higher volumes and finer droplets combined with slower travel speeds are often advised. This may be impractical, as most operators prefer to use less water and drive faster.

    When we used Medium-Fine droplets with no air assist, coverage was good (Figure 14) and better than coverage obtained using Very Coarse droplets. However, spray drift was unacceptable (Figure 15). When air-assist was engaged, we reaped the coverage advantage of smaller droplets and drift reduction as good or better than what we saw with coarser droplets. Unexpectedly, we did not see an obvious improvement in coverage from the air assist. This begs the question “If the spray didn’t drift, where did it go?” This demo was a far cry from a formal mass accounting exercise, but my guess is it wasn’t effectively captured by our collectors and that a hefty fraction ended up on the ground. We would expect more uniform coverage under the boom, and some improvement in canopy penetration, but our ad hoc experiment wasn’t sophisticated enough to reveal it.

    In the end, we feel there are advantages to the air-assist mechanism. The ability to employ a finer spray quality when required, while greatly reducing spray drift and combating inclement weather to extend the spray window are appealing features. Research has clearly demonstrated that deep-canopy spray coverage and overall efficacy are improved when this system is properly adjusted to match spray conditions. We’re not comfortable with suggesting it warrants lower carrier volumes (i.e. not dose) because of the expertise required to adjust the system. However, to be fair, experienced operators have accomplished it

    We hope to see more air-assist options on boom sprayers.

  • Mode of Action and Spray Quality

    Mode of Action and Spray Quality

    The decision on which application method is best for herbicides boils down to two main factors: (a) target type and (b) mode of action. In general, it’s easier for sprays to stick to broadleaf plants on account of their comparatively larger leaf size and better wettability compared to grassy plants. There are exceptions, of course – at the cotyledon stage, broadleaf plants can be very small and a finer spray with tighter droplet spacing may be needed. Water sensitive paper is a very useful tool to make that assessment. Imagine if a tiny cotyledon could fit between deposits – that could be a miss!

    Some weeds are also more difficult to wet, and those may also need a finer spray or a better surfactant for proper leaf contact. An easy test is to apply plain water to the leaf with a spray bottle. If the water beads off or the droplets remain perched on top in discrete spheres, the surface is considered hard to wet. Most grassy weeds are hard to wet, while most broadleaf weeds are easy to wet.

    Grassy weeds are an especially difficult target because they have smaller, more vertically oriented leaves, and almost without exception are more difficult to wet than broadleaf species. All these factors call for finer sprays for effective targeting and spray retention.

    Broadleaf weeds usually have more horizontally oriented leaves which also happen to be larger. As a result, they can intercept larger droplets quite efficiently.

    There are about thirty mode of action (MOA) groups among the herbicides with about ten accounting for the majority in Canadian prairie agriculture. It’s probably an over-simplification to categorize them into just two groups – systemic and contact.  But that grouping goes a long way to making an application decision.

    Contact products (MOA Group 5, 6, 10, 14, 22, 27) must form a deposit that provides good coverage. Good coverage is an ambiguous term that basically means that droplets need to be closely spaced and cover a significant proportion of the surface area because their physiological effects occur under the droplet, and don’t spread far from there. One way to generate more droplets is to reduce droplet diameter, another is to add more water. A reasonable combination of both is ideal because simply making droplets smaller creates issues with evaporation and drift.

    Systemic products (MOA Group 1, 2, 4, 9) will translocate within the plant to their site of action after uptake. As a result, coverage is less important as long as sufficient dose is presented to the plant. In practice, this means coarser sprays and/or less water may be acceptable.

    When two factors are combined, either in a tank mix or a weed spectrum, the more limiting factor rules. Application of a tank mix or product that is active on both broadleaf and grass plants will be governed by the limitation placed on grass targets. A tank mix comprised of both systemic and contact products is governed by the limitations placed on contact products.

    A factor we should also consider is soil activity and the presence of residue. Studies have shown that soil-active products are relatively insensitive to droplet size. But if they have to travel through a layer of trash to get to the soil surface, more application volume is the best tool.

    Below are some recommended spray qualities and water volumes for use in Canada. The spray qualities listed in the table can be matched to a specific nozzle by referring to nozzle manufacturer catalogues, websites, or apps. Note that Wilger also offers traditional VMD measurements on their site, allowing users to be a bit more specific if necessary.

    Click here to download PDF

  • How to Spray Ginseng

    How to Spray Ginseng

    This article was co-written with Dr. Sean Westerveld, Ontario Ginseng and Herb Specialist.

    An effective ginseng protection program begins with observing the Integrated Pest Management (IPM) process:

    • diagnose the problem,
    • monitor the problem,
    • control the problem, and
    • monitor the results.

    When spraying is warranted, the operator should understand the basics of application technology. This not only includes the equipment, but the effects of changing spraying parameters (such as pressure or carrier volume), the impact of weather conditions (such as wind and relative humidity) and the product being applied (such as correct timing and safety requirements). The operator should also understand how to properly maintain, calibrate and orient the sprayer according to the nature of the target. Finally, monitoring the results requires the operator to respond to changes in the environment and target during application and to consider these factors when evaluating the outcome.

    The ginseng garden

    This is a four-year old garden, which represents one of the largest, densest ginseng canopies an applicator can spray. The six-foot wide beds in this particular garden are higher than most beds, making sprayer/tractor clearance an issue. It also means the distance-to-target from boom to canopy is less in the middle of the bed than it is nearer the alleys, making it difficult to ensure consistent coverage. Sprayer operators typically drive in the same direction over each bed, “training” the plants to bend in the same direction each time the tractor passes over the surface. This practice, combined with fenders on the tractor wheels, helps to minimize physical damage as the sprayer passes.

    Ginseng gardens have high beds.
    Ginseng gardens have high beds.
    In a four year old ginseng garden. Clearance is an issue.
    Clearance is an issue in a four year old ginseng garden.

    The sprayer

    This custom-built sprayer is a fairly standard design for most ginseng operations: Eight nozzles on each wing and nine on the centre boom. Spacing varies but this sprayer is on 11 inch centres, with the outermost nozzles on five inch centres and aimed outward towards the adjacent beds. Given the limited boom height, all nozzles are aimed back about 45 degrees to increase the distance to target and allow for overlap. The angle is critical to prevent gaps in the spray swath, but given the recommended practice of limited overlap for hollow cone nozzles, the 11 inch spacing may be a little shorter than required.

    Custom-made ginseng sprayer. A standard design.
    Custom-made ginseng sprayer. A standard design in Ontario.

    Spray coverage

    There is no hard and fast rule for spraying ginseng. The crop can receive 30 or more applications a year, most of which are fungicide applications. Tip: Monitoring the small plants inside the canopy is a good indicator of overall garden health.

    The following lists products available for use in Ontario at the time this article was published. The application target varies for each product, depending on the pest or disease the applicator wishes to control. As such, the application volume should reflect the location of the intended target. For example, a foliar-and-stem application should achieve consistent coverage of all leaf surfaces without incurring run-off. An application intended to reach the crown through the straw will require some run-off down the plant stem and should require a higher volume than a foliar-and-stem application. Many products will become immobilized if they dry onto the straw. Applications are best done to wet straw, followed by irrigation or rainfall to wash the product into the root zone. Applications for diseases like Rhizoctonia generally take place early in the season before the canopy closes, and higher volumes may not be required to achieve root coverage. In order to know how much is required for optimal coverage, read on.

    Table 1 – Spray target and relative volume by pest

    PestApplication Target – Specific ProductGarden AgeRelative Volume
    Alternaria and/or BotrytisFoliar and Stem – all productsSeedling – 2nd yearLow
    3rd – 4th yearModerate
    Phytophthora Leaf BlightFoliar and Stem – most productsSeedlingLow
    2nd-4th yearModerate
    Foliar – Aiette and PhostrolAllLow
    Phytophthora Root RotRoot – xylem-mobile root rot productsAllHigh
    Foliar – Aiette and PhostrolAllLow
    Phytophthora Leaf and RootRoot – xylem-mobile root rot productsAllHigh
    Foliar – Aiette and PhostrolAllHigh
    CylindrocarponRoot – all productsAllHigh
    RhizoctoniaRoot – most productsAllHigh
    Root – QuadrisSeedlingHigh
    PythiumRoot – all productsAllHigh
    AphidsFoliar and Stem/Berries – all productsAllModerate
    CutwormsStem – all productsAllLow
    Four-Lined Plant BugFoliar – all productsAllModerate
    LeafrollersFoliar and Stem – all productsAllModerate
    Root Lesion NematodesRoot – all productsAllHigh

    History of the ginseng boom in Ontario

    Historically, ginseng sprayer operators used brass hollow cone nozzles to spray ginseng. For reasons that are unclear, many then adopted the Casotti-style sprayer, which used higher volumes and an oscillating nozzle assembly to create a larger swath. This was determined to be overkill for ginseng, and it produced inconsistent coverage.

    Many growers (sadly, not all) switched back to horizontal booms and began using the Arag microjet assembly. Drop nozzles (aka drop arms, drop booms, drop legs, etc.) were positioned with disc-core hollow cone nozzles behind the wheels to direct spray into the canopy from below.

    Later, we demonstrated that the microjet mixing valve was difficult to set accurately, creating outputs +/- 50% the optimal rate. In response, a new variation on the Arag microjet was introduced, with a more reliable rate adjustment and a lower price tag (they are imported from Italy by a single North American distributor). The drop nozzles are absolutely critical for under canopy coverage, and growers have begun suspending them in each alley – not just behind the sprayer wheels. I predict the future boom arrangement will return to hollow cone nozzles, but in the form of molded poly nozzles with ceramic handling and drop nozzles with full cone disc-core assemblies. Air assist would be even better.

    Sprayer settings

    Most operators employ a ground speed of about 5 km/h (3.1 mph), operate at about 13.8 bar (200 psi) with nozzles spaced 25-30.5 cm (10-12”) spraying anywhere from 1,000 L/ha (107 gal./ac.) to 1,686 L/ha (180 gal./ac.). The application volume should reflect the stage of crop growth, the age of the garden and the target in question (see Table 1). Applicators should also consider droplet size (Table 2). This is difficult to control given that the majority use Arag microjets with the 1.5 mm orifice disc. In which case, pressure choice will affect median droplet size, with lower pressures increasing median droplet diameter and vice versa.

    Table 2 The Impact of Droplet Size

    Droplet SizeDrops per areaRetentionCanopy PenetrationDrift Potential
    FineHighHighLowHigh
    MediumModerateModerateModerateModerate
    CoarseLowLowHighLow
    Two versions of the ARAG Microjet.
    Two versions of the ARAG Microjet.

    The older style Arag microjets with 1.5 mm diameter discs have highly variable outputs. We developed tables listing their rates with the mixing valve handle set in two positions. They can be found here. We have also developed tables for the newer Arag nozzles for the 1.0, 1.2 and 1.5 mm discs based on 28 cm (11”) spacing. They are listed in Metric and U.S. Imperial.

    Download the tables here: Metric (or) U.S. Imperial

    ARAG Microjet rates (Metric)
    ARAG Microjet rates (Metric)
    ARAG Microjet rates (U.S. Imperial)
    ARAG Microjet rates (U.S. Imperial)

    Timed output test

    Park the clean sprayer and get the pressure up to the desired level. Using a calibration vessel, perform a timed output test to determine each nozzle rate. I prefer the SpotOn SC-4 and a length of 1” braided line to direct the spray into the vessel. You will get wet, so ensure the water is clean and/or wear appropriate PPE.

    Timed output test. Prepare to get very wet. Sprayer must be clean and PPE is a must.
    Timed output test. Prepare to get very wet. Unless sprayer is sparkling clean, like this one, PPE is a must.

    At 200 psi, we took readings from each microjet and found that while they were more consistent than the older model, there was still a lot of variation from tip to tip. This required us to turn the valve on the nozzle to get a more consistent output, then take another reading, and repeat until we liked what we saw. It became tricky to adjust the rate without reducing the hollow cone pattern to a solid stream because only a slight turn of the nozzle was required. Once we had it, we tightened the lock nut and moved to the next nozzle. Table 3 is a record of the procedure.

    While calibrating, we noticed some of the nozzles would suddenly appear plugged, or dense lines could be seen in the spray cone indicating something was wrong. We cleaned them to discover bits of plastic from the poly tank. I asked about strainers, but they are not available for the microjets. I asked about in-line filters, but they aren’t rated for 200 psi. Filling the tank with clean water is very important, but even more so with these nozzles.

    Table 3 – Calibrating the new Arag microjets

    Nozzle PositionRates in gpm (bold represents final rate)Nozzle PositionRates in gpm (bold represents final rate)
    10.97, 0.96, 0.93140.77, 0.92
    21.07, 1.07, 1.26, 0.9150.76, 0.8, 0.95
    31.1, 1.1, 1.1, 0.93160.97, 0.95
    40.73, 0.92170.73, 1.0, 1.07, 1.0, 0.98
    50.92, 0.92180.83, 0.94
    60.94190.77, 1.0, 0.99, 1.1, 1.24, 10.8, 0.93
    70.88200.77, 0.88
    80.92210.71, 0.95
    90.95220.77, 1.07, 1.04, 1.1, 1.27, 1.0
    100.90231.06, 0.97
    110.86240.77, 0.97
    120.76, 0.83, 1.0, 1.0, 1.2, 0.92250.68, 0.95
    130.77, 0.92
    Average output: 0.93 gpm, standard deviation of 0.03 gpm.

    Ground speed

    Once the nozzles were adjusted, we filled the tank ½ full and measured out 25 m in the bed. We would normally do 50 m, but the row was too short. The sprayer operator drove the course and we measured the time it took to travel the 25 m distance. Pass one took 18.5 seconds and pass two took 18.3 seconds. That’s an average of 18.4, which we then double so it works in the formula = 36.8 s.

    ( 50 × 3.6 ) ÷ 36.8 s = 4.9 km/h

    Adjusting the drop leg nozzles

    This sprayer had drops behind the wheels and two more to hang in the adjacent alleys. This is excellent because research has shown considerably improved coverage with directed spray from drop arms. In my mind, these are not optional – they are mandatory!

    Drop nozzles in the alleys.
    Drop nozzles in the alleys.

    We swapped out the hollow cones we found in those positions for full cone disc and core (D5-DC35). Full cones increase the number of droplets that will clear the raised bed and enter the canopy. When adjusting them, be sure to minimize the portion intercepting the bed, while minimizing the spray escaping up through the canopy. It’s a fine line.

    Aiming drop arms in a ginseng garden.
    Aiming drop arms in a ginseng garden.

    Calculating sprayer output

    25 microjets at 200 psi = average of 0.93 gpm = 23.25 gpm
    8 × D5-DC35 at 200 psi = 1.4 gpm × 8 = 11.2 gpm
    That’s ~34.5 gpm for the boom.
    Ground speed was 4.9 k/hr or ~ 3mph.

    GPA = (GPM × 5,940) ÷ (mph ÷ nozzle spacing in inches)
    GPA = (34.5 gpm x 5,940) ÷ (3.0 mph × 11 inches)
    GPA = 204,940 ÷ 33
    62.1 GPA or about 580 L/ha.

    Diagnosing coverage

    Water sensitive paper, which turns from yellow to blue when contacted by moisture, was placed in the ginseng canopy. Two sets of papers were set out, with four papers in each set. The canopy was still wet with rain, which made placement difficult as the papers would accidentally contact water on the leaves and change colour prematurely.

    Water-sensitive paper wrapped around tubes for panoramic coverage.
    Water-sensitive paper wrapped around tubes for panoramic coverage.
    Position#1Clipped face-down on the underside of leaves at the top of the canopy.
    Position#2Clipped face-up on the upper side of leaves in the middle of the canopy.
    Position#3Clipped face-down on the underside of leaves in the middle of the canopy.
    Position#4Wrapped around a plastic tube and threaded over a wire flag, located at the foot of the plant to give panoramic coverage at the root.

    The sprayer passed over the canopy spraying water, and papers were carefully retrieved, allowed to dry and scanned.

    Panoramic papers in situ.
    Panoramic papers in situ.
    Flags mark the locations of papers.
    Flags mark the locations of papers.

    Generally, there were no “misses” whatsoever. Position 1 showed excellent coverage, with no indication of run-off and a high droplet count with even distribution. This is ideal for foliar applications, and under-leaf coverage is notoriously difficult to achieve. Positions 2 through 4 showed excessive coverage, with the exception of one of the position 3 papers, which was still adequate.

    Example of coverage and paper locations in canopy.
    Example of coverage and paper locations in canopy.

    Next steps

    Ideally, the operator would drop the pressure by 20 psi increments, reducing output until coverage failed. It is important to note that the operating pressure must never approach the lower end of the nozzle’s recommended pressure range, or the spray quality will be compromised and so will coverage.

    Once the coverage is considered a failure, the operator would return to the lowest output that did a good job, and the sprayer is calibrated for that crop (at that stage of growth).

    Note that the calibration must be performed for each significantly different crop. With the exception of an early-season drench intended to contact the entire root, an emerging one year old garden would need a very different prescription than a four year old garden with a fully-developed canopy. Plus, the weather conditions will affect coverage, so do not calibrate in conditions you would not normally spray in. Hot and dry and windy conditions produce very different coverage compared to cool, humid and still conditions.

    Once the operator knows what each garden requires, they will be able to mix their tanks using the same concentration of carrier to formulated product as they normally use, but likely go further on the tank. It will take some practice before the operator knows how much spray mix is required to finish the job.

  • Pro Tips for Pre-Harvest and Desiccation Sprays

    Pro Tips for Pre-Harvest and Desiccation Sprays

    A version of this article was originally written by @nozzle_guy as a guest blog for Farm At Hand, and is reproduced with permission.

    One of the smartest decisions a grower could make is to consider a late-season harvest-aid application. Particularly in years with thinner stands, weeds can maintain a foothold. Late season moisture can give new life to late emerging plants or branches.  When the crop is ready to cut, this could mean all sorts of cutterbar, pickup reel, feederchain, and sieve headaches.

    A desiccant or pre-harvest herbicide application can help avoid those problems.  The challenge is to get the spray into, or through, a mature crop canopy.  Here are some pointers to do it right.

    1. Evaluate where within the canopy the spray needs to go to do its job. If you’re considering a pre-harvest herbicide, are you looking to control dandelions or buckwheat near the bottom of the canopy, or are you trying to get thistles or quackgrass, whose leaves are near the top? If you’re mostly trying to accelerate drydown with a contact product, where in the canopy are the green stems and leaves that you need to contact?
    2. Take a bird’s eye view of your canopy. That’s how the spray sees it.  If you can clearly see your target, the spray application is pretty straightforward because most droplets will make their way there easily. But if the target is obscured by a lot of foliage, or if it’s vertical, the job is much more challenging and will require some combination of more water, slower speeds, angled tips or finer sprays.
    3. To hit plant parts that you can’t see, one of the main tools is finer sprays. The smaller droplets have an easier time changing direction to get around obstacles like leaves, and they are also much more likely to be intercepted by petioles and stems, and to stick to them. This can be both an advantage and disadvantage – for example, the awns in bearded cereals are notoriously effective at capturing the smallest droplets before they can do any good further down.  If you don’t want to install a different nozzle to get a finer spray, simply increase the spray pressure of your low-drift nozzle to 80, 90, even 100 psi.  This will create enough fine droplets. But don’t expect the higher pressure to push the spray into the canopy.  Only air-assist can do that.
    4. To get more spray deeper into the canopy, slow down, add water, and point nozzles backward. The backward orientation helps offset the forward travel speed, giving the droplets a slower net forward velocity that helps their downward movement.
    5. If you’re using contact products like diquat, paraquat, saflufenacil or carfentrazone, use generous amounts of water, and slightly finer sprays. Make sure that spray drift control remains a priority and pay attention to water quality.
    6. Test your water and make sure your water doesn’t have turbidity (suspended clay or other organic matter), for glyphosate and diquat or paraquat, and hardness, for glyphosate. Aluminum sulphate can help get rid of turbidity in a pond, but it takes time (treat turbid water at least 24 to 48 h before you need it).  If treating a storage vessel, expect a layer of sediment. Ammonium sulphate (AMS) and other water conditioners can remove antagonizing hard water ions like magnesium and calcium. This is especially important as we increase water volumes with glyphosate to get better coverage. The higher water volumes give a concentration advantage to the hardness minerals.
    7. Diquat and paraquat’s mode of action benefits from being applied in the evening. The absence of the sun allows it to be taken up and slightly moved (by diffusion, not true translocation) within the leaf before morning sunlight activates it. Once activated by the sun, these products exert their activity and movement stops. If you’re not careful, the tighter window of evening-only applications could get you behind. And of course, be aware of the signs of inversions and know when to quit.
    8. Plan ahead and make sure you give yourself enough time, because to do the job right you’ll be using more water and driving a bit slower. Focus on productivity tools like a fast, efficient fill to make up the lost time.

    A good job with a pre-harvest herbicide or a harvest-aid can save many harvesting headaches, and can help dry down during less than ideal conditions. It’s another reason why the sprayer may be the most important implement on the farm.

  • Spray Coverage in Field Tomato

    Spray Coverage in Field Tomato

    Spraying field tomato is difficult – period.

    In Ontario, early variety tomato canopies get very dense in July. The inner canopy is relatively still, humid, cool and a perfect environment for diseases such as late blight. It is challenging to deliver fungicides to the inner canopy and this can lead to inadequate disease control. Matters are slightly improved as the fruit grows and pulls the canopy open, and staked tomatoes might allow for the use of directed sprays, such as drop arms in staked peppers. But, there’s no getting around it – from a droplet’s perspective, it’s tough to get through the outer canopy.

    DSCF0002
    Imagine you are a spray droplet trying to get inside this canopy.

    Study 1 – Qualitative Observations

    In August, 2011 we worked in a market garden operation in Bolton comparing the spray coverage from four different nozzle configurations. We used the growers typical spray parameters: a travel speed of 4.5 km/h (2.8 mph), an operating pressure of about 4 bar (60 psi), a boom height of 45 cm (18 in) above the ground, and a sprayer output of 550 L/ha (~60 gpa). To monitor spray coverage, water sensitive paper was placed face-up in the middle of the tomato canopy. This diagnostic tool turns from yellow to blue when contacted by spray.

    Water-sensitive paper at top of tomato canopy - easy to hit.
    Water-sensitive paper at top of tomato canopy – easy to hit.

    This particular sprayer was equipped with an air assist sleeve that blew a curtain of air into the canopy at about 100 km/h (65 mph) as indicated by an air speed monitor placed at the air outlet. When properly adjusted, air-assist booms have a number of benefits:

    • They part the outer canopy giving spray access to the inner canopy.
    • They rustle leaves to expose all surfaces to spray.
    • They permit the use of smaller droplets, which are more numerous and adhere to vertical surfaces, by entraining them and reducing drift.
    • They extend the spray window by permitting the applicator to operate in slightly higher ambient wind speeds.
    Boom sprayer with air assist sleeve operating.
    Boom sprayer with air assist sleeve operating.

    We sprayed using the four different nozzle configurations, with and without air assist. Our goal was to make qualitative assessments (Good, Moderate, Poor), and here’s what we observed:

    Nozzle Type / Sprayer OutputWith Air AssistWithout Air Assist
    80 degree flat fans /~550 L/ha (60 g/ac)
    • Good coverage in upper canopy
    • Poor / Moderate canopy penetration
    • Low drift
    • Good coverage in upper canopy
    • Poor canopy penetration
    • Moderate drift
    80 degree air induction flat fans /~550 L/ha (60 g/ac)
    • Inconsistent upper canopy coverage
    • Poor canopy penetration
    • “No” drift
    • Inconsistent upper canopy coverage
    • Poor canopy penetration
    • “No”/Low drift
    TwinJet dual 80 degree flat fans /~550 L/ha (60 g/ac)
    • Good coverage in upper canopy
    • Poor / Moderate canopy penetration
    • Moderate Drift
    • Good coverage in upper canopy
    • Poor canopy penetration
    • Moderate/High drift
    Hollow cones /~750 L/ha (80 g/ac)
    • Good coverage in upper canopy
    • Moderate canopy penetration
    • Low drift
    • Good coverage in upper canopy
    • Poor canopy penetration
    • Very High drift

    The air induction nozzles performed poorly. Their Coarse/Very Coarse droplets impacted on the outer canopy, created run-off and resulted in very little canopy penetration. Medium droplets produced by twin fans and conventional flat fans were both inconsistent with inner-canopy coverage, but some advantage may have been observed with air assist. The TwinJets contributed to higher drift (likely because they were too high off the canopy) but otherwise produced coverage similar to the conventional flat fans. From these observations, the convention that spray shape (e.g. cone, fan, twin) has little or no impact on broadleaf canopy penetration holds true.

    Acceptable spray coverage deep in canopy (harder to hit) using hollow cone nozzles.
    Acceptable spray coverage deep in canopy (harder to hit) using hollow cone nozzles and air assist.

    After inspecting the papers deep in the canopy, we were surprised that air assist did not obviously improve canopy penetration. It did seem to help, but it wasn’t a slam-dunk. This may be because finer droplets (<50µm) are not easily seen on water sensitive paper. It might also be because we did not calibrate the air speed to the canopy: too little air and spray impacts on the outer canopy, while too much air forces leaves out of the way and spray is blown into the ground. It was obvious that drift was greatly reduced, so logically the spray had to have gone somewhere – we can only assume it entered the canopy.

    The best results were achieved with hollow cones and air assist. Theoretically, smaller droplets should improve the potential for coverage by sheer number, but they slow quickly and are easily blown off course. Winds were only about 5 km/h (3 mph) during the trials. Had they been higher, the no-air-assist condition would have resulted in poorer canopy coverage. While we feel the air assist improved inner canopy coverage, we attribute much of the performance to the spray volume of 750 L/ha (80 gpa), which was significantly higher than we used with the other nozzles. When we attempted lower volumes using the hollow cones (not shown) the inner canopy coverage was greatly compromised. Higher volumes are a demonstrated means for improving canopy penetration, so this observation is consistent with what was expected.

    The 2011 trial suggested that hollow cone tips used with high volume and air assist, improved canopy coverage and penetration. They are, however, very prone to drift and their use is not recommended without an air assist sleeve to counter the spray drift. Spray volumes over 500 L/ha are highly recommended.

    Study 2 – Quantitative Observations

    In July, 2016 we ran another study in Chatham-Kent. This operation was concerned about spray drift and recently changed from Hardi hollow cones on 25 cm (10″) centres to TeeJet Turbo TwinJets on 50 cm (20″) centres. They wanted to know if they had improved their coverage. We decided to test four nozzles at similar driving speeds and volumes.

    Once again, we used water-sensitive paper. This time we placed two pieces back-to-back (face up and face down) about 1/3 down into the canopy. Then we placed two more in the same orientation about 2/3 down into the canopy. We did this for three plants for each pass. The next four images show the visual drift and weather conditions for each nozzle. Note that only one boom section was nozzled (indicated by a white line) in each condition.

    Condition 1 – Turbo TwinJet (Coarse Spray Quality)

    2016_Tomato_Sprayers_TTJ

    Condition 2 – Hollow Cones (10″ centres – Fine/Medium Spray Quality)

    2016_Tomato_Sprayers_hollowcone

    Condition 3 – XR 110° FlatFan (Fine Spray Quality)

    2016_Tomato_Sprayers_XR

    Condition 4 – TeeJet 3070 (Coarse Spray Quality)

    2016_Tomato_Sprayers_3070

    It was very humid, making it difficult to place and retrieve the papers without smearing them. This made it tricky to discern differences in coverage, and the blurring prevented us from quantifying droplet density (i.e. number of drops per unit area). Nevertheless, papers were scanned and the percent coverage was calculated using the DepositScan software developed by the USDA’s Dr. Heping Zhu. The average percent-coverage (± S.E. n=3) is shown in the image below.

    2016_Tomato_Sprayers_Coverage

    Coverage on the upward-facing papers in the upper portion of the canopy showed excessive coverage for all nozzles but the 3070. Little or no coverage was detected on the downward-facing cards, but without air-assist or a directed application (e.g. drop arms), this was expected. It’s the deeper canopy that’s of particular interest. The only significant difference may lie in the XR flat fan which showed more coverage on the upward facing papers and some (however little) on the downward facing papers.

    This came as something of a surprise given that the XR produced a Fine spray quality and there was no air assist to guide spray into the canopy. I believe the high humidity and low winds played a role in this outcome by reducing evaporation and off-target drift. On a drier, windier day, we likely would not have seen this level of inner canopy coverage for either the XR or the hollow cone. By comparison, the Turbo TwinJet with its Coarse spray quality not only reduces off target drift, but would be more resilient in drier and windier weather and may very well have produced the best coverage by comparison.

    Take Home

    Drawing from both studies:

    • Properly calibrated air assist will reduce drift and has promise to improve canopy penetration/coverage.
    • Spray shape (e.g. twin, hollow cone, flat fan) does not seem to play a role in canopy penetration.
    • Spray quality larger than Coarse may negatively impact canopy penetration in tomato.
    • Coarse spray quality is perhaps the most versatile option when volume is sufficient (>500 L/ha).
    • Fine-Medium spray quality is only a viable option in high humidity and light winds. However, air assist is critical to counter drift, and high spray volumes (>500 L/ha) are still required despite the higher droplet count.
    • Underleaf coverage is exceedingly difficult to achieve, even with finer spray quality and air assist.
    This occurred in Ontario (date and location withheld). The sprayer missed the outer edge of the tomato field during a late blight application. An unintentional field check, and amazing to see the results.