
- Start with IPM: diagnose, monitor, control, monitor results.
- Calibrate sprayer with timed output tests; adjust each nozzle and lock settings for consistent flow.
- Set pressure, droplet size, ground speed, and carrier volume to match garden age and target (foliar versus root).
- Use drop nozzles and directed full-cone assemblies for under-canopy coverage; consider hollow cone return and air assist.
- Verify coverage with water-sensitive paper, reduce pressure until coverage fails, then use lowest successful setting; calibrate in typical weather.
This text was generated by OpenAI GPT 5 Mini
This article was co-written with Dr. Sean Westerveld, Ontario Ginseng and Herb Specialist.
An effective ginseng protection program begins with observing the Integrated Pest Management (IPM) process:
- diagnose the problem,
- monitor the problem,
- control the problem, and
- monitor the results.
When spraying is warranted, the operator should understand the basics of application technology. This not only includes the equipment, but the effects of changing spraying parameters (such as pressure or carrier volume), the impact of weather conditions (such as wind and relative humidity) and the product being applied (such as correct timing and safety requirements). The operator should also understand how to properly maintain, calibrate and orient the sprayer according to the nature of the target. Finally, monitoring the results requires the operator to respond to changes in the environment and target during application and to consider these factors when evaluating the outcome.
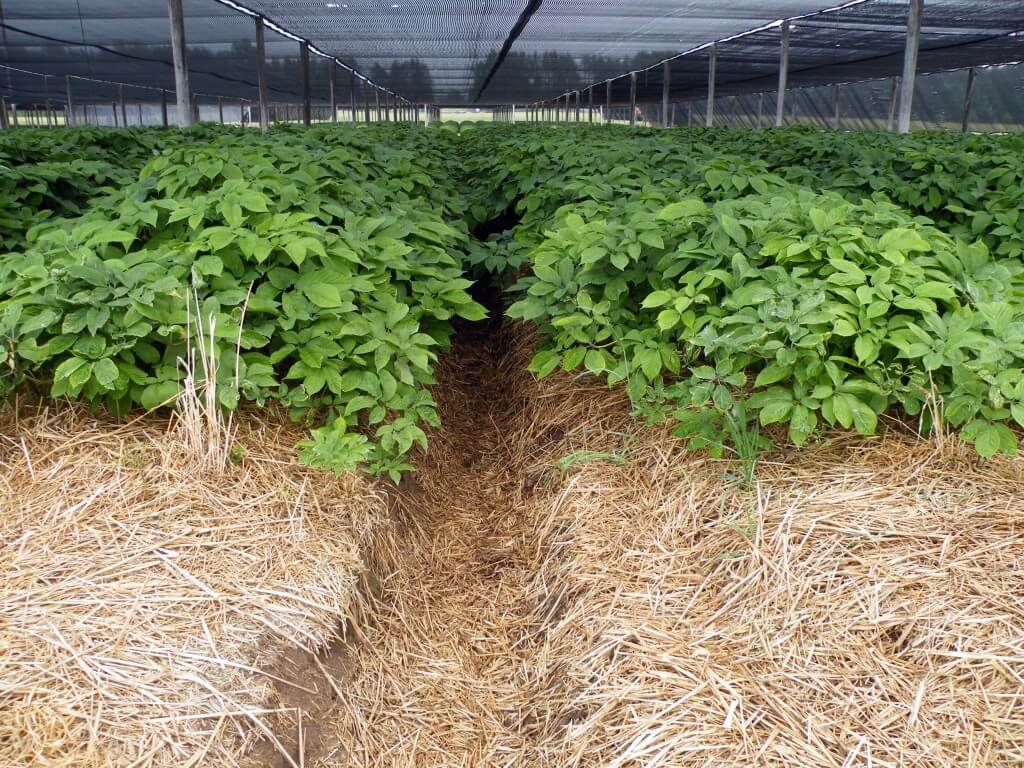
The ginseng garden
This is a four-year old garden, which represents one of the largest, densest ginseng canopies an applicator can spray. The six-foot wide beds in this particular garden are higher than most beds, making sprayer/tractor clearance an issue. It also means the distance-to-target from boom to canopy is less in the middle of the bed than it is nearer the alleys, making it difficult to ensure consistent coverage. Sprayer operators typically drive in the same direction over each bed, “training” the plants to bend in the same direction each time the tractor passes over the surface. This practice, combined with fenders on the tractor wheels, helps to minimize physical damage as the sprayer passes.
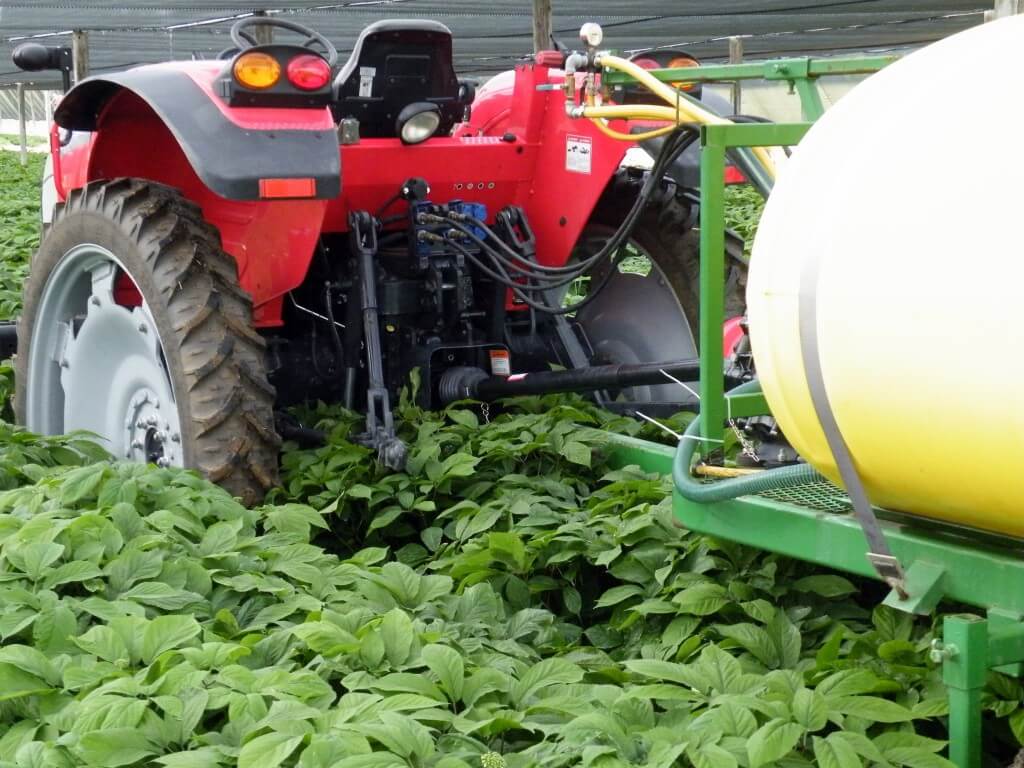
The sprayer
This custom-built sprayer is a fairly standard design for most ginseng operations: Eight nozzles on each wing and nine on the centre boom. Spacing varies but this sprayer is on 11 inch centres, with the outermost nozzles on five inch centres and aimed outward towards the adjacent beds. Given the limited boom height, all nozzles are aimed back about 45 degrees to increase the distance to target and allow for overlap. The angle is critical to prevent gaps in the spray swath, but given the recommended practice of limited overlap for hollow cone nozzles, the 11 inch spacing may be a little shorter than required.
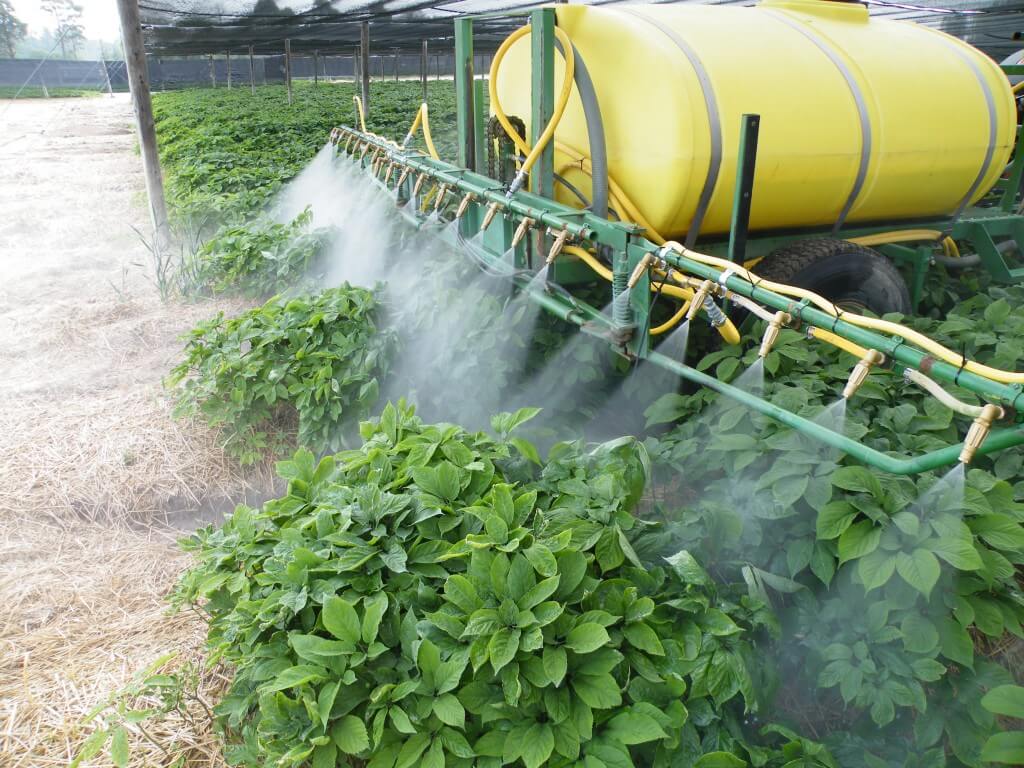
Spray coverage
There is no hard and fast rule for spraying ginseng. The crop can receive 30 or more applications a year, most of which are fungicide applications. Tip: Monitoring the small plants inside the canopy is a good indicator of overall garden health.
The following lists products available for use in Ontario at the time this article was published. The application target varies for each product, depending on the pest or disease the applicator wishes to control. As such, the application volume should reflect the location of the intended target. For example, a foliar-and-stem application should achieve consistent coverage of all leaf surfaces without incurring run-off. An application intended to reach the crown through the straw will require some run-off down the plant stem and should require a higher volume than a foliar-and-stem application. Many products will become immobilized if they dry onto the straw. Applications are best done to wet straw, followed by irrigation or rainfall to wash the product into the root zone. Applications for diseases like Rhizoctonia generally take place early in the season before the canopy closes, and higher volumes may not be required to achieve root coverage. In order to know how much is required for optimal coverage, read on.
Table 1 – Spray target and relative volume by pest
| Pest | Application Target – Specific Product | Garden Age | Relative Volume |
| Alternaria and/or Botrytis | Foliar and Stem – all products | Seedling – 2nd year | Low |
| 3rd – 4th year | Moderate | ||
| Phytophthora Leaf Blight | Foliar and Stem – most products | Seedling | Low |
| 2nd-4th year | Moderate | ||
| Foliar – Aiette and Phostrol | All | Low | |
| Phytophthora Root Rot | Root – xylem-mobile root rot products | All | High |
| Foliar – Aiette and Phostrol | All | Low | |
| Phytophthora Leaf and Root | Root – xylem-mobile root rot products | All | High |
| Foliar – Aiette and Phostrol | All | High | |
| Cylindrocarpon | Root – all products | All | High |
| Rhizoctonia | Root – most products | All | High |
| Root – Quadris | Seedling | High | |
| Pythium | Root – all products | All | High |
| Aphids | Foliar and Stem/Berries – all products | All | Moderate |
| Cutworms | Stem – all products | All | Low |
| Four-Lined Plant Bug | Foliar – all products | All | Moderate |
| Leafrollers | Foliar and Stem – all products | All | Moderate |
| Root Lesion Nematodes | Root – all products | All | High |
History of the ginseng boom in Ontario
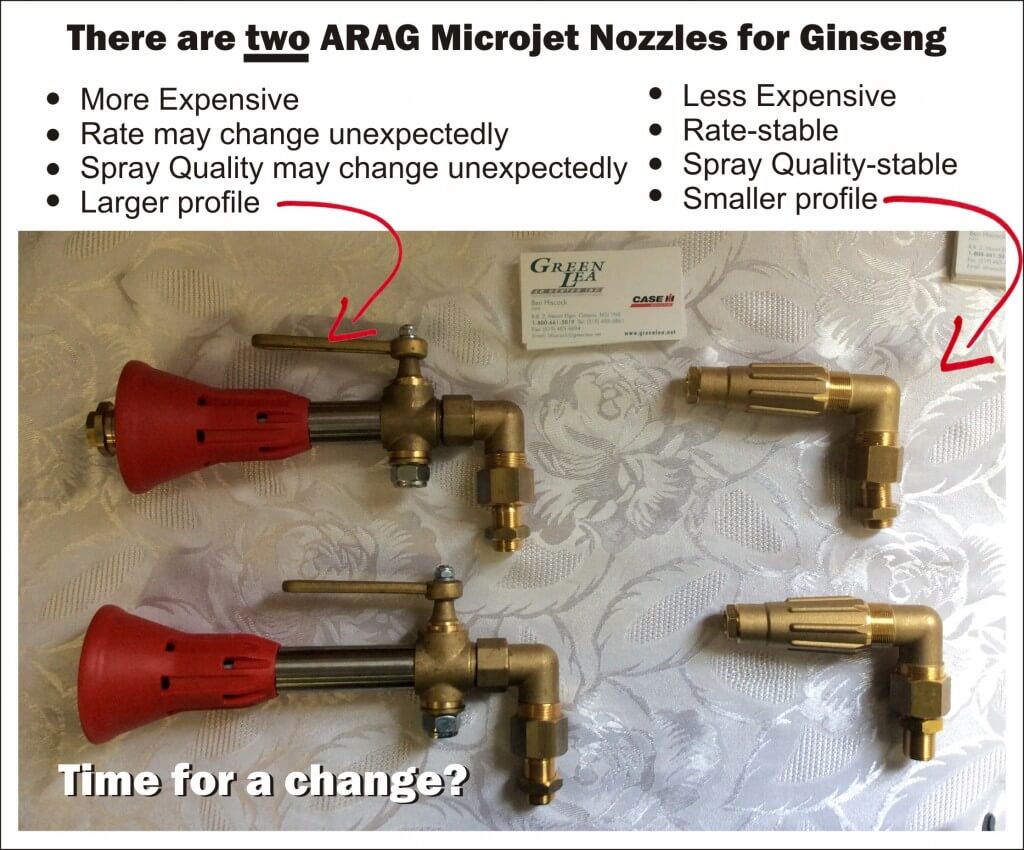
Historically, ginseng sprayer operators used brass hollow cone nozzles to spray ginseng. For reasons that are unclear, many then adopted the Casotti-style sprayer, which used higher volumes and an oscillating nozzle assembly to create a larger swath. This was determined to be overkill for ginseng, and it produced inconsistent coverage.
Many growers (sadly, not all) switched back to horizontal booms and began using the Arag microjet assembly. Drop nozzles (aka drop arms, drop booms, drop legs, etc.) were positioned with disc-core hollow cone nozzles behind the wheels to direct spray into the canopy from below.
Later, we demonstrated that the microjet mixing valve was difficult to set accurately, creating outputs +/- 50% the optimal rate. In response, a new variation on the Arag microjet was introduced, with a more reliable rate adjustment and a lower price tag (they are imported from Italy by a single North American distributor). The drop nozzles are absolutely critical for under canopy coverage, and growers have begun suspending them in each alley – not just behind the sprayer wheels. I predict the future boom arrangement will return to hollow cone nozzles, but in the form of molded poly nozzles with ceramic handling and drop nozzles with full cone disc-core assemblies. Air assist would be even better.
Sprayer settings
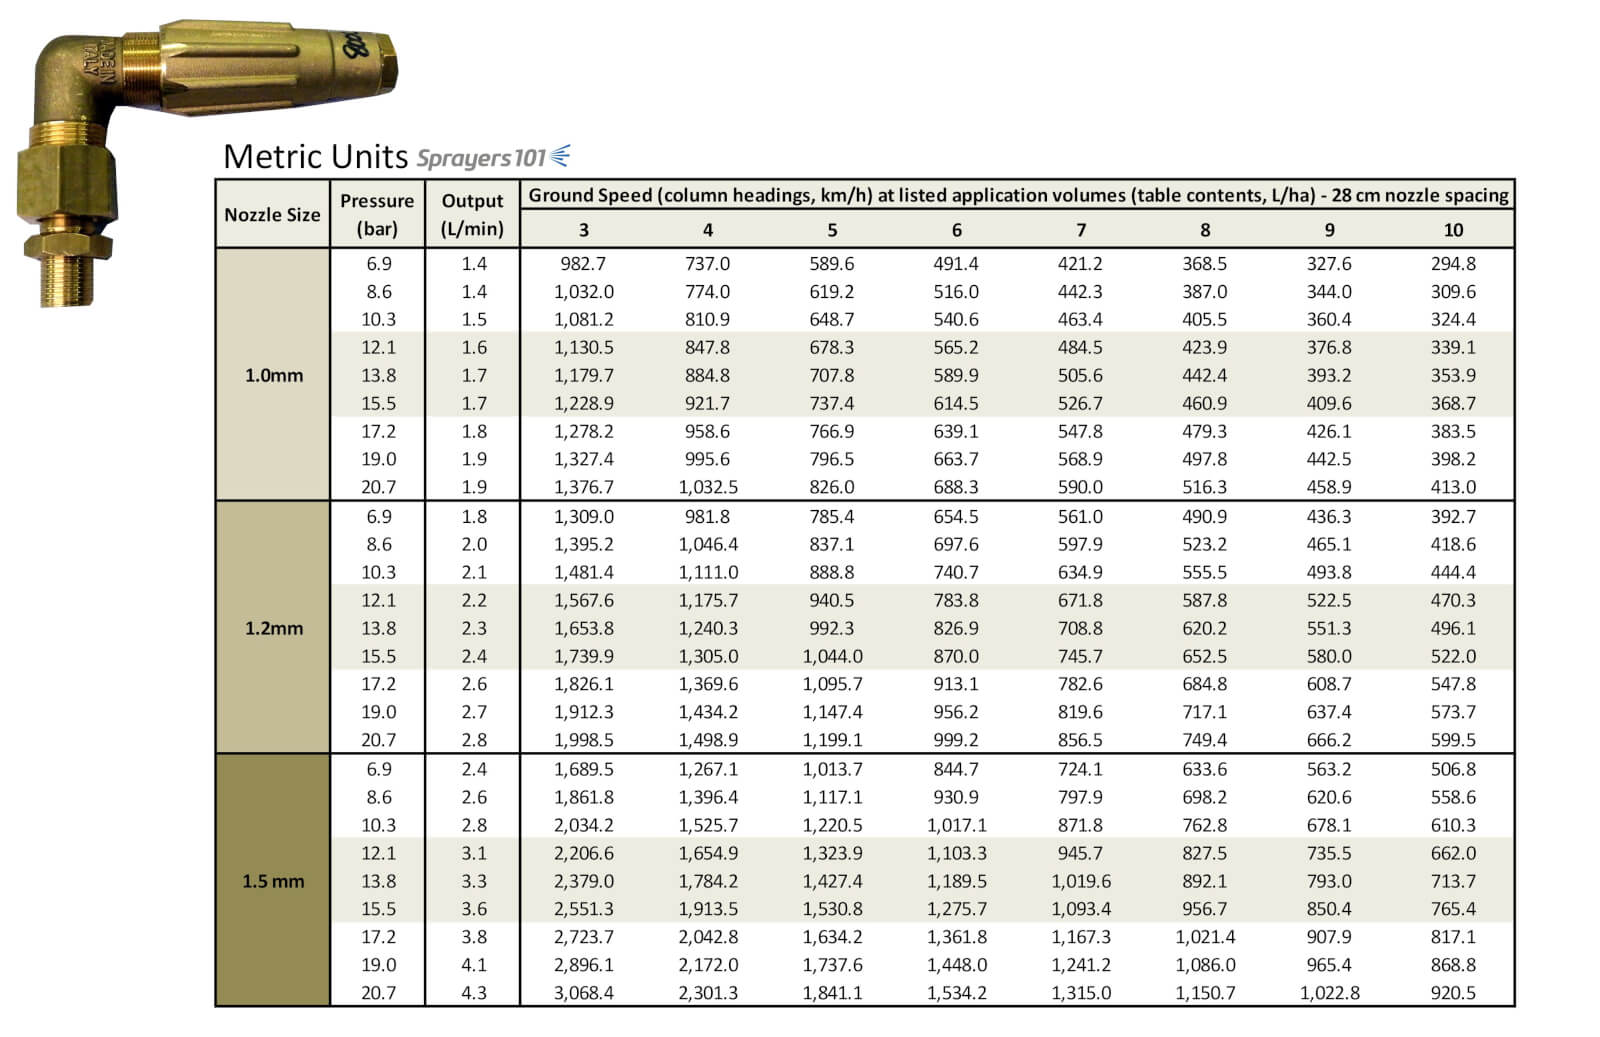
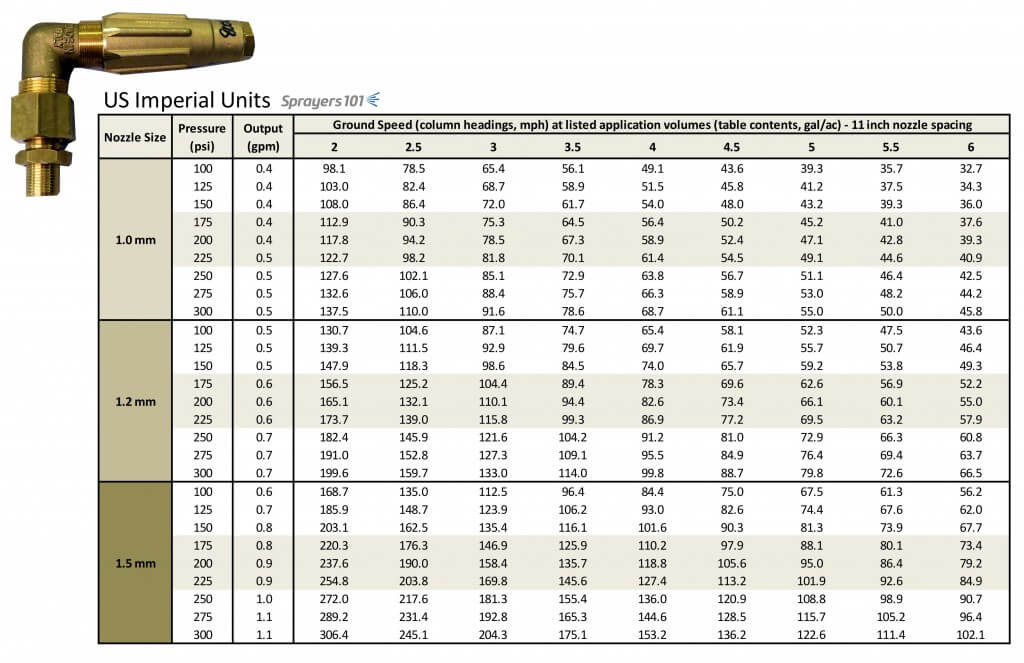
Most operators employ a ground speed of about 5 km/h (3.1 mph), operate at about 13.8 bar (200 psi) with nozzles spaced 25-30.5 cm (10-12”) spraying anywhere from 1,000 L/ha (107 gal./ac.) to 1,686 L/ha (180 gal./ac.). The application volume should reflect the stage of crop growth, the age of the garden and the target in question (see Table 1). Applicators should also consider droplet size (Table 2). This is difficult to control given that the majority use Arag microjets with the 1.5 mm orifice disc. In which case, pressure choice will affect median droplet size, with lower pressures increasing median droplet diameter and vice versa.
Table 2 – The Impact of Droplet Size
| Droplet Size | Drops per area | Retention | Canopy Penetration | Drift Potential |
| Fine | High | High | Low | High |
| Medium | Moderate | Moderate | Moderate | Moderate |
| Coarse | Low | Low | High | Low |
The older style Arag microjets with 1.5 mm diameter discs have highly variable outputs. We developed tables listing their rates with the mixing valve handle set in two positions. They can be found here. We have also developed tables for the newer Arag nozzles for the 1.0, 1.2 and 1.5 mm discs based on 28 cm (11”) spacing. They are listed in Metric and U.S. Imperial.
Download the tables here: Metric (or) U.S. Imperial
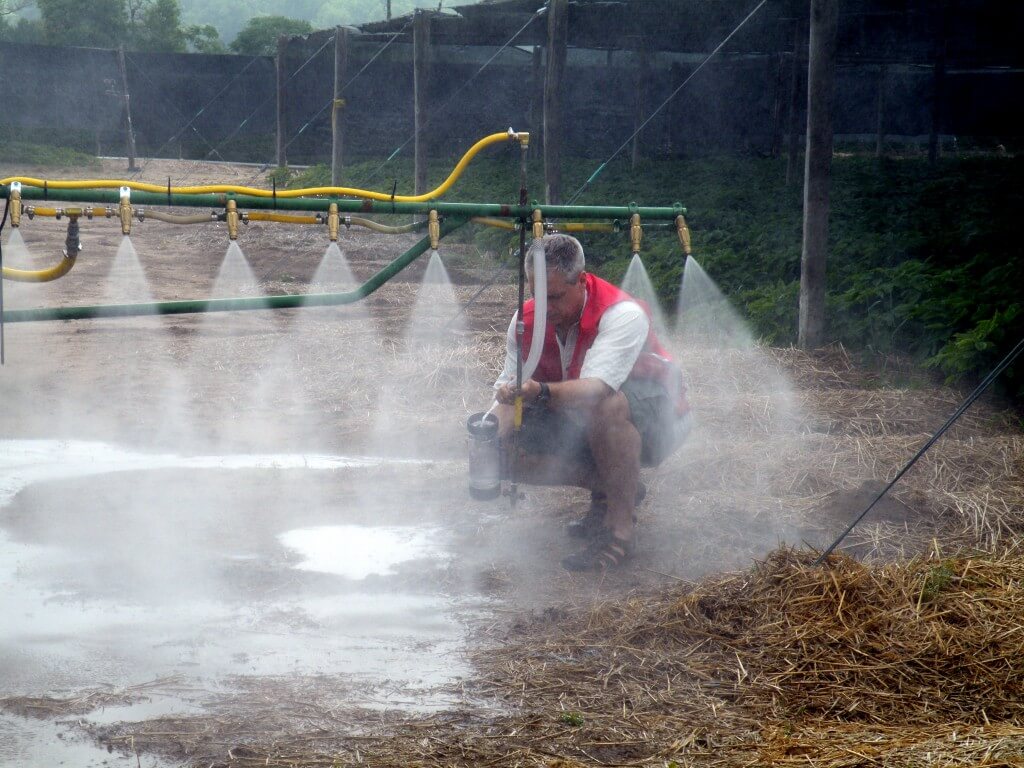
Timed output test
Park the clean sprayer and get the pressure up to the desired level. Using a calibration vessel, perform a timed output test to determine each nozzle rate. I prefer the SpotOn SC-4 and a length of 1” braided line to direct the spray into the vessel. You will get wet, so ensure the water is clean and/or wear appropriate PPE.
At 200 psi, we took readings from each microjet and found that while they were more consistent than the older model, there was still a lot of variation from tip to tip. This required us to turn the valve on the nozzle to get a more consistent output, then take another reading, and repeat until we liked what we saw. It became tricky to adjust the rate without reducing the hollow cone pattern to a solid stream because only a slight turn of the nozzle was required. Once we had it, we tightened the lock nut and moved to the next nozzle. Table 3 is a record of the procedure.
While calibrating, we noticed some of the nozzles would suddenly appear plugged, or dense lines could be seen in the spray cone indicating something was wrong. We cleaned them to discover bits of plastic from the poly tank. I asked about strainers, but they are not available for the microjets. I asked about in-line filters, but they aren’t rated for 200 psi. Filling the tank with clean water is very important, but even more so with these nozzles.
Table 3 – Calibrating the new Arag microjets
| Nozzle Position | Rates in gpm (bold represents final rate) | Nozzle Position | Rates in gpm (bold represents final rate) |
| 1 | 0.97, 0.96, 0.93 | 14 | 0.77, 0.92 |
| 2 | 1.07, 1.07, 1.26, 0.9 | 15 | 0.76, 0.8, 0.95 |
| 3 | 1.1, 1.1, 1.1, 0.93 | 16 | 0.97, 0.95 |
| 4 | 0.73, 0.92 | 17 | 0.73, 1.0, 1.07, 1.0, 0.98 |
| 5 | 0.92, 0.92 | 18 | 0.83, 0.94 |
| 6 | 0.94 | 19 | 0.77, 1.0, 0.99, 1.1, 1.24, 10.8, 0.93 |
| 7 | 0.88 | 20 | 0.77, 0.88 |
| 8 | 0.92 | 21 | 0.71, 0.95 |
| 9 | 0.95 | 22 | 0.77, 1.07, 1.04, 1.1, 1.27, 1.0 |
| 10 | 0.90 | 23 | 1.06, 0.97 |
| 11 | 0.86 | 24 | 0.77, 0.97 |
| 12 | 0.76, 0.83, 1.0, 1.0, 1.2, 0.92 | 25 | 0.68, 0.95 |
| 13 | 0.77, 0.92 |
Ground speed
Once the nozzles were adjusted, we filled the tank ½ full and measured out 25 m in the bed. We would normally do 50 m, but the row was too short. The sprayer operator drove the course and we measured the time it took to travel the 25 m distance. Pass one took 18.5 seconds and pass two took 18.3 seconds. That’s an average of 18.4, which we then double so it works in the formula = 36.8 s.
( 50 × 3.6 ) ÷ 36.8 s = 4.9 km/h
Adjusting the drop leg nozzles
This sprayer had drops behind the wheels and two more to hang in the adjacent alleys. This is excellent because research has shown considerably improved coverage with directed spray from drop arms. In my mind, these are not optional – they are mandatory!

We swapped out the hollow cones we found in those positions for full cone disc and core (D5-DC35). Full cones increase the number of droplets that will clear the raised bed and enter the canopy. When adjusting them, be sure to minimize the portion intercepting the bed, while minimizing the spray escaping up through the canopy. It’s a fine line.
Calculating sprayer output
25 microjets at 200 psi = average of 0.93 gpm = 23.25 gpm
8 × D5-DC35 at 200 psi = 1.4 gpm × 8 = 11.2 gpm
That’s ~34.5 gpm for the boom.
Ground speed was 4.9 k/hr or ~ 3mph.
GPA = (GPM × 5,940) ÷ (mph ÷ nozzle spacing in inches)
GPA = (34.5 gpm x 5,940) ÷ (3.0 mph × 11 inches)
GPA = 204,940 ÷ 33
62.1 GPA or about 580 L/ha.
Diagnosing coverage
Water sensitive paper, which turns from yellow to blue when contacted by moisture, was placed in the ginseng canopy. Two sets of papers were set out, with four papers in each set. The canopy was still wet with rain, which made placement difficult as the papers would accidentally contact water on the leaves and change colour prematurely.
| Position#1 | Clipped face-down on the underside of leaves at the top of the canopy. |
| Position#2 | Clipped face-up on the upper side of leaves in the middle of the canopy. |
| Position#3 | Clipped face-down on the underside of leaves in the middle of the canopy. |
| Position#4 | Wrapped around a plastic tube and threaded over a wire flag, located at the foot of the plant to give panoramic coverage at the root. |
The sprayer passed over the canopy spraying water, and papers were carefully retrieved, allowed to dry and scanned.

Generally, there were no “misses” whatsoever. Position 1 showed excellent coverage, with no indication of run-off and a high droplet count with even distribution. This is ideal for foliar applications, and under-leaf coverage is notoriously difficult to achieve. Positions 2 through 4 showed excessive coverage, with the exception of one of the position 3 papers, which was still adequate.
Next steps
Ideally, the operator would drop the pressure by 20 psi increments, reducing output until coverage failed. It is important to note that the operating pressure must never approach the lower end of the nozzle’s recommended pressure range, or the spray quality will be compromised and so will coverage.
Once the coverage is considered a failure, the operator would return to the lowest output that did a good job, and the sprayer is calibrated for that crop (at that stage of growth).
Note that the calibration must be performed for each significantly different crop. With the exception of an early-season drench intended to contact the entire root, an emerging one year old garden would need a very different prescription than a four year old garden with a fully-developed canopy. Plus, the weather conditions will affect coverage, so do not calibrate in conditions you would not normally spray in. Hot and dry and windy conditions produce very different coverage compared to cool, humid and still conditions.
Once the operator knows what each garden requires, they will be able to mix their tanks using the same concentration of carrier to formulated product as they normally use, but likely go further on the tank. It will take some practice before the operator knows how much spray mix is required to finish the job.