After running through your sprayer’s routine maintenance, it’s time to assess the suitability of its nozzles for upcoming applications, and, let’s face it, that decision can be pretty complicated. Besides the typical competition between manufacturers, you also have to consider spray quality. Do you want coarse droplets? Fine droplets? Air induction nozzles? Twin-fan nozzles? How many gallons of water will you need per acre? Are the nozzles you want readily available and replaceable?
I have three spots for different nozzles on my new sprayer. I want burn-off, in-crop and fungicide; what three should I have (5-15gal/acre)?
In this video, Tom Wolf discusses the attributes of some of the best of Canada’s spray nozzles, providing a visual demonstration of their differences, and thoughts on nozzle selection for pre-seed, in-crop and fungicide spray applications
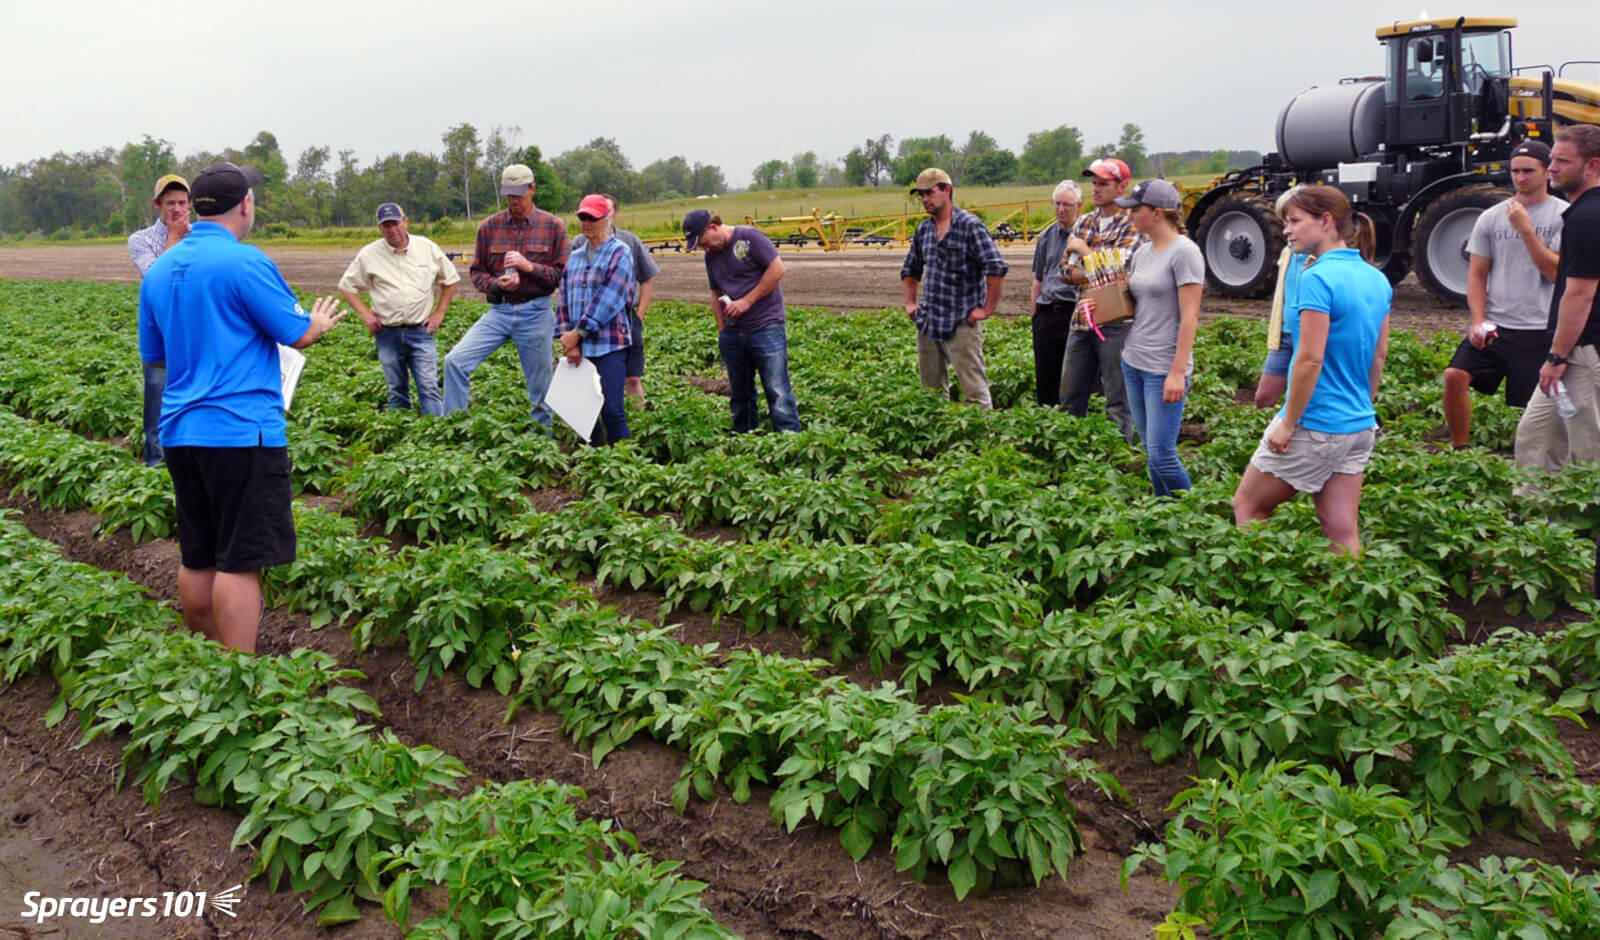
In June, 2014, 30 growers attended a spray coverage demonstration in a potato field in Alliston, Ontario. Our goal was to explore three questions:
What is the effect of droplet size on coverage?
What is the effect of volume on coverage?
What is the effect of spray angle on coverage?
This certainly wasn’t a scientific experiment. Spray demos are a great foil for discussing droplet behaviour and teaching operators how to diagnose spray coverage. Take the “results” with a grain of salt.
Discussing spray coverage in Alliston, Ontario (2014).
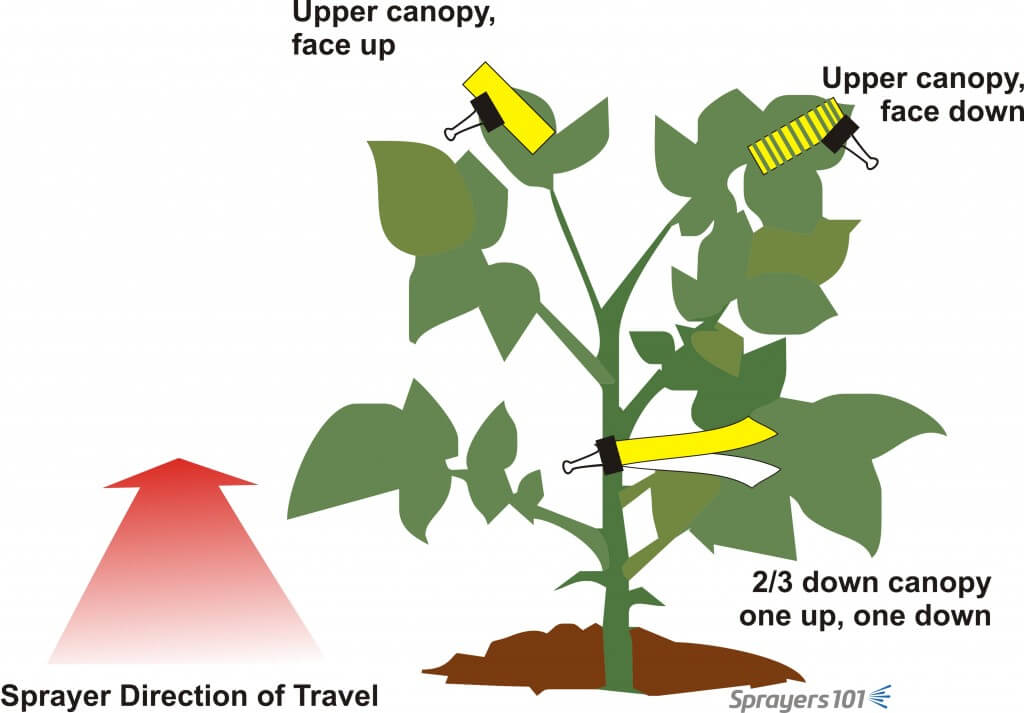
In order to see spray coverage, we placed water sensitive paper in the potato canopy (see below). Water sensitive paper turns from yellow to blue when it is contacted by water. Normally, we use a digital scanner to quantify spray coverage. However, it was a very humid day and this made it difficult for the scanner to discern spray from background. We decided to assign a qualitative value to the papers based on coverage. Low (or no) coverage got a score of zero. Moderate coverage (enough to offer good control) received a score of one. Papers with excessive coverage (anything more than moderate) received a score of two. Did I mention this wasn’t a scientific experiment?
The location of water-sensitive papers in the potato plant canopy. Two plants were papered for each nozzle.
Droplet Size
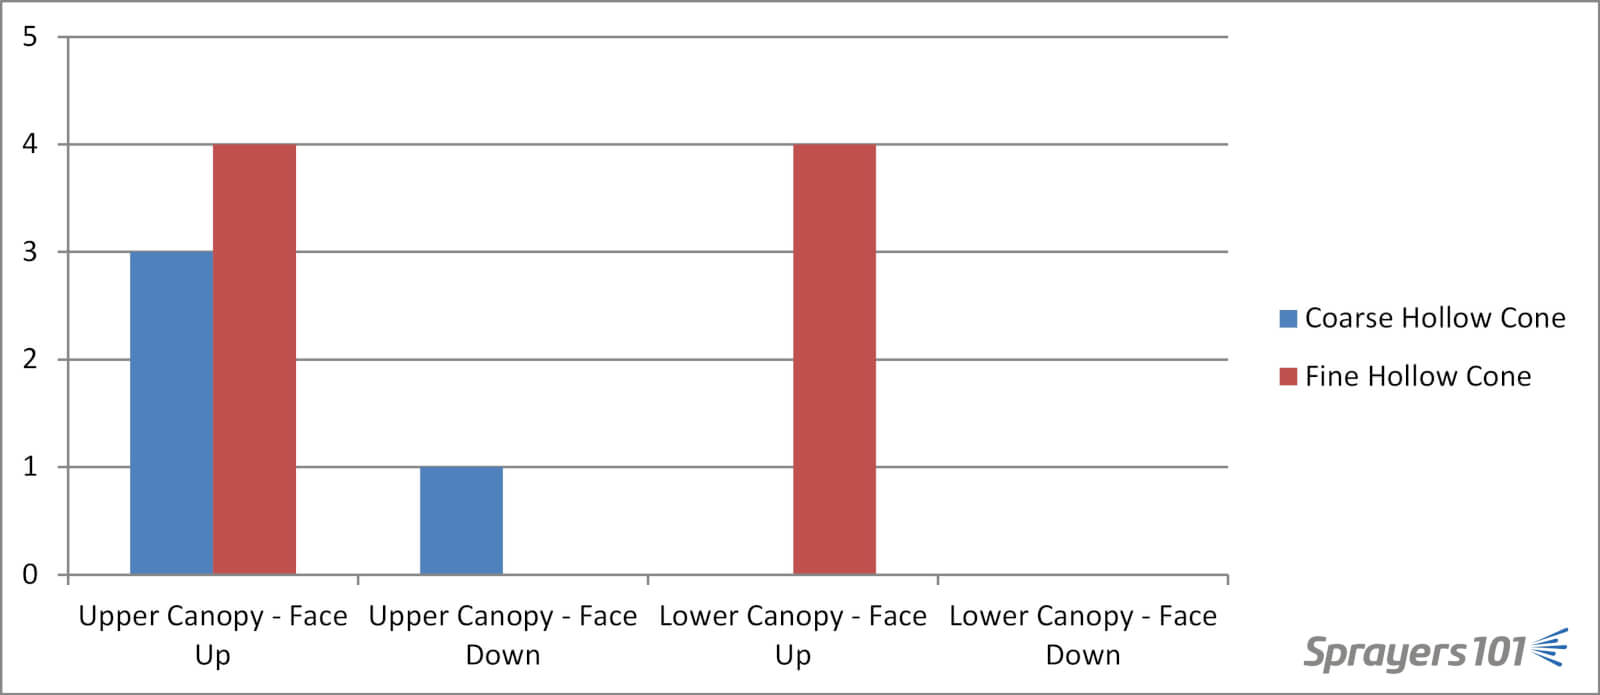
To answer the first question, we compared coverage from two hollow cone nozzles. The TeeJet TXR80028, which creates a fine/medium droplet size, and the TeeJet AITX8002VK, which is air-induced and creates a Coarse/Very Coarse droplet size. In both cases the boom was approximately 50 cm (20 in) above the top of the crop, travelling at 10 km/h (6.2 mph) and spraying about 110 L/ha (~11.5 gpa).
Generally, Coarse droplets tend to move in a straight line, and are not as easily deflected by moderate wind or travel speed. Conversely, Fine droplets slow very quickly and move erratically depending on the forces acting on them.
Graph 1 – Droplet size comparison. Cumulative spray coverage achieved in four positions, on two plants per nozzle. Low-to-no coverage = 0. Moderate coverage = 1. High-to-excessive coverage = 2.
Graph 1 shows the coverage results in each position. We see that finer droplets appear to penetrate the canopy more than the coarser droplets. We also see that under-leaf coverage was difficult to achieve overall. It’s possible the small amount of coverage achieved on the under-side of the top scaffold of leaves is the result of Coarse droplets bouncing… but if that’s the case, why wasn’t there any coverage on the upward-facing leaves inside the canopy? Write me – I’m open to ideas. In any case, redistribution is erratic and should not be relied on.
This graph may appear to favour smaller droplets, but be aware that Fine droplets are prone to drift and evaporation and should not be used without making every effort to prevent off-target movement. Shrouds, low ambient wind, and slower ground speed can help. To my mind, the best drift-mitigating option that still allows the use of finer droplets is an air-assist option on the boom, which would also improve under-leaf coverage. I’ve seen it in field tomato, soybean and even field corn. It’s disappointing that there aren’t more self-propelled sprayers in Ontario that offer this feature.
Volume
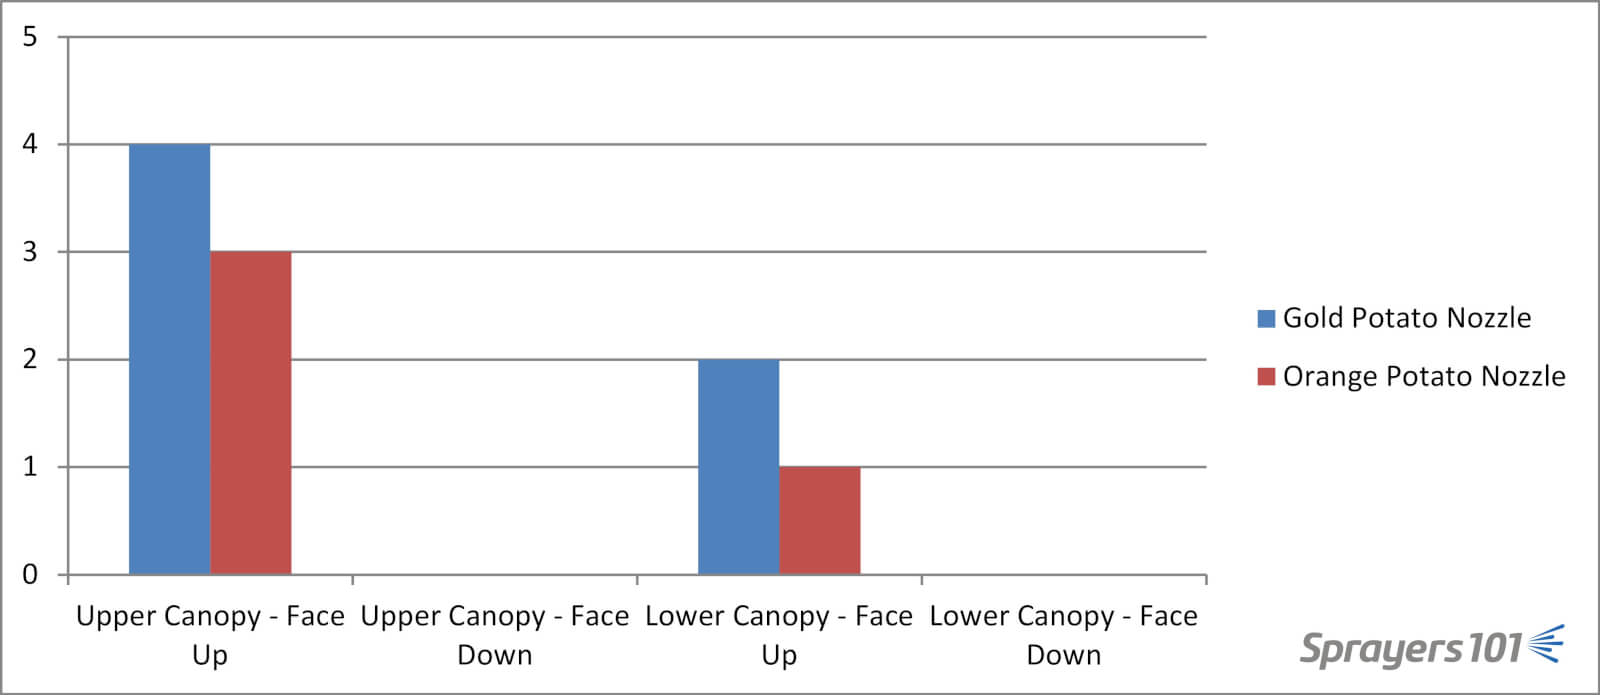
To answer this question, we compared coverage from Syngenta’s potato nozzles. They aren’t generally available in North America, but we got a few for the sake of the demo. The VP04 (gold) was operated at 1.5 bar (22 psi) and sprayed 135 L/ha (~14.4 gpa). The VP05 (Orange) sprayed 180 L/ha (~19.2 gpa) at the same pressure. The boom travelled at 10 km/h (6.2 mph) at approximately 50 cm (20 in) above the top of the crop.
Generally, raising the volume-per-hectare translates to improves coverage, but at some point there is a diminishing return. Imagine comparing coverage between 1 L/ha and 100 L/ha – there would be a big difference. Now imagine comparing 500 L/ha to 1,000 L/ha – probably not much difference, because drenched is drenched.
Graph 2 – Spray volume comparison. Cumulative spray coverage achieved in four positions, on two plants per nozzle. Low-to-no coverage = 0. Moderate coverage = 1. High-to-excessive coverage = 2.
According to Graph 2, the higher volume did not improve coverage. In fact, the lower volume appears to have superior coverage, but it’s likely not significant. Remember, there are no error bars here because there’s no statistical analysis – it’s not a scientific study. It’s possible that at this stage of growth, our 150 L/ha was close to the threshold of diminishing return.
Once again, note the absence of under-leaf coverage. Truly, the more I spray vegetable and row crops with conventional nozzles on a horizontal boom, the more I think under-leaf coverage can only be achieved by Bigfoot riding the Loch Ness Monster while wielding Harry’s wand. Without directed sprays from drops (aka pendant nozzles, drop hoses, etc.) or some means of redistribution (e.g. air assist or even maybe electrostatics) droplets will not reliably change direction.
Spray Angle
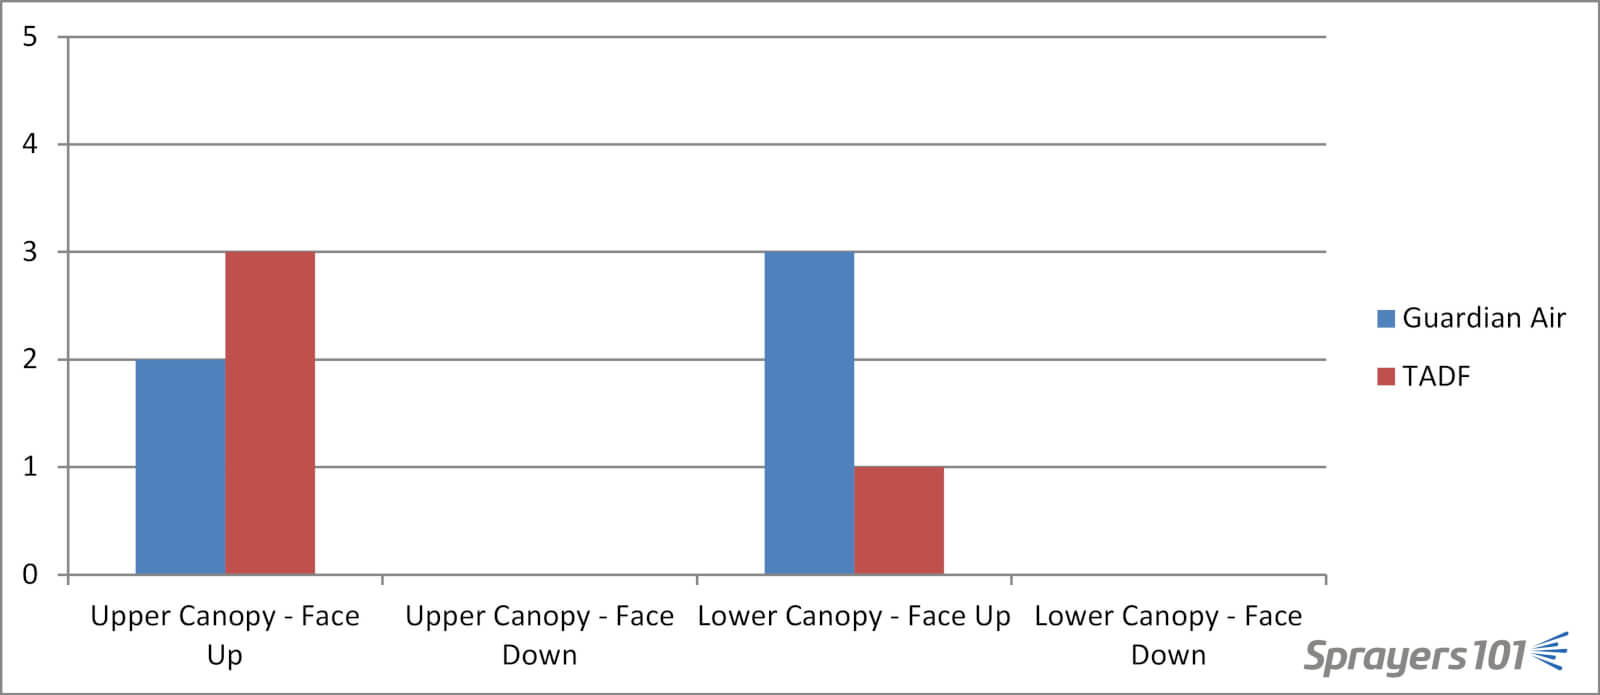
To answer this question, we used Hypro’s Guardian Air nozzle (GA11003), which is a 110° wedge-shaped flat fan that we alternated between 15° forward and 15° backward on the boom. We compared it to Greenleaf’s TADF nozzle (a blue and yellow 02), which is an asymmetrical, 110° twin-fan tip, where one fan is at 50° and has a higher flow compared to the second fan at 10°. We also alternated these nozzles on the boom to take advantage of what became four different angles of attack. Both tips sprayed 100 L/ha (10.9 g/ac) from a boom travelling 10 km/h (6.2 mph) and about 35 cm (~14 in) from the top of the canopy.
Graph 3 – Spray angle comparison. Cumulative spray coverage achieved in four positions on two plants per nozzle. Low-to-no coverage = 0. Moderate coverage = 1. High-to-excessive coverage = 2.
Graph 3 shows a lot of spray impacting on the surface of the canopy, with moderate penetration to the upward-facing leaves in the inner canopy. The angled spray may have helped a little, but no more than the finer droplets from hollow cones. While others like it, my personal experience in soybean, field tomato and ginseng has shown that the spray angle does not have much bearing on crop penetration in a broadleaf canopy. Perhaps if the canopy is sparse… but not in dense canopies. This shouldn’t be a surprise because angled sprays are best suited to vertical targets, such as wheat heads. Graph 3 seems to bear this out.
Now, since I ran this last demo, I’ve learned that I really didn’t use the twin fan nozzles optimally. In order to keep the outputs comparable, the rate controller operated the TADF’s at about 30 psi. That pressure is fine for something like glyphosate, but for contact products 60 psi to 120 psi is preferable to put the droplets in the medium range and keep them moving at the right angle.
A lot of people like the asymmetrical nozzles in broad leaf crops, so if they’re working for you that’s great. Carry on! As for me, I’m hoping to run a more stringent experiment in the future to satisfy myself.
Take Home
So, as I’ve pointed out a few times, this comparison of nozzles and spray variables isn’t definitive. It was only a subjective demonstration. Further, coverage doesn’t necessarily imply efficacy: Just because you have more coverage doesn’t mean you didn’t already have enough to do the job.
Caveats aside, however, there are a few points to be made:
Smaller droplets penetrate dense canopies better than larger droplets, as long as they survive to arrive.
Under-leaf coverage is difficult to achieve without some form of mechanical assistance – e.g. directed application from drops, air-assist, electrostatics, etc.
Higher volumes result in improved coverage, but only to a certain point. Volume should reflect the stage of growth.
At the moment, I’m unconvinced that spray angles impact (dense) broad leaf canopy penetration. There are, of course, many other learned and experienced opinions for spraying vegetables.
Reproduced from an article written by Angela Lovell for Grainews, 2014
“The fundamental challenge of spraying is that it’s a compromise game,” said Tom Wolf of Agrimetrix Research and Training. “As operators and advisors we need to always balance the opposite needs of coverage, efficacy and drift.”
Wolf, in a presentation at the recent Manitoba Agronomists Conference in Winnipeg, sees a trend towards more fungicide use on farms across western Canada and technology that purports to make application more efficient. These trends include wider booms, faster speed capability, complex monitors, auto boom heights and bigger tanks.
As much as technology is a great thing, it’s still the operator that is the single most important part of any spray operation, so it’s important to make sure that he or she isn’t going out to the field with any conventional beliefs that simply aren’t correct.
The challenge with spraying is to control pests without harming you neighbour’s crops or the environment and over the years Tom Wolf has developed some pretty good ideas about how to do that and has had to dispel more than one popular myth about spraying.
Myth # 1: More pressure forces the spray into the canopy.
“There’s an element of truth to this but it’s forcing spray downward is the least thing that pressure does,” says Wolf. Spray pressure is primarily used to change spray flow rate. If you increase the pressure you will need to travel faster to allow the carrier volume to stay constant, and faster travel speed actually works against canopy penetration. Another important change is that spray quality will become finer with higher pressure. Finally, droplet velocity will initially increase, but even at higher pressure, small droplets still move slowly by the time they reach the canopy. “If you want to force a fine spray into the canopy, the best way to do that is to lower your boom, slow down, and increase the carrier volume,” says Wolf.
Myth # 2: Higher water volumes lead to run off.
There are two things that govern run off; droplet size and surface morphology of the leaf surface. “Anyone who says that anything more than 3 gallons/acre runs off the leaf surface is not telling you the whole picture,” says Wolf. “We’ve been unable to induce runoff from up to 200 US gpa in our tests, even using hard-to-wet grasses like green foxtail. Don’t be afraid of water. It’s a very good way of covering the canopies. Water gives you flexibility to use coarser sprays and that allows you to spray when it’s windier.”
Myth # 3: Spray drift is no issue for fungicides and insecticides
Aquatic organisms are extremely sensitive to most fungicides and insecticides. We might not see this effect, but it has a definite impact on our environment. It’s important to observe the buffer zones shown on product labels, which can vary depending on the product, the application method and the specific environment.
Myth # 4: Faster travel speeds save time and boost productivity
Wolf suggests evaluating this on a field by field basis. At faster speeds you lose control of the spray cloud and the finest droplets will go wherever the wind goes. Other problems with higher speeds are canopy penetration, pattern uniformity and pressure management. If you have an 800 gallon tank with an 80 ft boom and you are going 12 mph at 10 gallons/ac and your fill rate is 50 gallons per minute you are going to do about 84 acres/hour not including turns. If you go faster – 18 mph – you can do 110 acres/hour. But if you increase your fill speed, thereby decreasing the time spent filling you can increase productivity just as much. If you also increase your boom width you also increase productivity. “All I am asking is you don’t just look at travel speed to improve your productivity,” says Wolf.
Myth # 5: Double nozzles produce more droplets and improve coverage
“It’s the droplet size and water volume that drives the droplet numbers produced. It doesn’t matter how many nozzles produce this size,” says Wolf. Although some double nozzles produce finer droplets and therefore improve coverage, others actually produce coarse sprays which may decrease coverage. Pay attention to droplet size first – nozzle manufacturers publish spray qualities from their products. You can increase coverage from a single nozzle simply by increasing the spray pressure so yo produce a finer spray.
Myth # 6: Calm early mornings have the lowest drift risk
This is one of the biggest myths out there, says Wolf, and it’s all because of a condition called an inversion, which usually occur during clear nights, and which linger into the early morning hours. Under normal sunny daytime conditions, air currents rise, fall and disperse spray clouds rapidly but under inversion conditions they don’t. This can lead to severe drift issues, even significant distances away from the treated field.
Under sunny daytime conditions, air temperature cools with height and that allows for thermal turbulence to disperse the spray cloud. On clear nights, the temperature increases with height (the opposite temperature profile, therefore called an “inversion”), and this prevents air from mixing. As a result, the spray cloud will not disperse.
Assume that the atmosphere is inverted on clear summer nights, extending into a few hours after sunrise. Producers should never spray when an inversion is present, and a good indication might be if fog or smoke hangs in the air and not dispersing.
Myth # 7: A rate controller calibrates the sprayer
“Even with a $400,000 sprayer, the rate controller still relies on a single flow meter that sits at the back of the sprayer and measures the total flow to the boom. The operator has no idea where that total flow is going,” says Wolf. As a result, there is still no substitute for individual nozzle calibration. There are various new tools on the market to assist with that but they still need to be done individually.
Myth # 8: If I mess up agronomic decisions, I can correct that with a good spray application
A spray application has to be on time to be truly effective, says Wolf. In efficacy studies where yeield was measured, spraying herbicides “on time” (=early) produced a yield advantage over spraying just one week later, even with a spray quality that was so coarse that it resulted in relatively poor weed control. “If it’s breezy, use a low drift nozzle. This allows you the opportunity to spray on time,” he adds.
Myth # 9: Ammonia is a good general purpose tank cleaner
Ammonia raises pH and some chemicals like sulfonylurea products dissolve better at a higher pH. But if you have an oily emulsifiable concentrate (EC) formulation, either as a product or adjuvant, a soapy cleanout product will be needed. “Liberty exposes poor tank cleanout because the adjuvant in Liberty is such an excellent cleaner,” says Wolf. After use of an oily product, the use of a wetting agent such as AgSurf will assist in removing oily residue and many soap-based commercial cleaners are available.
Myth # 10: There is an optimal nozzle that does it all
“Right now a sprayer costs approximately 100,000 times more than the nozzle and the nozzle is still the part that makes you happy or sad,” says Wolf. “If we inverted the investment trend and said ‘let’s build a better atomizer’ there would be an optimal nozzle right now. But although we’ve made progress with low-drift nozzles recently, the industry still looks for inexpensive, simple ways to atmozie sprays.”
Spray quality is the language that is used when selecting nozzles. All manufacturers publish spray quality charts for their nozzles that also give recommended pressures to produce different spray qualities using a particular nozzle type. Spray qualities are colour coded and generally speaking the hotter (redder) the colour code the more drift-prone (finer) the spray. There are many nozzle choices and designs and typically grassy targets and contact products require nozzles that will produce Medium to Coarse spray quality. For broadleaf targets and systemic products a Coarse to Very Coarse spray quality can be used successfully. Selecting the right nozzle to produce the quality of spray required is important, says Wolf who recommends Coarse as a general purpose spray quality.
Undoubtedly, the number one question we get from operators is: “Which nozzle should I get”? Luckily there’s no simple answer, or we wouldn’t have jobs! The reason it’s not simple is because selecting the “right” nozzle for a sprayer is a process. It can be broken down into two steps:
identifying the right flow rate (aka nozzle size)
choosing a specific nozzle model (i.e. brand, spray pattern type, spray quality, etc.)
It’s a big question, so let’s tackle just the first bullet: identifying the right flow rate.
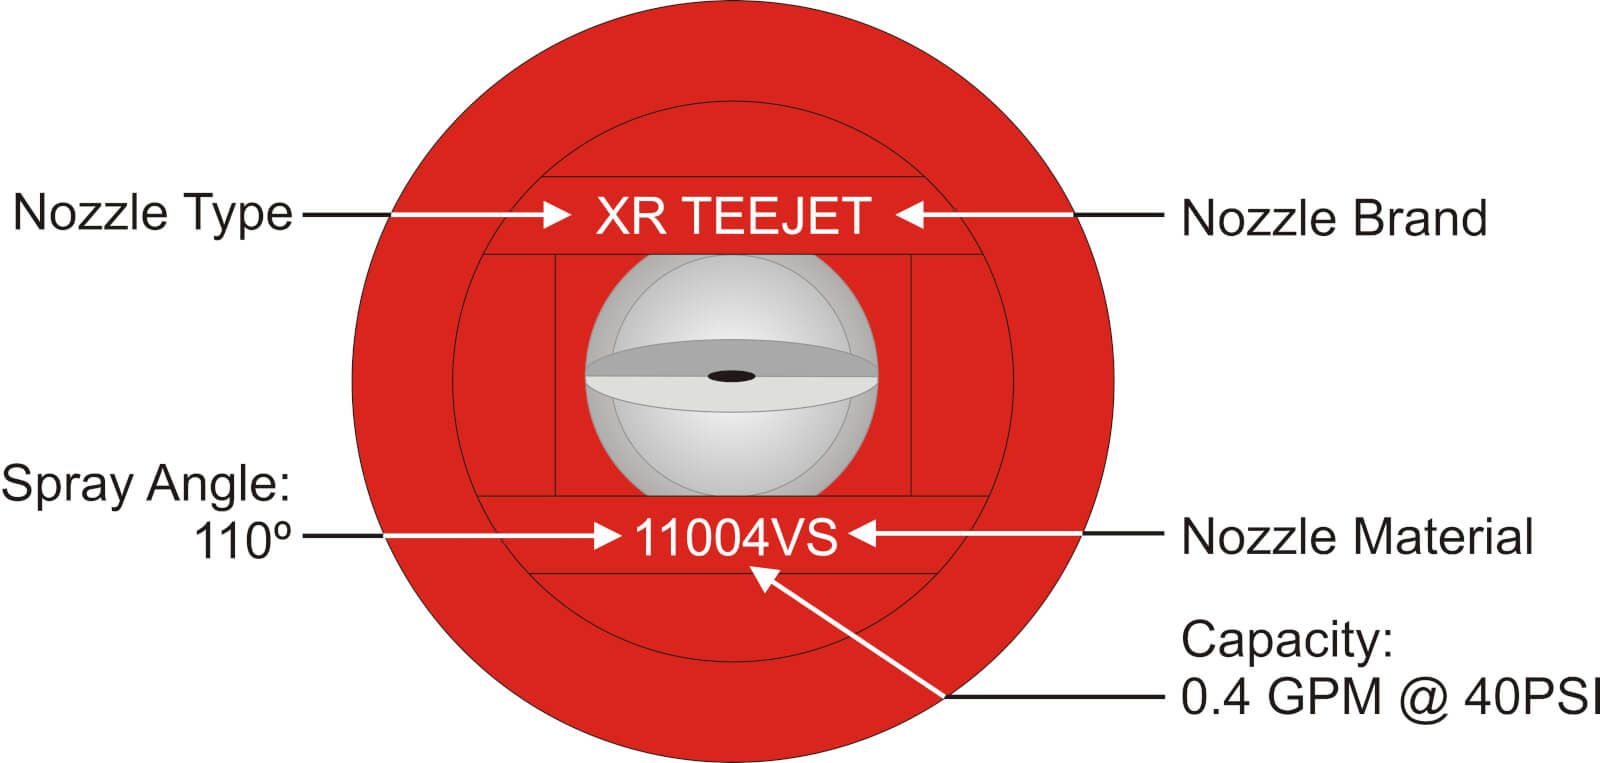
All sprayer nozzles come in standardized (ISO) sizes, and these sizes are usually identified by numbers stamped on the nozzle as well as the colour of the nozzle itself. The nozzle’s key characteristics (i.e. the fan angle and nominal flow rate), are identified in a format that looks like some version of this (Fig. 1):
Fig. 1: Typical information printed on modern nozzles.
The 110 refers to the fan angle (110°) and the 04 refers to the flow rate. 04 means 0.4 US gallons of water per minute (gpm) at 40 psi. Each nozzle brand has a slightly different convention, but no matter how the information is presented it ought to be on the nozzle somewhere.
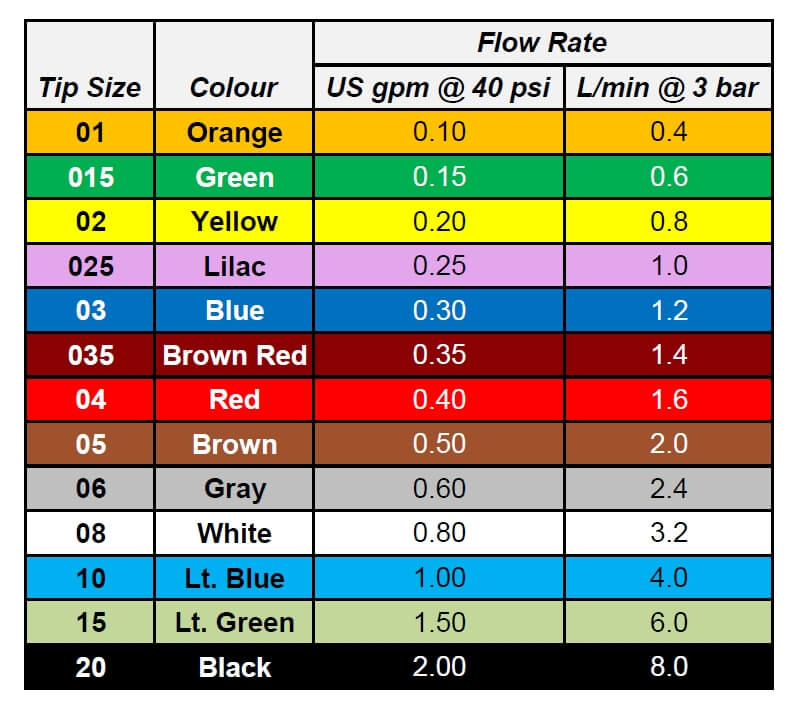
Nozzle colour has an ISO standard across fan-style nozzles, and we have this table to match the nozzle colour to the flow rate:
Fig 3: ISO nozzle colours and flow rates
You’ll note that the nozzle we pictured earlier was “flame red”, matching the 0.4 gpm on the table. So how do we use the table to pick the right size nozzle?
Application rate (i.e. gallons per acre or L/ha) is a function of travel speed, nozzle spacing along the boom, and nozzle flow rate. Traditionally, this has been expressed as the following formula in US units:
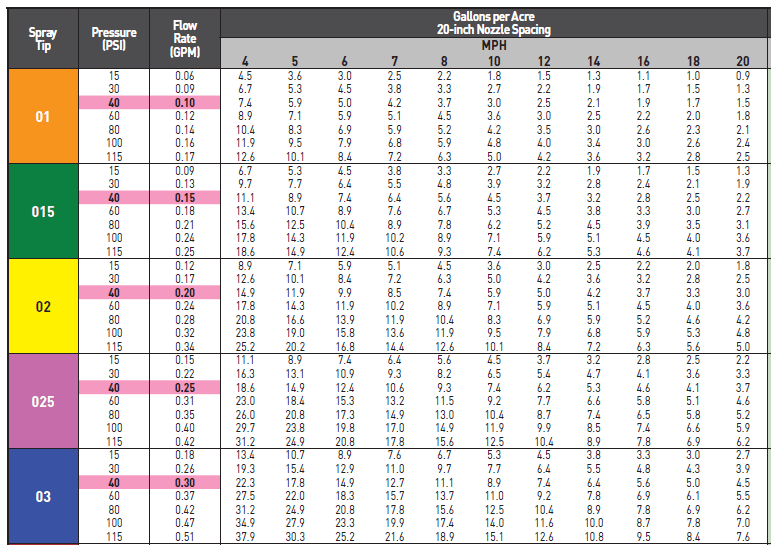
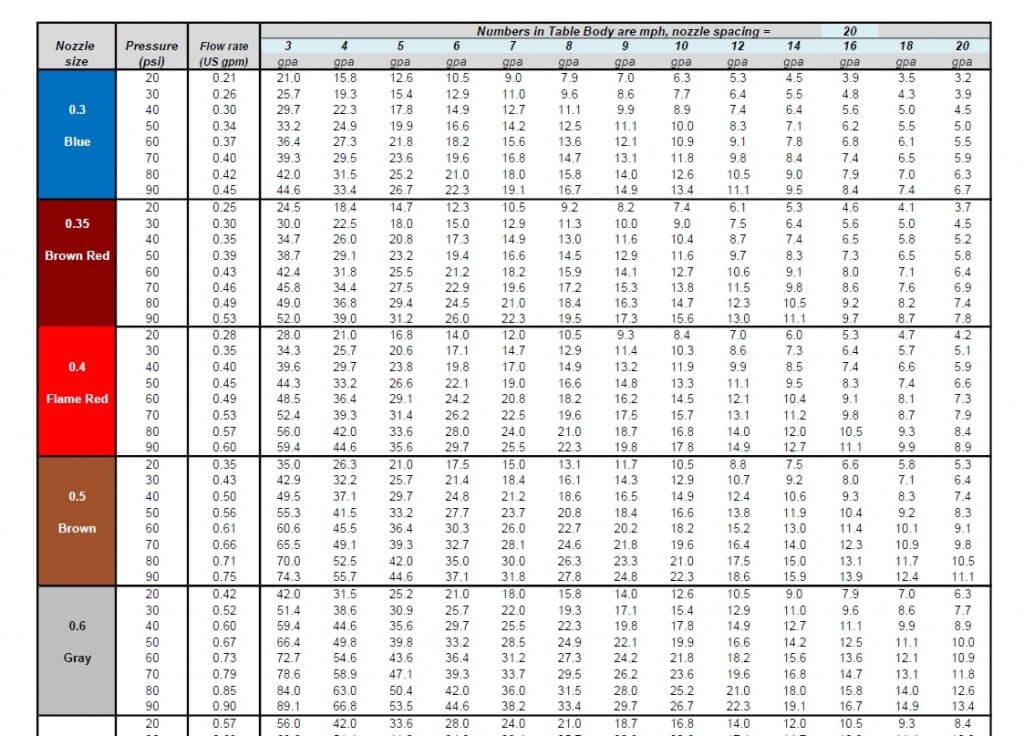
This formula is famously represented in nozzle charts found in all sprayer catalogues (Fig 4). Along the left side are nozzle sizes and pressures. Along the top is sprayer speed. The body of the table contains application volume. Pick your speed, and look for your application volume in the columns. If you want to apply five gpa, you need to look for the number 5 (or as close as you can get to it), among these numbers.
Fig 4: Typical nozzle flow rate chart, with speed at top and volumes in body. Ugh.
The format of the chart can be confusing because it doesn’t follow a modern sprayer operator’s priorities. Usually, an operator decides on an application volume first, and this decision is not very flexible. Travel speed, decided second, has more flexibility.
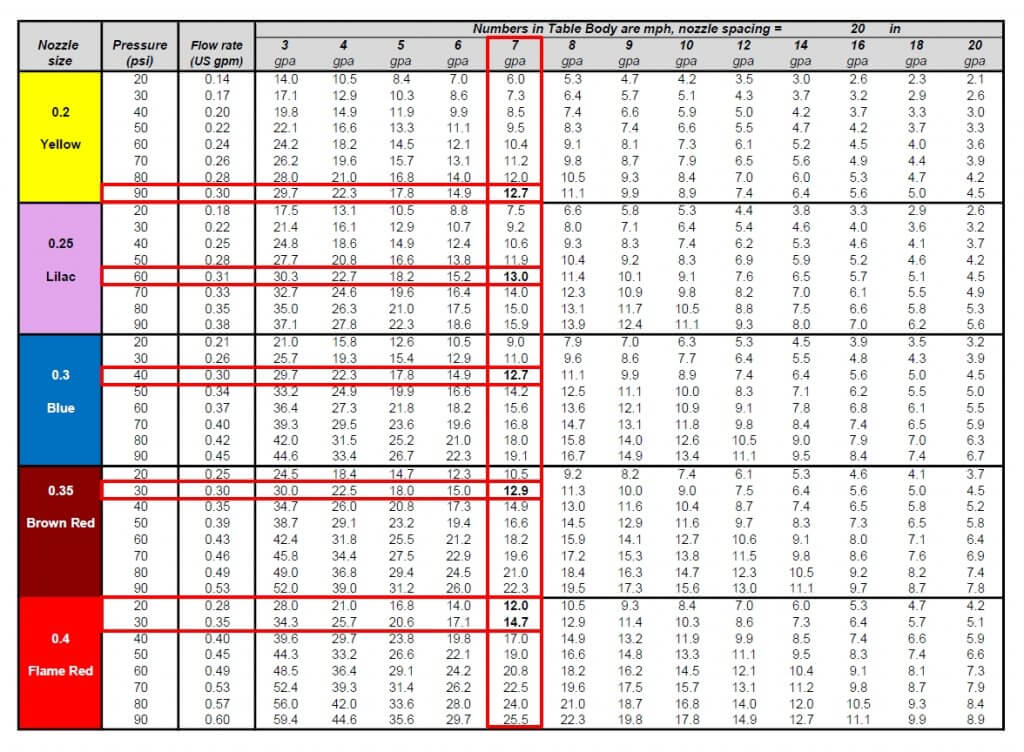
We’ve therefore re-worked the table to make more sense (Fig. 5). Along the top are common water volumes. The body of the table are travel speeds. Pick a water volume at the top and follow the column underneath this value to find a speed range you’re comfortable with. To the left, the nozzle size and corresponding operating pressures are now visible.
Fig. 5: Nozzle flow rate chart with volumes at top makes it user friendly.
Try to operate at a spray pressure that’s in the middle of the nozzle’s operating range. For an air-induced nozzle, the range is usually from 30 to 90 psi, so the middle is 60 to 70 psi. That should be the target pressure. Look for a nozzle size that delivers this pressure at your expected travel speed.
These columns can be used to work out a nozzle’s travel speed range. If a nozzle can be operated between 30 and 90 psi, for example, the corresponding speeds are listed in the same rows in the volume column.
For example, say you want to apply seven gpa and think that 13 mph would be a good average travel speed.
Fig 6: Five solutions for the question, “which nozzle to apply 7 gpa at 13 mph?”
Move down the seven gpa column, and you’ll encounter a value close to 13 mph five times – the yellow nozzle at 90 psi, the lilac nozzle at 60 psi, the blue nozzle at 40 psi, the dark red at 30 psi, and the red at about 25 psi. Now use the columns to see which of these three best matches your expected travel speed range.
The yellow nozzle would allow between seven and 12.5 mph from 30 and 90 psi, the lilac nozzle nine to 16 mph, the blue nozzle 11 to 19 mph, the dark red 13 to 22 mph, and the red 15 to 26 mph.
The best choice for a typical air-induced tip would be the lilac 025 size, since it would meet the target speed of 13 mph at a perfect 60 psi, about right for nozzles of that size, and allowing some travel speed flex on the slower side.
Some operators try to extend that range, but dropping below 30 psi will likely result in too narrow a pattern, or too coarse a spray quality, so it’s not advised.
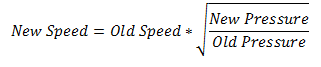
Note that the three-fold change in pressure from 30 to 90 psi translates to only a 1.73-fold change in travel speed. That’s due to the square-root nature of the relationship, as illustrated by this formula:
This exercise applies to sprayers with rate controllers that adjust pressure to regulate flow rates. However, if you use pulse-width modulation (e.g. Case AIM Command, Capstan Sharpshooter, Raven Hawkeye, or TeeJet DynaJet) check out this article describing these systems.
There are a number of apps and websites, usually developed by nozzle manufacturers, which provide similar answers. These are also very useful, and all of them rely on the same formulas used in our new, simplified table. You can go here to download a high resolution version, suitable for framing, in both US and metric units.
Low water volumes can mean less effort to apply pesticides. But there is a limit to how low water volumes can go before problems appear. To understand the reasons why, and help applicators use the right volume for a given situation, we briefly outline what happens to a spray cloud as it reaches the crop canopy.
Basic Principles
To choose the right water volume, we have to remember three criteria for sprays to be effective.
First, the spray must reach the target.
Second, there must be enough droplets to sufficiently cover the target.
Third, the droplets have to be in a form (size and pesticide concentration) that allows the pesticide to be efficiently taken up by the target.
Reaching the target
Let’s start with the first criteria, reaching the target. Droplet size is important for minimizing both spray drift and droplet evaporation. Small droplets move off-target easily, they also evaporate to dryness very quickly and may not have the expected performance as a result. Larger droplets clearly reduce drift, but may bounce off the target and offer less coverage per water volume.
Droplets of various sizes are actually important to cover all parts of a target, so we shouldn’t eliminate all the small ones. For example, penetration of dense broadleaf canopies, or coverage of small targets like stems is best achieved with smaller droplets, while larger droplets are useful for penetrating grassy canopies or targeting the top of a broadleaf canopy.
Target coverage
We need to get the right number of droplets to the target. The more leaf area to be covered (i.e., the taller or denser the crop canopy), the more droplets will be required. Leaf Area Index (LAI), defined as the total leaf area per unit ground area, is a good indicator of canopy density.
To put this in perspective, consider a pre-seed burnoff or an early post-emergent herbicide spray vs. a late season fungicide. In the first case, the canopy can be described as being in a single plane near ground level, with leaf areas of target plants fully exposed and with an LAI of <1. High droplet density on the leaves will be achievable with relatively low volumes.
In the second case, the canopy will have more depth, and will contain large leaf areas in each of the lower, mid, and upper canopy regions, with LAI >>1. Providing the same droplet number to each of the regions in the second case will require more droplets, and therefore more volume.
Taken as a whole, the exclusive use of finer droplets can be counterproductive due to evaporation and drift. Higher water volumes have the advantage of allowing larger average droplet sizes to be used, minimizing evaporation, drift, and enhancing deposition.
Deposit efficacy
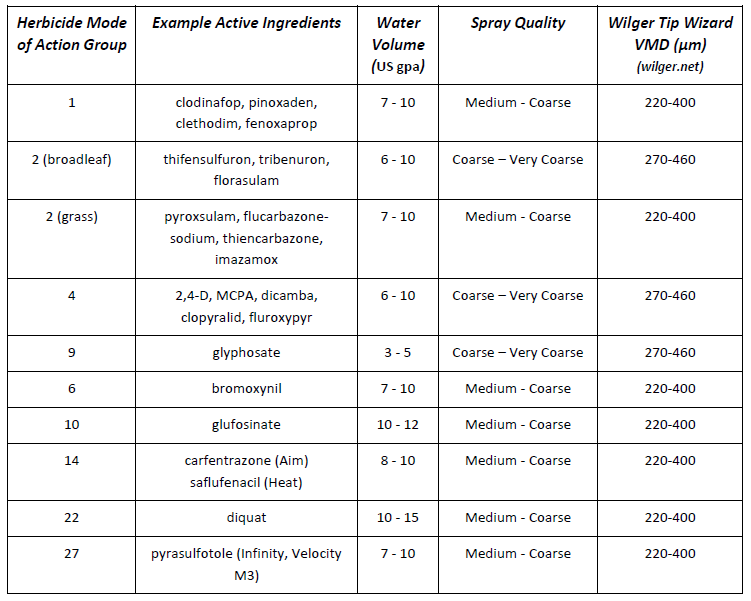
The third criteria, maximizing the performance of specific pesticides with droplet size, is more complicated. Typically, contact modes of action and grassy or difficult-to-wet targets require somewhat finer sprays and higher water volumes (Table 1). With tank mixes, such as glyphosate and Heat or AIM, the higher water volume and finer spray criteria should be used. For any specific herbicide, use the higher volume with coarser sprays.
Table 1. Herbicide modes of action, minimum water volumes with low-drift nozzles, and maximum spray quality
In practice, an applicator rarely encounters just one type of targeting situation. Most herbicides are either broad-spectrum, or are tank mixed to target both grass and broadleaf weeds. As a result, the same spray operation has to be effective on grass weeds and broadleaf weeds, some of which may be near the top of the canopy, or be more mature, whereas others may be just emerging. In these cases, a number of different droplet sizes will be required.
Low-drift nozzles
A low-drift nozzle can be used for most applications, as long as small adjustments are made for specific conditions. Increases in pressure above 60 psi (for finer droplets, Medium to Coarse spray quality) and volume to at least 7 to 10 US gpa (for better penetration) with this nozzle optimizes performance for grassy weeds. Lower pressures (down to 40 psi, Coarse to Very Coarse spray quality) are sufficient for systemic broadleaf products or when additional drift control is necessary. Higher volumes (12 – 15 US gpa) may be needed to obtain coverage in dense canopies. Always check with nozzle manufacturer information to learn what spray quality is produced by the nozzle you’re using – this will vary with nozzle type, flow rate, and spray pressure.
Droplet sizes in sprays
All nozzles produce a wide variety of droplet sizes ranging from 5 µm to 1000 µm in diameter. The main difference between sprays is the proportion of their volume in any given size fraction, with low-drift sprays having less of their volume in the drift-prone sizes.
Size distribution (by volume) of two spray qualities. Not that both of these sprays contain small and large droplets. The difference is the volume (=dosage) in each of these size fractions. Shaded areas highlight drift-prone droplets (left) and bounce-prone droplets (right).
But even low-drift nozzles produce small droplets, and these provide sufficient coverage in most cases. Low-drift sprays do create more larger droplets, and these do not contribute to coverage due to their relatively low number and poor retention.
Our main tools for droplet size selection are spray pressure (higher pressure reduces droplet size) or nozzle choice.
Spray Pressure
Higher pressures are sometimes thought to increase canopy penetration because they force the spray into the canopy. This is not true. While higher pressures create faster moving droplets, this speed quickly diminishes. By the time the spray enters the canopy, the faster velocity is lost, especially for the smaller droplets, and the only effect that remains is the finer spray. Finer droplets will penetrate many canopies further, but only if they are protected from wind. On a windy day, the finer sprays are more likely to blow downstream, or perhaps evaporate. The main benefit of higher pressure is better operation of the nozzle, especially air-induced nozzles, leading to more uniform patterns and better overall results.
Large Droplet Advantages
Although coarser sprays are often thought to work less well, they offer certain advantages.
One advantage is that a coarser spray tends to provide the air assist mentioned above (dragging air into the canopy, and giving smaller droplets a greater chance of moving where they’re needed).
Larger droplets also take longer to evaporate, increasing opportunities for uptake and translocation within the plant.
Larger droplets are more efficient at targeting the exposed, large leaves of plants requiring disease protection, leading to greater deposition and fungicide performance.
Most importantly, coarser sprays produce less drift, enabling application under windier conditions and thus ensuring that the timing of the application with respect to the crop or disease stage can be optimized.
Water Volume
Higher water volumes are the single most effective way of increasing dense canopy penetration. Higher volumes will deliver a greater number of droplets to the lower canopy, leading to greater performance when lower canopy coverage is of importance. When used in combination with lower travel speeds, the downward air flow created by sprays can provide significant benefits in forcing the smaller droplets further down. Larger volumes also decrease sensitivity to droplet size, permitting coarser sprays that reduce spray drift.
Nozzle Angling
Research has shown that exposed (upper canopy) vertical targets such as heads or stems will benefit from an angled spray. Forward-pointed sprays offer a slight advantage over backward-pointed sprays. Since angled sprays must maintain this trajectory to be useful, it is recommended that coarser spray qualities be used to minimize fine droplet production. Angled fine droplets will quickly deflect from their initial angled path and move with prevailing winds. Low booms heights also help in maximizing the benefit of angled sprays. Canopy penetration has not been shown to be improved with forward angled sprays, but backward angled sprays can help place some spray deeper into grassy canopies.
Broadleaf vs Grassy Canopies
How can an applicator decide the most appropriate water volume and spray quality for a specific application scenario? The following guides should help.
First determine the canopy density and form (broadleaf or grassy), and the target site within it (upper, mid, or lower). If the canopy is dense, but fairly vertical (i.e., a cereal), and a significant portion of it needs to be protected, the best strategy is to apply a higher water volume using a reasonably slow ground speed to allow the spray’s built-in air assist to work. If, on the other hand, only the upper layer of leaves, or the heads, are to be targeted, slightly less water can be used. If the water volume is appropriately high for the canopy, larger droplet sizes do not significantly diminish coverage or pesticide performance.
If the canopy is dense but more horizontally oriented (broadleaf crops), similar rules apply for water volume and travel speed, but now the use of a somewhat finer spray may be of benefit. The smaller droplets will be better able to move around and through the leaves to reach deeper into the canopy. Ensuring a downward trajectory of the spray through travel speed and water volume selections will be important.
Nozzle suggestions
A very good starting point for a conventional rate-controlled sprayer is any one of the low-pressure air-induced tips that now form the majority of the market. These tips are similar enough in terms of pressure range (30 – 100 psi), spray quality (Medium-Coarse-Very Coarse, depending on pressure), and spray pattern fan angle (about 100 degrees) to have comparable performance with most pesticides. Such tips are best operated in the middle of their pressure range, which is about 50 – 70 psi, offering some room to move as travel speeds change.
For those with Pulse-Width Modulation (PWM), where most air-induced tips cannot be used, nozzle choice is more limited but growing