Tag: nozzle

  • Nozzle Choice in Vegetable Crops – an Australian Perspective

    Nozzle Choice in Vegetable Crops – an Australian Perspective

    Editor’s Note: Any brand-specific references or recommendations in this article are based on the author’s experience. Sprayers101 endeavours to preserve brand independence and impartiality to best serve our readers. This article was originally posted in 2018.

    During my many years of work in the Australian vegetable and horticultural industry, I am continually asked:

    Q. What is the best spray unit to use?

    My answer is simple:

    A. The one that has been correctly set up and matched to the crop you are spraying.

    That can be hard to achieve, especially in vegetable crops where the target can vary enormously from bare ground to upright leaf crops (e.g. onions), to horizontal leaf crops (e.g. potatoes and brassica).

    Generally, I have found that air-assist booms offer the best starting point for achieving good spray coverage of vegetable crops. However, like any spray boom, they must be set up correctly. Air-assist booms are more expensive and require a few more horses to operate, which is why most Australian vegetable growers prefer to make do with a non air-assist boom.

    So, if air-assist isn’t an option, it then becomes imperative to determine the most suitable nozzles for their particular requirements. I have worked in many vegetable crops over the years. I’ve held my share of “fluorescent dye nights” and checked spray coverage and canopy penetration with many grower groups. Based on my experience, there are three types of nozzles I recommend for most vegetable crops:

    Nozzle #1: Air Induction Flat Fan

    Here’s what I say when the grower (inevitably) asks which nozzle is the best for every task:

    Using only one nozzle will compromise some aspect of a series of applications. However, the Syngenta 110 025 air induction nozzle generally performs well. Manufactured by Hypro it creates more droplets per liter than other air induction nozzles of the same size (as of 2018). (Editor’s note: as of 2025, a likely North American equivalent is alternating-direction Syngenta 3D 90’s. They produce a high-velocity Extremely Coarse-Ultra Coarse spray quality and the manufacturer claims they improve the penetration of broad leaf canopies over conventionally-angled sprays. However, when drift potential is low, travel speed is reasonable, and boom height is low, alternating-direction Defy 3Ds produce a Medium-Coarse Spray quality which may be more conducive to retention on hard-to-wet vertical targets).

    As long as the crop isn’t too large (e.g. later season), I recommend this nozzle with lower water volumes. This is because I tend to see more application issues arising from excessive water rates that wash product off the plant. Unless you are after soil borne diseases, avoid run-off and wastage by using the SAI 110 -25 with volumes of about 200 L/ha. The following graph shows the results of application volume on brussels sprout coverage (per Syngenta UK).

    Nozzle #2: Narrow Spray-Angle Flat Fan

    When I am trying to increase canopy penetration, I like the Syngenta Vegetable Nozzle (SV65-04 flat fan). I feel the narrow spray fan angle delivers a directed spray pattern into the crop canopy which can significantly improve penetration. This is a good fit for late-season insecticide and fungicide sprays in brassica crops, where pests and diseases can be hidden deep in the crop canopy.

    I worked with a vegetable grower who was having trouble controlling sclerotinia in his mature fennel crop. The target was the base of the stem, deep in the canopy. In the following image you can see the water sensitive paper taken from ground-level in the canopy. The nozzles used from left to right are; Hardi Twin AI 110-05, Syngenta 65-06 vegetable nozzle and Syngenta AI 110-05. Coverage was estimated using the SnapCard app (freely available for iPhone and Android platforms). (Editor’s note: as of 2025, Syngenta’s silver 06 and gold 08 vegetable nozzles are not available in North America. They produce high volume, slow-moving, Coarse-Very Coarse sprays. TeeJet’s Visiflo is a 65 degree tip, but produces too fine a spray quality to be serviceable. As spot-spraying is increasingly adopted, the development of narrow-angled nozzles is anticipated and may offer a reasonable alternative.).

    So, I know pyrethrum is a flower and not a vegetable crop (think chrysanthemum), but it can be hard to penetrate, so this is a good example. We compared five nozzles and estimated coverage using SnapCard. The Veg 65-04, AI 110-035, and Twin AI 110-04 seemed to improve coverage over the Defy 3D 85-04 and conventional AI 110-04.

    For broadacre farmers (i.e. field or cereal crops) the SV65 flat fan nozzle has also proven to be extremely successful at penetrating thick standing stubble residue when using pre-emergent herbicides. Likewise, it performs well when targeting lower leaves during fungicide applications. Again, I believe that this is due to the narrow fan angle of the spray giving a more direct spray down through both the stubble and the current season’s foliage. Be attentive to nozzle spacing and boom height when using narrow fan angles to ensure correct overlap and complete coverage.

    Nozzle #3: Angled Flat Fan

    For onions and broadleaf crops (e.g. potatoes and beans), I feel the nozzles that have their spray fans angled forwards and backwards along the (non air-assist) boom are best suited.

    The following image shows coverage from angled sprays on simulated upright targets in the field using water sensitive paper.

    The Syngenta angled nozzles are designed with a 30° incline intended to improve foliar coverage down to the lower leaves on some vegetable crops. Although originally designed for use in potato crops, I have also had success in other vegetable crops such as onions and leeks. (Editor’s note: as of 2025, the Gold 04 and Orange 05 potato nozzles do not appear to be commercially available, although possibly in Ireland. They produced a ~Medium spray quality at an angle similar to that of the vegetable nozzles).

    Summary

    No matter the nozzle choice, or how good the application technique may be, the priority should be to manage disease and insect pests early in crop development. If you are trying to control heavy pressure from disease or insects and it’s deep within the crop canopy, often, you’re going to come off second best. Prevention is always better than cure, no matter what crop protection product you are spraying.

    With that caveat, I’ll leave you with my suggested nozzle choices. Preferably, I would suggest installing (at least) a triplet nozzle selector to quickly change between three nozzles for each crop.

    CropGrowth StageWater Volume (L/ha)Suggested NozzleNotes
    CabbageSmall, open100-200Air InductionRun-off is the enemy of small plants.
    Hearted300-80065 ° Fan Angle NozzleAngled spray important to get spray under top leaves. Use twin cap option for volumes greater than 300 L/ha.
    CarrotsSmall100-200Air InductionCarrots are good at catching spray. Angling nozzles e.g. Twin Cap will give best results.
    Large200-40065 ° Fan Angle Nozzle65º fan the best for penetrating to crown. Apply volume of 200 L/ha, increasing to 400 L/ha in denser crops. Avoid air induction (aka bubble jet) and hollow cone nozzles for later application timings.
    Brussels SproutsSmall, open100-200Syngenta AI 110025Run-off is the enemy of small plants.
    Large200-300Syngenta 3D nozzle 85 04 or 85 05
    LeeksSmall100Syngenta 3D Nozzle 85 03, 85 035 and 85 04 cover both sides of the plant.Coverage, run-off and missing the target are the problems likely in Leeks. Angled spray forward and backwards is important. High Volumes = Run-off.
    Large200-300Syngenta 3D nozzle 85 04 or 85 05Angled spray forward and backward. High Volumes = Run-off.
    LettuceSmall, open100-200Air Induction Run-off is the enemy of small plants.
    Hearted300-80065 ° Fan Angle Nozzle
    OnionsSmall100Syngenta 3D Nozzle 85 03, 85 035 and 85 04 cover both sides of the plant.Coverage, run-off and missing the target are the problems likely in onions. Angled spray forward and backwards is important. High volumes = run-off.
    Large200Syngenta 3D Nozzle 85 04 or 85 05Angled spray forward and backward to cover both sides of the plant.
    PotatoesPrior to row closure100Syngenta Pre-em 03 nozzleAngled spray forward and backward.
    After row closureSyngenta 3D Nozzle 85 03, 85 035 and 85 04
    Pre harvest (desiccation)200-400Syngenta 3D Nozzle 85 04 or 85 05The desiccation of very large canopies may require up to 400 L/ha of water on the 1st application.
    Peas and Edible BeansSmall100Syngenta 3D Nozzle 85 04 for 7–9 km/hr. Syngenta 3D Nozzle 85 05 for 10–12 km/hr.Medium spray quality and use higher water volumes in dense crops. All nozzles 0.4-0.5 m above top of crop.
    Large200
  • Nitrogen Application Technology in Winter Wheat

    Nitrogen Application Technology in Winter Wheat

    With an ever growing selection of options for nozzles and streamer bars, many growers are asking the question, what should I outfit my sprayer with for winter wheat liquid fertilizer applications? Well, it depends on what are you trying to accomplish.

    If the goal is to push your winter wheat management and improve yields, then the accurate and uniform application of liquid nitrogen is key. Selecting the appropriate sprayer technology can have a huge impact. Using a twitter poll, we learned that growers use many methods:

    • 3, 5, 6 or 7 hole streamer nozzles
    • Flood nozzles
    • 3 or 5 hole streamer bars

    Let’s look at some of the options and consider why you might choose one technology over another.

    Floods on a Terra-Gator. Photo courtesy of Kyle DeCorte.

    Air Induction, Conventional Flat Fan or Flood Nozzles

    Let’s get this one out of the way first. Air induction (AI), conventional flat fan and flood nozzles are a no-go when it comes to applying 28% UAN in winter wheat. Dr. Peter Sikkema (University of Guelph) demonstrated that when 28% UAN was applied with an AI nozzle there was an increase in visual crop injury (Table 1).

    He also showed that injury increased substantially when tank-mixed with herbicides and when nitrogen applications were delayed (Table 2). So, while AI nozzles are great for herbicide applications, they are not suitable for 28%. Growers should consider fall weed control to avoid the need for spring herbicide applications.

    Table 1. Potential yield loss associated with applying UAN 28% as overall broadcast treatment using FloodJet or TeeJet nozzles. 11 gallon (Imperial) = 1.2 U.S gal. Source: P. Sikkema, University of Guelph (RCAT), 2008–2013 (OMAFRA Pub 811: Agronomy Guide).

    Application CombinationVisual InjuryYield
    200 L/ha water (18 1g/ac water)0%6.4 t/ha (95 bu/ac)
    150 L/ha water + 50L/ha UAN (13.4 g/ac water +4.5 gal/acre UAN)3%6.4 t/ha (95 bu/ac)
    100 L/ha water + 100L/ha UAN (9 g/ac water +9 g/ac UAN)5%6.1 t/ha (91 bu/ac)
    50 L/ha water + 150L/ha UAN (4.5 g/ac water +13.4 g/ac UAN)7%6.1 t/ha (91 bu/ac)
    200 L/ha UAN (18 g/ac UAN)9%6.0 t/ha (89 bu/ac)

    Table 2. Crop injury (%) and yield (bu/ac) of winter wheat following an application of 28% UAN (400 L/ha) alone with air induction nozzles and with various herbicides compared to an untreated control that received the same amount of nitrogen. Source: Dr. P.H. Sikkema, 3 trials from 2008-2010, University of Guelph (Ridgetown Campus) – Additional information on tank-mixing with herbicides can be found here.

    TreatmentHerbicide rate/acInjury (%)Yield (bu/ac)
    control (unsprayed)——0105
    28% UAN alone——6105
    28% UAN + Infinity0.33 L9104
    28% UAN + Buctril M0.4 L8103
    28% UAN + Estaprop XT0.48 L9102
    28% UAN + Refine M12 g + 0.36 L1799

    Streamer Nozzles

    Streamers significantly reduce crop injury when applying UAN 28% in winter wheat. Growers in Ontario are using a range of 3, 5, 6 and 7 hole nozzles. These nozzles provide even coverage and minimize burn compared to flat-fan or flood nozzles; however, boom height can have an impact on crop injury. This is particularly important with 3 and 6 hole streamer nozzles. If there are significant variations in boom height (e.g. uneven emergence, uneven land, or a boom with excessive sway and yaw), significant crop injury can occur. This is exacerbated by hot and dry conditions.

    The damage is the result of non-uniform coverage. Streamers deliver spray in a triangular shape. If the boom is too low gaps in the spray pattern reduce coverage. If the boom is too high the crop may receive increased overlap, resulting in crop injury. Therefore, these nozzles are an excellent option for apply UAN 28% to winter wheat crop (see image below) as long as boom height can be managed effectively.

    Pro tip: 28-0-0 often has crystals so strainers are important.

    UAN 28% being applied uniformly to winter wheat using 3 hole streamer nozzles. Photo courtesy of: Jim Patton.

    Streamer Bars

    Streamer bars (see image below) may be the best choice. Streamer bars deliver liquid nitrogen to the crop vertically. This allows for even distribution across the winter wheat crop at various boom heights, often permitting great speed. Some even have a sliding orifice to permit an easy transition between rates. Research performed in Kentucky showed that streamer bars produced a 2.8 bu/ac yield advantage compared to 3 hole streamer nozzles, and a 4.9 bu/ac yield advantage over 7 hole streamer nozzles.

    Some may argue those aren’t significant yield advantages, but most Ontario growers would argue differently. Streamer bars provide uniform coverage no matter the state of emergence, boom height, topography or even wind conditions. Streamer bars can be adapted to most sprayers and are available in 15″ or 20″ spacing. The only caveat is that they can be fragile and can make folding the boom difficult.

    Chafer streamer bar. Photo courtesy of Alex Zelem.

    Other Ways to Reduce Burn

    In addition to proper nozzle selection there are a few things you can do to reduce the risk of crop injury from N applications.

    • Avoid applications of 28% when the crop is stressed or during hot and dry conditions.
    • If conditions are more conducive for crop injury, increasing water volumes or applying less N can also help reduce burn significantly.

    At the end of the day it is important to remember the end goal – maximize yield potential. If we can deliver UAN 28% as uniformly as possible to a standing winter wheat crop while minimizing crop injury, the 100+ bu/ac wheat crop will be well worth the effort.

    Here’s Peter Johnson (@WheatPete) to tell you more in this RealAgriculture Wheat School episode:

  • Airblast Nozzles – Distributing Flow

    Airblast Nozzles – Distributing Flow

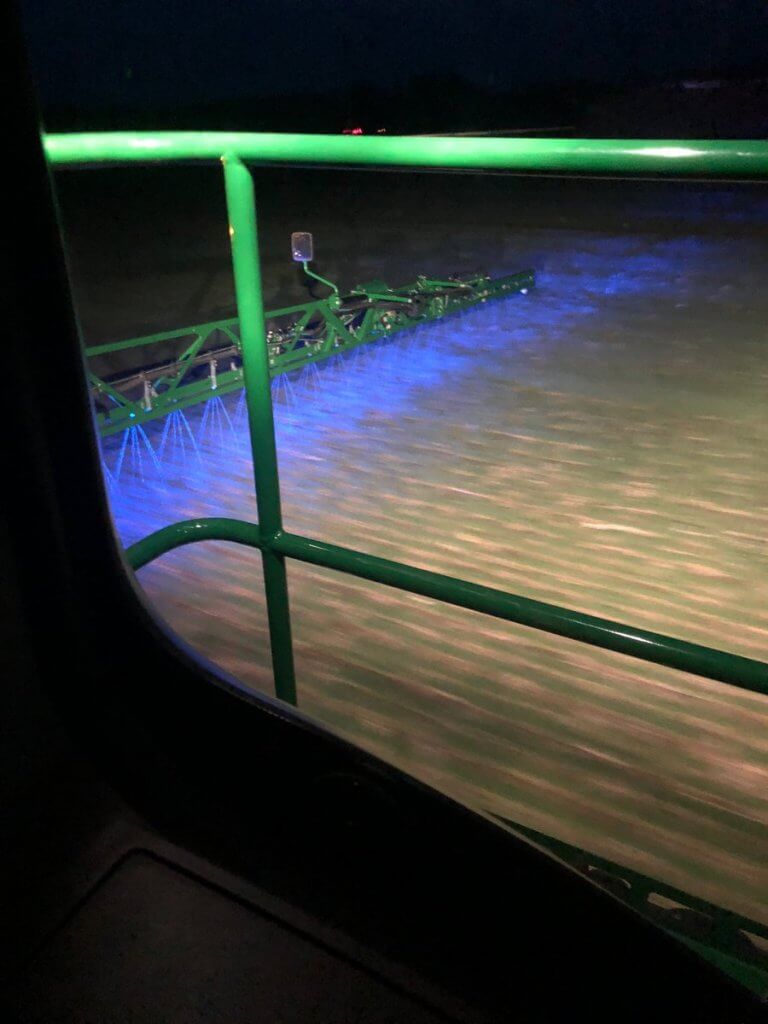
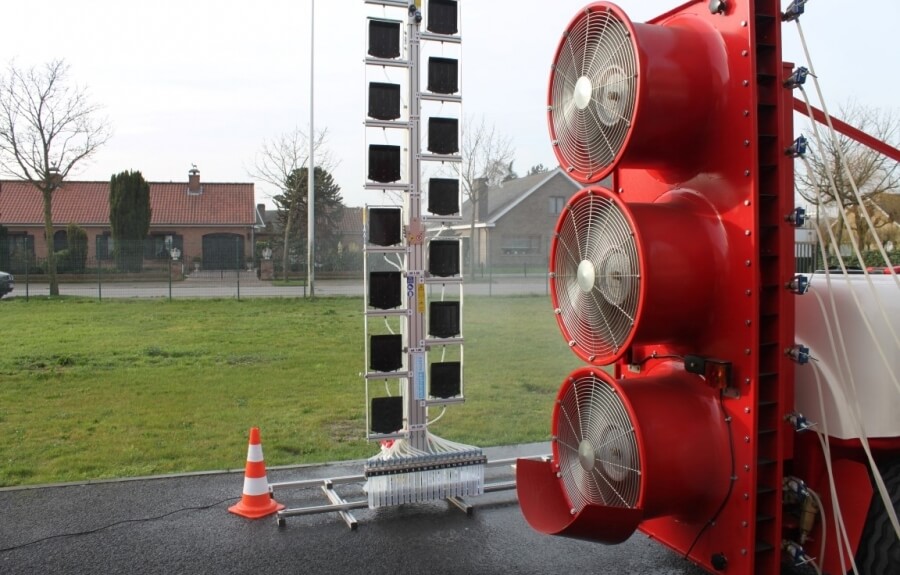
    There’s a certain deer-in-headlights expression that creeps onto a sprayer operator’s face when we discuss nozzle selection. We sympathize with our field sprayer clients given the variety of brands, styles, flow rates and spray qualities they must choose from. And PWM has made the process even more complex. However, airblast operators face an additional challenge; Unlike horizontal booms, vertical booms often distribute the flow unevenly to reflect relative differences in the distance-to-target and the density of the corresponding portion of target canopy. We discuss the broader, iterative process of nozzling an airblast boom here, but in this article we focus on the topic of flow distribution.

    An overwhelmed operator trying to nozzle a boom.

    The question of “which rate goes where” is still debated. It’s led to diagnostic devices called Vertical Patternators which show the profile of the spray. Operators can use these to visualize their distribution… but they are few and far between. For the rest of us, deciding on the best distribution begins with understanding how the practice evolved.

    The AAMS vertical patternator. The mast moves back and forth across the swath of a parked sprayer. Each black collector intercepts the spray at different heights. The fractions collect in the tubes at the bottom to show relative volume.
    An OMAFRA-built vertical patternator. The sprayer parks in front of the screens, which intercept spray. It’s collected in troughs and runs into columns that show relative volume.

    1950s

    In the 1950s, the mantra was to blow as much as you could, as hard as you could, and hope something stuck. At the time, John Bean promoted a method called “The 70% Rule” whereby operators used full-cone, high volume disc-core nozzles to emit the vast majority of the spray from the top boom positions. John Bean provided a slide-rule calculator to help operators configure booms to align the top nozzles with the deepest, densest portion of the 20-25 foot standard trees they were trying to protect. Back then, most airblast sprayers were engine-driven low-profile radial monsters capable of blowing to the tops of those trees. The practice persisted into the 60s and was encouraged by Cornell University (Brann, J.L. Jr. 1965. Factors affecting the thoroughness of spray application. N.Y. State. Arg. Exp. Sta. J. paper no. 1429).

    The profile of the spray would have looked something like the following graph:

    1970s

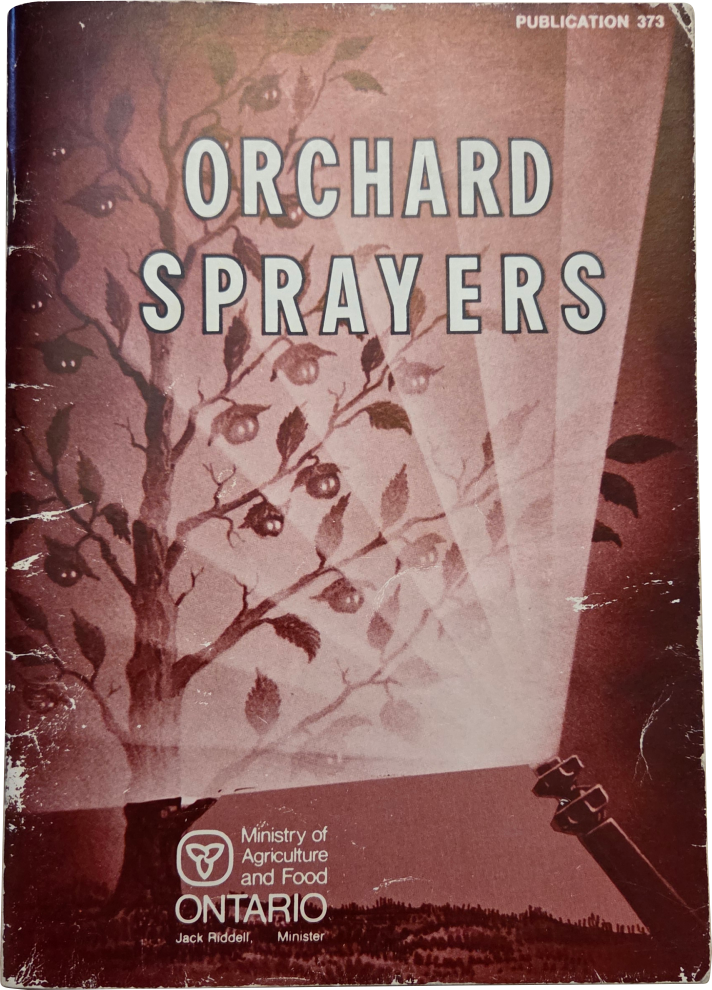
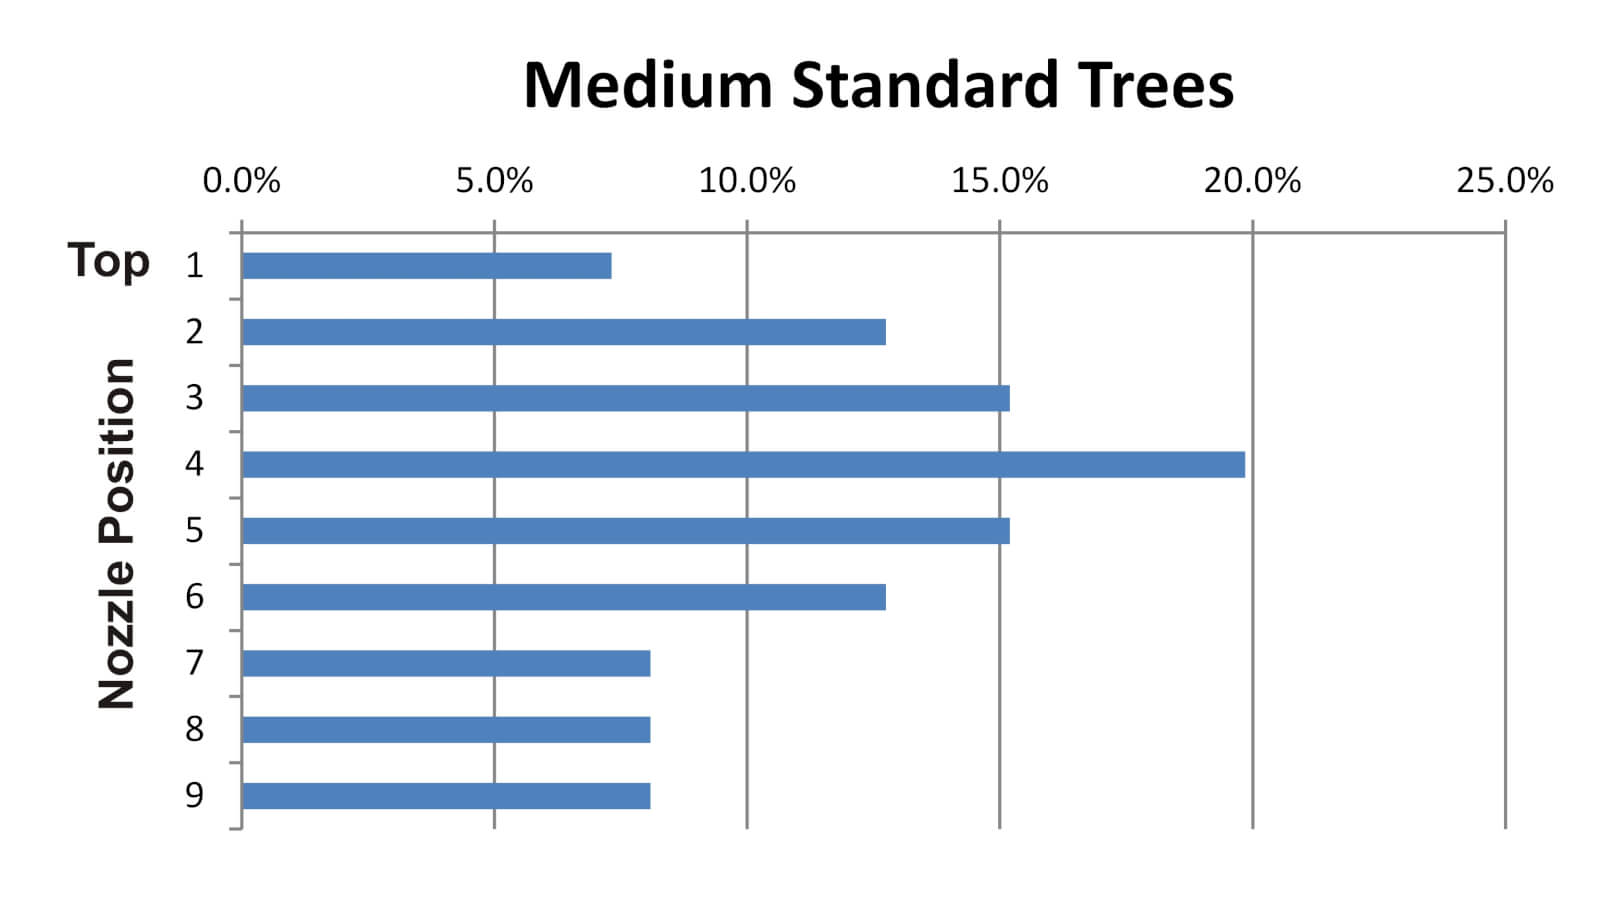
    In the 70s, extension specialists began advising operators to tailor the distribution to match the orchard spacing, tree architecture, canopy density and weather conditions. we reached deep into our archives for the Ontario Ministry of Agriculture and Food’s 1976 publication entitled “Orchard Sprayers” to see what we used to tell airblast operators.

    Here’s a synopsis of what was advised:

    1. Choose a tree size and shape that is typical of your orchard and park the sprayer at the normal spraying distance from it.
    2. Find one or two middle nozzle position(s) and air deflector or vane settings that direct the spray up through the top-inside of the tree. This is called the “middle volume zone”.
    3. Find rates that will give a large output in this middle volume zone, and smaller outputs for positions above and below.
    4. The total output must still add up to the target volume.

    It seemed operators were getting away from high rates in the top positions and instead shifting the distribution to match the canopy shape and density. If we were to follow these recommendations, the spray profile would look something like this:
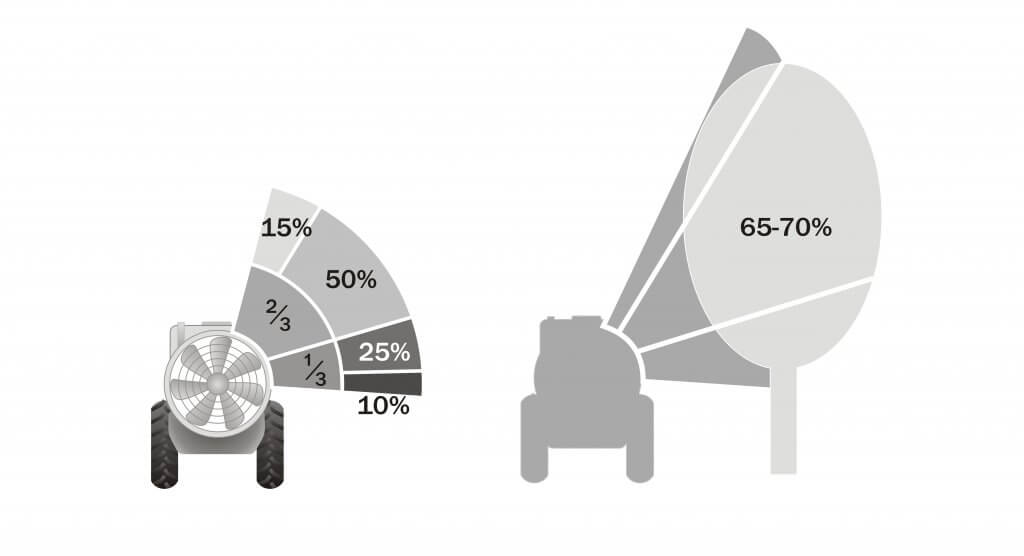
    This begins to resemble advise found in Agriculture Canada’s 1977 publication entitled “Air-Blast Orchard Sprayers – A Operation and Maintenance Manual“. Here we find the “2/3 boom rule” as the authors state: “To ensure good distribution through the trees, about two-thirds of the spray should be emitted from the upper half of the manifold.”
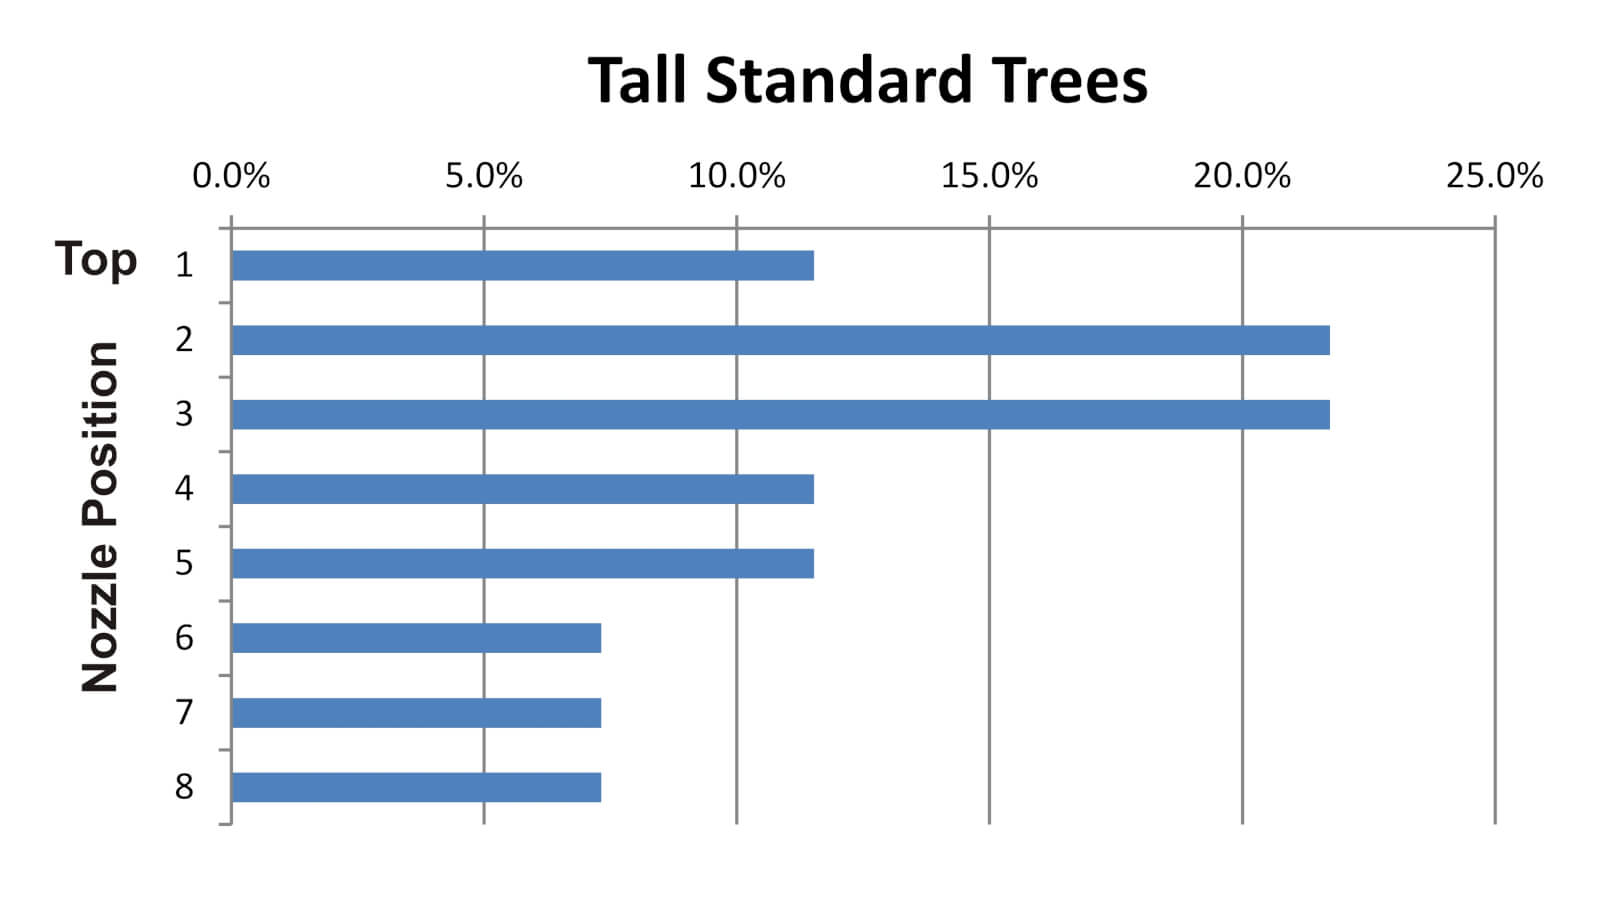
    1980s

    Operators followed this approach well into the 80s, as they endeavored to aim the majority of the spray into the densest part of the canopy. Many can relate to the following illustration that divides the boom. The fractions represent the portion of the available boom. The percentages indicate the relative volume. Of course, it matters how large and how far away the target is for either the 2/3-boom or 70% rule to make sense (the middle volume zone is shown receiving 65-70% in the silhouette).

    1990s-2000s

    The 2/3 or 70% rules still work for standard nut and citrus trees, and perhaps for large cherry trees, but pome and tender fruit orchard architecture is densifying. In the 90s and 00s we started transitioning from semi-dwarf into trellised, high density orchards. In 2005, Ohio’s Dr. Heping Zhu et al., found that a high density orchard is effectively sprayed by the same rate in each nozzle position. They wrote: “[Historical] recommendations are to use a larger nozzle at the top of each side, with the capacity of the top nozzle at least three times greater than other individual nozzles. However, results in this study with three different spray techniques showed that spray deposit was uniform across the tree canopy from top to bottom with the equal capacity nozzles on the air blast sprayer.”

    What a pleasant surprise to simplify our lives! If we can use an even distribution for dense, nearby trees, it follows that any vertical crop with the same width and density located close to the sprayer (e.g. cane fruit, trellised vines, etc.) would benefit from even distribution:

    Today

    So, how do we do it today? There is still no simple answer; Conditions change, not all sprayers are the same, and not all applications have the same target. Let’s build on what we’ve learned to establish a process to achieve better coverage uniformity and reduce waste.

    No matter the crop, the operator must first adjust air settings. Air volume and direction play the most critical role in transporting a droplet to (and into) a target canopy. Too high an air speed will cause spray to blow through the target, rather than allowing it to deposit within. Aim the air just over, and just under, the average canopy. Ensure there’s enough air to overcome ambient wind and to push the spray just past the middle of the target canopy.

    It should be noted that we assume the operator is spraying every row. With certain exceptions, alternate row middle spraying is not generally recommended. Not only can it compromise coverage on the far side of the target, it makes it far harder to match the nozzling on a single-row sprayer and is a sure-fire way to increase drift.

    Next, determine which nozzles are not needed (e.g. spraying the ground or excessively higher than the top of the canopy). Remember: hollow cones overlap very close to the boom and spread as much as 80°. Airblast sprayers rarely if ever need the lowest positions and unless spraying overhead trellises they may not need the highest either. Turning off the highest, and most drift-prone, nozzle positions in high density orchards is illustrated very nicely in the logo of Washington’s 2017 Pound the Plume awareness campaign.

    Then, finally, we decide on distribution. If the crop is nearby and relatively narrow, you can try even distribution. If you elect to distribute the spray unevenly to better match the variable-width target, or compensate for distance, aim half the overall output at the densest part of the canopy (the middle volume zone). Consider how the following factors might influence your choices:

    1. High humidity means more spray will reach the target, and vice versa. This is because all droplets are prone to evaporation. We have heard it said in dry conditions a droplet can lose ½ its diameter every 10 feet. As they evaporate they get lighter, meaning they are less subject to their original vector and the pull of gravity, and more subject to deflection by wind. The use or coarser droplets, and/or humectants, can help, but higher volumes can help too – they increase the odds of some droplets hitting the target and actually humidify the air to slow evaporation.
    2. Windspeed increases with elevation, so spray is most likely to deflect at the top of canopies where they have already lost size (and momentum and direction). Early in the season when there is little if any foliage, wind speeds are higher overall. This is why we advise adjusting air settings using a ribbon test before considering boom distribution – you need enough air volume, aimed correctly, to get the spray to the top.
    3. The denser and deeper a canopy, the more spray is filtered and unavailable for coverage. This is why you will always achieve more coverage on the adjacent, outer portion of a canopy versus the interior. In semi dwarf apple orchards we have seen the coverage drop by half for every meter of canopy. Finer spray can penetrate more deeply because there are more droplets and they move erratically, whereas coarser droplets move in straight lines and impact on the first thing they encounter. Higher volumes will improve penetration and overall coverage, but there is a diminishing return and runoff will occur more quickly leading to more waste.
    4. Further to the last point, remember that it’s the air that propels the spray, not the pressure. Higher liquid pressure can propel coarser droplets further, but has little effect on finer droplets. imagine throwing a golf ball and a ping pong ball into a light headwind and envision how they fly. Plus, the higher the pressure, the finer the mean droplet diameter.

    Confirm Your Work

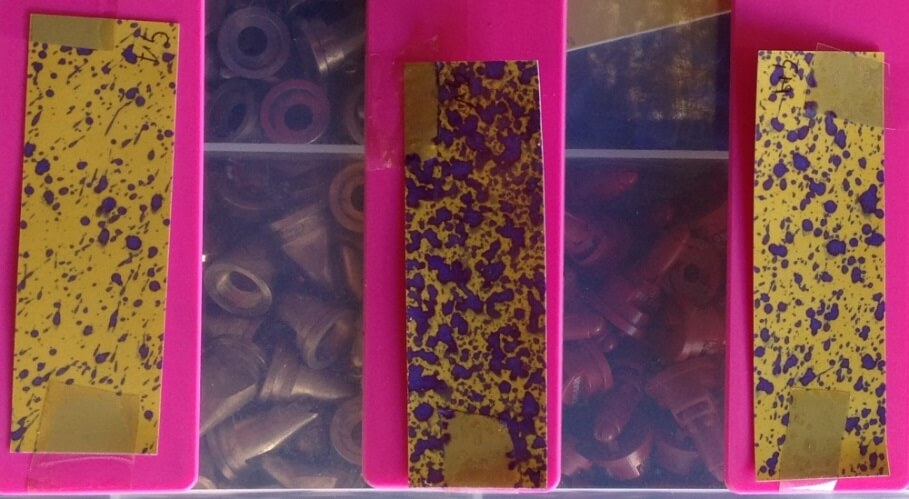
    To know how all these factors play out, you must use water sensitive paper (or some other form of coverage indicator) to diagnose the results. Remember, the goal is uniform coverage and for most foliar products, we want to achieve a minimum coverage threshold of 15% and a droplet density of 85 deposits per cm2 on at least 80% of the targets.

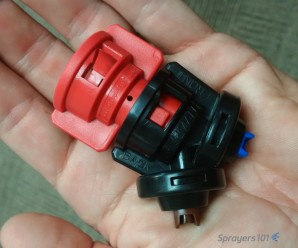
    Taking the time to match your output to the target has the potential to greatly improve coverage and reduce waste. Nozzle body flips and quick-change nozzle caps make the process of switching nozzles between blocks fast and easy. It’s worth it.

    Grateful thanks to Mark Ledebuhr, Gail Amos and Heping Zhu who edited, corrected and contributed to this article.

  • Mode of Action and Spray Quality

    Mode of Action and Spray Quality

    The decision on which application method is best for herbicides boils down to two main factors: (a) target type and (b) mode of action. In general, it’s easier for sprays to stick to broadleaf plants on account of their comparatively larger leaf size and better wettability compared to grassy plants. There are exceptions, of course – at the cotyledon stage, broadleaf plants can be very small and a finer spray with tighter droplet spacing may be needed. Water sensitive paper is a very useful tool to make that assessment. Imagine if a tiny cotyledon could fit between deposits – that could be a miss!

    Some weeds are also more difficult to wet, and those may also need a finer spray or a better surfactant for proper leaf contact. An easy test is to apply plain water to the leaf with a spray bottle. If the water beads off or the droplets remain perched on top in discrete spheres, the surface is considered hard to wet. Most grassy weeds are hard to wet, while most broadleaf weeds are easy to wet.

    Grassy weeds are an especially difficult target because they have smaller, more vertically oriented leaves, and almost without exception are more difficult to wet than broadleaf species. All these factors call for finer sprays for effective targeting and spray retention.

    Broadleaf weeds usually have more horizontally oriented leaves which also happen to be larger. As a result, they can intercept larger droplets quite efficiently.

    There are about thirty mode of action (MOA) groups among the herbicides with about ten accounting for the majority in Canadian prairie agriculture. It’s probably an over-simplification to categorize them into just two groups – systemic and contact.  But that grouping goes a long way to making an application decision.

    Contact products (MOA Group 5, 6, 10, 14, 22, 27) must form a deposit that provides good coverage. Good coverage is an ambiguous term that basically means that droplets need to be closely spaced and cover a significant proportion of the surface area because their physiological effects occur under the droplet, and don’t spread far from there. One way to generate more droplets is to reduce droplet diameter, another is to add more water. A reasonable combination of both is ideal because simply making droplets smaller creates issues with evaporation and drift.

    Systemic products (MOA Group 1, 2, 4, 9) will translocate within the plant to their site of action after uptake. As a result, coverage is less important as long as sufficient dose is presented to the plant. In practice, this means coarser sprays and/or less water may be acceptable.

    When two factors are combined, either in a tank mix or a weed spectrum, the more limiting factor rules. Application of a tank mix or product that is active on both broadleaf and grass plants will be governed by the limitation placed on grass targets. A tank mix comprised of both systemic and contact products is governed by the limitations placed on contact products.

    A factor we should also consider is soil activity and the presence of residue. Studies have shown that soil-active products are relatively insensitive to droplet size. But if they have to travel through a layer of trash to get to the soil surface, more application volume is the best tool.

    Below are some recommended spray qualities and water volumes for use in Canada. The spray qualities listed in the table can be matched to a specific nozzle by referring to nozzle manufacturer catalogues, websites, or apps. Note that Wilger also offers traditional VMD measurements on their site, allowing users to be a bit more specific if necessary.

    Click here to download PDF

  • Clean Your Nozzles

    Clean Your Nozzles

    When operators winterize their sprayers, they should remove all the tips and store them separately. Many store them in large pails with lids. Calibrating the sprayer just prior to winterizing will indicate if the nozzles should be stored, or replaced. Let’s assume each tip flow rate is within 5% of the average output and no more than 5% more than the manufacturer’s pressure tables. Yes, industry standard is 10%, but I always wonder how the spray quality suffers with that much wear. Nozzles are, comparatively, a cheap replacement and it’s not worth skimping. Learn more how to check nozzle flow rate, here.

    Just like any other part of the sprayer that comes in contact with spray liquid, nozzles (and strainers) should be cleaned regularly. And, just like any other part of the plumbing, the best way to do that is to dilute any residues via a series of rinses. For a more rigorous cleaning, one of the intermediate rinses should include a detergent, and soaking during this step is an excellent practice.

    The orifice of any nozzle is delicate, either machined or molded to exacting standards. Even small changes to the orifice shape results in distorted spray (e.g. spray comes out at undesirable angles), a change to the rate (typically more volume per minute) and a change in the spray quality (typically larger median droplet size). If foreign objects or residues remain in the tips, the subsequent spray job may be less accurate and even damage the tips.

    In the case of air induction nozzles, which are essentially the standard on most boom sprayers, debris and weed seeds can plug the air-intake ports. When that happens, the nozzle will not function as intended. So, while the occasional soaking of nozzles does a great deal of good, they may also have to be scrubbed. Don’t use picks or reamers! There are nozzle cleaning tools out there, but they’re basically toothbrushes so save your old ones (and mark them clearly). Soft bristles are the way to go for removing stubborn residues and cleaning any tip orifices, but we found a nifty new way:

    Occasionally we receive photos like the one below and we’re asked what we think. Well, just the same way we don’t recommend cleaning your sprayer overalls in the family clothes washer, we also don’t recommend the use of dishwashers for nozzles.

    Not a great idea. Certainly not if you intend to ever use this dishwasher for anything else. And where does the rinsate go?

    In an interesting experiment, Lucas Olenick of Wilger tried cleaning tips in a heated ultrasonic cleaner. We haven’t tested this and we don’t know what heat and vibration might do to poly and ceramic components, but surely it’s no more aggressive than hot, soapy water and a bristle brush. Lucas tried several durations with and without detergent and arrived at this recipe:

    “For tough, non-water-soluble pesticides, around 8+ hours in a heated ultra-sonic cleaner with (Dawn) dish soap to come out like brand new. Other solvents may speed this up, but I’d generally suggest against heating solvents at any concentration. For water-soluble pesticides, expect to be within the 3-6+ hours for the first time to be confident enough in not having to flow-test each of the nozzles. With any pesticides, ensure proper care in handling contaminated nozzles and rinsate after cleaning nozzles.”

    The mad genius of Lucas Olenick (@WilgerParts) who used dish detergent and a heated sonic cleaner to unplug tips. Be sure to dispose of rinsate safely. Photo credit: Lucas Olenick.

    Don’t have a heated sonic cleaner? No problem. Here’s a step by step:

    1. Wearing gloves, remove all nozzles, strainers, rubber gaskets and tips from the sprayer.
    2. Put them in a large plastic pail and cover them in warm water. Leave them to soak.
    3. Drain the pail, but be aware that the rinsate will have pesticide residue.
    4. Fill a second pail with a solution of the same commercial detergent used to clean the sprayer.
    5. With a toothbrush, scrub the caps, gaskets, strainers and nozzles to remove any residue. Some nozzles can be pulled apart to expose the mixing chamber and facilitate cleaning.
    6. Once scrubbed, leave all the parts to soak in the detergent solution.
    7. Drain the solution, which will contain trace amounts of pesticide, rinse the parts with water and reassemble the nozzles.

    While you’re at it, drop those filters and scrub them alongside the tips. This may seem extreme, but of all the technology on a sprayer, the nozzle has the biggest impact on the effectiveness and efficiency of the spray job. Take the opportunity over the winter months to clean and inspect the tips for damage so the sprayer is ready for calibration in the spring.

    Soak, scrub, rinse and store nozzles and nozzle strainers. You may replace them once the sprayer is clean, but I prefer to store then separately. Photo credit: Jason Boersma (@RVFBoys), Ridge Valley Farms, Ontario.

    Thanks to Jason Boersma (@RVFBoys), Ridge Valley Farms, Ontario, who sparked this article with his tweet: “Great job for a cold winter day, soak & clean all your tips to be ready for spring also saves on down time!”