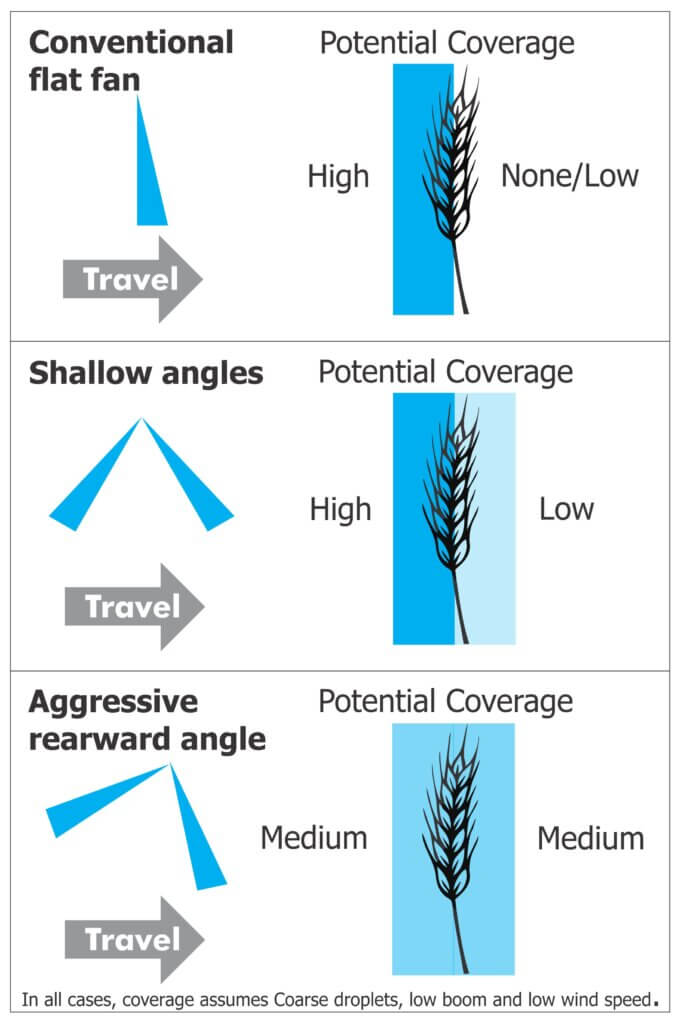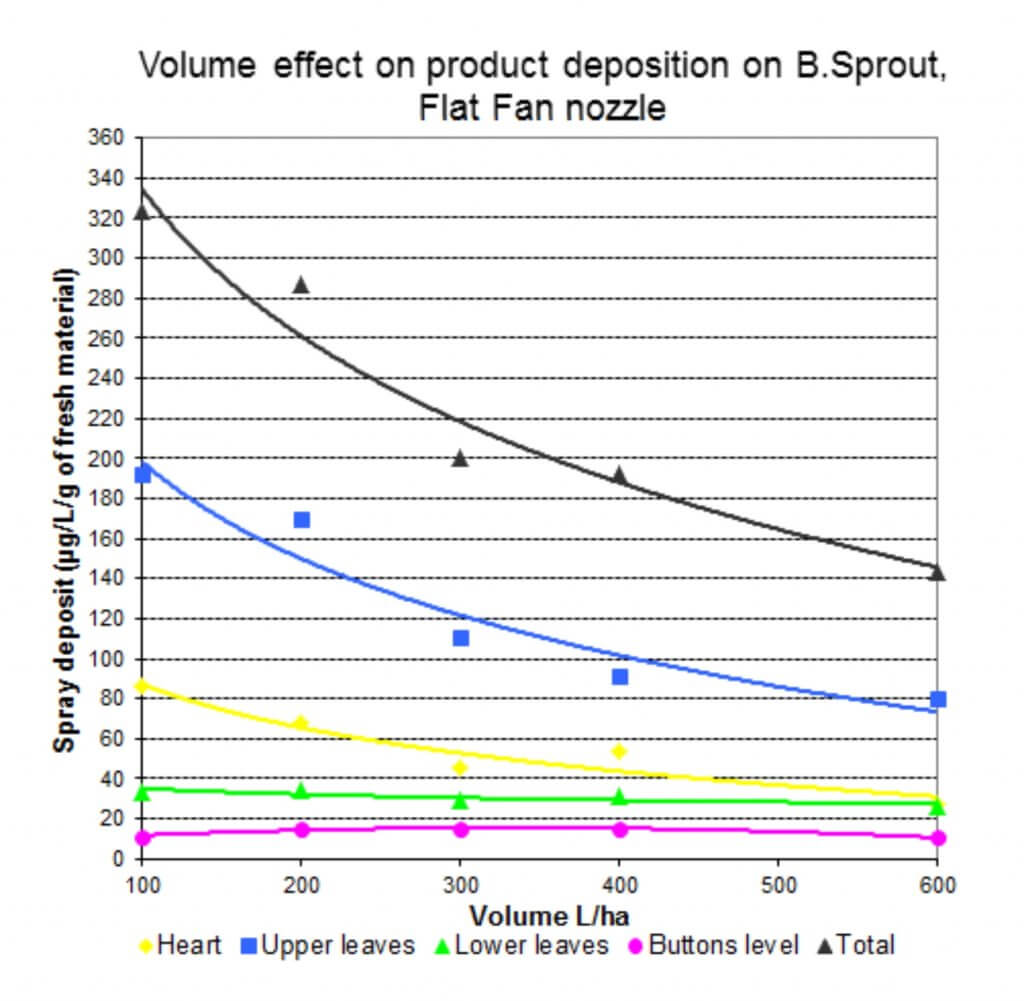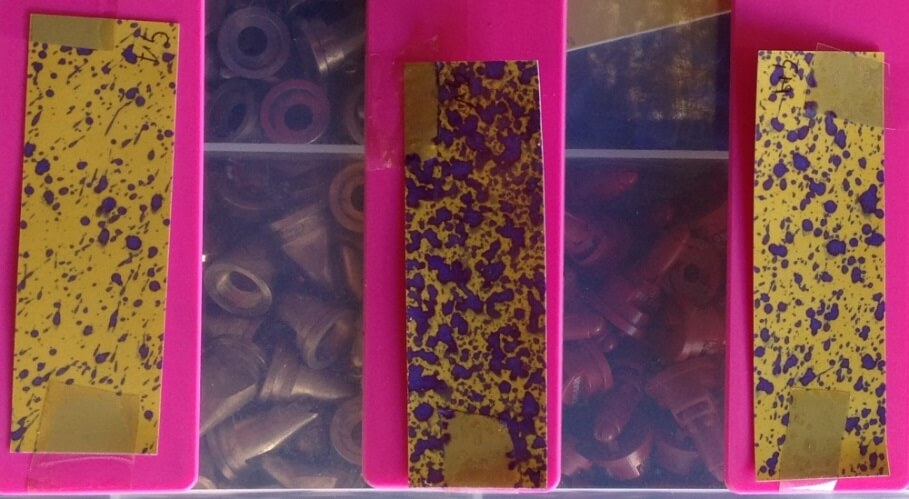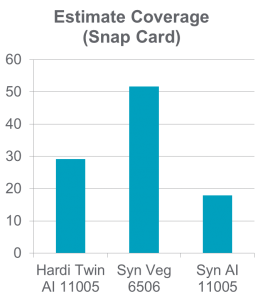
The decision on which application method is best for herbicides boils down to two main factors: (a) target type and (b) mode of action. In general, it’s easier for sprays to stick to broadleaf plants on account of their comparatively larger leaf size and better wettability compared to grassy plants. There are exceptions, of course – at the cotyledon stage, broadleaf plants can be very small and a finer spray with tighter droplet spacing may be needed. Water sensitive paper is a very useful tool to make that assessment. Imagine if a tiny cotyledon could fit between deposits – that could be a miss!
Some weeds are also more difficult to wet, and those may also need a finer spray or a better surfactant for proper leaf contact. An easy test is to apply plain water to the leaf with a spray bottle. If the water beads off or the droplets remain perched on top in discrete spheres, the surface is considered hard to wet. Most grassy weeds are hard to wet, while most broadleaf weeds are easy to wet.
Grassy weeds are an especially difficult target because they have smaller, more vertically oriented leaves, and almost without exception are more difficult to wet than broadleaf species. All these factors call for finer sprays for effective targeting and spray retention.
Broadleaf weeds usually have more horizontally oriented leaves which also happen to be larger. As a result, they can intercept larger droplets quite efficiently.
There are about thirty mode of action (MOA) groups among the herbicides with about ten accounting for the majority in Canadian prairie agriculture. It’s probably an over-simplification to categorize them into just two groups – systemic and contact. But that grouping goes a long way to making an application decision.
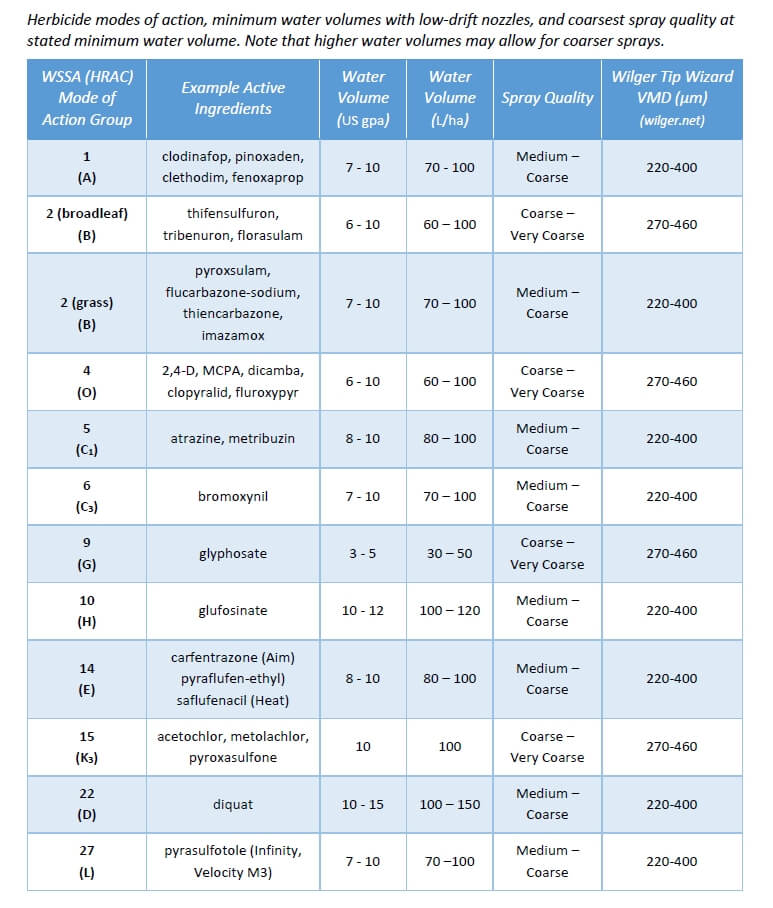
Contact products (MOA Group 5, 6, 10, 14, 22, 27) must form a deposit that provides good coverage. Good coverage is an ambiguous term that basically means that droplets need to be closely spaced and cover a significant proportion of the surface area because their physiological effects occur under the droplet, and don’t spread far from there. One way to generate more droplets is to reduce droplet diameter, another is to add more water. A reasonable combination of both is ideal because simply making droplets smaller creates issues with evaporation and drift.
Systemic products (MOA Group 1, 2, 4, 9) will translocate within the plant to their site of action after uptake. As a result, coverage is less important as long as sufficient dose is presented to the plant. In practice, this means coarser sprays and/or less water may be acceptable.
When two factors are combined, either in a tank mix or a weed spectrum, the more limiting factor rules. Application of a tank mix or product that is active on both broadleaf and grass plants will be governed by the limitation placed on grass targets. A tank mix comprised of both systemic and contact products is governed by the limitations placed on contact products.
A factor we should also consider is soil activity and the presence of residue. Studies have shown that soil-active products are relatively insensitive to droplet size. But if they have to travel through a layer of trash to get to the soil surface, more application volume is the best tool.
Below are some recommended spray qualities and water volumes for use in Canada. The spray qualities listed in the table can be matched to a specific nozzle by referring to nozzle manufacturer catalogues, websites, or apps. Note that Wilger also offers traditional VMD measurements on their site, allowing users to be a bit more specific if necessary.
When operators winterize their sprayers, they should remove all the tips and store them separately. Many store them in large pails with lids. Calibrating the sprayer just prior to winterizing will indicate if the nozzles should be stored, or replaced. Let’s assume each tip flow rate is within 5% of the average output and no more than 5% more than the manufacturer’s pressure tables. Yes, industry standard is 10%, but I always wonder how the spray quality suffers with that much wear. Nozzles are, comparatively, a cheap replacement and it’s not worth skimping. Learn more how to check nozzle flow rate, here.
Just like any other part of the sprayer that comes in contact with spray liquid, nozzles (and strainers) should be cleaned regularly. And, just like any other part of the plumbing, the best way to do that is to dilute any residues via a series of rinses. For a more rigorous cleaning, one of the intermediate rinses should include a detergent, and soaking during this step is an excellent practice.
The orifice of any nozzle is delicate, either machined or molded to exacting standards. Even small changes to the orifice shape results in distorted spray (e.g. spray comes out at undesirable angles), a change to the rate (typically more volume per minute) and a change in the spray quality (typically larger median droplet size). If foreign objects or residues remain in the tips, the subsequent spray job may be less accurate and even damage the tips.
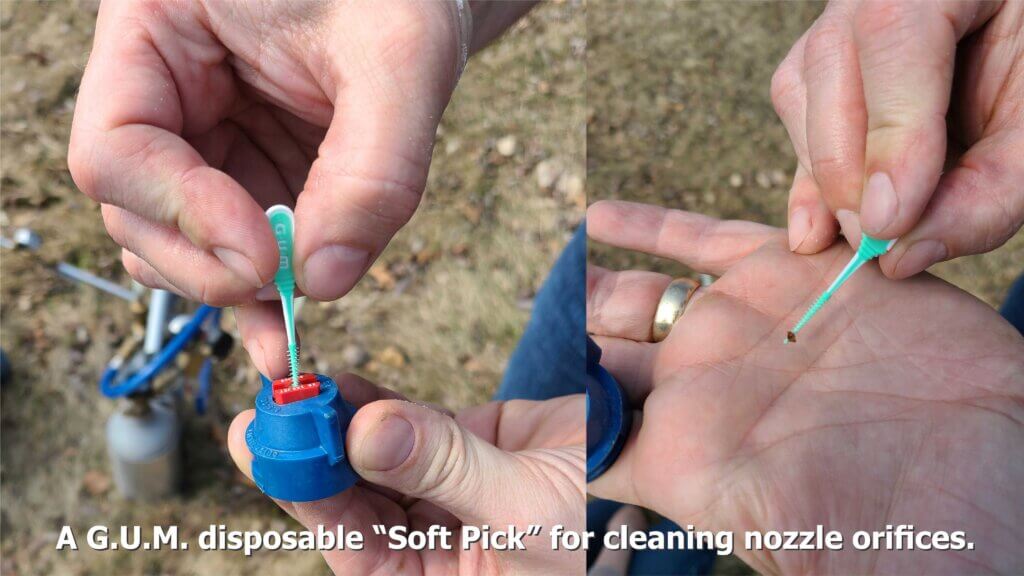
In the case of air induction nozzles, which are essentially the standard on most boom sprayers, debris and weed seeds can plug the air-intake ports. When that happens, the nozzle will not function as intended. So, while the occasional soaking of nozzles does a great deal of good, they may also have to be scrubbed. Don’t use picks or reamers! There are nozzle cleaning tools out there, but they’re basically toothbrushes so save your old ones (and mark them clearly). Soft bristles are the way to go for removing stubborn residues and cleaning any tip orifices, but we found a nifty new way:
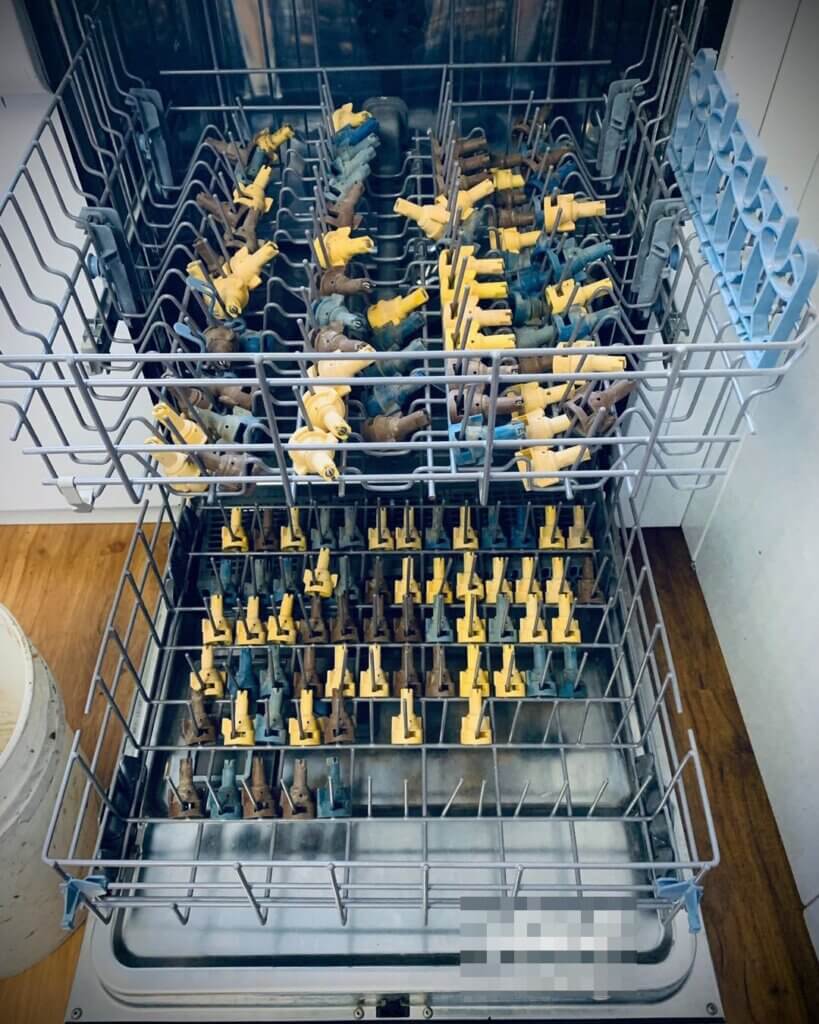
Occasionally we receive photos like the one below and we’re asked what we think. Well, just the same way we don’t recommend cleaning your sprayer overalls in the family clothes washer, we also don’t recommend the use of dishwashers for nozzles.
Not a great idea. Certainly not if you intend to ever use this dishwasher for anything else. And where does the rinsate go?
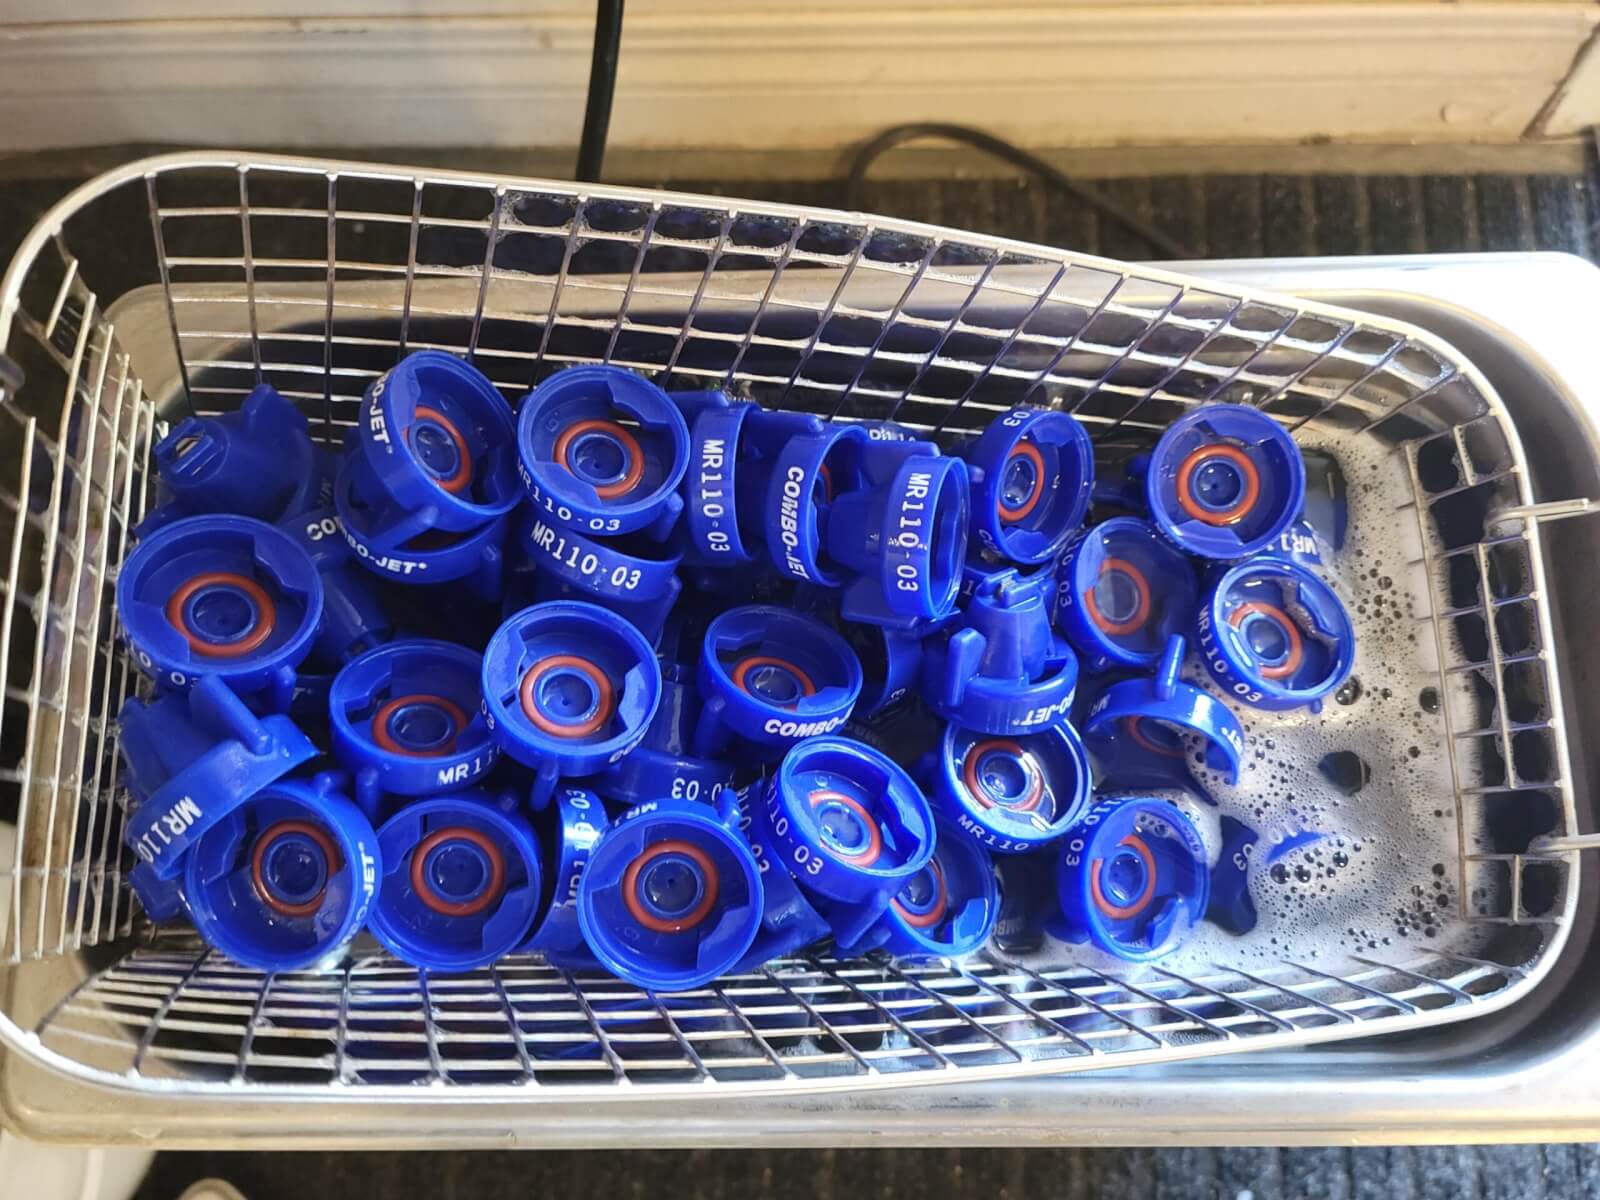
In an interesting experiment, Lucas Olenick of Wilger tried cleaning tips in a heated ultrasonic cleaner. We haven’t tested this and we don’t know what heat and vibration might do to poly and ceramic components, but surely it’s no more aggressive than hot, soapy water and a bristle brush. Lucas tried several durations with and without detergent and arrived at this recipe:
“For tough, non-water-soluble pesticides, around 8+ hours in a heated ultra-sonic cleaner with (Dawn) dish soap to come out like brand new. Other solvents may speed this up, but I’d generally suggest against heating solvents at any concentration. For water-soluble pesticides, expect to be within the 3-6+ hours for the first time to be confident enough in not having to flow-test each of the nozzles. With any pesticides, ensure proper care in handling contaminated nozzles and rinsate after cleaning nozzles.”
The mad genius of Lucas Olenick (@WilgerParts) who used dish detergent and a heated sonic cleaner to unplug tips. Be sure to dispose of rinsate safely. Photo credit: Lucas Olenick.
Don’t have a heated sonic cleaner? No problem. Here’s a step by step:
Wearing gloves, remove all nozzles, strainers, rubber gaskets and tips from the sprayer.
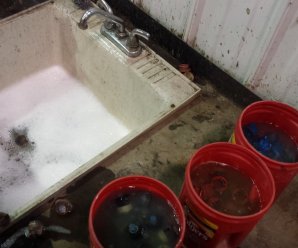
Put them in a large plastic pail and cover them in warm water. Leave them to soak.
Drain the pail, but be aware that the rinsate will have pesticide residue.
Fill a second pail with a solution of the same commercial detergent used to clean the sprayer.
With a toothbrush, scrub the caps, gaskets, strainers and nozzles to remove any residue. Some nozzles can be pulled apart to expose the mixing chamber and facilitate cleaning.
Once scrubbed, leave all the parts to soak in the detergent solution.
Drain the solution, which will contain trace amounts of pesticide, rinse the parts with water and reassemble the nozzles.
While you’re at it, drop those filters and scrub them alongside the tips. This may seem extreme, but of all the technology on a sprayer, the nozzle has the biggest impact on the effectiveness and efficiency of the spray job. Take the opportunity over the winter months to clean and inspect the tips for damage so the sprayer is ready for calibration in the spring.
Soak, scrub, rinse and store nozzles and nozzle strainers. You may replace them once the sprayer is clean, but I prefer to store then separately. Photo credit: Jason Boersma (@RVFBoys), Ridge Valley Farms, Ontario.
Thanks to Jason Boersma (@RVFBoys), Ridge Valley Farms, Ontario, who sparked this article with his tweet: “Great job for a cold winter day, soak & clean all your tips to be ready for spring also saves on down time!”
Establishing an airblast nozzling solution is an involved process. We must first define the working parameters and flush out any special circumstances. Then we use an iterative approach to identify suitable nozzle combinations that require minimal changes to the sprayer.
This article outlines my process step-by-step and then applies it to a hypothetical orchard scenario. If readers wish to delve deeper into the variables or the reasoning, several links to supporting articles are provided. Be aware that nozzling the sprayer is the penultimate step in establishing optimal sprayer settings. Operators should first adjust air settings, which includes identifying a suitable travel speed. The last step in setting up any sprayer is to verify you are achieving threshold spray coverage.
Step One: Establish sprayer parameters
Is there more than one sprayer available? In diverse plantings, it may be more efficient to assign a sprayer to blocks that require the same nozzling solution.
How many nozzle positions are there on one side of the sprayer? If the nozzle bodies are roll-over style the operator can alternate between two different nozzles in each position. Some designs have twice as many nozzle bodies as needed. The intent is to assign two unique nozzle solutions in an alternating A-B set-up. This additional capacity gives us some flexibility if needed.
Is this a tower or a low-profile axial sprayer? Generally, we distribute nozzle flow evenly over a tower boom but distribute ½ the flow in the top 1/3 of the boom on a low-profile axial sprayer (depending on canopy shape and density). Air-shear and one-sided sprayers are special cases that are not addressed in this article.
What is the average travel speed, and can the operator easily change it? This process assumes the selected speed achieves a reasonable work rate while optimizing the interaction between sprayer air and the canopy.
What is the average operating pressure, and can the operator easily change it? For sprayers with positive displacement pumps, pressure is easily changed via the regulator. Not so for sprayers with centrifugal pumps. Pressure-based rate controllersempower an operator to dial in their desired volume and are easiest of all .
Step Two: Establish target parameters
What is the row spacing (or spacings)? Some operations include a variety of canopy morphologies and planting architectures.
What is the target volume (or volumes)? Operators often use a range of volumes to reflect the product being applied and the canopy area-density. This process assumes the volume will provide threshold, uniform coverage without misses or excess.
Step Three: Are there any environmental, geographical or adjacency concerns?
Each operation is unique, including conditions that may influence nozzling. For example, open water, sensitive crops, or residential areas adjacent and downwind of the planting may warrant drift-reducing nozzles or require the operator to only spray inward from one side of the sprayer. In another example, dry and windy conditions may require nozzles that produce a coarser spray quality will improve their survivability. Rolling hills and uneven alleys may cause sway that prevents the upper-most nozzles from consistently reaching the target.
Step Four: Find out why the operator is re-nozzling
The answer may reveal the operator’s willingness and ability to make changes to sprayer settings. For example, if their objective is to improve the match between sprayer and canopy it implies a willingness to take a more active role in spraying. Conversely, a less experienced operator might be satisfied with a more robust (i.e., wasteful) set up that does not require many changes between blocks.
Step Five: Determine the highest and lowest boom flow requirements
The following formulae relate travel speed, row spacing, and the desired volume sprayed per planted area to the output from a single boom. I recommend downloading this Excel-based calculator to make the process easier.
US Imperial Formula Output from single boom (gpm) = [(Sprayer Output (gpa) × Travel Speed (mph)) ÷ 990] × Row Spacing (ft)
Metric Formula Output from single boom (L/min) = [(Sprayer Output (L/ha) × Travel Speed (km/h)) ÷ 1,220] × Row Spacing (m)
Using the formula with the appropriate units, enter the highest desired volume, the fastest travel speed and the longest row spacing. This will give the highest rate of flow the boom must satisfy.
Repeat this process using the lowest desired volume, the slowest travel speed and the shortest row spacing. This will give the lowest rate of flow the boom must satisfy.
The ultimate objective is to select a combination of nozzles that can produce these two flows, distributed sensibly along the boom, with no gaps or excessive flow relative to the target. Ideally, the operator should be able to alternate between these two flows with as few changes as possible.
Step Six: Satisfy the highest flow
This step requires a nozzle manufacturer’s catalogue and a calculator (or the downloaded Excel spreadsheet). We must assume the range of available nozzle positions are oriented to span the target canopy with no over- or under-spray.
Divide the highest flow requirement by the number of available nozzles. Hypothetically, a nozzle size that produces this flow would satisfy the highest flow requirement while providing an even distribution along the boom.
Using the nozzle manufacturer’s catalog, find the flow table for the nozzle you want. Generally, a molded hollow cone nozzle is the preferred choice (e.g., TeeJet’s TXR ConeJet or Albuz’s ATR). If drift is a concern, there are also air induction (AI) hollow cones available. AI nozzles are most effective in the top two or three nozzle positions where drift potential is highest. However, they may require higher flow than calculated to compensate for a reduced droplet count.
Find the operating pressure (it may be in either the column or row heading) and find a flow rate in the body of the table that is as close as possible to your calculated ideal. It’s almost never an exact match, so choose the option that is less than the target rate – not higher.
Imagine placing that nozzle in every available position. Add up all the rates to determine how close you are to the ideal flow. It will likely be less. To compensate, replace the top nozzle on the boom with a higher rate and re-calculate the total flow. Repeat this process, substituting for nozzles with a higher rate, moving top-down along the boom until the flows match.
You have now satisfied the demand for the highest flow.
It is important to note that this process assumes the flow distribution along the boom should be relatively even, perhaps skewed towards the top. However, it is sometimes appropriate to distribute the flow differently to reflect each nozzle’s distance-to-target and the density of the corresponding portion of canopy it needs to spray. This tends to be the case when pairing low-profile radial sprayers with large or trellised canopies, and you can read more about that process in this article.
Step Seven: Satisfy the lowest flow
This is the art-and-compromise part of the nozzling process.
Confirm that the range of available nozzle positions still corresponds to the target. Quite often, the lowest flow is intended for smaller canopies. If so, we may no longer have as many nozzle positions to work with.
Imagine the sprayer is still nozzled for the highest flow per the last step. Leaving the highest effective nozzle on, imagine turning off every second nozzle. Add up the flows and determine how close you are to the lowest rate of flow. It is often still too much. Do not turn off any more nozzles or you may create gaps in the swath.
Instead, return to the nozzle catalogue and re-calculate the flows for the same nozzles, but using a lower operating pressure. Can you make that work? If not, you may have to go back further in the calculation (Step five) and recalculate the lowest flow required using a faster travel speed. This will reduce the demand for flow.
If none of those options are viable you will have to consider re-nozzling. Perhaps that’s swapping a few nozzles to lower rates. Hopefully this only requires the operator to flip a roll-over position, but it may mean using a wrench to remove caps and swap nozzles.
Once you’ve satisfied the lowest flow, the hardest part of the process is complete.
Step Eight: Satisfy the other permutations
The last step is no different than what we’ve already done. Go back to Step Five and calculate the flow for each spraying situation. That is, each unique combination of row spacing, travel speed and target volume. Using the nozzles already on the sprayer, adjust the pattern of nozzles in use (and pressure and/or travel speed if required) until each unique flow requirement is satisfied.
Step Nine: Record the setups, nozzle the sprayer and test the coverage
Be sure to clearly record the sprayer settings required to achieve each flow. Purchase the nozzles and take the time to test each set up using water sensitive paper to ensure coverage is achieved.
A working example
Let’s apply this process in a hypothetical orchard. I’ve included a screenshot of the spreadsheet I use to record the final nozzling solution (below) but feel free to design your own. It includes the nozzling solution for this example.
Our orchard is a 50 acre operation with both 11 and 15 foot row spacings. They have one tower sprayer with 15 nozzle positions on one side and they are not roll-over bodies. The operator wants to apply a 40 gpa volume (concentrated) and a 100 gpa volume (dilute). Their preferred travel speed is 4.5 mph and preferred operating pressure is 140 psi, but they are willing to change them if required.
We use the Excel calculator to work out the ideal highest and lowest demands for flow:
I usually shut off the lowest nozzle position because it almost never aims at the target. Let’s divide the high flow of 6.8 gpm by 14 available positions to give us an average output of 0.48 gpm per nozzle. This operator wants to use TeeJet TXRs, so using their table (below) we see that at 140 psi the Orange ’02 is too low and the Red ‘028 is too large. If we drop the operating pressure to 120 psi, the Red ‘028 is much closer at 0.465 gpm, so let’s do that.
A quick check gives us our current boom flow: 14 positions × 0.465 gpm per nozzle is 6.51 gpm of boom flow. We wanted 6.8 gpm, so let’s go up to the Grey ’03 in the top three positions. Now it’s 4 × 0.517 gpm + 10 × 0.465 gpm = 6.72 gpm. That’s close to our ideal 6.8 gpm, so let’s lock that down. If you want to see what this is in gpa, you can plug the value into the Excel calculator to discover it’s 99.6 gpa. Pretty darn close to our target 100 gpa.
Now using that nozzling arrangement, let’s see if we can satisfy the lowest flow requirement by shutting off every second nozzle position, leaving the highest position on. Doing so reduces us to two Greys and five Reds, totaling 3.36 gpm. That boom flow is much too high compared to the 2.0 gpm we need. However, in our hypothetical orchard, this block has shorter trees so we don’t need the highest nozzle. That drops us to only one Grey and a new total of 2.84 gpm. Good try, but it’s still too much.
Let’s reduce the operating pressure from 120 psi to 100 psi, which is as low as I like to go. According to TeeJet’s table, the Grey produces 0.473 gpm and the Red produces 0.426 gpm at this pressure. This gives us a new total of 2.60 gpm. Still too high! Well, let’s raise our travel speed from 4.5 mph to 5.0 mph and recalculate the lowest flow for Situation D:
This still won’t do it, and driving that fast (even if it’s possible) would change our air settings too drastically. Having exhausted all the easy options we have no choice but to re-nozzle the sprayer for the original lowest flow requirement.
Returning to the TeeJet table we see the best fit is to spray at 100 psi using one Red TXR80028 and five Orange TXR8002s. It’s a lucky break that our 1.98 gpm has come so close to the 2.0 gpm of flow we wanted.
Now let’s work out the best arrangement for the other permutations, Situation B and C. We need 5.0 gpm and 2.7 gpm, respectively. For Situation B, let’s use the nozzling solution from Situation A. We see that shutting off four nozzles gets us very close at 4.81 gpm or 97.3 gpa where we wanted 100 gpa. As for Situation C, let’s work from the nozzling for situation D. By adding a few more nozzles from that set, we can manage 2.71 gpm or 40.2 gpa.
Finally, we record all the settings (refer back to the spreadsheet image). We will need four Grey TXR8003s, ten Red TXR80028s and six Orange TX8002s per side, so 40 nozzles in total (plus a few spares for each rate). We will need to spray at 120 psi for Situation A and be prepared to shut off a few nozzles for Situation B. Situation C will require 100 psi and an entirely different nozzling and we will have to shut a few of them off for Situation D. Not only have we determined a nozzling solution, but we have revealed an efficient order for spraying the blocks that will require as little manual change to the sprayer as possible.
Summary
There is no one right answer to the question “which nozzles do I need” but there are certainly wrong answers. Bear this in mind when you buy a sprayer and the dealer offers you a factory-standard nozzle setup. Apply this process to your operation and be sure to use water sensitive paper to confirm the coverage and to make informed changes where required.
In this installment, Dr. Tom Wolf, intrepid reporter, braves the unforgiving wilds of Saskatoon as he investigates claims of mysterious devices popping up all over the city. Colloquially referred to as “nozzles” these items are imprinted with obscure codes that scientists are struggling to decipher. Be the first to learn how to read a nozzle and nozzle table in our newest installment.