Tag: Swath

  • How to Calibrate a Drone – Swath Width Calculation

    How to Calibrate a Drone – Swath Width Calculation

    Calibration is a fundamental step in any spray application. To apply the correct product rate, we need to know how much liquid per unit land area is deposited under the sprayer.

    To conduct the calculations, either manually or through the drone software, we need to know the width of the spray swath. This task requires the operation of the sprayer under typical conditions, some kind of sampler capture the spray deposit, and a means of quantifying that deposit so the spray pattern becomes apparent. Here’s how we do it:

    1. Confirm the accuracy of the flow meter

    Drones don’t typically report the spray pressure of the spray mix. Instead, they report the flow rate using a built-in flow meter. The drone maintains the desired application rate by using the flow rate to adjust pump speed and engage nozzles over a range of travel speeds. Because everything depends on the flow meter, its accuracy needs to be verified.

    • Fill the spray tank with clean water and flush all the lines.
    • Install nozzles required for task, ensuring all nozzles are identical and in good working order.
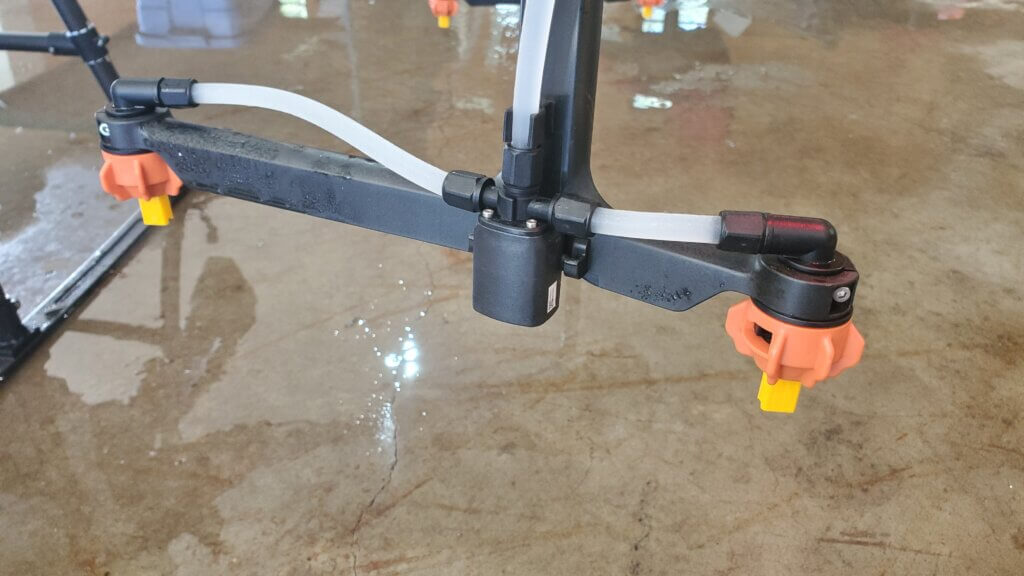
    Nozzles installed on DJI T20 drone.
    • Select the nozzle size you installed on the spray monitor.
    • Purge the air from the system.
    • Activate the spray and wait for the flow rate to stabilize on the spray monitor. This may take a few moments.
    • With the nozzles flowing, place collectors under each nozzle and collect the spray liquid for a fixed time, say one minute.
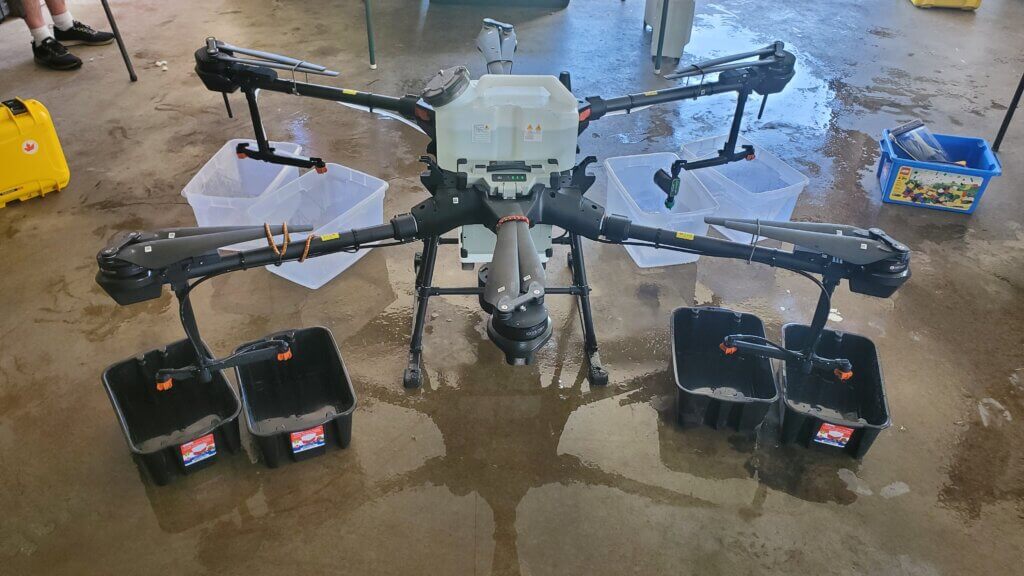
    Capturing spray during flow meter calibration.
    • Ensure the collector catches all the spray. Buckets often create turbulence. Rotary atomizers make this more difficult.
    • When the time elapses, remove the collectors and then shut off the spray.
    • Unless the shutoff is very fast and positive, leaving the collectors in place during shutoff can introduce error as the flow diminishes.
    • Confirm that the volume collected from each nozzle was identical, and that the flow rate reported by the drone flow meter is accurate.
    • Repeat to ensure consistency.
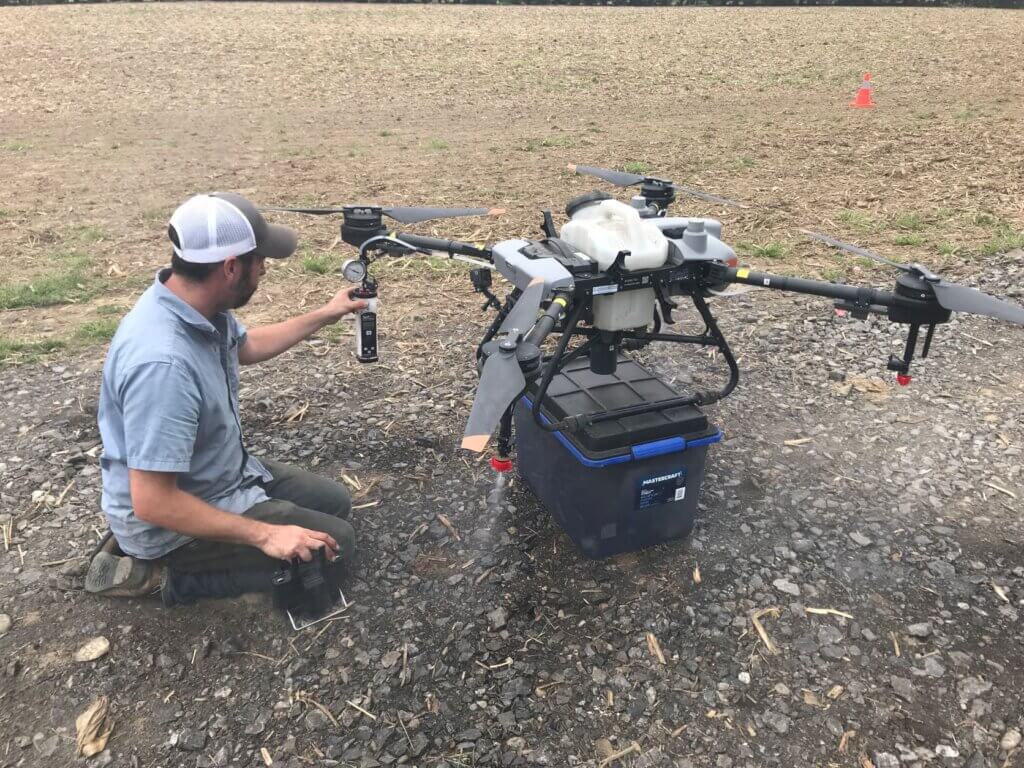
    Use of a Spot-On digital calibrating cup ensures that all spray is captured and it also reports the volume instantly.

    2. Measure the swath width

    Spray swath width is variable. For a measurement to be relevant we must evaluate spray deposition under environmental conditions that are similar to the planned spray operation, as well as use the same operational settings such as altitude, travel speed, nozzle choice, and application volume.

    Spray samplers are positioned along the ground, perpendicular to the flight path. We use water-sensitive paper (WSP) because it’s readily available, fast and easy to use, and the deposits can be analyzed visually or using simple apps that calculate coverage. We create a sampling line of WSP positioned a 1 m intervals (or maybe 0.5 m for narrow swaths). The samplers should extend to twice the expected swath width to account for any swath displacement from sidewinds.

    • Choose a day with light, consistent winds.
    • Find an open space free of obstruction in the direction of the prevailing wind.
    • Install a weather station to document conditions during flight.
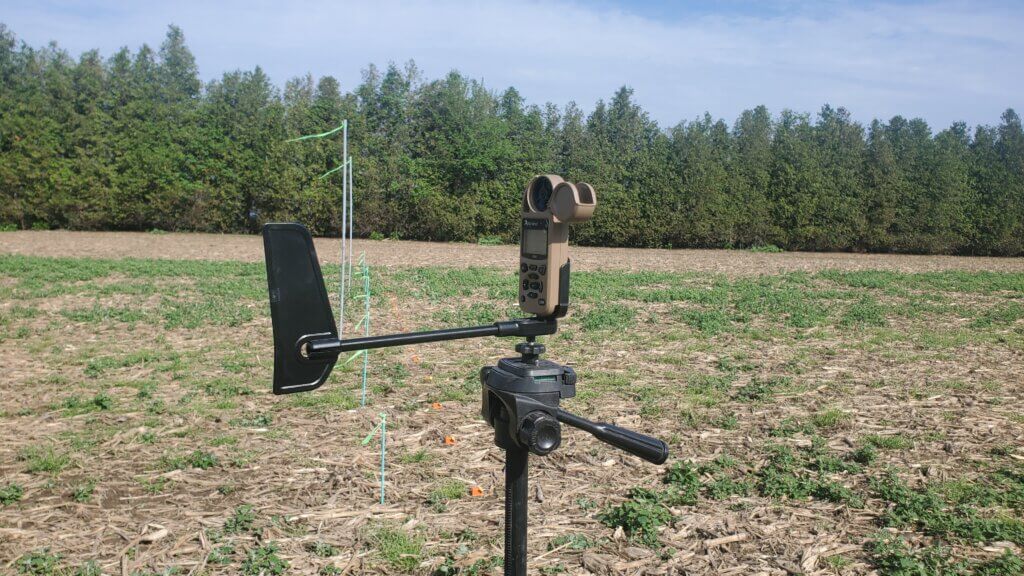
    A Kestrel 3550AG or 5550AG wind meter can record weather data and download to a phone via Bluetooth.
    • Mark an approximately 200 m long flight line into the prevailing wind direction by placing wire flags every 50 m.
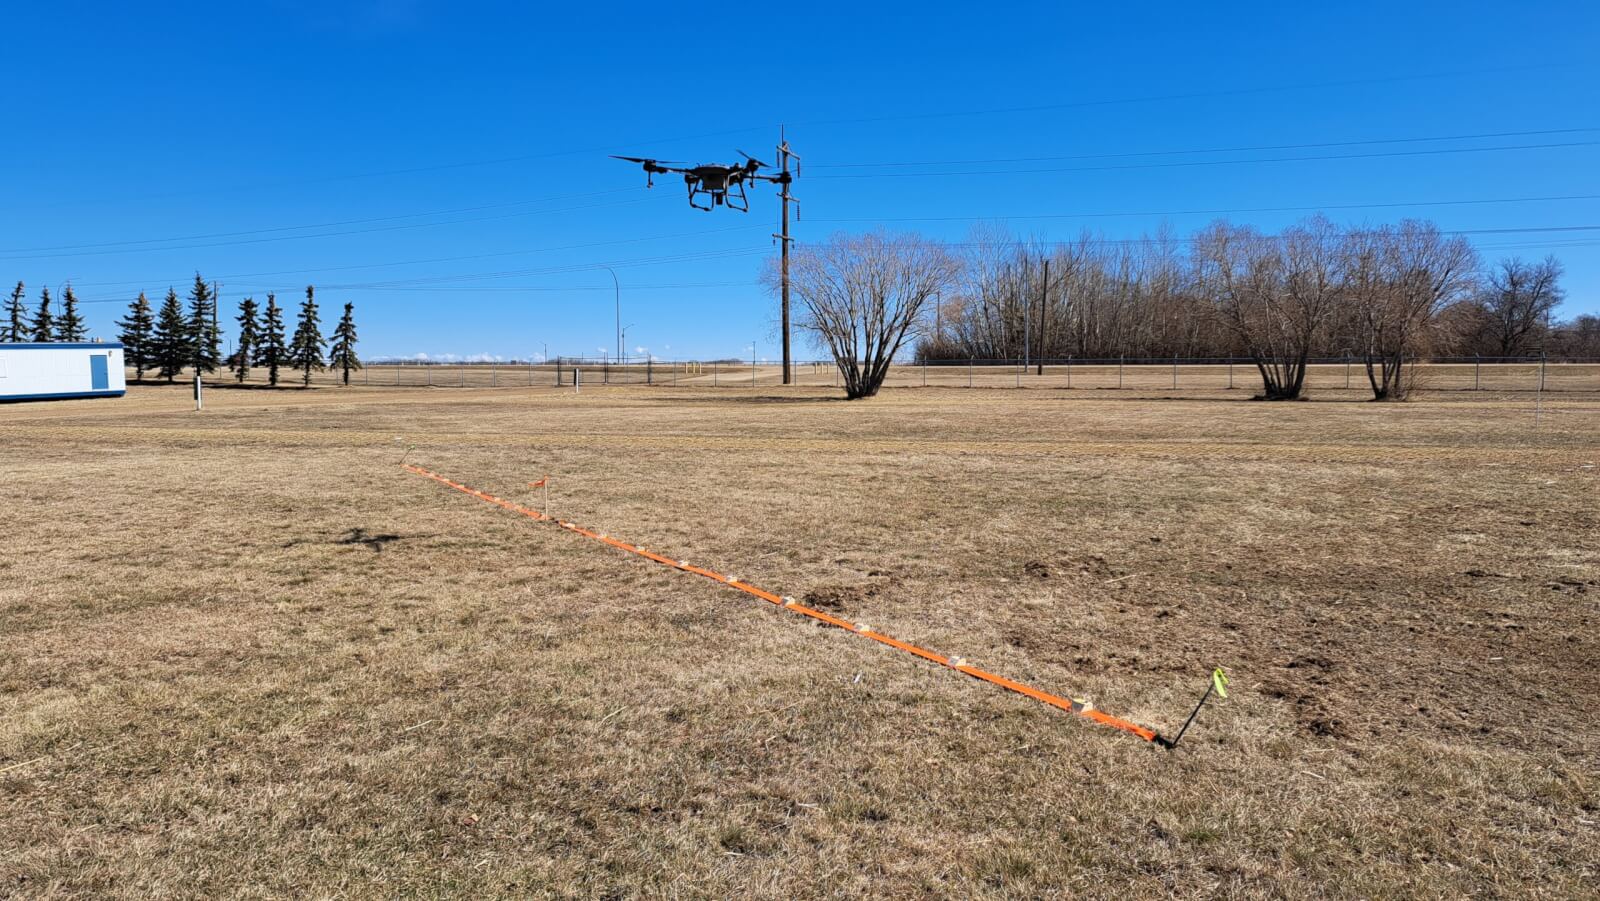
    • At the 150 m mark, use wire flags to centre a sampler line perpendicular to the flight path. Sampler line length should be about twice the expected swath width.
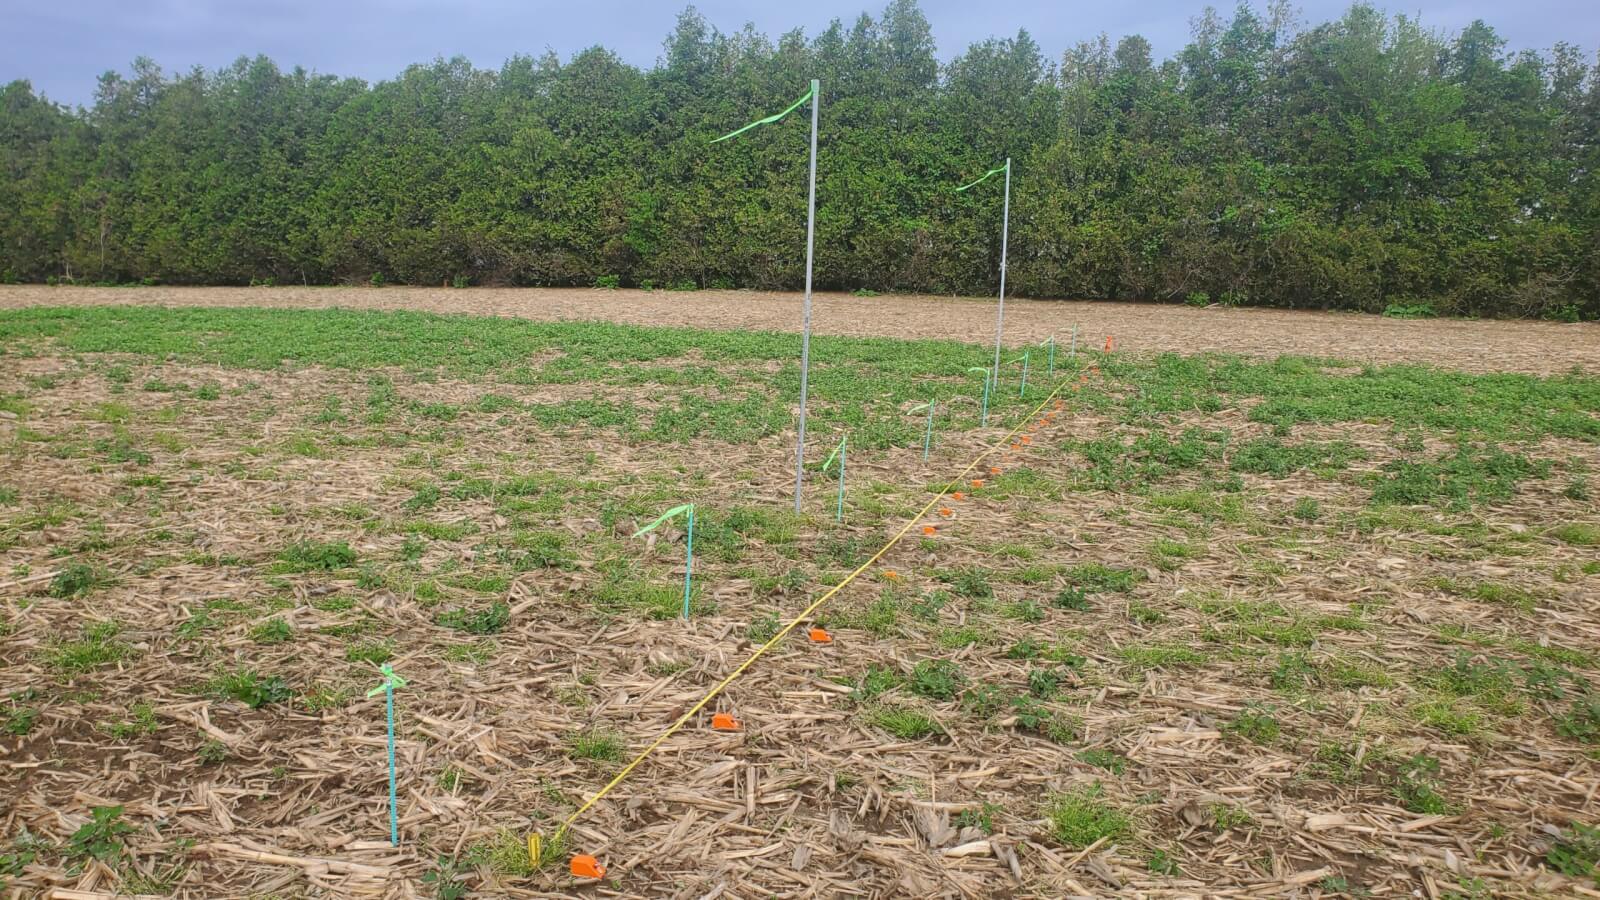
    Swath sampling line
    • Wooden blocks with paper clips can be used to secure WSP at regular intervals along the sampler line.
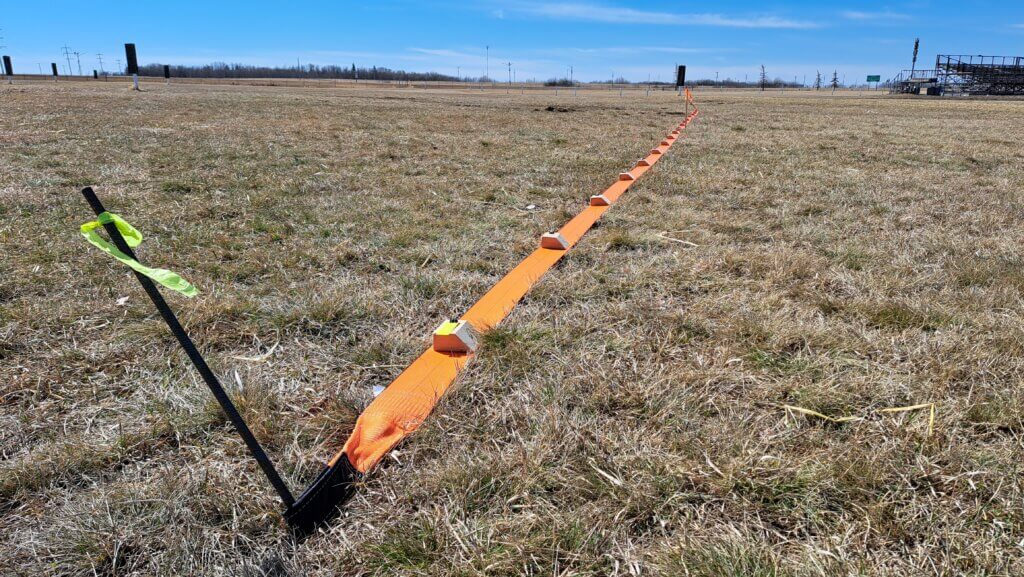
    Wooden blocks attached to a 4″ tow strap allows for easy setup and movement of sampling line.
    • Fill the drone 1/2 full.
    • Manually fly the drone along the entire flight line. The spray pressure, flow rate and altitude of the drone should be stable before it reaches the sampler line. This may take 25 meters or more depending on drone model, flight speed and drone weight.
    • Fly 50 m past the sampling line without any drone maneuvering to avoid affecting the deposit.
    • Land the drone and walk along the sampler line.
    • Note the deposits in the central region. Walk along line as the deposits taper off, looking for deposits that are approximately 50% of the average central deposits.
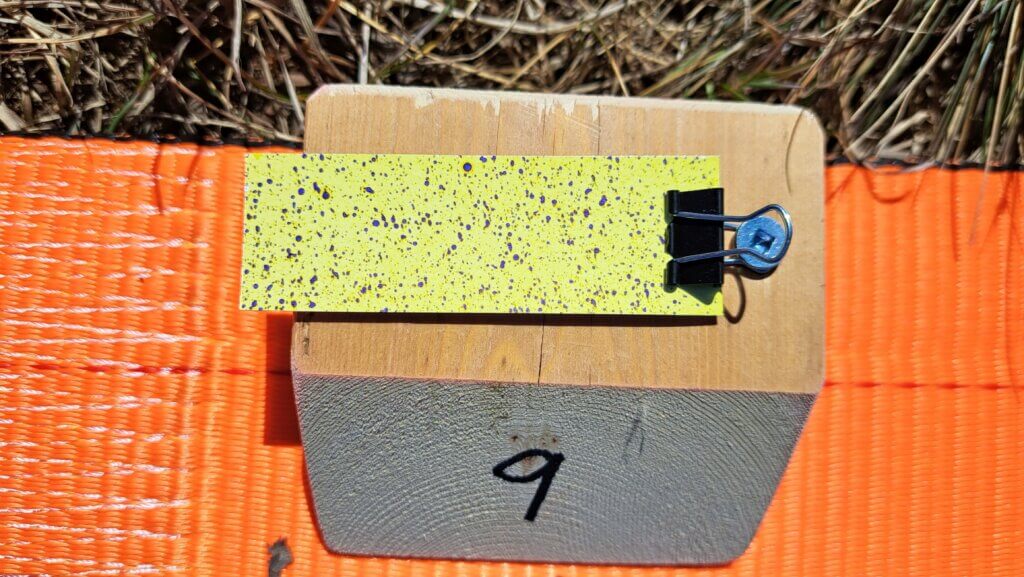
    Water-sensitive paper following a drone application.
    • Estimate the distance between these deposits on both edges of the swath. This is the estimated swath width that can be entered for the second flight.
    • Replace the WSP with a fresh set, refill the drone to 1/2 full, and repeat the flight two more times.

    Other methods perform a more advanced assessment by analyzing the entire swath, and not just intervals. These methods use dyes and dedicated hardware to quantify the deposits along strings or paper samplers.
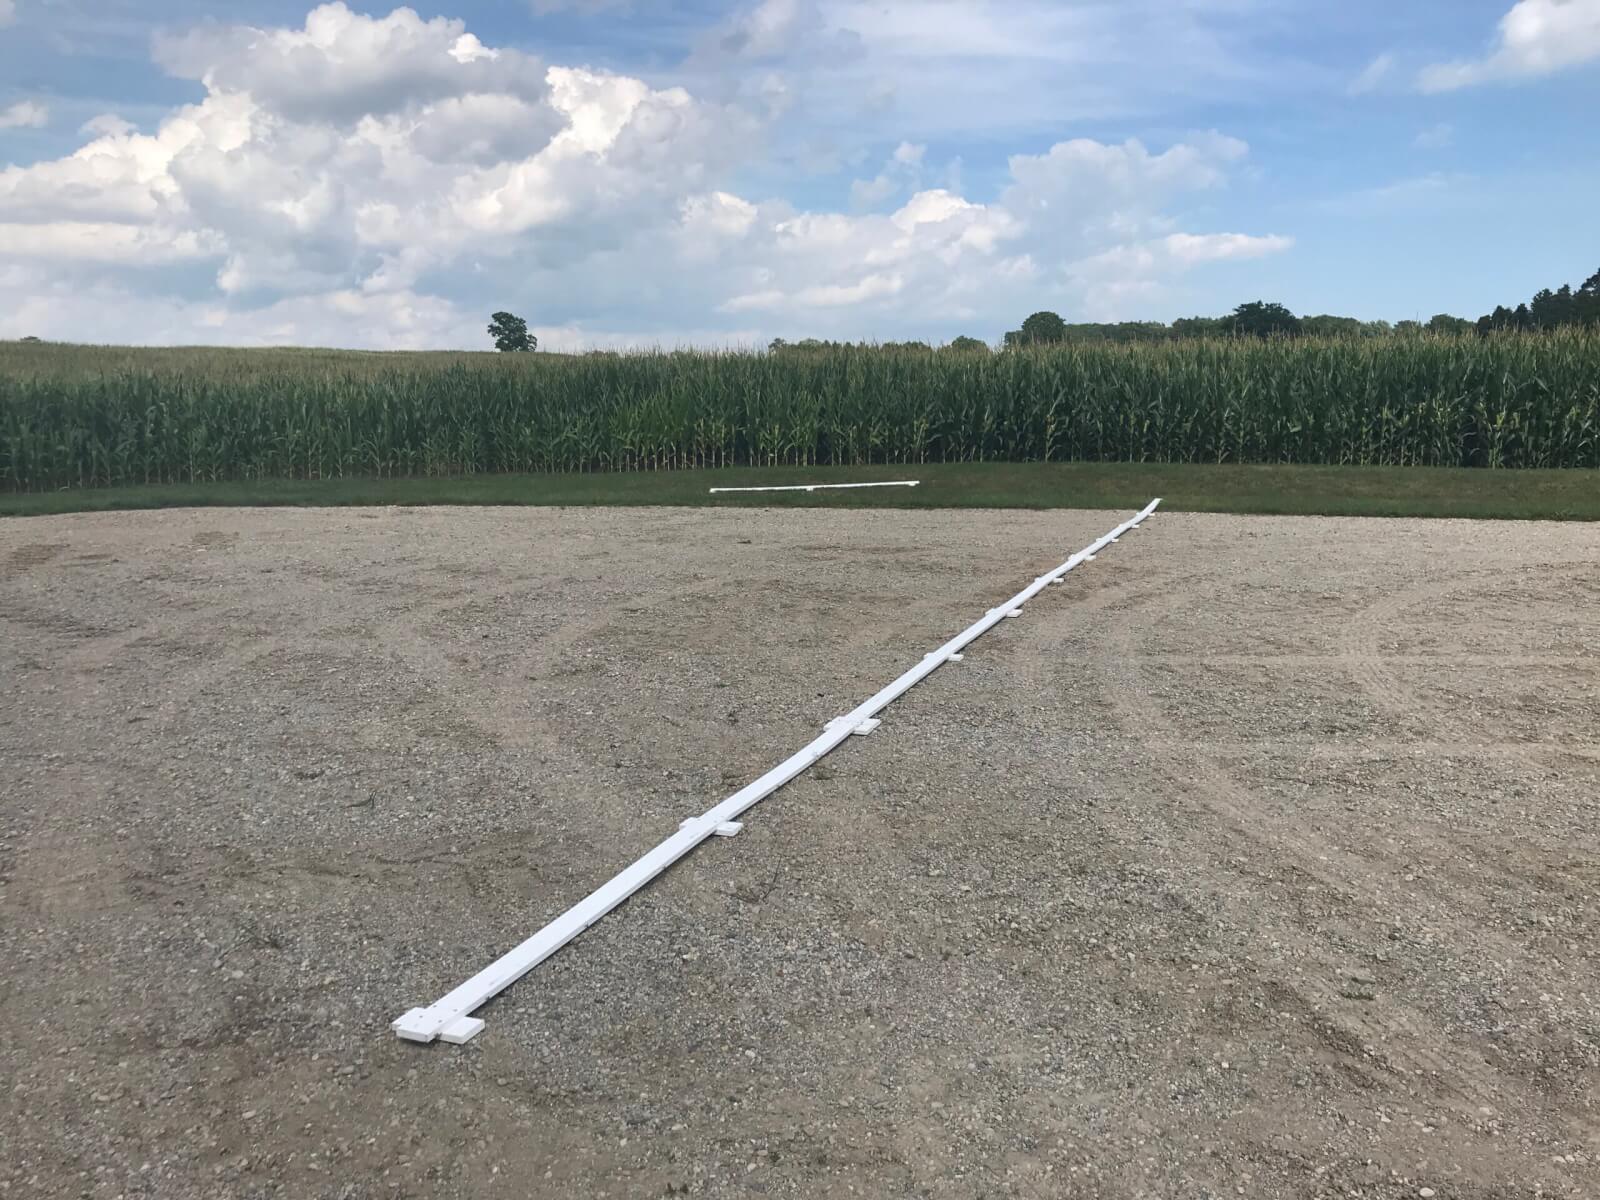
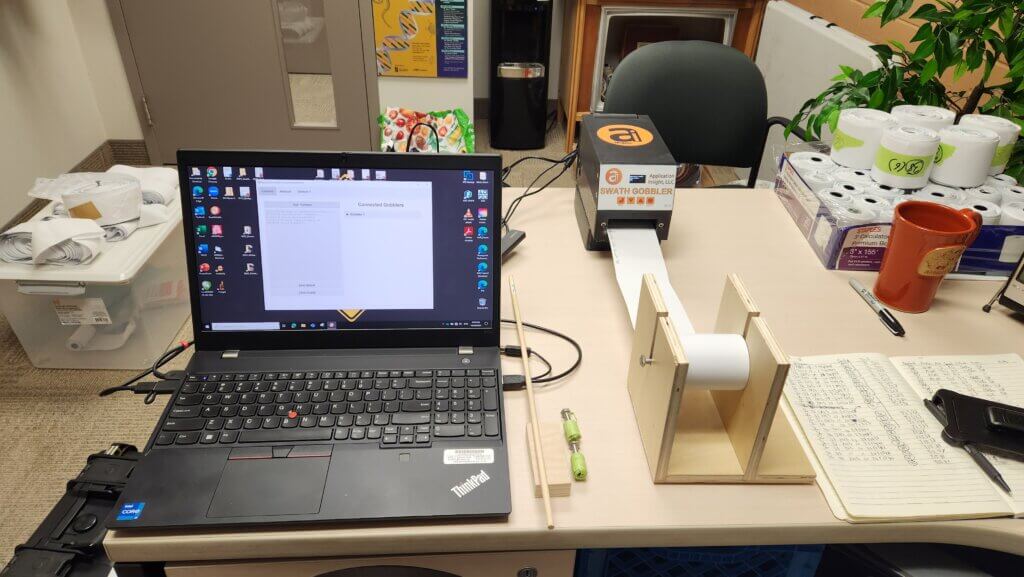
    The Swath Gobbler documents swaths at high resolution using lengths of 3″ bonded receipt paper, food grade dye, and a digital scanner.
    The Application Insight LLC Swath Gobbler scanner in action.

    3. Analyze the Pattern

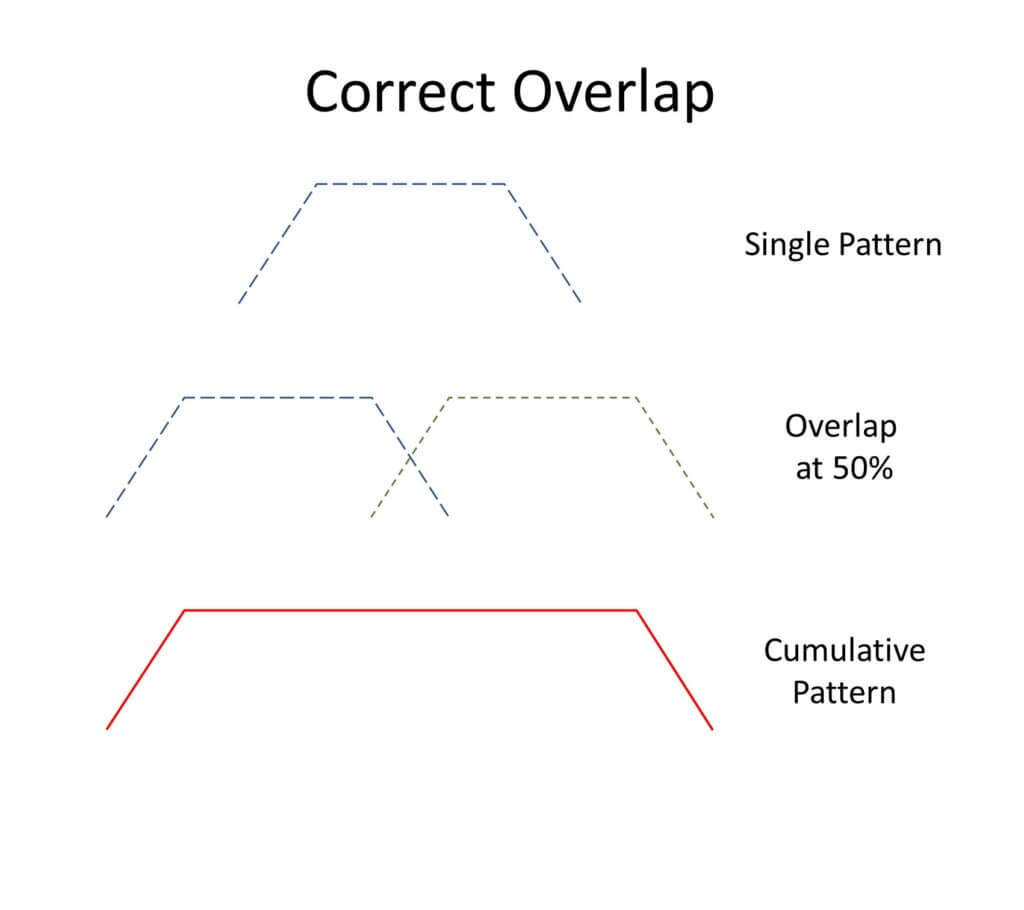
    The nearest approximation for drone swathing is that of a manned aircraft. The spray pattern of an aircraft is tapered, meaning the highest deposition is near the centre of the swath, and the edges of the swath fade to zero deposit. In order to achieve consistent coverage, we need the edges of the spray swath to overlap so the cumulative coverage at the edges is closer to that in the centre. Too little overlap leaves gaps and too much overlap results in excessive deposit.
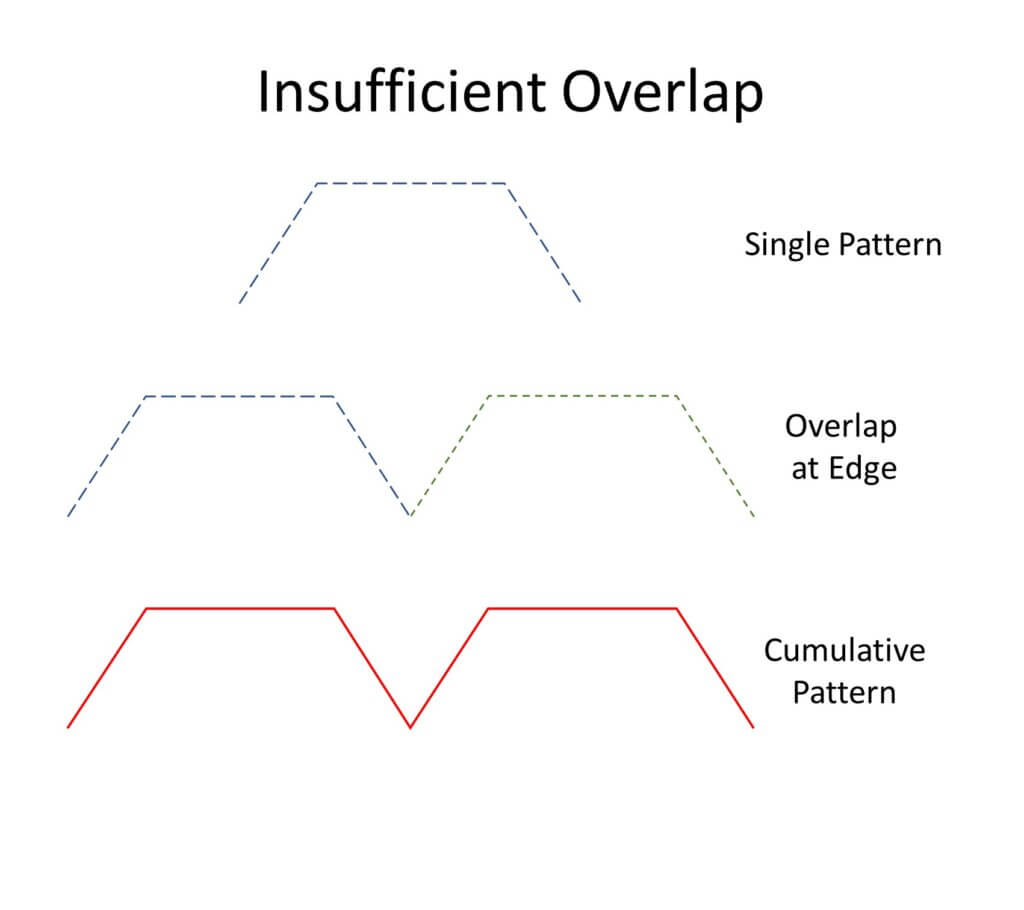
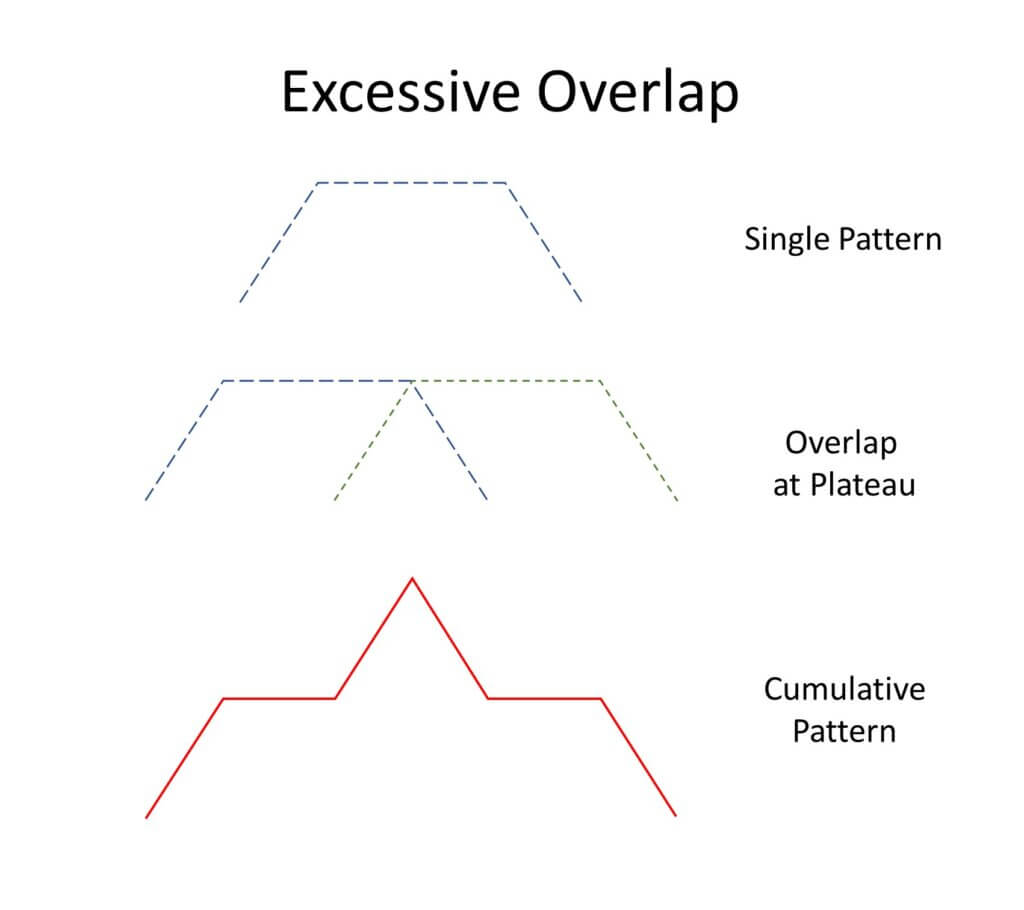
    Insufficient overlap creates gaps in coverage
    Excessive overlap results in over-dosing and waste
    Correct overlap is necessary for efficient and effective application.

    Deposits from drones can be highly variable. The challenge is to find an overlap distance that minimizes this variability, minimizes both over- and under-application, and maximizes swath width. Download a copy of an app we’ve developed to help you with this process.

    The first step is to estimate a reasonable average deposit, called “Threshold”. The app graphs the deposits from each sampler, and the user estimates a point on the Y axis (Relative Deposition) that represents the average maximum deposit. This could be the maximum value of the plateau, or a midpoint between the maximum and a nearby dip. The app assumes a value that is 90% of the maximum, to start.

    We then take 50% of this estimated average deposit, and find the two distances on the X axis (Sampler Locations) that intersect the curve at these points. The distance between these two points is our first estimate of the swath width. If two adjacent swaths are spaced so the edge of one overlaps 50% with the next, the overall cumulative deposit should be relatively even.
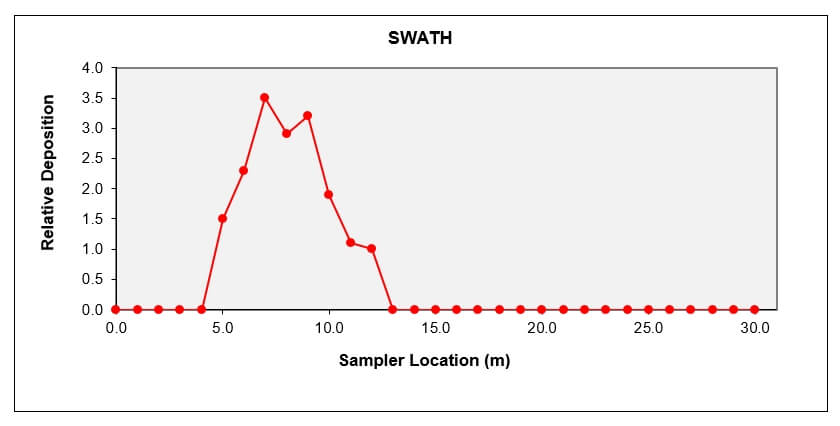
    The coverage information from each sampler location is graphed to create a deposit pattern.

    We can alter the amount of overlap to improve the apparent uniformity, but be cautious. For example, even though we can often improve the uniformity by narrowing the swath width, this can add deposit to the area under the drone and raise the overall deposit amount. That would be waste. Plus, the narrower swath also lowers the productivity of the drone. Use the app to establish a swath width that has the lowest variability (Coefficient of Variability or CV) AND results in a balance between over- and under-dosing. The app has an “Optimize” button that can do this for you.

    It’s possible to select a racetrack or a back and forth pattern. We’ve been using the racetrack pattern even though in real life the drone will frly back and forth, for the following reason: We expect a field to be sprayed in a sidewind. The tail of the deposit will always be on the same side of the pattern even with a back and forth flight path. In essence, the wwind creates a racetrack pattern for us.
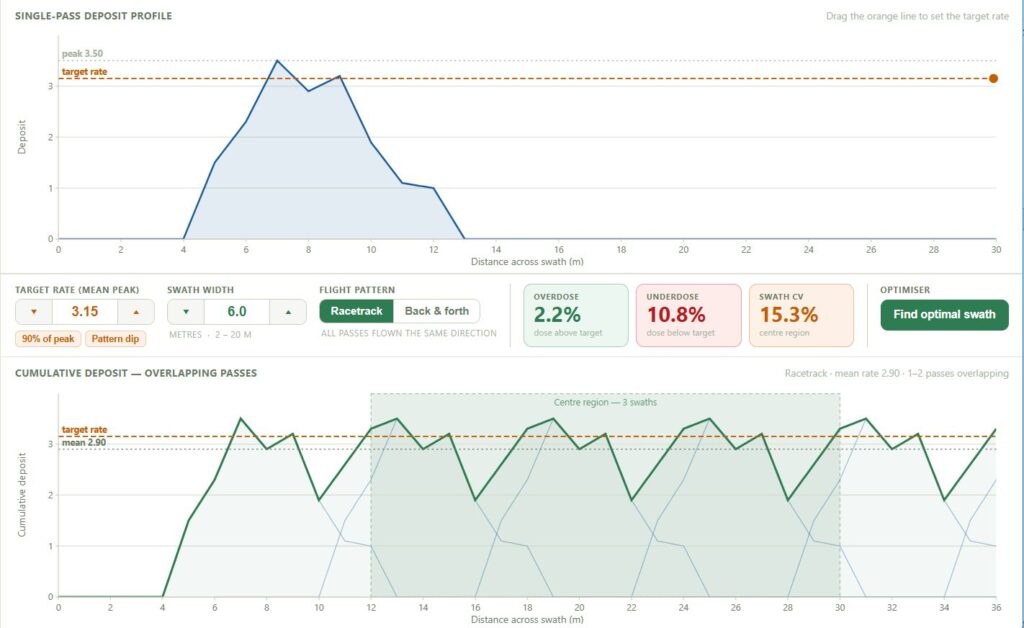
    The amount of overlap is adjusted to minimize variability (CV) and both equalize and minimize over- and under-dosing.

    The app allows you to import your data using an Excel file. If the file has multiple data column, the user can select the column to be analyzed. From that point, other columns can be selected as the analysis proceeds. Each analysis can be saved and exported as a pdf file.

    4. Recognize the factors that influence swath width

    Operational use case affects swath width

    Swath width is affected by altitude, speed, water volume and spray quality. Generally, higher altitudes, lower volumes, and finer sprays will result in a wider swath. Unfortunately, the same configuration also results in greater drift. It is recommended that swath widths be determined for each spray volume and nozzle arrangement that will be used.

    Drones will be applying low water volumes and this requires a critical assessment of coverage to ensure the deposit density is sufficient to achieve the desired result. A low volume will require a finer spray for minimum coverage to be realized. Coarser sprays that reduce drift and evaporation will need higher water volumes and result in narrower swaths. Significant time may need to be invested to understand the effects of operational settings and environmental conditions on spray deposit uniformity and swath width.

    Effective Swath Width and the Agronomic Use Case

    The relatively sparse coverage at the extremes of the measured swath width may be insufficient to elicit the desired biological result. The Effective Swath Width (ESW) represents the segment of the total swath width that results in pesticide efficacy. In some use cases, the two widths can be similar, but typically the ESW is only a fraction.

    The difference is influenced by the “Agronomic Use Case” which includes factors such as:

    • Spray mix rheology (i.e. the interaction of spray mix viscosity and atomizer design on droplet size)
    • Minimum effective dose: This is a complex relationship between coverage, spray mix concentration and pesticide mode-of-action that results in an effective result while minimizing the environmental impact.
    • Target location (e.g. a pest within a dense canopy or a weed on relatively bare ground)

    Taken collectively, research has shown a 20-30% reduction in ESW for corn, wheat and soybean fungicide applications compared to swaths measured on open ground. Conversely, herbicides sprayed on bare earth or sparse vegetation can produce an efficacious response 20% wider than the measured swath width. The impact of agronomic use case on ESW must be considered during mission planning.

    Additional pointers

    Here are a few tips and tricks to help you be successful when calibrating your drone.

    • Drone patterns will have deposit peaks and valleys in the central region. Repeated runs are needed to confirm that these are real and persistent. If so, then adjustments in flying height, spray quality, or water volume may be needed to eliminate them.
    • The absence of pressure gauges on drones can be corrected by installing an analog gauge in-line with one of the spray nozzles. If may be necessary to mount an auxiliary camera on the drone to record this gauge. We have observed strong fluctuations in spray pressure, particularly on starting a spray swath, that were not reflected in the reported flow rate.
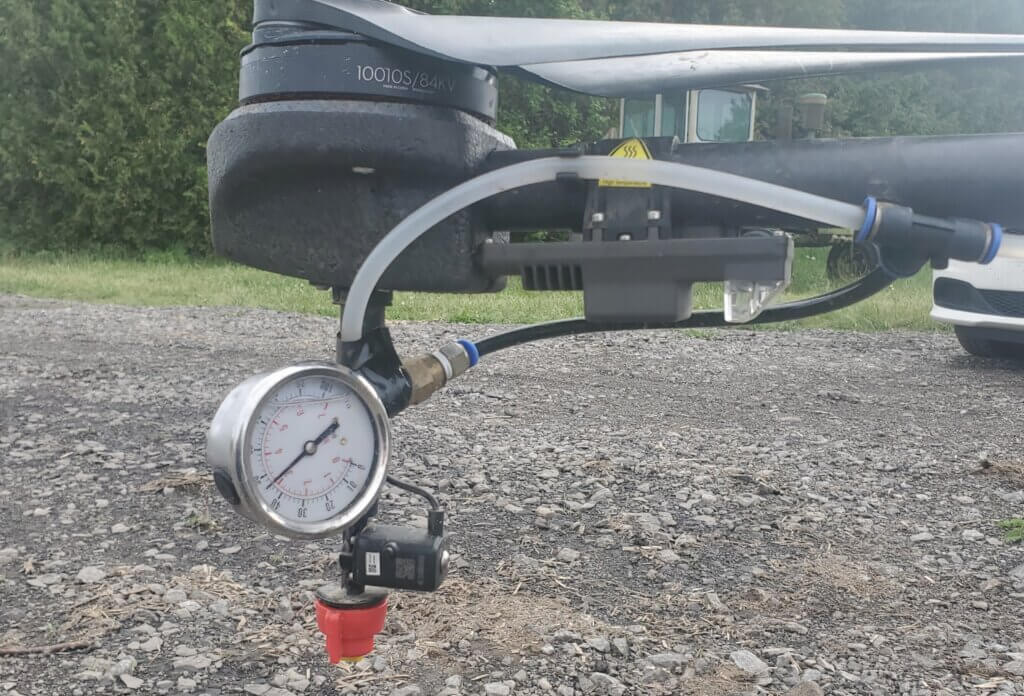
    A pressure gauge can be plumbed into a drone without affecting flight behaviour. A camera is trained on it to read pressure during a flight.
    • Many drones have the option of recording the flight screen during a mission. This will provide a record of the performance of the drone, and can be valuable should performance problems arise.
    • Although swath width calibration is done by flying into a headwind, the actual spray application should be done with a side wind. Start at the downwind edge of the field and turn into the wind. The drone is symmetrical and the tapered spray patterns should equalize the deposits. Alternately, flying into a headwind and returning with a tailwind can alter the aerodynamics of the spray deposition process, alternating between a wider and more narrow swath width, respectively.

    Drone spraying will walk a razor’s edge of sorts – there is little room for error when using scant water and fine droplets. Getting the basics right has never been more important.
  • Wind and Flight Speed Shape Drone Spray Coverage: Lessons from 3D Deposition Mapping in Wheat

    Wind and Flight Speed Shape Drone Spray Coverage: Lessons from 3D Deposition Mapping in Wheat

    In this study, 3D sampling of drone spray applications in wheat demonstrates that coverage is strongly influenced by the interaction between drone downwash, flight speed, and wind conditions. These factors collectively determine where droplets land, how evenly they are distributed, and how reliable coverage is from pass to pass. In 2025 we characterized wheat head coverage from a DJI Agras T50. In this study, we explore the larger, faster DJI Agras T100, and relate the observations to what we’ve seen in previous studies.

    Materials and Methods

    Site and crop

    The experiment was conducted at 45939 John Wise Line, St. Thomas, Ontario (42°43’57.0″N, 81°05’49.8″W) on June 3, 2025. Wheat was seeded at 1.8 million seeds/ac on 19 cm spacing and was at the T3 stage (~0.7 m height) at application.

    Design

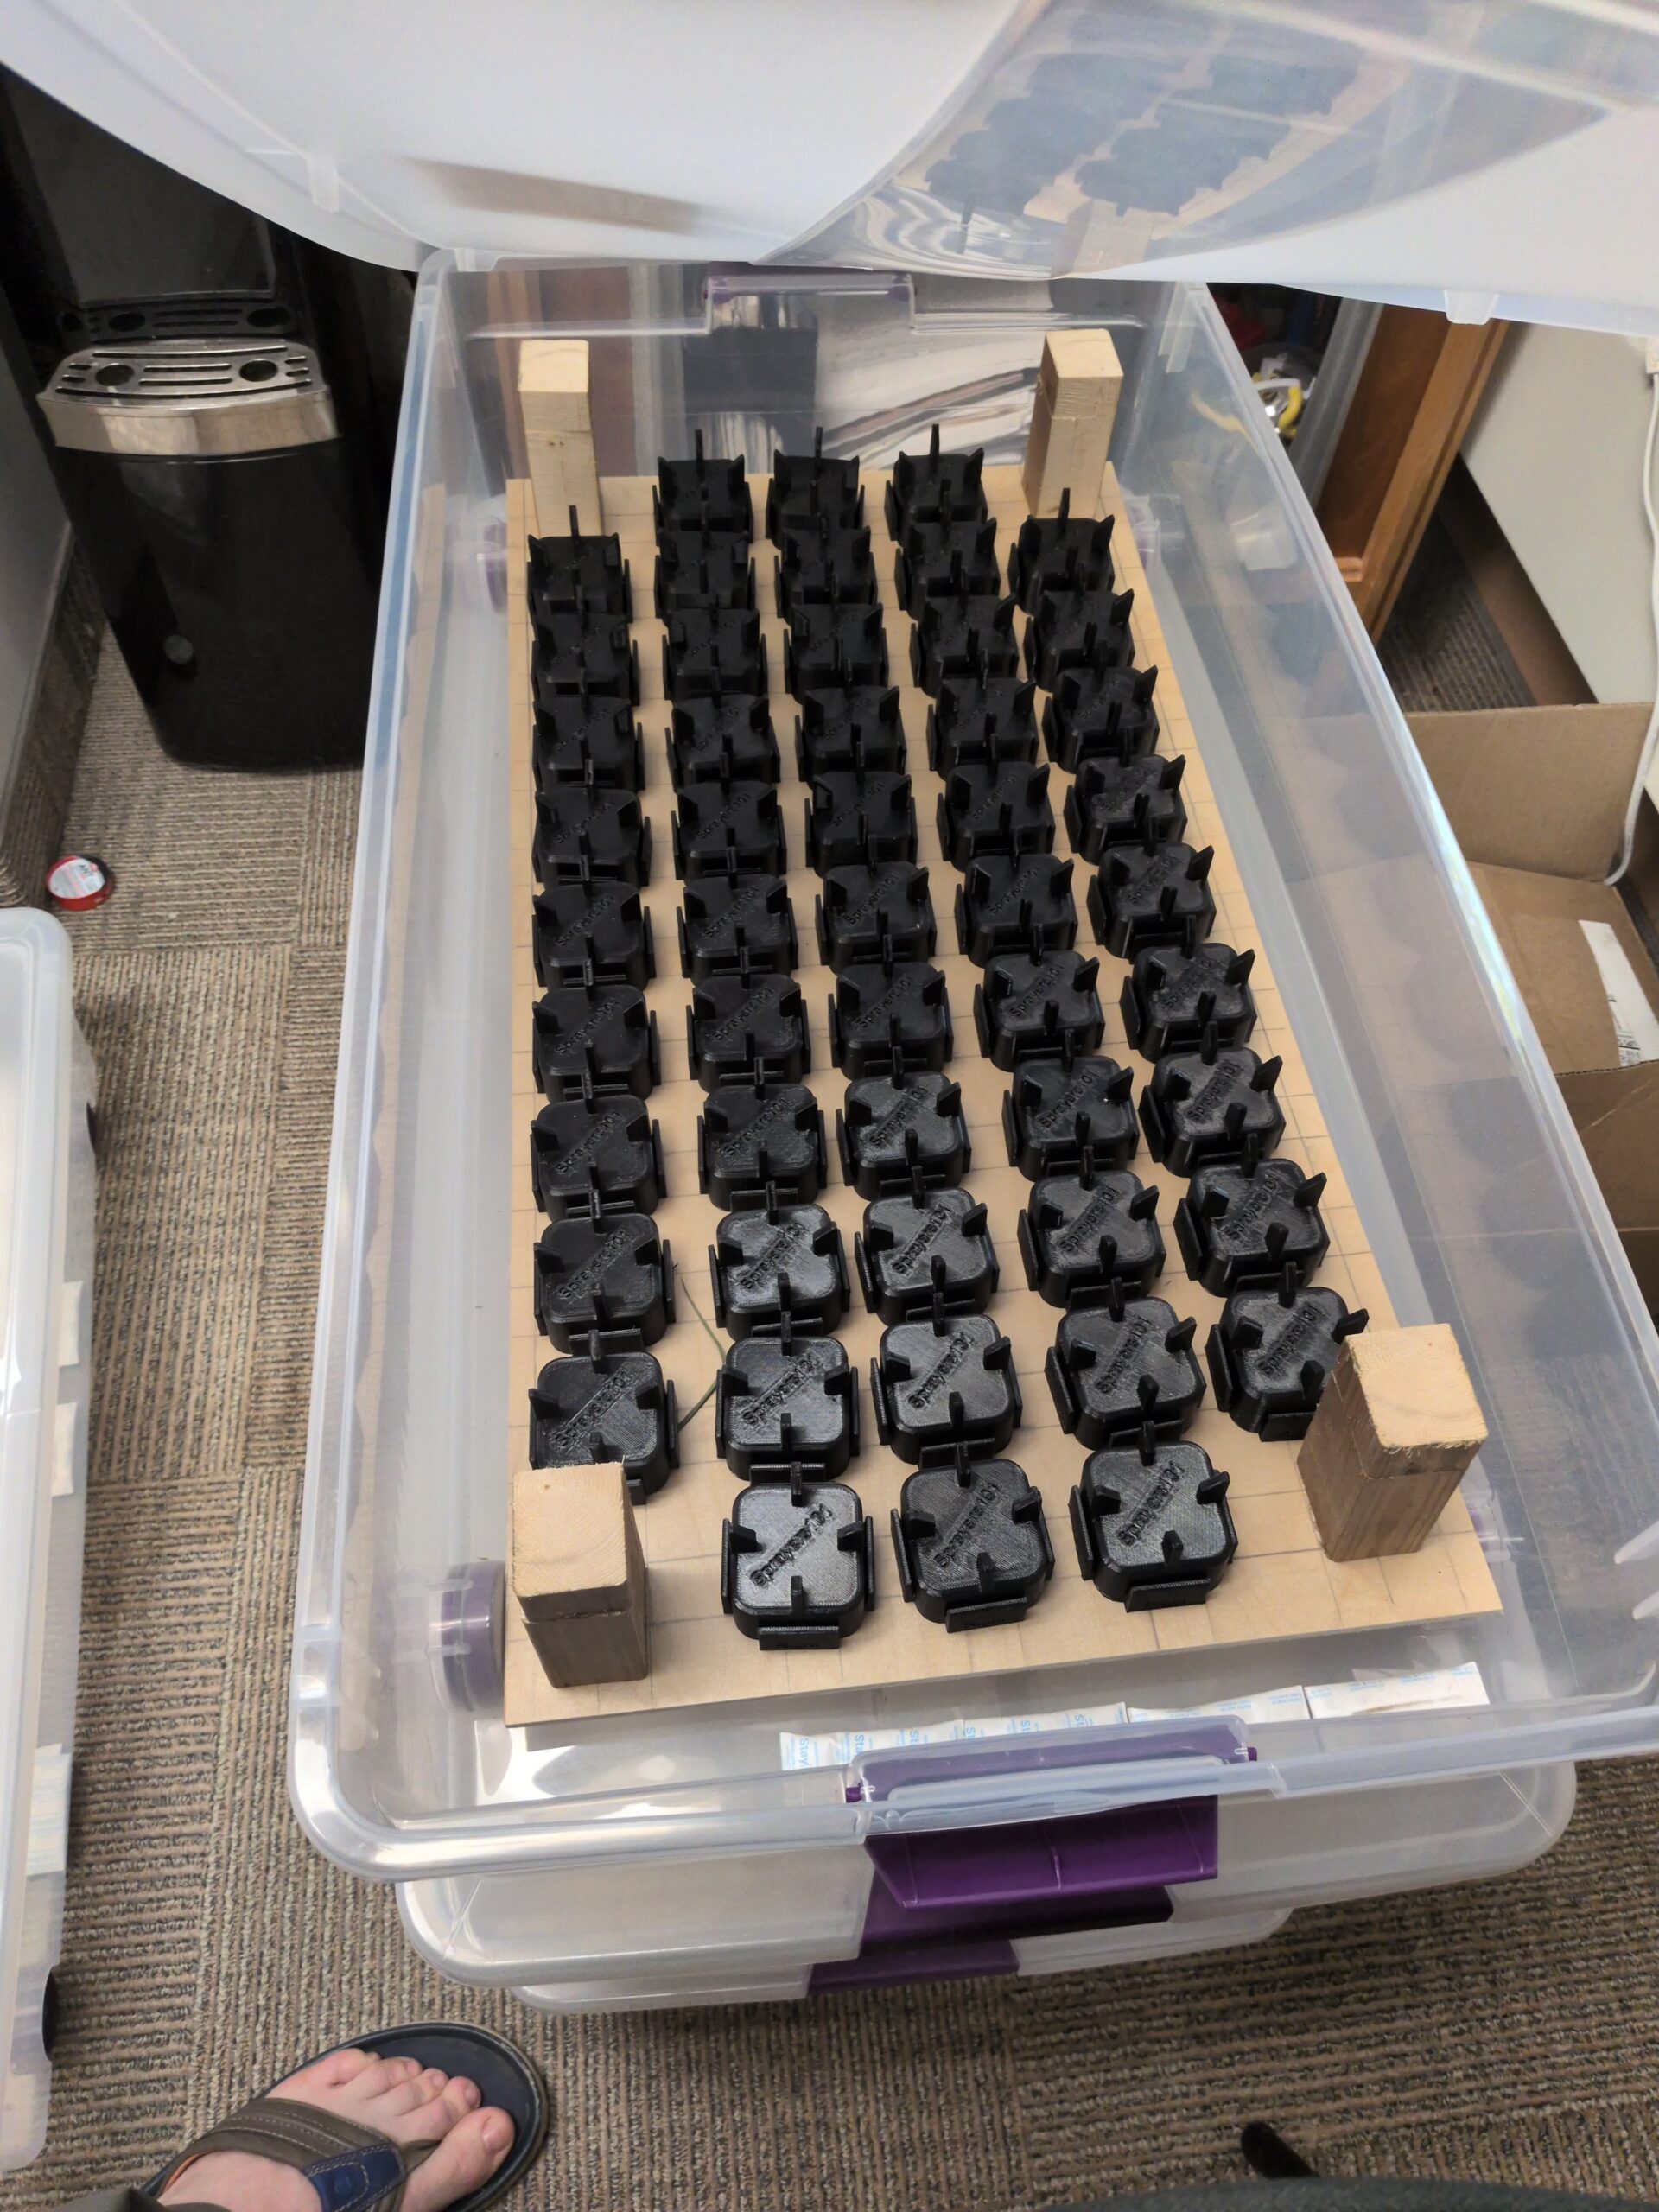
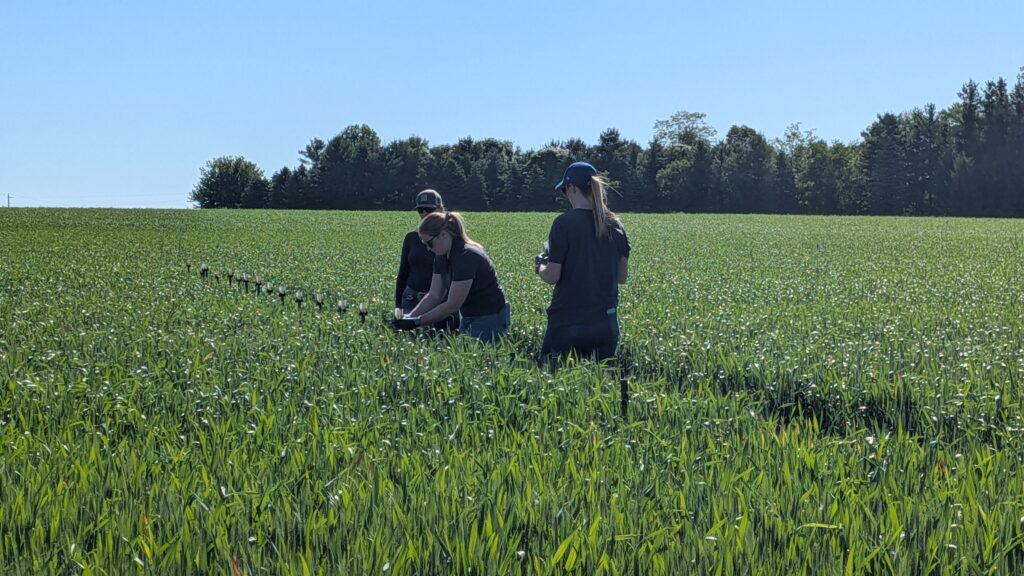
    Twenty-one poles spaced at 1 m intervals held 3D-printed mounts with 1×3″ water-sensitive papers oriented in four directions relative to the drone flight path: advance, retreat, left, and right. A tramline behind the array preserved canopy structure while allowing access to the samplers (Figure 1).

    Figure 1 – Volunteers retrieving and replacing samplers between passes.

    Drone Operational Settings

    The primary objective of the study was to explore the effect of flight speed on coverage. Speed was increased from 6, to 10, to 14 m/s with the following operational settings:

    • 4 LX07550SX (sprinkler) nozzles
    • 50 L/ha application volume
    • 350 µm droplet size
    • 4 m flight altitude
    • 7 m programmed swath width
    • Tank volume maintained at ~50 L

    The drone began spraying 50 m before and continued 20 m after the samplers, flown on full auto over pole 10 and 11 (the middle of the 21 poles). The spray liquid was municipal water with 0.5% v/v of MasterLock (Winfield United).

    The secondary objective was to compare coverage from the drone spraying 5 gpa (6 m/s) to a 10 gpa (7 m/s) condition.

    Weather

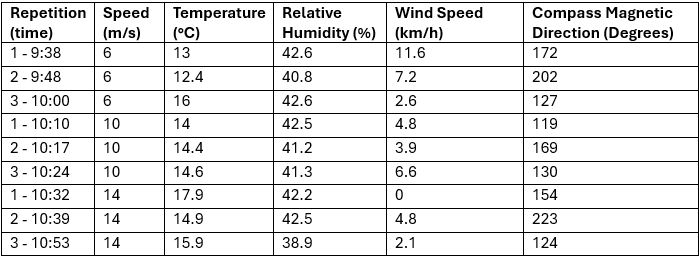
    Weather data was collected using a Kestrel 3550AG weather meter (Kestrel Instruments) in a vane mount positioned roughly 2 m below drone altitude. Data was logged as the drone passed the samplers (Table 1).

    Table 1 – Weather conditions for each spray pass.

    Flights were conducted under a prevailing tailwind (rather than the preferred headwind) due to field constraints. Wind conditions during application varied by treatment. The 6 m/s treatment experienced higher and more variable wind speeds (avg. 6.6 km/h, SD 3.7 km/h, 177°), predominantly from the north (tailwind). The 10 m/s treatment occurred under moderate and stable winds (avg. 4.8 km/h, SD 1.1 km/h, 136°) with a slight right-to-left crosswind component. The 14 m/s treatment experienced low and variable wind speeds (avg. 1.6 km/h, SD 2.0 km/h, 198°) including periods of calm .

    Results

    Deposition Magnitude and Orientation

    Papers were analyzed using a DropScope™ (SprayX, São Carlos, Brazil). Deposition differed strongly by collector orientation (Table 2). Some repetitions were removed if wind pushed spray beyond the collectors. This left a minimum 2 repetitions per condition.

    SpeedDirectionMean (deposits/cm2)Std DevMinMax
    6 m/sAdvance45.7067.031.3210.7
     Left40.0666.190.0211.8
     Retreat20.1020.250.071.0
     Right45.4773.550.0208.9
    10 m/sAdvance52.0763.050.1189.3
     Left31.9543.650.0136.0
     Retreat5.129.190.037.6
     Right37.2270.180.0202.1
    14 m/sAdvance39.0237.510.5115.3
     Left26.8943.910.0130.9
     Retreat0.431.270.05.7
     Right11.0322.530.071.2
    Table 2 – Average deposition by sampler orientation for each speed.

    Forward-facing collectors (advance) consistently recorded the highest deposition across all speeds, followed by lateral orientations. Reverse-facing collectors (retreat) recorded substantially lower deposition. Variability was high for advance and lateral orientations, whereas retreat collectors showed consistently low variability (Table 3).

    DirectionMean (deposits/cm2)Std DevMinMax
    Advance39.0237.510.5115.3
    Left26.8943.910.0130.9
    Retreat0.431.270.05.7
    Right11.0322.530.071.2
    Table 3 – Average deposition by sampler orientation for all passes.

    Directional Bias (Anisotropy)

    Anisotropy refers to the property of having different values when measured in different directions. We can quantify this by dividing the average coverage on one plane by the opposite plane; The resulting indices show the relative direction of deposition.

    For the lateral plane (left-to-right), we divide the average coverage on the left-facing orientation by the right. On the sagittal plane (advance-to-retreat), we divide the average coverage on the advance-facing orientation by the retreat (Table 4).

    SpeedLateral (L÷R)Sagittal (A÷R)
    6 m/s0.88 (slight right-dominant)2.27 (moderate advance-dominant)
    10 m/s0.86 (slight right-dominant)10.17 (strong advance-dominant)
    14 m/s2.44 (strong left-dominant)90.05 (almost entirely advance-dominant)
    Table 4 – Relative coverage indices for lateral and sagittal planes.

    Bias in the lateral index was relatively weak, with a subtle shift with the wind (wind-facing is left) at higher speeds. The sagittal index (advance-to-retreat) increased from a 2x between 6 m/s and 10 m/s to 5x between 10 m/s and 14 m/s, demonstrating strong forward bias with flight and wind direction despite the down-and-back vector created by the downwash.

    Spatial Distribution

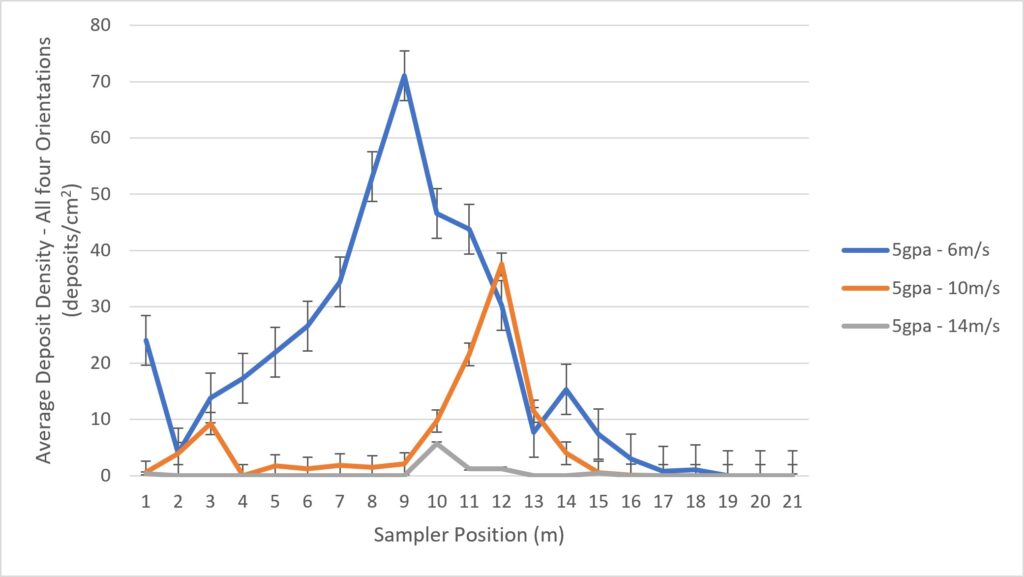
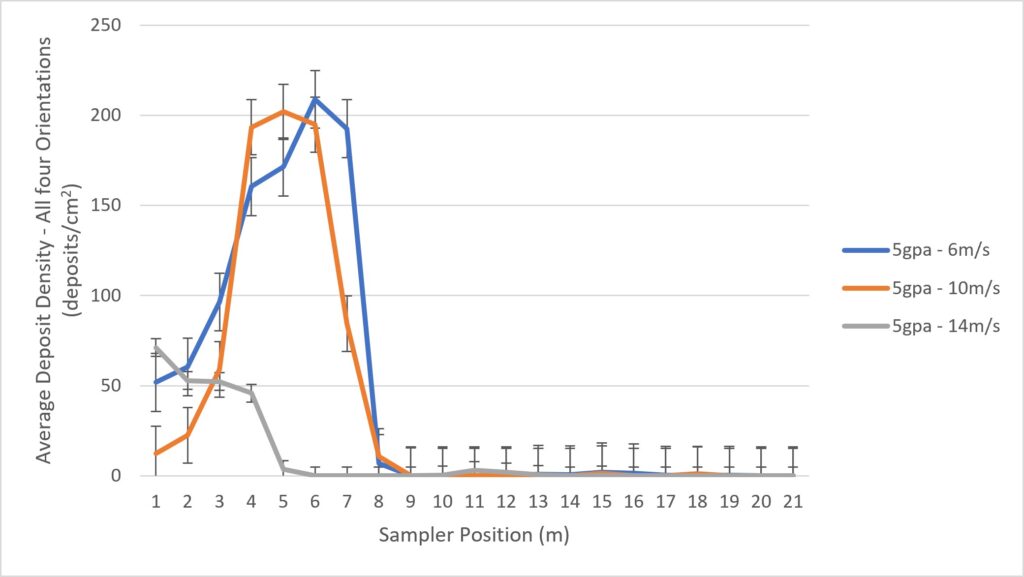
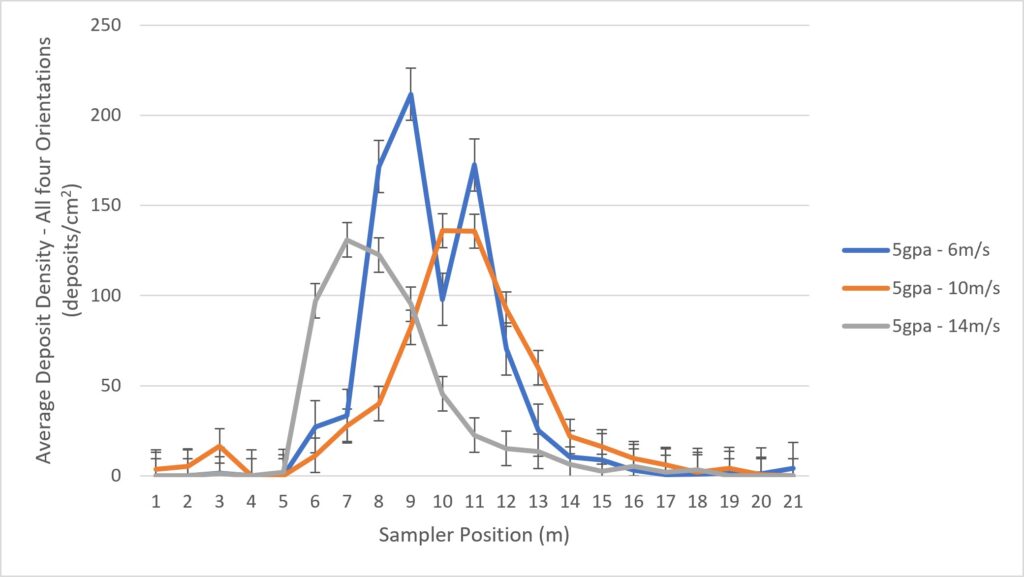
    Peak deposition consistently occurred 1 to 5 m downwind of the flight line, rather than directly beneath it. A cross-tail wind shifted deposition laterally, while forward motion (inertia) and wind reinforced deposition in the advance direction. This can be illustrated by isolating the average coverage for each orientation, for all three speeds (Figures 2 to 5).

    Figure 2- Advance Orientation (Facing tailwind). Bars = SE
    Figure 3 – Retreat Orientation (facing away from tailwind). Bars = SE
    Figure 4 – Right Orientation (Facing cross wind). Bars = SE
    Figure 5 – Left Orientation (facing away from cross wind). Bars = SE

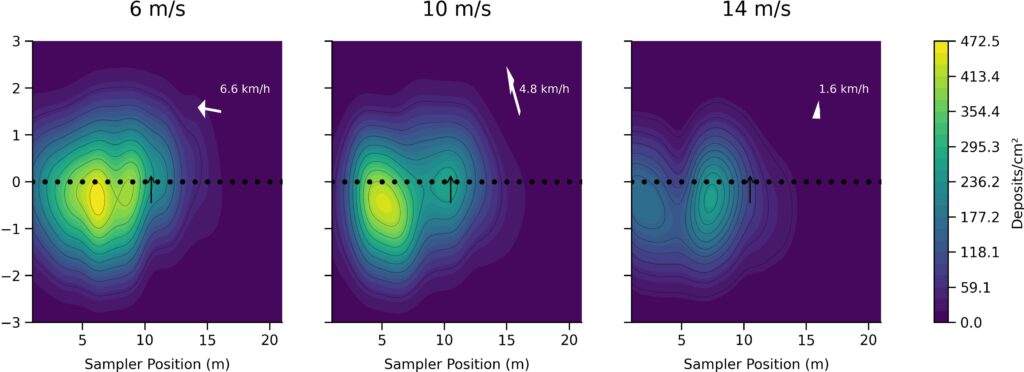
    By combining and plotting average coverage on all orientations in a top-down heatmap, we can clearly see the lateral shift to the left of the flight pass (with the light crosswind), the higher relative coverage on the advance face, and indications of bi-modal coverage that likely corresponds to the position of the rotary atomizers(Figure 6).

    Figure 6 – Coverage heatmap created by smoothing the average deposition data for each speed (σ ≈ 1.1 – 1.2 m) over a 300 x 300 grid to illustrate deposition gradients. The colour scale supports a direct comparison of deposition intensity. The 21 samplers are indicated by black dots spaced at 1 m intervals, and the drone flight path appears as a black arrow between posts 10 and 11. Average wind speed and direction appears as an inset white arrow (vector).

    Effect of flight speed on swath width

    Swath width was determined by averaging all deposition on each post for each speed and using our online swath width calculator. The range of flight speeds used in this study did not significantly affect swath width.

    • 6 m/s: 8 m swath width (16.3 % C.V.).
    • 10 m/s: 7.5 m swath width (22.5 % C.V.)
    • 14 m/s: 7.5 m swath width (22.3 % C.V.)

    These widths are 15-20% wider than the widths calculated in the same manner during the 2025 study with the T50.

    Averaging swath widths can mask variability

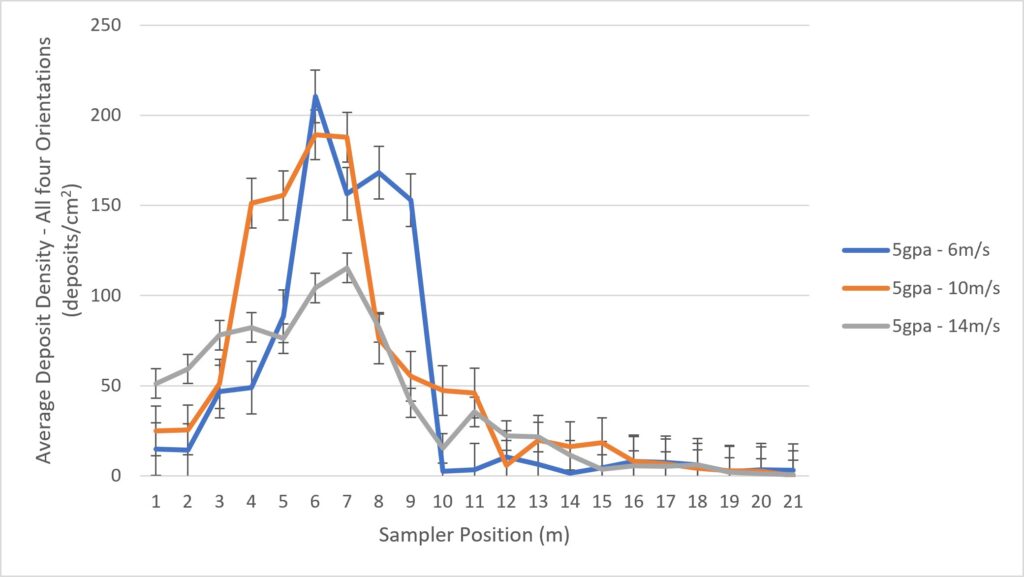
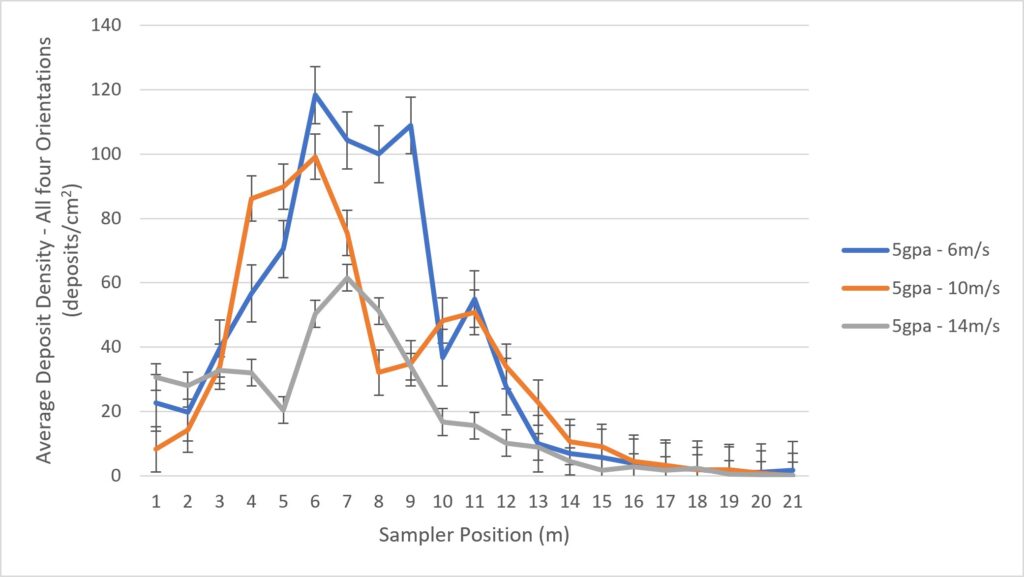
    This method of calculating and comparing average swath widths is convenient, but it hides any variability in the amount of spray deposited within the swath. Consider that an 8 m swath with 10 deposits/cm2 every meter would have the same C.V. as an 8 m swath with 100 deposits/cm2. Deposit variability can be illustrated by plotting the average coverage along the swath with standard error (figure 7). We see that flight speed significantly influenced the degree of deposition, where higher speeds reduced the average droplet density (counts) as well as the variability (standard deviation).

    Figure 7 – Average coverage, all orientations, for each speed. Bars = SE

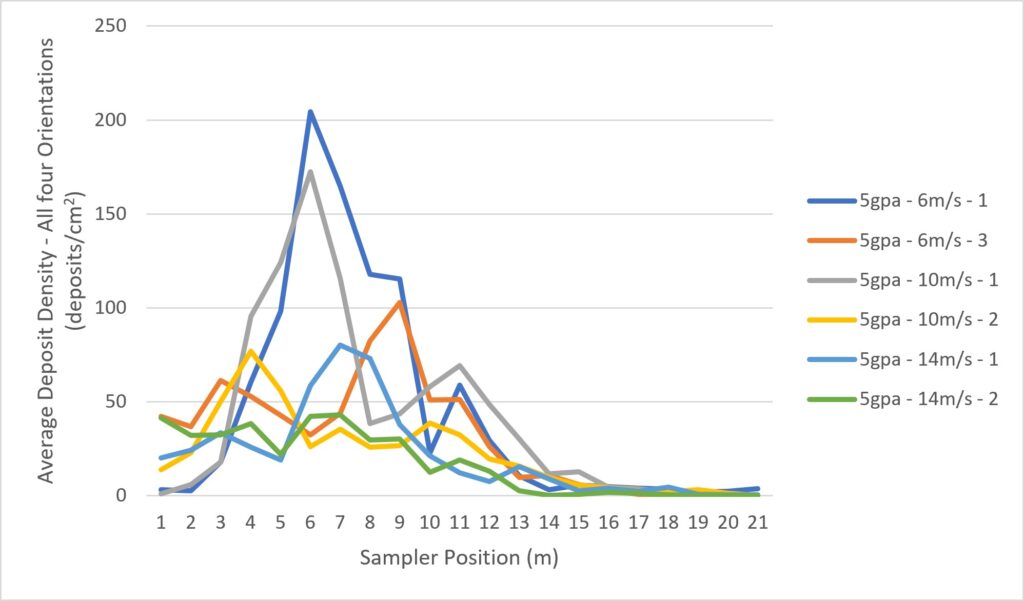
    Think of each repetition as a randomly-selected cross section of the swath from somewhere along a spray pass. Calculating swath width from averaged coverage data can hide shifts in the relative position along the flight path, making the composite value greater than that of any single replicate. This variability and the potential for inadvertent smoothing can be exposed by plotting each repetition. (Figure 8).

    Figure 7 – Average coverage (all orientations) from each pole plotted by speed and repetition.

    Therefore, the order of operations matters. When swath width is calculated for each repetition, and then averaged, we would expect the widths to be somewhat smaller. They are presented here in table form next to the previous values for comparison (Table 5).

    Speed (m/s)(A) Deposition averaged, then swath calculated (m)(B) Swaths calculated, then average (m)Difference (A-B) (m)
    68 (16.3% C.V.)6 (29.6% C.V.)-2
    107.5 (22.5% C.V.)6 (33.5% C.V.)-1.5
    157.5 (22.3% C.V.)7.5 (30.5% C.V.)0
    Table 5. Average swath widths generated by two methods.

    Statistical Analysis

    No matter the method, we can draw conclusions from the swath widths calculated here.

    • 6 m/s: highest deposition but greatest variability.
    • 10 m/s: best balance of deposition, uniformity, and swath width.
    • 14 m/s: lowest deposition and most directional bias.

    A two-way analysis of variance (ANOVA) was conducted to evaluate the effects of flight speed and collector orientation on spray deposition. Deposition differed significantly between Advance, Left, Right, and Retreat collectors (F = 6.1, p = 0.0005). Flight speed had a statistically significant effect on deposition, where deposition was reduced with speed (F = 3.03, p = 0.05). The effect of orientation did not significantly depend on speed (F = 0.46, p = 0.83), suggesting that the pattern of deposition was consistent across speeds.

    Effect of volume on deposition

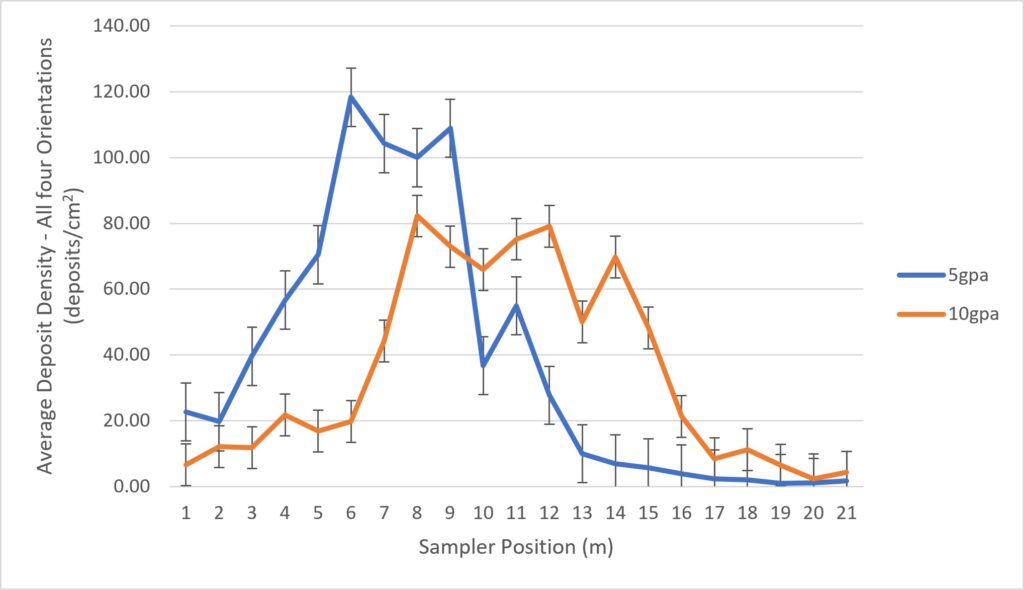
    In a secondary investigation, the drone was flown at 7 m/s, applying 10 gpa to compare coverage to the 6 m/s, 5 gpa condition (Figure 8).

    Figure 8 – Average coverage as deposit counts, all orientations, for 5 gpa and 10 gpa. n=2 for each condition . Bars = SE

    Surprisingly, there was no significant increase in total deposition within the swath when volumes were increased. In fact, the 5 gpa condition is ~8% higher when all deposits are summed or when area under the curve is calculated. The relative shape of the curve was notably different with 5 gpa producing a sharper, higher-intensity central peak, while 10 gpa produced a broader and more uniform deposition profile.

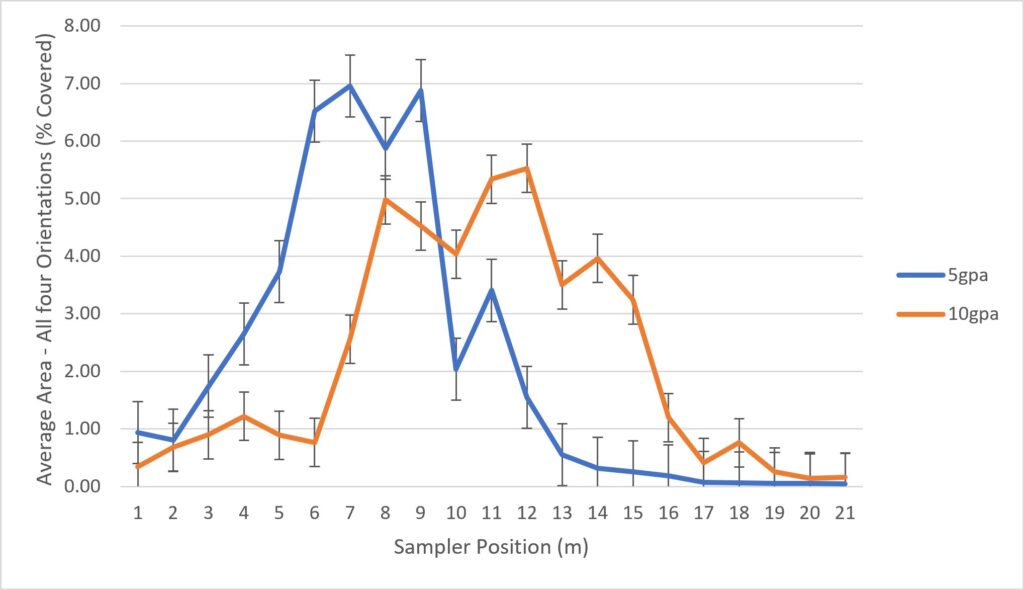
    It was expected that higher volumes would result in higher counts. One theory for the absence of this result was that overlapping depositions in the high volume treatment might have underestimated counts when the papers were digitized. Therefore, the percent surface area was also analyzed (Figure 9). Once again, there was no significant difference in the total percent area or a comparison of area under the curves.

    Figure 9 – Average coverage as area covered, all orientations, for 5 gpa and 10 gpa. n=2 for each condition . Bars = SE

    When swath widths were calculated for each repetition, then averaged for each speed, we arrived at (5 m + 7 m) ÷ 2 = 6 m for the 5 gpa condition, and (5.5 m + 6.5 m) ÷ 2 = 6 m for the 10 gpa condition. We have no explanation for why there was no volume-related difference.

    Discussion

    Wind direction strongly influenced deposition, overriding the down-and-back pattern seen in previous studies. A tail-cross wind likely drove deposition (likely occurring after the drone passed the sampling location), explaining why retreat-facing collectors captured minimal deposition, and peak deposition was accordingly displaced from the flight line.

    Overall, results confirm that wind conditions fundamentally reshape spray distribution. The implication is that wind direction must be accounted for alongside swath width when developing flight path spacing to minimize the potential for overlaps and gaps between passes.

    Further, previous studies have demonstrated a direct and positive relationship between flight speed and swath width up to 8-10 m/s with no further response after ~8 m/s. This study supports the hypothesis that rotary-wing drone speed and swath width share an asymptotic relationship that inflects at ~8-10 m/s (variability makes it difficult to determine an exact value). Flight speed also has a direct and inverse impact on the degree of spray deposition and deposit variability within the swath.

    Finally, caution is advised when interpreting average swath widths. There may be no indication of the degree of coverage within the swath (affecting efficacy), or the lateral variability along the flight path (affecting fieldwide uniformity).

    Related video

    Thanks to Adam Pfeffer and Bayer Canada for in kind and financial support, and thanks to volunteers Erin Jewson (OMAFA Engineer), Halle Barton and Nikki Intranuovo (Bayer Summer Students) for their help with the field work.

    Author’s Note: These results were adjusted in July to exclude outliers and include the results of the spray volume comparison.

  • How Higher Speeds Affect Drone Swath Width

    How Higher Speeds Affect Drone Swath Width

    Speed Study

    Swath width is a fundamental parameter in spray drone mission planning. It facilitates the uniform application of broadacre pesticides at the target rate. Pilots adjust the swath width via operational settings such as droplet size, flight speed and altitude to produce the most effective and efficient application.

    Rapid advances in drone design, however, may warrant a re-evaluation of how operational settings affect swath width. For example, the most recent generation of drones are now capable of speeds up to 20 m/s (72 km/h), which is twice that of the previous generation.

    In late 2025 we conducted a series of comparative herbicide applications using the DJI Agras T50 and T100. For both drones, swath width increased with speed up to ~10 m/s, as expected. However, between ~10 m/s and 18.5 m/s, swath width from the T100 did not seem to increase further. Similar observations have been reported by researchers at AgroEfetiva (São Paulo, Brazil; personal communication).

    These results suggest that the relationship between speed and swath width is positive and direct at lower speeds, but reaches a saturation point beyond which any further increase in speed no longer affects swath width. This is an asymptotic relationship. To test this hypothesis, we conducted a deposition study where swath width was measured at flight speeds that increased incrementally from 8 m/s to 20 m/s.

    Configuration Study

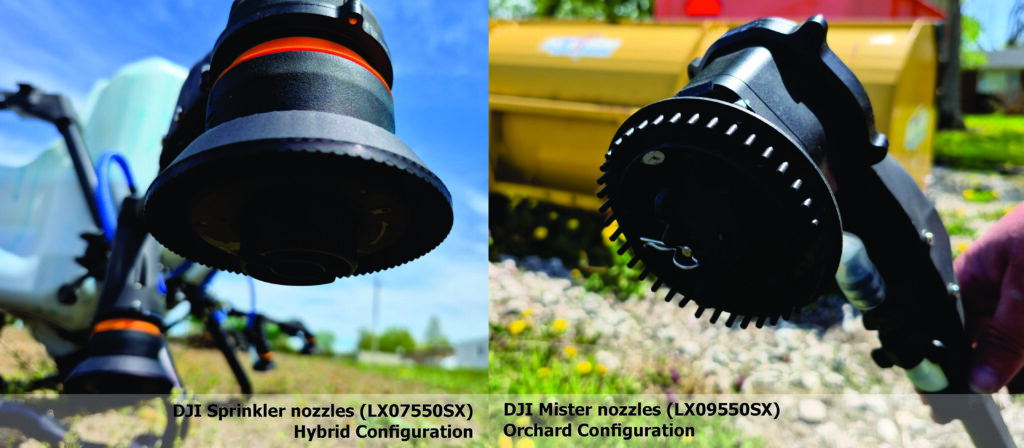
    The standard T100 configuration uses two rotary atomizers (“sprinkler” nozzles; LX07550SX) with a reported maximum combined flow rate of 30 L/min. The alternate orchard configuration incorporates a boom that supports two additional “mister” nozzles (LX09550SX), increasing the reported maximum flow rate to 40 L/min.

    To improve productivity in broadacre applications, some operators have adopted a hybrid configuration. In this setup, the orchard boom is retained, but the reputedly drift-prone mister nozzles are replaced with a second set of sprinklers. This approach is intended to achieve a higher flow rate than the standard two nozzle configuration while maintaining a larger mean droplet size.

    A secondary objective of this study was to compare the Hybrid configuration with the Orchard configuration (Figure 1).

    Figure 1 – Left: DJI Sprinkler Nozzle (LX07550SX). Four such nozzles comprised the “Hybrid” configuration. Right: DJI Mister nozzle (LX09550SX). Four such nozzles comprised the “Orchard” configuration.

    Materials and Methods

    Location and Layout

    The study was conducted at Ontario’s Simcoe Research Station on May 12, 2026. The site (42.857414, -80.271759) was a flat, recently tilled sand/loam field with no vegetation present. A DJI Agris T100 drone was used to perform the spray applications, supported by the D-RTK 3 relay station and flown on full auto.

    The spray mix was 0.2% v/v Super Signal Blue (Precision Laboratories) and 0.125% v/v Activate Plus NIS (Winfield United) in municipal water, pre-mixed to ensure consistency. A volume of 40 L – 60 L was maintained throughout the trial to minimize the effect of a changing payload.

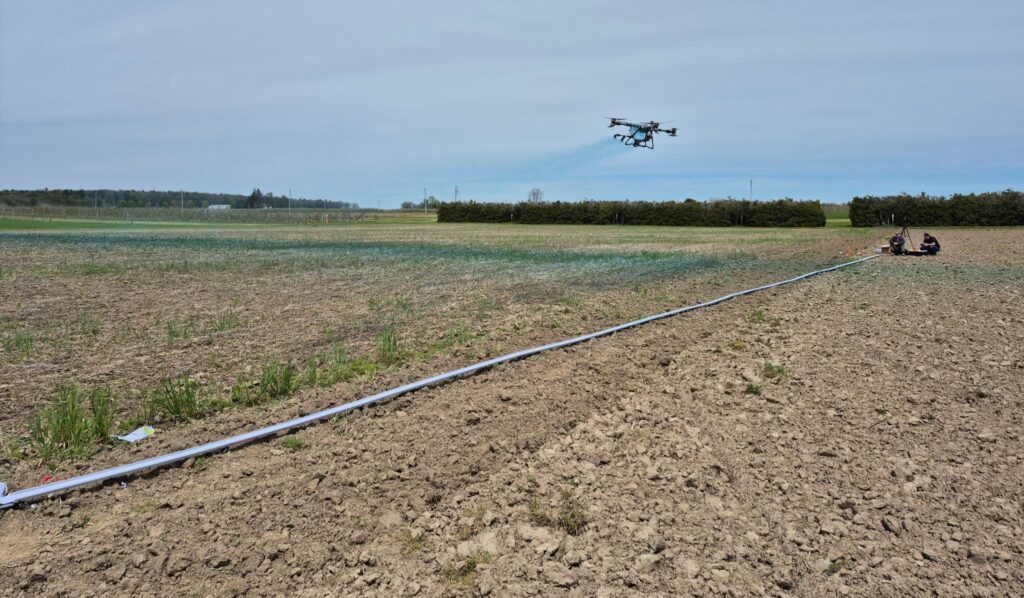
    The sampler was a flat, horizontal, continuous bond paper strip measuring 7.5 cm wide and 30 m long (secured in Speed Tracks™, Application Insight LLC). The sampler was oriented perpendicular to the prevailing wind, with the intention of flying the drone with a headwind across the 15 m mark (the centre) (Figure 2). Test passes determined that the T100 required 210 m to reach 20 m/s while half-full.

    Figure 2 – T100 spraying indicator dye across the 30 m continuous sampler.

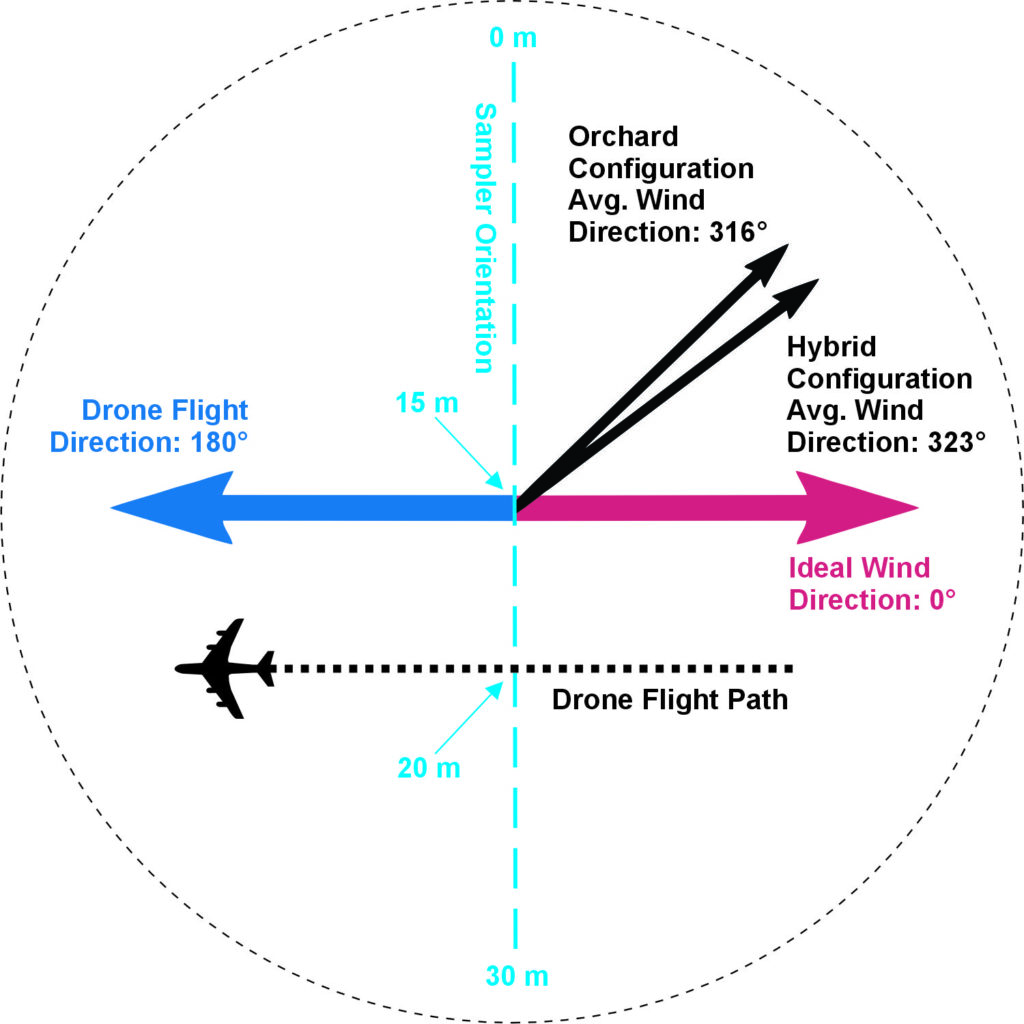
    Before the swathing runs began, the prevailing wind shifted direction slightly.  It was decided to fly the drone 5 m upwind (at the 20 m mark along the 30 m sampler) to ensure any downwind displacement was captured on the sampler (Figure 3).

    Figure 3 – Trial layout and prevailing wind conditions.

    Drone Settings and Swathing Order

    The primary objective of the study was to explore the effect of flight speed on swath width. Speed was increased from 8 m/s to the maximum 20 m/s by 2 m/s increments. Trial and error with the controller indicated that we could achieve these speeds by balancing an application volume of 30 L/ha and a programmed swath width of 7 m.

    Altitude was set to 4 m which is lower than the 5 m minimum recommended by DJI for high-speed flight. This was a compromise above the preferred 3.5 m altitude we have historically used with the T50. It was felt that higher altitudes would create unacceptable potential for swath displacement.

    Rotary atomizer design is not standardized, and as a result, the droplet size selected on the controller did not necessarily produce the desired results. The Hybrid configuration was programmed to emit 350 µm droplets, selected as a compromise between drift mitigation and coverage potential. To offset the Mister nozzles’ reputation for producing a finer spray, the Orchard configuration was set to the maximum 500 µm. Operations settings are noted in Table 1.

    ConfigurationNozzleDroplet size (µm)Speed (m/s)Altitude (m)Programmed Swath Width (m)Application Volume (L/ha)
    Hybrid4 Sprinklers3508, 10, 12, 14, 16, 18, 204730
    Orchard2 Misters, 2 Sprinklers5008, 10, 12, 14, 16, 18, 204730
    Table 1 – Operational settings for trials.

    Three repetitions of seven speeds were flown for each configuration. Anticipating an increase in temperature and wind speed throughout the day, it was decided move through all seven speeds (a single repetition) before resetting and doing so two more times. The intent was to preclude confounding weather effects. Ideally, we should have alternated between configurations as well, but this proved impractical. As a result, we flew the Hybrid configuration first and the Orchard configuration last.

    Weather

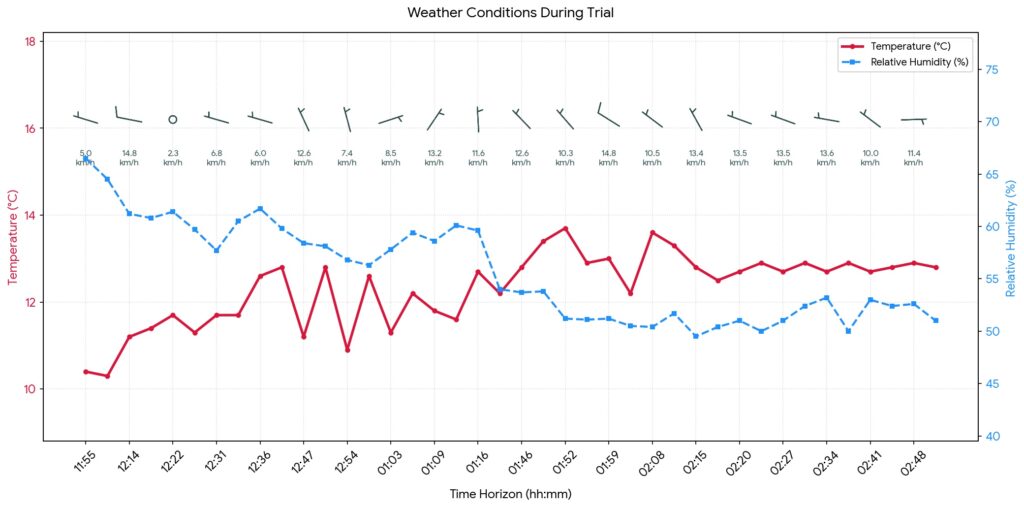
    Weather data was collected using a Kestrel 3550AG weather meter (Kestrel Instruments) in a vane mount positioned 2.5 m above ground. Temperature and relative humidity were comparable throughout the ~3 hours of data collection, but as anticipated, wind speed was higher for the later Orchard configuration passes.

    As previously indicated, wind direction shifted from an ideal headwind situation just before trials began, and was somewhat changeable, but the average wind direction for the two configurations was comparable (Figure 4 and Table 2).

    Figure 4 – Weather conditions recorded at roughly 10-minute intervals, corresponding to the drone passing over the sampler.
    TimeConfiguration FlownAverage Temperature (°C)Average Relative Humidity (%)Average Wind Speed (km/h ± SD)Average Direction (° ± SD)
    11:55 am – 1:16 pmHybrid11.759.98.4 ± 3.5323 ± 46
    1:43 pm – 2:52 pmOrchard12.951.611.9 ± 2.5316 ± 48
    Table 2 – Average weather conditions for the Hybrid configuration passes and for the Orchard configuration passes.

    Collector analysis

    Bond paper digitization

    Bond papers were scanned using a Swath Gobbler™ (Application Insight LLC). The software measured deposition as both percent area covered (% area) and deposit density (deposits/cm2) every 100 mm, with a thresholded Hue of 23-280, a Saturation of 5-120 and a Value of 156-255.

    Effective swath width calculation

    The large data set produced by each pass was reduced in size by averaging the deposition for every 50 cm. This data was entered into our Excel-based swath width calculator, which assumes a racetrack pattern and sums deposits from adjacent swaths. The resulting swath width for each pass was the maximum width that minimized over- and under-dosing as well as the coefficient of variation (CV).

    Analysis

    The average swath width derived from deposit density data was wider than that derived from percent area covered (Table 3).

    Table 3 – Group means and standard deviation for average swath widths derived from deposit density data and percent coverage data. The average CV was between 29 and 32%.

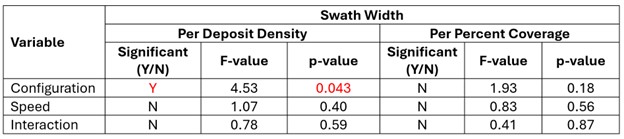
    A two-way ANOVA (Analysis of Variance; α = 0.05) was performed to determine any significant effect of speed or configuration on swath width (Table 4). Flight speed had no significant effect on swath width, no matter how it was derived (% area covered or deposit density), for either configuration (Hybrid or Orchard). However, the average swath width derived from deposit density was significantly wider for the Orchard configuration compared to the Hybrid and presented higher variability.

    Table 4 – Results of two-way ANOVA, exploring interactions between speed, swath width and configuration (95% confidence interval).

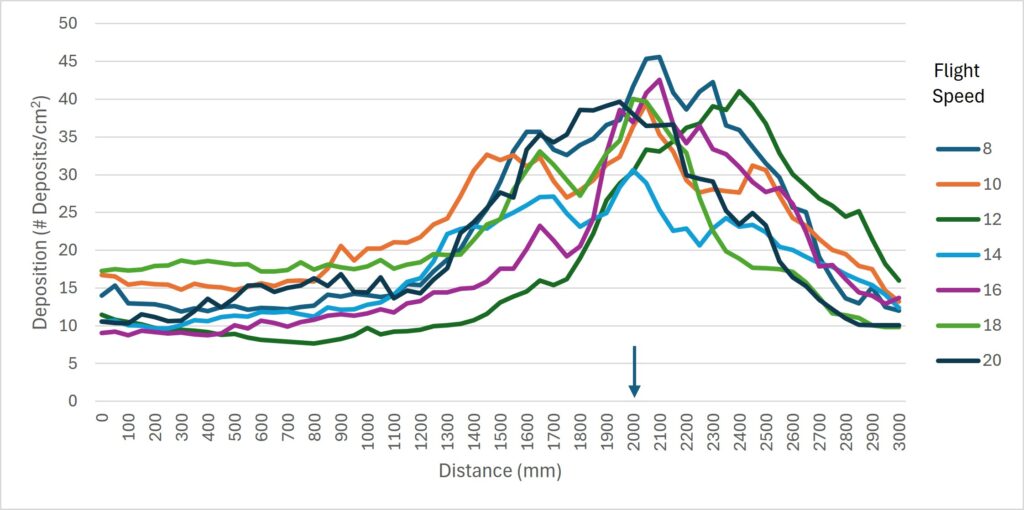
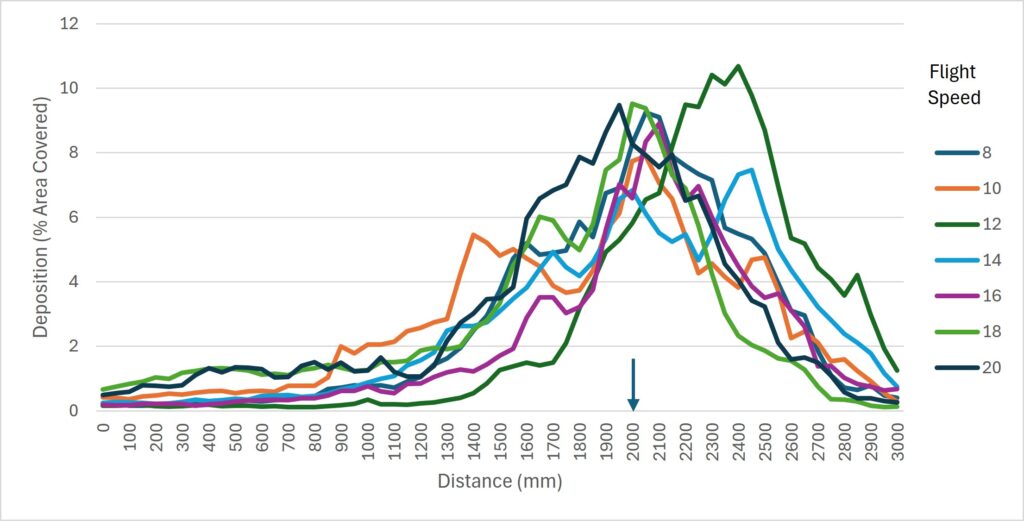
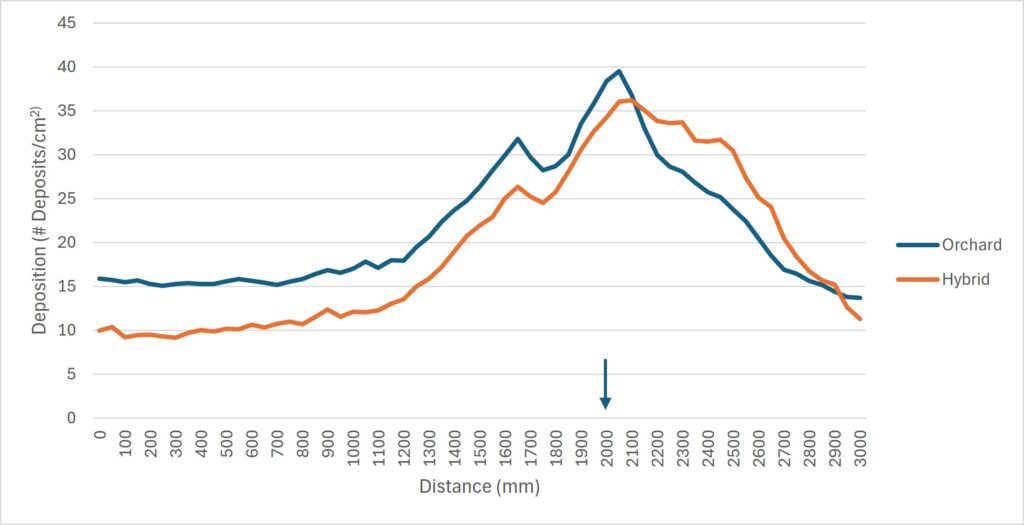
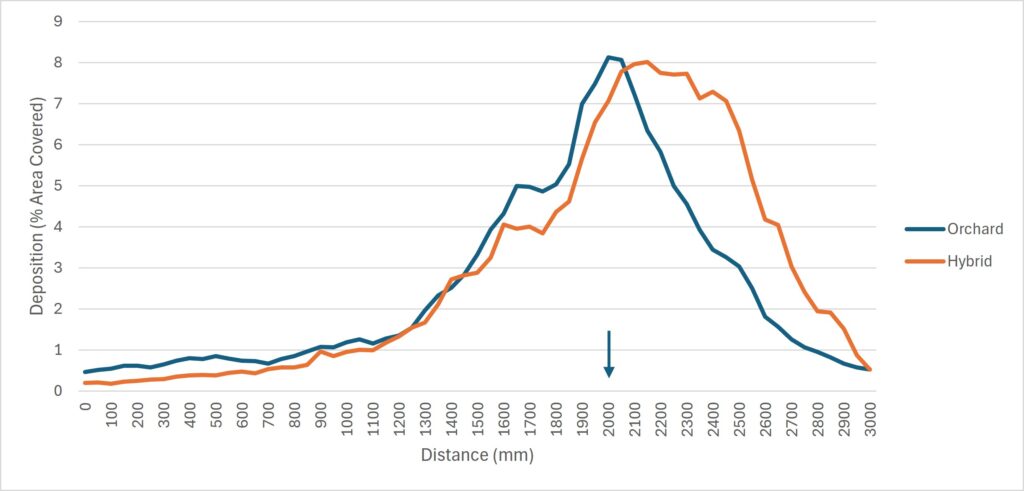
    Orchard configuration was prone to displacement in a side wind. Shifting the flight path 5 m upwind improved the downwind capture, but for some flights it did trim a small portion of the upwind deposition. Deposit density gives greater resolution and exposes more variability than percent area covered. Figure 5 shows the average deposition by speed based on deposit density. Figure 6 shows the average deposition by speed based on percent area covered.

    Figure 5 – Average deposition by speed based on deposit density. Arrow indicates flight path.
    Figure 6 – Average deposition by speed based on percent area covered. Arrow indicates flight path.

    Figure 7 shows the average deposition by configuration based on deposit density. Figure 8 shows the average deposition by configuration, based on percent area covered. Based on deposit density, there were 55% more deposits on the downwind side of the sampler for Orchard configuration set to set to 500 microns compared to the Modified configuration set to 350 microns.

    Figure 6 – Average deposition by configuration based on deposit density. Arrow indicates flight path.
    Figure 8 – Average deposition by configuration based on percent area covered. Arrow indicates flight path.

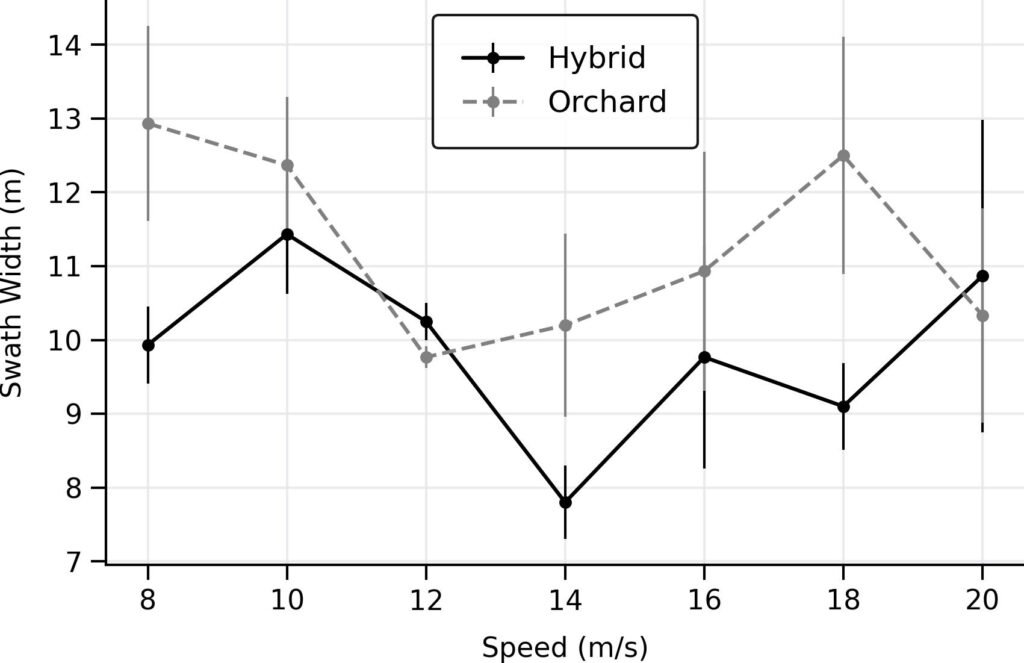
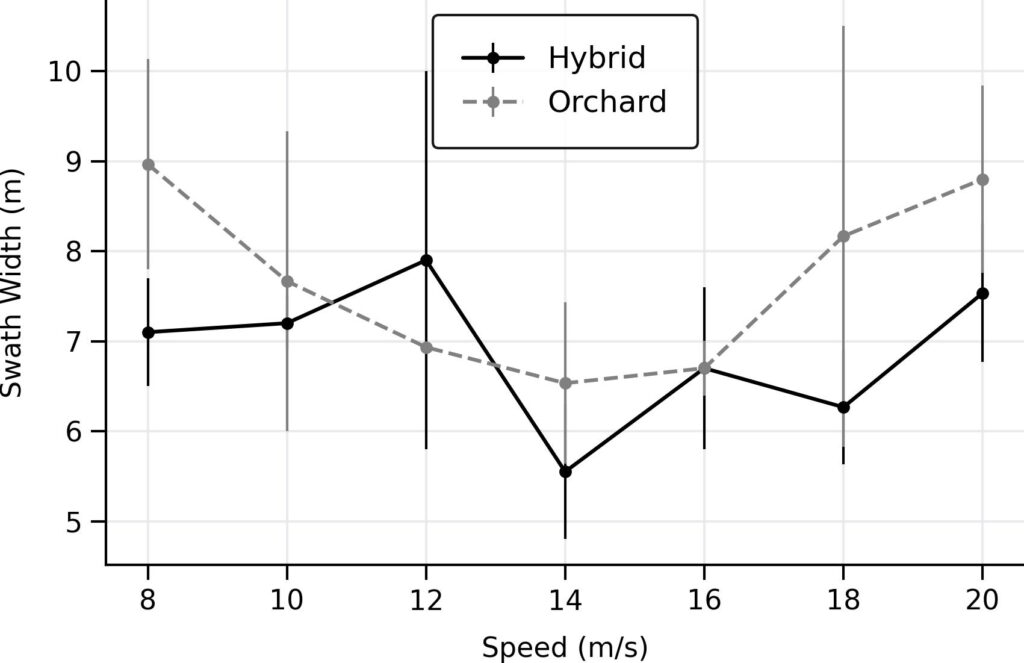
    The average swath widths calculated from deposit density (Figure 9) and percent area covered (Figure 10) are shown with standard deviation. While it appears the swath width is less around 14 m/s, it is statistically insignificant and the response to speed is essentially flat. As with prior studies, swath widths calculated from deposit density are larger than those calculated from percent area covered.

    Figure 9 – Average swath widths for each speed, derived from deposit density data. SD shown. n=3 for each speed, while n=2 for Hybrid configuration at 12 m/s and 14 m/s.
    Figure 10 – Average swath widths for each speed, derived from percent coverage data. SD shown. n=3 for each speed, while n=2 for Hybrid configuration at 12 m/s and 14 m/s.

    Observations

    Previous studies demonstrated a direct and positive relationship between drone speed and swath width up to 8-10 m/s. Here, we see no further response after ~8 m/s. This supports the hypothesis that rotary-wing drone speed and swath width share an asymptotic relationship that inflects at ~8-10 m/s. Variability makes it difficult to determine an exact value.

    Despite increasing the programmed droplet size to the maximum 500 microns for the Orchard condition, there was 55% more downwind deposition compared to the Hybrid condition, which was set to 350 microns. This supports the claim that the Mister nozzle produces a span of droplet sizes that include far more fines than the Sprinkler nozzle, and underpins the need for a better understanding of the spray quality produced by rotary atomizers.

    Spraying at high speeds is not an advisable practice. While swath width is no longer affected after ~8 m/s, there are other considerations. Note that it required 200 m for the drone to reach the highest speed, and in a related study we have seen swath width taper during initial acceleration and final deceleration, leaving gaps in coverage.

    Further, the minimum 5 m altitude advised by DJI ensures a safe margin for the drone to respond to obstacles and topography during high speed flight, but is not conducive to spraying. The author is aware of a situation where flying the T100 at 4 m altitude and 18 m/s over a canola field with rolling hills caused it to perform an emergency landing.

    An ideal speed is one that maintains the most consistent swath width at a reasonable altitude.

    Thanks to Drone Spray Canada and Bayer Canada for in kind and financial support, and thanks to Cesar Cappa, OMAFA horticulture weed specialist for his participation in the study.

  • A Drone’s Swath Width Tapers During Acceleration and Deceleration

    A Drone’s Swath Width Tapers During Acceleration and Deceleration

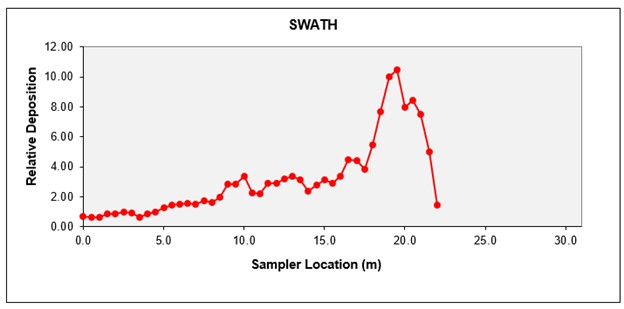
    It can be challenging to illustrate how a drone deposits spray. We can take a cross-section of spray deposit (that is, the swath) using a continuous sampler, or a series of discrete samplers. This typically reveals a sharply-peaked curve that is symmetrical in a head- or tail-wind, or skewed if there is a cross-wind.

    Spray coverage from a DJI T100 (4 m altitude, 30 L/ha, 16 m/s, 350 µm droplets) measured as percent area covered over a 30 m continuous sampler (Speed Track and Swath Gobbler – Application Insight LLC). Note: the prevailing wind was 8 km/h and generally from the right, skewing deposition to the left.

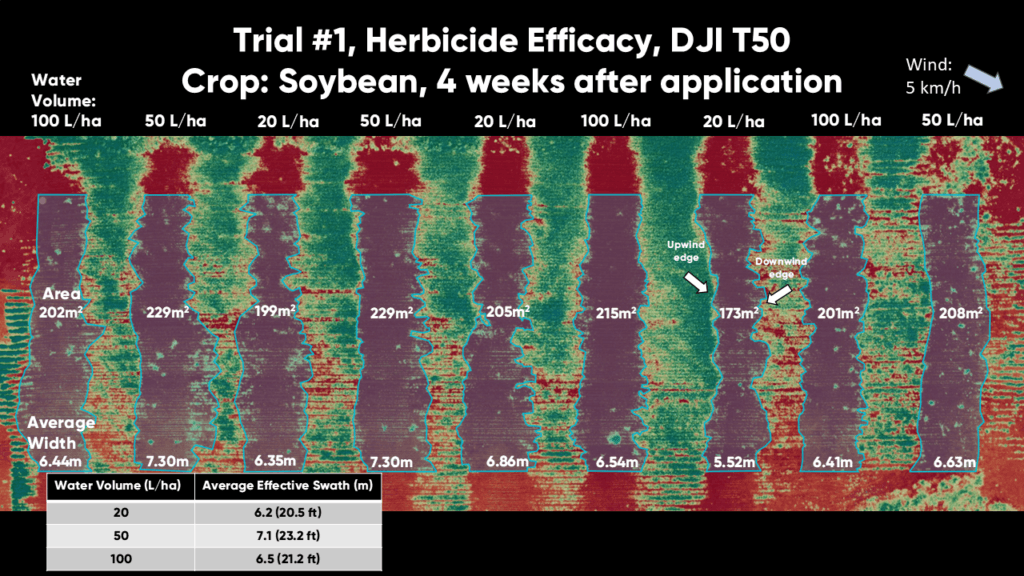
    But this analysis only captures a slice of the swath at a single moment in time. Swath width and relative position along the flight path is inconsistent and highly variable. Some have shown this using herbicides and aerial photographs analyzed through a Normalized Difference Vegetation Index (NDVI). NDVI reveals the health and density of vegetation based on how they reflect different wavelengths.

    A 50 m continuous swath visualization. This stitched graphic from work by K. Falk shows annotations for upwind/downwind edges and width measurements.

    Design

    We wanted to try something similar, but using dye instead of herbicide. Rhodamine WT is a synthetic fluorescent dye that absorbs green light and emits red light. It’s highly water-soluble and is the industry standard for environmental monitoring, including mapping groundwater flow, tracing pollution plumes and studying flow rates in rivers. We’ve used it in the past on Ontario’s snowy fields to show how boom height affects coverage uniformity with boom sprayers. Why not from a drone?

    Spray coverage from a boom at an optimal height (left), too low (middle) and too high (right). From episode seven of our Exploding Sprayer Myths series.

    The idea was to lay down swaths from a DJI T100 at different altitudes and speeds, and then take aerial photographs of the stained snow using a DJI Mavic 3 Multispectral drone. It would be visually impactful, and perhaps we could even quantify the deposition using photogrammetry and drone mapping software.

    We flew a snowy field on Stefina Line, Blenheim, Ontario. It was 2°C and wind was gusting from 8-14 km/h. We mixed a 0.5% v/v solution of 0.5 L rhodamine WT in 900 L and flew a trial run (4 m altitude, 50 L/ha, 10 m/s, 500 µm droplets). But, as Robbie Burns said, “The best laid plans of mice and men [often go awry]. (If you’re not into late 18th century poetry, you’re forgiven.)

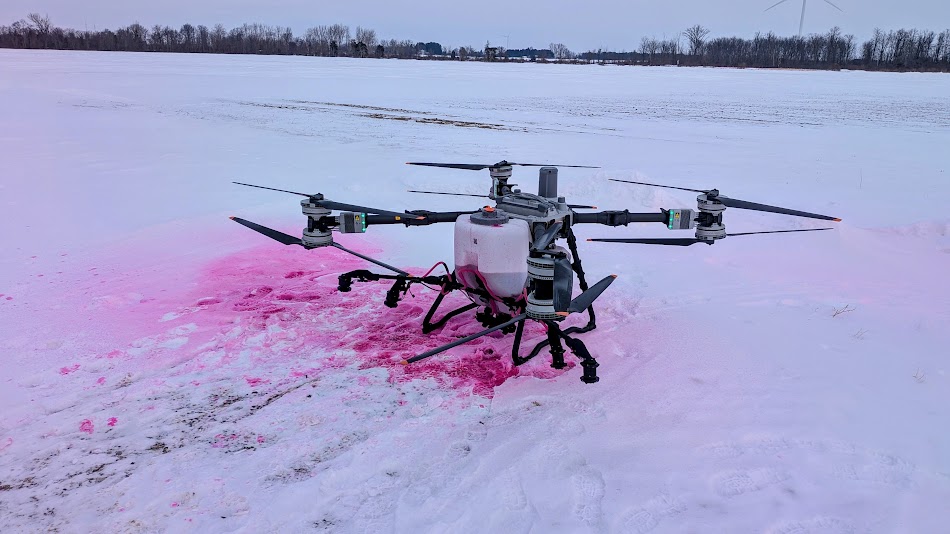
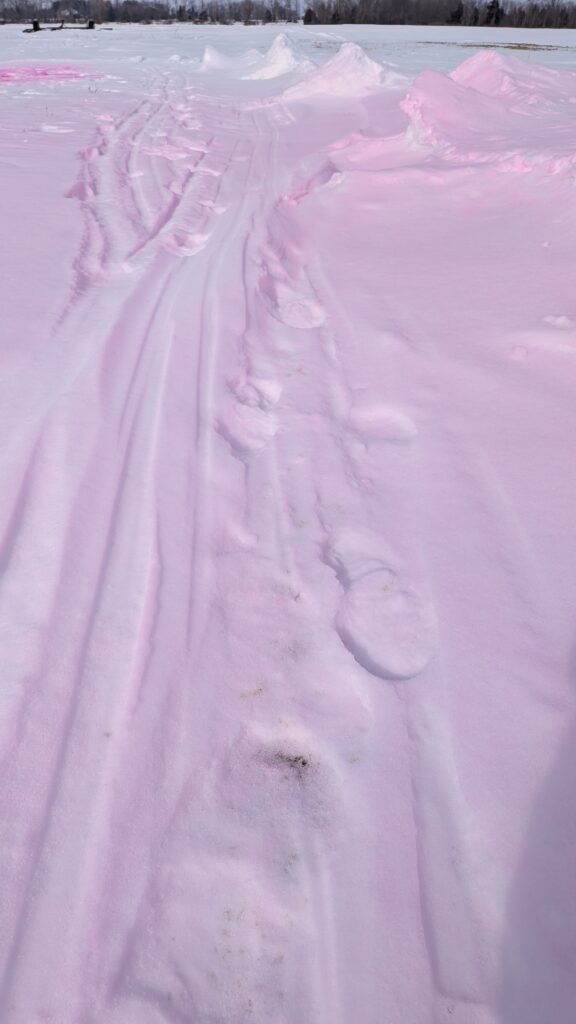
    Rhodamine WT applied by drone did not result in high-contrast deposition. Hoping it was a function of concentration, we emptied the remaining rhodamine into the nurse tank, essentially doubling the concentration (we didn’t measure it), but to no avail.

    Rhodamine WT applied by drone did not result in high-contrast deposition.

    New Plan

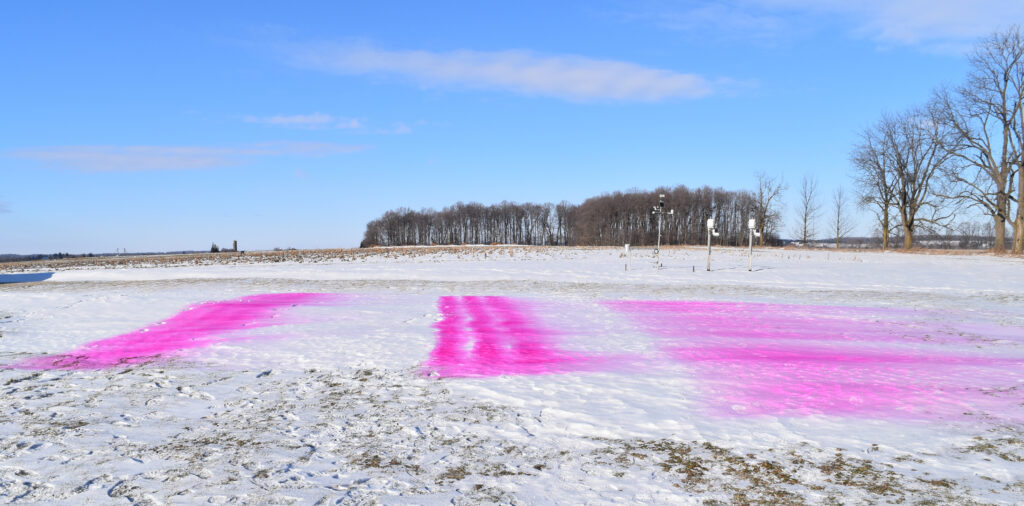
    We decided to pivot. We laid out a ~2.0 ha (5 ac) area and programmed the drone to fly a 10 m route spacing. Our hope was that the swaths would overlap for complete coverage, and perhaps we’d see a completely-stained rectangle. But, it seemed striated rather than solid, and the faint colouration made it difficult to see. This led us to shift to another location and spray another block, but this time we flew it four times in the hope that “multiple coats” would result in a brighter stain. We were already there, so why not?

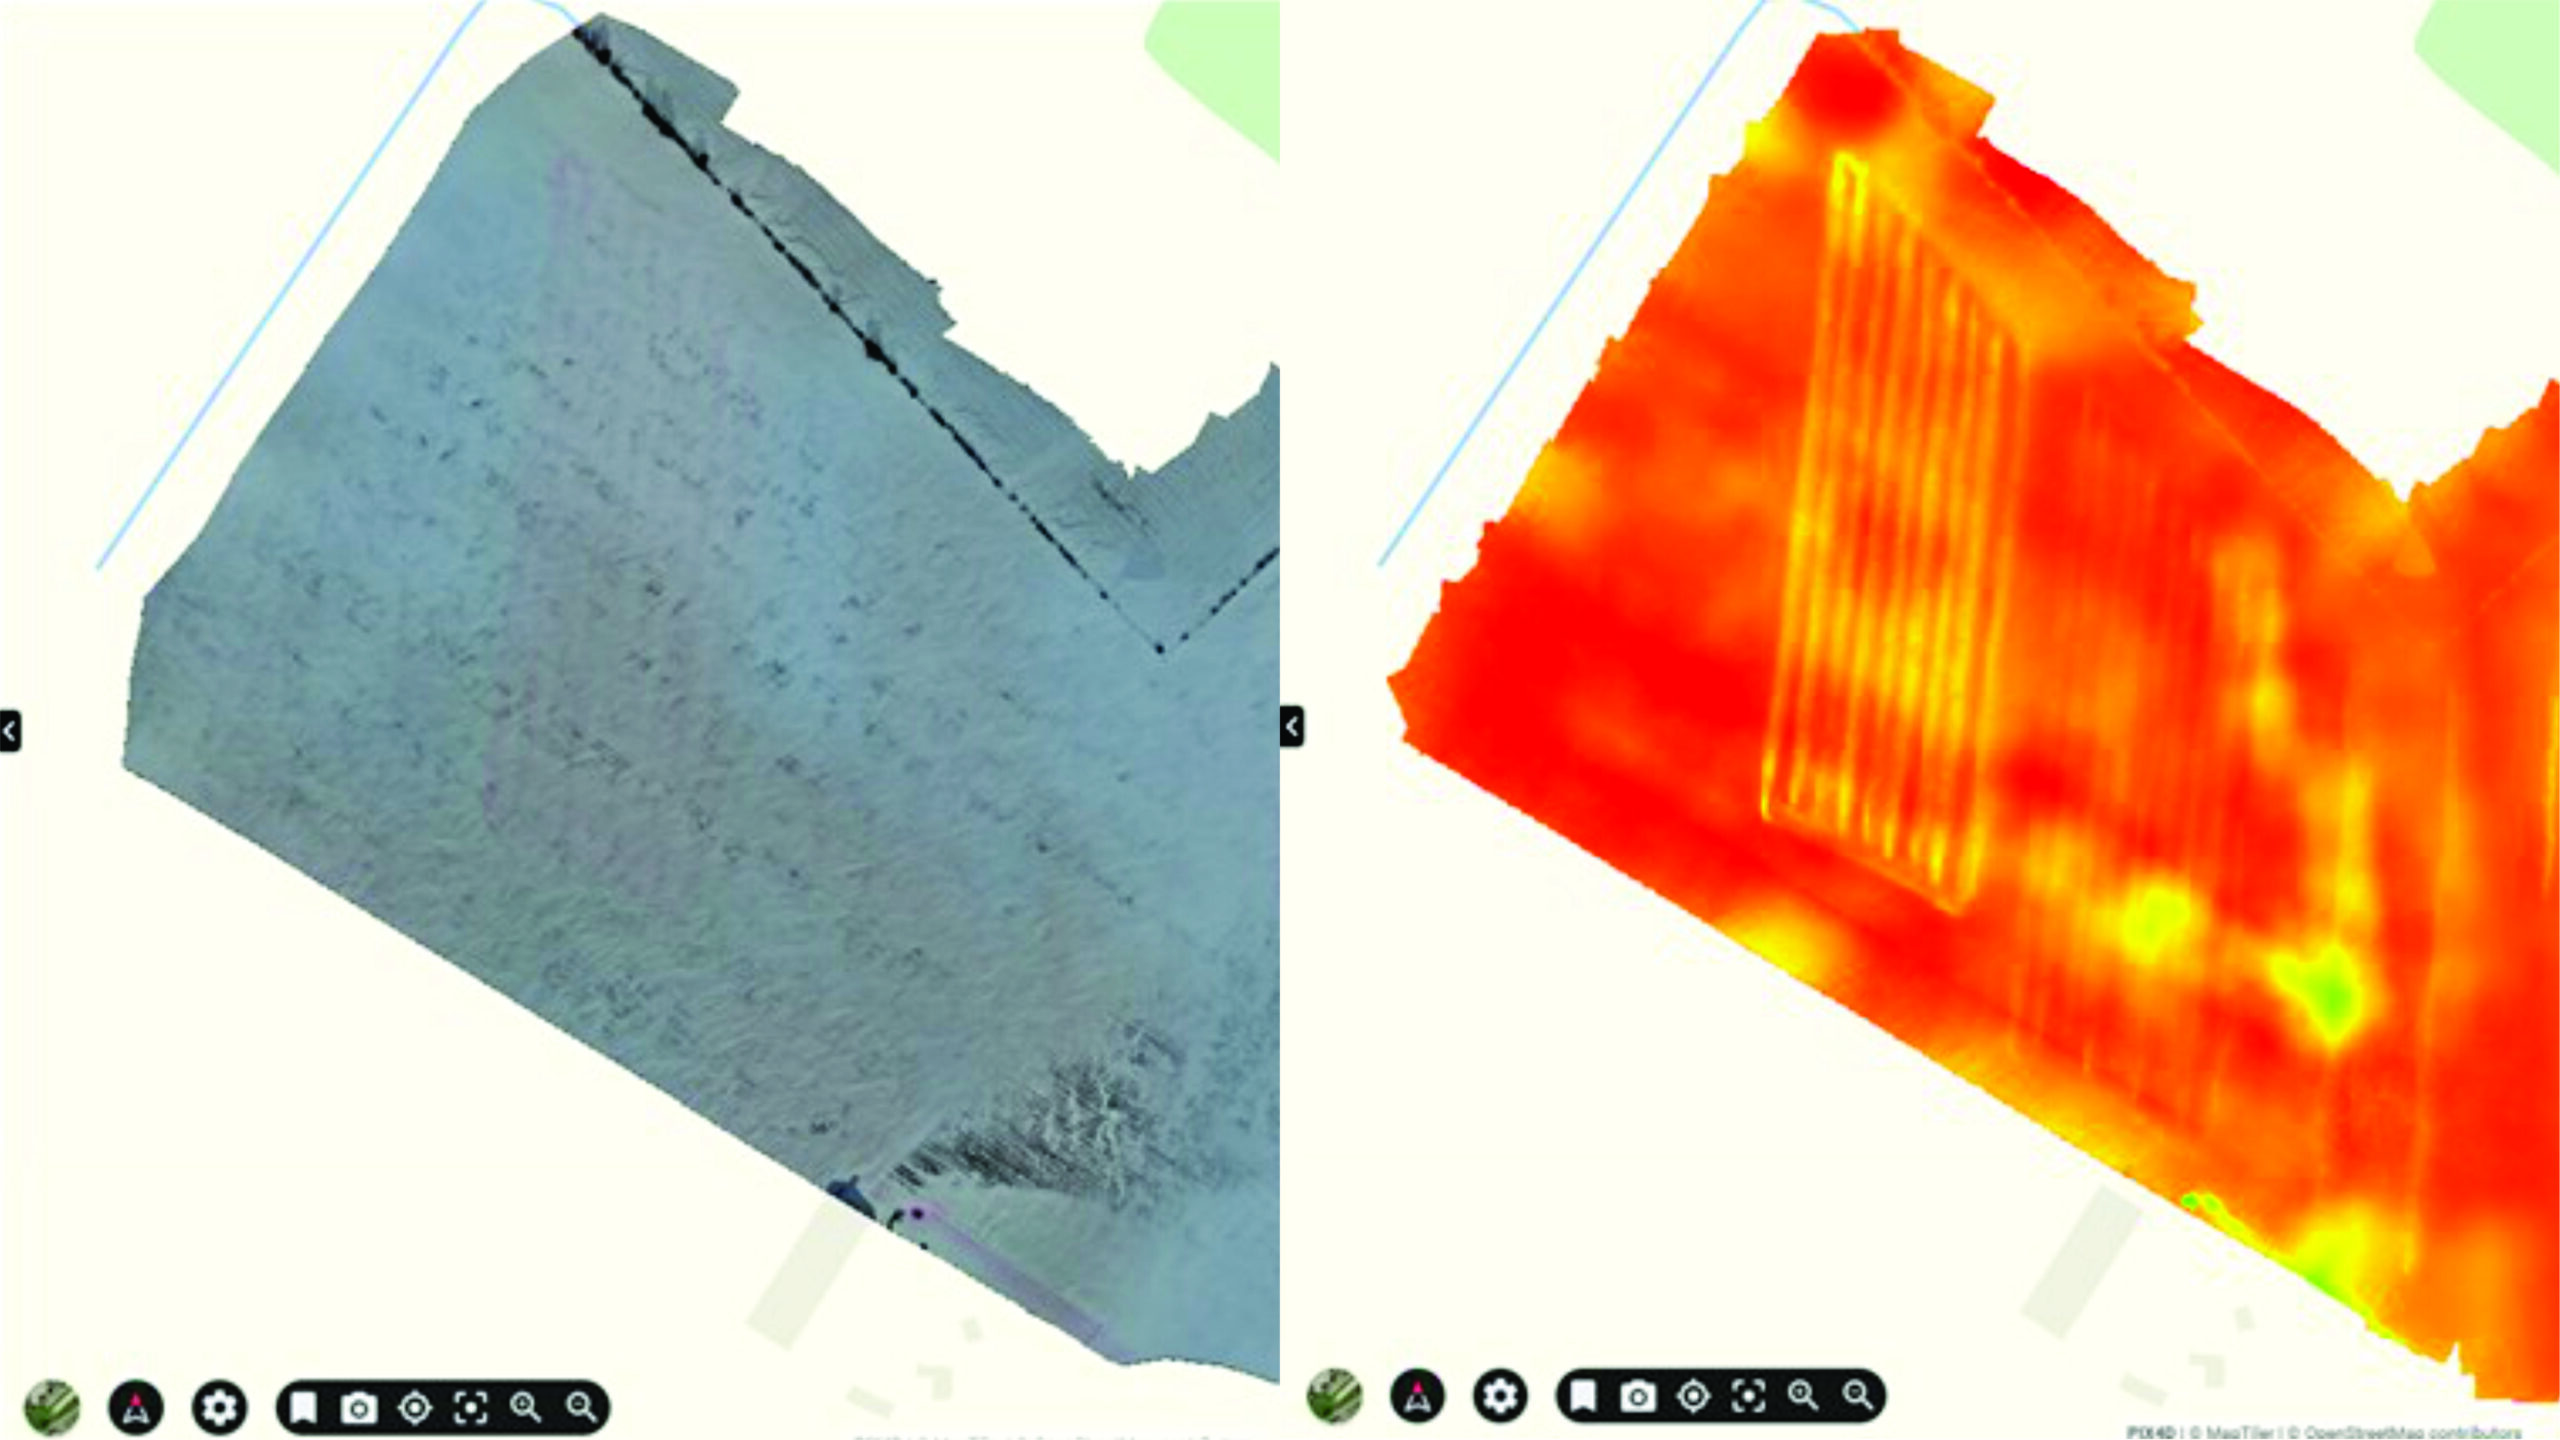
    Feeling a bit underwhelmed, we slowly flew the Mavic M3M to capture aerial footage. In the following image you see the less-than-spectacular result in the visual spectrum (left). Then our operator had the bright idea to filter the spectrum to enhance the rhodamine, and suddenly we had something (right). By reducing the green light, the rhodamine glowed gold, and we could see the faint block (sprayed once) and the much more intense block (sprayed four times).

    (Left half) Image from DJI Mavic M3M stitched together in Pix4D. Faint pink colouring can be discerned in the visual spectrum. (Right half) when green is reduced, the rhodamine glows gold on a red background. We begin to see the faint ~2.0 ha (5 ac) block sprayed with a single pass on the right, and the much brighter ~2.0 ha (5 ac) block sprayed 4x on the left.

    Note that the block is not a uniform, gold rectangle. The deposition is concentrated along the flight paths and does not seem to overlap (or even reach) the spray from adjacent passes. While this might be a resolution issue, it implies the swath width was less than the route spacing.

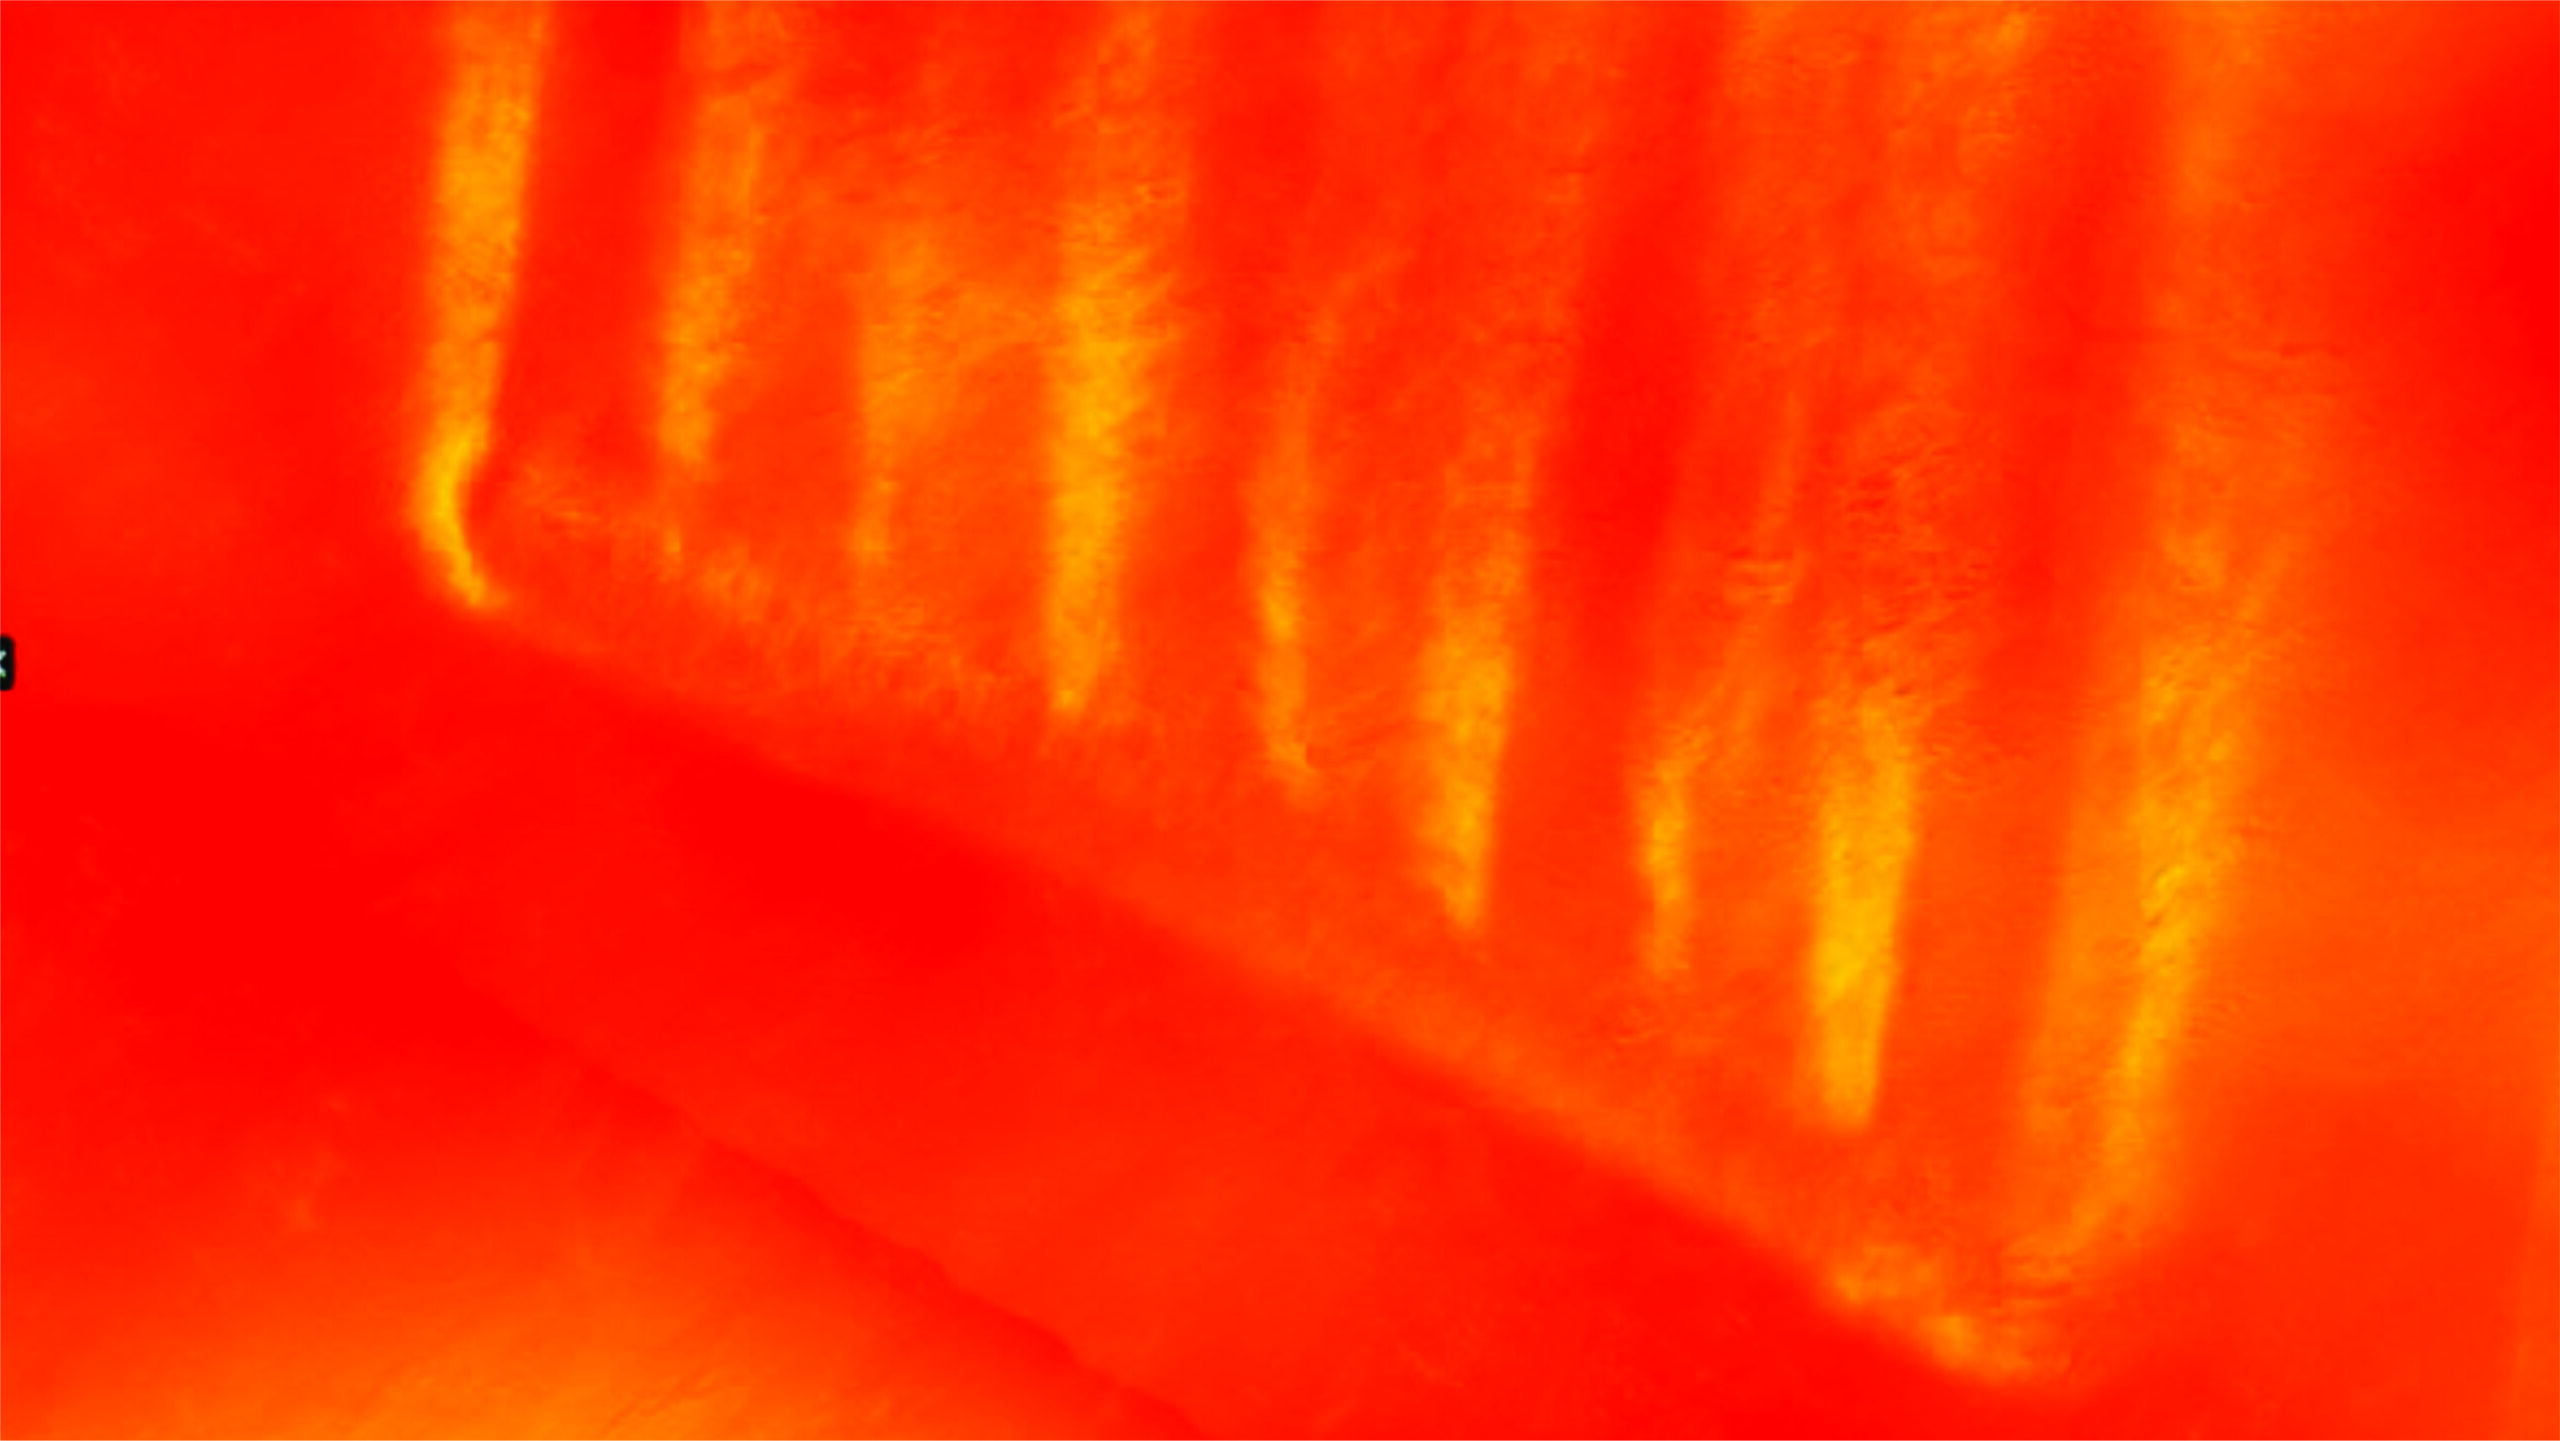
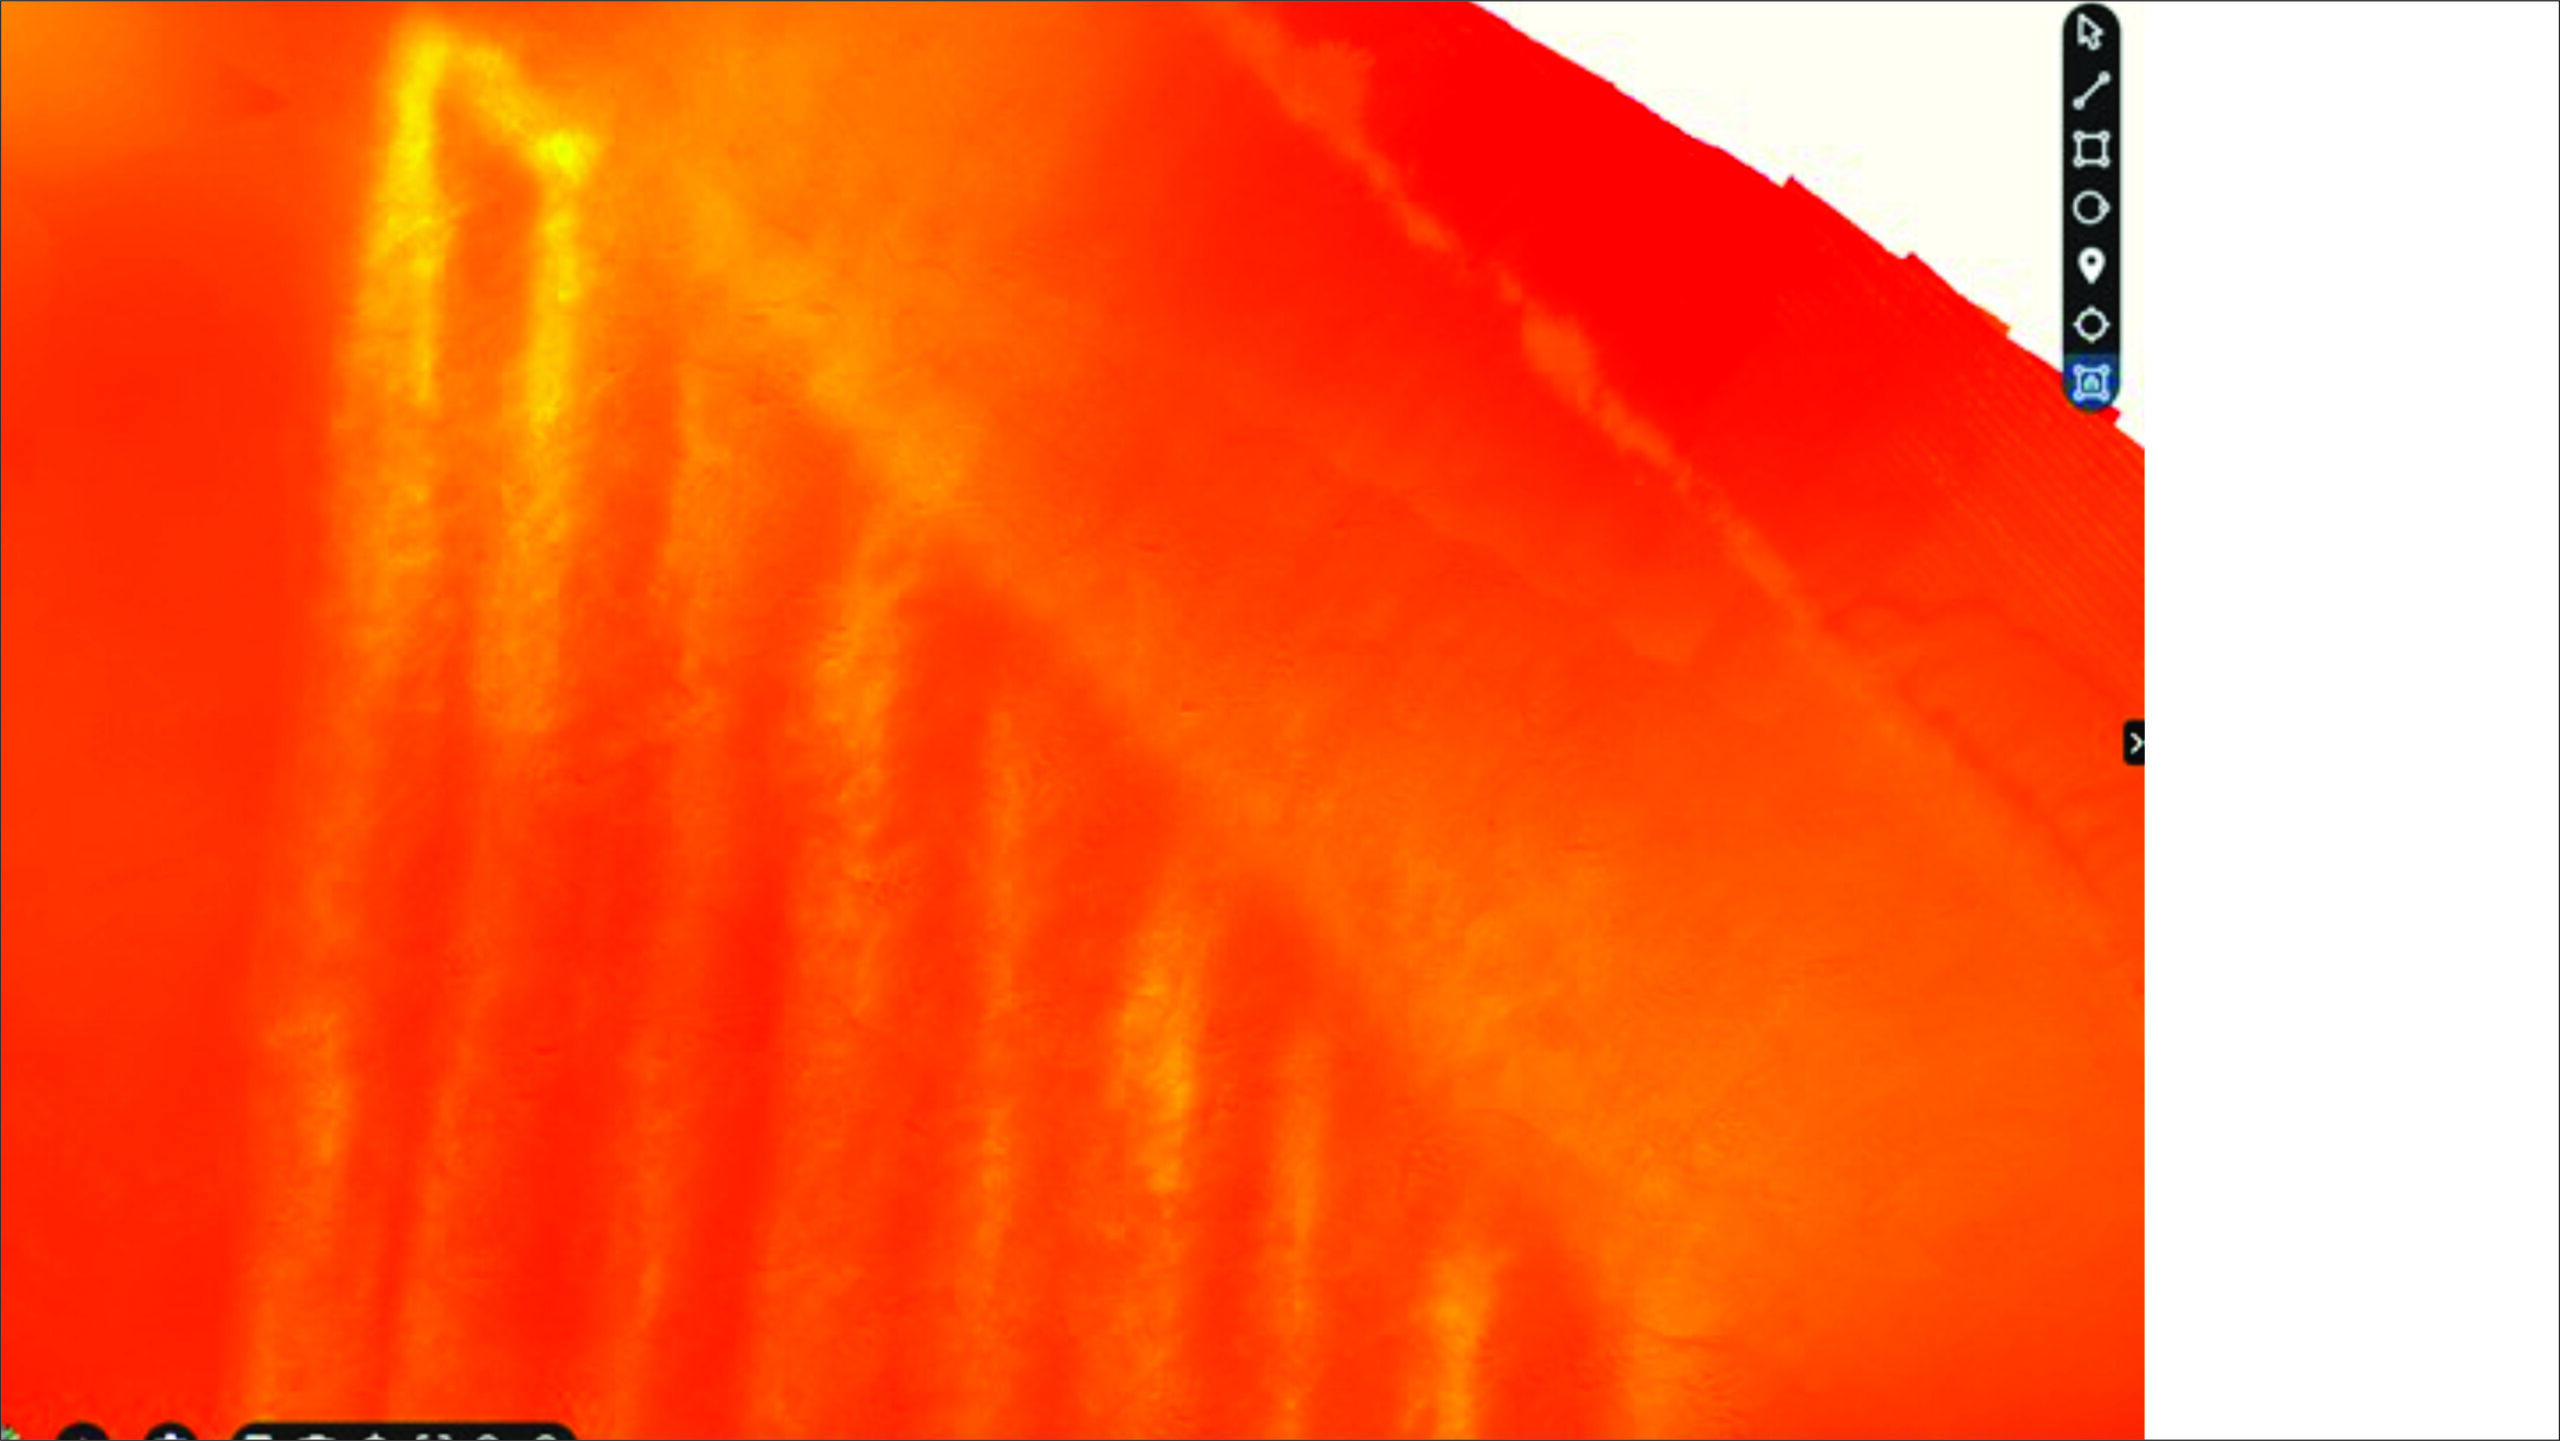
    Then we zoomed-in on the downwind and upwind edges of the block that received multiple passes and noticed something. Given the variability of spray deposition, and the fact that we made four passes, we expected coverage would be blurred. Instead, there were clear, intense tapers where the drone was either accelerating or decelerating at the boundary (depending on the direction it was flying).

    Close-up of the downwind edge of the ~2.0 ha (5 ac) area sprayed four times. Note the intensity and tapered profile of the swaths as they approach the boundary.
    Close-up of the upwind edge of the ~2.0 ha (5 ac) area sprayed four times. Note the intensity and tapered profile of the swaths as they approach the boundary.

    We know from prior work with the T10, T30 and T50 that swath width and travel speed are directly related up to a certain speed (perhaps around 10 m/s, but this is yet to be determined). The practical implication was made clear in these images: there were significant gaps in coverage on two field margins. How long were the gaps? Did relative wind direction matter? Did this change with acceleration or deceleration? We went to the DJI flight record to find out.

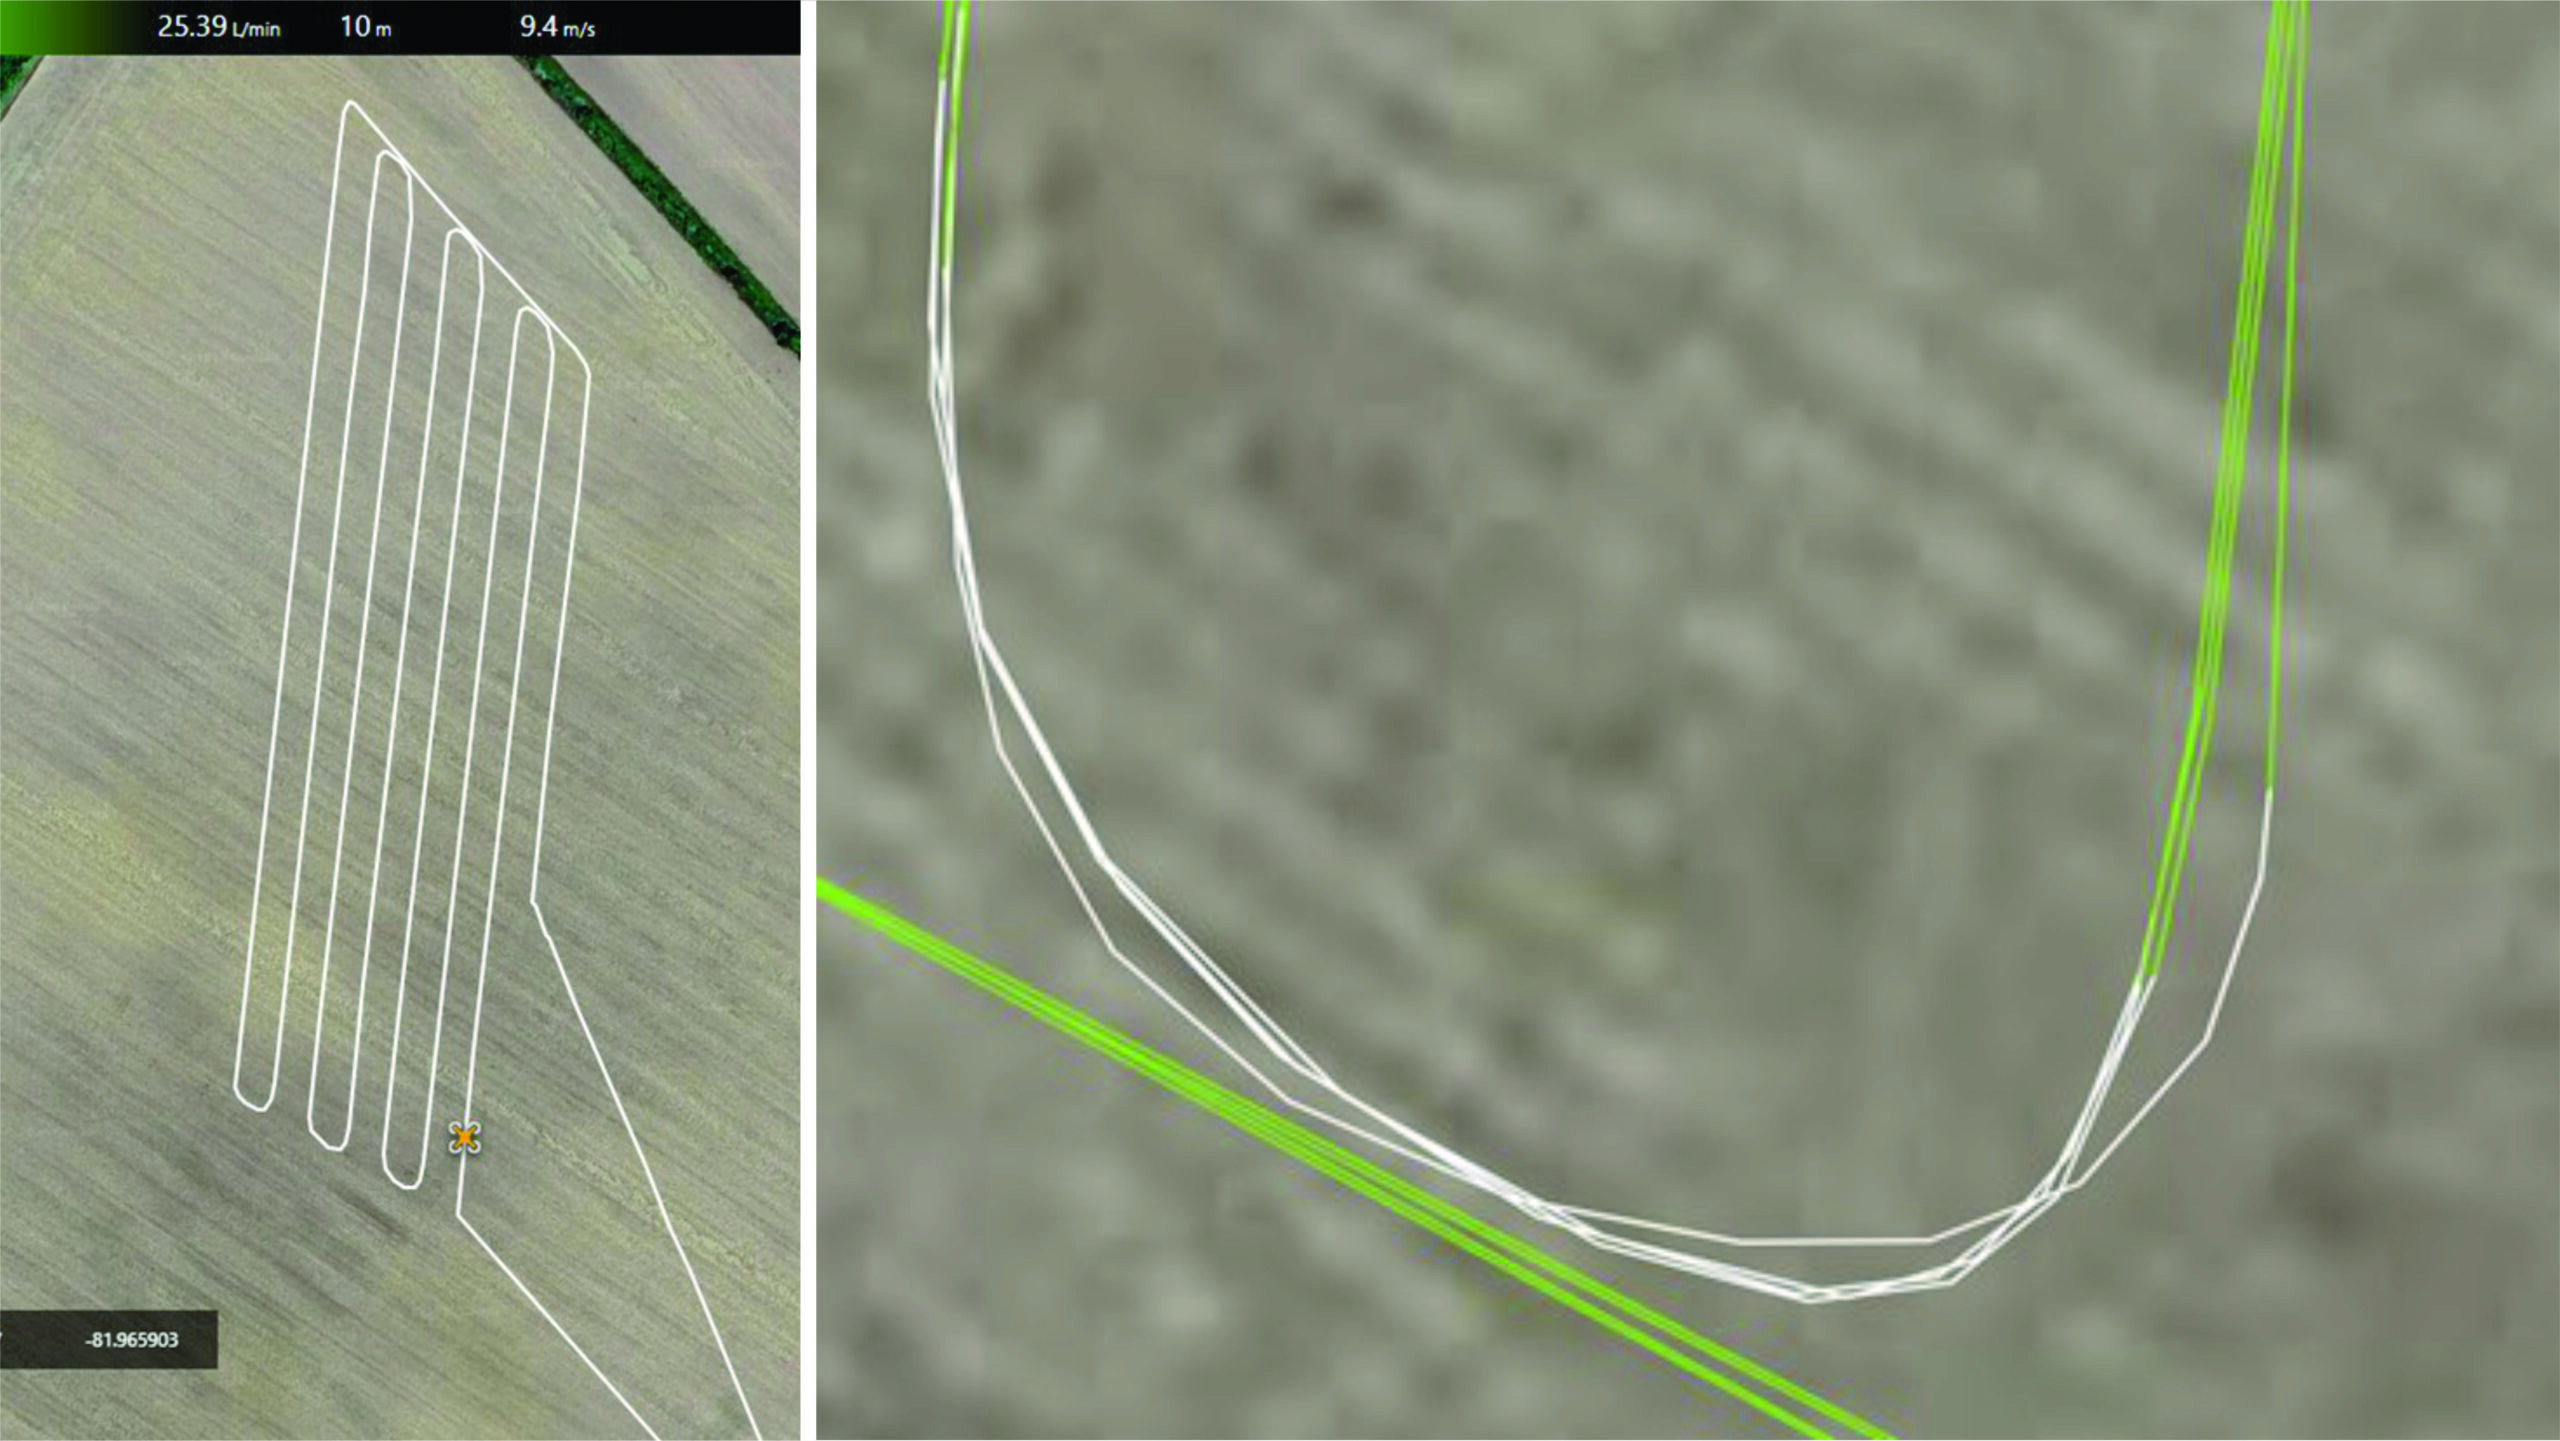
    Using the playback feature, we could see the flow rate relative to the drone speed and geographical position (that is, latitude and longitude). Using a single pass, we established the point where the drone started or stopped spraying, and the point where the the target flow rate and speed were constant. Then, using the latitude and longitude, we calculated the intervening distance between coordinates.
    Screen captures from the DJI flight recorder. (Left) The ~2.0 ha (5 ac) sprayed four times. You can see the drone icon displaying its position on the flight path, as well as the flow rate, altitude, speed and longitude (latitude was cropped out of the image). (Right) A close-up of one of the turns at the lower side of the sprayed block. All four passes are traced.

    Analysis

    We should note that we were able to spray just under 5 ac with a single tank, so the area that received four passes required multiple refills. This means the weight of the drone at any given location (and therefore the strength of the downwash) changed throughout the trial. We feel weight would affect acceleration and deceleration distances, but it wasn’t controlled in this study.

    Most runs showed the acceleration distance was significantly greater than deceleration distance (Paired t-test: t = 2.54, p = 0.044).

    PassRelative VelocityHeadwind Distance (m)Tailwind Distance (m)
    1Acceleration54.4
    1Deceleration44.1
    2Acceleration57.1
    2Deceleration43.4
    3Acceleration44.3
    3Deceleration38.9
    4Acceleration54.8
    4Deceleration64.6
    5Acceleration52.2
    5Deceleration37.7
    6Acceleration56.7
    6Deceleration46.7
    7Acceleration55.9
    7Deceleration43.5

    Headwind increased both acceleration and deceleration distances. There was a 7.5 m (16%) increase in a headwind, which was significant (r2 = 0.23). There was a stronger effect on deceleration, although not significantly.

    Wind DirectionMean (m)Std Dev (m)Min (m)Max (m)Count
    Headwind53.97.743.464.66
    Tailwind46.47.037.755.98
    Relative VelocityHeadwind Mean Distance (m)Tailwind Mean Distance (m)
    Acceleration56.251.7
    Deceleration51.641.0

    Conclusion

    In a previous trial with the DJI T100 we noted the drone was not able to exceed 18.3 m/s over a 250 m treatment distance. It took roughly 200 m to get up to 18.3 m/s before the drone began to slow in anticipation of the end of the treatment block. At the time we assumed the drone would not be under- or over-applying because the pump flow rate compensated for a changing travel speed.

    However, we had not considered the effect on swath width. Here, we see the T100 requires about 50 m to accelerate to / decelerate from 10 m/s. This distance is a function of wind direction, and to a lesser extent, whether the drone is accelerating or decelerating. During this time, the swath width is less than when at target flight speed, leaving (larger) gaps between passes.

    This is a concern for broadacre applications where consistent, uniform coverage is required. Consider a fungicide that may no longer be effective at the extremes of the swath, or a systemic post-emerge herbicide where crops directly beneath the drone (especially horticultural crops or GMO’s with stressed metabolisms) could experience phytotoxic damage.

    We have no practical work-around to suggest, but operators should be aware of the effect.

    Thanks to Drone Spray Canada for in kind support and access to flight records, and thanks for Cesar Cappa, OMAFA horticulture weed specialist for his participation in the study and assistance with data analysis.

  • The Hidden Shape of a Drone’s Spray Swath: What 2-D Imagery Reveals

    The Hidden Shape of a Drone’s Spray Swath: What 2-D Imagery Reveals

    Most operators assume drone swath widths are wide, stable, and predictable. That confidence generally comes from three places:

    • Manufacturer specs, often broad, vague and dependent on working conditions, not to mention each drone model is different, and even two drones of the same model behave differently.
    • Single point calibrations (water sensitive paper, Swath Gobbler, etc.) that are useful and display a 1-dimensional point-in-time snapshot of the swath.
    • “Looks good from the ground.” Watching a plume from below often makes it feel wider than it is.

    But drones move through space and time; spray patterns evolve as they fly. What you think is happening in the two seconds you glance up is not what’s happening over a 50 metre pass. The following video shows a multi-drone comparison where three drones apply 20, 50 and 100 L/ha.

    Why Single Point Methods Fall Short

    This isn’t a criticism. Water sensitive paper (WSP) cards and tools like Swath Gobbler are valuable. But they are 1-D snapshots of a 2-D, time-evolving problem. WSP captures a moment, not a pattern. Swath Gobbler helps visualize centre mass but can’t show edge dynamics or how edges wander along the pass.

    Real deposition and uniformity depend on:

    • Flight parameters (altitude, speed, droplet size)
    • Ground or crop size and shape
    • Path stability and lane keeping of the aircraft
    • Continuous micro corrections the aircraft makes
    • Gusts, even in “light” wind
    • Onboard wind compensation behaviour

    We noticed an observation from the field: gusts → aircraft corrections → amplified drift. If a left-side gust pushes the aircraft, the autopilot often dips into the wind to hold course. The nozzles are mounted to the airframe, so that slight tilt can direct spray downwind, in the same direction the gust is pushing, amplifying drift rather than cancelling it.

    Hidden Message: Many operators are doing their homework. At SDEUC 2026, I was impressed by how many pilots were calibrating and said they “knew” their drone’s pattern. My data suggests your drone may be subtly lying to you – its pattern shifts as it moves through air over distance.

    What Happens Over 50 m: The Swath You Weren’t Expecting

    The setup matters, because without context, a lot of people will assume the pattern you’re about to see is an artifact. It’s not. It’s the result of a controlled, repeatable field experiment designed specifically to expose real-world swath behaviour.

    During August–September 2024, we conducted clopyralid herbicide application trials in soybean, a crop that is extremely sensitive to clopyralid. Even a trace amount causes clear visual symptoms four weeks after application, which makes soybean a perfect bio indicator of spray deposition. (I jokingly call this sensitivity the “touch of death” because it reveals every detail.)

    We used a DJI T50 to apply Lontrel XC (clopyralid) at the highest labeled rate (300 g ae/ha) across three water volumes (20, 50, 100 L/ha) over 100 m long field plots. From each pass, a continuous 50 metre analysis zone was extracted to see how the swath behaved over distance (Table 1).

    CategoryDetails
    CropCrop Soybean (highly sensitive to clopyralid, ideal for visualizing deposition)
    HerbicideLontrel XC (clopyralid) @ 300 g ae/ha (highest labeled rate)
    EquipmentDJI Agras T50 with rotary atomizers
    Spray Altitude3 m above canopy
    Water Volumes20 L/ha, 50 L/ha, 100 L/ha
    Droplet Size300 µm (rotary atomizer setting)
    Flight Speeds Achieved~7.0 m/s (20 L/ha), ~6.9 m/s (50 L/ha), ~4.2 m/s (100 L/ha)
    Plot Dimensions10 m wide × up to 110 m long (location dependent)
    Analysis WindowCentral 50 m (avoids acceleration/deceleration effects)
    Wind~5 km/h (cross wind)
    Data ExtractionDroneDeploy orthomosaic → continuous 2 D swath visualization
    Table 1 Key application parameters for the 50 m Swath Visualization trials

    Now, here’s what the swath actually looked like over 50 m (Figures 1 and 2):

    Figure 1 – 50 m continuous swath visualization, Trial 1. This stitched graphic shows annotations for upwind/downwind edges and width measurements.
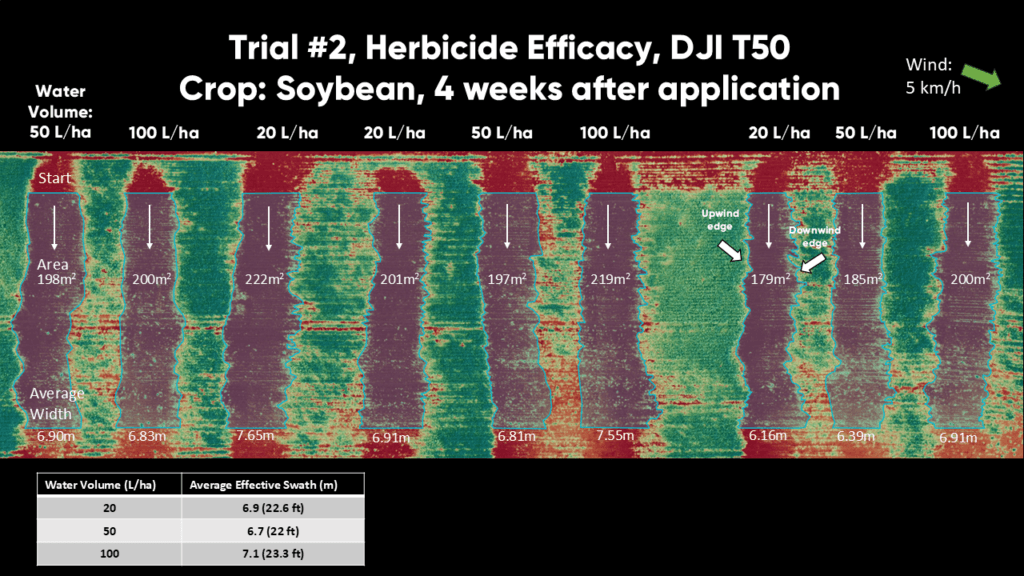
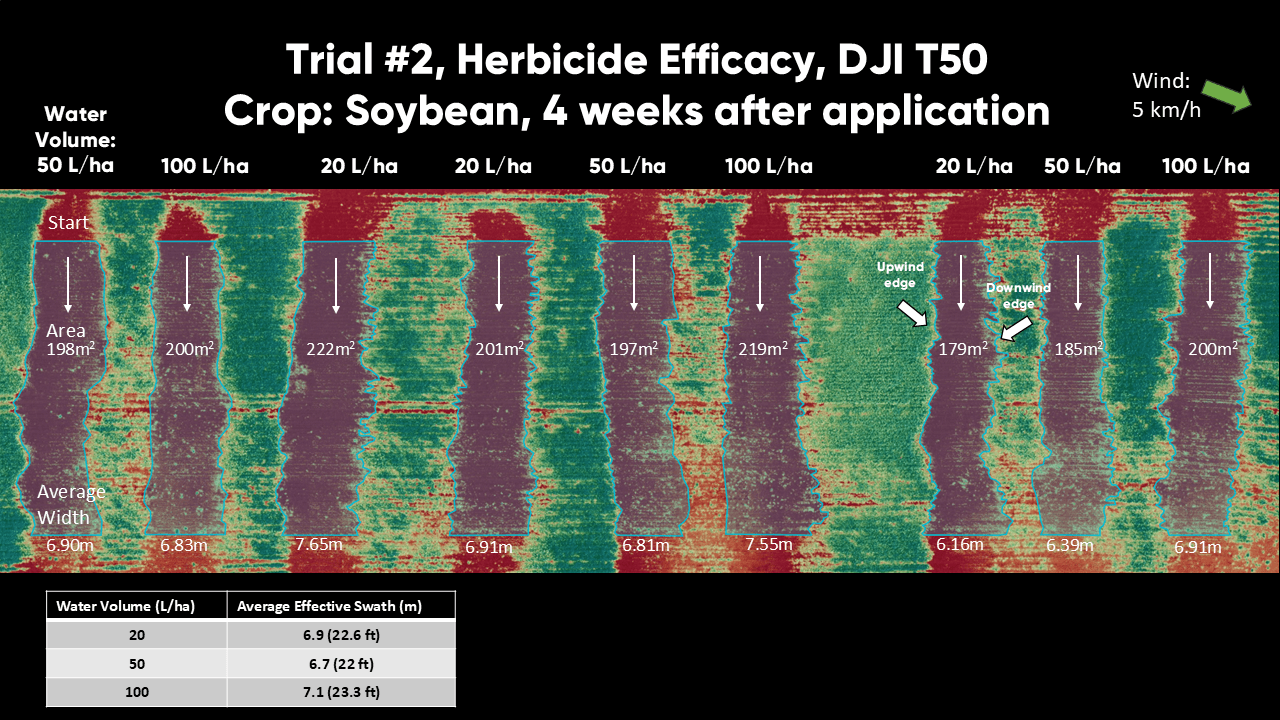
    Figure 2 – 50 m continuous swath visualization, Trial 2. This stitched graphic shows annotations for upwind/downwind edges and width measurements.

    What becomes immediately obvious is that this is not the clean, geometric ribbon many expect. Here’s what the 50 m swath showed:

    • Despite all the drone consistently flying north to south in a straight line, the path of efficacy isn’t consistently straight, appearing to subtly be affected by the wind.
    • Within the path, the edges are also not straight, the upwind edge can often appear jagged. Each “tooth” could correspond to a micro correction the drone makes to hold course. The downwind edge adds a frayed or tattered look, not as clean of a boundary, likely caused by drifting spray.
    • The width changes along the pass. Some sections widen, while others pinch inward. It would be unlikely to see these 2-D effects with 1-D sampling such as WSP cards.
    • The plume tail wanders. The airborne portion of the spray oscillates left and right in response to gusts and minor stability corrections.
    • The pattern is asymmetric. Left ≠ right. Upwind ≠ downwind. A drone swath is not a mirror image, and each pass is different.

    The bottom line: A drone’s real swath is not a clean bar of colour, it’s an irregular coastline. And once you visualize it in 2-D over 50 m, the story becomes clear: swaths are dynamic, variable, dependent on conditions, and often narrower than manufacturer recommendations.

    Why I Think It Looks Like This

    It’s not that drones are bad sprayers; it’s that their reality is dynamic. 2-D imagery simply reveals what single point tools cannot:

    • Drones are constantly making tiny left/right/forward/back corrections to counter act the forces (mostly wind) acting on them.
    • The wind and the resulting corrections of the aircraft slightly change where the spray actually travels.
    • The downwash column shifts with the aircraft’s posture.
    • Even light wind (< 5 km/h) is enough to expose these shifts.

    The Wandering Swath and Jagged Edge Problem: Swaths Don’t Fit Together Like Shark Teeth

    This is where mis-set swath widths come back to bite. When you slide one measured swath against its neighbour, the non-linear path and jagged edges don’t interlock. Some spots show metres of overlap; others flirt with gaps. The following video shows us sliding a measured 2-D swath polygon until it just touches the neighbouring swath. Note how irregular edges force uneven overlap and occasional near misses.


    Operationally, if you rely on the widest advertised swath—or on a single clean snapshot—two things happen:

    1. Misses (especially with herbicides): escapes, patchy control.
    2. Dose non uniformity: some areas get 0x, others 2x.

    Sure, the average across 160 acres may equal the target rate, but field level uniformity is not icing-smooth.

    Practical Recommendations You Can Use Tomorrow

    These are observational, conservative, and based on what the 2-D data actually shows:

    1. Calibrate, test in your conditions, over distance

    Run a long test strip and evaluate coverage continuously (not just a few cards). Evaluate in many wind conditions, to best understand your swath variance given the situation.

    2. Tighten your swaths beyond what’s stated in the brochure

    Depending on the application and product, plan for more overlap than the manufacturer’s suggested swath width. Adjust from there with your own measurements.

    3. Different jobs, different risk tolerance

    • Herbicides: misses are costly → tightest spacing.
    • Fungicides: somewhat more forgiving but still benefit from stability and overlap.

    4. Faster (7 m/s) with lower water volume displayed more variable swath

    Higher water volumes direct in a large amount of water being pushed down within the downwash resulting in less drift and more consistency. This coupled with slower flight = fewer corrections = a straighter, more consistent swath.

    • At ~5 m/s, droplets fall mostly into the downwash beneath the drone, deposition is close to the flight line.
    • At ~9 m/s, the airframe tilts forward to hold speed. The nozzles are slightly tilted back and the spray is deflected backward, it trails the drone like Superman’s cape.
      • Downwash is no longer straight down.
        • Coupled with the flight speed, the downwash is no longer pushing the spray into the canopy.
        • Deposition lands farther behind the drone.
      • Small gusts now matter more.
        • A backward angled plume has more side profile for crosswind to grab. The following speed comparison (same drone, two speeds) illustrates this effect:

    5. Respect “light” wind

    The imagery shows meaningful edge change and drift even in 5 km/h. Even the ‘gusts’ in light wind move the swath. In relatively calm days continue to watch variability, plan overlap, and validate.

    Conclusion – Know the Swath You Actually Have

    Drone spraying is promising and can be very effective and is getting better fast. Fit the setting with the task. If there is less room for error (herbicide), tighten those swaths to prevent misses caused by the wandering swath. Swaths are often misunderstood when we only look at single points.

    When you test over distance and see the 2-D pattern:

    • Coverage becomes more reliable
    • Reduces misses
    • Efficacy gets consistent
    • Confidence rises

    The first step to improving application is knowing the real shape of your swath. Tighten spacing, higher water volumes, slow down when you can, validate in your own conditions, and keep learning as the technology evolves. Spray drone technology is rapidly evolving, and many of today’s limitations will be addressed with innovation.