Category: Nozzles & Droplets

Articles about nozzles and droplet size for specialty sprayers.

  • Spray Coverage in Potato

    Spray Coverage in Potato

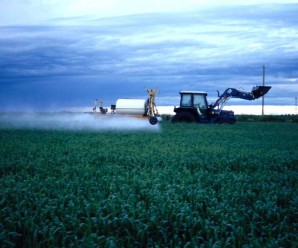
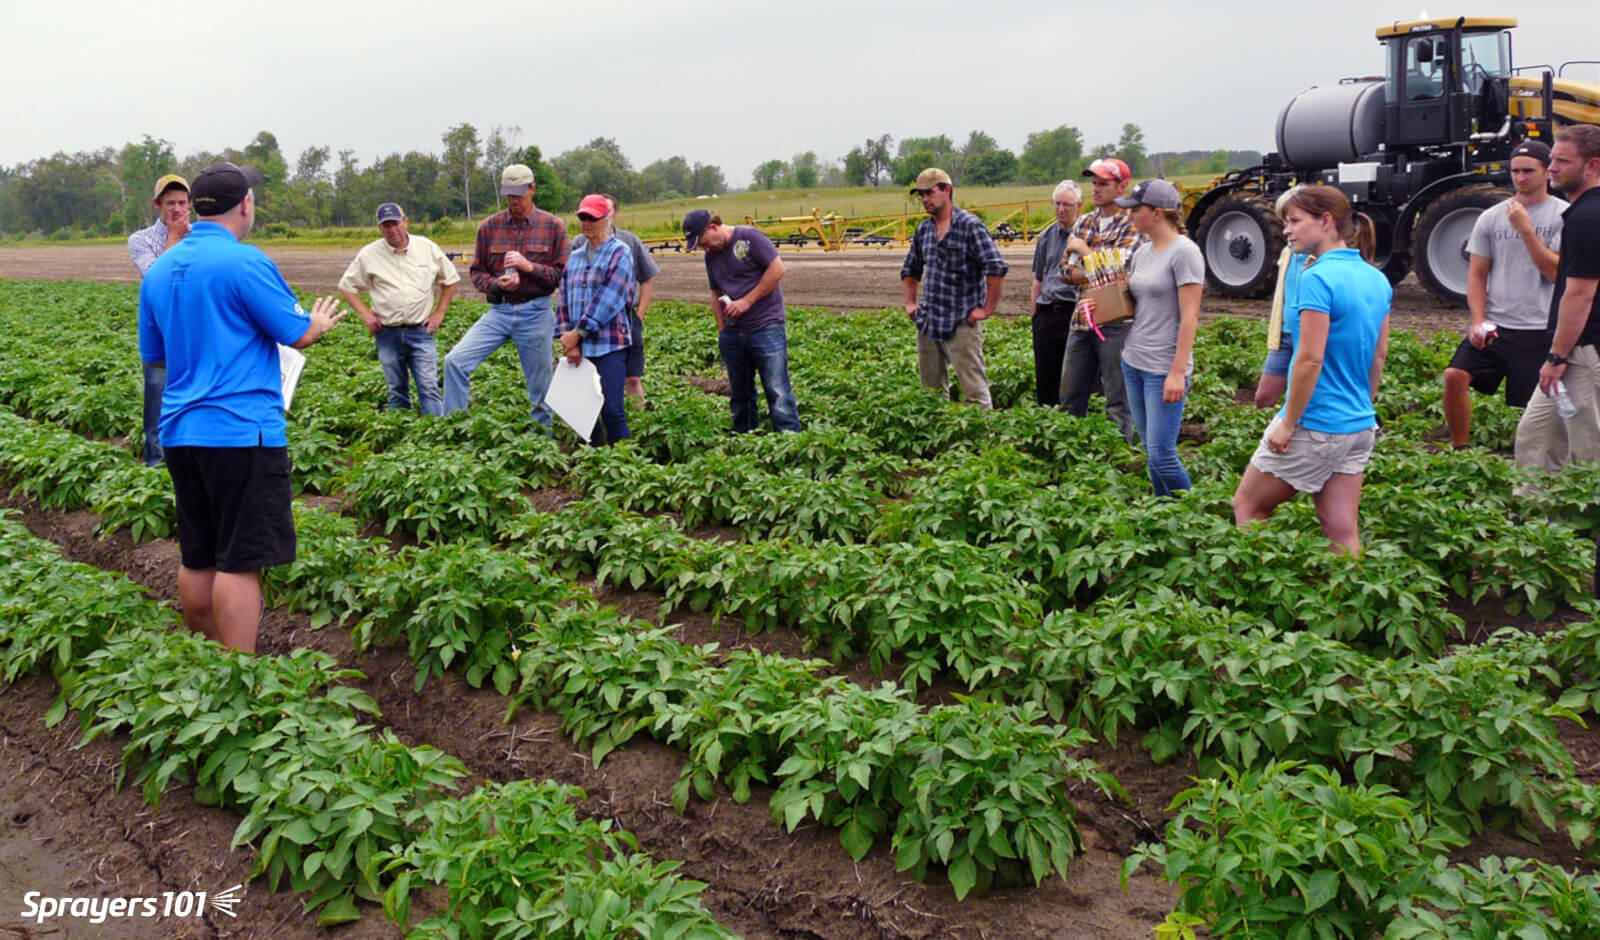
    In June, 2014, 30 growers attended a spray coverage demonstration in a potato field in Alliston, Ontario. Our goal was to explore three questions:

    1. What is the effect of droplet size on coverage?
    2. What is the effect of volume on coverage?
    3. What is the effect of spray angle on coverage?

    This certainly wasn’t a scientific experiment. Spray demos are a great foil for discussing droplet behaviour and teaching operators how to diagnose spray coverage. Take the “results” with a grain of salt.

    Discussing spray coverage in Alliston, Ontario (2014).
    Discussing spray coverage in Alliston, Ontario (2014).

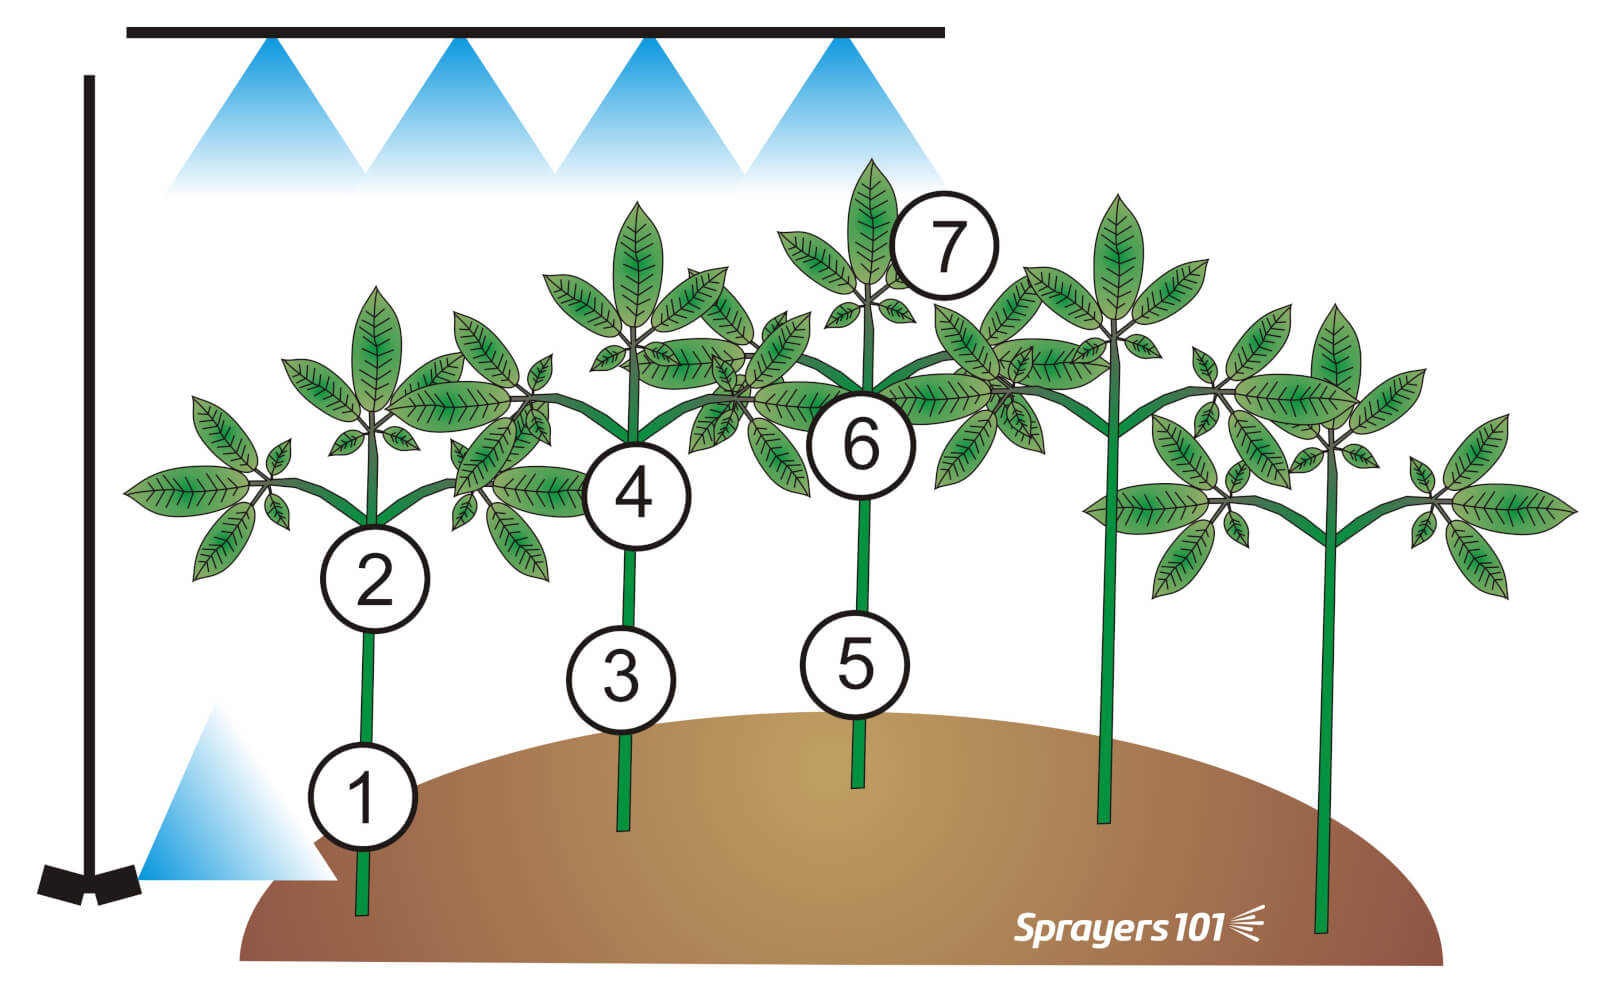
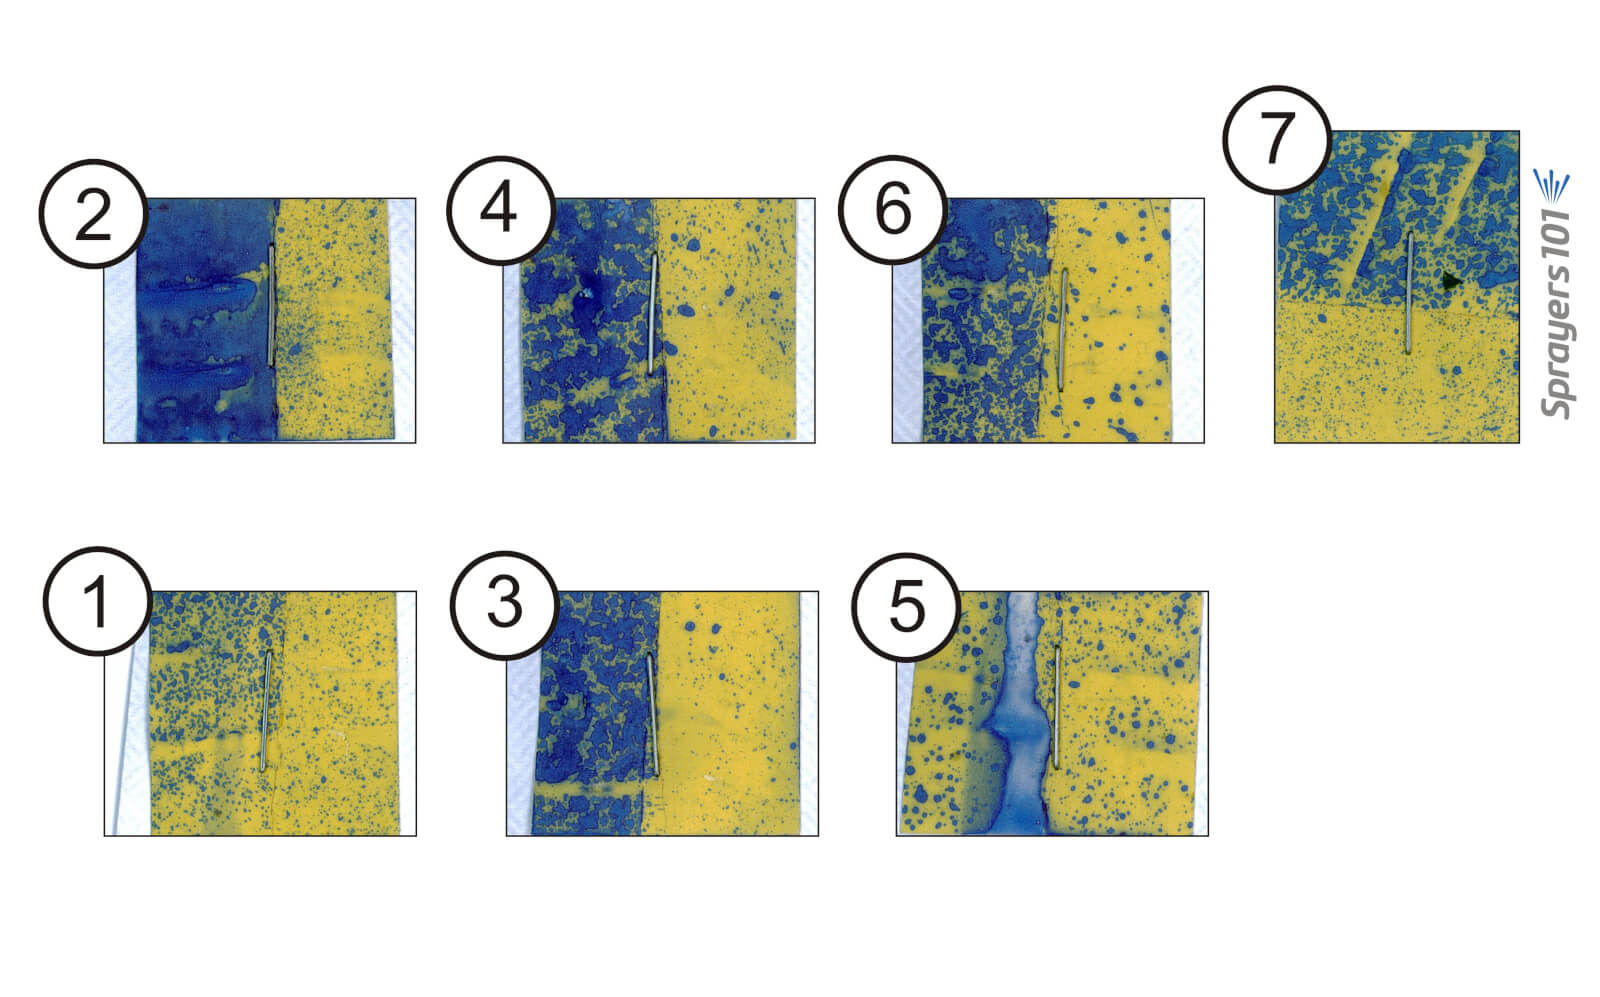
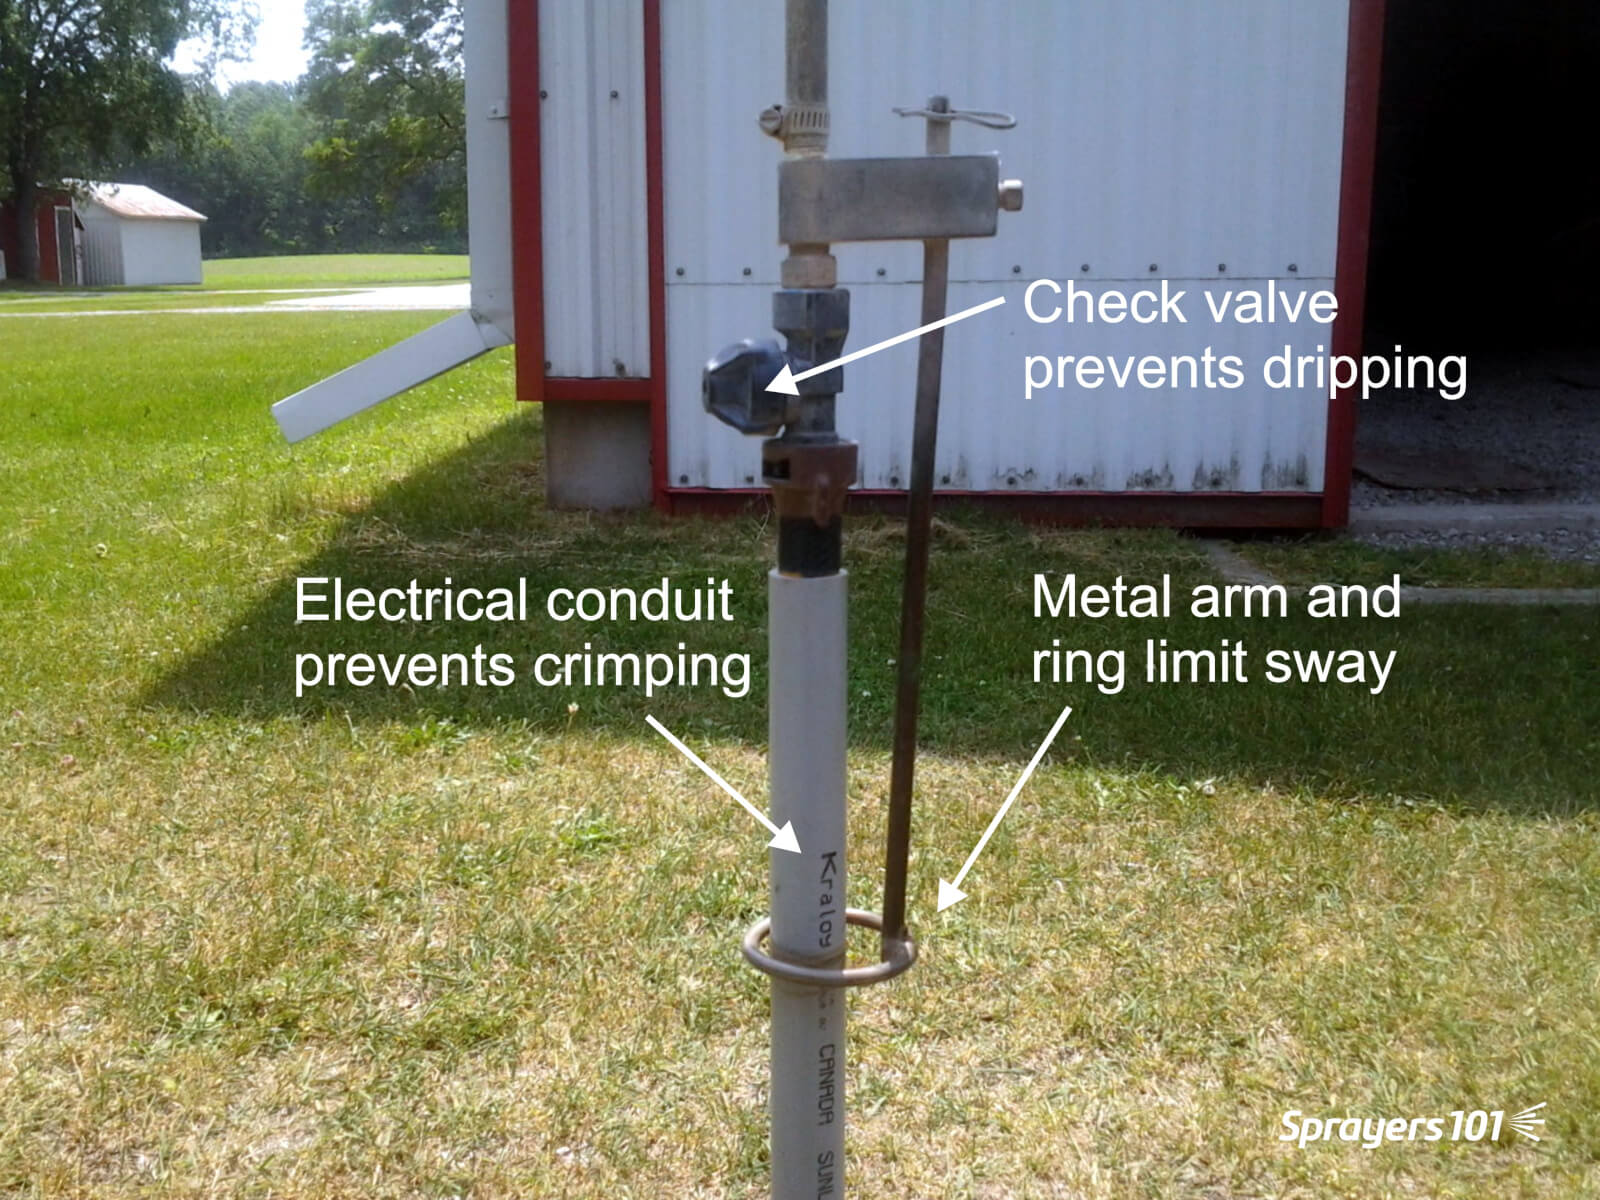
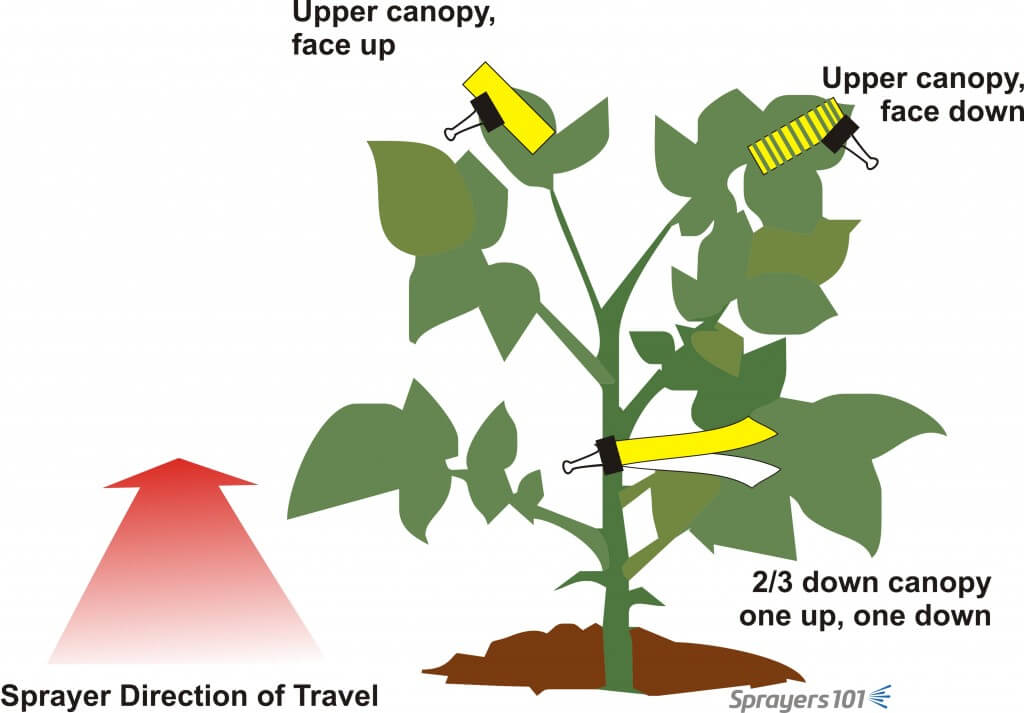
    In order to see spray coverage, we placed water sensitive paper in the potato canopy (see below). Water sensitive paper turns from yellow to blue when it is contacted by water. Normally, we use a digital scanner to quantify spray coverage. However, it was a very humid day and this made it difficult for the scanner to discern spray from background. We decided to assign a qualitative value to the papers based on coverage. Low (or no) coverage got a score of zero. Moderate coverage (enough to offer good control) received a score of one. Papers with excessive coverage (anything more than moderate) received a score of two. Did I mention this wasn’t a scientific experiment?

    The location of water-sensitive papers in the potato plant canopy. Two plants were papered for each nozzle.
    The location of water-sensitive papers in the potato plant canopy. Two plants were papered for each nozzle.

    Droplet Size

    To answer the first question, we compared coverage from two hollow cone nozzles. The TeeJet TXR80028, which creates a fine/medium droplet size, and the TeeJet AITX8002VK, which is air-induced and creates a Coarse/Very Coarse droplet size. In both cases the boom was approximately 50 cm (20 in) above the top of the crop, travelling at 10 km/h (6.2 mph) and spraying about 110 L/ha (~11.5 gpa).

    Generally, Coarse droplets tend to move in a straight line, and are not as easily deflected by moderate wind or travel speed. Conversely, Fine droplets slow very quickly and move erratically depending on the forces acting on them.

    Droplet size comparison. Cumulative spray coverage achieved in four positions, on two plants per nozzle. Low-to-no coverage = 0. Moderate coverage = 1. High-to-excessive coverage = 2.
    Graph 1 – Droplet size comparison. Cumulative spray coverage achieved in four positions, on two plants per nozzle. Low-to-no coverage = 0. Moderate coverage = 1. High-to-excessive coverage = 2.

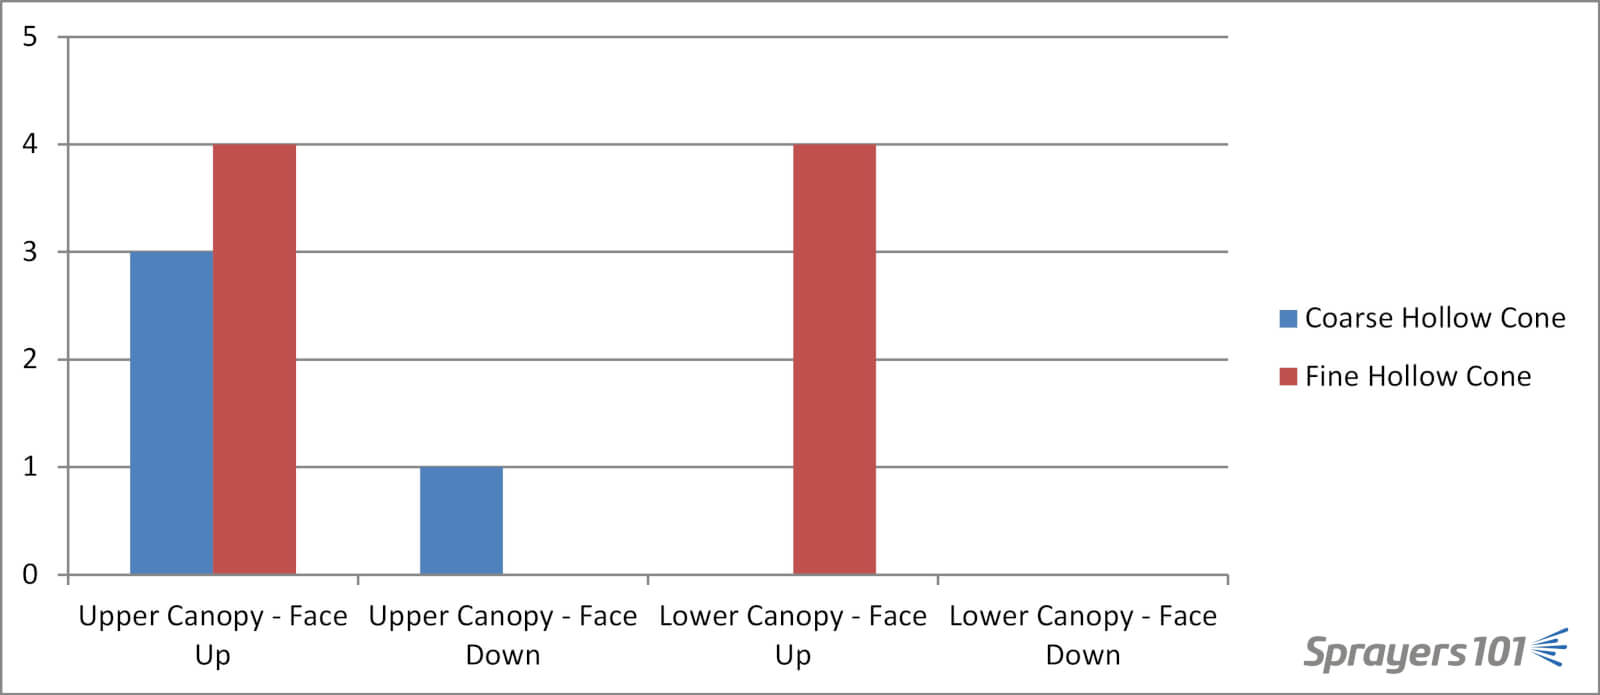
    Graph 1 shows the coverage results in each position. We see that finer droplets appear to penetrate the canopy more than the coarser droplets. We also see that under-leaf coverage was difficult to achieve overall. It’s possible the small amount of coverage achieved on the under-side of the top scaffold of leaves is the result of Coarse droplets bouncing… but if that’s the case, why wasn’t there any coverage on the upward-facing leaves inside the canopy? Write me – I’m open to ideas. In any case, redistribution is erratic and should not be relied on.

    This graph may appear to favour smaller droplets, but be aware that Fine droplets are prone to drift and evaporation and should not be used without making every effort to prevent off-target movement. Shrouds, low ambient wind, and slower ground speed can help. To my mind, the best drift-mitigating option that still allows the use of finer droplets is an air-assist option on the boom, which would also improve under-leaf coverage. I’ve seen it in field tomato, soybean and even field corn. It’s disappointing that there aren’t more self-propelled sprayers in Ontario that offer this feature.

    Volume

    To answer this question, we compared coverage from Syngenta’s potato nozzles. They aren’t generally available in North America, but we got a few for the sake of the demo. The VP04 (gold) was operated at 1.5 bar (22 psi) and sprayed 135 L/ha (~14.4 gpa). The VP05 (Orange) sprayed 180 L/ha (~19.2 gpa) at the same pressure. The boom travelled at 10 km/h (6.2 mph) at approximately 50 cm (20 in) above the top of the crop.

    Generally, raising the volume-per-hectare translates to improves coverage, but at some point there is a diminishing return. Imagine comparing coverage between 1 L/ha and 100 L/ha – there would be a big difference. Now imagine comparing 500 L/ha to 1,000 L/ha – probably not much difference, because drenched is drenched.

    Spray volume comparison. Cumulative spray coverage achieved in four positions, on two plants per nozzle. Low-to-no coverage = 0. Moderate coverage = 1. High-to-excessive coverage = 2.
    Graph 2 – Spray volume comparison. Cumulative spray coverage achieved in four positions, on two plants per nozzle. Low-to-no coverage = 0. Moderate coverage = 1. High-to-excessive coverage = 2.

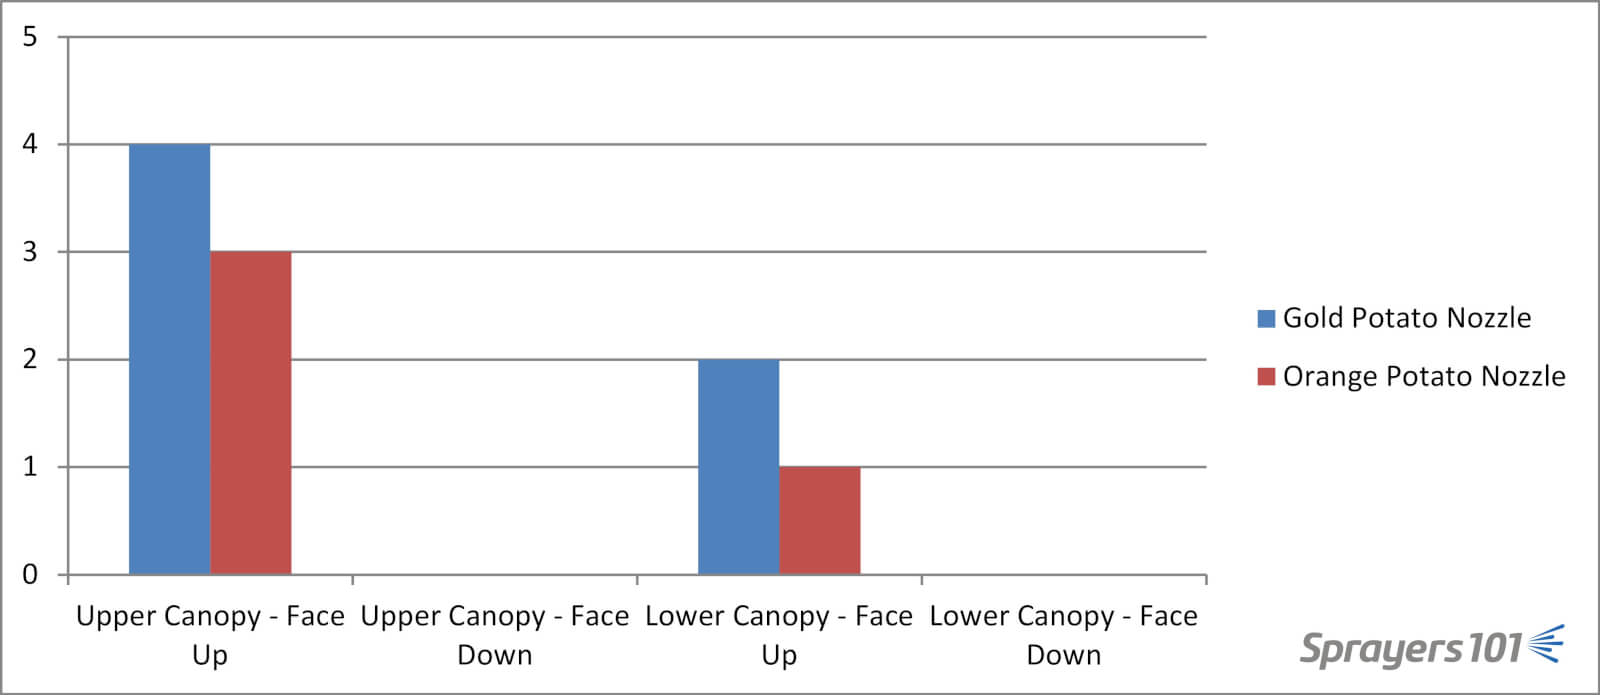
    According to Graph 2, the higher volume did not improve coverage. In fact, the lower volume appears to have superior coverage, but it’s likely not significant. Remember, there are no error bars here because there’s no statistical analysis – it’s not a scientific study. It’s possible that at this stage of growth, our 150 L/ha was close to the threshold of diminishing return.

    Once again, note the absence of under-leaf coverage. Truly, the more I spray vegetable and row crops with conventional nozzles on a horizontal boom, the more I think under-leaf coverage can only be achieved by Bigfoot riding the Loch Ness Monster while wielding Harry’s wand. Without directed sprays from drops (aka pendant nozzles, drop hoses, etc.) or some means of redistribution (e.g. air assist or even maybe electrostatics) droplets will not reliably change direction.

    Spray Angle

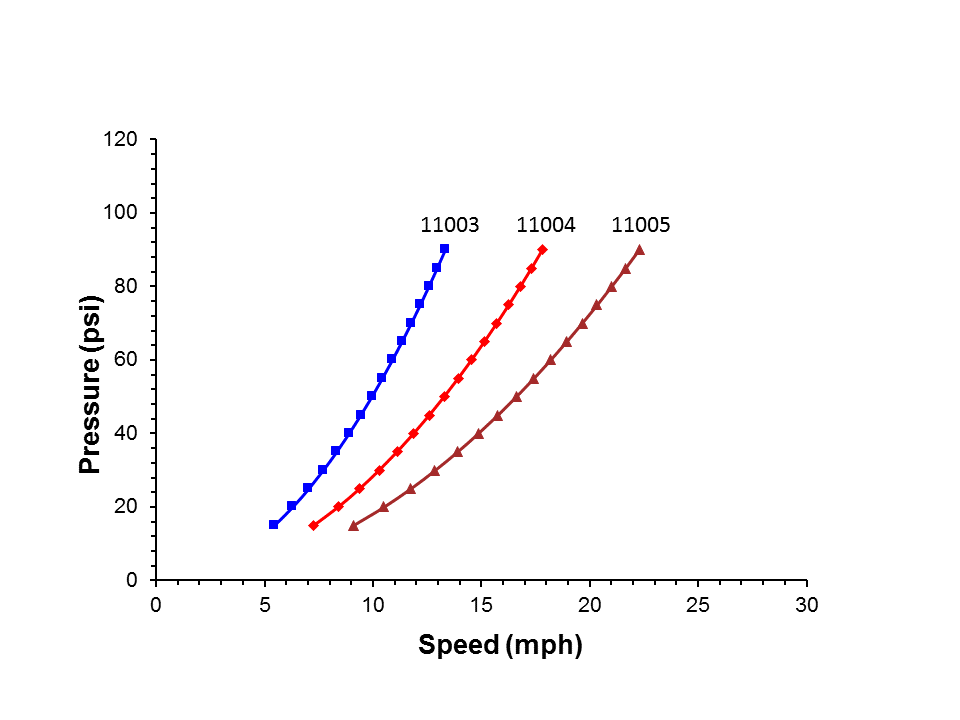
    To answer this question, we used Hypro’s Guardian Air nozzle (GA11003), which is a 110° wedge-shaped flat fan that we alternated between 15° forward and 15° backward on the boom. We compared it to Greenleaf’s TADF nozzle (a blue and yellow 02), which is an asymmetrical, 110° twin-fan tip, where one fan is at 50° and has a higher flow compared to the second fan at 10°. We also alternated these nozzles on the boom to take advantage of what became four different angles of attack. Both tips sprayed 100 L/ha (10.9 g/ac) from a boom travelling 10 km/h (6.2 mph) and about 35 cm (~14 in) from the top of the canopy.

    Spray angle comparison. Cumulative spray coverage achieved in four positions on two plants per nozzle. Low-to-no coverage = 0. Moderate coverage = 1. High-to-excessive coverage = 2.
    Graph 3 – Spray angle comparison. Cumulative spray coverage achieved in four positions on two plants per nozzle. Low-to-no coverage = 0. Moderate coverage = 1. High-to-excessive coverage = 2.

    Graph 3 shows a lot of spray impacting on the surface of the canopy, with moderate penetration to the upward-facing leaves in the inner canopy. The angled spray may have helped a little, but no more than the finer droplets from hollow cones. While others like it, my personal experience in soybean, field tomato and ginseng has shown that the spray angle does not have much bearing on crop penetration in a broadleaf canopy. Perhaps if the canopy is sparse… but not in dense canopies. This shouldn’t be a surprise because angled sprays are best suited to vertical targets, such as wheat heads. Graph 3 seems to bear this out.

    Now, since I ran this last demo, I’ve learned that I really didn’t use the twin fan nozzles optimally. In order to keep the outputs comparable, the rate controller operated the TADF’s at about 30 psi. That pressure is fine for something like glyphosate, but for contact products 60 psi to 120 psi is preferable to put the droplets in the medium range and keep them moving at the right angle.

    A lot of people like the asymmetrical nozzles in broad leaf crops, so if they’re working for you that’s great. Carry on! As for me, I’m hoping to run a more stringent experiment in the future to satisfy myself.

    Take Home

    So, as I’ve pointed out a few times, this comparison of nozzles and spray variables isn’t definitive. It was only a subjective demonstration. Further, coverage doesn’t necessarily imply efficacy: Just because you have more coverage doesn’t mean you didn’t already have enough to do the job.

    Caveats aside, however, there are a few points to be made:

    • Smaller droplets penetrate dense canopies better than larger droplets, as long as they survive to arrive.
    • Under-leaf coverage is difficult to achieve without some form of mechanical assistance – e.g. directed application from drops, air-assist, electrostatics, etc.
    • Higher volumes result in improved coverage, but only to a certain point. Volume should reflect the stage of growth.
    • At the moment, I’m unconvinced that spray angles impact (dense) broad leaf canopy penetration. There are, of course, many other learned and experienced opinions for spraying vegetables.
  • Novel Ginseng Boom Design

    Novel Ginseng Boom Design

    In 2013 we ran a sprayer coverage demonstration in a ginseng garden in Norfolk County, Ontario. The goal was to encourage growers to reconsider their spray operation with an eye to coverage. We performed a down-and-dirty comparison between simple disc-core nozzles and the considerably more expensive Arag Microjets. Opinions were mixed, but we were confident the humble disc-core could do the job.

    One grower took the day to heart.

    Having experienced Alternaria infection (likely due to frost damage) in the outer rows, he decided to buy a few packages of water sensitive paper and put his spray boom to the test. Multiple ground speeds, nozzle choices, pressures, spray volumes and even nozzle orientations were tested. This led him to what we will call “ideal coverage” from what may be the perfect ginseng boom.

    Possibly the “perfect” ginseng spray boom. 25 hollow cones and four drop arms sporting 2 full cones apiece.
    Possibly the “perfect” ginseng spray boom. 25 hollow cones and four drop arms sporting 2 full cones apiece.

    On June 15th, the temperature was about 22 °C, winds were light and humidity was about 40%. The nozzle arrangement was 24 D4-45’s (hollow cones) on the horizontal booms, spaced every 50 cm (20 inches). The grower built four drop arms, hung over each alley (not just behind the wheels) with twin bodies that each held two D5-35’s (full cones), for a total of eight dropped nozzles.

    His output was ~1,000 L/ha (115 US gallons per acre) and he sprayed at ~14 bars (200 psi) and he was travelling at ~7.2 kilometers per hour (4.5 miles per hour).

    Compared to traditional methods, that’s low pressure and low volume for ginseng. The ground speed was reasonable given the art of negotiating a sprayer under a shade structure. Collectively, this is a savings in fuel, water and pesticide.

    Positions for water-sensitive papers.
    Positions for water sensitive papers.

    Water sensitive papers were placed in seven positions (see image below) in a three-year old garden. In each position, the papers were folded so the paper wrapped around the stems and could show coverage facing each alley. They were placed on the stems just above the ground and just below the canopy on three plants. The seventh card was folded over the uppermost leaf, to show coverage on the adaxial (top), and abaxial (underside) of the leaf.

    Water-sensitive papers corresponding to positions in Figure 2. Cards were folded around the stems to face each alley (Cards 1-6) and around the top leaf for surface and underleaf coverage (Card 7). There are some drenches, but no misses.
    Water sensitive papers corresponding to the numbered positions in the earlier illustration. Cards were folded around the stems to face each alley (Cards 1-6) and around the top leaf for surface and under-leaf coverage (Card 7). There are some drenches, but no misses.

    The coverage was excellent. A completely blue card represents a drench, which isn’t necessary but can be difficult to avoid when trying to spray all surfaces in a dense canopy. The rest of the papers show a high droplet density which tends to lead to an effective application. Ideally, hope to see 10-15% coverage and >85 droplets per cm2. This is a difficult or even impossible prospect for abaxial coverage, but we achieved it (note the lower half of card 7).

    The trick, you ask? The full cones on the drop arms are aimed so the bottom of the cone is parallel with the ground (essentially, aimed up about 30°). That creates a cloud of spray moving under the canopy, improving the odds of contact on all surfaces. It is important to not spray the cone into the ground or the raised mound, and to spray in from both sides.

    The improved drop arm
    The improved drop arm

    The drops themselves have been modified so they are flexible enough to move through an overgrown 3rd or 4th year garden (yes, there will be some leaf damage), but are also stiff enough not to sway. This was accomplished by sliding a sheath of electrical conduit over the drop arm and using a metal stabilizing arm that terminates in a ring around the conduit.

    With the right timing and product choice this method of spraying will be hard to beat. And it’s cheap! It’s going to save fuel and wear because of lower pressures, and save spray mix because he can go a lot farther on a tank spraying only 1,000 L/ha.

    For more information, check out the OMAFA research article describing the original research that set us on the path of drop leg technology.

    Special thanks to Richard Klosler of Michael Klosler Farms Ltd. for sharing his great boom design.

  • Measuring Pressure Drop

    Measuring Pressure Drop

    All sprayers experience a drop in pressure as the solution moves further away from the pump.  Here’s why that’s important, and how to measure it.

    Optimal nozzle operation in terms of spray quality and fan angle is closely tied to spray pressure.  As we try to maximize travel speed range with a modern sprayer, we often push spray pressure to its limits on the low and high side. For many air-induced nozzles, spray quality and fan angle become critical at about 30 psi.  We need to be sure about the exact nozzle spray pressure to prevent problems.

    Pressure drop is caused by the friction that the spray solution experiences as it moves from the pump to the spray nozzles.  It’s caused by a number of factors, including length of tubing, elbows, valves, screens, and other flow obstructions.

    Plumbing components add friction to liquid flow. If the pressure gauge is installed before these components, the nozzle pressure is unknown but will be lower than the gauge reading.

    The pressure transducer that reports pressure to the cab is usually located between the pump and the manifold that divides the spray into the various boom sections.  At this point, the spray liquid hasn’t experienced any significant flow restrictions.  The transducer basically reports pump pressure.

    Once the spray mixture starts moving through boom sections towards the nozzles, it encounters those restrictions, and pressure at the nozzle will therefore be lower than the cab reading indicates.  The higher the liquid flow, the greater the friction, and therefore, pressure loss.

    Even older sprayers with only two boom sections (left and right) and few elbows and reducers, will see pressure losses due to the narrow and long boom pipe that feeds up to 60′ on each side.

    The nozzle pressure can be measured with a gauge placed on a nozzle body.  Simply purchase a quality gauge and a threaded nozzle cap, combine the two and install in place of a nozzle.

    A pressure gauge threaded into a nozzle cap can measure boom pressure.

    Operate the sprayer at your expected spray pressure (say, 60 psi) with all boom sections on.  Install the portable pressure gauge on an open turret position and turn into place, noting its reading.  If both gauges are accurate, the boom pressure will likely be below 60 psi.

    The difference between the cab gauge pressure and the boom gauge pressure two is the pressure drop.  Repeat the measurement for each boom section.  Also repeat at your lowest, as well as your highest expected flow rates.  Higher flow rates cause greater pressure drops.

    Now, use this information to adjust your interpretation of the cab pressure reading.  For example, if you want to spray at 60 psi and your pressure drop is 10 psi, then the cab pressure should read 70 psi.

    If your boom pressure is higher than your cab pressure, and you’ve checked the accuracy of your new boom gauge, then don’t be too mystified.  Your pressure transducer is malfunctioning.

    This exercise is important if you’re trying to compare your nozzle flow to the expected nominal flow of the nozzle – perhaps you’re trying to determine nozzle wear.  The nominal flow of agricultural nozzles is determined at 40 psi, so it will be important to measure the flow at exactly that pressure.

    By measuring pressure drop on all your boom sections, you also get a good sense of the variability in pressure across your boom.  Your measurements might reveal an obstruction or a hose kink somewhere along the line.

    To see how low pressures can affect coverage, watch this video.

    Note that the pulse-width modulated systems offered by Capstan, Case, and Raven use a solenoid at each valve.  This solenoid adds a known, and significant, pressure drop to the spray system as can be seen here.

    Pulse-Width-Modulation (PWM) solenoids typically have internal flow restrictions that can contribute to pressure drop.

    Here’s a fun video filmed by the Ontario Pest Education Program during a break at Ontario’s Southwest Crop Diagnostic Days:

  • Fungicide Application Basics

    Fungicide Application Basics

    Fungicide use appears to be the fastest growing segment of North American crop protection.  Here is some advice on how to get the best bang for the buck.

    • Timing is the most important part of fungicide application. Diseases can develop and spread quickly.  Most fungicides cannot cure a disease infection, they can only protect against it.  If an application misses the window, yield is lost.  Remember your priorities – become familiar with disease symptoms, the susceptibility of your crop and key growth stages.  Make sure your sprayer is ready – your nozzles are installed, calibrated, and you can achieve the necessary boom height.  Hire an agronomist to help scout and make recommendations. Make the right decision about whether to spray or not.
    • Water volume is the most important application parameter for fungicide application. In years of study, increasing water volume had a greater effect on fungicide performance than changes in droplet size or spray pressure.  More water is needed for fungicides than herbicides because of the greater amount of plant material present.  Getting coverage on leaf areas deeper into the canopy requires more water.  Although finer sprays can also help with coverage, this practice is riskier due to drift potential and higher evaporation rates.
    • Double nozzles, in particular the asymmetric types, are becoming more popular with fungicides. Double nozzles are proven effective and recommended primarily for fusarium head blight, or any other disease where an exposed vertical part of the plant canopy is the primary spray target.  Double nozzles are also useful for preventing the spray quality from getting too coarse as higher flow-rate nozzles (which tend to have larger droplets) are used.
    • Travel speed is important with fungicides. Canopy penetration sometimes improves with slower travel speeds, and this can be used as an advantage by eliminating the need for a special fungicide nozzle.  For example, assume a nozzle was used to apply 8 gpa of herbicide at 15 mph at 70 psi (this pressure assumes air-induced tips).  For fungicides, this same nozzle and pressure will deliver 12 gpa simply by slowing down to 10 mph.

    Boom height and spray quality are both important for single angled sprays or double nozzles. The angle at which a spray leaves a nozzle diminishes quickly as air resistance and gravity exert their influence.  If the boom is too high, the initial forward  angle will be lost and the spray droplets will actually deposit with gravity and wind.  But if the spray is a bit coarser and the boom is low enough, the angle of attack is retained for long enough to make a difference in spray deposition.

    Despite these suggestions for making the spray more effective, there is no substitute for an informed decision regarding fungicide use.  It’s possible that spraying is unnecessary for a number of reasons, and it’s best to have professional advice help make that call.  If you decide to go ahead, ensure that your sprayer is set up to deliver the fungicide to the part of the canopy that needs protection.

  • Rate Controllers and Spray Pressure

    Rate Controllers and Spray Pressure

    Automatic rate controllers are standard equipment on almost all new sprayers. They ensure consistent application volumes, but they don’t do all the thinking for you.  We explore how to make them work properly.

    A rate controller needs to know the boom width (entered by the user), the total spray liquid flow rate (from a flow meter), and the sprayer speed (gps, radar).  It controls the spray liquid pressure by opening or closing a bypass valve. More pressure equals more flow to the boom.

    The rate controller allows the applicator to enter a desired application volume and the controller sets the spray pressure that gives the necessary flow for the application volume and sprayer travel speed being used. In practice, this means that higher travel speeds result in higher spray pressure, and vice versa.

    But it’s not that simple. Rate controllers aren’t smart enough to know how pressure affects nozzle performance. Some nozzles don’t work well at low pressures. Others do a poor job at high pressures. Some sprayer pumps may even have a problem generating some of the higher pressures a rate controller calls for. What does that mean for the available travel speed range that’s possible with any given nozzle? To answer that question, we first have to have a closer look at how pressure affects nozzle performance.

    Spray Pressure and Nozzle Performance

    Nozzle performance depends on a number of factors. Of these, the most critical is spray pressure. Pressure affects the flow rate of the nozzle, the spray pattern (fan angle) and the spray quality (droplet size range). The last two of these affect coverage, overlap, and spray drift, so it’s important to get them right. Each nozzle model has a unique spray pressure range and unique spray qualities within that range, so one must obtain information that is specific to the nozzles on the spray boom from the nozzle manufacturer.

    ASABE spray quality for the TeeJet AIXR nozzle.

     Catalogues Contain Important Information

    Nozzle manufacturer catalogues identify the pressure range over which the nozzle should be operated. At low pressures, engineers look for a uniform pattern that meets the advertised fan angle. The upper pressure limits are kept low enough to prevent the formation of excessively fine sprays. Manufacturers now publish tables containing “Spray Quality”, a broad categorization of droplet size, for their various nozzles and spray pressures in their product line. Common spray qualities for agricultural nozzles are Fine (orange), Medium (yellow), Coarse (blue), Very Coarse (green), and Extremely Coarse (white). An example table from a catalogue is shown in Figure 1. Note that for any given nozzle flow rate (left column), the spray quality changes with spray pressure. For example, the TT110025 nozzle can produce a Very Coarse or a Fine spray, depending on the pressure. Also note that for any given pressure, higher flow rate nozzles produce coarser sprays. At 40 psi, the TT nozzle can produce a Medium, Coarse, or Very Coarse spray, depending on its nominal flow. Both of these relationships depend on the nozzle model and manufacturer.

    Speed-Pressure-Spray Quality Relationship

    As we increase spray pressure, flow rate increases with a square-root relationship.

    Speed-Pressure resize
    The square root relationship between travel speed (or flow rate) and spray pressure for hydraulic nozzles

    This means that in order to double the flow rate, we need to increase spray pressure by a factor of four. Figure 2 shows three different flow rate tips, each applying 10 US gpa at a range of travel speeds. Assume the operator uses a AIXR11004 to apply 10 US gpa at 12 mph. The nozzle would operate at about 40 psi, producing an Extremely Coarse spray quality. If the sprayer slows down to 7 mph to initiate a turn, spray pressure will drop to 15 psi, producing an Ultra Coarse spray. The spray pattern would likely become noticeably narrower, and poor pest control performance is likely in this situation due to the coarseness of the spray.

    Relationship between travel speed and spray pressure for three nozzles applying 10 US gpa

    It would have been better to use the AIXR11003 nozzle.  At 12 mph, this nozzle would have operated at about 70 psi, producing a Coarse spray.  Slowing down to 7 mph would drop the pressure to 25 psi, producing an Extremely Coarse spray.  If the pesticide being used is sensitive to spray quality, then perhaps such slow speeds should be avoided in order to maintain a higher pressure and finer spray.

    The lesson from this exercise is three-fold: (a) size the nozzle to operate at a higher pressure at your target speed to avoid dropping the pressure too low when you slow down, (b) avoid going as slow as 7 mph to prevent the pressure from dropping too low (c) compromise by setting a minimum spray pressure on the rate controller, in which case you’d over-apply product somewhat when their speed dropped too low.

    Spray Pattern Overlap

    Flat fan nozzle patterns need the correct overlap in order to achieve a uniform spray pattern under the boom. Research has shown that the amount of overlap for low-drift nozzles needs to be at least 100% to achieve optimum nozzle performance. In other words, the edge of a fan should reach into the centre of the adjacent fan (Figure 3), with each fan covering twice the nozzle spacing at target height. This amount of overlap assures that not only the spray volume is uniformly distributed, but that the droplet density is equally uniform. Less overlap may result in fewer droplets depositing in the overlap region, resulting in poor coverage and reduced pesticide performance.

    Nozzle Pattern Overlap
    100% overlap means that all areas under the boom receive spray from two adjacent nozzles.

    Adjust the boom height so that at the lowest expected spray pressure (slowest planned travel speed), the nozzles still achieve 100% overlap. There is no disadvantage with greater than 100% overlap, but higher booms will lead to greater drift. When a choice exists, choose 110º fan angle nozzles. Most air-induced nozzles are produced at one (usually wide) fan angle only, but actual angles often differ from those advertised. It is important to visually check the overlap before spraying.

    Recommendations

    What does this mean in practice? Spray operators need to know the right spray quality for the job, and should consult with the pesticide product manufacturer. They also need to use nozzle manufacturers’ charts to identify the spray quality their nozzle will likely produce at their expected application volume and travel speed. If it’s a poor match, a different nozzle may need to be found. Here are some rules of thumb:

    1. Choose a nozzle that produces a Coarse spray over most of the operating pressures you expect to use. Although Very Coarse sprays can work in most situations, avoid them when using lower water volumes, controlling grassy weeds, or using contact modes of action.
    2. Minimize spray drift by avoiding nozzles or pressures that produce Medium or Fine spray qualities.
    3. Make your pressure gauge your speedometer. First, choose a pressure that is in the middle of the nozzle’s recommended operating range. If the range is 15 to 90 psi, select 50 psi. If it’s 40 to 100 psi, select 70 psi. This allows you slow down or speed up somewhat without breaching the nozzle’s capabilities.
    4. Identify the travel speeds that are possible without creating spray qualities that could compromise your application goals.
    5. Visually inspect the spray pattern at the pressure extremes you expect to spray at. At the lowest pressure, your nozzle should still produce 100% overlap (the edge of the spray fan should come to the middle of the next nozzle at target height). If it doesn’t, choose a wider fan angle nozzle, increase spray pressure or elevate the boom.
    6. Make sure your pump can produce the higher spray pressures you expect to need. Pressure limitations are greatest at high flow rates (fast travel speeds applying large water volumes).
    7. Be prepared to compromise. It’s rarely possible to travel at the exact speed, obtain the perfect pressure, and apply the desired water volume that’s been worked out in the office or using manufacturer’s charts. If in doubt, choose slower speeds or higher water volumes to make things work out.

    Nozzle manufacturers are getting much better at producing information that helps applicators produce good spraying outcomes. Learning how to use this information is the first step.