Despite the abundance of information available on spray drift, we continue to see widespread incidents of damage to a variety of crops every year. Do applicators just not care or are they missing some vital information when making decisions to spray? I believe it is the latter.
What is the problem?
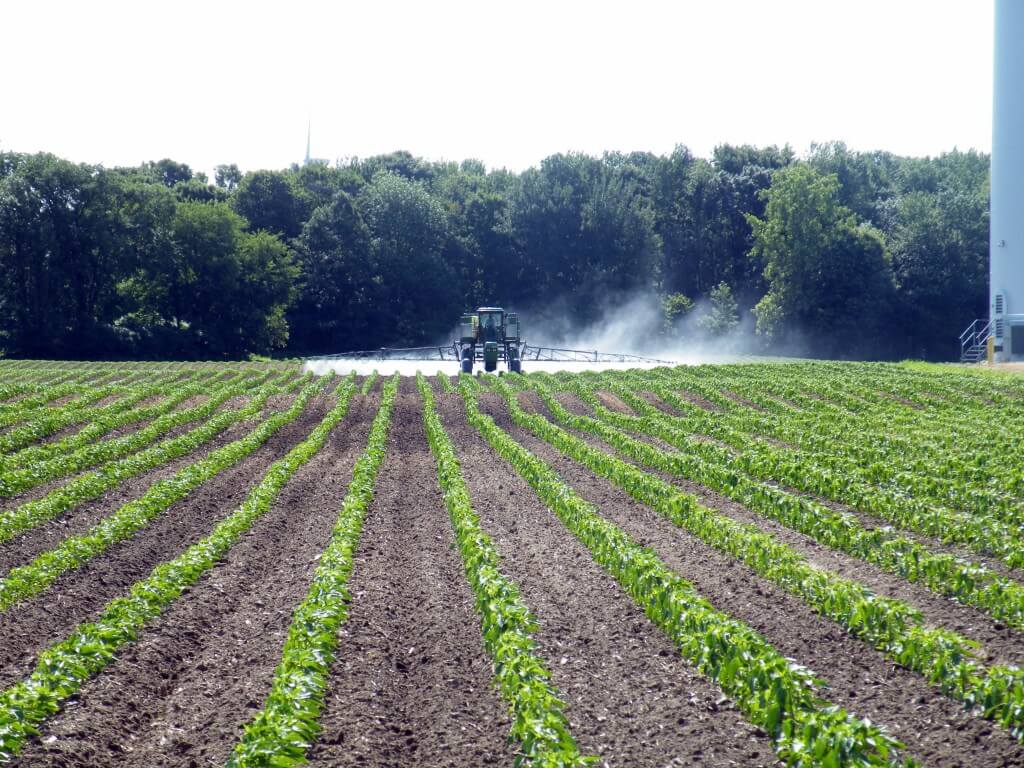
In my experience, the vast majority of spray drift cases (probably 90% or more) are the result of ‘inversion drift’. That means the drift has not come from an adjacent sprayed area, it has come from one or more sources that are some distance from the site of damage. The distance between the sprayed site and the location of the damage may vary dramatically, from a few kilometres to tens of kilometres.
Why is there so much inversion drift when labels specifically prohibit use of the products under surface temperature inversions? Many may argue that it is a blatant disregard of the label by a few applicators (translation = cowboy operators). I do not agree this is the main problem. While I can confirm the existence of ‘cowboy operators’, thankfully they are limited in number. I believe the problem is a lack of understanding about how to tell when there is an inversion and particularly not knowing how ‘day wind’ moves differently to ‘inversion wind’. I continue to see good farmers/applicators doing what they believe to be the right thing but it is not. These are people very concerned about minimizing spray drift; they honestly do not think they are doing anything wrong.
What is ‘day wind’?
After sunrise, the sun begins to heat the ground, the warm ground then heats the air close to the surface, and this air then rises. As that warm air rises, cold air from above sinks down to replace it. The ground then warms this cold air and it rises. This cycling of warm air rising and cold air sinking creates turbulence and then wind. This is a good thing; turbulent wind movement is much safer for spraying. ‘Day wind’ has a turbulent motion and is much more likely to pull any fine droplets to the ground within a reasonable distance. During the day, we can predict which direction and how far our fine droplets will travel.
What is ‘inversion wind’?
As the sun sets, the ground begins to cool quickly and this in turn cools the air next to the ground. As we all know, cold air does not rise and warm air does not sink. This means there is a layer of cold air trapped close to the surface and a layer of warm air above it. The result is no turbulent movement or mixing of the air. The air may become quite still and this is often observed around sunset when the daytime wind ceases or drops off. What happens next is where the real danger occurs for spraying.
As the night progresses and the ground cools more, the cool air close to the surface becomes colder and therefore more dense, particularly from midnight onwards. This cold dense air then begins to move across the landscape, often down slope and in very unpredictable directions. Remember this air is not turbulent, there is no mixing, it has layers of air, something like layers in plywood, and it flows parallel to the ground. Any fine droplets released into these layers of cold non-turbulent air will simply move sideways across the surface until the sun rises and heats the ground again. This is when the fine droplets are released from the layers and they come to ground, often in the lower parts of the catchment and a long way from the site of application. It is impossible to predict what direction this ‘inversion wind’ will go. For this reason, spraying in this type of wind is extremely high risk for spray drift.
Key indicators that and inversion is unlikely
We should always expect that a surface temperature inversion has formed at sunset and will persist until sometime after sunrise unless we have one or more of the following: continuous overcast weather, with low and heavy cloud;
continuous rain;
wind speed remains consistently above 11km/h for the whole time between sunset and sunrise;
and after a clear night, cumulus clouds begin to form.
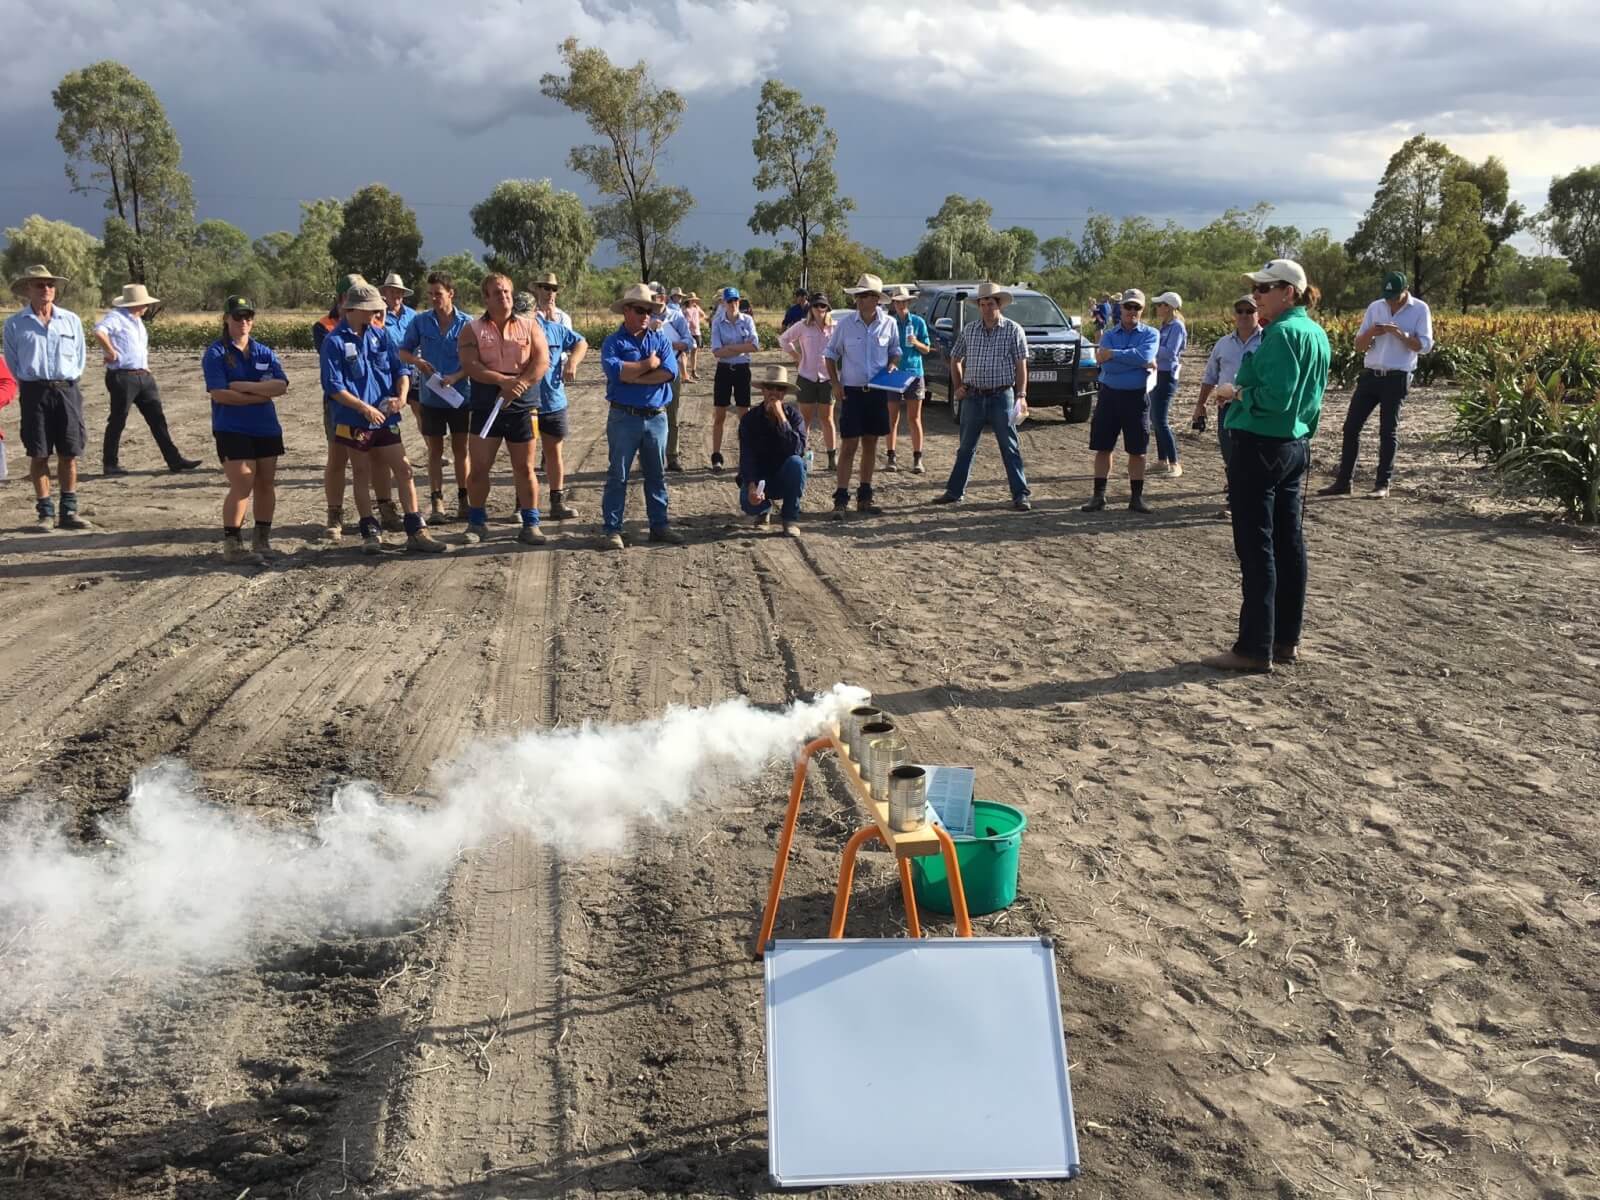
Inversion wind movement – practical demonstration video
Wind is a key factor in any spray application. The problem is that not all wind is the same. To reduce the incidence of spray drift, it is critical that spray applicators understand how wind moves, particularly during a surface temperature inversion. This video uses smoke flares to visually demonstrate the air movement under inversion conditions.
Here’s what we’re looking for: moderate wind with consistent direction that disperses spray and drives it to ground.
Conclusion
Many factors affect the potential for spray to drift but the main ones are; the weather conditions at the time of application, nozzle selection, products/tank mix used, actual spray quality achieved, speed of rig, and boom height. The common denominator is that all of these things are within the control of the spray operator.
Spraying under inversion conditions is extremely high risk and prohibited on many product labels, that means it is illegal. If you are serious about preventing drift, then you must learn how to identify when an inversion is likely to be present and more importantly when it has broken.
All agricultural chemicals have the potential to drift; it is how we use them that increases or decreases that potential. Therefore, the problem is a human one, not a chemical one. There is a suite of information available but if you are still unsure or need any assistance, please seek advice from an expert. Maintaining long-term access to key products depends on us reducing spray drift.
Managing the canopy of any perennial crop (e.g. pruning, hedging, leaf stripping, etc.) is an important consideration. The benefits are manifold: It affects the health of the plant, the quantity and the quality of the yield. It allows light and air to circulate and it keeps the crop manageable. From the perspective of an airblast sprayer operator, the reason for canopy management is quite simple:
If you can’t see it, odds are you can’t spray it.
Picture this: It’s late April, and an apple grower and I are calibrating his sprayer. We achieve excellent spray coverage in the target block, shake hands and part ways. In late May I get a phone call from the grower. I assume it’s time to adjust his settings to match the growing canopy, but no… he had called to say he suspected apple scab in one of his blocks. Since I was the last person to adjust his sprayer, the unspoken implication was that I’d better come fix matters.
As I drove back out to his orchard, I considered what the problem might be:
Bad product choice?
Poor application timing?
Spraying in inclement weather?
Cutting rates?
Resistance? (a long shot)
Maybe it was ego, but I couldn’t believe it would be the calibration. We left ample volume to provide sufficient coverage to get the grower to petal fall. We ensured the spray swath was higher than top of the tallest tree, accounting for wind and an uneven alley. We did everything right to match the sprayer to the canopy and leave enough buffer to get to petal fall.
When I arrived, he took me to a block I hadn’t seen before. We didn’t calibrate the sprayer to match this particular group of trees, but he figured since they were about the same height, the sprayer would do its job. It was immediately obvious to me what the problem was, but I knew if I simply told him outright, the lesson might not stick. And so, with respect to that old proverb, I taught him to fish rather than give him one. We spent the next few hours trying to fix our alleged calibration problem by exploring:
Slower ground speed
Higher fan gear
Higher rpms to increase fan speed
Changes to deflector settings
Air induction nozzles in top positions
Higher sprayer output
Of course, none of these adjustments had any great impact on coverage because the problem was that the alley had grown so tight that branches were brushing the cab of the tractor (see picture).
If the canopy is brushing against the tractor, it may intercept spray before it expands fully. Essentially, it temporarily blocks nozzles.Closed canopies and tight alleys will almost always compromise spray coverage.
The canopy was so dense you couldn’t see the trunk! I asked the grower to move the sprayer down the row to a tree I saw that was far less dense that the others. We returned the sprayer to our original calibration settings and achieved excellent coverage once again. The only solution was to prune the trees, and once his workers did this, coverage improved considerably. An airblast sprayer can only do so much. Sometimes it comes down to canopy management.
An orchardist taught me this trick: If you want to know if spray will penetrate a canopy, you should be able to see the trunk.An orchardist taught me this trick: If you want to know if spray will penetrate a canopy, you should be able to see sunlight through the shadow at high noon.
Row Spacing in Specialty Crops
Canopy management isn’t just an orchard issue. For high bush blueberry crops, coverage problems may stem from insufficient pruning. How can spray reach the lower, inner portion of a mature bush to control spotted-wing drosophila if the canopy is too thick?
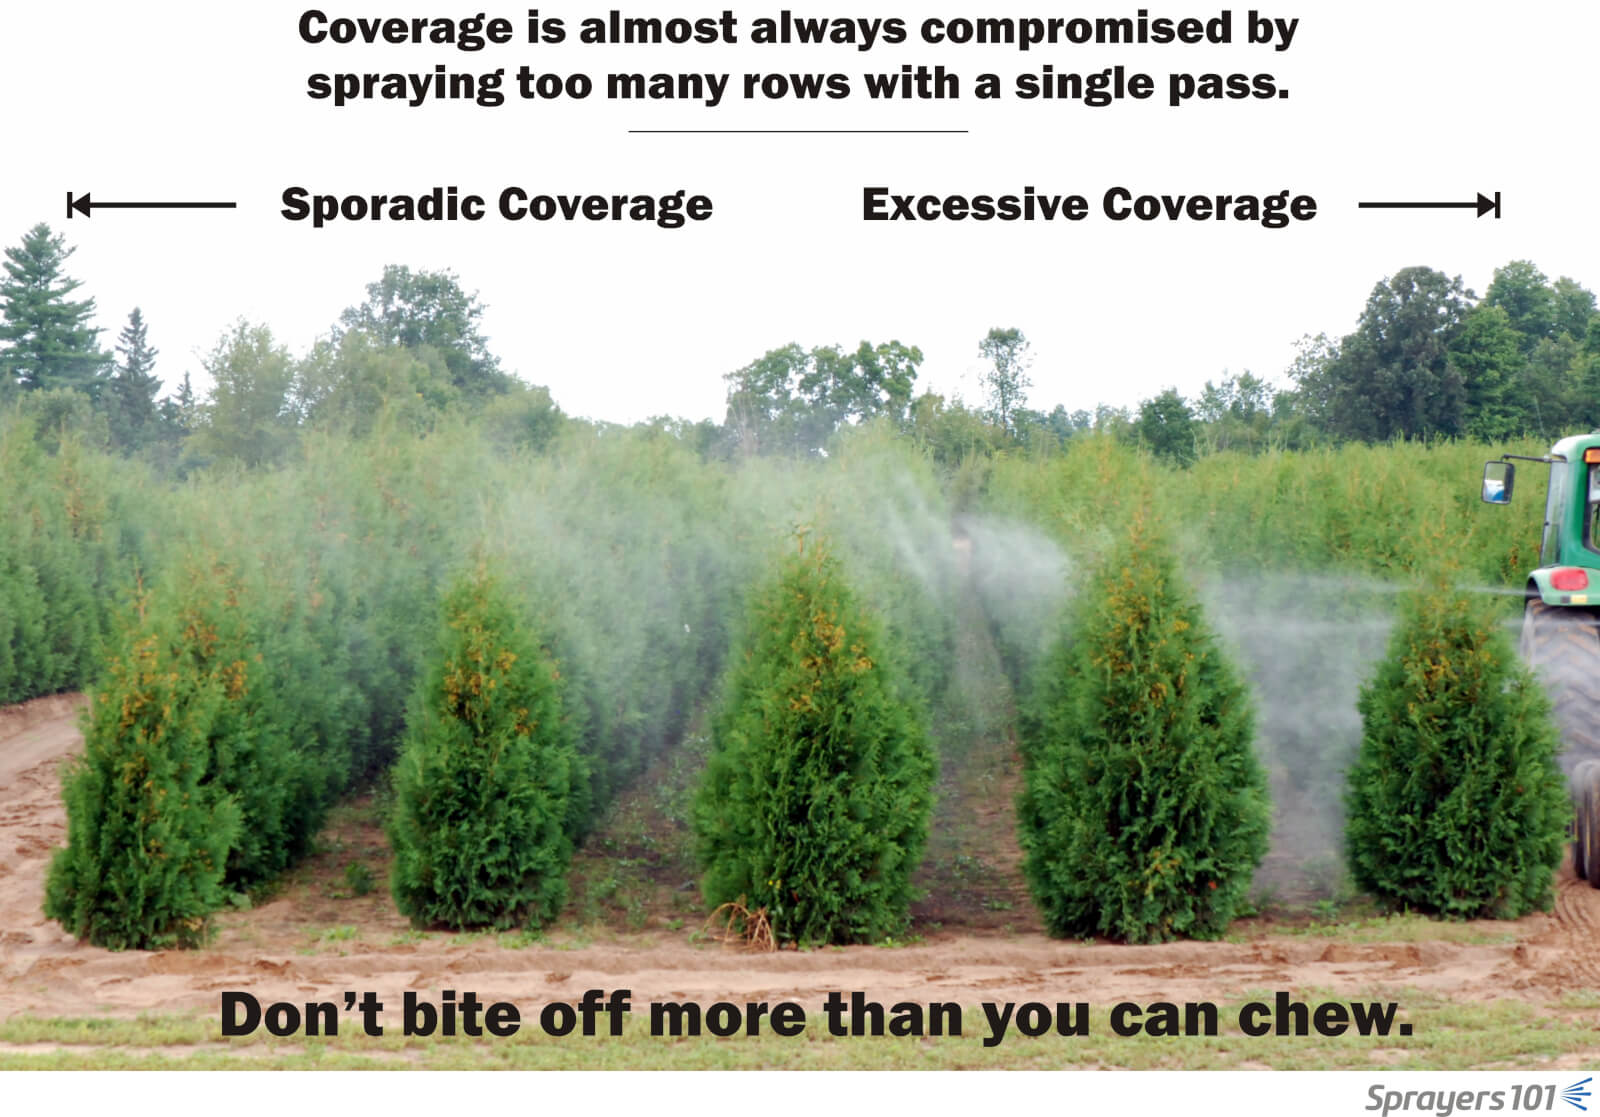
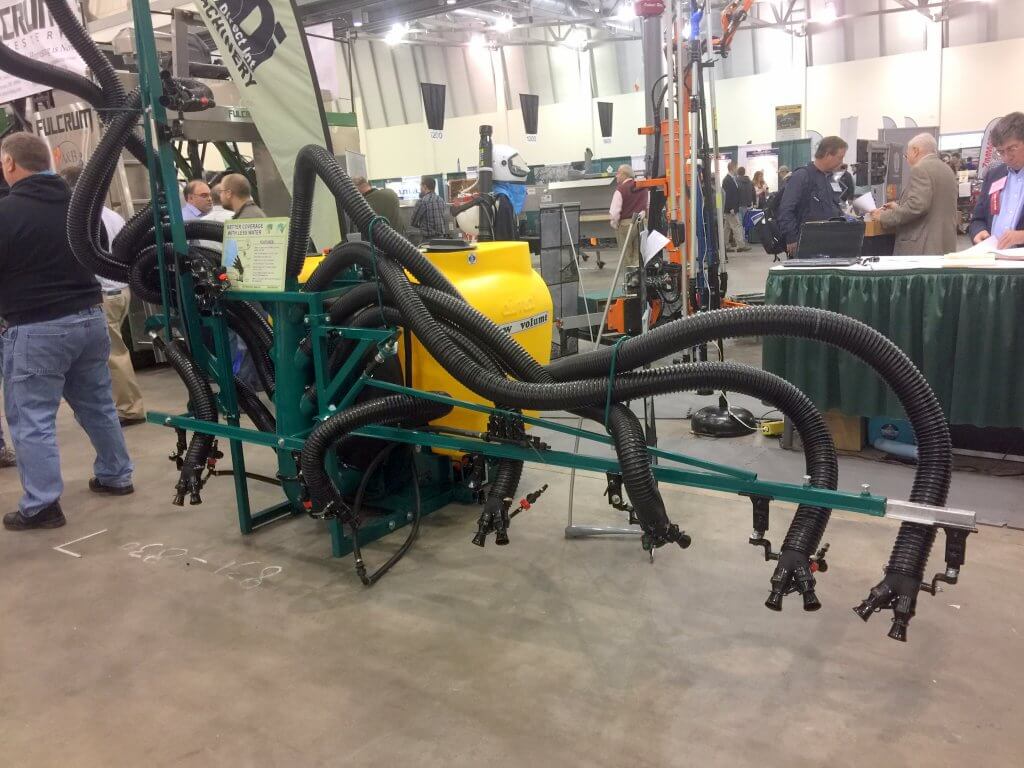
Sometimes it’s not the canopy, but the plant and/or row spacing. Many nurseries arrange container crops, shrubs, whips and cedars as tightly as possible. This may optimize how many plants will fit on a given area, but it compromises sprayer access (due to the reduced number of alleys) and may cause plants to block one another from the spray. Nursery sprayer operators often use cannon sprayers to throw spray over and through all those rows of plants, but cannon sprayers produce excessive coverage at the beginning of the swath and increasingly erratic coverage as a function of distance.
A cannon sprayer attempting five rows of cedars. This sprayer will eventually spray in from the other side, but experience has shown that coverage will be compromised in the centre rows and excessive in the outer rows. Spraying multiple rows may save time, but coverage is almost always erratic.Calibrating a cannon sprayer can greatly improve coverage consistency. Before calibration (above) the sprayer was equipped with full cone nozzles in the upper boom positions and excessive air was employed in an attempt to force spray through the canopy. Although the sprayer would eventually pass down the far side of the five rows, only the water-sensitive papers in the tops of the trees indicated suitable coverage, and a great deal of spray simply blew away. After calibration (below) considerably less air and spray was used, and coverage on water-sensitive papers placed lower in the trees and facing the sprayer was more consistent. Remember, the sprayer would eventually pass down the far side, resulting in similar coverage on the remaining papers. Don’t bite off more than your cannon sprayer can chew – the further spray travels from the sprayer, the harder it is to achieve consistent coverage.
Coverage can be improved by reducing the distance the spray has to travel (i.e. leaving more alleys and reducing the density of planted rows).
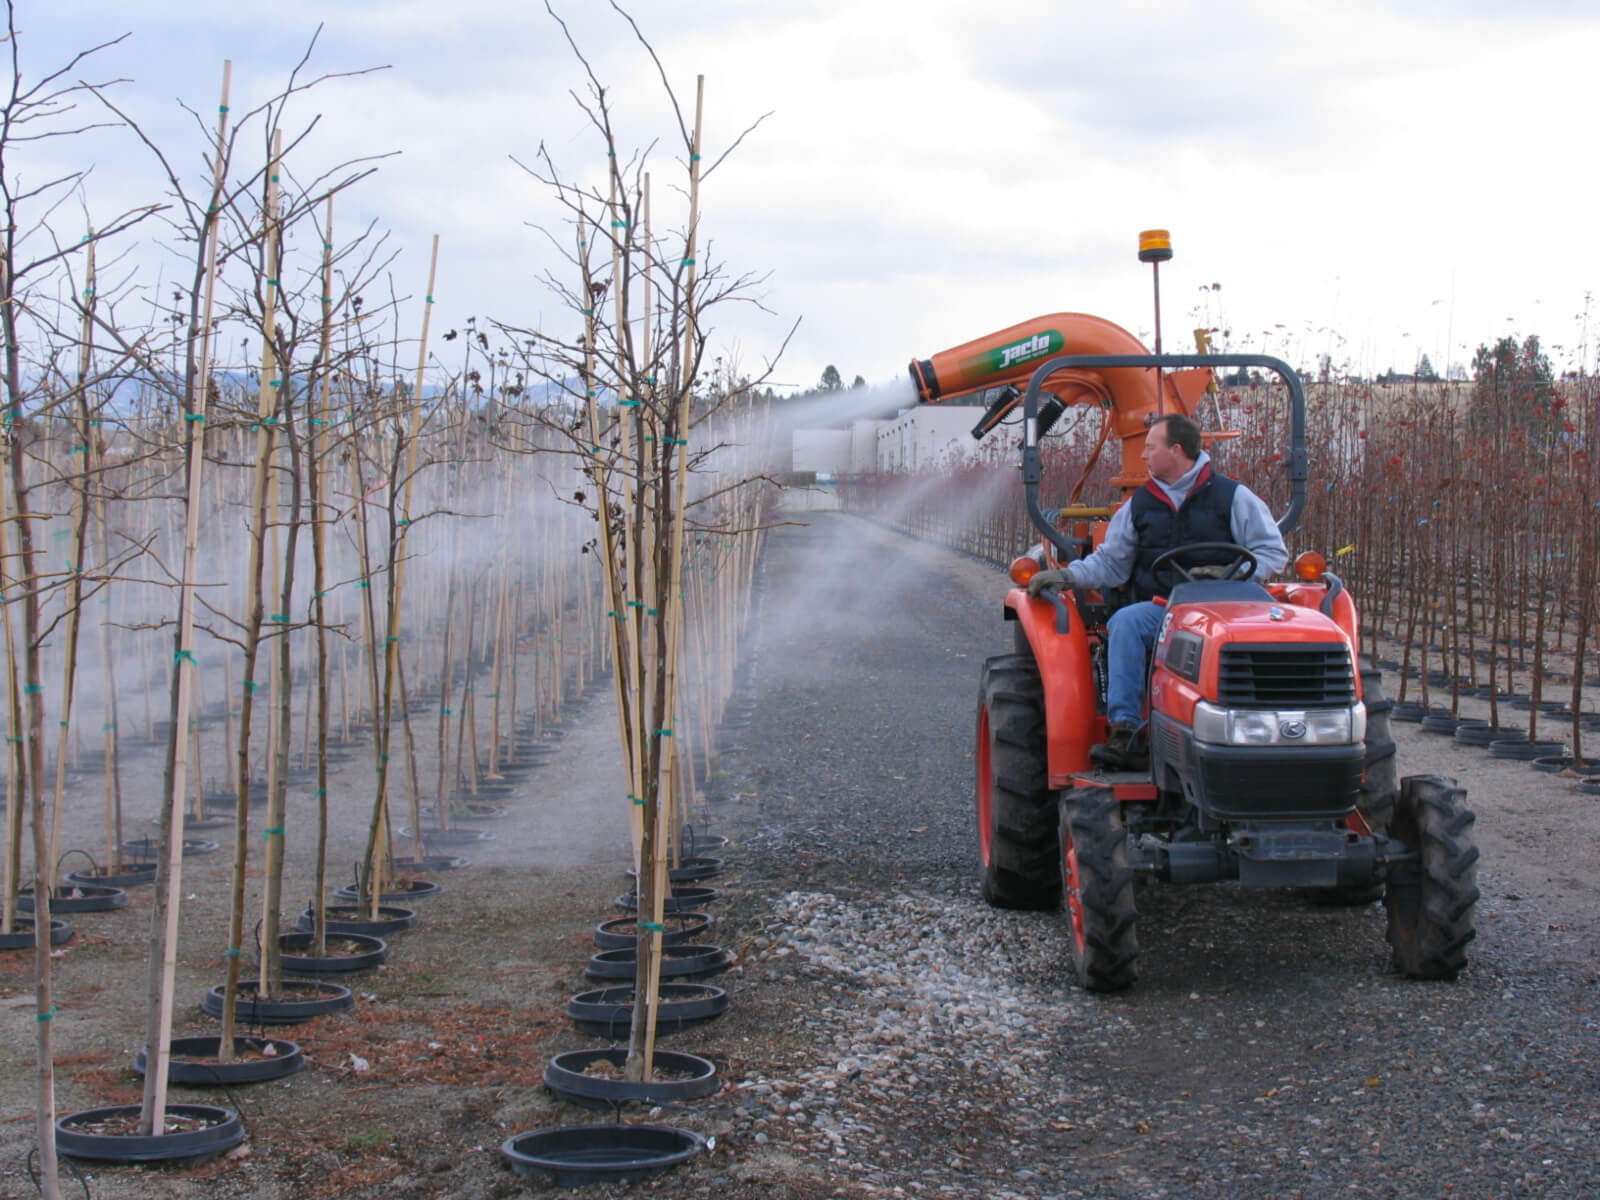
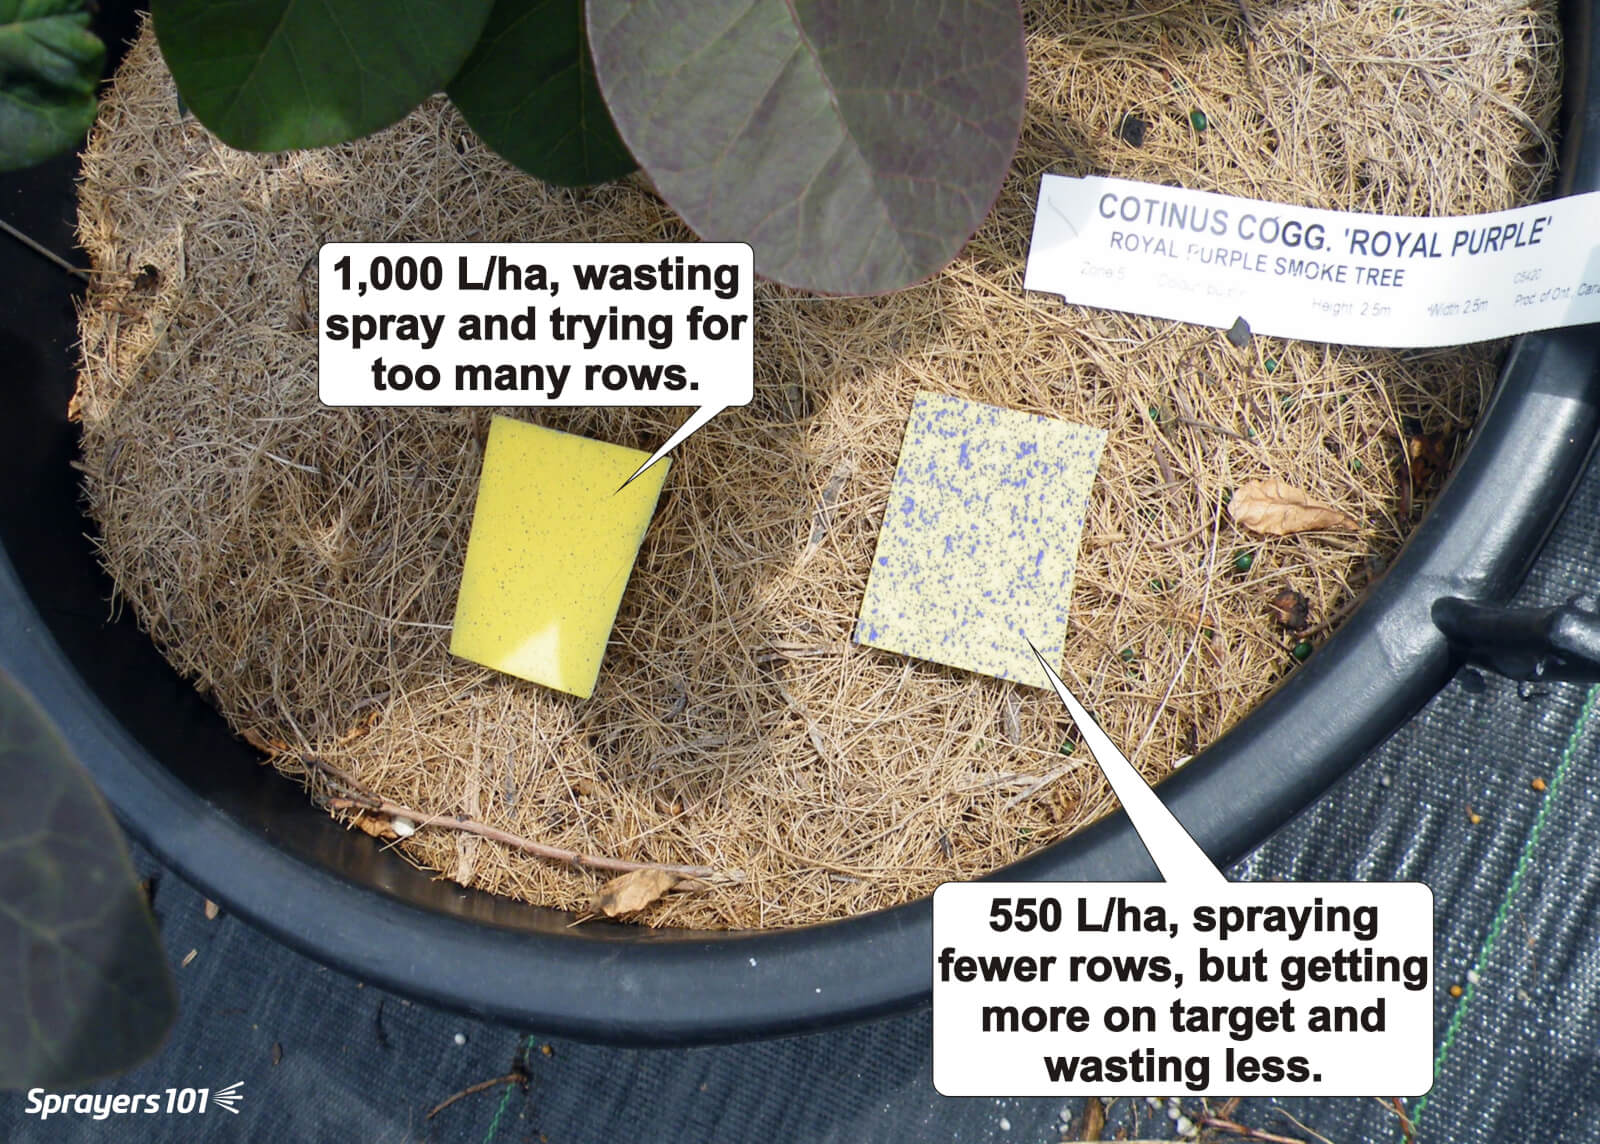
A Jacto cannon sprayer in a nursery. Many nursery and berry operations elect to spray multiple rows in one pass, but be aware that spray coverage suffers the farther away from the sprayer it goes. Independent research has shown that coverage is not reliable at half the distance typically claimed by many cannon sprayer manufacturers. This is a function of canopy density and weather. Always confirm coverage with water-sensitive paper. Photo Credit – M. Lanthier, British Columbia.The results of a cannon sprayer calibration in a container crop nursery. The cannon sprayed 1,000 L/ha and tried to cover too many rows in a pass. The water-sensitive paper showed insufficient and inconsistent coverage. When it was recalibrated to spray 550 L/ha, but drive more rows, the water-sensitive paper showed considerable improvement.
I also suspect that staggering plant spacing from row to row to reduce mutual shading might allow spray to penetrate more easily. As I write this, we’re planning to explore this concept in cedars.
This is speculative, but the when nursery shrubs, trees and container crops are planted in perfect grids, mutual shading probably prevents spray from penetrating deeply into the planting. By staggering the spacing, spray may be able to penetrate more easily between rows. This can be accomplished without reducing the number of plants per hectare significantly.
In the end, try to see the spray target from the droplet’s point of view. If you can easily see where you want the spray to go, you’ll do well. If you can’t see the target, it’s far more challenging.
A very common question we hear at sprayer demonstrations is:
“I want to drive the spray deeper into the canopy – does higher pressure help?”
Well, here’s the classic government answer:
“…yes and no.”
It depends on two things. First, the size of the droplet and second, your tolerance for drift (ours is almost zero, BTW). The following video explains how Fine droplets behave very differently than Coarse droplets. It’s always nice to get outside and toss a few balls around:
Well, that last statement in the video isn’t strictly correct…
It’s true that changes in pressure have greater impact on the momentum of coarser droplets, but there is some impact on finer droplets, too. Sufficiently high pressure makes for a finer spray quality and finer sprays have been shown to penetrate dense canopies more effectively. We have seen improved canopy penetration in ginseng, field peppers and matted-row strawberry using finer spray under higher pressure. If pressure is high enough, it will create air-inclusion and impart additional momentum to even Fine spray droplets over a short distance, but it’s a case of diminishing return. That is, it takes a lot of pressure to do it and relatively speaking they only got a bit faster/further. In our work, we used pressures between 90 and 300 psi. Excepting hollow cones, that’s generally on the upper end, or beyond a nozzles rated pressure range and it may even be outside the pumps capacity.
The reason we downplay pressure as a tool for improving canopy penetration is because finer spray under high pressure causes unbelievable drift. A fraction of the spray does get deeper into canopies when you “fog it in”, but the plume of spray blowing beyond the sprayer is entirely unacceptable. Slowing down the travel speed, spraying on cool, humid, low-wind days and lowering boom height can help, but in every trial where we’ve used high pressure and Fine spray quality, we see the image below… or far worse:
Staged drift in peppers using water and high pressure combined with Fine spray quality
The compromise in canopy penetration is to use a Medium spray quality and higher water volume. Stay within the pressure range the nozzle requires to achieve that Medium spray quality. If canopy penetration is still insufficient, consider canopy management (like planting density and pruning) and explore drop-arms to direct the spray, or booms that offer an air-assist or air-deflection option (a few shown here) to entrain and carry spray into the canopy.
Don’t use higher pressure to increase canopy penetration.
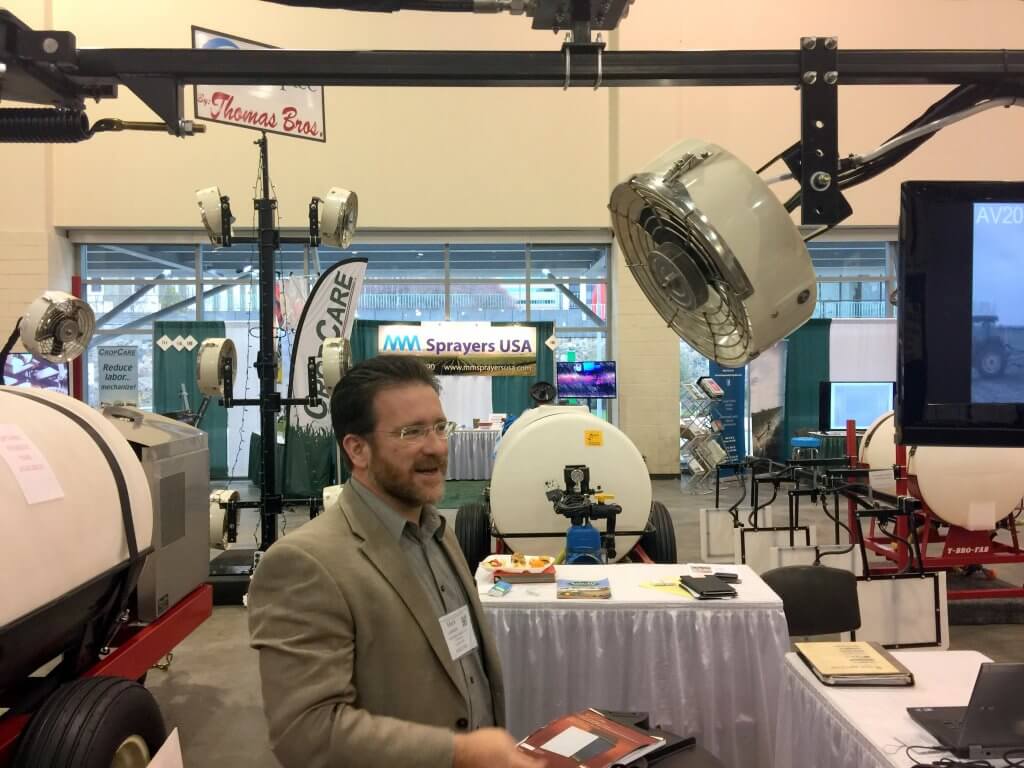
Michigan’s Great Lakes EXPO is a massive horticultural convention that draws international speakers and more than 4,000 attendees to Grand Rapids every December. Like any large agricultural conference, it can be challenging to run back and forth between lecture rooms to hear key presentations. And, of course, there is always disappointment when you have to choose between two talks in concurrent sessions. When your head is full and your posterior is numb, you move onto the trade show floor.
I think the trade show might be my favourite part; Who doesn’t like filling a bag with swag? Candies, foam vegetables, pens, DVD’s, colourful brochures and all manner of gimmicks designed to get your attention in a sea of vendors that vie for “just a minute of your time”. But for me, I only have eyes for the sprayers. And wow, were there a lot of sprayers at GLEXPO.
This article is a photo journal of those sprayers (or features) that caught my eye. For some readers, these features might be old news, but for me they were insight into a different way of spraying. For example, Europe’s tolerance for spray drift is practically nil, and sprayer manufacturers have had to develop equipment that comply with that reality. Many such sprayers were present, so I had a chance to see, and ask questions, about their claims of less than 5% drift. At the other end of the spectrum, there were sprayers that proudly boasted being able to cover multiple rows in a single pass by boiling the spray over great distances… which while appealing to producers looking to save time, still makes me wince. But then, I’ve never tried to spray almonds in California, or citrus in Florida. Then there were sprayers claiming to cover multitple rows and reduce drift, which would be quite a trick. I reserve the right to be a skeptic.
So, I’m not promoting or condoning any of the equipment or claims described here. I’m just sharing what I found interesting and I’m giving the reader a peek onto a trade show floor they might not otherwise have seen.
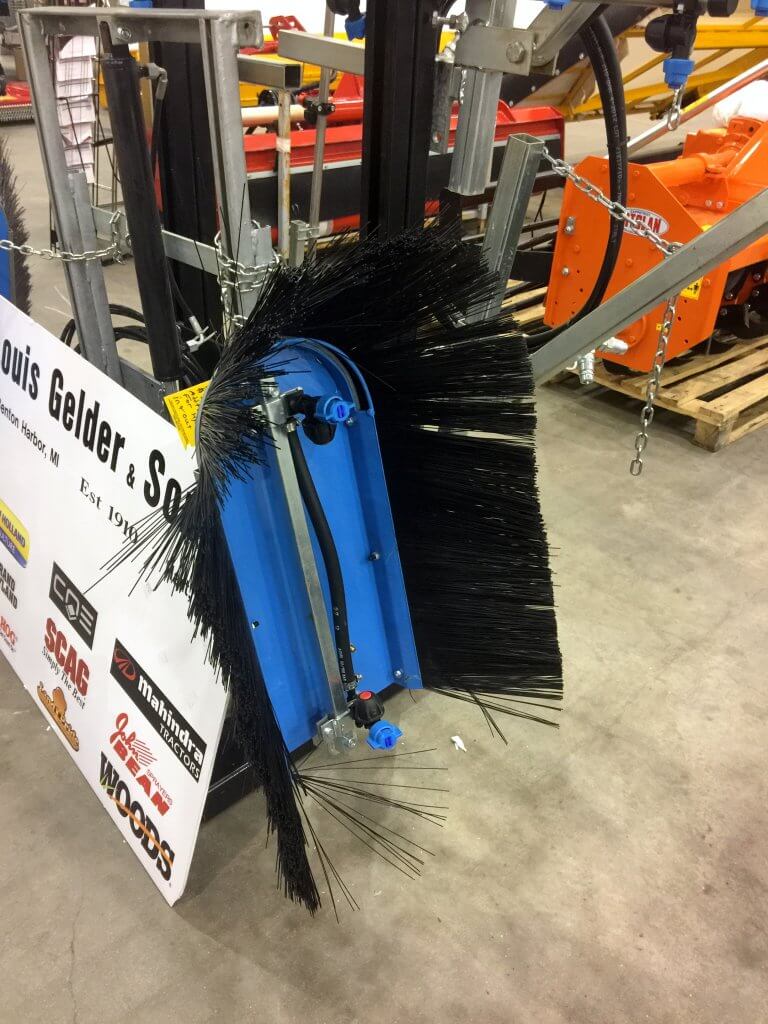
Shrouded Herbicide Application
There are lots of approaches to making in-row or under-row herbicide applications. The concept is simple enough: You want to get the product on the ground either under or between rows without hitting the crop itself. If you don’t care about hitting a mature orchard trunk, the boomless nozzle is a good choice with it’s massive droplets and variable swath. But if you want to avoid off-target movement as much as possible, you need shrouds.
I’ve seen brushes used to great effect in asparagus because they match the contour of moderately uneven ground by dragging over it. Gaps may open in the shroud as the bristles part, but that issue may be offset by the possible advantage of physical redistribution of herbicide as it rubs over the target weeds like a weed-wicker.
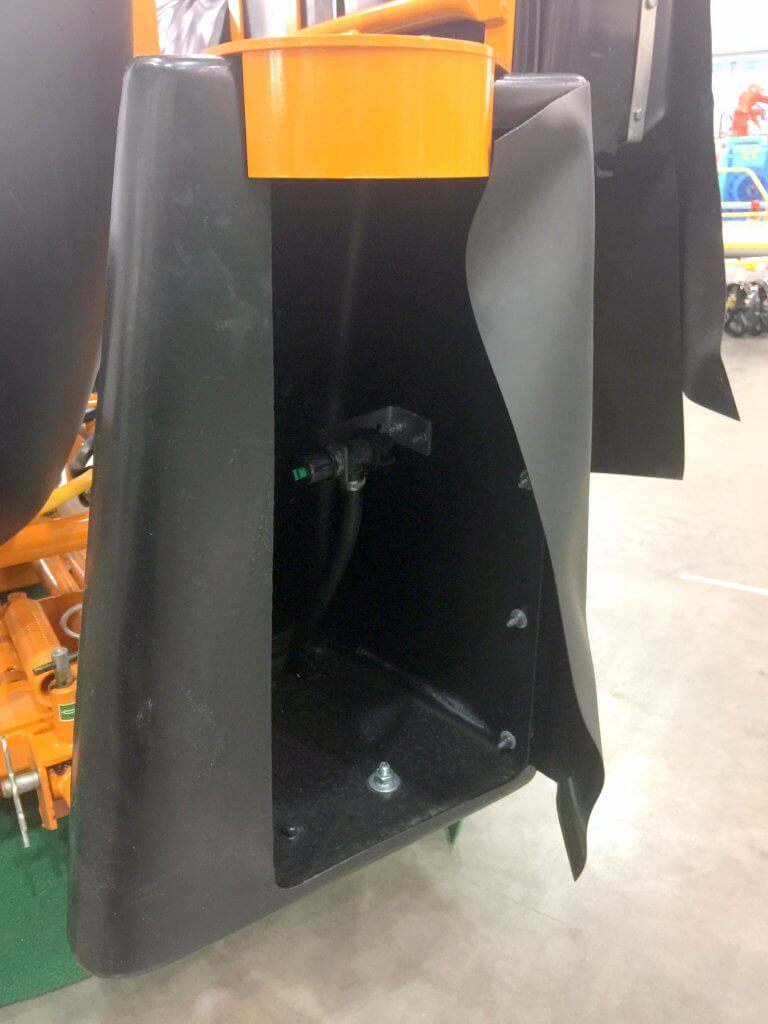
Then there’s the classic flexible curtain. Similar to the brushes, it’s intended to “just” touch the ground and should maintain a reasonable seal even if said ground is moderately uneven. I often wonder how difficult it is to clean all the surfaces on these systems, but since they are only ever used with herbicide, I won’t speculate how often operators actually decontaminate (or even rinse) them.
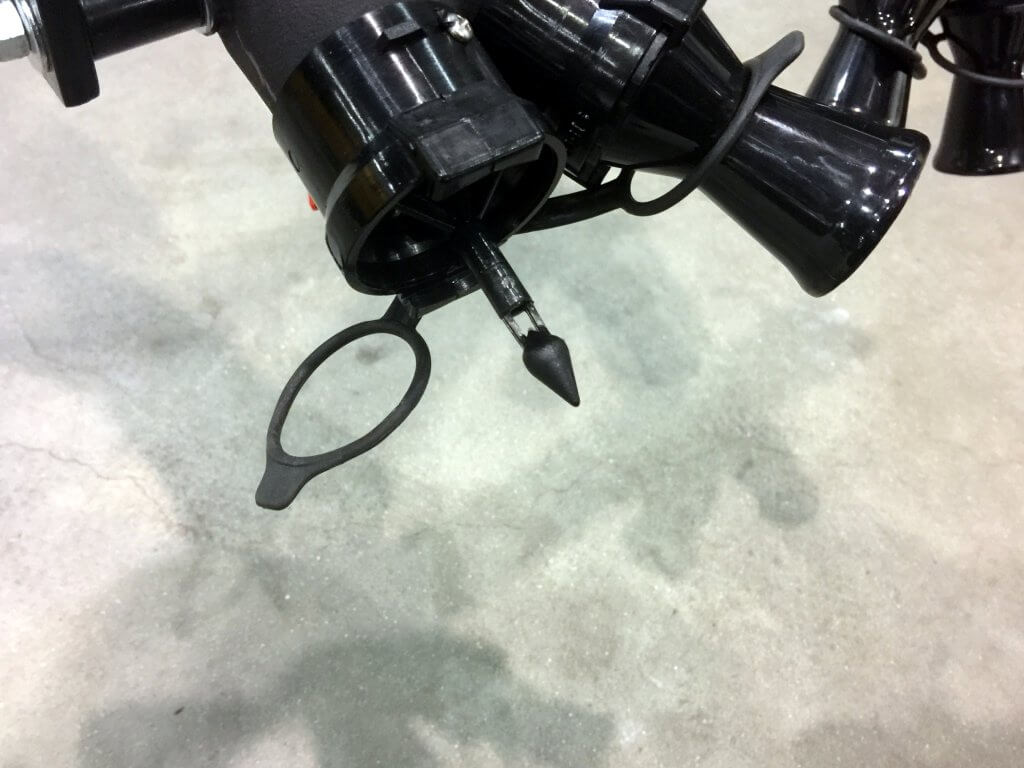
Other variations include a hard carapace with no contouring lip. They should only be used with Coarse spray qualities or larger. Note the hefty spring on the boom for those inattentive moments where the operator might whack a trunk or fence post. The wing flexes away from the impact and snaps back into position, giving the operator time to put down the cell phone and tweak the steering wheel. The adjustable nozzle body on the far end is a nice feature for adjusting the swath without changing nozzle spacing, but beware to maintain proper overlap.
And, if you want the heartiness of a solid carapace, wouldn’t it be nice to be able to see through it so you can spot a plugged nozzle before it becomes a problem? This variation with its heavy impact bar, tight nozzle spacing (to reduce the potential for misses) and guide wheel (to maintain correct boom height) looks ready to handle anything.
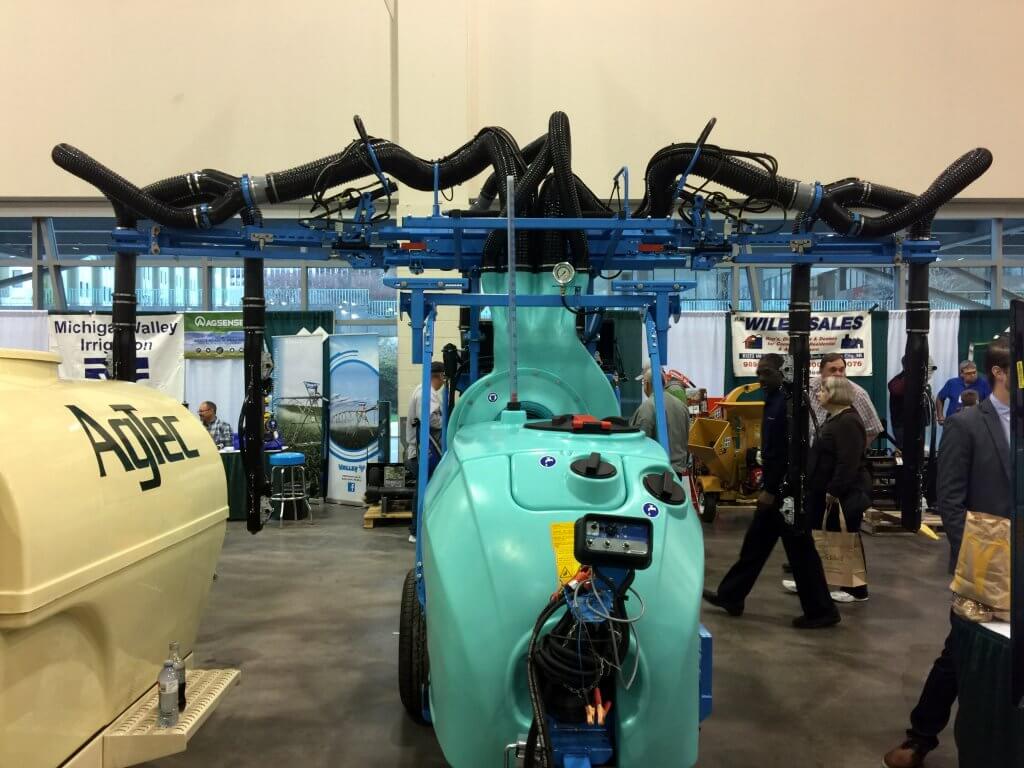
Airblast – Multi-Row, Ducted Systems
In the never-ending quest to do more in less time, multi-row airblast systems are very appealing. Delivering air to the vertical booms in each row can be challenging. I’ve seen suspended axial fans (e.g. Gregoire, not pictured) but they’ve always struck me as overkill because of the volume and speed of the air they deliver, and because they need fairly wide rows to be accommodated. Their weight is also a concern, requiring scaffolding that must be strong and still somewhat flexible to handle the inevitable pitch and yaw translated from uneven ground to the boom.
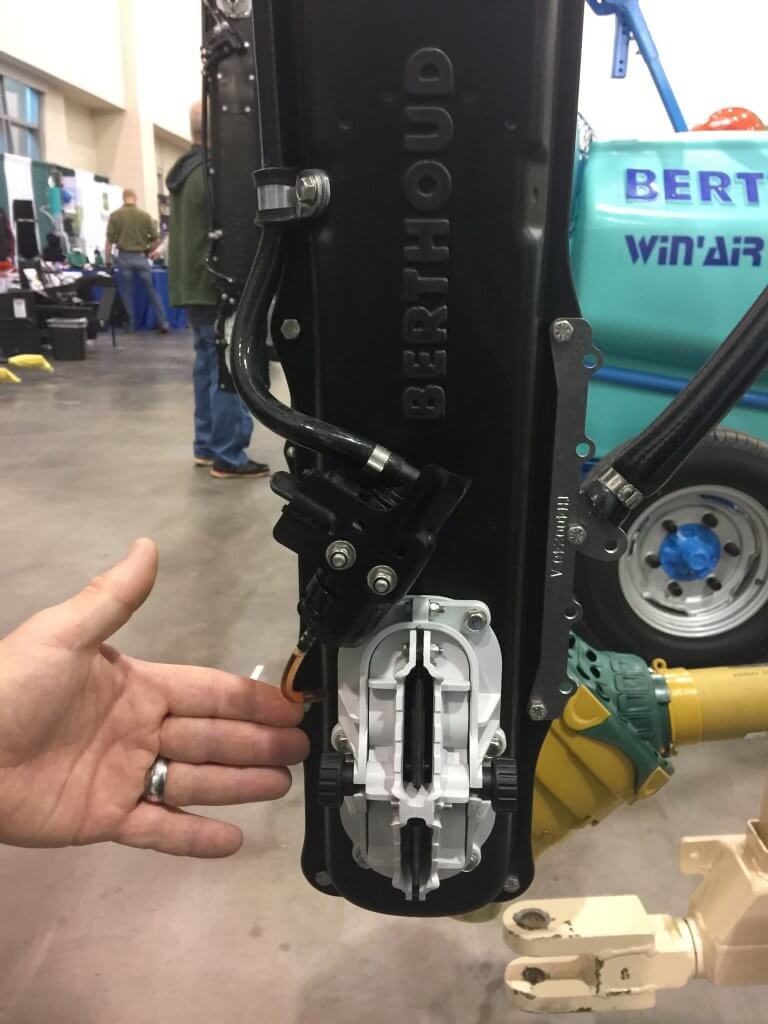
Lightweight conduits that channel air through ducts (like the Berthoud sprayer below) are a popular solution. They can be suspended to any length and telescope to any row width. Head pressure, and friction from sharp bends in the ducts can influence the air delivered, so the shorter the ducts and the less bends, the better. It was a surprise to discover the ducts in this sprayer are corrugated inside as well as out, but apparently it’s not enough to disrupt air flow significantly.
This Berthoud sprayer offers many of the optional features I’ve seen on the Hol sprayer (not pictured) such as tandem axles, a hand wash tank, low residual volume tank, and built-in boom and tank rinse systems. What’s interesting is the light weight “Drop Legs” (i.e. the vertical booms) with dual-angled “airmist diffusers” (i.e. the air shear nozzles) for multi-row vineyard applications. The close-up below uses my hand for reference. There are options for two to four diffusers on each drop leg, and they can be single or double sided, giving a lot of flexibility to match the crop.
How do you control flow? With a digital flow regulator. What if you want a different rate at each diffuser? Well, if I understand this correctly, instead of using a typical flow-metering disk placed in-line to restrict flow, you slot a conventional moulded hollowcone inline and use the nozzle manufacturer’s flow tables. And what if you are concerned about using a misting air-shear style nozzle? It appears they also offer an option to swap out the diffusers for air assisted swirl nozzles where the air flow is behind the nozzle to entrain the spray and limit dispersion. They look similar to the diffusers, except they have a nozzle cap between the slotted air outlets (not pictured).
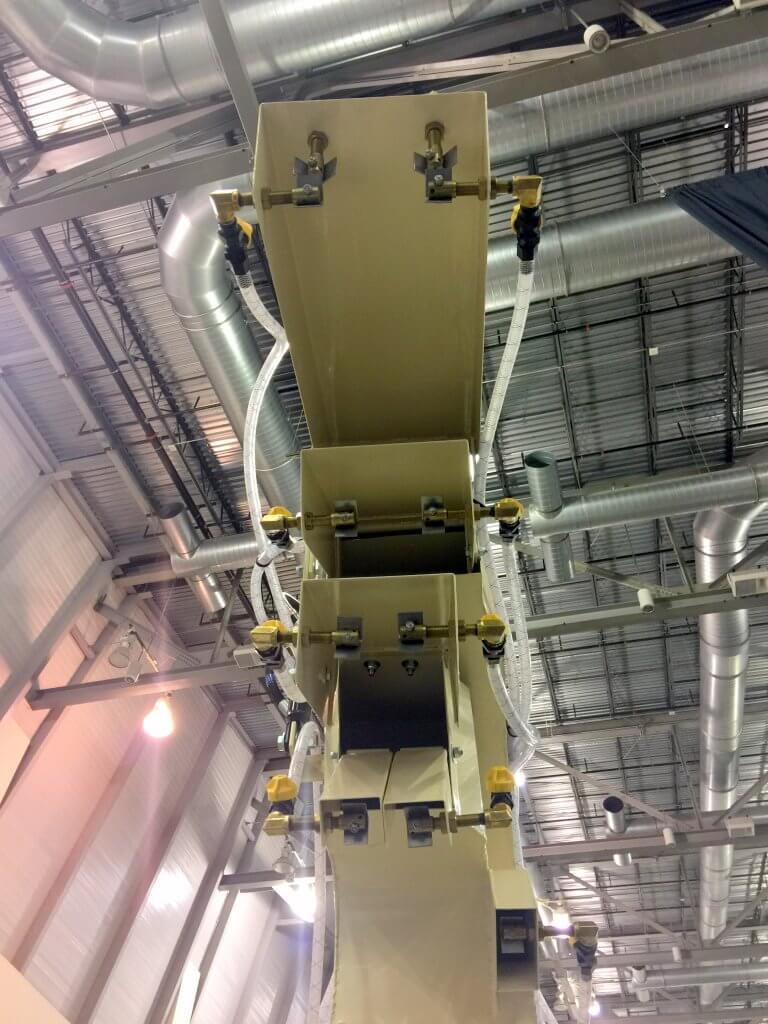
Ducted air handling comes in many shapes and sizes. Rather than terminating in a blade-shaped diffuser, Cima has hourglass shaped distribution heads that use the venturi principle to deliver airspeeds up to 180 mph at the nozzle. That’s fast, and while it would help entrain spray as it travels longer distances, I wonder what it does to crops close-up?
In the centre of each head is the teardrop-shaped atomizer-style nozzle that produces a Very Fine spray quality between 100 and 150 µm in diameter. It was explained that the teardrop employs Bernoulli’s principle… and for the lay reader (like me), think of the teardrop the way you think of an airplane wing. Air moves over the contour at different rates, making a low pressure area at the tip. The upshot is that it creates lots of very small droplets that (according to the manufacturer) permit you to use much lower volumes that you would with an airblast sprayer using conventional hydraulic nozzles. As always, I suggest you let coverage be your guide to spray volume.
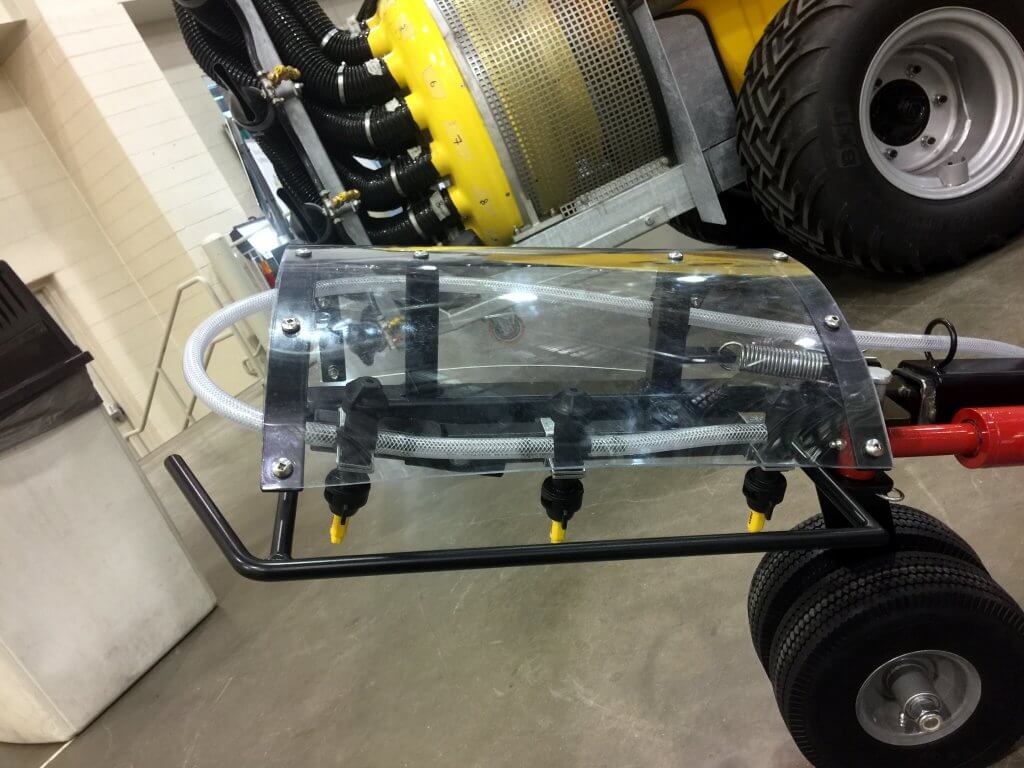
Flow is controlled by an inline disc that allow the user to select from a series of flow-restricting orifices. Look back two photos and you’ll see them as yellow circles on the tower. The photo below is a stainless steel version from an AgTec.
Air-Assist Horizontal Booms
A ducted, vertical airblast sprayer is an air-assisted horizontal boom sprayer just waiting to happen. For vegetable and berry growers, air assisted spraying is an appealing prospect. Many still use axial airblast or cannon sprayers to spray row crops, but I don’t like that. It’s my opinion that while it may be effective, it’s not efficient because it’s not possible to consistently control drift or coverage. I prefer getting the air and nozzle closer to the crop, but sprayers that can do this are few and far between.
There have been no after-market options I’m aware of for converting a horizontal boom to an air-assisted boom. That leaves only a few manufacturers of trailed boom sprayers to fill the need (e.g. the trailed Hardi Commander with Twinforce air or their new self-propelled Alpha evo). But this tradeshow opened other possibilities, as demonstrated by the Cima below. It uses all the same principles described above… it just aims down.
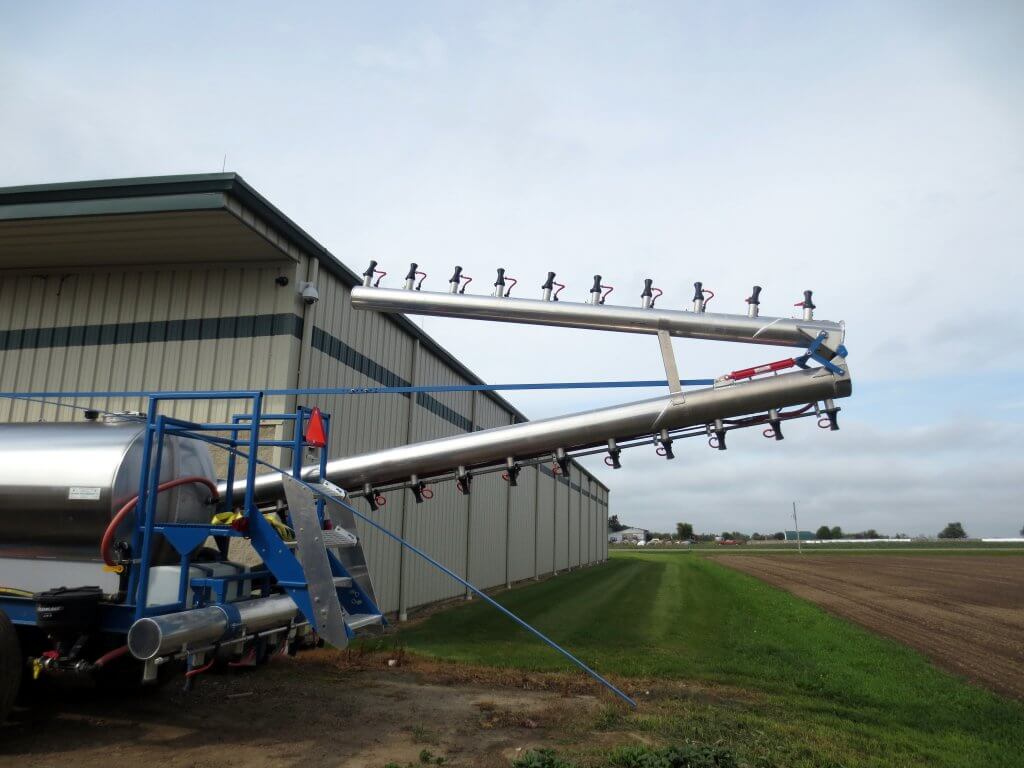
Not interested in ducted air delivery on a three-point hitch system from France or Italy? No problem. How about a Florida company called Airtec that offers trailed air-assist booms up to 120 ft. I wasn’t able to photograph the sprayer at the show, so here’s a picture of one in the field (from their website), as well as several I took at a spinach operation in Ontario.
Airtec offers a single axle, or a walking beam tandem axle reminiscent of the Argifac Condor. Note that the boom itself is the air conduit, which should open crop canopies, expose underleaf surfaces, entrain smaller droplets to reduce drift, and extend the spray window by allowing the operator to work in slightly windier conditions. I can’t speak to the manufacturer’s claims of reducing spray volumes (and by extension, chemicals), but you can read it on their glossy brochure.
Each air outlet terminates in an hourglass-shaped duct, similar to the Cima and ostensibly creating the same advantage, as they also claim 180 mph windspeed at the nozzle. Again, I wonder if that can be dialed back, or adjusted to match the density of the crop canopy? Unlike the Cima teardrop shear nozzle, conventional hollowcone nozzles are used (see below). They can also be suspended to match the contour of the row (look back at the first photo) improving coverage in a manner similar to using drop arms or row kits.
Airblast – Unconventional Fans
Have you seen this man? Mark Ledebuhr is the co-author of the 2nd edition of Airblast101. He looks happy here… little did he know I’d one day lasso him into writing the new edition with me.
Let’s get back to airblast sprayers. The majority do not use ducts to convey air to the target – they point and blow. Pictured below is the generous Mark Ledebuhr with a Proptec rotary atomizer. I call him generous because for several hours Mark led me through the tradeshow and introduced me to many of the vendors. Perhaps more importantly, he helped me interpret what they were explaining after we left each display. Developed with his father, the Proptec system suspends individual fans with rotary atomizers so each can be aimed and operated independently, offering a lot of targeting flexibility. The fans can be electrically or hydraulically driven. Some might be reminded of a Sardi fan (not pictured) but unlike that system which uses several conventional nozzles around the circumference of the fan, Proptec employs a rotary atomizer in the centre. Rotary atomizers can produce very, very small droplets and until GLEXPO I was only familiar with their use in aerial applications.
I admit to a bias when it comes to airblast sprayers. In my mind, the further away the source of air and spray are from the target, the more opportunity there is to drift. Particularly when such small droplets are involved. I couldn’t find the Proptec video I saw looping at the tradeshow, but what I saw looked like tight columns of cycling spray, reminiscent of a tornado, firing into each row of a vineyard. I was told it was during a 15 mph wind, yet I didn’t see a lot of off target movement. A notable advantage to spraying down into the ground rather than sideways or up into the air. Here’s a good video I found of one operating in highbush blueberry (below). It seems I have a lot more to learn about this system.
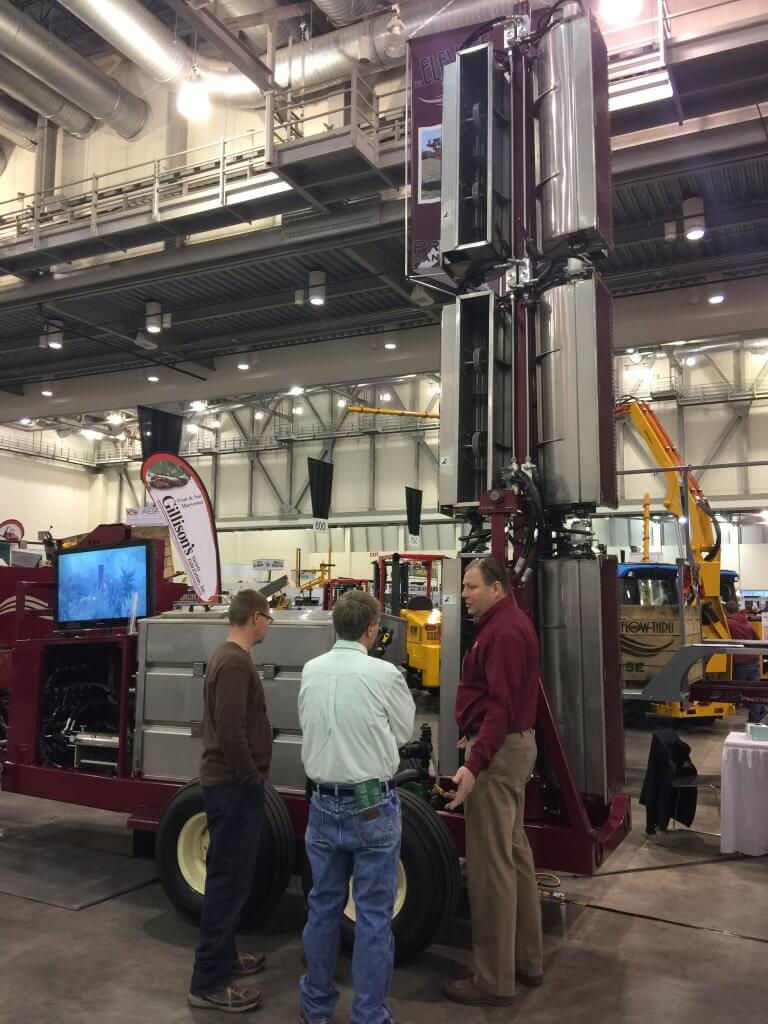
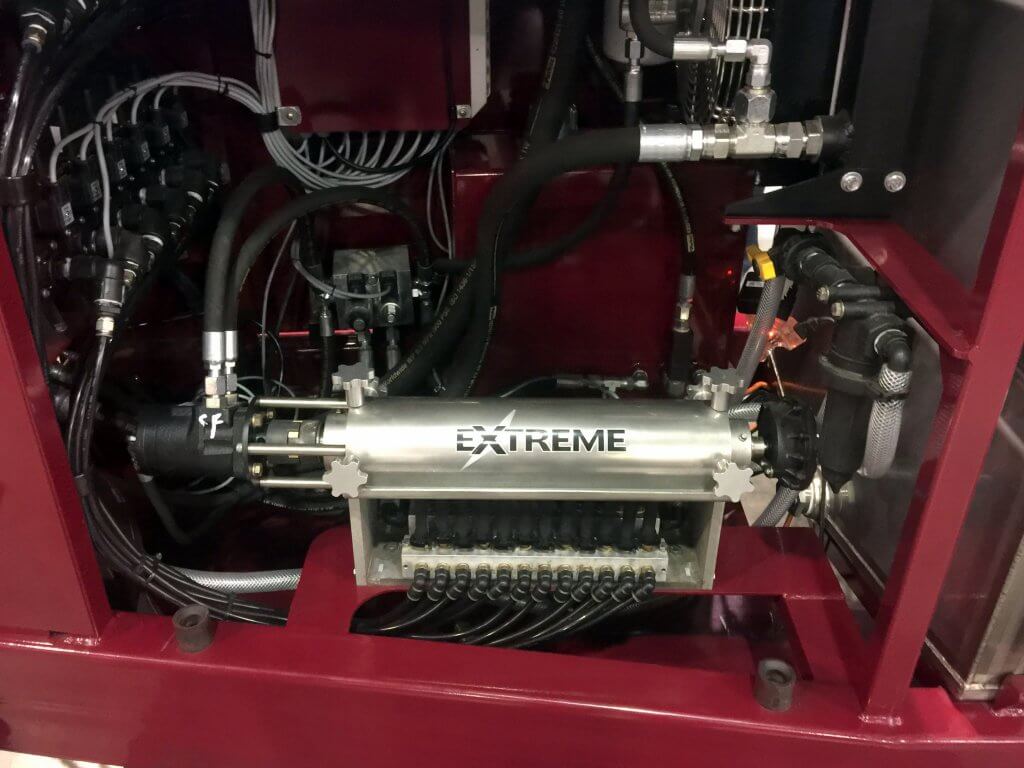
Then Mark and I went over to see Michigan-based Precise Manufacturing’s EX III cross-flow rotary atomizing tower system. I was reminded of the Curtec tangential fan towers that, like this sprayer, employ rotary atomizers and a peristaltic pump. For Curtec, it’s the AccuStaltic pump. For Precise, it’s the Extreme pump. More on that shortly.
Here’s a video of the EX III operating (sourced from the Precise Mfg. website). Obviously, we’re not talking grapes, berries or high-density orchards, here. This is for big, dense targets like standard cherry, nut trees and citrus. The rotary atomizers throw spray in a circle, but the air from the tangential fans capture it and blow it all out towards the target in very laminar (i.e. not turbulent) air that carries it over long distances to the target.
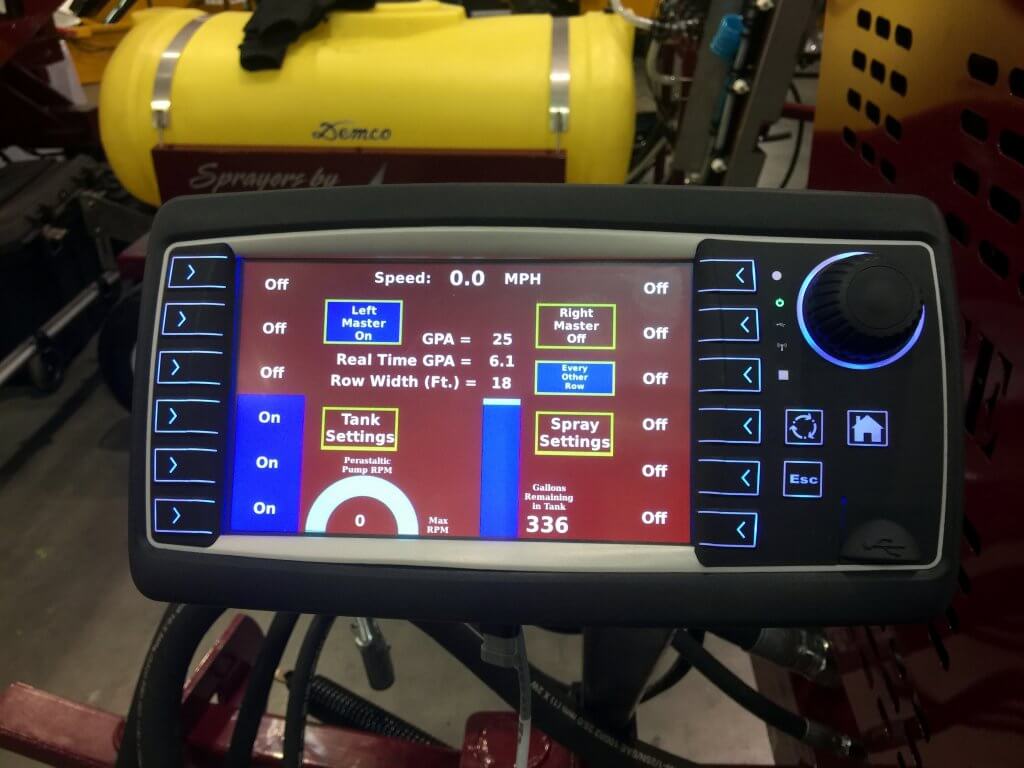
Back to the peristaltic pump. It can run dry, is self-priming, is anti-backflow, low maintenance and can handle pretty much any manner of spray mix (i.e. viscosity and corrosion are non-issues). Each atomizer has its own flow channel, and by changing the diameter of each tube you change the relative flow rate to each atomizer. Certainly not something you’d do every day, but it does allow you to match flow to the canopy density.
The Precise Touch Screen Controller is very intuitive and I liked how much control the operator has. Fan speed can be adjusted quite easily (although it would require a very knowledgeable operator to ensure the correct speed is selected). It tracks GPS position and logs where the sprayer empties and the rates used per acre. It also calculates a kind of tree-row volume by determining savings when the operator turns off nozzles that would otherwise blow over the tops of targets, or when overall flow is reduced by slowing the rpms of the pump.
Airblast – Cannons
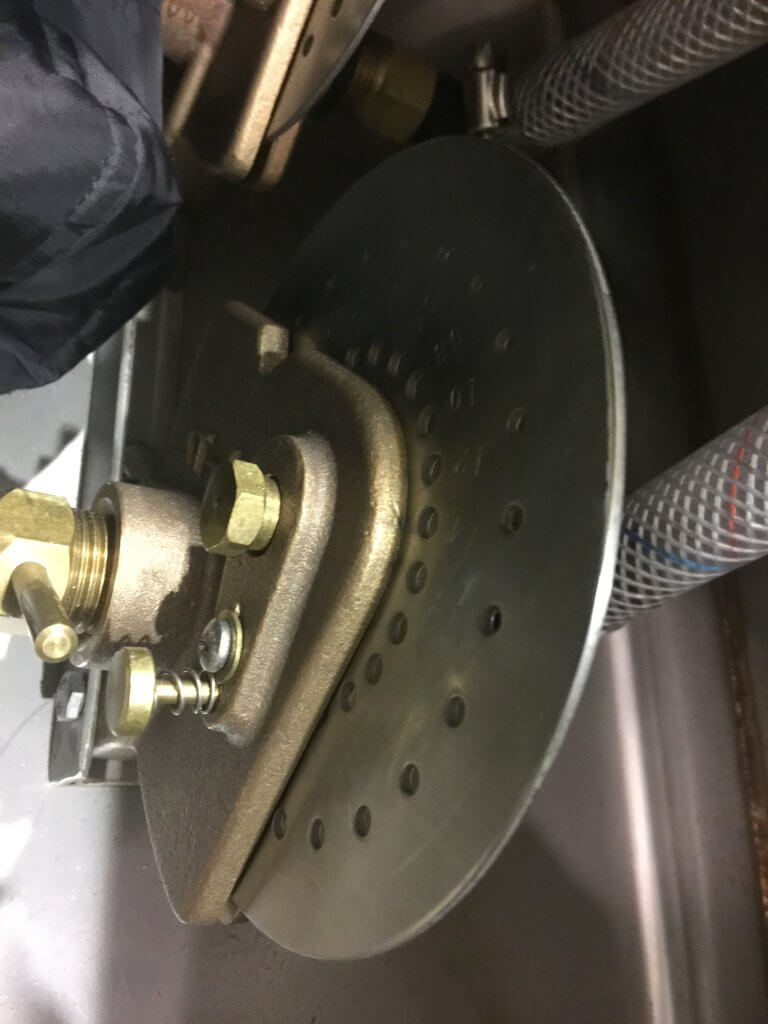
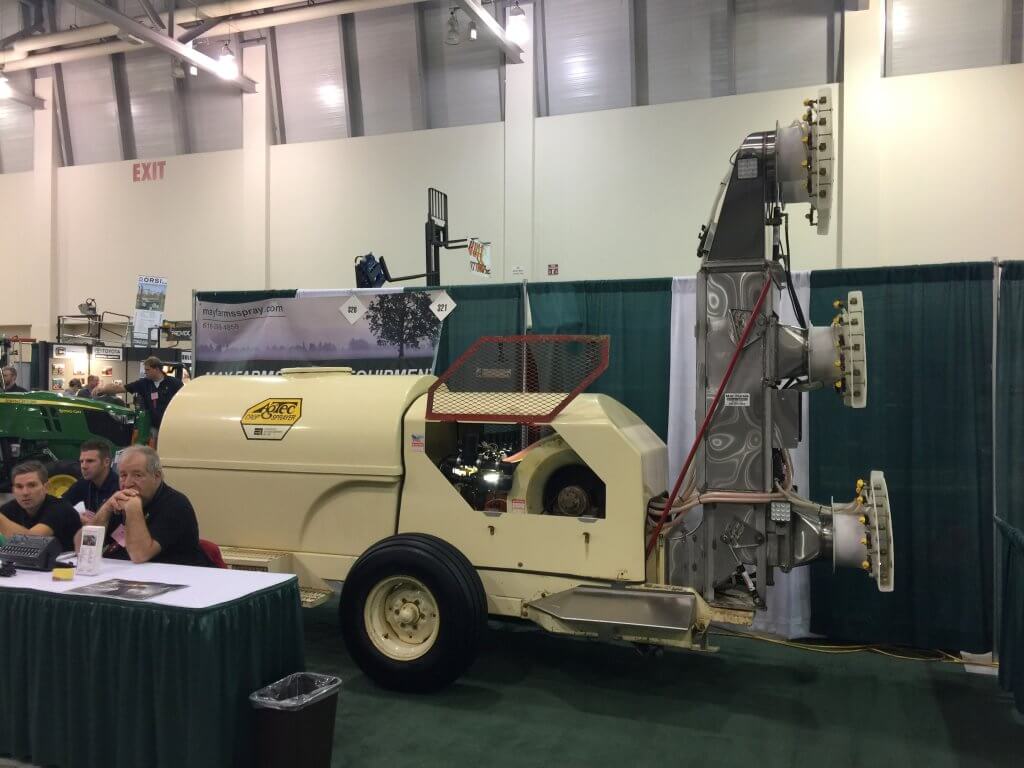
Well, there were lots of cannon sprayers. Most airblast manufacturers have one in their lineup. Squirrel-cage style fans feed air into a tower that allows spray to come out laterally, and on a downward angle from the top of the sprayer. AgTec, pictured below, has long sold such a sprayer.
The nozzles are air-shear style, relying on fast-moving air to shear the spray into finer droplets.
They usually only have nozzles on one side and the cannon can be turned via a chain-driven gear, and aimed up or down from the cab. They are intended to spray larger areas to save the grower traveling every row, and to prevent physical damage to the crop as the sprayer passes (I’m thinking about knocking berries off, mostly).
Nurseries use cannon sprayers quite often because they spray whips (i.e. young trees), shrubs, container crops, and all manner of crops in dense plantings and they try to spray them all with a single sprayer. Generally, there’s a lot of drift potential and erratic coverage from cannon sprayers – especially when operators try to cover too much ground in a single pass. I’m always skeptical when I can’t adjust air settings without impacting spray quality, and considering the bad practice of trying to apply too wide a swath, I have a hard time with cannon sprayers. I will note that the AgTec now has baffles that allow the operator to distribute air over the height of the tower (see the hand near the hydraulic piston in the image below). However, I don’t know what that does to spray quality in each section of the tower.
Airblast – Classic Axial Fans
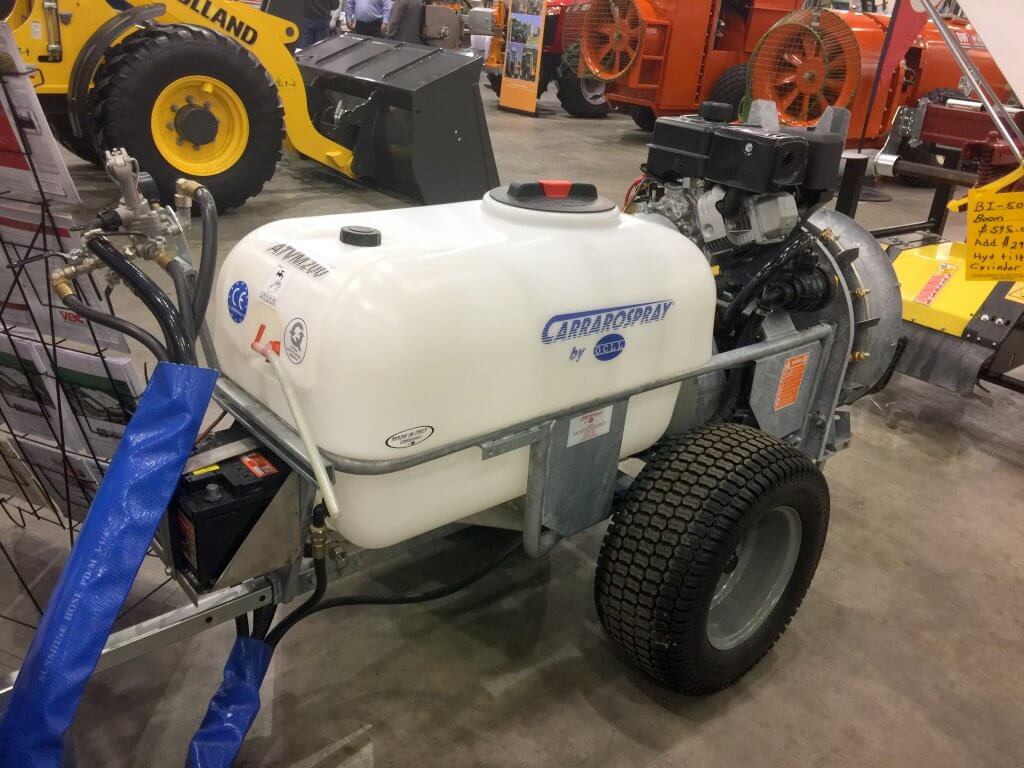
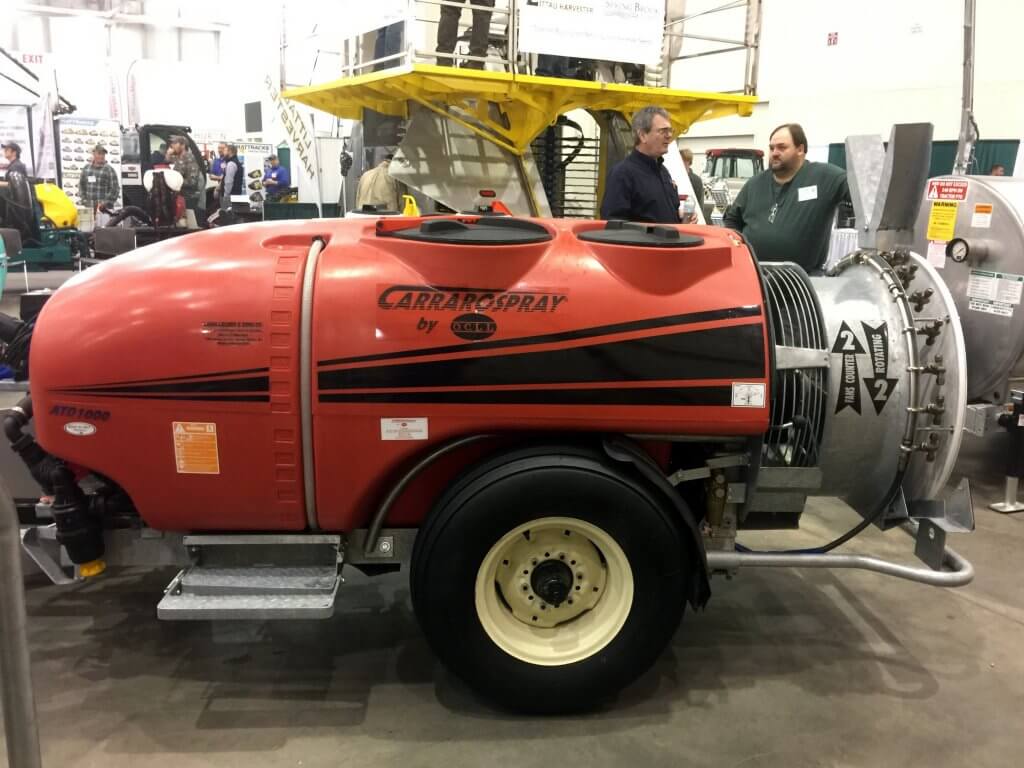
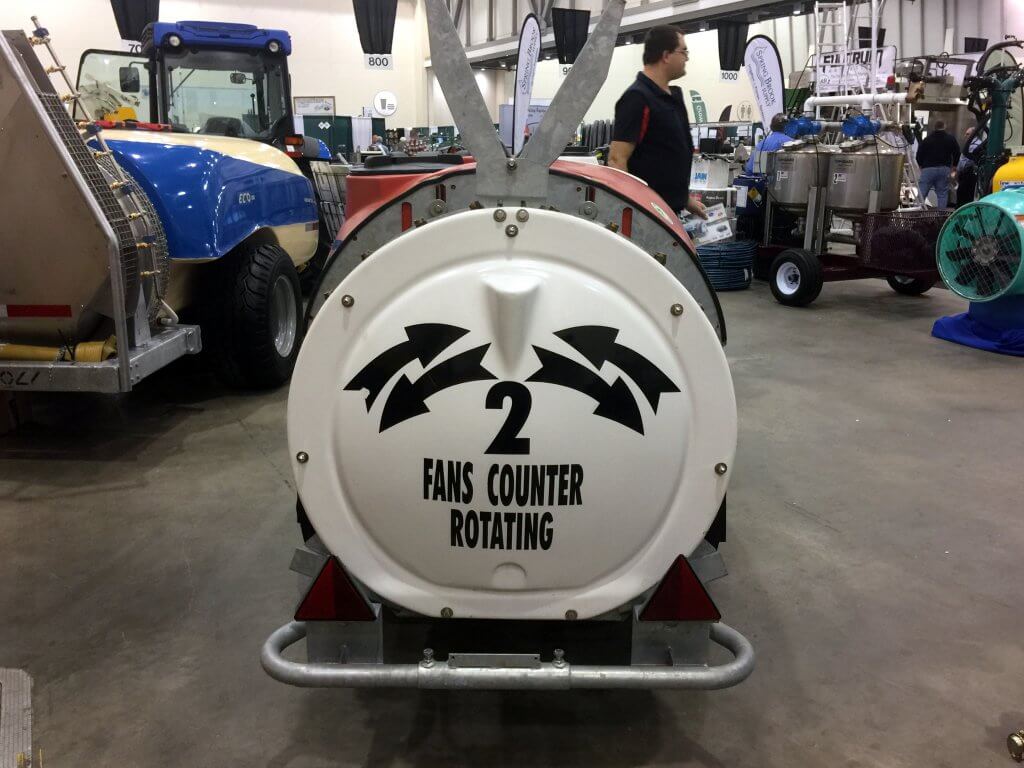
And, of course, there were many classic axial airblast sprayers. Even then, however, there were features to set them apart from one another. British Columbia’s Slimline TurboMist was there, featuring their turbine fans and adjustable air outlets (not pictured). Italy’s Carrarospray was there, and I’ve written about them in the past because they make a tiny sprayer that I like in cane fruit and highbush blueberry. You can hitch it to a mower and mow while you blow.
More interesting to me was their sprayer boasting two axial fans that run counter to one another. Carrarospray claims this counter-rotation creates more uniform air than a single fan… but I have no idea how.
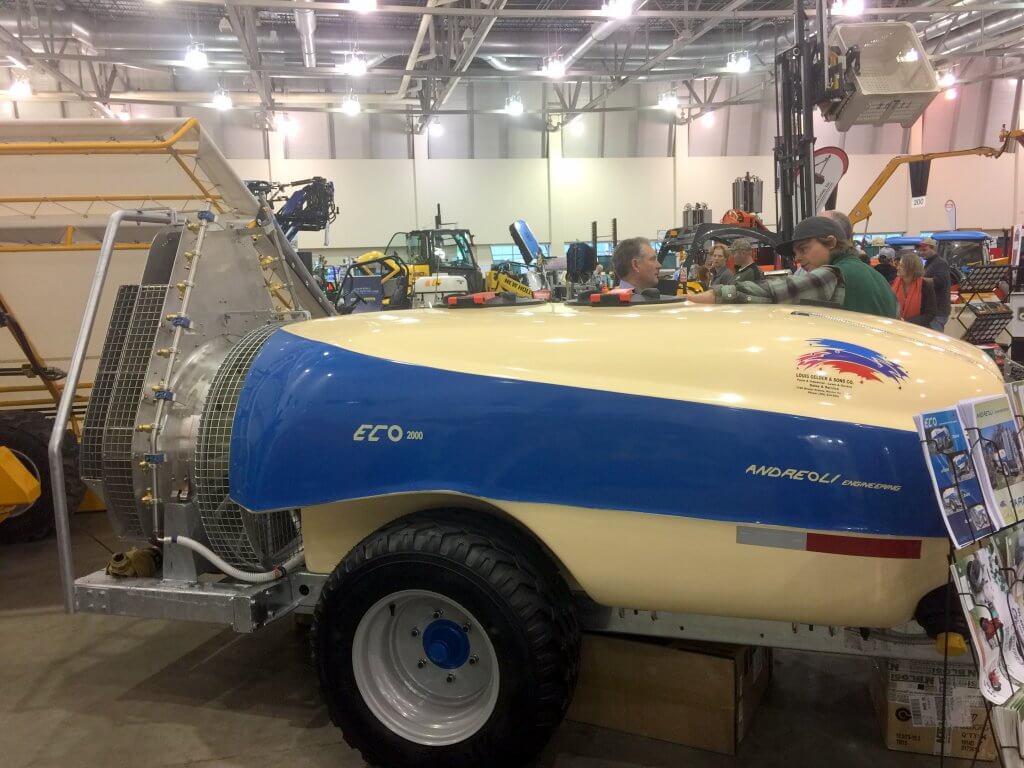
Then there was the Andreoli Eco with it’s stainless steel high-efficiency vane system. Reminding me of the Turbomist, the suction is in the front, so the sprayer is a little less likely to draw spray into the fan when one side is shut down for border spraying and when turning at the end of a row. Louvers covering the outlets would be better, but still, this is an improvement. They also claim to have a symmetrical airflow pattern, unlike older axial fans that move air up on one side and down on the other.
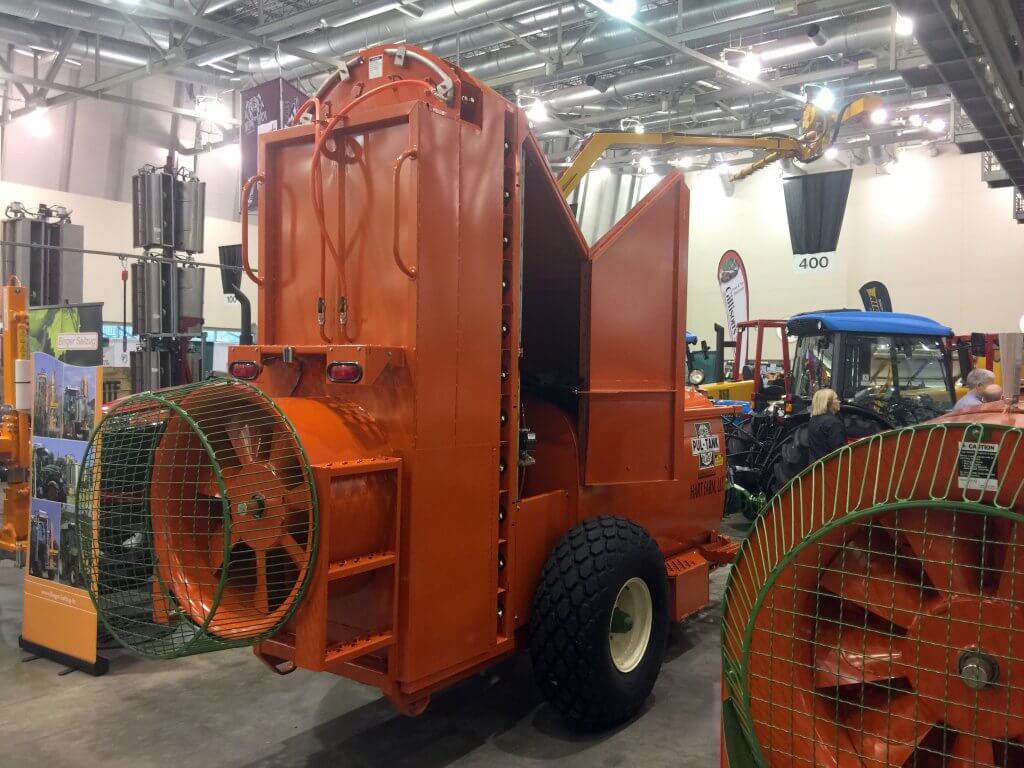
The Rears Pul-Tank reminded me of just that – a tank! Heavy-duty, stainless construction and intended (with care) to last a long, long time. No special features to boast of. It would seem this sprayer adheres to old-school ideas about airblast spraying. Certainly, simple and strong are two appealing features to those operators that don’t want to be bothered with complications.
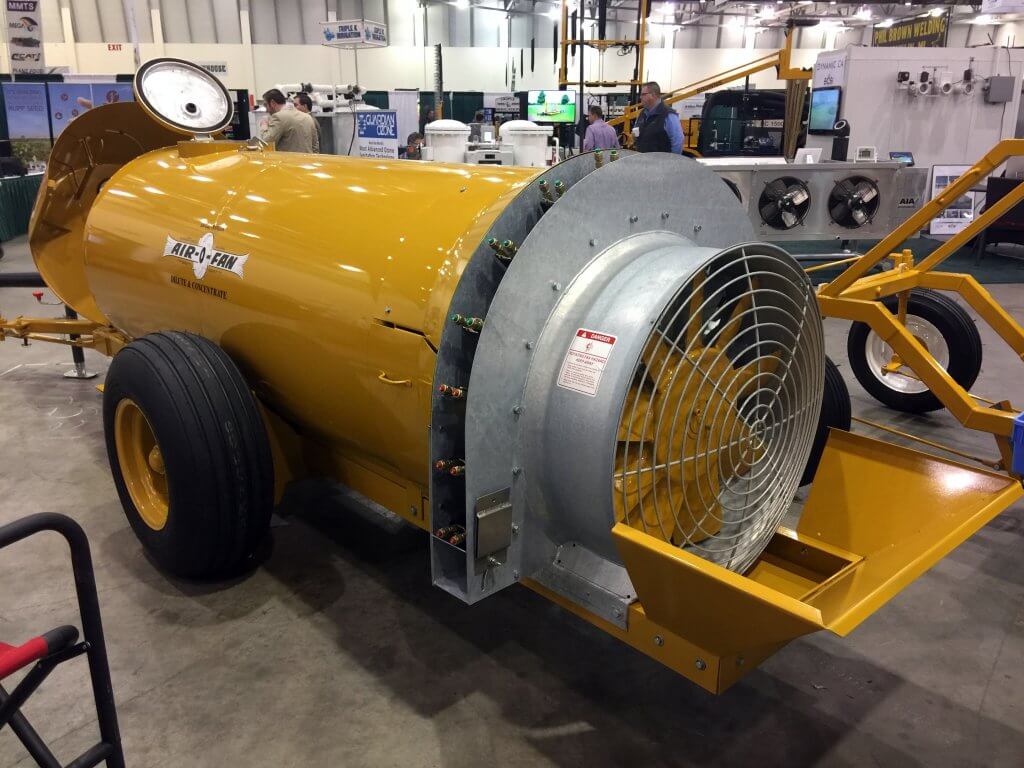
And, lastly (not leastly), was the Air-O-Fan sprayer. Another solidly-built sprayer with a few interesting features. Not shown is the reverse-style propeller which like the Andreoli Eco, claims to draw from clean air, and not spray-laden air. This is undoubtedly the biggest trash guard I’ve ever seen to protect the fan blades from drawing in dirt and leaves (see below). Looks like a CAT steam shovel.
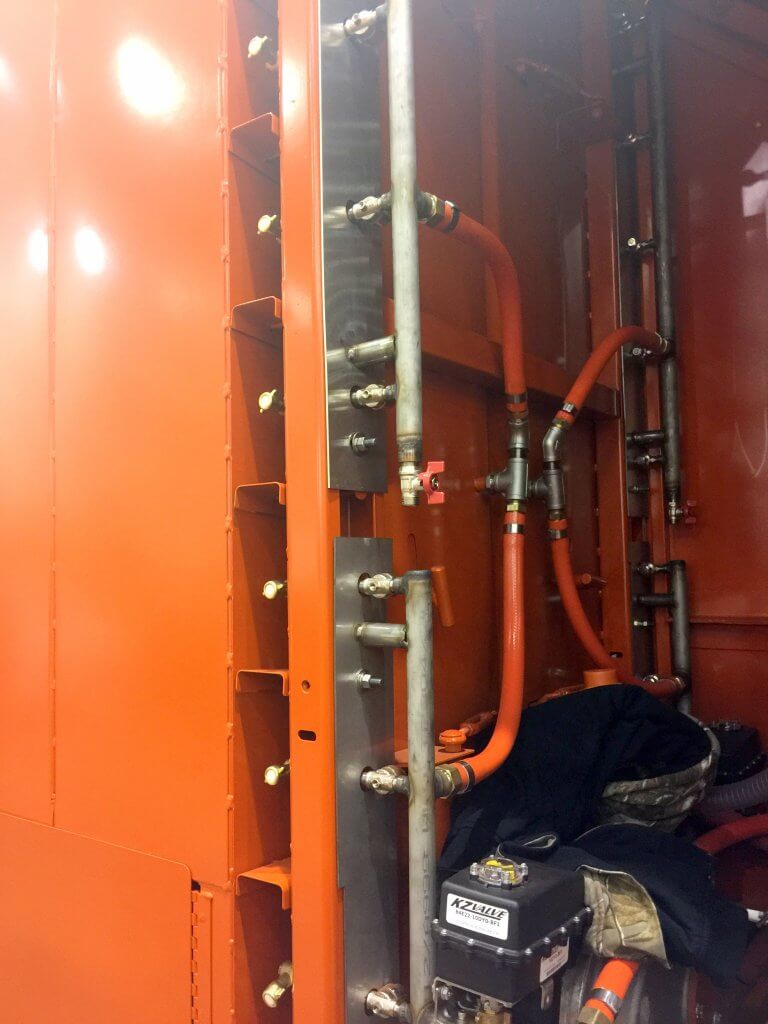
Something that struck me was the air deflector blades inside the fan housing. In my experience, the nozzle bodies and blades are two separate components. But not here, and it makes so much sense! I’ve always taught operators to adjust the air speed/volume and direction first, then adjust nozzle direction and rates second. With this system, you aim the nozzles right along with the air. Expanded systems (e.g. for tree nut, citrus) can have as many as three nozzles per deflector blade.
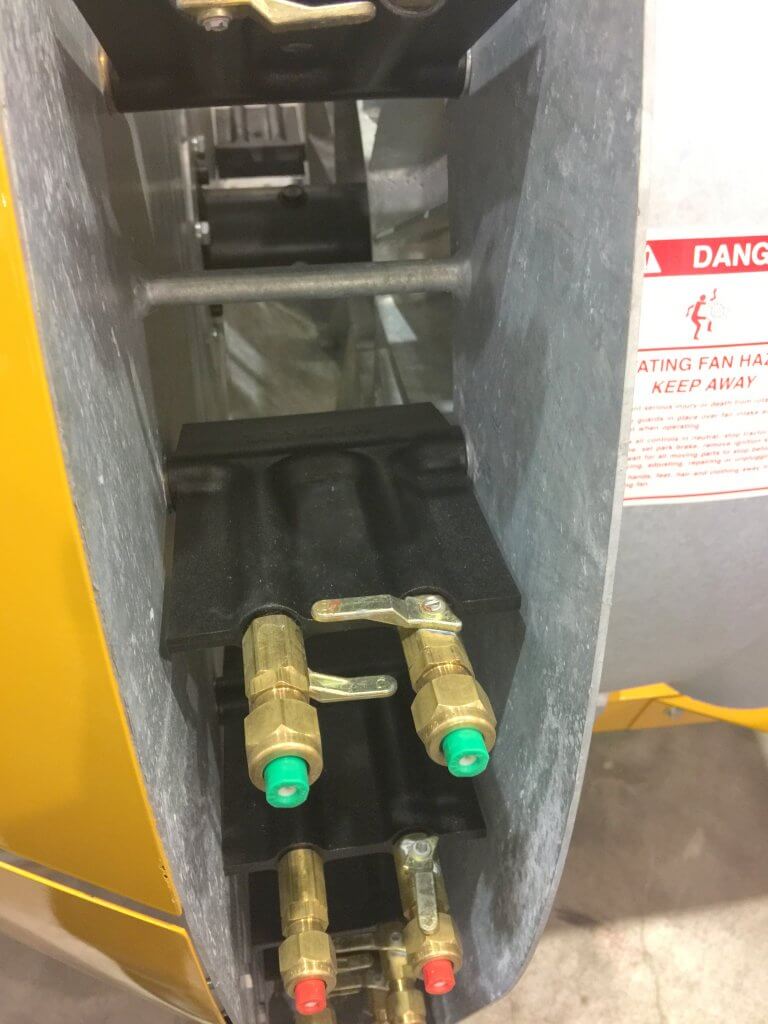
There was one other very exciting feature coming to this sprayer that I promised I wouldn’t reveal until they were ready, but I’ll just write “HVES” so you will remember you heard it here, first!
Closing
So, this was a massive, sprawling article. Congratulations for getting to the end and I hope it opens your mind to the possibilities for horticultural spray application. The GLEXPO tradeshow was a great experience and I’ll try to get back there in the future. Until then, I look forward to bringing some of this equipment to Ontario to try it out in our horticulture operations. There’s always more to learn.
Note: While there’s nothing wrong with this article, a more recent article on this subject can be found here.
It’s nearing the end of a long morning of spraying and you just want to get it done. As the tank empties and you watch the last of the spray cloud waft through the row, you’re thinking about rinsing out and moving on… but did the spray land where you wanted?
How do you really know if you hit the target?
Maybe you’re content with the occasional “shoulder checks” you made from the cab while spraying. Perhaps you stop at the end of the row and get out of the tractor to look for wet foliage during. Maybe you plan to return once the product is dry and look for white residue.
This early morning “shoulder check” was photographed by the operator using his smartphone. You can’t see coverage, but gaps in the spray will show if nozzles are plugged. You can also check to see if you are overshooting or blowing through the target. Photo Credit – C. Hedges, ON.
These are all good feedback practices, but a more accurate method is the use of water-sensitive paper, which turns from yellow to blue wherever spray touches it. You can easily see the distribution of the spray and the overall area covered, and it can be quantified so you can compare one sprayer set-up to another, or see the impact of weather, or even the effects of nozzle choice, pressure and water volume.
Water- (and oil-) sensitive paper: Cheap, simple and available on-line or in person from your favourite sprayer equipment store.
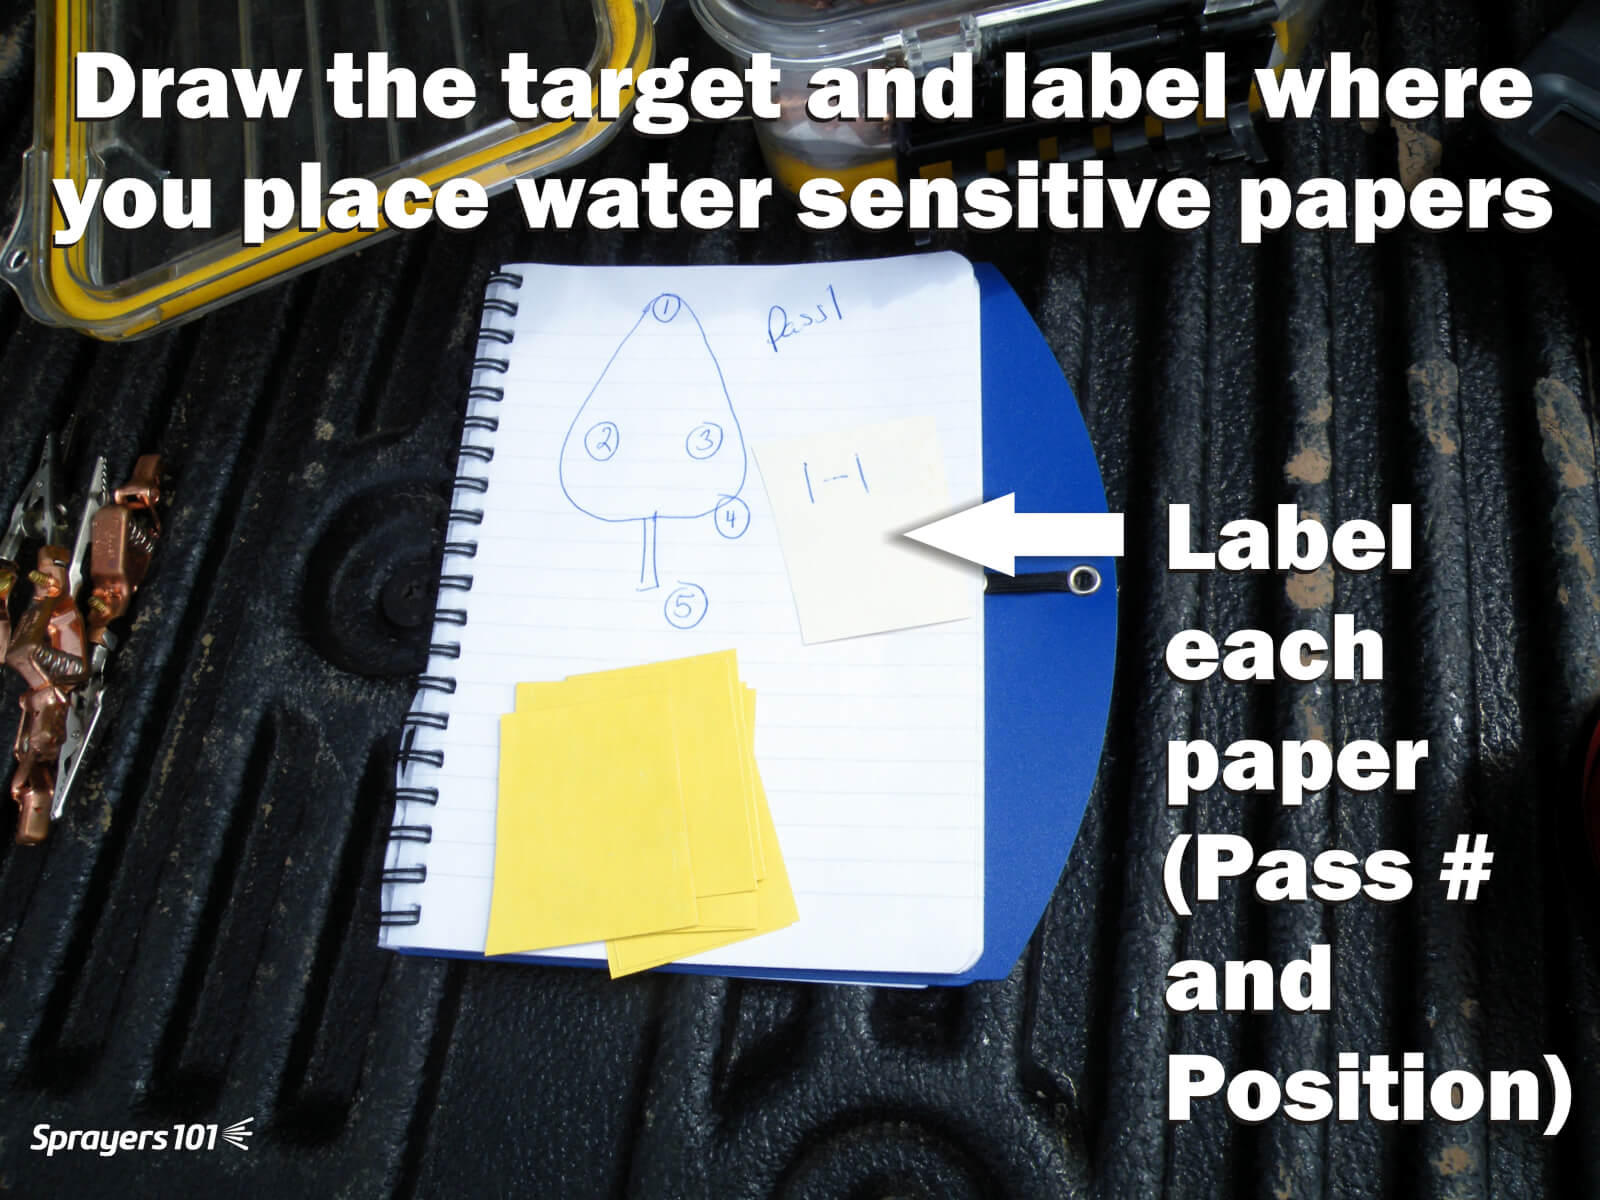
Draw a map
Begin by creating a simple drawing of the tree, cane, bush,vine, etc. you wish to spray. Label the drawing with unique numbers that correspond to where you are going to place the papers. Write the numbers on the back of each paper so you can see where they came from after they are collected. You should also note the pass number, so you can differentiate between each sprayer setup and corresponding pass. You might make a change and want to see how it affects coverage, and it’s very easy to mix up the papers if you haven’t record everything clearly. Plan to do this for at least two plants upwind from the sprayer to ensure you will get an accurate representation of average coverage. Be sure to wear disposable gloves and avoid dew so the papers don’t react prematurely.
Create a simple drawing of the target. Number positions on the drawing that correspond to where you plan to place the papers.
Distribute the papers
It is critical to distribute the papers evenly throughout each target canopy. They should be placed in key locations where pest damage has been an issue in the past (e.g. scab at the top of a tree, or spotted-wing drosophila at the bottom-centre of highbush blueberry), or anywhere coverage is notoriously difficult. Our preference is to place them at the top, centre and bottom of a tree canopy as well as laterally from the outer edge of the canopy beside the sprayer moving in towards the trunk.
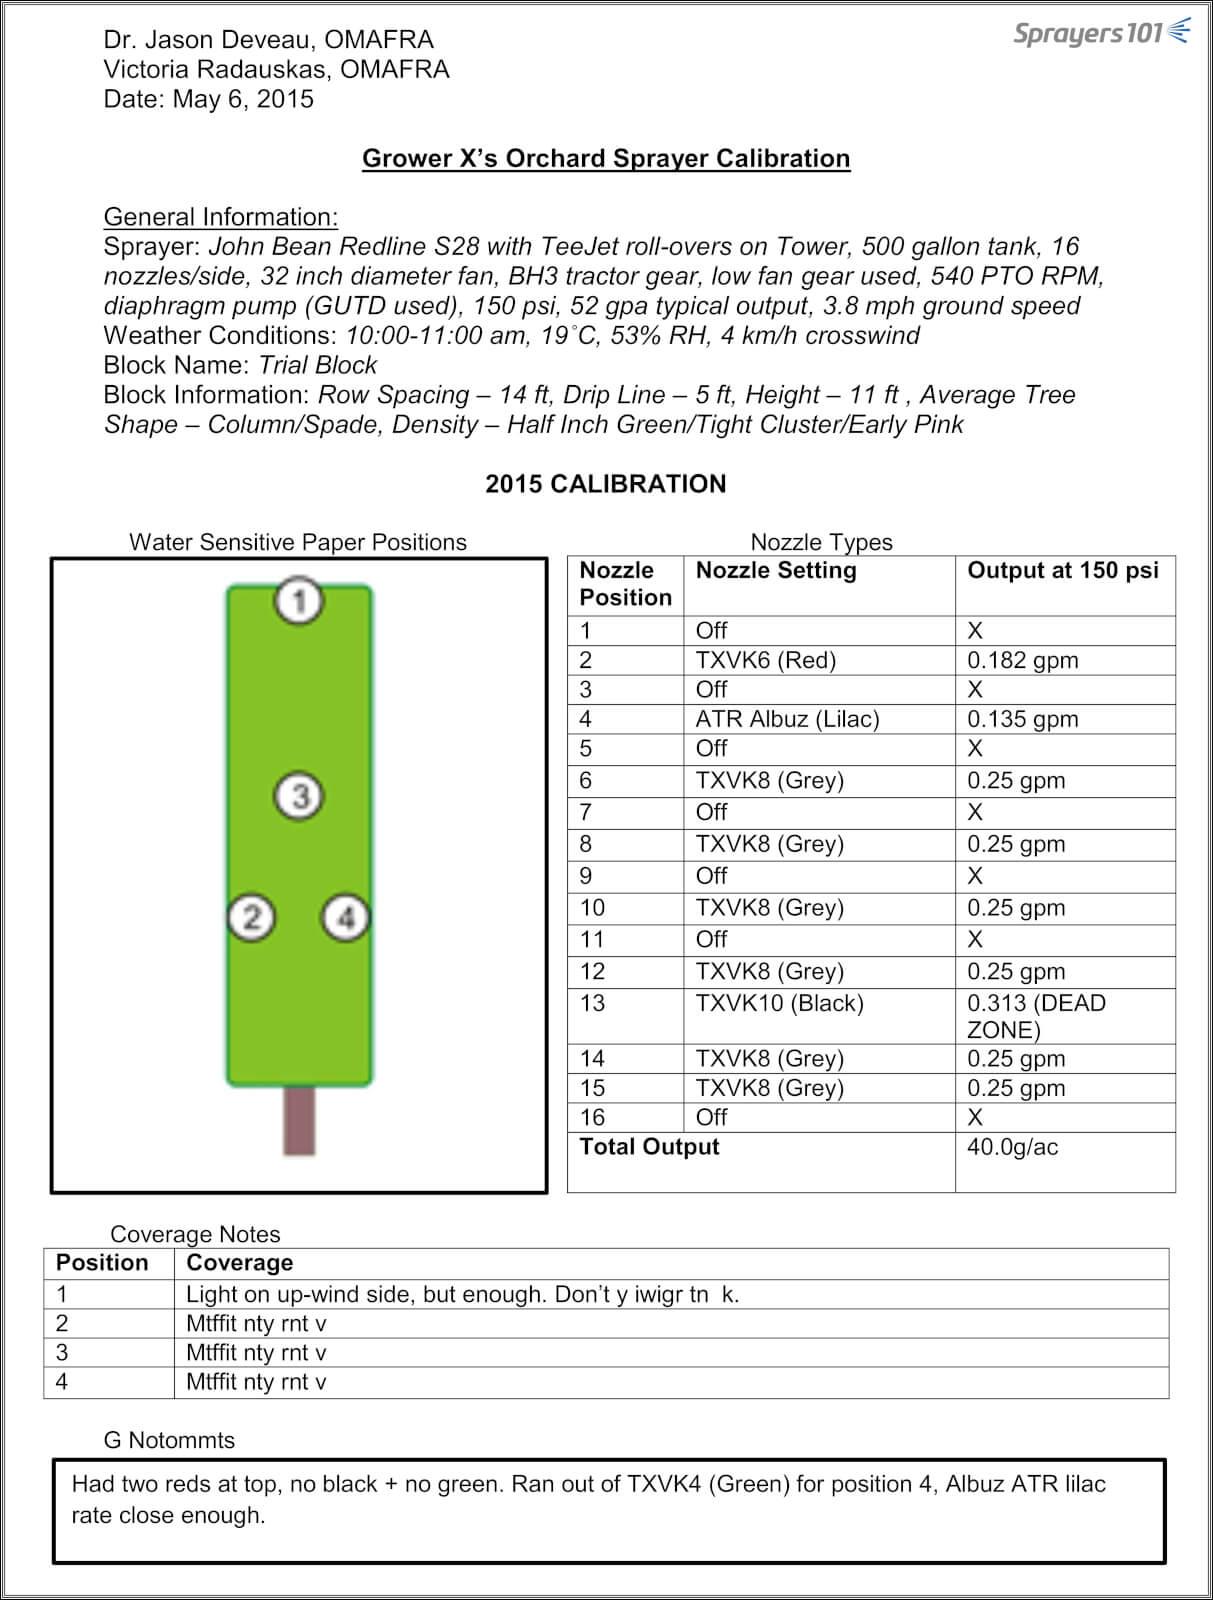
Number positions on the drawing that correspond to where you plan to place the papers. Label the papers as well so you know where they came from. Consider writing the pass number and the position (e.g. 1-1 would be Pass 1, Position 1) so you can evaluate the changes to the sprayer settings from pass to pass. Later, all the information from the calibration can be entered into your spray records, like in this mock-up.
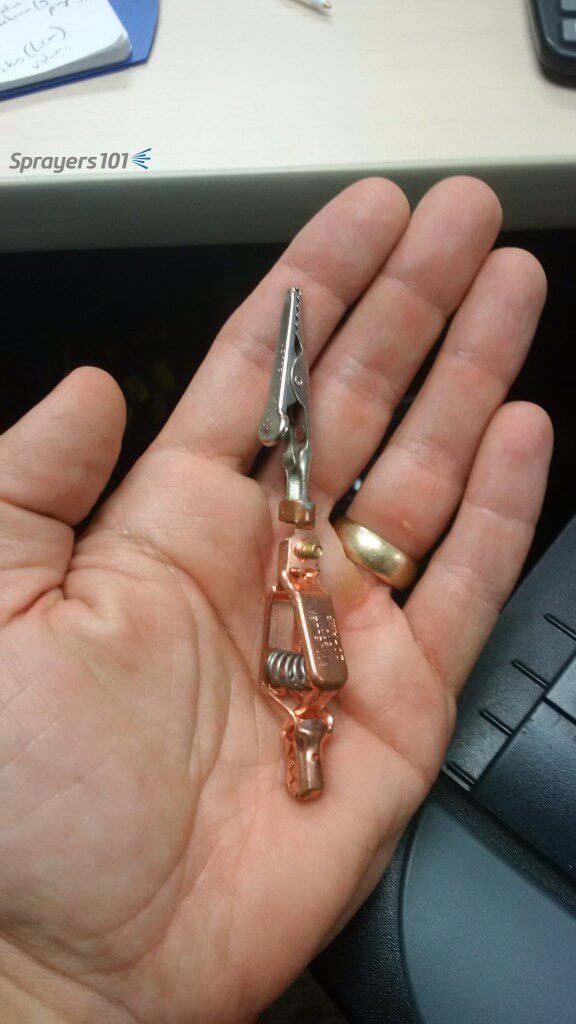
We use spring-back paper clips attached to alligator clips at 90 degrees to attach the papers to small branches. You can also staple them to the upper or lower face of the leaves (as long as they don’t cause leaf to droop). You can wrap them around stems for panoramic coverage or to monitor drenches. They can be stapled the trunk to show if spray is aimed into the canopy or being wasted. You can even skewer to the ground using wire flags to to illustrate poor lower-nozzle positioning and/or canopy run-off. Put them wherever you want to know about spray coverage!
This home-made double-ended alligator clip holds papers at right angles. One end for the paper, the other end to a twig or wire flag.
We typically orient them facing the alleys so their sensitive faces are square to the sprayer as it passes. We often use two in each location, oriented back-to-back facing each alley so you can resolve coverage from both sides. The important part is to ensure you are consistent. Mark the location in the canopy with some colourful flagging tape so you can find the papers after you spray, and if you wish to replace them with fresh papers to evaluate another pass, orient them the same way to make the comparison fair.
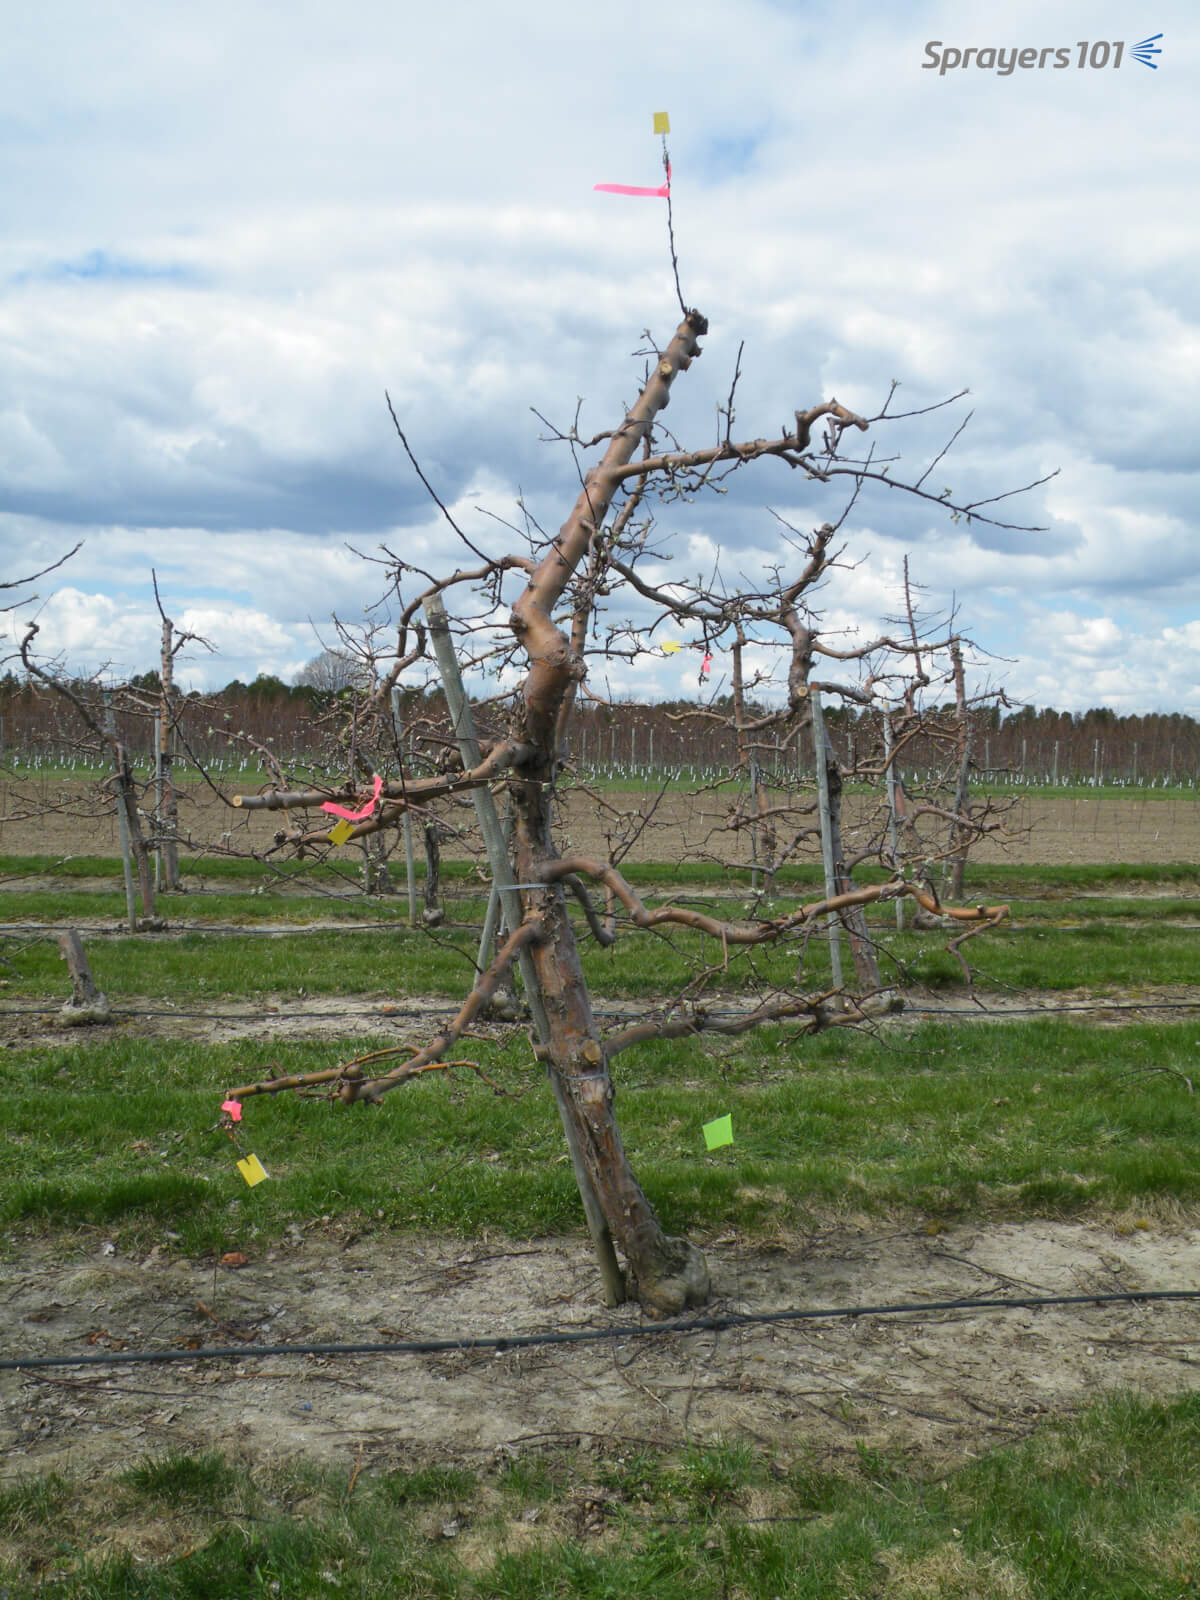
Water-sensitive papers located in five positions in an Empire apple tree. Two papers were pinned back-to-back in each position, distributed evenly throughout the canopy, facing the alleys. One paper was located at the lowest branch to determine if the lowest nozzle position needed to be on. Another paper was pinned to the ground face-up under the tree to show any excessive waste. Be consistent from pass to pass.
Spray, check and spray again
Once the papers are in place, pass by on one side with both booms open (as you would normally spray). Be sure to start spraying well before passing the target, and keep spraying afterwards to ensure the resultant coverage represents an actual application. It is very informative to get out of the cab and examine the papers before passing by on the other side. You can learn a lot about how the wind is affecting the spay.
Once papers are in place, pass by spraying with both booms open to emulate a typical spray day. Be sure to start spraying well before passing the target, and keep spraying afterwards to ensure the resultant coverage represents an actual application. It can be very informative to examine coverage at this point to see how wind is affecting the spray. Then, pass by on the other side to complete the application.An example of the coverage obtained on water-sensitive papers placed throughout an apple tree canopy, and on the ground beneath it.
Interpret the patterns
You might notice the outer portions of larger canopies receive more spray than the inside. This is hardly surprising given that spray must pass through the outside to get to the inside. As a result, inner papers often receive proportionally less spray and should be the basis for determining if you have sufficient spray coverage. This is also why the label recommendation of “spraying to the point of runoff” is unhelpful: the outer portion of wide, dense canopies often begin to drip before the inner portion receives sufficient coverage. Further, how do you spray to the point of runoff? How do you know when to stop before it’s too late? Label language can be frustrating…
When water-sensitive paper is sprayed to the point of run-off, the blue dye will drip. This is fine for a drench (dilute) application, but excessive for a typical concentrated application like foliar fungicides and insecticides.
When assessing coverage, don’t follow the droplet counts in the small guide that comes with the paper sensitive paper kit – they haven’t been updated for a very long time and are more appropriate for field crop applications – not airblast applications. Research and experience suggest that 85 discrete fine/medium-sized droplets per square centimetre and a total coverage of 10-15% should be sufficient for most foliar insecticides and fungicides. Remember, this is only a suggested threshold and in the case of coarser sprays, focus more on even distribution and the 10-15% coverage.
It’s debatable, but 85 Fine/Medium-sized drops per square centimetre and about 15% total surface covered on a minimum 80% of all papers represents adequate airblast spray coverage for most foliar applications. It is less applicable for applications made with Coarse/Very Coarse droplets, because there are fewer of them and they generally cover more area. In this case, focus more on the even distribution of spray and the 15% coverage. An extreme example of this is a drench (dilute) application of oil where total saturation is the goal. Conversely, ultra-low volume applications employ Very Fine droplets and a better metric is uniform, high droplet density rather than area covered.
Make a change and try again
There’s no easy way to define a threshold between sufficient and insufficient spray coverage. When you retrieve and examine the papers, think about how the product is intended to work: “Is it a contact, trans-laminar or locally systemic pesticide? What are the odds that an insect or spore will come in contact with residue? Will I be spraying again soon (e.g. fungicide) and will the spray already on the leaves have residual activity?” Regarding that last thought, protectant fungicide applications are often layered, so what one spray misses, the next will catch. Quite often, “sufficient coverage” is less than most sprayer operators think.
If you are content with the coverage, record your sprayer settings to use them again in that block (in similar weather, and assuming the crop canopy doesn’t change significantly before the next spray day). If you are not content, make a change to the sprayer to improve matters, reset the papers, and go again. It can take time and some effort to get it right, but improved coverage and reduced waste are ample financial reward for your efforts.
Other methods of evaluating coverage
It should be noted that while water-sensitive paper is versatile, cheap and easy to use, it has its shortcomings. Placement and orientation of the paper is very important; it’s easy to hit papers on the outside of the canopy with the sensitive-side facing the sprayer. It’s considerably harder when they are at the very centre of the canopy, or hiding behind fruit. When the thin edge of the paper is oriented to the spray (i.e. oriented facing the ground), it presents very little surface and can be difficult to hit.
Use enough air to only just ruffle the leaves. This exposes all surfaces, however briefly, to the spray. Too much air will align leaves with the spray, exposing only their thin edge and making coverage difficult. Too much air may also cause leaves to shingle (overlap), and create shadows like on the grape leaves shown here.
Further, the papers won’t show the finest droplets (<50 µm), so there may be spray even though you can’t see it. Taken collectively with the product’s mode of action (i.e. contact or locally systemic), and any possible re-distribution by rain or dew, spray coverage becomes a good indicator for protection, but it isn’t definitive. While coverage is a good indicator, improved coverage does not always mean improved efficacy.
Some sprayer operators use other methods to confirm their coverage. Kaolin clay is an inert compound that leaves white residue when dry. Red, yellow or green water-soluble, food-grade dyes will also indicate coverage. Even fluorescent dyes such as phosphorus can be sprayed at night and illuminated under black lights.
Kaolin clay and fluorescent dies sprayed into fruit canopies give a lot of information about sprayer coverage, but are relatively inconvenient compared to water-sensitive paper.Red food-grade dye sprayed from a horizontal boom to demonstrate downwind drift onto a white target. This was a messy experiment and my hands, and the sprayer, were pink for a long time afterwards. Photo Credit – J. McDougall, Ontario.
Take home
These methods give the sprayer operator a lot of information because they land on the actual target, not a piece of paper hung in the canopy. But, they require a lot of time and effort and are typically out of reach for most operators. Further, they do not allow multiple applications on the same canopy to compare the effect of sprayer settings on coverage – once the target is sprayed, it’s sprayed.
No matter which method you choose to use, understanding how changes to you sprayer, or the impact of weather, affect coverage is a critical piece of information. Operators should make an effort to evaluate spray coverage. Here are a few videos describing the process:
Using water-sensitive paper for airblast coverage diagnostics – thanks to Penn State, Univ. New Hampshire and Chazzbo Media (2014).
Checking water-sensitive paper in an orchard. Tower is spraying only water during a calibration run (2013).