We like to keep things simple ’round here and this poka-yoke from Arkansas is both simple and effective. What’s a poka-yoke?
“Poka-Yoke”: a Japanese term that means “mistake-proofing”. It’s a mechanism that helps an equipment operator avoid (yokeru) mistakes (poka) by preventing, correcting, or drawing attention to human errors as they occur. Thanks, Wikipedia.
The problem
An aerial applicator has to spray a lot of fields. They consult their work orders, the plane is loaded, they spray and repeat. However, depending on which herbicide trait was introduced to which crop, accidents can happen. Imagine the mess when you spray a crop with glyphosate… and it isn’t a glyphosate-tolerant crop? This problem promises to become more of an issue as we introduce glyphosate+2,4-D and glyphosate+dicamba-tolerant crops. It may look like the right soybean plant, but you DO NOT want to mess up by spraying the wrong chemistry on the wrong genetics! You think a bit of residue in the lines can cause trouble…
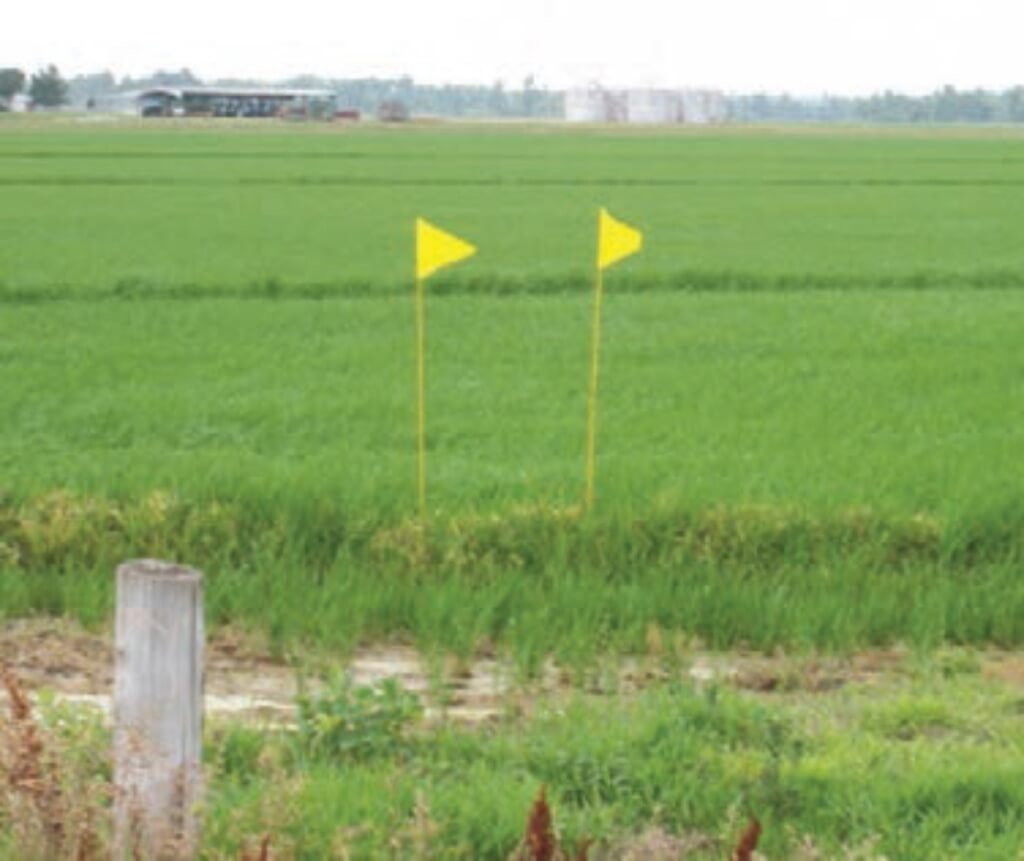
Yellow flags designate this field as a Clearfield rice field (Photo from UofA FSA2162)
The solution
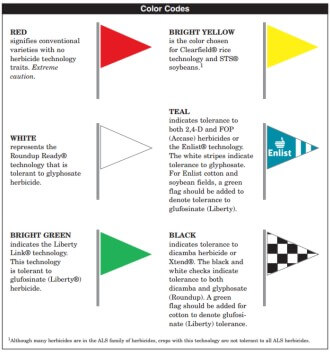
In 2011 the University of Arkansas came up with a “quick and inexpensive” way to prevent this from happening. They used six-foot, colour-coded bicycle flags. Each colour or pattern represented a specific herbicide tolerance, as shown here. Aerial operators were given a copy of this visual key and the growers placed a couple of appropriate flags at the edge of the field on the approach vector at planting.
The result
Aerial applicators got one final check before they started to spray… just in case. In 2014 the innovative people behind this concept reported that it prevented countless acres of accidentally-damaged crops. Several (honest) aerial operators admitted to pulling up just before they started to spray because they realized there was a mismatch between what was in their tank and what the field was supposed to receive.
Corn field with glyphosate (white) and glufosinate (bright green) stacked technology. (Photo from UofA FSA2162)
The challenge
This is the kind of elegant, simple tool that we all should be using for ground rigs as well as aerial sprayers as we begin to plant more crops with stacked traits. Canada, the US, Australia, anyone using these genetics, could benefit. We should consider adopting this method, complying with Arkansas’ existing colour scheme and adding to it as required. Seed companies and agrichemical companies should find a way to bundle the flags with the chemicals and seeds for the buyer.
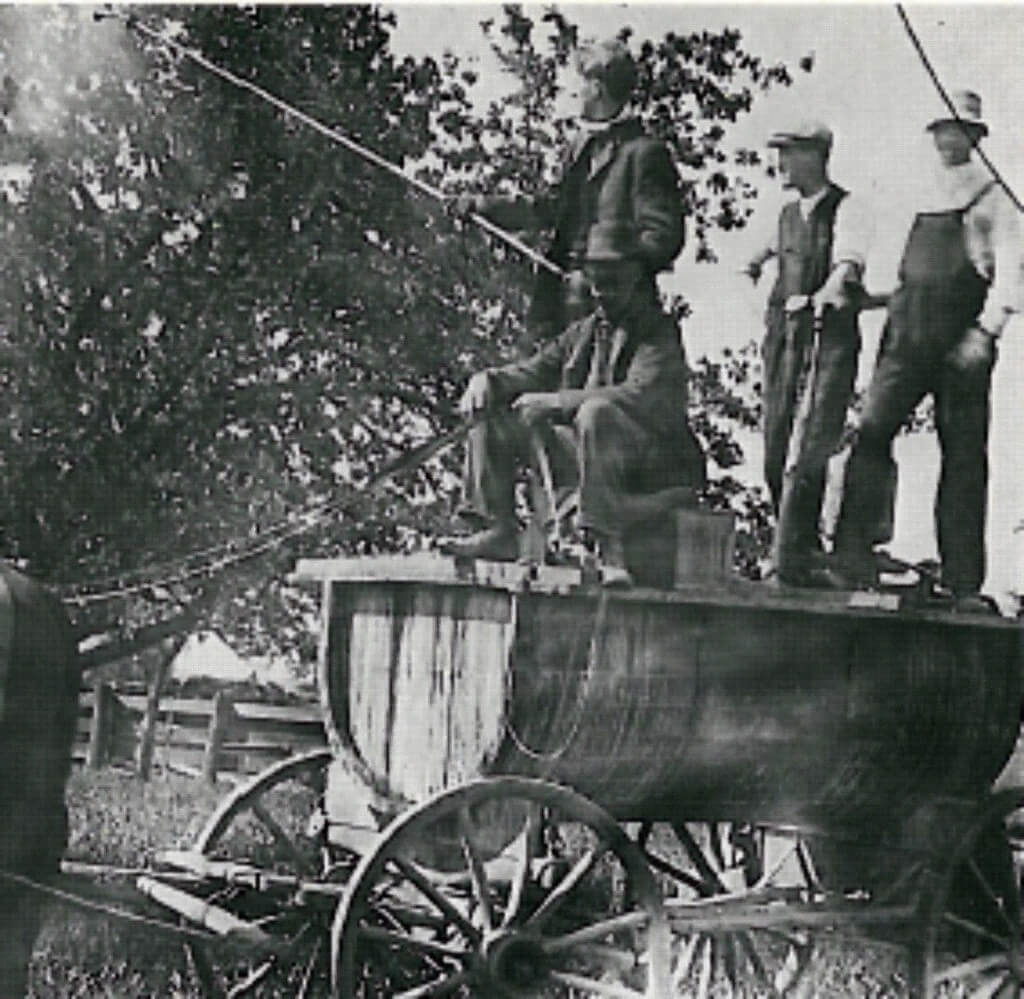
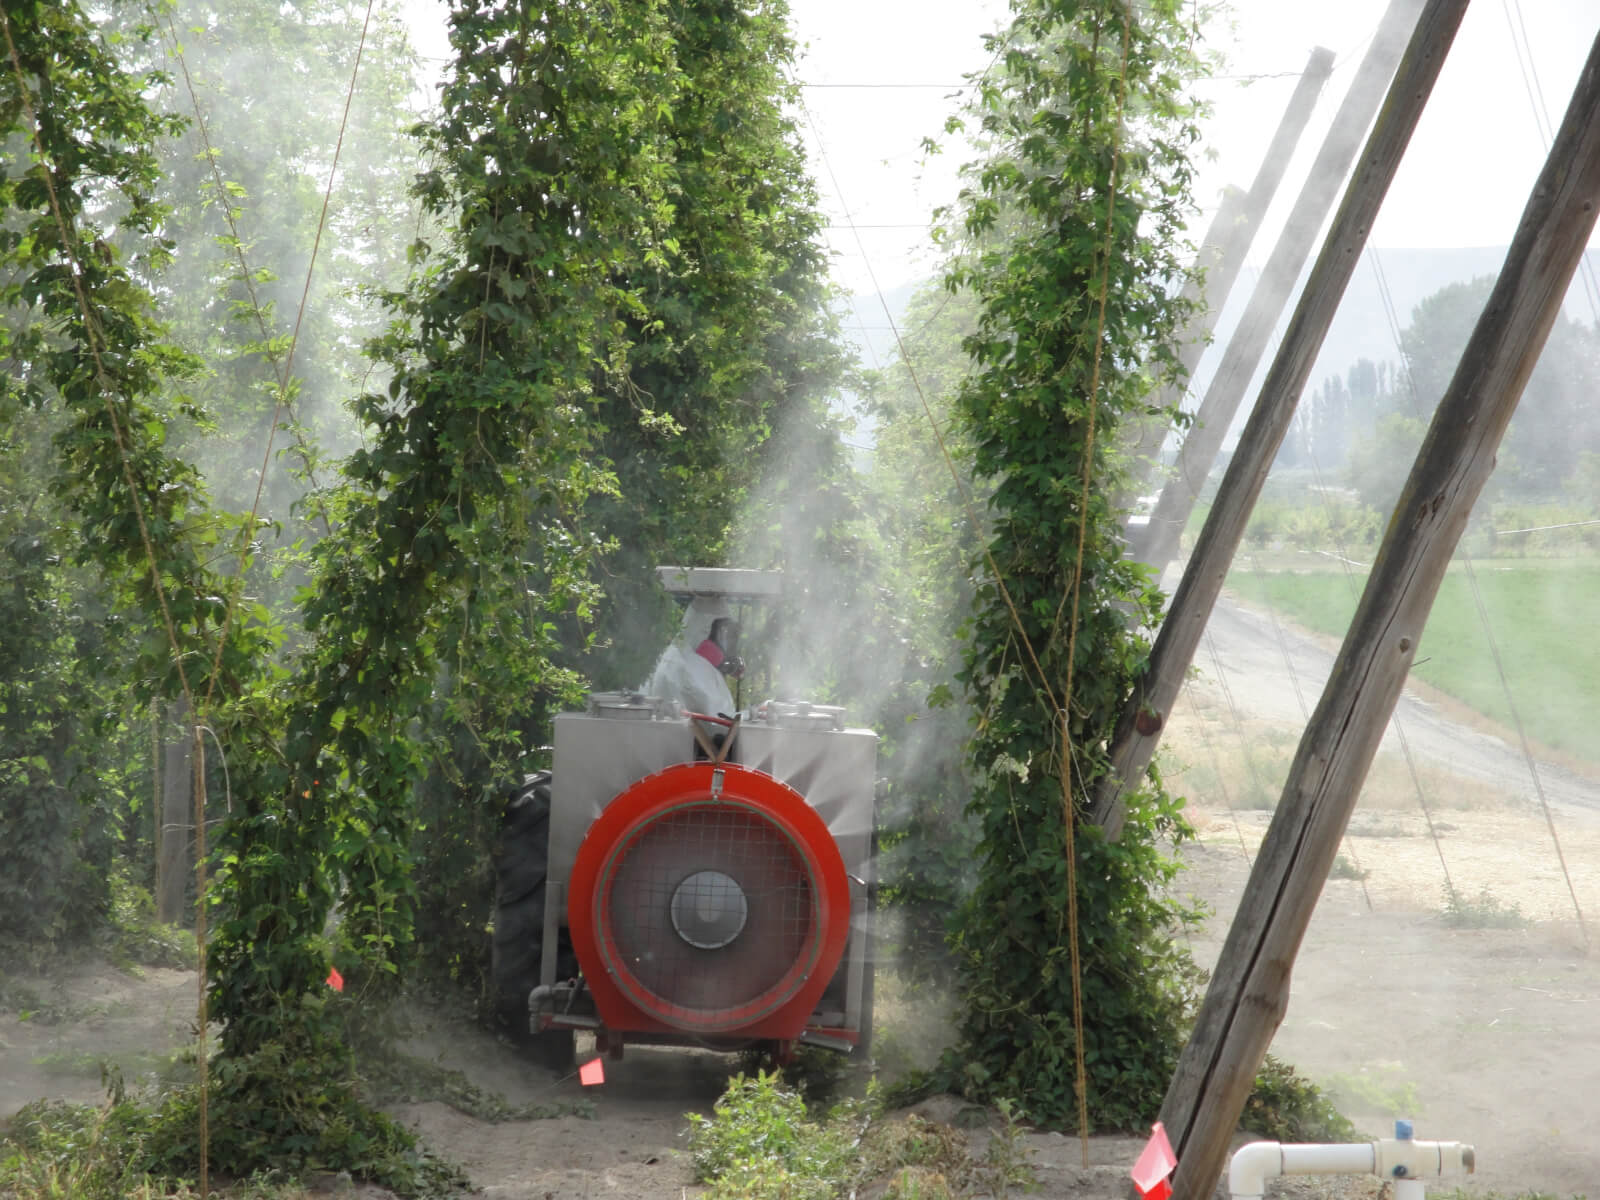
The first modern airblast sprayer was developed in the mid 1900’s, but competed with existing equipment before it was adopted by the majority. As you can see below, we’ve come a long way. As application technology continues to evolve and grow, so does the array of choices facing growers.
An Ontario orchard spray crew c.1910. Pump pressure was maintained by the two operators at the right. The spraying rate by the above method could cover 1.2 to 1.6 hectares (3 to 4 acres) per hour. Image from www.farms.com
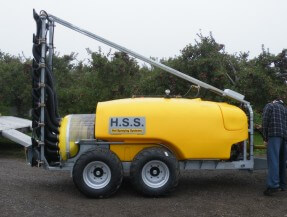
Provide Agro (a subsidiary of N. M. Bartlett Inc.) had been considering introducing a new airblast sprayer to Canada for more than ten years. After deciding not to get into the manufacturing game, they explored importing sprayers from Europe and Australia. In late 2014 they recently invited me to see their choice: the H.S.S. CF airblast sprayer built by Holland-based “Hol Spraying Systems”.
It’s not often I get to see a “new” airblast sprayer design. To be fair, H.S.S. has been building similar sprayers in Holland for more than 20 years, so technically it was new-to-me.
We met at a local apple orchard in Simcoe, where we ran the sprayer through a series of light duties. The first thing we did was explore the sprayer’s features, both optional and standard. As the ambassador to Canada, this particular model had all the bells and whistles. Here is a list of features and observations I feel are worth relating. It’s important to note that this list is in no way an endorsement, nor are any omissions intended to be a condemnation.
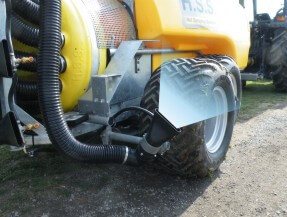
The H.S.S. CF sprayer. Outwardly this PTO-driven sprayer appears very different from Ontario’s typical fleet of airblast sprayers. Notably the flexible ducts and gantry comprising the tower, and the double axle. However, it operates using the same principles as our more familiar sprayers and following a brief inspection of welds and fastens (and given its more than 20 year history in Europe) it appears to be very durable.
Each duct is paired to a nozzle body, and that means each air outlet can be adjusted individually. The tower structure can be customized to match everything from vines to high-density orchards and even has an optional woolly aphid attachment for directing air and spray up-and-into the canopy. For taller crops like hops and semi-dwarf trees, a second fan can extend the tower to 5.5 m.
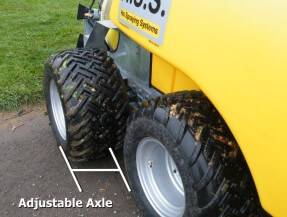
Anyone that’s been stuck in wet weather can appreciate the value in this adjustable double axle. Weight is distributed to reduce compaction and hopefully, the creation of ruts. This feature is standard, but you have the option to upgrade to hydraulic adjustment. I’m not sure how often an operator would want to adjust the axle length, but there it is.
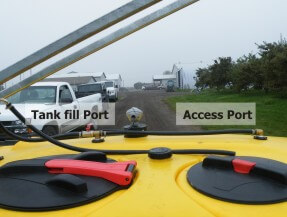
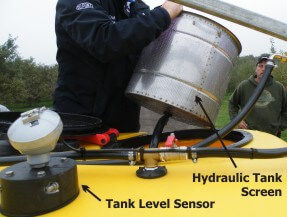
The H.S.S. CF has a lot of features that promote operator safety by reducing the potential for exposure. One convenient feature is the access port separate from the tank fill port. No need to remove the basket to examine/clean the interior, and no need to remove the basket and come in contact with (potentially) concentrated pesticide residue.
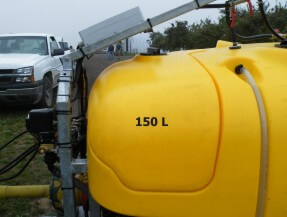
Many large field sprayers feature tank rinse nozzles to facilitate sprayer cleanout following an application. Finally, airblast can boast this feature as well. The 150 L clean water tank supplies enough water to the tank rinse nozzles for a triple, low-volume rinse in the field with no need for a pressure washer or a nurse tank. This prevents residue buildup and reduces operator exposure – and it’s standard!
An optional feature is the tank level sensor, which can be tied to the agitation. If you are using a foamy tank mix, agitation won’t turn on until a preset tank level. I’m not certain about this option because proper tank suspension requires agitation from the beginning – just use a defoamer. Note the tank basket has a hose attached to the bottom… read on.
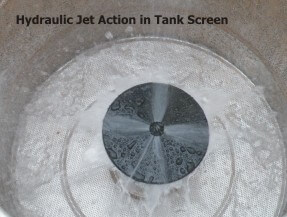
There’s a standard hydraulic jet at the bottom of the tank basket to assist in proper mixing. I don’t know if it precludes mixing a slurry, or if it will improve pesticide bag dissolution, but I have to assume it helps. I trust there’s a safety feature to prevent this nozzle from operating while the hatch is open, but I’m not certain.
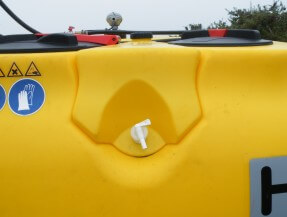
This final standard feature may seem small, but it further reduces the potential for operator exposure. The onboard clean water source is separate from the spray tank and the tank-rinse supply and provides a convenient hand-wash station.
Other features include solenoid shut-offs for boom sections, a rate controller and a small-radius draw bar.
An important function of any airblast sprayer is air handling. Too often, tower sprayers have inconsistent air speeds (and presumably air volumes) over the length of the air outlet. Sometimes this can be compensated for using the small deflectors in the tower, or in extreme cases, replacing conventional hollow cone nozzles in “dead spots” with air induction hollow cones that produce coarser droplets and tend to fly farther under pressure. Using a Pitot meter, we examined the airspeed from each air outlet. The PTO was set to 400 rpm and the fan gear was in low.
Nozzle:
Ground
2
3
4
5
6
7
Top
Left
70 mph
85 mph
90 mph
85 mph
80 mph
85 mph
80 mph
85 mph
Right
75 mph
90 mph
90 mph
90 mph
80 mph
90 mph
85 mph
85 mph
There were no obvious dead spots, and the left and right sides of the tower seemed about equal. The bottom two positions were notably slower than the rest, but given the distance to the target in that position, and the fact that ambient wind is slower at the ground, it’s interesting, but not necessarily a concern.
We arranged a set of water-sensitive targets in the canopies of semi dwarf apple trees to get a sense of the sprayer coverage. Admittedly, it was very humid and there was little wind that day, so coverage is much easier to achieve because so little spray evaporated or was blown off course before reaching the target. We ran different combinations of PTO speed and fan gear. These images are from 540 rpm and low fan gear using red Albuz nozzles (1.5 L/nozzle/minute @ 6 bar) spraying about 400 L/ha at about 5 kph. On a drier and windier day, higher volumes would be needed.
There were no obvious misses, even when papers were oriented parallel with the ground (exposing their narrow edge to the sprayer, such as in the paper on the right). This isn’t conclusive, but it does show that the sprayer had no trouble penetrating the canopy, and with further tweaking should be able to provide suitable coverage throughout the canopy. Personally, given the upward orientation, I would use the woolly aphid nozzle for all applications, particularly for drenches. More on that later.
One notable quality was the “quiet” operation of the sprayer. Applicators are familiar with the loud whine created by most airblast sprayers; at lower rpm’s and in low fan gear, the tractor seemed as loud (or even louder) than the sprayer operation. You can watch a video of one of the spray passes at the bottom of this article.
So the big question: “How much?”. You’ll have to contact the dealers to find out more, but I will say that stripped down to standard features, it’s comparable to some of the more expensive sprayers in Ontario. Don’t be dissuaded because I believe the expense is warranted given the features, with particular note of the on-board tank rinse system and adjustable air ducts.
So is this the sprayer for you? Well, if you’re in the market for a new sprayer, always start by prioritizing your goals. Perhaps work-rate is a priority, so look to sprayer capacity to reduce the number of refills and consider over-the-row technology (where possible) to reduce the number of passes. Perhaps the crop is adjacent to sensitive areas or residential homes and drift control is a priority; consider adjustable air direction and adjustable air speed.
When compiling a prioritized list, reflect on the positives and negatives of your current sprayer and talk to fellow growers about their experiences. It may come down to personal preference, but consider the following points. These points are in no particular order; they come from many articles I’ve read on the subject of considering new equipment purchases and from talking to dealers, mechanics and sprayer owners:
Necessity – Is a new sprayer really needed? Manufacturers have a number of retrofit kits available to upgrade and improve sprayers. If poor pesticide performance has led to the decision to purchase a new sprayer, be sure it’s related to the technology, and not to an operating error.
Crop Type and Acreage – Consider the size of the operation and the size, shape and density of the crop(s). Can the sprayer adapt to provide adequate coverage throughout the growing season and in the long-term? How flexible is the sprayer when spraying different products onto different targets? • Sprayer Capacity and Filling – Fewer refills means a higher work rate, but increased capacity also means more weight, so consider the effects on navigation, turning radius and soil compaction. Is the tank easy to fill?
Cleaning, Calibrating and Maintenance – Moving between crops sometimes requires complete cleaning and decontamination of the tank, lines, nozzles and any shrouds or ducts. Clean water reservoirs, tank-rinsing nozzles and overall accessibility should be considered. Review the steps required to winterize and to calibrate the sprayer. Is it easy to access parts? Is operator exposure minimized
Horsepower – This is an important consideration for airblast sprayers because fans move a lot of air and liquid. Tank agitators require power, too. Consider selecting from the higher range of manufacturer-recommended horsepower to improve longevity. Remember, however, that fans typically don’t have to operate at the maximum rated rpm’s, particularly early in the season.
Nozzle Technology and Operating Pressure – Consider the range of nozzle-types intended for use and ensure the sprayer can provide sufficient pressure. While more expensive, diaphragm and piston pumps have fewer moving parts in contact with the spray solution, reducing cleaning time and operator exposure.
Spraying Conditions – A sprayer has to be reliable, even in adverse conditions, so consider the operating environment. Night spraying, uneven terrain, high winds, dry conditions – many environmental factors can impact sprayer performance and may warrant special consideration. Investigate deflectors, shrouds and the structural framework and durability of the sprayer.
Since its introduction in late 2014, growers have been slowly adopting this sprayer in Ontario and the northern US. Some high-density operations have purchased the optional over-the-row boom system that allows them to spray multiple rows at once. Here at at the Simcoe Resource Station, we’re hoping to run the HOL sprayer in apples for the 2016 season to see if the optional woolly apple aphid (WAA) nozzle has any impact on scale, mites and of course, WAA control. Moreover, we plan to run that nozzle all season long to see if its upward angle improves underleaf coverage and canopy penetration.
A local strawberry producer was just beginning his harvest when the entire field was suddenly stricken with anthracnose. He would have done almost anything to save it, but he could only watch in frustration as the disease quickly devastated his crop. While he was telling me this story, he was wringing his hands; I’m sure he didn’t realize he was doing it. It had been more than a month since the crop was lost and he was obviously still very upset. Let’s put on our deerstalker hats and consider what might have caused the trouble.
Strawberry anthracnose. Photo by Pam Fisher, former berry specialist with OMAFRA.
Most of the fungicides we apply in horticulture are protectants, not curatives. What that means is that the fungicide has to be in place before disease has a chance to take hold. Once it establishes a beachhead, you can typically only hold it at bay, not eradicate it. So, if you’re guilty of waiting too long between fungicide applications, the problems may have already begun. This is exacerbated when you don’t achieve the necessary spray coverage. Put the two together and mix in rainy and warm conditions and diseases like anthracnose can spread at alarming speed.
Method
I focus on the sprayer part of disease management, so I have to assume that inoculum is being controlled as much as possible (e.g. culling infected plants, drip irrigation, etc.). I asked the grower about his sprayer and his spraying schedule. He admitted to pushing the limits between fungicide applications, and being uncertain about the spray coverage he was achieving with his conventional flat fan nozzles.
Strawberry Sprayer
In cases like this I try to find gentle ways of introducing the idea of using more water, increasing the frequency of applications, or buying new nozzles, because there is time and expense involved and many growers don’t want to hear that. However, when I started my soft sell routine, he looked me straight in the eye and said he’d lost tens of thousands of dollars in revenue so a few nozzles or a couple more applications were not a pressing concern. There’s a point in any endeavour when you’ve committed so much time and money that you’ll do pretty much anything to see it come to fruition (pun intended). He was willing to do whatever it took. This was my kind of guy.
So, in preparation for next year, we diagnosed spray coverage from five different sprayer set ups. Let me point out, as I always do, that spray coverage analysis does not necessarily extend to control. They correlate well, but if you aren’t using the right product or your timing is off, even the best coverage won’t help you. Caveats aside, here’s what we tested:
Setup1:
Broadcast application using a horizontal boom with TeeJet Twinjet 8006’s at 8.3 bar (120 psi) on 50 cm (20 in) centres. We calculated a nozzle rate of 3.9 L/min (1.03 gpm), so at 5.0 km/h (3.1 mph) that’s 923 L/ha (98.7 g/ac).
Setup 2:
Banded application on a horizontal boom equipped with a row kits suspending three TeeJet XR 8002’s at 8.3 bar (120 psi). We angled the two side nozzles so the fans were not perpendicular or parallel with ground. This kept more spray on the raised row and out of the alleys. The swath covered 50 cm (18 in) and we calculated a nozzle rate of 1.29 L/min (0.34 gpm), so at 5.0 km/h (3.1 mph) that’s 1,016 L/ha (108.6 g/ac).
Setup 3:
Banded application on a horizontal boom equipped with a row kits suspending three TeeJet XR 8002’s at 6.2 bar (90 psi). We angled the two side nozzles so the fans were not perpendicular or parallel with ground. This kept more spray on the raised row and out of the alleys. The swath covered 50 cm (18 in) and we calculated a nozzle rate of 1.14 L/min (0.3 gpm), so at 5.0 km/h (3.1 mph) that’s 896 L/ha (95.8 g/ac).
Setup 4:
Broadcast application using a horizontal boom with TeeJet Twinjet 8004’s at 6.2 bar (90 psi) on 38 cm (15 in) centres. We calculated a nozzle rate of 2.27 L/min (0.6 gpm) so at 5.0 km/h (3.1 mph) that’s 717 L/ha (76.5 g/ac).
Set up 5:
Broadcast application using a horizontal boom with TeeJet Twinjet 8006’s at 6.2 bar (90 psi) on 38 cm (15 in) centres. We calculated a nozzle rate of 3.4 L/min (0.9 gpm) so at 5.0 km/h (3.1 mph) that’s 1,076 L/ha (115 g/ac).
Protocol and Conditions
It was late September, so the weather was a cool 8 °C, humidity was low and winds averaged 5 to 15 km/h. We timed our passes to correspond with lighter wind wherever possible. Three sets of water-sensitive paper were placed in a single row, but only one pass was made per sprayer setup. One paper was placed at the top of the canopy which is always very easy to hit, so we oriented it sensitive-face-down. The second paper was placed midway down the canopy, oriented facing up. The final paper was also oriented facing up, but placed at the very bottom of the canopy, more or less on the ground. Collectively, we spanned the depth of the canopy.
Following each application, papers were collected for digital analysis using “DepositScan” which determines the percent of the paper covered with spray, and the droplet density. Both of these factors contribute to overall coverage. This wasn’t intended to be a rigorous experiment, so the means are presented here with standard error for the sake of comparison. There was no statistical analysis. In the case of papers located face-down, when only trace amounts of spray were discernible they were assigned a percent coverage of 1% and droplet density of 25 droplets/cm2.
Results
A few observations before we get to the results. Research has demonstrated that row kits and higher volumes improve spray coverage, and that’s why we tried banding the applications using row kits in Setups 2 and 3. However, this grower didn’t use GPS to plant his rows, and while they weren’t too crooked, they made it challenging to apply in a band. Further, there is some concern that a banded application would miss any inoculum in the alleys. These are important points to factor in when considering methods to control disease.
The keen reader might notice we sprayed using pressures that exceed the manufacturer’s recommendations. In fact, none of these tips were rated over 60 psi and I used a formula to calculate their output at our high pressures. I have been heard to say (many times) never to exceed the manufacturer’s rates because it makes a mess out of the spray quality: droplets get much finer and pressure does not cause finer drops to penetrate a dense canopy. Better to switch to larger nozzles and stay within the pressures indicated on the manufacturer’s rate tables. I maintain that assertion. However, the grower was assured by fellow growers and custom applicators that this was the way to go and he wanted to try it. So, that’s where Setups 1, 4 and 5 came from.
Be aware that a small sprayer like the one in this study needs considerable pump capacity to support such high pressure and flow to the boom and maintain effective agitation. For more information on pumps, check out this article.
The following table expresses the coverage obtained by setup:
Set up
Paper Position
Mean % Coverage (±SE)
Mean Deposits/cm2 (±SE)
Setup 1 – Broadcast XR 8006’s on 20” centres at 120 psi for 98.7 gpa
Top
1.0 ± 0
25.0 ± 0
Middle
23.6 ± 4.5
253.5 ± 72.9
Bottom
15.2 ± 2.1
423.2 ± 35.3
Setup 2 – Three banded XR 8002’s at 120 psi for 108.6 gpa
Top
2.1 ± 1.1
78.9 ± 53.9
Middle
54.8 ± 12.1
275.2 ± 145.3
Bottom
29.1 ± 2.7
544.5 ± 70.4
Setup 3 – Three banded XR 8002’s at 90 psi for 95.8 gpa
Top
7.4 ± 5.9
134.4 ± 52.2
Middle
31.6 ± 15.9
203.6 ± 108.5
Bottom
8.1 ± 3.9
224.4 ± 102.3
Setup 4 – Broadcast Twinjet 8004’s on 15” centres at 90 psi for 76.5 gpa
Top
1.0 ± 0
25.0 ± 0
Middle
33.3 ± 5.0
240.7 ± 70.9
Bottom
12.9 ± 6.0
263.9 ± 95.2
Setup 5 – Broadcast Twinjet 8006’s on 15” centres at 90 psi for 115 gpa
Top
2.3 ± 1.3
105.6 ± 80.6
Middle
48.9 ± 5.5
194.3 ± 25.6
Bottom
19.5 ± 10.3
246.8 ± 40.4
The results may be easier to compare and contrast in the following graph.
Strawberry coverage results for all five setups.
Observations
According to the results, Setup 2 appeared to provide the best overall coverage. This is no surprise given that it was the second highest volume and employed a row kit. This corresponds with findings that have been published elsewhere. However, the excessively high pressure did create a lot of drift and the row kit didn’t always line up with the planted row. Further still, there’s the potential for missing anything that might harbour inoculum in the alleys, like runners. This setup wasn’t appropriate for this particular situation.
The second-best overall coverage was obtained from Setup 5. This represented the highest volume, and a preferably lower pressure on twinjets, which may have allowed the spray to penetrate the canopy from multiple angles. This broadcast application is more reliable for hitting meandering rows and covers the alleys as well. So, the grower plans to employ this setup for the 2016 season, spraying at shorter intervals and confirming his coverage with water-sensitive paper. Let’s hope it works out.
End-of-Season Update
The grower that volunteered his time to this study has reported that his strawberries at the end of the 2016 season were absolutely beautiful. Granted, it is always difficult to draw a direct correlation between sprayer calibration and control. For example, 2016 was a very dry growing season and disease pressure was lower than in 2015. Nevertheless, spray coverage plays an important role in crop protection and our work to improve sprayer performance definitely played it’s part. His success is great news!
In 2013, when this sprayer was constructed, Ontario’s hops acreage was expanding for the first time in many years. While there were a few large operations, most were small acreage hobbyists and part-time hops growers that did not have any experience spraying the crop. The latter operations recognized a need to spray, but couldn’t justify investing in an expensive (and complicated) airblast sprayer.
In response, we set out to design a budget-conscious, low-capacity, tower-style sprayer that small-acreage growers could build for their own operations. Our hope was that hydraulic pressure would give droplets sufficient momentum to cover all foliar surfaces, thereby eliminating the expense of an air-assist fan. Additionally, the telescoping tower would allow the operator to match the height of the crop canopy as the season progressed, reducing the amount of wasted spray mix.
Unfortunately, the results of our spray coverage trials indicated that while the upper-face of leaves received excellent coverage, the under-side received only sparse coverage. We were unable to move the trials beyond spray coverage and into the efficacy stage, and because of this, we do not know if the under-leaf coverage would be sufficient to control sucking insects or diseases with contact products.
So why publish this article? The principles behind the design, construction, and testing of this sprayer are still valuable. It led, in part, to growers attempting to modify older and inefficient airblast sprayers to duct air through homemade towers (see here). But, be advised that without efficacy data, we must recommend that budget-conscious and/or small acreage hop growers explore the use of gently used, conventional airblast sprayers.
Introduction
Hop bines are trained around twine lines and grown an average 5.5m (~18ft) high. Each line supports two or more bines and, when mature, the line becomes a dense column of foliage as much as 0.5m (~2ft) in diameter. Hopyards, both organic and conventional, use radial airblast sprayers to apply products to the foliage. However, the profile of the radial airblast boom does not match the profile of the target crop. The nozzles at the top of the sprayer have to spray a target 5.5m (~18ft) away, while those at the side spray a target 0.5m (~2ft) away. Additionally, the air from the fan must be calibrated to carry the spray to the highest point on the hop bine, which means it is excessive for the length of bine directly adjacent. With this in mind, it was theorized that a more efficient sprayer design would feature a vertical boom to position each nozzle as close to the target as possible.
We would build “the Hopsprayer”.
Rears airblast sprayer tackling 16-20 foot bines. Photo credit – D. Groenendale, Washington
Beyond the obvious requirements of operator safety and being mechanically sound, the design and construction of the Hopsprayer was guided by four principles:
The Hopsprayer should be less expensive than a conventional 3-point hitch airblast sprayer or small trailed airblast sprayer, making it cost-effective for Ontario’s small-acreage operations (~$4,000.00 CAD).
The Hopsprayer should be constructed of over-the-counter parts that require minimal modification and no special machining or tools to assemble.
The Hopsprayer should have the capacity to operate in the same conditions as an airblast sprayer (i.e. moderately uneven terrain, reasonable ground speeds, and through any configuration of hopyard trellising).
The Hopsprayer should achieve comparable or better spray coverage along the entire length of the hop bine, both on the upper and lower surfaces of the leaves.
Key Structural Components
In order to make construction as simple as possible, it was decided to build the sprayer from a commercially-available three-point hitch horizontal boom sprayer. After removing the horizontal boom, several concepts were examined for mounting nozzles on a dynamic vertical boom. The key requirement was that the vertical boom could be raised incrementally, and nozzles activated sequentially, to match the height of the hop bine as it grew taller over the growing season.
The boom itself went through several redesigns, each dismissed for reasons of excessive weight, lack of structural stability, or concerns about operator safety when raising and lowering (or even folding and unfolding) the boom. Finally, it was decided to use a commercially-available 6m (~20ft) sliding aluminium ladder. This had the advantage of being strong, light, easy to mount, and the hollow rungs were ideal for running spray lines from one side of the boom to the other. Plus, with the addition of a marine hand winch, the ladder could easily be extended to any height.
Regarding the nozzles, several nozzle bodies and tips were considered, but the Arag Microjet had several advantages over conventional nozzle-body-and-tip configurations. The Microjet has a mixing valve built into the nozzle body which allows the operator to turn individual nozzles off, as well make minor changes to the spray quality emitted from each unit. Further, the brass nozzle body bends 90° before terminating in a threaded male connection, ideal for fixing to the ladder and attaching spray lines.
From this point, it was a matter of positioning the key components and finding appropriate mounting hardware.
Construction
1 – Removing horizontal boom from three-point hitch sprayer
(~$2,000.00 CAD for new sprayer)
Costs vary depending on the sprayer, but the sprayer should feature a pump capable of 200 psi, a minimum capacity of 100 US gallons and a chassis that wraps around the tank to provide a sound surface in the rear for mounting he ladder. Removing the existing boom is a simple matter of disconnecting the feed line and using a set of wrenches to unbolt the boom itself.
Horizontal boom sprayer
2 – Fitting the vertical boom (ladder)
(~$200.00 CAD for ladder, pipe and fasteners)
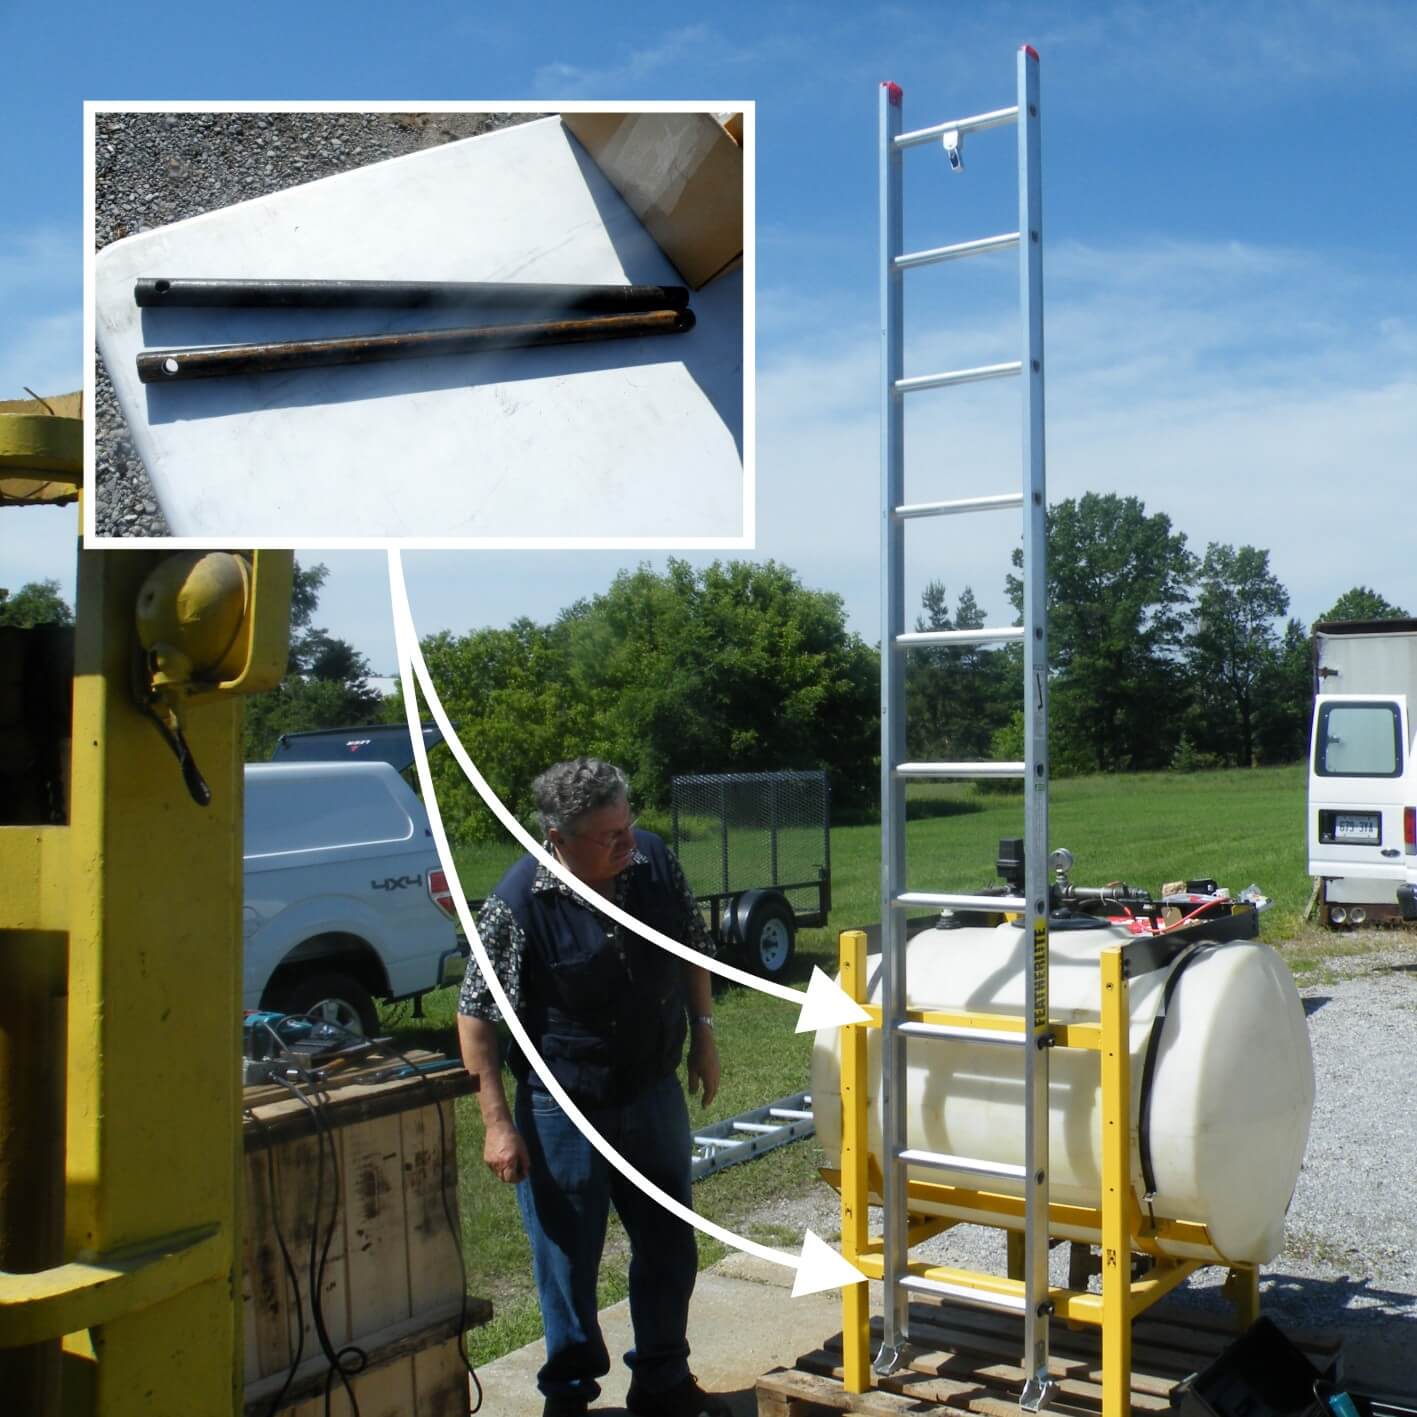
A 6m (20ft) ladder will not actually extend 6m because an overlap is required between the two lengths for stability. However, when mounted to the sprayer it will achieve a final height of 5.5m (~18ft) off the ground. Cut two lengths of black pipe with a diameter that just fits in the hollow rung (~½”) to a length that spans the chassis at the rear of the sprayer. Centre the ladder, punch, pilot and drill holes through the pipe and the sprayer chassis (take care not to hit the poly tank) to mount the ladder using bolts, lock washers and nuts.
Dry-fit the vertical boom
3 – Preparing to mount the nozzles
(~$1,000.00 CAD for 12 Arag Microjet nozzle assemblies)
Remove the ladder and separate the two lengths. Remove the two latches that lock the ladder when it slides. We mounted nozzles every 45cm (at each rung) but that was too many. Consider mounting nozzles every second rung (~90cm). We mounted the nozzles with 9/32” U-bolts but hose-hangers only require one hole and can be swiveled to position the nozzle. This is how the bottom four nozzles were attached to the chassis (see inset), not the ladder. The ladders must be able to slide past one another and the valve handle must be unobstructed.
Dry-mount a nozzle (hose-hanger in inset)
4 – Grinding and mounting the nozzles
(~$100.00 CAD for mounting hardware and grinder disc)
Remove the dry-fitted nozzle. Centre-punch and drill all the holes for the U-bolts (or preferably, the hose hangers). Remove the threaded swivel from each Microjet. Use a hand drill set to low with a Robertson bit, and an angle grinder to carefully remove the thread and taper the tip to accommodate a ½” hose. Be aware: eye protection is imperative and the brass will get hot. Replace the cool swivels and mount all the nozzles on the ladder. Use washers and set them so the hex-nut on the nozzle body is flush against the aluminium ladder.
Removing thread from brass swivel
5 – Plumbing the sprayer
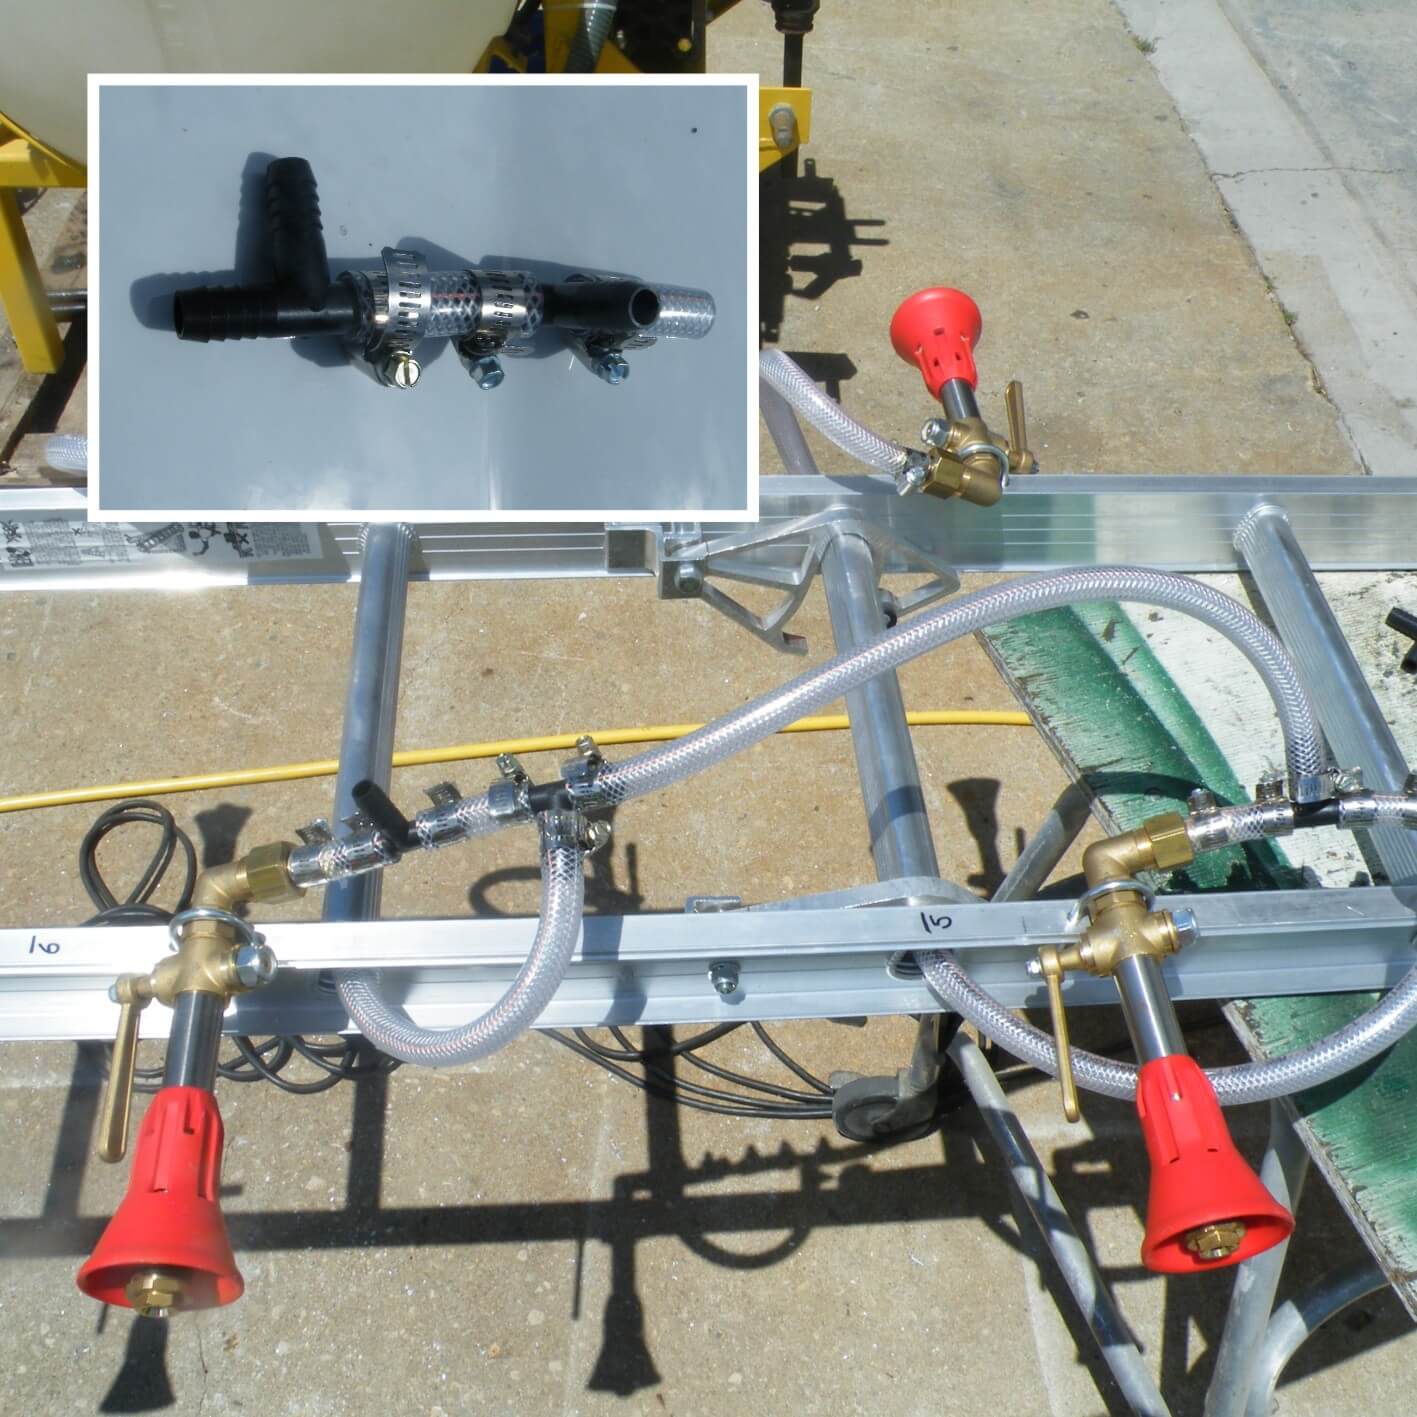
(~$75.00 for hose, $20.00 CAD for Tee’s, $75.00 CAD for hose clamps)
The plumbing on the sprayer is not complicated, but takes thought. It will require 11 ½” TeeJet T-junctions and roughly 60ft of ½” braided, clear spray line rated to 200 psi. You will also need 8 hose clamps for each set of nozzles for a total of ~50 (get extras). Using hose cutters, cut appropriate lengths for a single set of nozzles and use them as a template for the rest. Pass the line through the rungs and do not make loops too tight. Use a drill with a ratcheting chuck to ensure each hose clamp is tight.
Plumbing the nozzles
6 – Mounting the winch
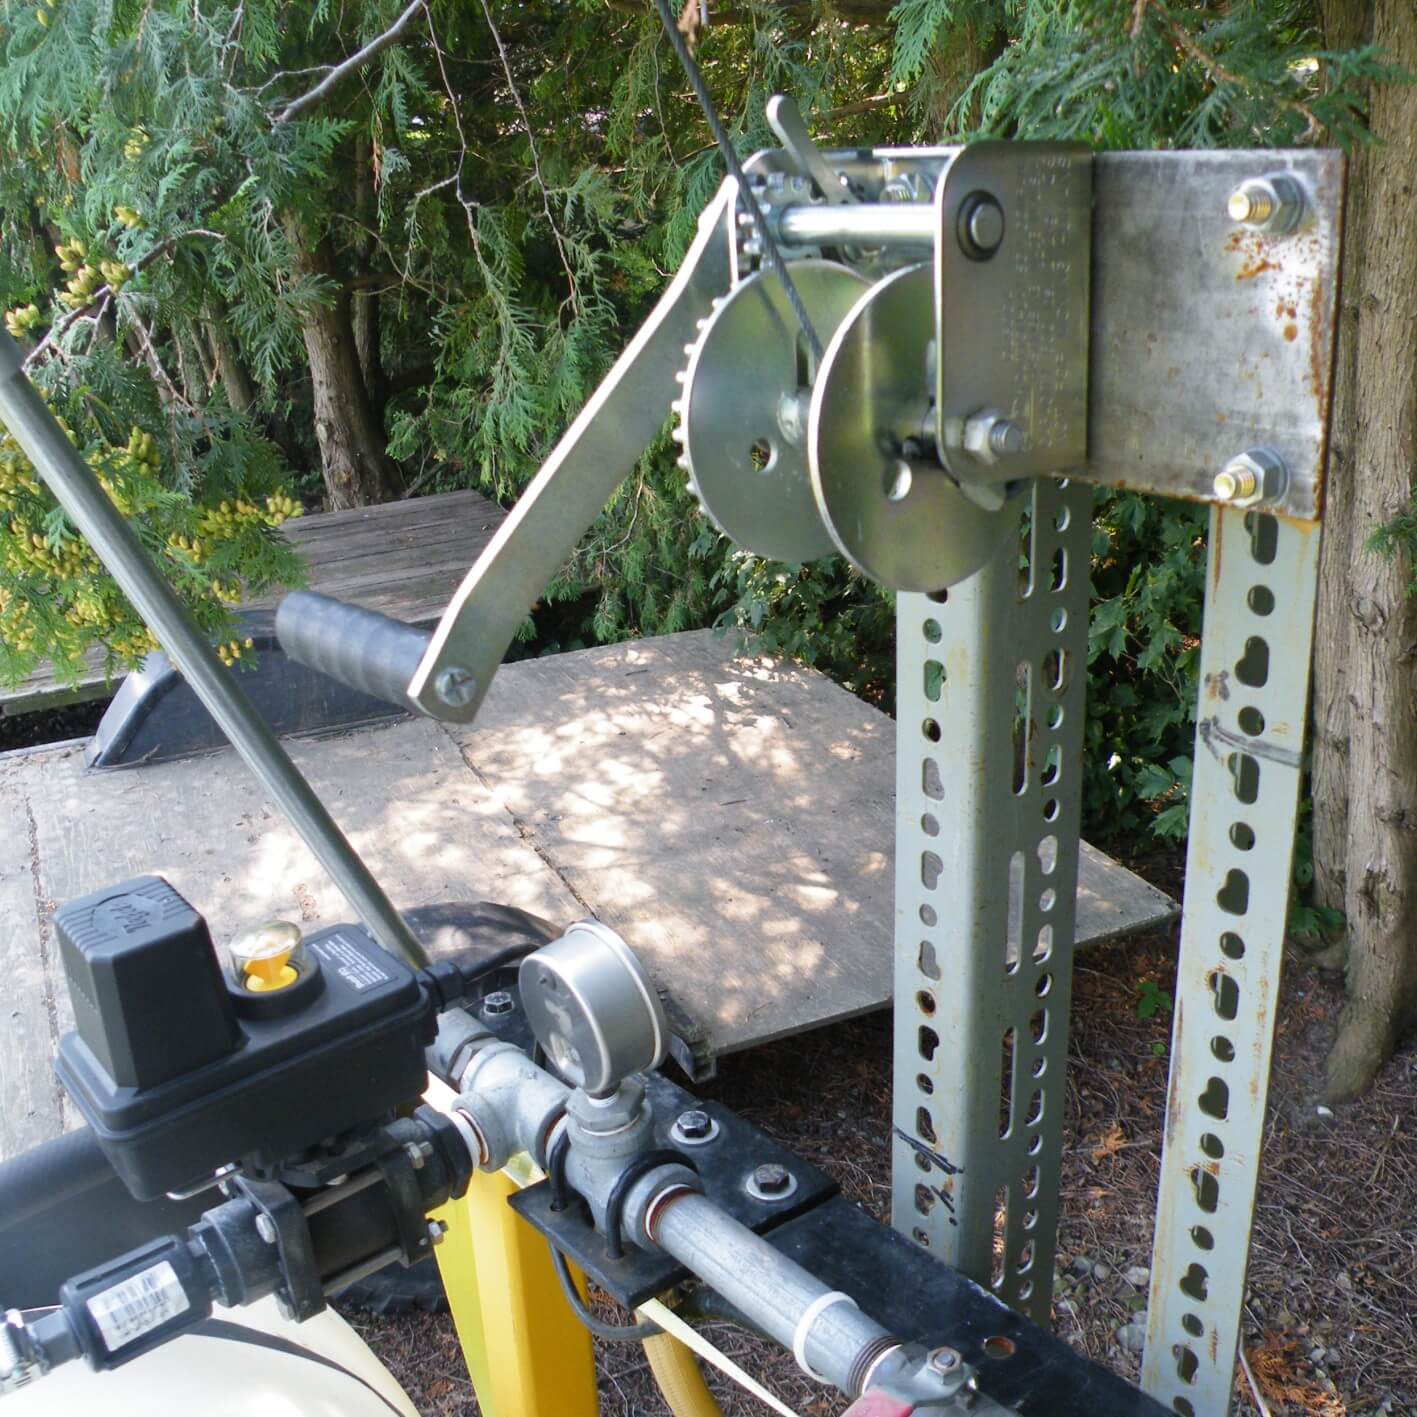
(~$125.00 CAD for winch, cable, clamp, angle iron and plate)
This step is sprayer-specific. Find a spot on the chassis that you can mount a length (or two lengths) of angle iron to house the winch. On the prototype we included a sheet of plate iron to make the mount as stable as possible. Be aware that the handle (and user’s knuckles) must not hit any part of the sprayer when turning. Never let go of the handle without setting the lock, or the boom will drop and the handle will spin out of control.
Mount the winch
7 – Raising and securing the boom
This will take two people. Slide the two lengths back together and raise the boom into position. Bolt the boom into place (see Step 1). Take a ½”, 8ft length of galvanized conduit and crush 2” of one end in a vice. Punch a divot and drill a hole in the crushed end. Repeat with a ¾” length of conduit. Attach the ½” inch length to the chassis and the ¾” length to the top of the bottom boom, telescoping the two lengths together. Now you have a support that is the right length, you can screw the two lengths together and repeat on the other side. Remember not to tighten one side completely before the other is in place.
Strut + boom & chassis
8 – Tie in plumbing and winch cable
Attach the cable to the winch, pass it through the pulley on the top boom and clamp it to the lowest rung. Pass the cable between the booms. This is also how the two lengths of boom are plumbed together: A long length of hose hangs from the bottom-most nozzle on the top boom, tied to the top-most nozzle on the lower boom. All the excess hose (needed when the ladder is fully extended) hangs between the two ladders. Trust me – this makes more sense once you do it.
Nozzles on drop arms
9 – Test the plumbing
(~$150.00 CAD for PTO shaft)
Finally, the sprayer must be attached to a tractor via the 3-pt hitch and PTO shaft. Ensure the sprayer is plumb and level or the boom will bounce and sway excessively as you drive. Raise and lower the boom via the winch to ensure it moves smoothly. Bring up the rpms on the tractor and engage the boom at 100 psi. Look for any leaks. Bring it up to 200 psi and drive the sprayer around with boom fully extended. Repair any blown lines. You are now ready to calibrate your new sprayer.
Test the sprayer plumbing and stability
Calibration
Classic Arag Microjets will emit approximately 1 US gallon per minute at 200 psi. However, the position of the mixing valve will affect both the spray quality and rate of the nozzle. As such, a timed output test should be performed on each nozzle. Bring down the boom, fill the sprayer with water, bring it up to operating pressure and begin spraying. Adjust one nozzle until you achieve the desired pattern. Then, using a telescoping paint roller handle to reach the highest nozzles, place all valves in similar positions. Using a collection vessel, determine how much volume is emitted at a given pressure and valve position in one minute – this is a timed output test. You can find rates and valve settings for these nozzles in this ginseng article.
Evaluating Spray Coverage
There are two ways to evaluate spray coverage:
The amount of the surface area covered (e.g. 25%)
The droplet density (i.e.. the number of drops per square centimetre)
They are not the same thing. For example, one massive droplet covering ½ the target would leave a lot of space uncovered, and therefore lots of room for an insect to walk past and never touch it. However, an even smattering of small droplets, still covering ½ the target are better because they are distributed evenly and odds are, will hit a pest.
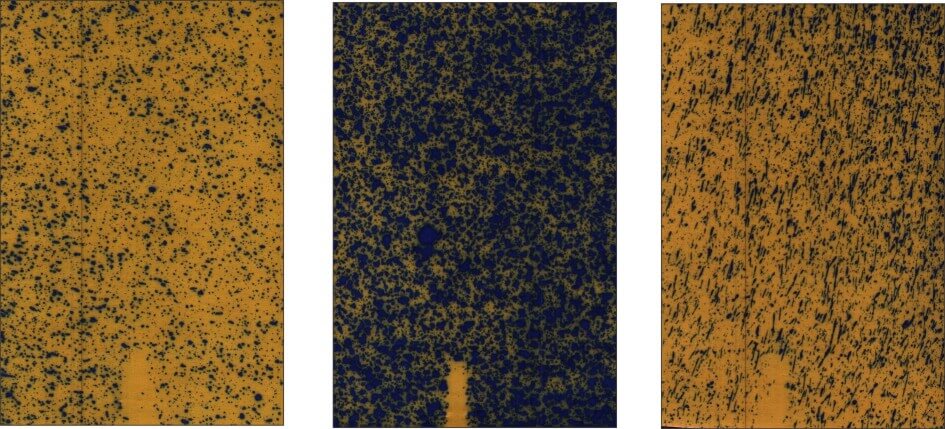
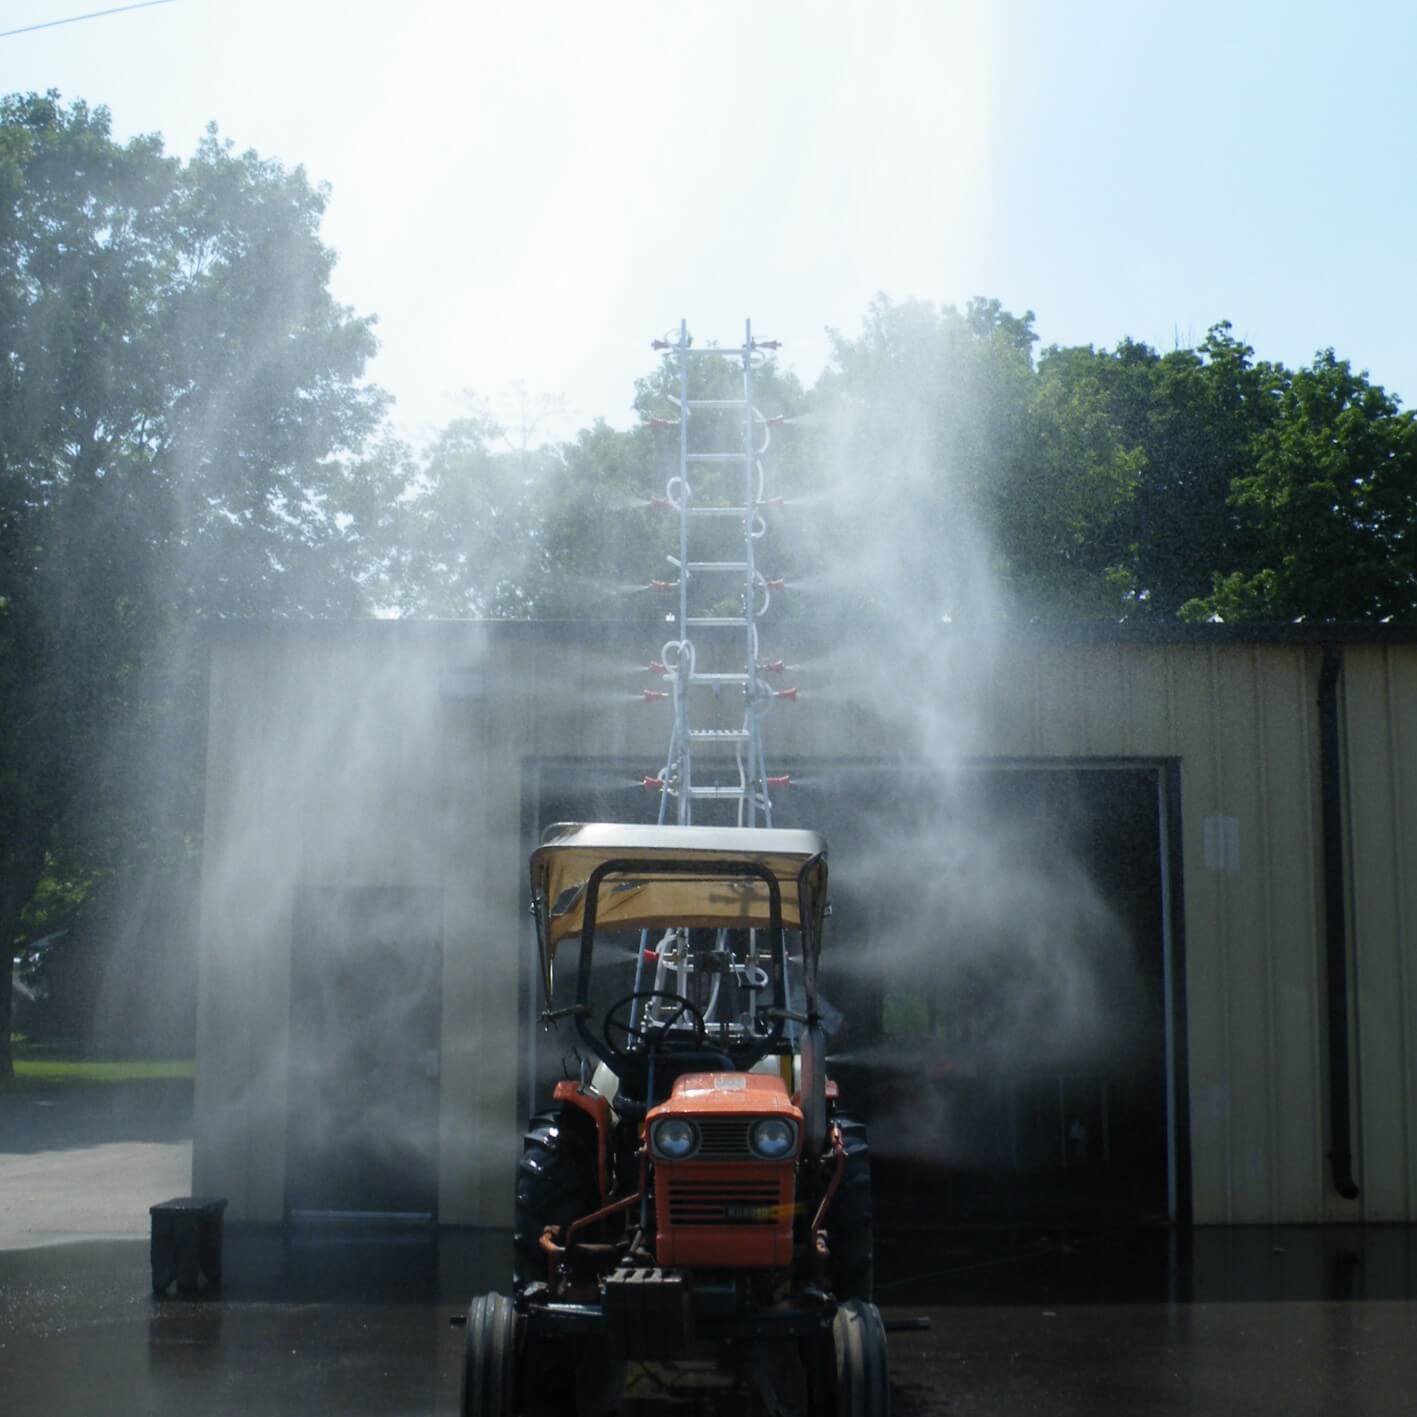
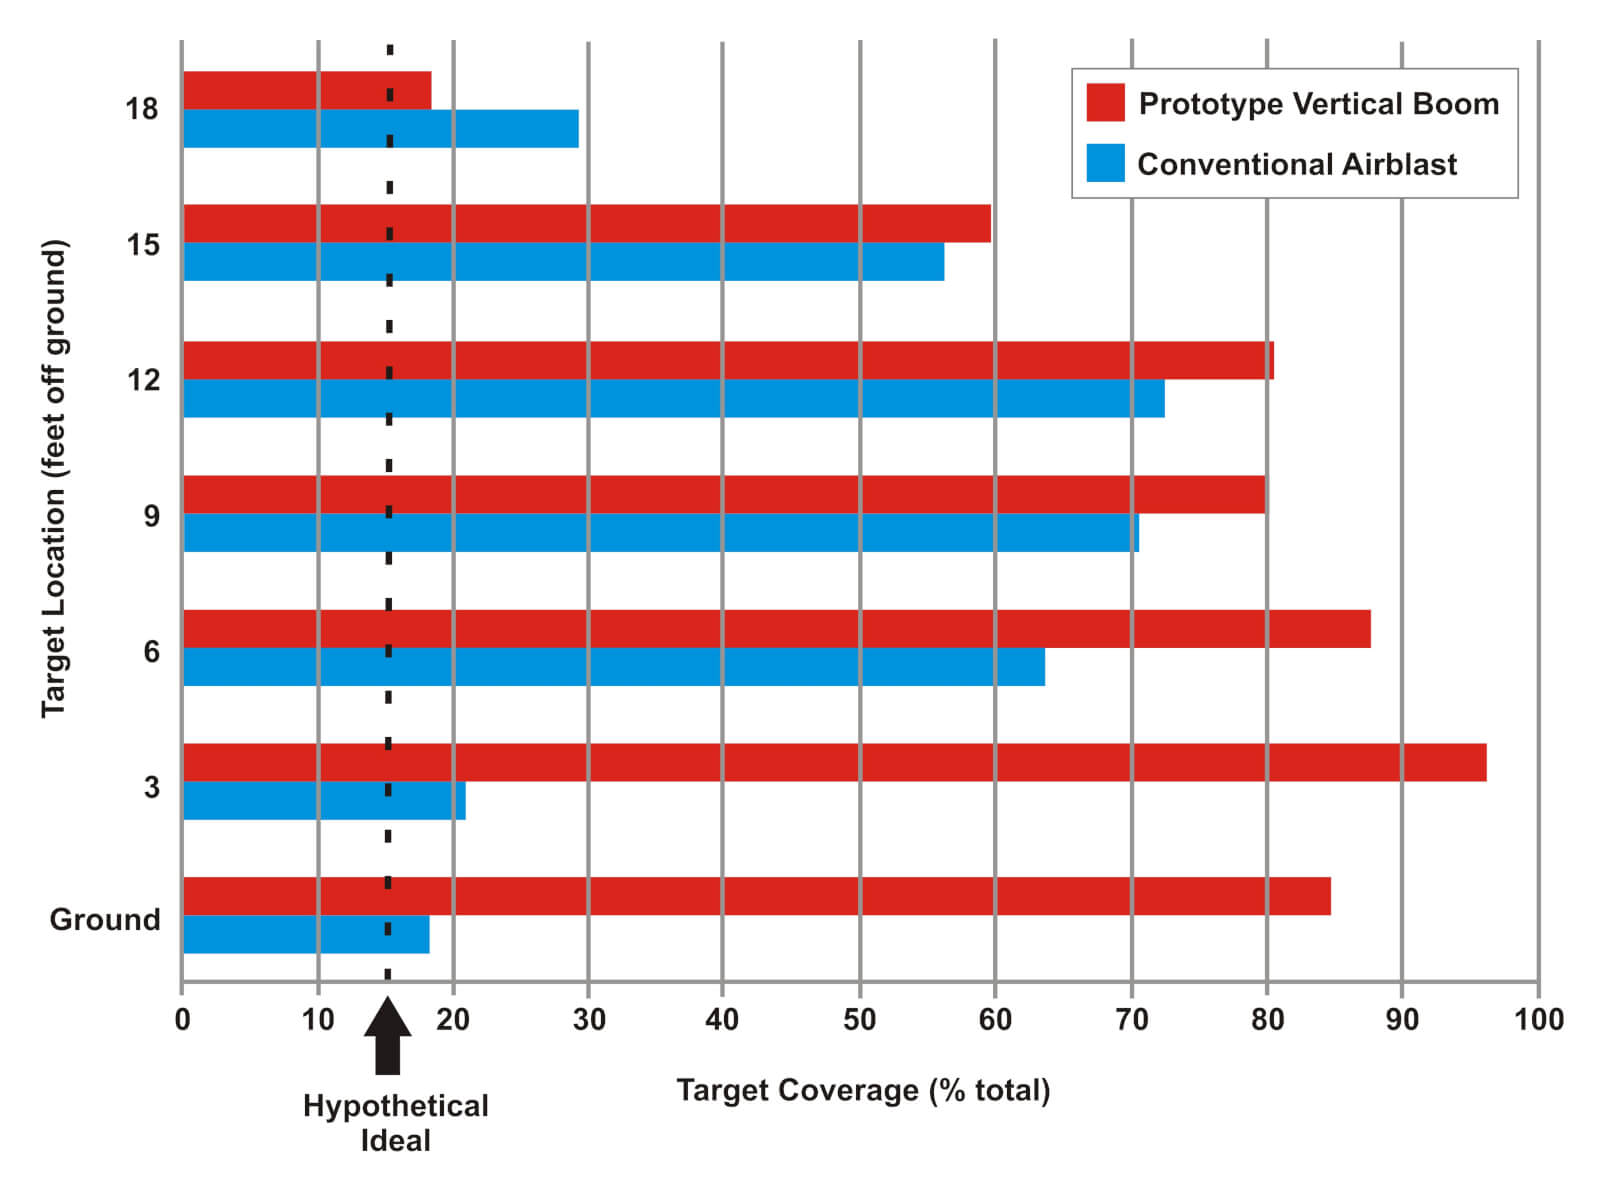
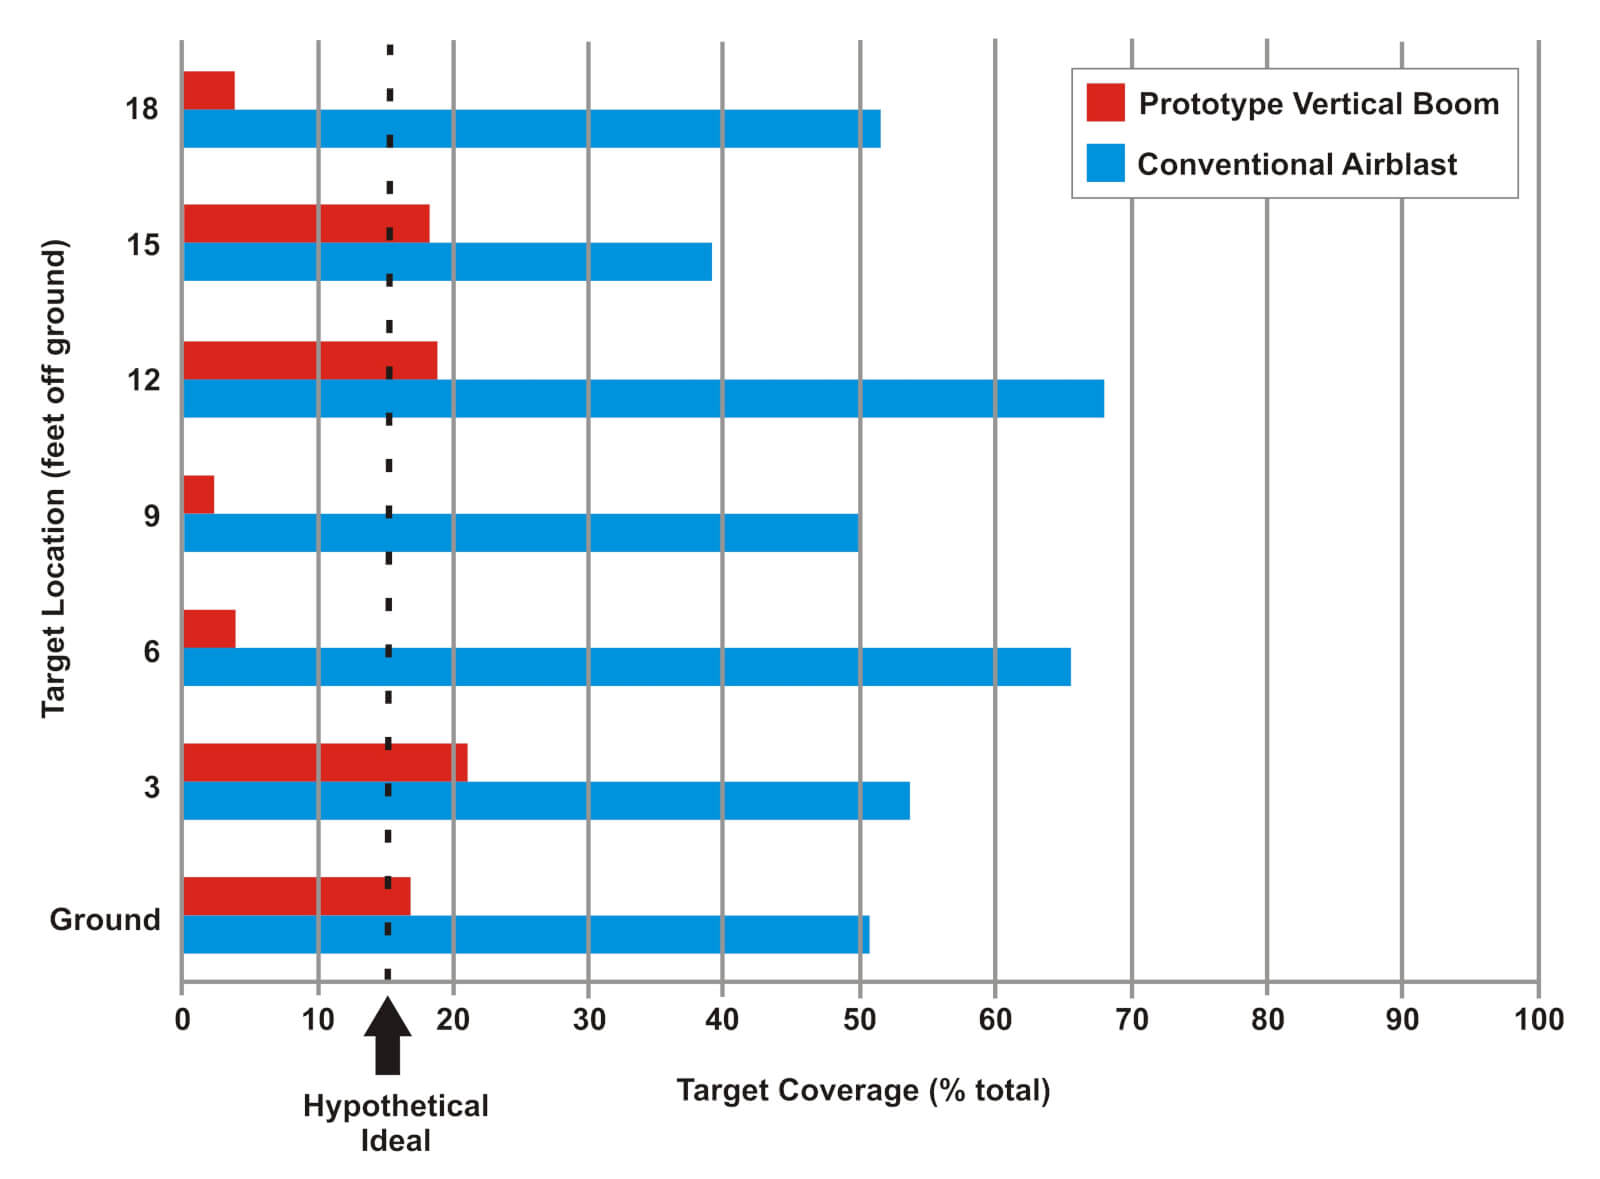
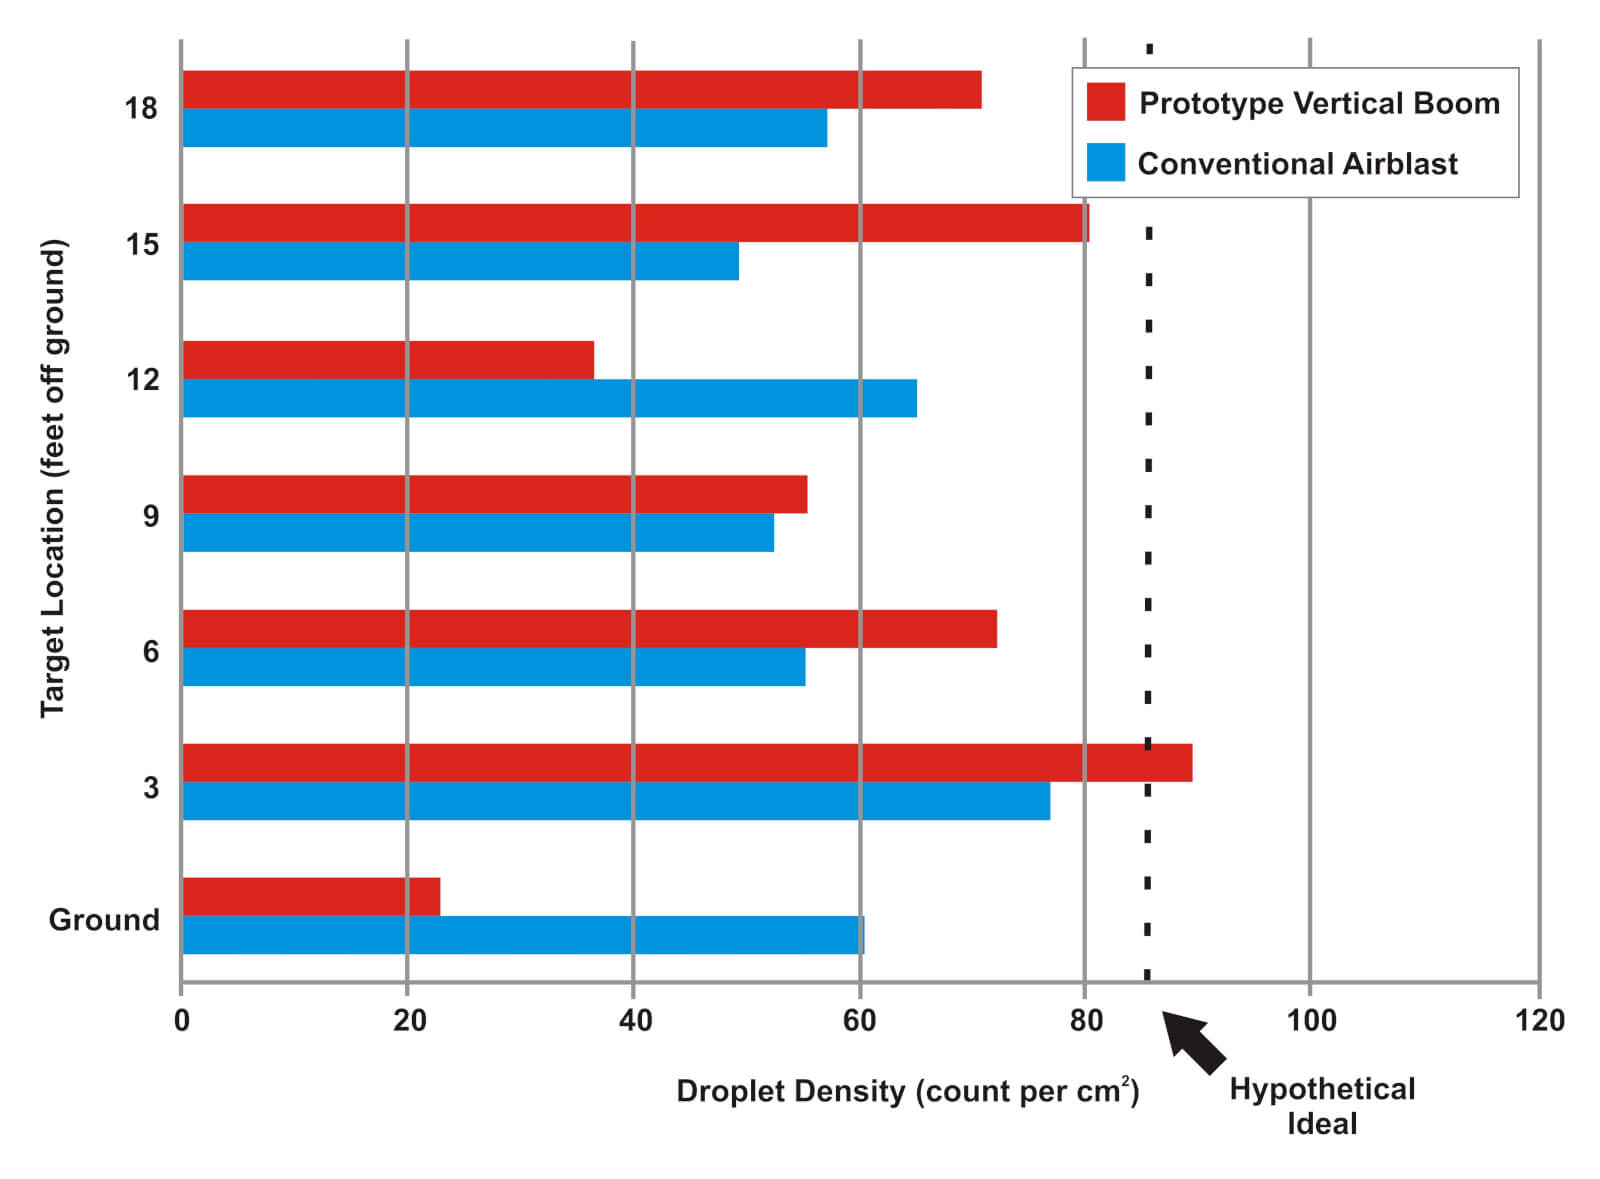
The Hopsprayer was trialed at Clear Valley Farms, Nottawa, Ontario. Water sensitive paper (which turns from yellow to blue when contacted by spray) was clipped every three feet up to 18 feet on the upper and under sides of leaves. The grower cooperators used their own airblast sprayer operated at their standard 2,340 L/ha and 2.75 km/hr. The Hopsprayer was tested at 1,220 L/ha and 7.5 km/hr – half the volume and three times as fast, even while fully-extended to its 18 foot height. The four histrograms show the coverage on top of the leaves and on the underside of the leaves.
Total % coverage on upper side of leaves (n=3)Total percent surface covered on underside of leaves (n=3)Droplet density on underside of leaves (n=3)Droplet density on underside of leaves (n=3)
Conclusion
The airblast achieved minimally-acceptable coverage on all leaf surfaces at all heights. The prototype did not cover as much of the under leaf surface (not surprising as the sprayer did not utilize air assist to lift the leaves), but it did deposit almost three times as many droplets.
The airblast did well on the tops and undersides, both for total % coverage and for droplet density. The Hopsprayer didn’t cover as much under leaf surface, but did have a higher droplet density. That means there were more drops, but they were very small.
The big question is: Did higher droplet density, but smaller droplet size, contain enough active ingredient to control insects and disease? That can only be verified through efficacy testing where the Hopsprayer is actually used for a season to evaluate its performance. For now, we just don’t know, and cannot recommend the sprayer design.
Acknowledgements
Thanks to TeeJet technologies for providing water sensitive paper and nozzles, McPhee Enterprises of Oakville, Ontario, for providing the Microjets at cost, Mr. Evan Elford (OMAFRA), Mr. Paul Splinter (University of Guelph), Ms. Megan Leedham (OMAFRA summer student), Mr. Herman Kunkel (Allparts Ltd., Simcoe, Ontario) and Clear Valley Farms for hosting the trials. This project was made possible through funding by OMAFRA and the University of Guelph.
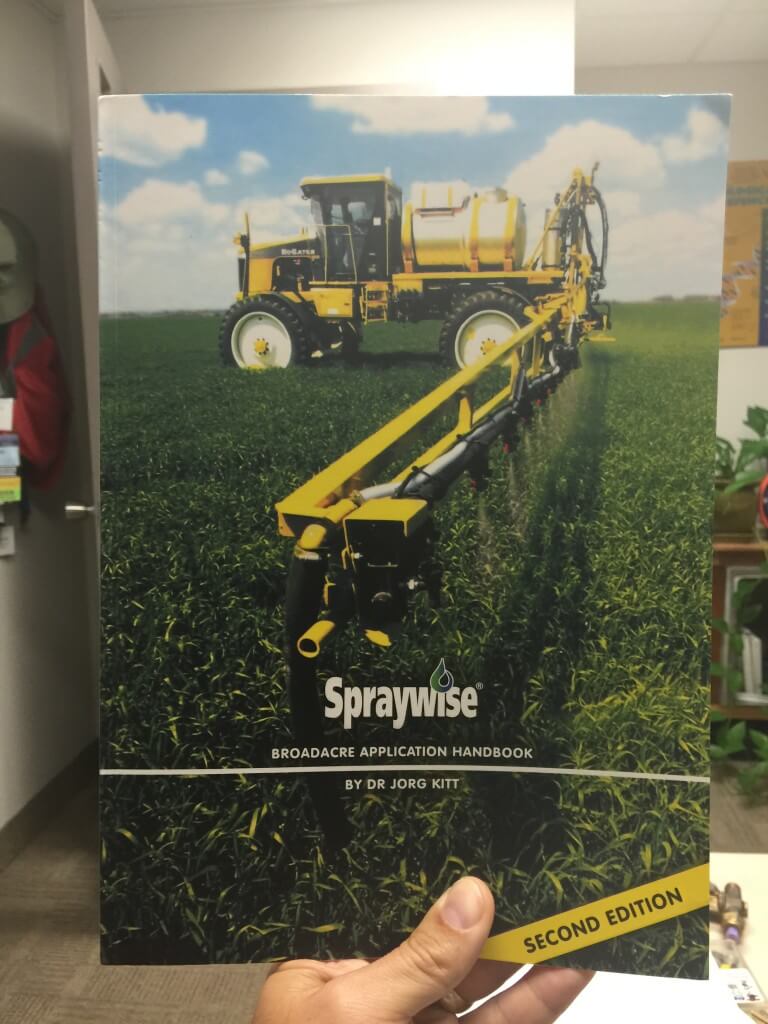
I haven’t written a book-report since high school, but I was recently sent a copy of Dr. Jorg Kitt’s “Spraywise – Broadacre Application Handbook” and I was compelled to share. It’s published by Nufarm and is based out of Australia. What a fantastic, easy-to-read book full of excellent spraying know-how.
Am I overselling this? I am not.
Spraywise – Broadacre Application Handbook by Dr. Jorg Kitt (published by Nufarm, Australia)
The chapters include:
Droplet Size
Chemical Target Interaction
Nozzle Types
Nozzle Selection
Nozzle Spacing & Boom Height
Drift
Weather
Adjuvants
Formulation & Mixing Order
Cleaning Procedure
Calibration
Record Keeping
At risk of copyright infringement, let me share a little of Dr. Kitt’s advice on chemical and target interaction.
“Many chemicals used in agriculture show only limited movement in or on the plant. For surface active fungicides such as mancozeb coverage is critical because the active does not move – it settles where the droplet dries with only limited redistribution properties.”
This is why we suggest coverage is king when applying products that don’t translocate. You can slow down, raise water volume, or as a last resort reduce spray quality (minding the drift and evaporation issues that arise from this choice). But he goes on:
“Many cereal fungicides such as DMIs move only in the xylem (water transport bundles) and therefore can only travel in one direction – upwards towards the tip of the leaf (acropetal).”
So, I admit that as I continue to transition from horticultural spray applications to broadacre work, I have a lot to learn. Something that bothered me when I started looking at fungicide applications in corn was the appalling coverage on water sensitive paper. If any of my vegetable or orchard applicators had such poor coverage, their crops would be riddled with disease… so why was such poor coverage working so well in field crops?
According to this new-to-me information, perhaps the >Coarse droplets were penetrating the canopy, reaching down to impinge on the base of the plant (or splatter up from the soil) where they could re-distribute by moving up through the xylem. It certainly makes more sense to me why such coarse droplets and relatively low volumes can still be efficacious for certain fungicides in field crops. I’ll reiterate – this may be old hat to some readers, but I still have a lot to learn on this topic.
Dr. Kitt shares many digestible, easily-implemented little factoids that make this handbook a must-have for your spray library. Applied herbicide advice, for example:
“…if 50% of the ground is covered with stubble only half the spray volume will hit the soil directly; the other half will strike stubble. To optimise applications in this situation it is important to produce droplets with sufficient velocity to increase bounce and splatter. The applicator should use higher water volumes (70-100 L/ha) and a coarse to very coarse spray quality. In a clean bed spray quality and water volume have little effect. A coarse spray quality and water volumes above 50 L should be sufficient to achieve efficacy.
These volumes are low for North America (Australia uses nerve-rackingly low volumes) but otherwise this is solid gold.
I was fortunate to have someone send me a copy of this handbook. I’ve poked around on-line to try to find a Nufarm-based website where anyone could order a copy, but I was unsuccessful. However, if you Google “Spraywise Broadacre Application Handbook 2nd ed.” you will find a number of dealers that will happily sell and mail you a copy. I won’t share those links here to avoid a bias, but they’re easily found.
So, to summarize, I wanted to make the sprayers101 readership aware of this Handbook. Given the affiliation with an agrichemical company, it’s a bit adjuvant-rich, but it’s chock full of great information and well worth the cost and effort to have a copy mailed to you.