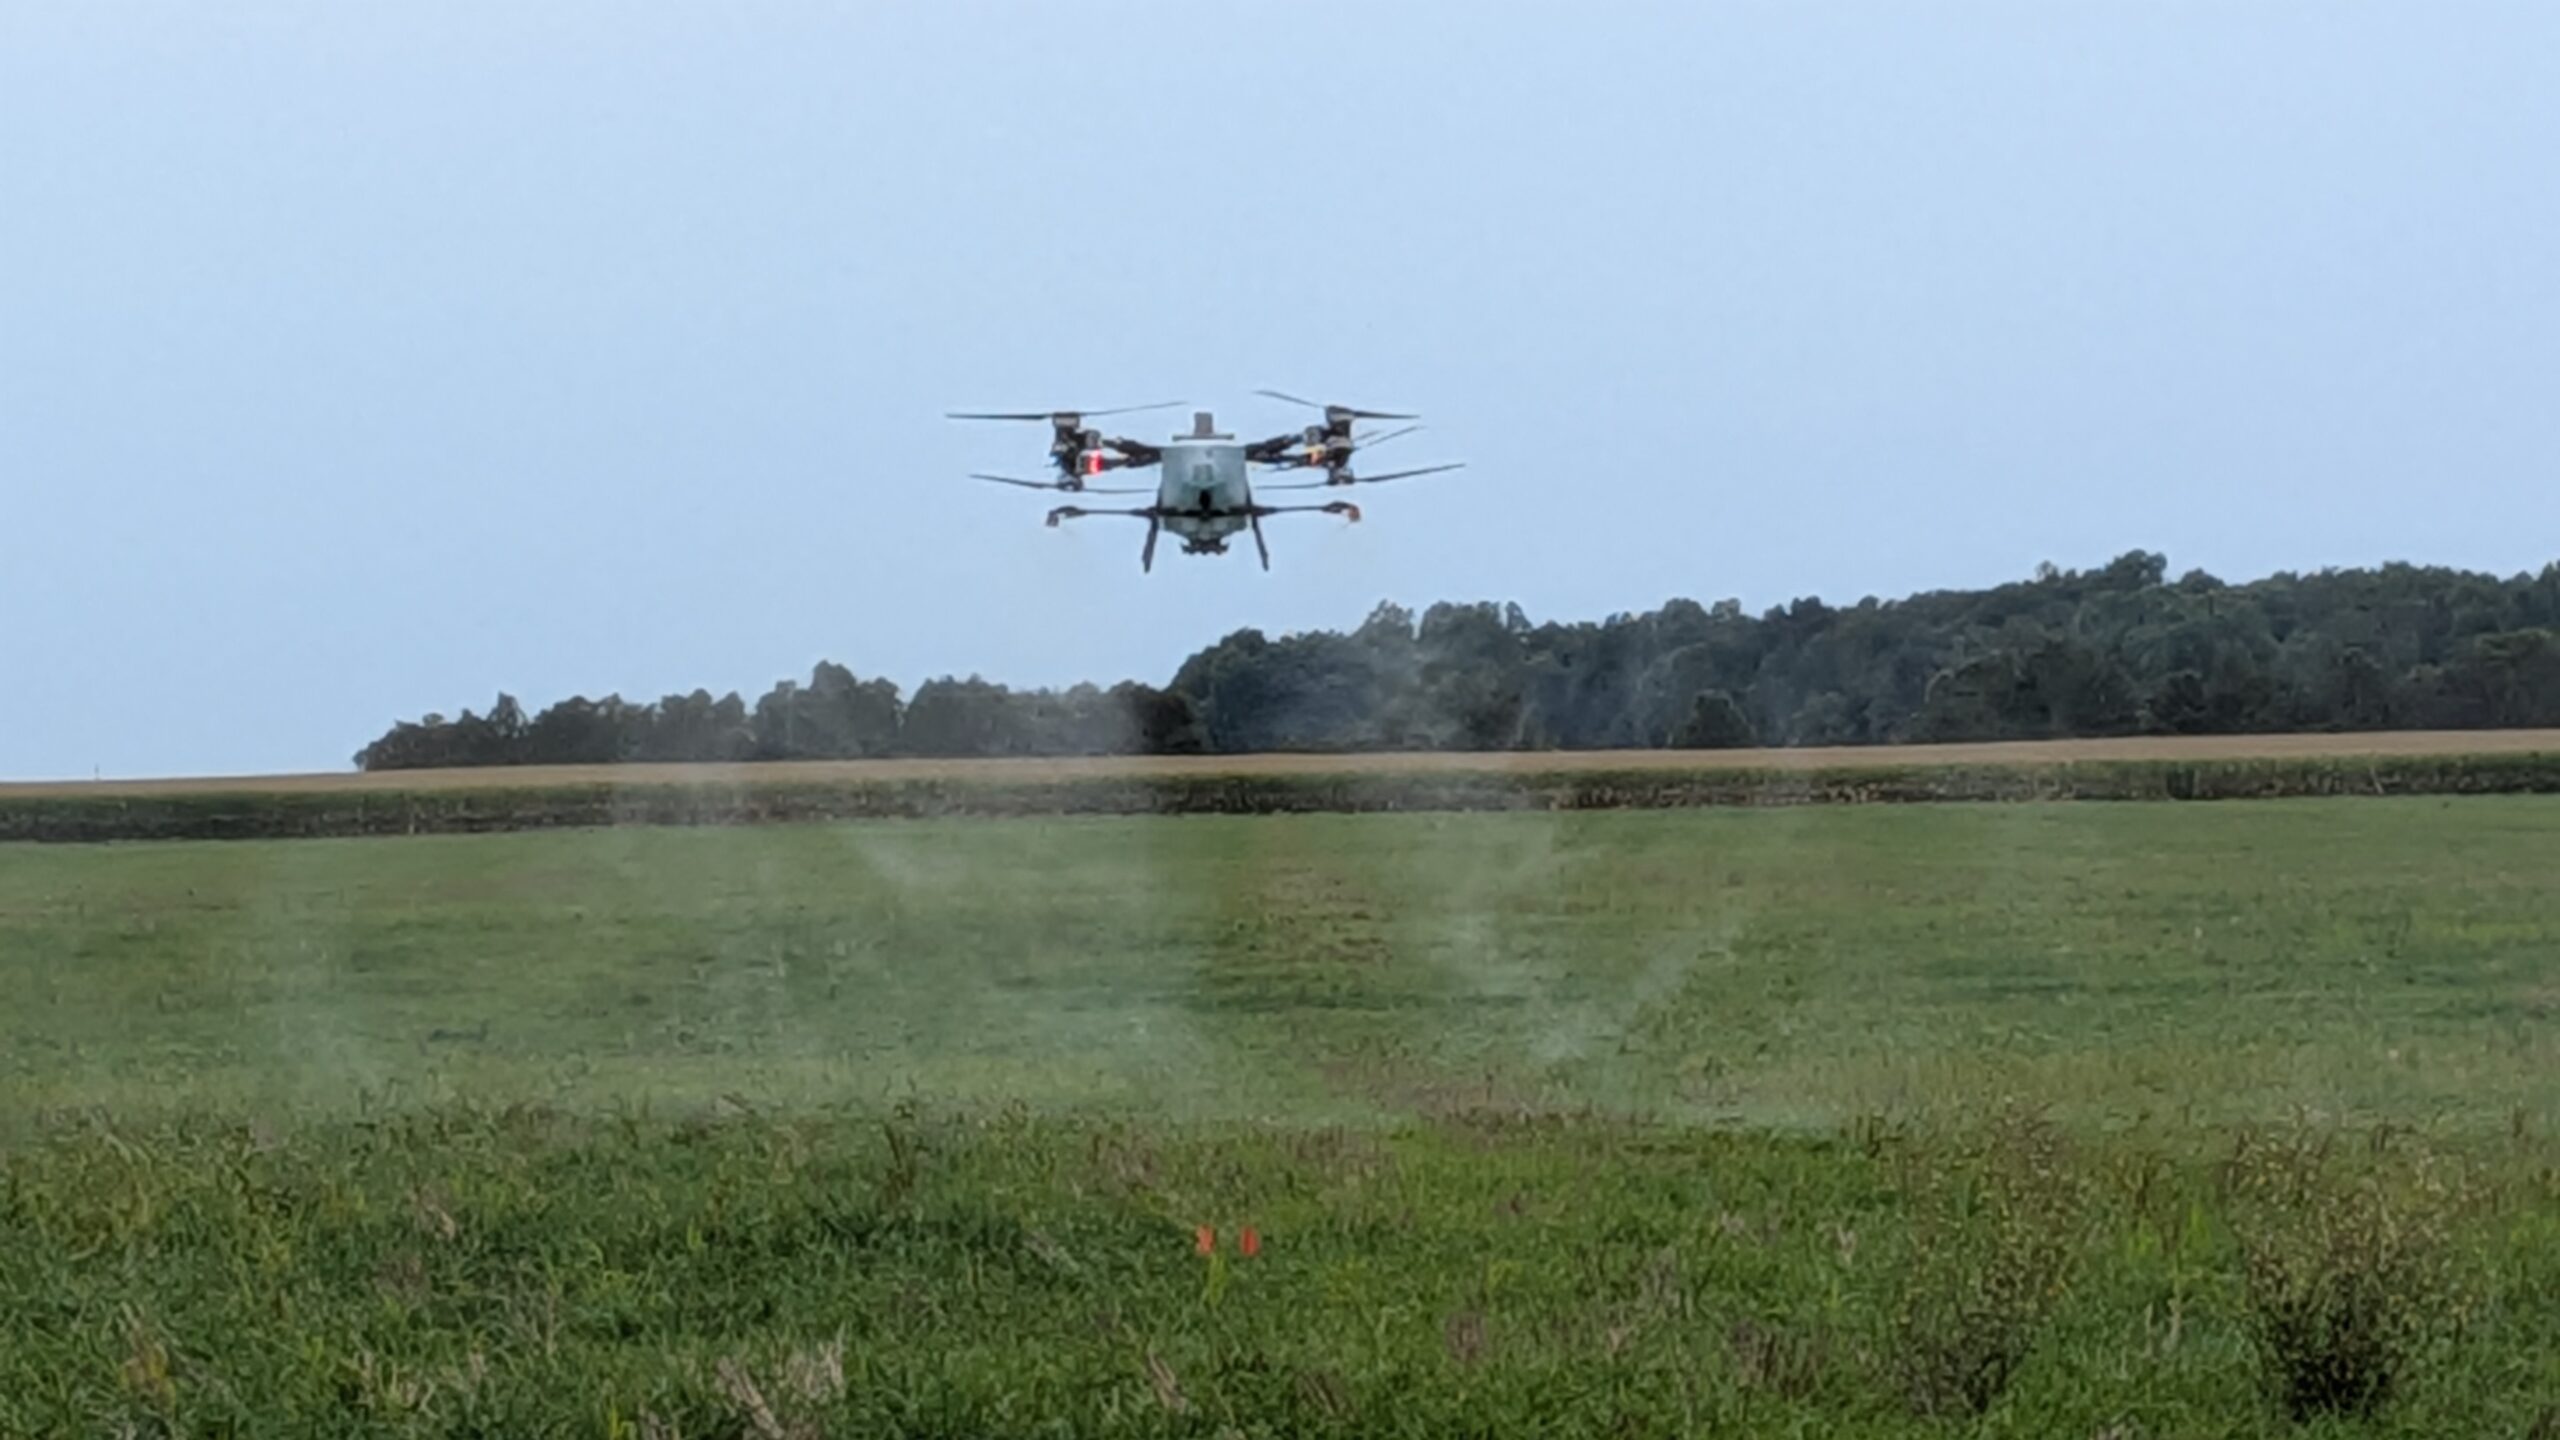
Tag: drone

  • Droplet Trajectories from RPAS Application – Implications for Swath Width Measurements

    Droplet Trajectories from RPAS Application – Implications for Swath Width Measurements

    We conducted a series of drone deposition studies with three main objectives:

    We wanted to:

    • Measure the swath width of a T50 drone at two flight speeds;
    • Document the nature of the downwash along the swath width;
    • Compare different techniques for measuring and analyzing swath widths.

    The four swath width measurement methods were:

    • Horizontal bond paper (H-BP)
    • Horizontal water-sensitive paper (H-WSP)
    • Retreat-facing water-sensitive paper (R-WSP)
    • Three-dimensionally arranged water-sensitive paper (3D-WSP)

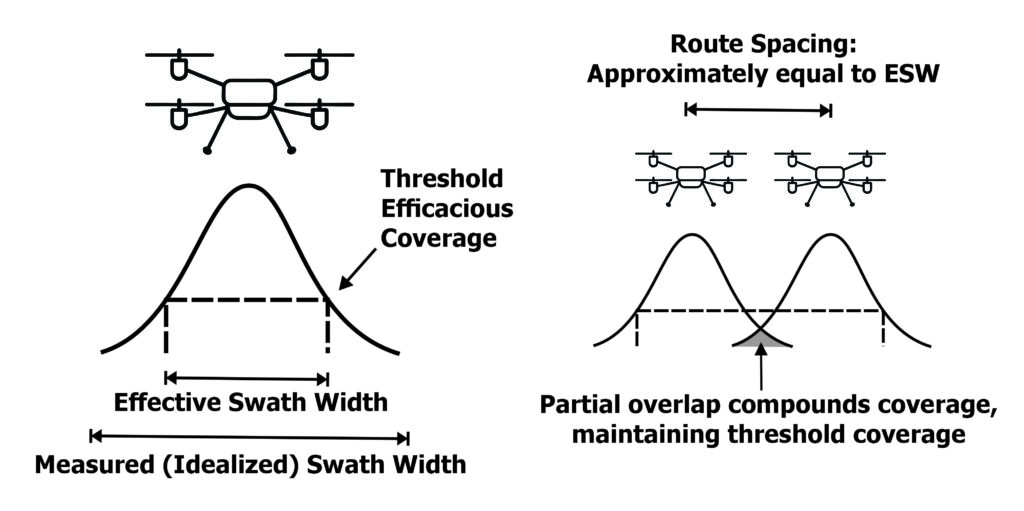
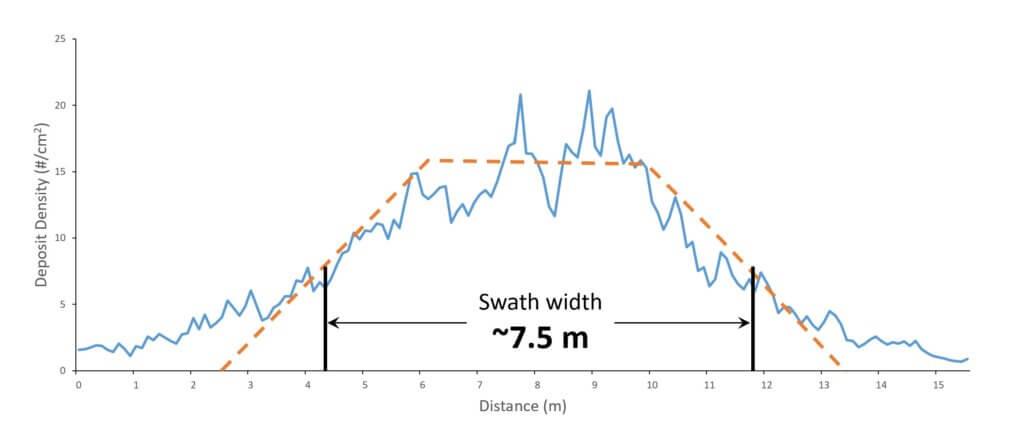
    Assuming a trapezoidal-shaped spray swath, the Effective Swath Width (ESW) can be roughly defined as the span between two points that represent 1/2 of the average maximum deposit density. The idea is to create a cumulative pattern that is as uniform as possible when adjacent flights are added (Figure 1).

    As with any application system, if we assume that the target rate provides acceptable control, any deviation from the intended target rate along the pattern is either over-dosing (waste), or under-dosing (reduced control). It is therefore imperative that the distributed dose, as received by the intended target, be as uniform as possible.

    Figure 1. A spray pattern from DJI Agras T50, as depicted by horizontally oriented bond paper and scanned by Swath Gobbler™. In this case, the effective swath width is estimated from 1/2 the maximum deposit density, spanning approximately 7.5 m.

    Materials and Methods

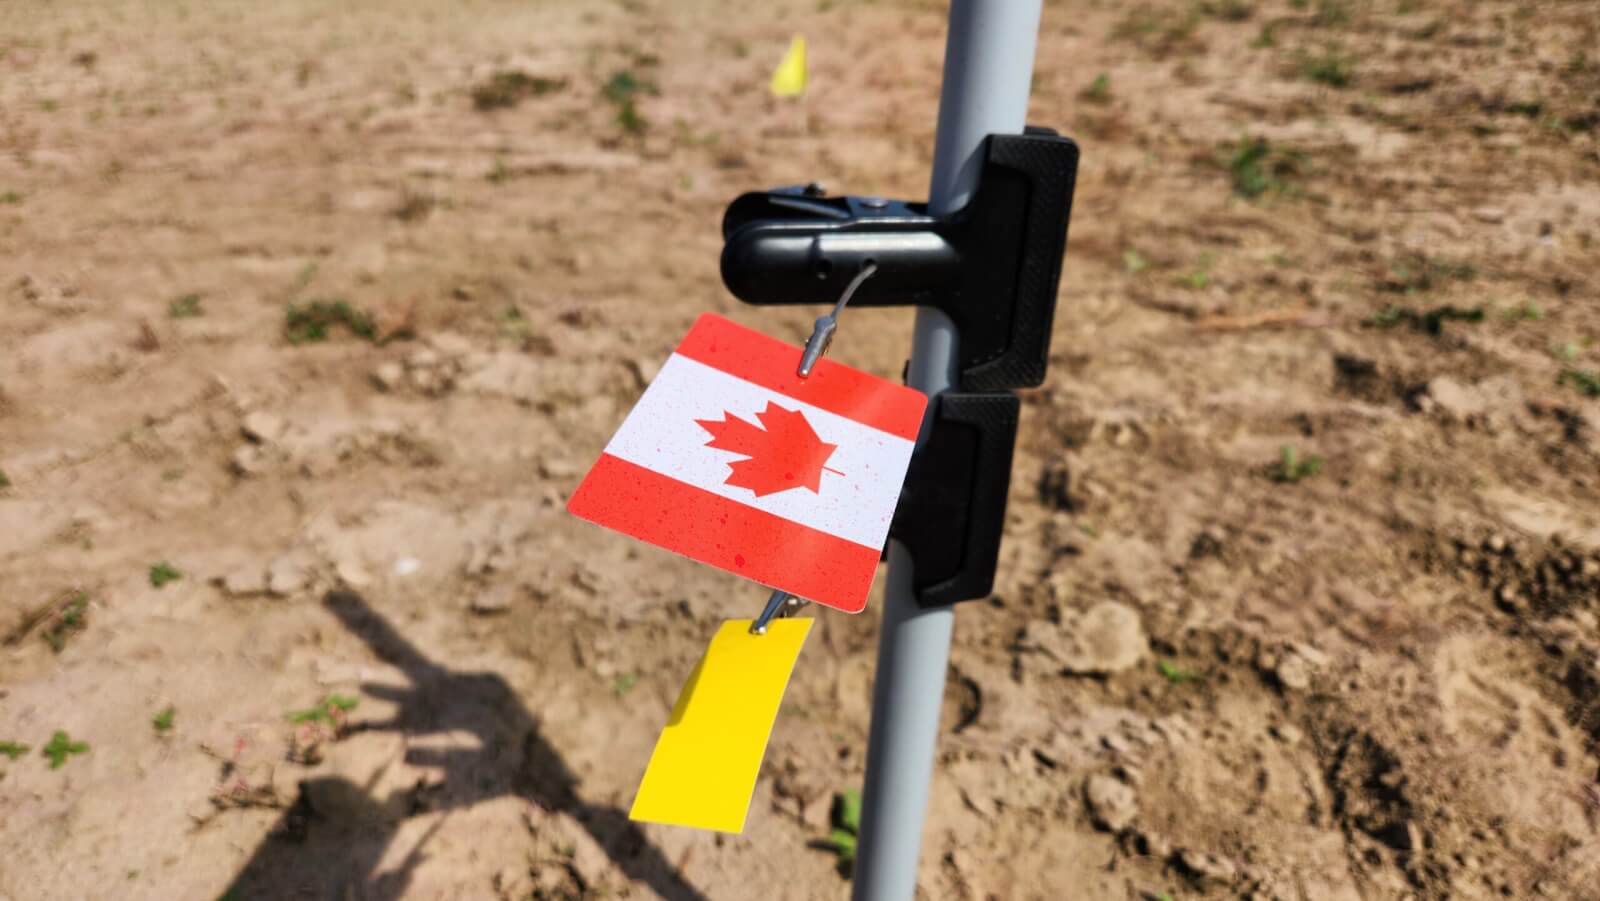
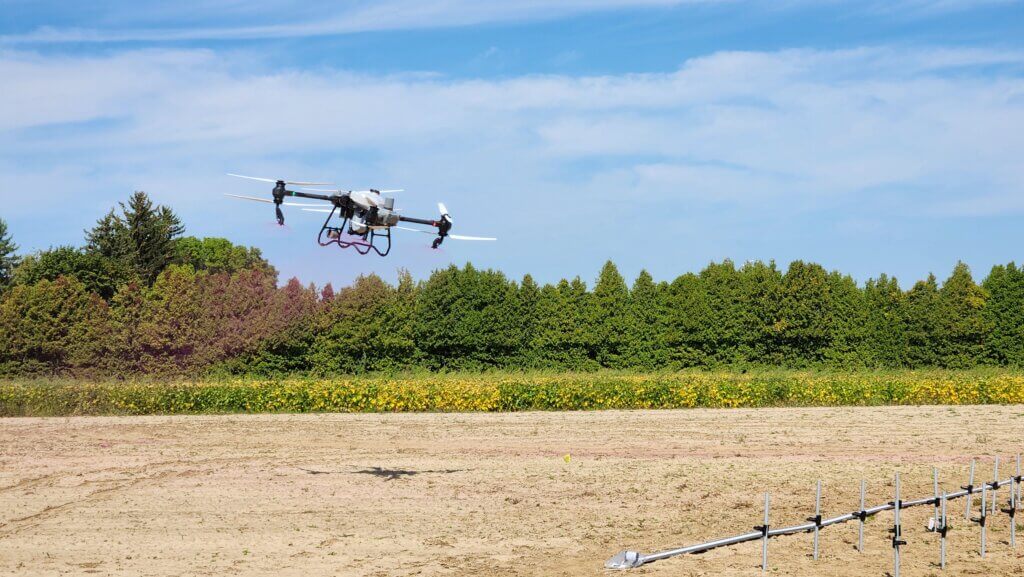
    The study was conducted at Ontario’s Simcoe Research Station on September 17, 2024. The site was a flat, sand/loam field with no vegetation present (Figure 2).

    Figure 2. Ground conditions at site.

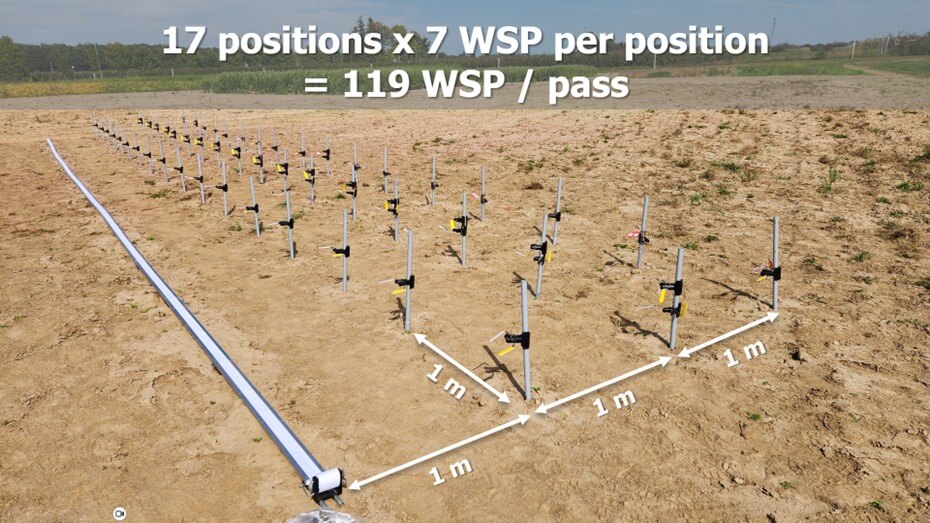
    A sampling array was established perpendicular to the forecast prevailing wind direction (150º). The sampling array had 17 discrete sampling locations (0 m to 16 m at 1 m intervals).

    Two collector methods were used simultaneously, centered on and perpendicular to the flight path:

    1. A flat, horizontal, continuous bond paper strip measuring 7.5 cm wide and 16 m long (secured in a Speed Track™ and analyzed using a Swath Gobbler™, Application Insight, Lansing MI).
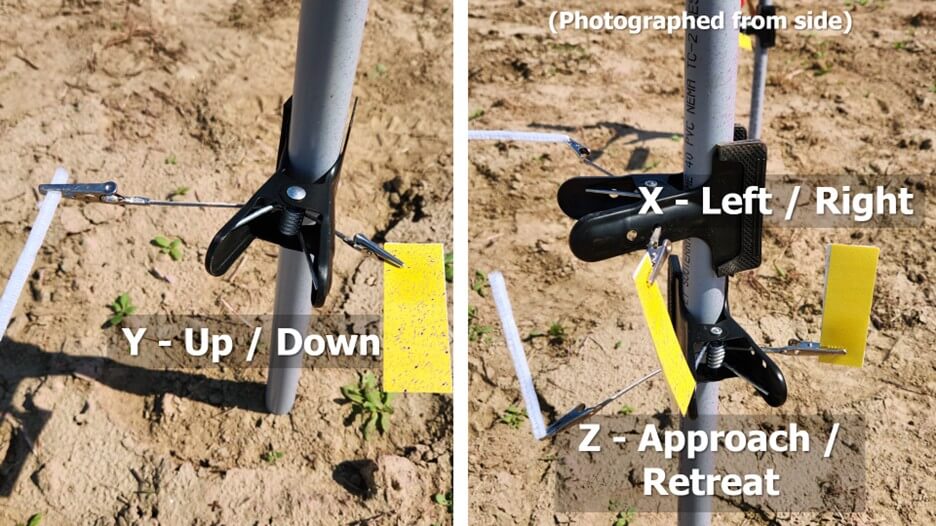
    2. Discrete water-sensitive paper (WSP) collectors facing in three directions (x, y, z), each clamped back to back. WSP measured 26 x 76 mm (Spraying Systems, Glendale Heights, IL) and were analyzed using a DropScope™ (SprayX, São Carlos, Brazil).

    Sampling height was 30 cm above ground to simulate a fungicide application into a soybean crop. To avoid crowding collectors on each sampler, three parallel sampler rows were established, separated by a 1 m spacing (Figure 3).

    Figure 3. Sampling array and collectors.

    The first row contained the WSP oriented in the Y direction (WSP facing upward and downward. The second row contained the WSP in the X direction (WSP facing left and right relative to flight direction), as well as Z direction (WSP facing sprayer approach and retreat (Figure 4).

    Figure 4. Examples of discrete sampler design and collector orientation.

    Drone settings

    A DJI T50 drone fitted with four rotary atomizers was used to make the spray applications. The flight controller settings were a 250 µm droplet diameter spray over a 7 m swath width, at an altitude of 3 m above ground. Flight speed was either 4 m/s or 8 m/s. Application volume was 30 L/ha. Each flight speed was replicated three times. A total of six passes were made in this trial.

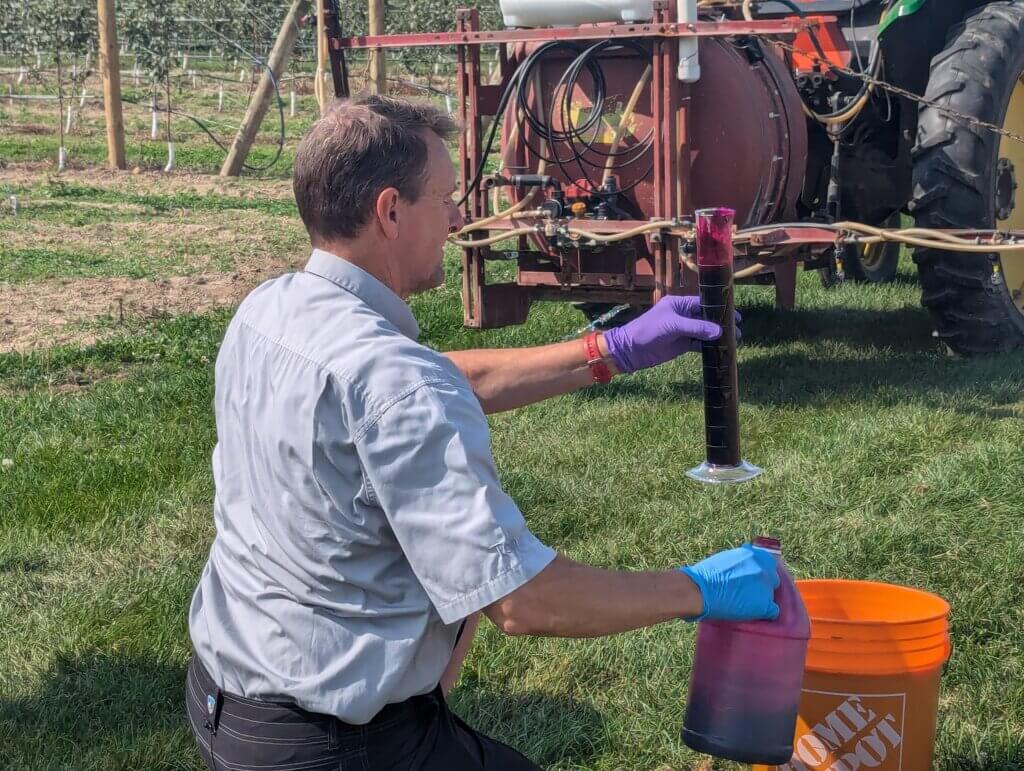
    The drone tank (capacity 40 L) contained tap water water with 0.2% v/v of Rhodamine WT 20% liquid (Hoskin Scientific, Burnaby, BC), prepared in a single batch (Figure 5). The level of liquid in the RPAS tank was maintained between 20 L and 30 L throughout the trial to minimize the effect of a changing payload. A volume of spray liquid was sampled prior to each pass to serve as standards for fluorometric analysis.

    Figure 5. Preparing the dye solution.

    Trial procedure

    Collectors were placed in samplers and the drone was positioned ~75 m downwind of the array to allow it to reach the target flight speed. When wind conditions were deemed appropriate, a signal was given to initiate the flight. Upon pass completion, one minute was allowed to elapse before sampler collection to permit complete deposition and drying.

    Labelled WSP were retrieved and placed loosely in paper bags to prevent any residual moisture from ruining the collectors. Bond paper from the Swath Gobbler was marked with treatment information and reeled onto individual spools (one per treatment).

    Weather conditions

    Both wind speed and direction varied slightly during the study, but it was always possible to run a trial with negligible sidewinds so that the sample array captured the majority of the spray swath. Air temperature was approximately 25 °C. Wind speed was ranged from 6 to 14 km/h during the trial. All spray passes were into a headwind with maximum deviations of -10 to +30°.

    Collector analysis

    Bond paper digitization

    Bond papers (Figure 6) were scanned using a Swath Gobbler. The software measured both deposit density and percent coverage at each scanned location, but only deposit density was used in the analysis.

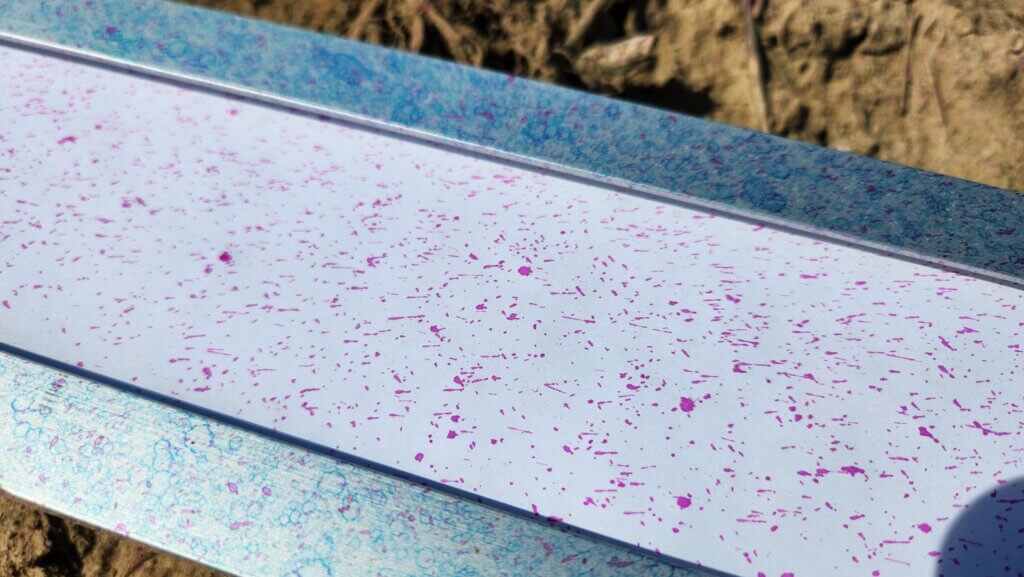
    Figure 6. Bond paper secured in a Speed Track and sprayed with a Rhodamine WT solution.

    WSP digitzation

    WSP were removed from paper bags, sorted and sequenced into reps. WSP were scanned using a Drop Scope set to “Ground sprayer” and “Syngenta WSP” (Figure 7). The software reported deposit density and percent area coverage, but only deposit density was used in the analysis.

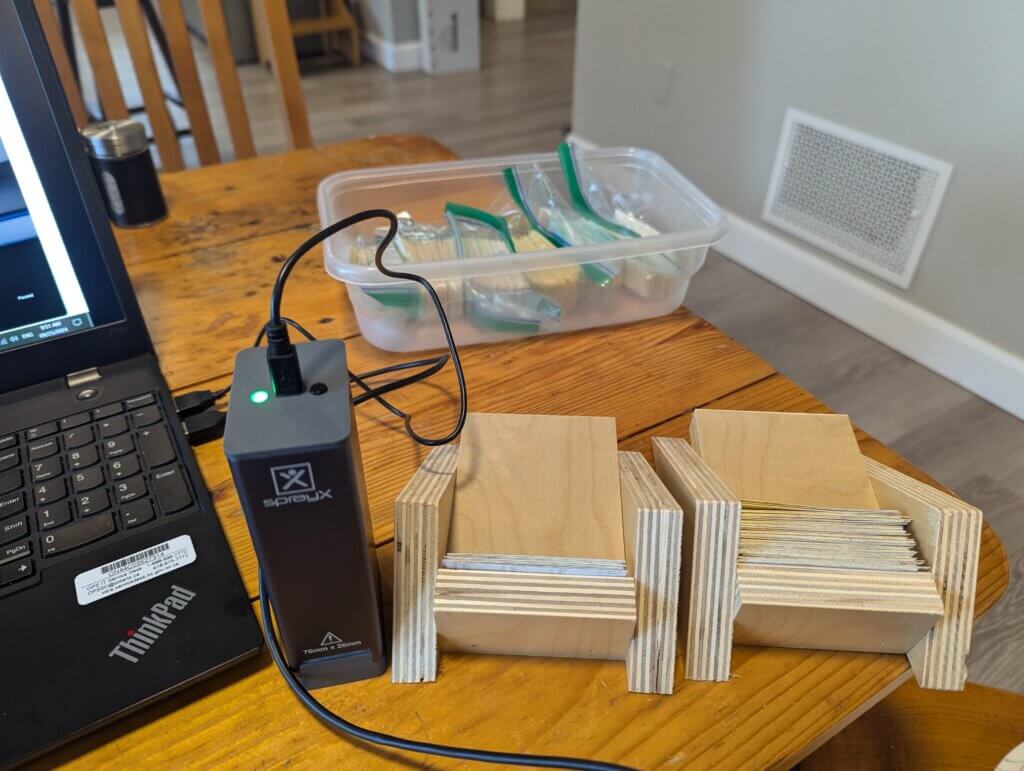
    Figure 7. In-box, Out-box procedure for scanning WSP using a Drop Scope.

    Effective swath width calculation

    We used our Excel-based model which assumes a racetrack pattern and sums deposits from adjacent swaths. Swath width was adjusted to minimize over- and under-dosing as well as deposit coefficient of variation (CV), while maximizing swath width.

    For the WSP collectors, each of the six orientations were first evaluated separately, and then averaged to simulate a three-dimensional plant structure. Given the similar orientations, the upward-facing WSP and bond paper were used as quality-checks.

    Visualizing coverage in three dimensions

    In order to understand the direction the spray cloud moved as it imacted the collector array, we declared a dominant side to each of the three cardinal directions, x, y, and z that we captured using the WSP.

    • X-axis: Looking in the direction of travel, WSP deposits facing right were subtracted from those facing left.
    • Y-axis: WSP facing up minus papers facing down.
    • Z-axis: WSP facing the RPAS retreat minus papers facing the advance.

    This allowed us to estimate the vectors with which the spray was deposited.

    Results and Discussion

    Deposits on WSP

    We first looked at WSP data to better understand the direction that the droplets flew at the time of impact.

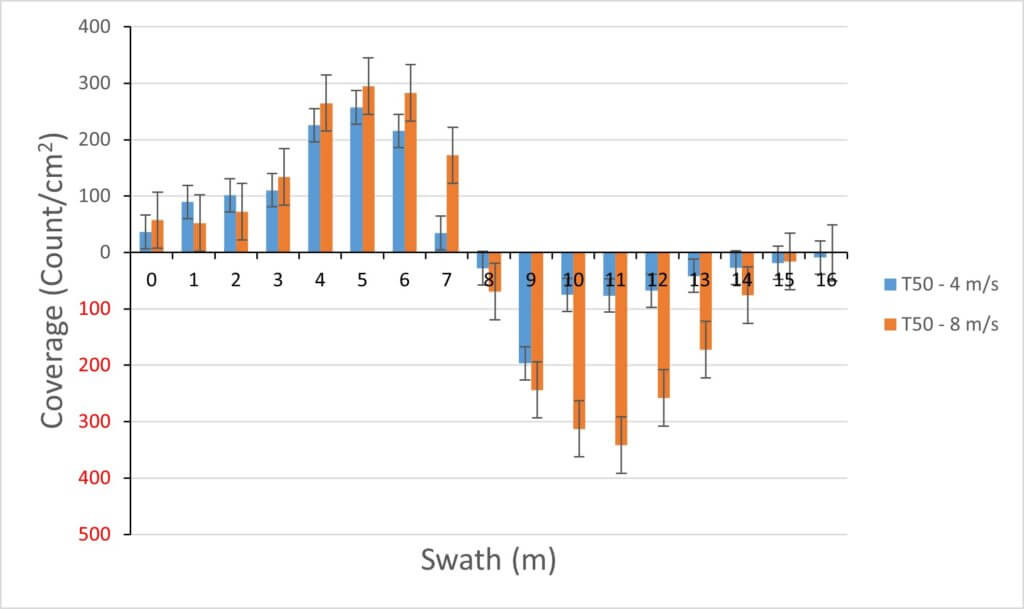
    X-axis: Note that the right-facing cards are depicted as being positive, whereas the left-facing cards are depicted as negative.

    Only those WSP facing the drone received deposit, with the deposit amount being larger for the faster flight speed (Figure 8). This implies that the spray moved out to either side from the centre of the flight path, carried by a laterally moving downwash.

    Figure 8. Coverage on the X-axis, with WSP faces oriented perpendicular to flight path. Note that the drone passed between the 7 and 8 metre marks.

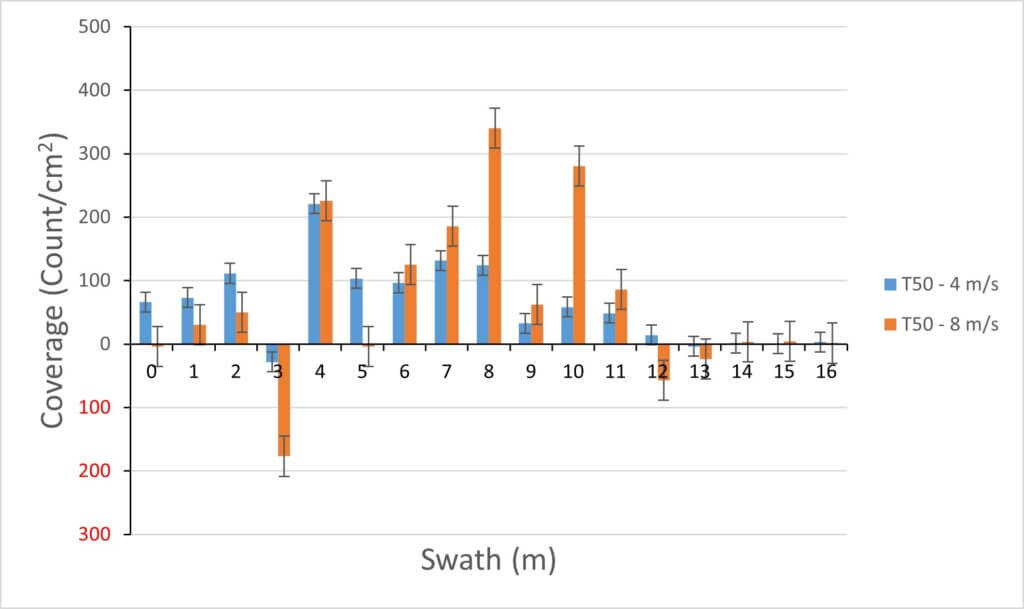
    Y-axis: On the whole, deposition on the horozontal collectors was most variable of the three orientations, and resulted in the lowest measured droplet densities (Figure 9). Upward-facing WSP received more of the deposits than the downward-facing WSP. However, at 3 m and 12 m, the majority of deposition appeared on the downward-facing WSP. Underneath the drone rotors, downwash force would prevent re-bound. But at the edge of the rotors, a lower pressure region would permit pressurized air to escape not just laterally but also vertically. Entrained droplets would therefore gain an upward vector, and impact the downward-facing WSP. A slight wind from the right truncated the swath at the 13 m mark. That same wind may have captured any spray from the “bounce” at 3 m to become secondary deposition along the 1 m – 3 m section.

    Figure 9. Coverage on the Y-axis, with WSP faces oriented up or down. The drone passed between the 7 and 8 meter marks.

    Z-Axis: Only those WSP facing the retreat of the drone received deposits (Figure 10). As previously discussed, this is likely due to the downwash, which is vectored downward and rearward along the flight path according to the drone orientation in flight. These deposits were further reinforced by the prevailing wind direction after the drone had passed.

    This deposit pattern is opposite to that of a ground sprayer, where spray tends to deposit on the advance surfaces due to droplet inertia (assuming a low boom height and fast travel speed). A slight shift to the left is apparent in Figure 10, likely due to the headwind’s directional deviation to starboard. Note that the faster flight speed had higher deposit densities. Reasons for this are unclear, as there was no commensurate deficit in droplet numbers at other sampler orientations for the faster speed.

    The overall deposit density on the retreat-facing orientation was highest of any single collector orientation. The high deposit density and swath width is likely the result of the prevailing wind direction as well as the additional contribution of the downwash from the forward-tilted RPAS. These two factors helped transport the spray plume backwards for efficient interception by retreat-facing collectors.

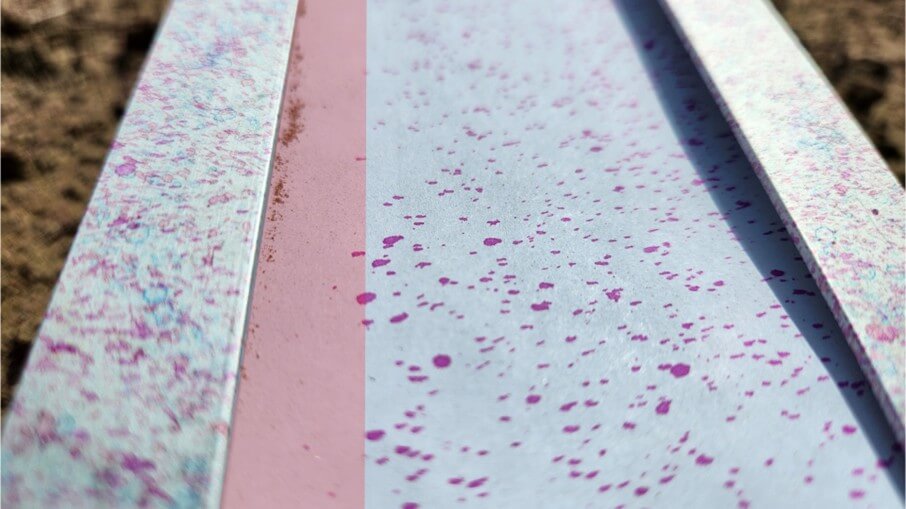
    Further evidence of this dynamic was visible when examining the bond paper collector strips. In the lee of the track edge, deposits were scarce, indicating a predominant horizontal trajectory of the droplets (Figure 11).

    Figure 10. Coverage on the Z-axis, with WSP faces oriented to face drone advance and retreat. The drone passed between the 7 and 8 meter marks.
    Figure 11. A shadowed region (highlighted in light red) that sometimes appeared along the retreat-edge of the Speed Track.

    ESW at 8 m/s flight speed

    Only the upward- and retreat-facing WSP surfaces received consistent spray coverage. As a result, only these two orientations were individually used for ESW calculations. However, deposits from all six orientations were averaged for the combined ESW measurement.

    Two analysis methods were compared. First, the ESW was calculated for each replicate run seprately, and the resulting ESW were then averaged. Second, the three replicate run deposits were first averaged, and then ESW was calculated from that average.

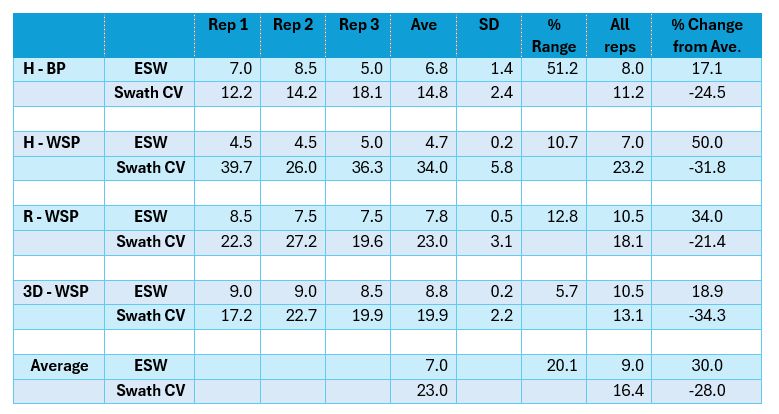
    When ESW from the bond paper was calculated for each replicate and then averaged, the ESW was 6.8 ± 1.4 m (Table 1). The resulting average CV of those swaths in a racetrack pattern was 14.8%.

    When ESW was calculated from the upward-facing WSP for each replicate, the ESW was 4.7 ± 0.2 m. This was narrower than the bond paper result oriented on the same plane. In addition, the average swath CV was now 34%, significantly higher than that from the bond paper collector.

    The retreat-facing WSP resulted in the highest ESW so far, 7.8 ± 0.5 m.

    To better simulate a plant’s cumulative deposit, reflecting the pesticide dose received on leaves and stems that might vary in location and orientation, all six orientations were combined for each pass. When ESW was then calculated for each replicate, it was 8.8 ± 0.2 m (CV = 20%).

    The range of swath widths onserved within each of the three reps ranged from 6 to 51% of the mean ESW. Differences between replicates could be due to automatic, instantaneous adjustments in the flight path controlled by the drone, or it may be due to changes in environmental conditions in the two hours that elspsed between consecutive replications. It may be instructive to increase the replicate sampling to obtain better estimates of variability within any given treatment.

    If reps were pooled before calculating ESW, ESW increased an average of 30% for all sampling methods (Table 1). The CV of multiple swath simulations also decreased an average of 28% with this approach. Pooling prior to analysis is, however, less accurate because it eliminates the variability one might observe between two dicrete locations, which is how product efficacy will be observed in a pest control situation.

    Table 1. Calculated ESW (m) and CV (%) for 8 m/s flight speed based on deposit density (count/cm2). Range (% of mean) calculated for the averages. Change from Average is the % change in the ESW of a pooled sample compared to the averaged ESW from each replicate. H-BP: Horizontal Bond Paper, H-WSP: Horizontal water-sensitive paper, R-WSP: Retreat-facing water-sensitive paper, 3D-WSP: Sum of all six facets of water-sensitive paper.

    ESW at 4 m/s flight speed

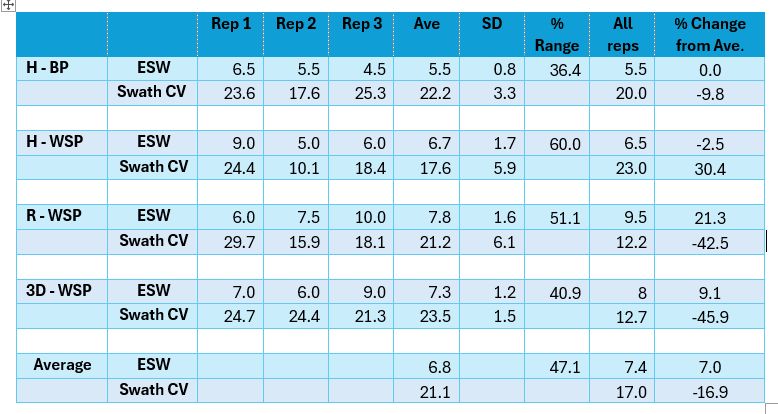
    ESW were significantly narrower at the slower flight speed when measured on the bond paper, but of similar widths when measured using WSP (Table 2). The slower speed had much greater variability among replicate samples as well, ranging from 36 to 60% of the average ESW.

    The retreat orientation showed the widest ESW, with the 3D orientations resulting in slightly narrower swaths. At the high speed treatment, the 3D analysis had produced the largest ESW.

    Pooling the reps prior to analysis resulted in similar ESW for the bond paper and the upward-facing WSP, whereas the remaining orientations resulted in wider swaths when the reps were pooled.

    In general, the swath CVs at the slower flight speed were similar to the fast RPAS speed, averaging in the low to mid 20s. Pooling the reps prior to analysis reduced swath CVs for the retreat orientation and the combined orientations, but not for the upward-facing collectors.

    Table 2. Calculated ESW (m) for 4 m/s flight speed based on deposit density (count/cm2). Range (% of mean) calculated for the averages. Change from Average is the % change in the ESW of a pooled sample compared to the averaged ESW from each replicate. H-BP: Horizontal Bond Paper, H-WSP: Horizontal water-sensitive paper, R-WSP: Retreat-facing water-sensitive paper, 3D-WSP: Sum of all six facets of water-sensitive paper.

    Comparing speeds

    When ESW was calculated for each replicate, the slower flight speed resulted in ESW that were slightly smaller than the faster flight speed on average (6.8 vs 7.0 m). However, when reps were pooled, the slower flight speed resulted in significantly smaller ESW compared to the faster flight speed (7.4 vs 9 m). Pooling the reps prior to analysis also resulted in a lower coefficient of variation.

    Generally, there was less variability among replicates for the faster flying speed. Whether this was the result of the speed itself or was an artifact of the specific conditions during which the flights occurred is unclear.

    Comparing swath appearance from bond paper and optimal WSP orientations

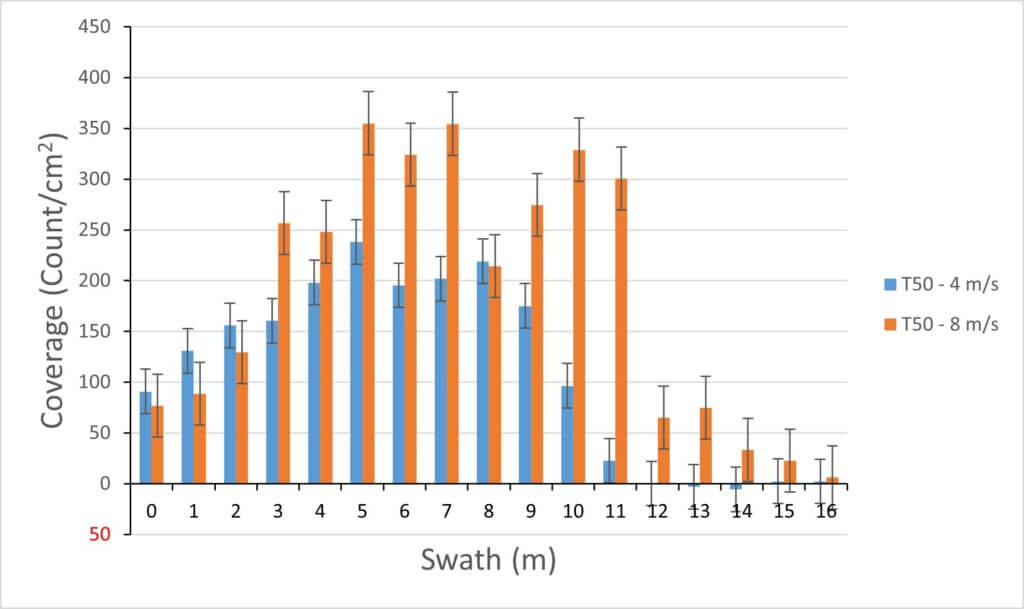
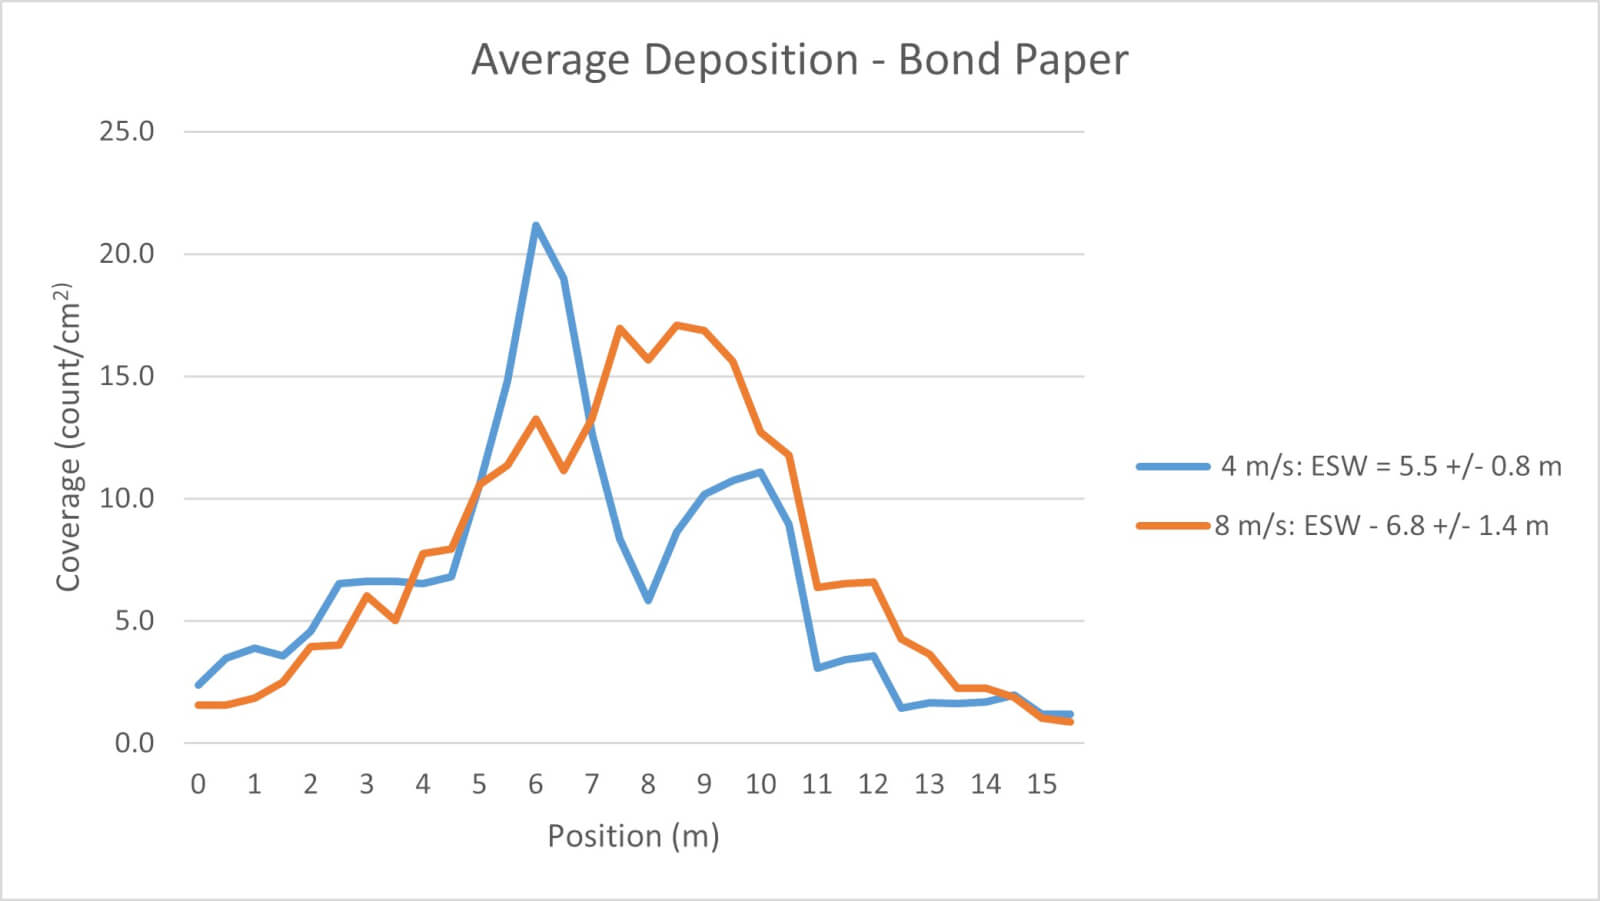
    When the ESW from the bond paper was calculated for each replicate and then averaged, the following graph was produced (Figure 12). Note the bi-modal shape produced at the slower flight speed. This corresponds with the position of the atomizers and it’s possible the increased dwell time directed more spray in those positions compared to the faster flight speed, which increased ESW and dispersed the spray more evenly.

    This could also be responsible for greater uniformity among the three replicate flights that was observed.

    Figure 12. Average of three passes from bond paper at 4 m/s and 8 m/s speed.

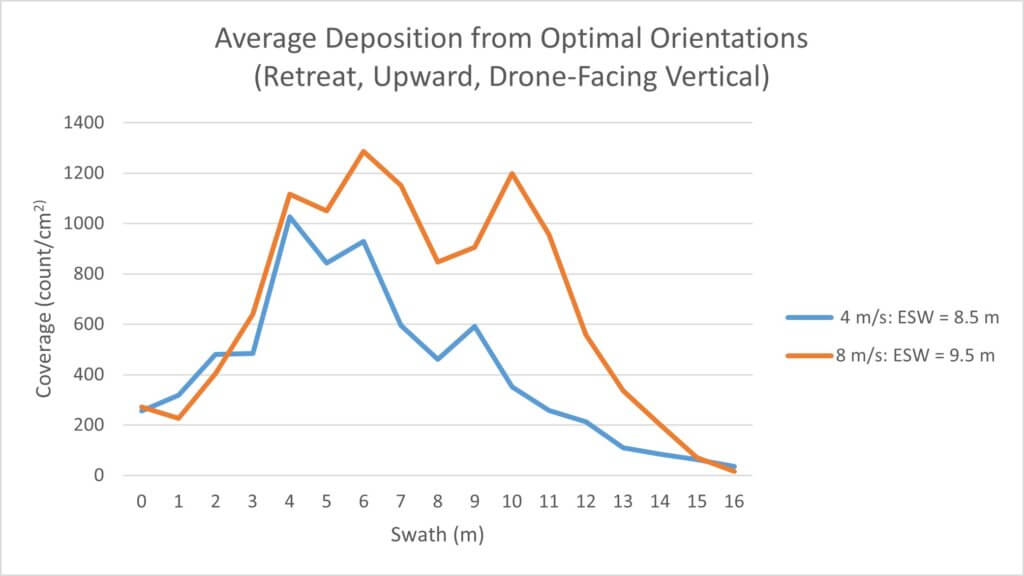
    When we averaged coverage from the optimal 3D orientations (X-axis: inward-facing, Y-axis: upward-facing, and Z-axis: retreat-facing) and compared their swaths to the 2D, we are able to capture more droplets and eliminate the bi-modal pattern appearance of the lower speed, reducing CV and increasing the ESW (Figure 13). This may begin to explain why sprays that appear to have low coverage on horizontal collectors can produce better-than expected efficacy.

    Figure 13. Average of three passes from optimal-facing WSP samplers at 4 m/s and 8 m/s speed.

    Vector analysis

    The sampler array permitted the generation of spray vectors that showed the inferred direction and intensity of the downwash movement.

    To graph vectors for droplet movement at each position along the 16 m swath, we calculated net coverage as previously described (i.e. for each of the x, y, and z sampler orientations, the deposit density on one side was subtracted from the other). The magnitude of that value represented the relative dominance of that side of the orientation for spray deposition. We assumed that droplets were primarily carried by air movement to their collectors, therefore we inverted the sign on the coverage to express it as wind direction from the from the vantage of the drone. When these data were combined for the X-Y and the X-Z direction, we were able to estimate the origin and strength of the deposit vectors, and thus infer droplet-carrying airflow.

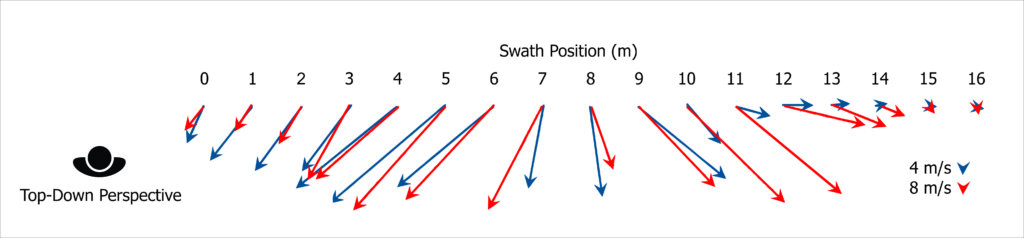
    Plotting X by Z meant you are looking down from above (Figure 14). This created vectors that indicate lateral and rearward spray movement.

    Figure 14. Plotting X by Z coverage creates vectors that indicate lateral and rearward forces that carry spray droplets released from the drone.

    Note that the predominant direction of deposit in the X-Z plane was rearward, in the direction of the wind. The forward-tilt of the RPAS aso directed its downwash towards the rear, adding to the headwind effect. At the edge of the spray swath, the rearward vectors diminished, being solely under the influence of the headwind. The vectors were strongest at the locations corresponding to the RPAS rotors.

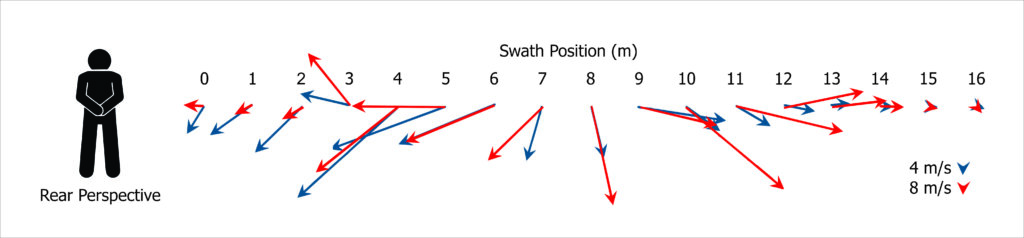
    Plotting X by Y for each position means looking at the RPAS from ground level as it flies away from you. The resultant vectors indicated a combination of lateral and downward spray movement for the majority of the swath (Figure 15).

    Figure 15. Plotting X by Y coverage creates vectors that indicate lateral and predominantly downward forces.

    At two locations (3 m and 13 m) the net spray deposition was on the underside of the Y-samplers. This suggested that a special region in the downwash existed, where the high pressure air generated by the rotors dissipated, allowing droplet-laden air to move upwards, essentially re-bounding from the ground. At the same time, droplets moved laterally to escape the same high pressure region.

    This region of high turbulence could be where plants in the canopy may see droplets arriving from a large number of directions, contributing to coverage that may not be similarly captured by a single flat collector.

    Summary

    ESW Measurement Method

    There was significant variability in swath width and uniformity among three replicate measurements of the same drone configuration. We observed an average of 34%, and as much as 60%, variation in swath widths within replicate passes of the same speed treatment. Spray deposition cannot be assumed to be repeatable, and understanding deposit variability is likely more important than calculating its average.

    Measurement techniques affected the observed swath widths. Generally, horizontal targets resulted in narrower swath width measurements than vertical targets facing into the wind and the direction of drone travel. A composite of various target orientations resulted in the widest and most uniform swath deposits.

    Effect of Flight Speed

    Faster drone flight speeds resulted in wider measured swath widths in all but one measurement technique. It is possible that the greater concentration of downwash energy at the lower flight speed prevented more of the droplets from moving laterally prior to impact with a collecting surface.

    Measuring Downwash Turbulence

    The direction of droplet movement varied with position under the drone. The majority of the droplets had a strong z-vector at deposition. This is the direction of the wind and of the retreating side of the drone. Both wind and backward-tilted downwash of the drone would contribute to this.

    As the spray droplets neared the ground, the high air pressure under the drone rotors caused the downwash to move laterally away from the centreline. Droplets entrained in the downwash therefore moved strongly to the left and right of the centreline.

    Of the dominant three collector orientations (retreat, lateral, and upwards), the lowest collection was achieved with horizontally oriented targets. Interestingly, at the rotor edge, vortices formed and these moved the droplets upwards, away from the ground. This effect was only observed in a narrow band at he outside edge of the rotors.

    These effects were somewhat variable but consistent for all spray passes, and occurred at both travel speeds.

    Overall Conclusions

    1. A drone’s downwash results in spray droplets moving in many directions which cannot be accurately sampled with a single collector orientation.
    2. If only a single plane can be sampled, it should be facing the retreat side of the spray pass.
    3. Three-dimensional sampling may be required to better simulate the spray capture of an agricultural canopy.
    4. Higher travel speeds resulted in slightly more uniform, wider, and repeatable deposition.
    5. The variability of a drone’s deposition, both in ESW and CV, is considerable and remains a barrier for consistent efficacy.
    6. Multiple replicate passes, analyzed discretely, are required to understand the variability of the drone’s spray deposit, both in ESW and in CV.

    Author’s Note: Newer 3D deposition studies have revealed additional information that should be considered. Read more here

    Thanks to Drone Spray Canada and Don Murdoch (University of Guelph) for their cooperation and in kind support of this study.

  • Drone Tendering – Considerations before Buying or Building

    Drone Tendering – Considerations before Buying or Building

    Much of this article is based on a session and tradeshow I attended at the 2026 Drone End-User Conference in Kansas City. I want to acknowledge the insightful information provided by the three session speakers, as well as the ~200 audience members that asked honest questions and shared their experiences. The speakers were Mr. Chase Plumer (Owner, ProBuilt Fabrication/ProDrone Spraying & Seeding, Seymour, IN), Mr. Klaytin Hunsinger (Owner, Hunsinger Ag Solutions, Rossville, IL) and Mr. Kyle Albertson (Owner, Albertson Drone Service LLC, Benton County IN).

    Tendering systems

    Drone-based crop protection is a rapidly growing industry and operator experience spans from novice to veteran. It follows that tendering systems are not a one-size-fits-all proposition. The best fit will be a configuration that is budget-conscious, reflects the size and nature of the operation, and accounts for future needs.

    We can categorize them by their complexity, cost and capacity.

    Entry-level tendering system: A starting point

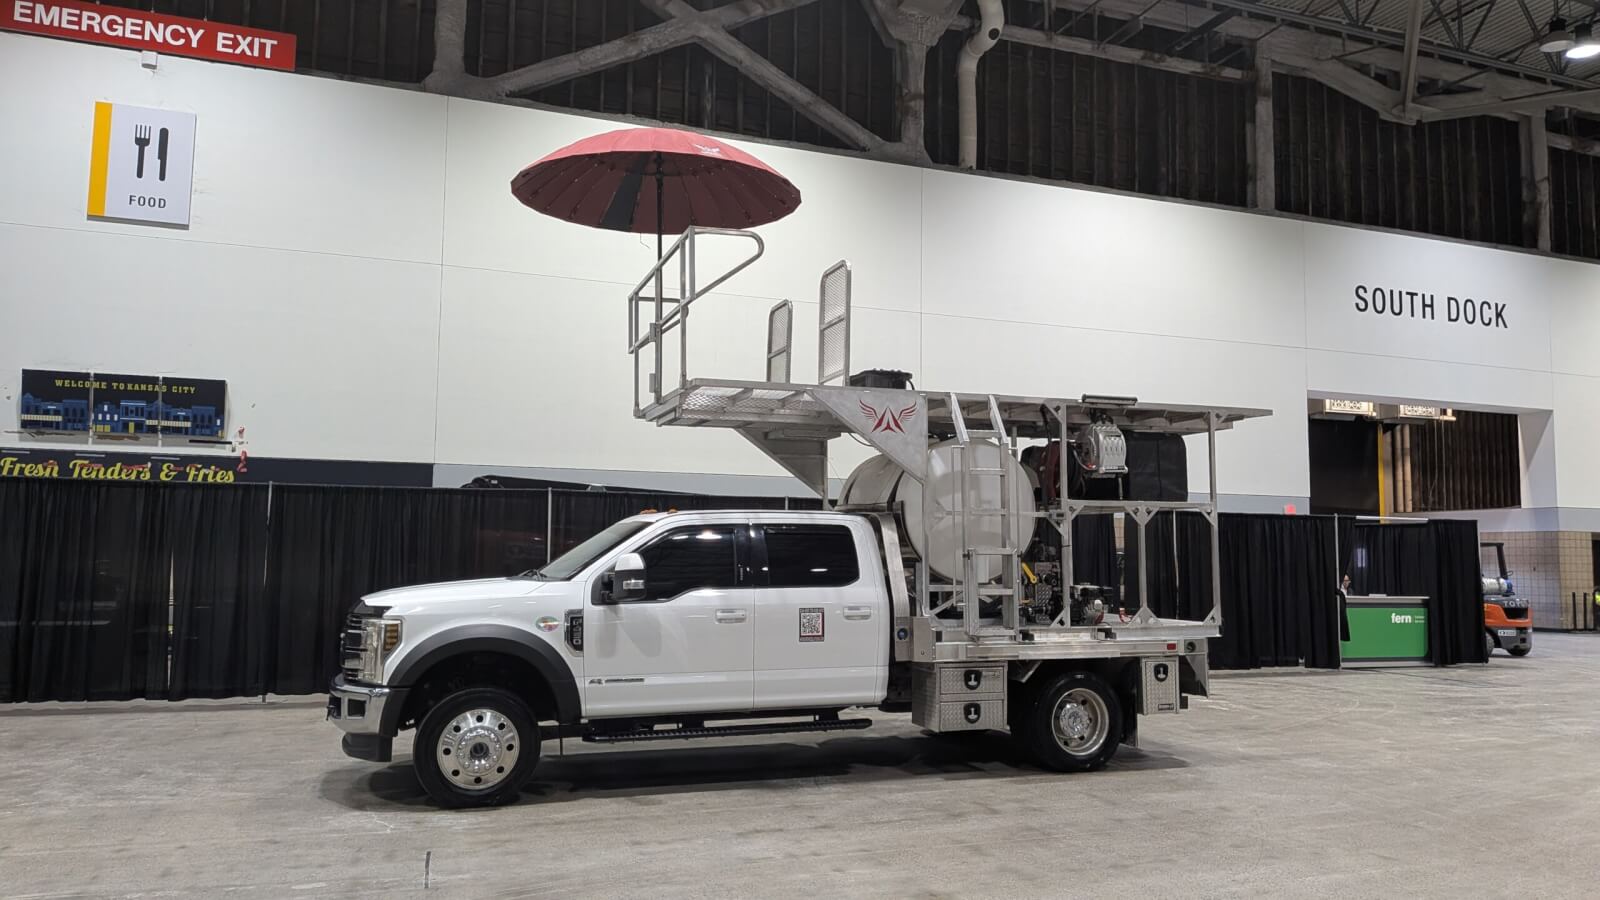
    For those just getting started, focus on affordability (lower initial investment) and simplicity (basic components). Examples include skid or truck builds, which are removeable or permanent systems that either rest on a vehicle bed or are built on-and-around the vehicle. This is an operator-friendly system that is small and portable for easy access to diverse fields. It’s the least durable configuration, and not particularly efficient or upgradeable, but it will serve until you know what you really need and how you like to work.

    Mid-level tender system: Second year

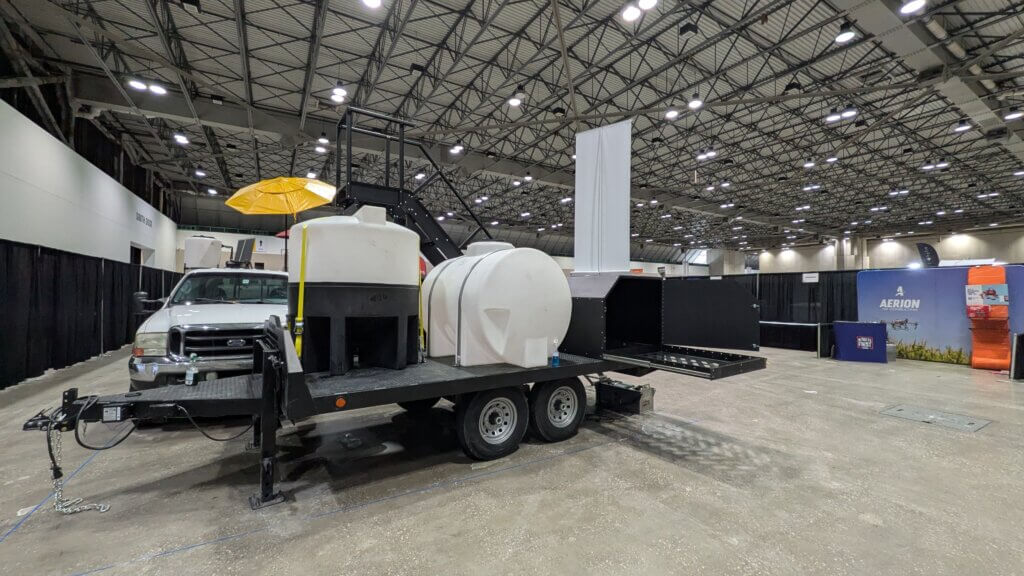
    By year two, you might want a larger and more efficient configuration with additional storage and a few creature comforts to reduce operator fatigue. A truck build might suit, but this is more likely a trailed system that is still capable of being towed by a mid-sized (1/2 to 3/4 tonne) truck. Some operators feel enclosing the trailer reduces efficiency, while others appreciate the security and protection afforded by defined spaces.

    A mid level system has some capacity for modification, but isn’t designed to support multiple drones, and likely won’t have enough capacity to store a day’s worth of water, chemical, or fuel. The operator may wish to detach the truck to run for supplies. Or perhaps it makes more sense to run a truck with a skid-mounted tender system that trails a second, mid-level system to divide-and-conquer, or scale up for larger projects.

    Beware going too big, too quickly. A 30-foot gooseneck can get caught on hilly terrain, where a 20-foot flat bed with a straight truck might be better suited. Small to mid-size trailers also take less time to set up and tear down. Consider performing site recon before dispatching a mid-level tender system. This is an additional step, but it allows the operator to scope out potential hazards and is ultimately more productive because it prevents tender systems getting stuck or placed in inefficient or unsafe locations. For example, if a client is “plant-out, pick-in”, the fields are hard to service because there’s no way to access them with large vehicles. Pilots become landscapers, spending valuable time clearing an operations area.

    High-level tender system: Large scale and Commercial interests

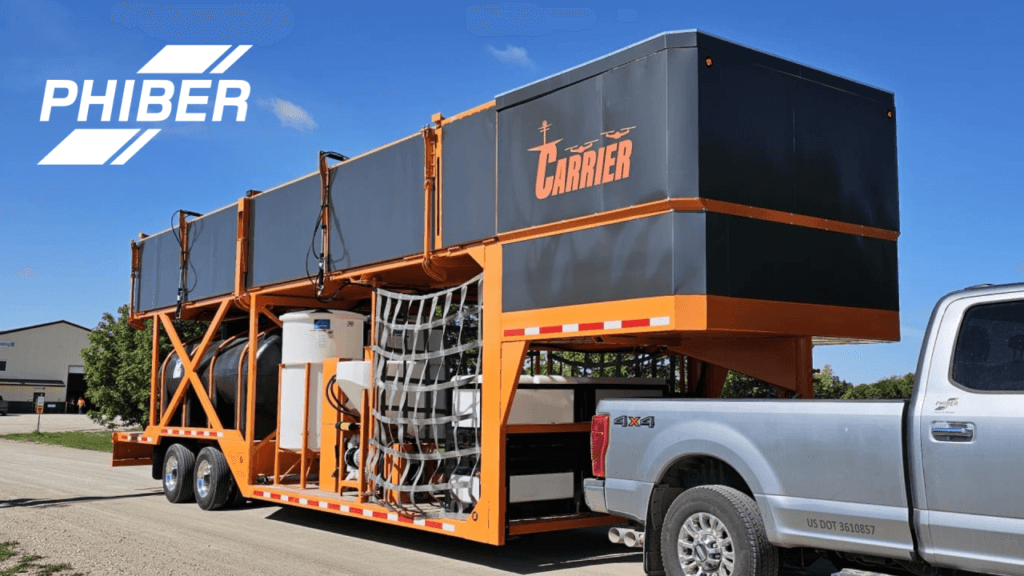
    Made for efficiency, the limiting factor of this system is the drone’s productivity. This category is comprised of the largest gooseneck trailers, which may include an upper deck and enclosed areas. It has the highest capacity for water storage, can service multiple drones and has ample storage. Intended for large fields, the size of this unit can make it physically incapable of reaching smaller fields. While a one tonne truck might be able to tow it, an even larger vehicle might be more suitable. It may also be prohibitively inefficient given the time required for setup and teardown. Consider an operator that requires a 15 minute start-up and a 15 minute teardown to spray 250 acres at 50 ac/hr; At $20/ac, that’s roughly $500.00.

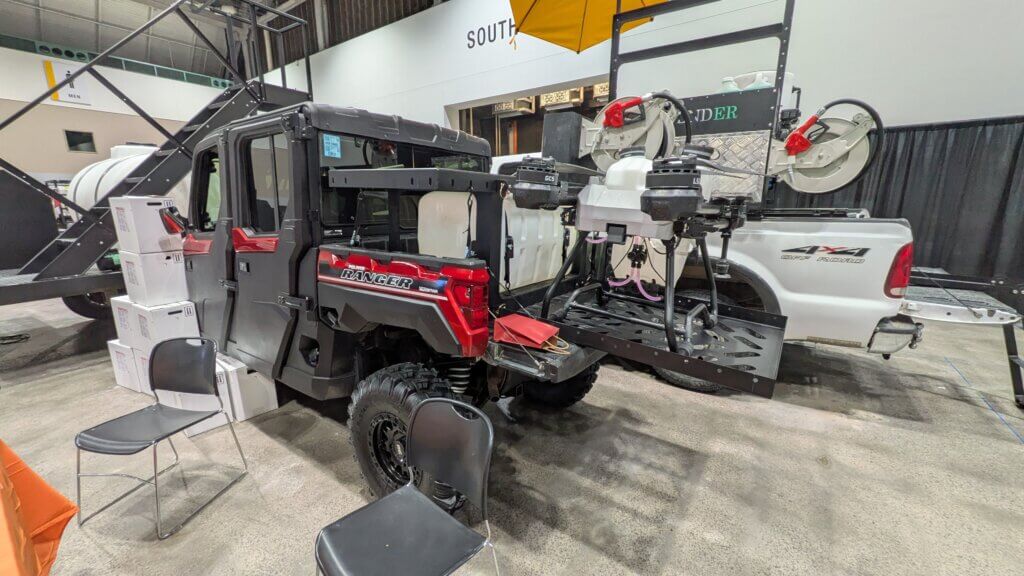
    Phiber’s DASH Carrier (image from website)

    Components

    Fundamentally, each tendering system has the same function, so they share the same basic components. Here’s an overview of common features and considerations.

    Trailer

    The trailer is (literally) the foundation of most tendering systems. Operators suggest building for your current budget but planning for future needs as best you can. Trailer size should reflect the nature of the farms you will be servicing and how best to access them. You should also consider the safest and most efficient workflow on and around the trailer before committing to a layout.

    Option 1 – Utility trailer

    AdvantagesDisadvantages
    Easy to get on/offLow ground clearance
    Less expensiveNarrow footprint for accessories (e.g. conventional tanks not fitting between wheel wells)
    Versatile (use for drones on season, and other tasks off season)Narrow if planning a top flight deck
    May be an insufficient trailer GVWR (Gross Vehicle Weight Rating). This is the maximum allowable total weight of a trailer when fully loaded.

    Option 2 – Flatbed gooseneck trailer

    AdvantagesDisadvantages
    More room for accessoriesMuch heavier. ¾ tonne truck likely not sufficient.
    Better ground clearanceHard to get into tight places (length dependent).
    Higher GVWRSet up / Tear down takes longer
    Potential for top flight deck. Typically, 102” wide, so top deck can be about the same.

    Option 3 – Enclosed trailer

    AdvantagesDisadvantages
    Protection from weather and elementsLimited clearance for large drones (e.g. 24’ long, 8.5’ wide)
    Increased security for equipmentHighest GVWR
    Could serve as mobile workspace / officeMost expensive
    Cleaner environment for charging batteries, and generators don’t need maintenance (e.g. filters changed) as often.Can get hot inside, both for people and battery overheating. Airflow on batteries is a necessity, and fans can only cool to ambient. Drone hasn’t got time to cool between fields.

    Vehicle

    Based on operator discussion, it seems many have a tendency to push their trucks to the limit… or beyond it. One operator uses a ¾ tonne truck to pull a 22-foot trailer with an upper deck. Another uses a 1 tonne (aka tonner) gas F350 which struggles to pull a 30-foot trailer. Others recommended the use of a single axle semi (e.g. a Kodiac or a Kenworth T300), which even used still has ample life left in it, and at ~15 to 17,000.00 USD is cheaper than buying a truck.

    Consider that if you run a two-person operation, you may want more than one vehicle. A smaller truck can be employed to run for parts or fuel, or as previously noted can be fitted with a skid mount and a 1,300 gal. poly tank to split up the duty.

    Tanks

    Tank size(s) will depend on how you choose to operate, how many acres you plan to do in a day, and the weight capacity of your truck and trailer. Again, there is no one solution, so consider the following scenarios before you commit.

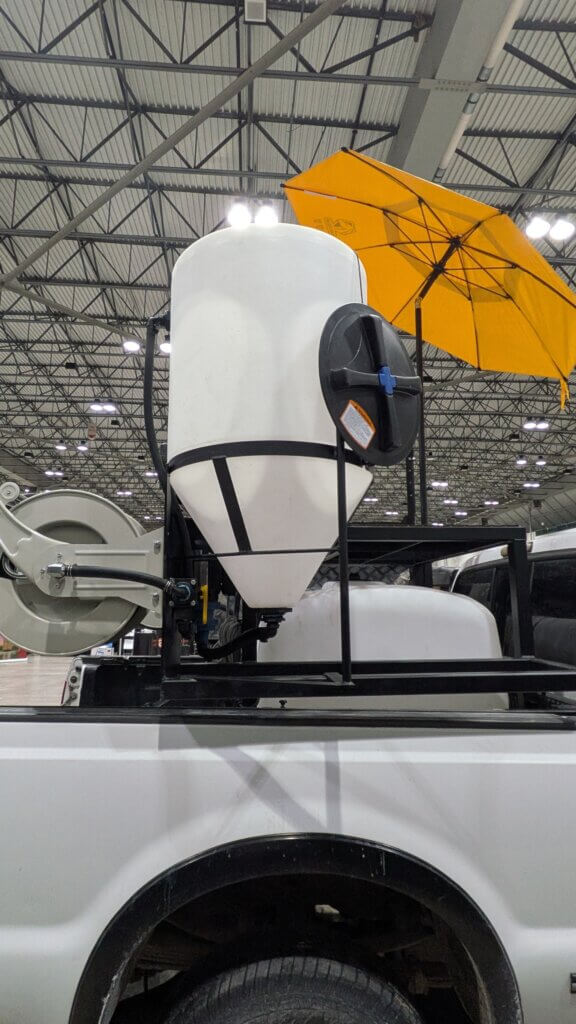
    If you plan to hot load, perhaps you’ll just mix in a single, large tank. However, if you plan to switch between insecticides, fungicides and herbicides, one or two 100-gallon cone-bottom tanks with wash-down nozzles might make more sense. Then, you can carry clean water separately in a few repurposed IBC’s or go for the efficiency of a single, high-volume poly or stainless tank. Consider the most flexible and efficient arrangement.

    Will you have access to water, will you have water tendered, or will you carry enough for the day? Will you fill from a 3-inch connector or suffer the lost time and fill with a garden hose? Will your truck and your trailer handle that weight, and will the vessel(s) fit between the wheel wells? Are the tanks black or shaded to prevent algae and do you have a plan to baffle the volume, so it doesn’t slosh when you drive over uneven terrain? Larger poly tanks (e.g. ~1,000-gallon tanks) have spots molded in to accept baffles, but some operators noted it’s difficult to install them after-market. Slosh suppressors such as floating balls or lengths of poly French drain can help.

    Pumps and Lines

    While some prefab trailers offer pneumatic pumps, most must choose between electric and gas pumps, and there are pros and cons to both.

    Electric PumpGas Pump
    Low noiseHigh noise
    No exhaustExhaust
    Taxes the generatorDoes not tax the generator
    No fuelRequires fuel
    Low maintenanceRegular maintance
    May limit head pressureAmple head pressure

    Gas-powered pumps (e.g. Drummond or Predator transfer pumps) are relatively cheap, but some claim they have a high failure rate. This not only incurs downtime, but operators must deal with the chemical in the pump and lines during repair.

    Electric may be a better choice, if only to avoid the noise and exhaust, and some operators run them continuously to recirculate chemistry when not filling a drone. Consider the horsepower, gallons per hour and head pressure, especially if you are pushing flow to an upper flight deck.

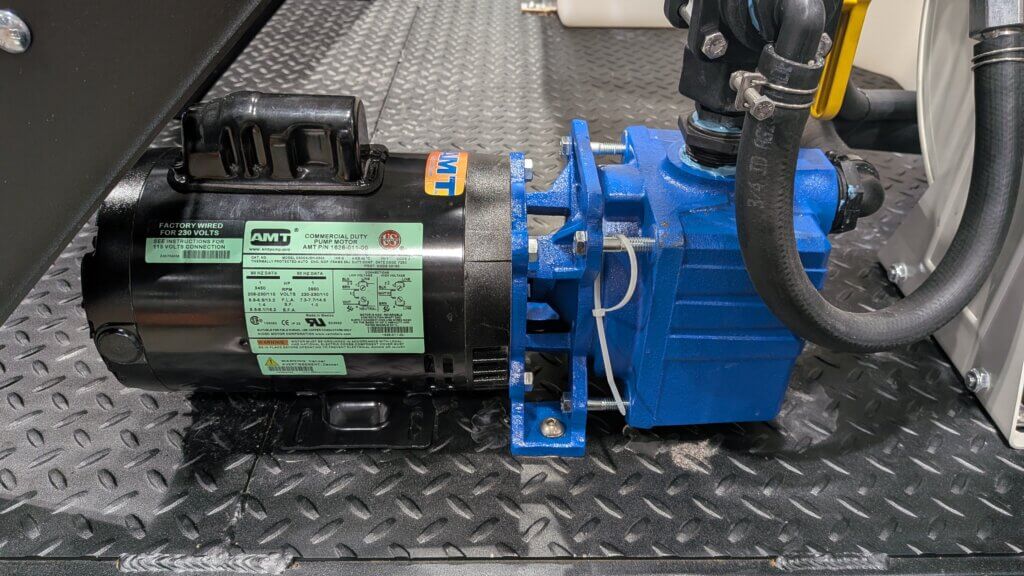
    An AMT electric transfer pump on a mid-level tender system.

    You should be able to fill a drone in about a minute. Some operators have begun increasing fill line diameter from 1-inch to 1.5-inch but feel 2-inch lines are too heavy to warrant the few seconds saved during filling. This may not be a limitation, however, if they are part of a top flight deck arrangement, and not dragged along the ground.

    The auto shutoff function of a fuel-pump-style filler is preferred over a quarter-turn-style. The former contributes to foaming but some operators say that can be mitigated by using an anti-foam adjuvant and it’s less likely to create an overflow situation.

    Perhaps a metered flow valve that shuts off once a predesignated volume has been dispensed would be a workable solution. This would preserve speed, but without foaming or potential overflows.

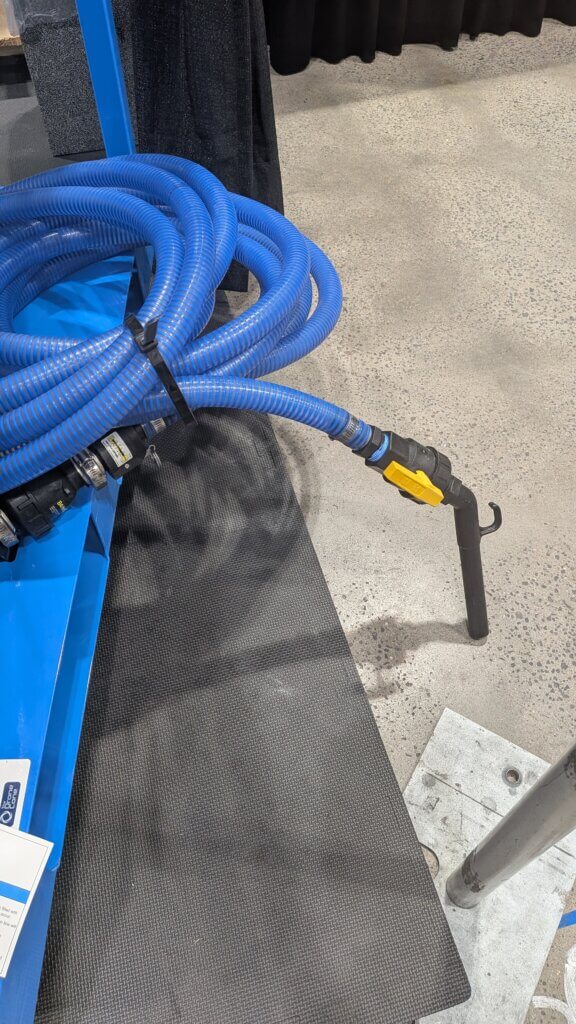
    A loose line terminating in a quarter-turn valve fills quickly and with few bubbles, but is ultimately not ideal. It’s prone to causing overflows which increase the potential for operator exposure and cause point source contamination.
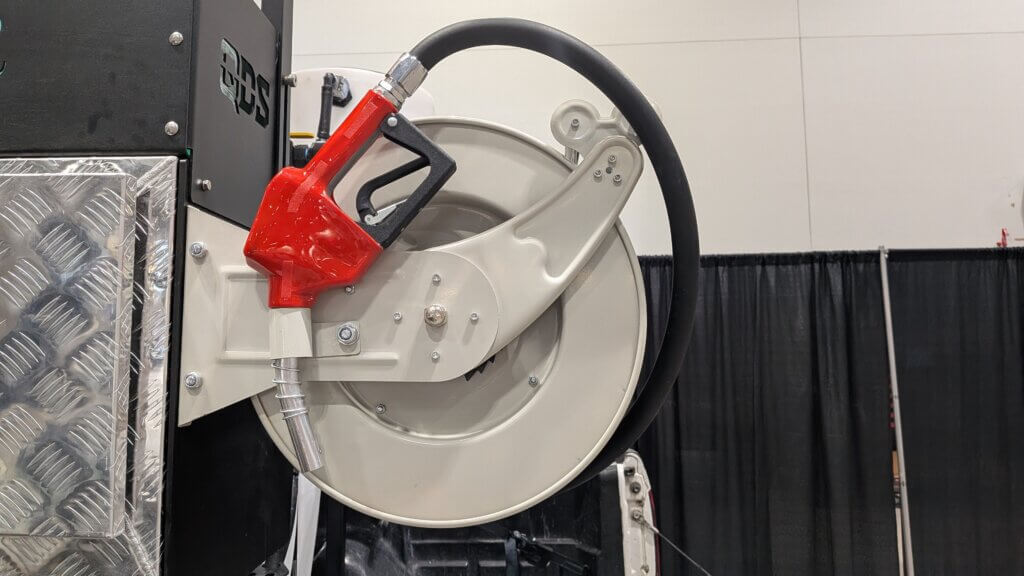
    A reeled hose and a fuel-pump style filler is a better approach. The hose can be recoiled to keep it from being underfoot, and the filler has a back pressure valve that shuts off when the drone is full. There is greater potential for foaming, but some suggest anti-foam adjuvants can help.

    Generator

    This proved to be a controversial subject at the conference. Many operators were unwilling to promote a single make or model, but the discussion resulted in some general guidance based on personal experiences. Generators will have a peak and a continuous performance rating. Ensure the sum total of all your draws does net exceed the continuous rating.

    Drones are getting bigger, and the number of electrically powered devices on the trailer is increasing. Smaller operations tend to employ mobile gas generators that produce less than 10 kW. Larger operations reported using 30 kW (or more) diesel standby generators to charge two drones, plus accessories, while ensuring room for future growth.

    A mobile gas generator (inverter or not) tends to be the cheaper, lighter alternative, depending on the wattage. They are a good choice for entry level systems and with regular maintenance will last longer, but are still a short-term proposition. Diesel generators tend to be more expensive, but are quieter, more fuel efficient and more reliable. A liquid propane standby generator is yet another option; Generally cheaper than diesel, consideration must be given to the weight and size of what is typically a 250-gallon propane tank.

    A few points raised by operators during the discussion:

    • Most standby generators do not need diesel emission fluid, while mobile generators do.
    • Many operators prefer the durability of mobile generators over standby generators. The former is built to be moved while the later presents issues with brackets, mounts and stators.
    • Warranties are advisable for inversion generators, as they are not easily repaired.
    • Standby gas generators (10 kW continuous / 13 kW surge) may require you to downrate the battery charger, or the heat can trip the breakers. It is not advisable to bypass breakers.

    Storage

    Storage is often overlooked but can be critical to efficiency. For example, if you plan to spray six, 50-acre farms in a day and it takes 10 minutes for set up and 10 for tear down, that’s two hours gone. Consider what you’ll need and where you’ll need it, and place storage accordingly to minimize downtime. PPE should be located near your flight deck or filling area. You’ll also want to consider carrying spare parts, such as an electronic speed controller, motor, pump and a full set or rotors.

    Batteries

    Some battery chargers feature water baths, misters or air conditioning, but at bare minimum batteries should charge in the shade and in a ventilated area (e.g. not enclosed in a storage or tool box). One operator vented air from a commercial blower fan to the batteries on the top flight deck.

    Connectivity

    A hotspot on your cellphone doesn’t always provide reliable service. Satellite internet providers such as Starlink or Xplore (depending on your location) might be a solution. If the controller drops a direct signal to drone, it can bridge to satellite to connect to the SIM card in most drones. Operators that use this system advise it’s best to rent the hardware (if possible) so if something damages it, you get a free replacement. 100 gb of monthly roaming has proven more than enough for most operators.

    Mounting solutions vary, but operators noted good experiences with companies such as Veritas Vans, which have a replacement policy. They warn against 3D printed options that tend to be produced using unsuitable filament materials. Operators that use magnetic mounts on their trucks have reported no issues. Some run wire through rear window or sliding door, and others pull the headliner down and run the power cord out through the third brake light.

    Operator safety

    Lastly but certainly not least, when it comes to the cost-benefit assessment of tender features, safety should always be a priority. Even simple comforts such as folding chairs combat operator fatigue, increase safety and happily also improve overall productivity. We’re none of us getting any younger.

    RV awnings, umbrellas, foldable Bimini-style tops or flip-up doors provide shade. Switching to lower-decibel equipment (e.g. inverter gas generators run at about 90 decibels and electric pumps are even quieter), enclosing loud systems, or positioning them far from the filling area, reduce noise and emission exposure. Chemical drift and exposure during filling should be considered, and PPE should be used and stored in convenient locations.

    Trailers that feature an upper flight deck sometimes include a central cable to tether belt harnesses. Stationary railings can help prevent falls, while a fold-up version provides clearance when backing the trailer into a shed.

    The drones themselves are a hazard. Long flight decks keep landings and lift-offs at a safe distance, and a protected cockpit area improves matters. Decks with pull-out platforms or hydraulic wings can increase the operating area and can be adjusted to account for adjacent roads and the slope of the ground. A short rail around the landing area can prevent a drone from slipping off; A falling drone is expensive, but falling or sliding into an operator is a disaster. The simplest approach might be to operate on the ground.

    An enclosed area for operators on a two-platform gooseneck trailer.
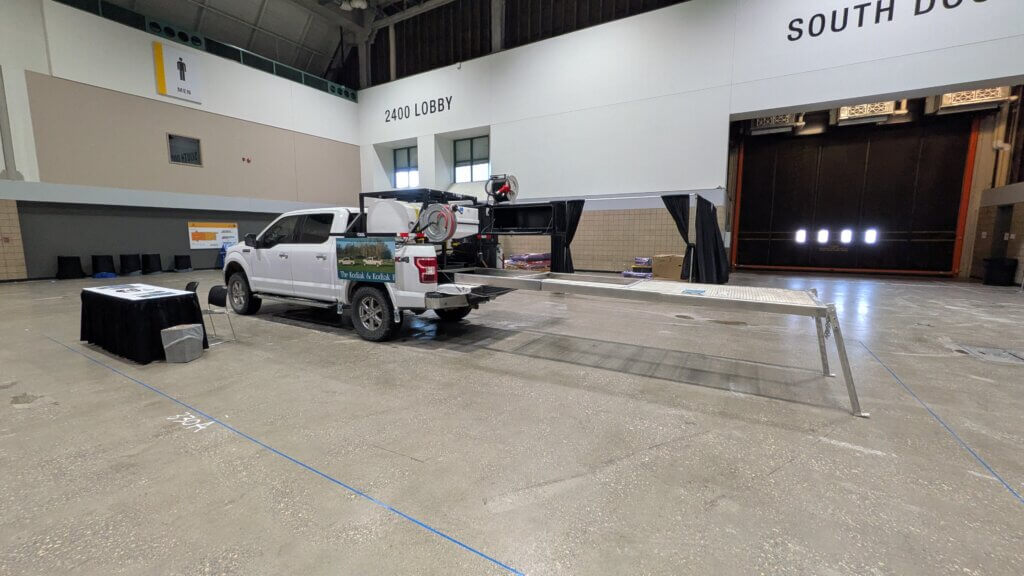
    Kodiak’s retractable flight deck on their skid-mounted system

    Take home

    The speakers left the session with some summary advice.

    • Trailer first, equipment second.
    • Build for today and tomorrow.
    • Function over form (stability, balance and access over appearance, bearing in mind that if it is a business, it can’t look terrible, either).
    • Efficiency from day one. Run a stopwatch (when the crew isn’t watching). Find and change the limiting factor, if it’s changeable. The right trailer improves efficiency even before the first acre is sprayed.

    Thanks to the many speakers, attendees and trades people that contributed to this article. If you want to share pictures and specs for your tender system, let us know! If we get enough interest we’ll publish an article showcasing your tender systems so others can learn from your experience.
  • The Carvalho Boom and the Stages of Quadcopter Flight

    The Carvalho Boom and the Stages of Quadcopter Flight

    The Hypothesis

    The results of a recent herbicide deposition study performed with the DJI T100 led us to observe that after ~13 m/s, swath width and drift were no longer directly related to travel speed; They appeared unaffected. The result was completely unexpected as it was counter to several years of prior study with smaller drones. This led to a hypothesis that the aerodynamics of this new generation of quadcopters might be similar to that of a helicopter, and it was impacting spray deposition in a similar fashion.
    Let’s use the stages of quadcopter flight to set up the premise.

    1. Hover

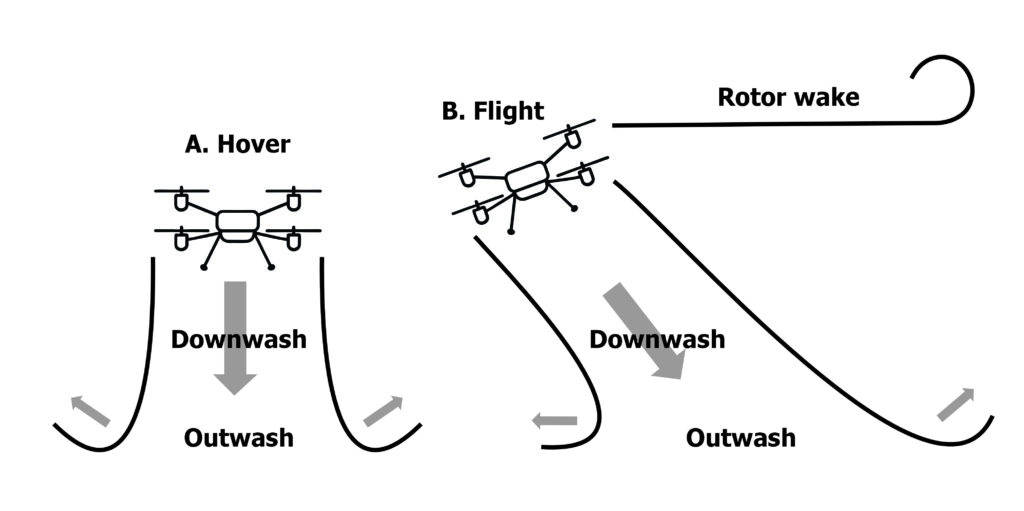
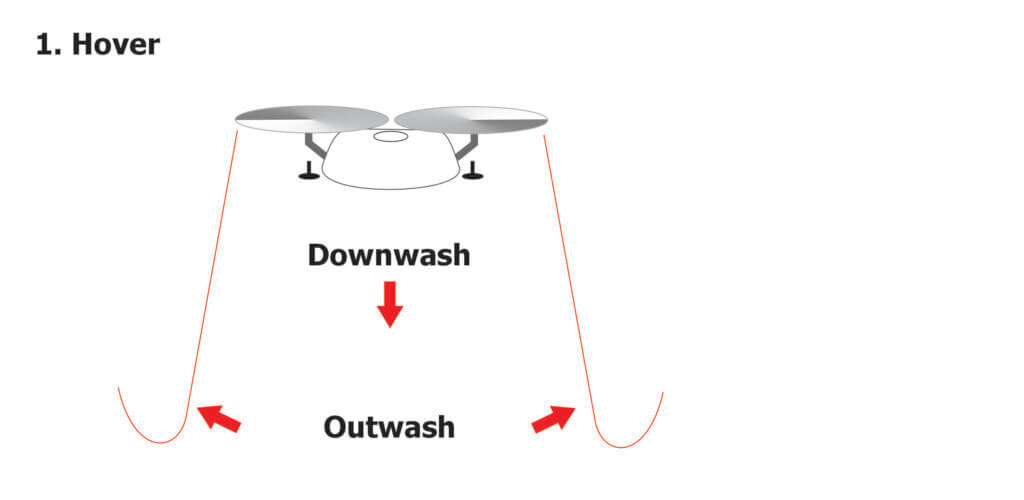
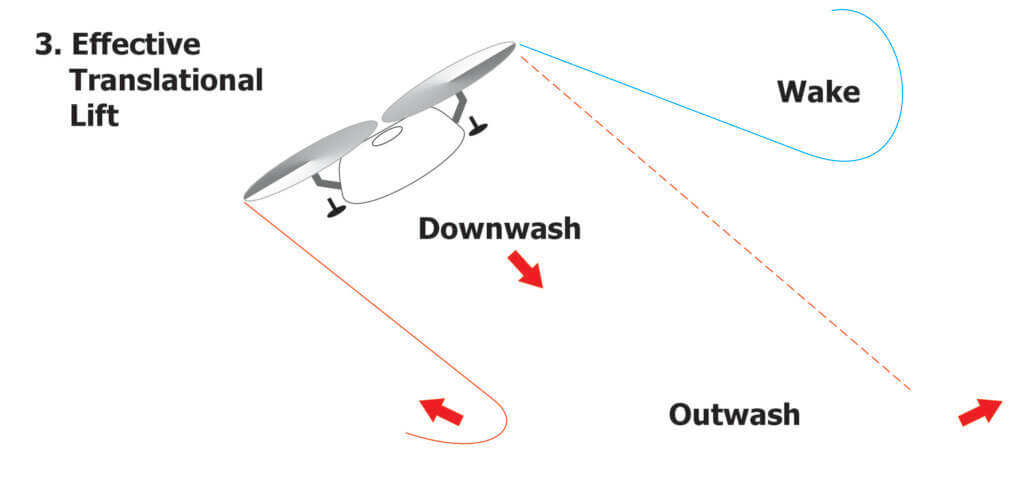
    When a drone hovers, each rotor draws air from above and accelerates it downward in a high-velocity blast. The cumulative effect is a vertical component referred to as the “downwash” and the turbulent splash of air that hits the ground and spreads laterally is the “outwash”.

    The initial strength of the downwash depends on the degree of “disc loading” which is the weight of the drone divided by the rotor area. The intensity of the downwash wanes with distance from the rotor, spreading out in three dimensions until it impacts the ground and becomes the outwash.

    During hover, the drone recycles some of its downwash. This turbulence affects the stability of the drone, requiring a great deal of power to stay aloft, especially when it’s full.

    2. Low-speed flight

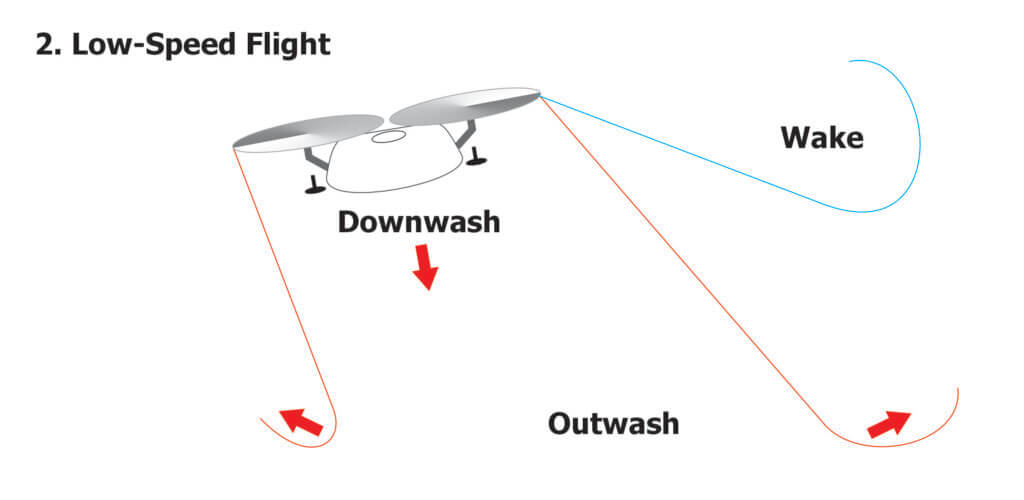
    A helicopter achieves forward thrust by changing the pitch of its rotor blades. Most drones have fixed-pitch rotors, so the entire drone must tilt forward to enter low-speed flight. This causes the column of downwash to tilt backward.

    While the downwash is created by lift, “wake turbulence” is created at the tips of the rotors as high-pressure air beneath the rotor wraps around to the low-pressure area above. As the drone flies at low speed (~<3 m/s) the wake is visualized by a pair of counter-rotating, cylindrical vortices that trail behind. Some journal articles suggest the downwash for medium-sized drones (e.g. < 50 L capacity) detach from the ground at speeds as low as 3 m/s.

    3. Effective Translational Lift (EFT)

    As the drone accelerates it continues to angle forward, likely not exceeding 30°. At some point (~15 m/s?), we suggest it enters a state of “effective translational lift”, becoming more stable and therefore more energy efficient. This speed is notably slower than is commonly reported for a helicopter.

    During the transition, the drone behaves more like a wing as it essentially outruns its downwash, moving undisturbed air over the rotors. This horizontal air provides some lift, making flight more energy efficient, at least until drag begins to pull on the drone.

    The Possible Effect of Flight Stage on Spray Behaviour

    Droplets released beneath a drone at hover are completely entrained by the downwash. The majority get driven to the ground and then laterally along the outwash, while some small portion (likely smaller droplets) recirculate back up through the rotors.

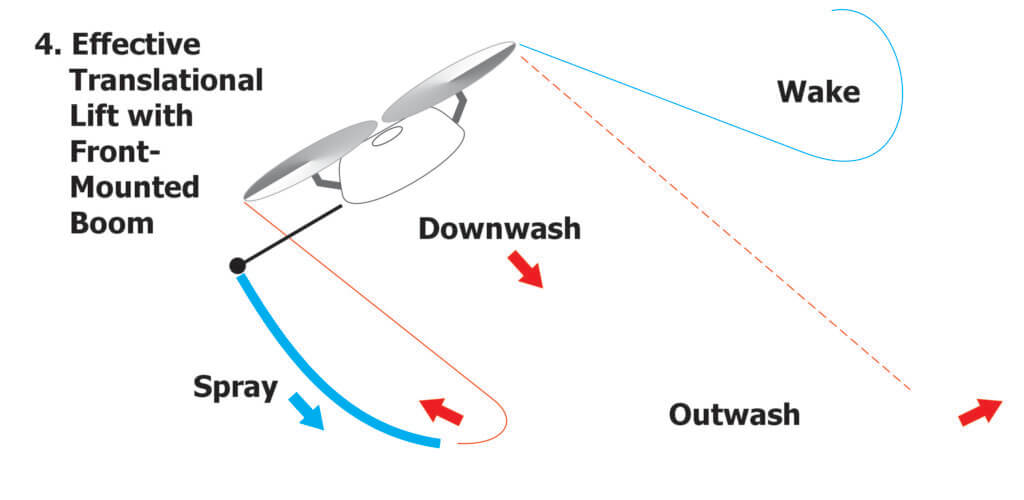
    At low-speed flight, the downwash begins to tip backwards and the downwash trails behind and at some point detaches from the ground. Spray released beneath the drone is still entrained and will trail on a downward and rearward vector in that downwash. However, a portion will get caught in the wake. We can sometimes see this spray separation occur when lighting conditions are just right.

    As speed continues to increase, much of the spray would still be entrained in the downwash, but a greater portion would get caught in the wake, appearing as spray curling at the extremes of the swath. At some point, perhaps if and when the drone enters EFT, the the downwash might be less chaotic and behave more like laminar air. In which case some spray would still curl in the wake, but much of it would fall in a more stable sheet. Further increases in speed would not affect spray behaviour appreciably.

    Taking Advantage of ETL

    If this is the case, it is conceivable that rotary atomizers positioned under the front rotors could fling some droplets beyond the leading edge of the downwash. What if instead, it were a horizontal boom positioned out in front of the rotors, transecting the chord line?

    As the drone tipped forward during high-speed flight, so too would the boom, bringing it closer to the ground and releasing droplets ahead of, and below, the leading edge of the downwash. This should produce a more uniform swath, perhaps subsequently pushed down as the drone passed over.

    It’s an interesting idea that is only made possible when drones are capable of high-speed flight.

    Reception

    In January 2026 I presented this concept during a lecture at the 4th annual Drone End-User meeting in Kansas City. The response was polite, but skeptical. I then shopped the idea around the trade show floor where drone manufacturers suggested a front-mounted boom would interfere with obstacle avoidance sensors, or shift the centre of gravity, making the drone difficult to fly and to land. And what about the impact of wind speed and direction? All good points. Then, Nino Carvalho introduced himself.

    The Carvalho Boom

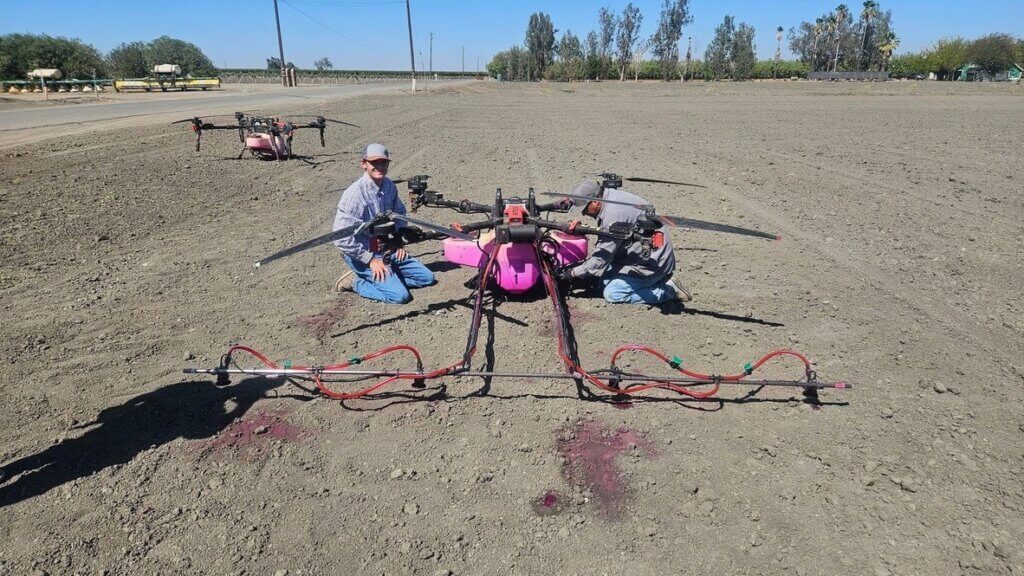
    Nino Carvalho and his son, Emilio, own and operate NC Ag Spraying in the Central Valley of California, USA. Emilio was inspired to modify his drone after discussing matters with his mentors; one who owns and operates a fixed wing aerial business, and another that pilots a Huey helicopter. In late 2025, they designed and built a horizontal boom which I’ve dubbed “The Carvalho Boom”.

    Their first attempt was with a DJI T50, but the boom mount interfered with the stacked rotors, and the atomizer cables were difficult to extend. The XAG P150 had fewer cables and only top-mounted rotors, so it was a better fit. After experimenting with various materials (PVC was too flimsy, steel too heavy) they mounted a length of ½ inch metal conduit directly under the drone.

    In California, aircraft booms must be limited to 90% of the rotor width (because of rotor tip vortices). The greatest span of the rotors was 312 cm (122.8 in), so they made the boom 275 cm (~9 ft) long. They spaced the rotary atomizers evenly along the boom every 69 cm (~ 2 ft 3 in), extended the original 30.5 cm (12 in) nozzle cables to 305 cm (10 ft) to reach their respective electronic speed controllers, and plumbed them using 1.25 cm (0.5 in) diameter tubing.

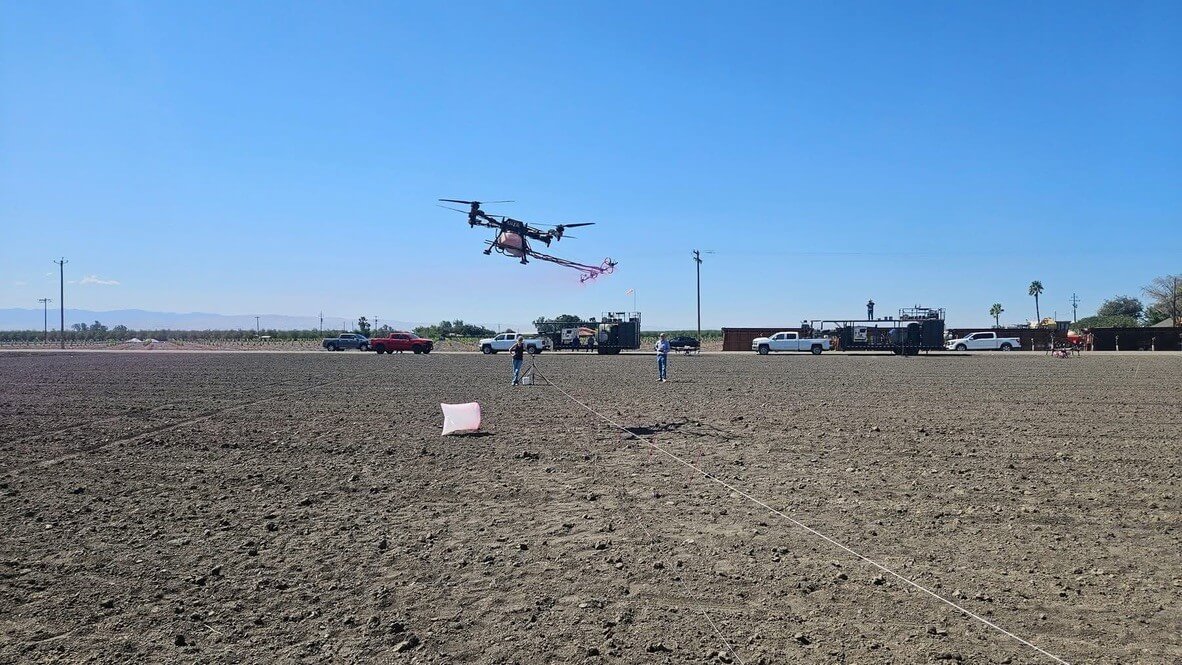
    They flew this first prototype over water sensitive papers. Dropping from a 3 m (10 ft) altitude to 2 m (6.6 ft) improved coverage uniformity and resulted in a 10.3 m (34 ft) effective swath width. They could see the downwash was interfering with deposition, and while increasing to a larger droplet size helped, it didn’t help enough. Then they made some design changes, extending the boom 30.5 cm (12 in) beyond the rotors, and they saw they had something. They reached out to Agri-Spray Consulting (Nebraska) and arranged to run a series of Operation S.A.F.E. fly-ins.

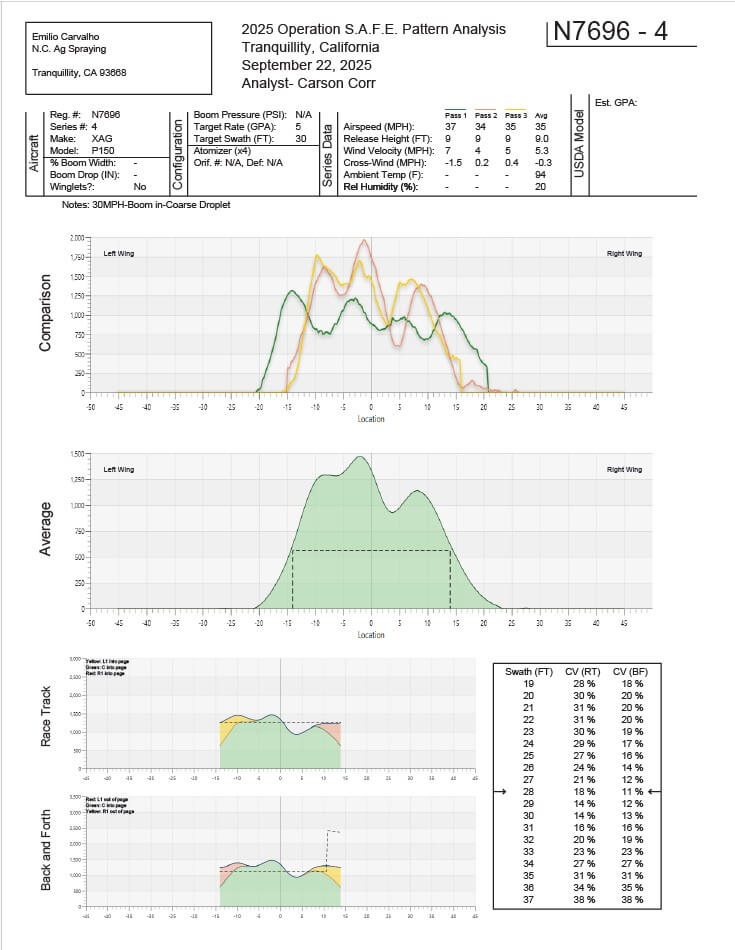
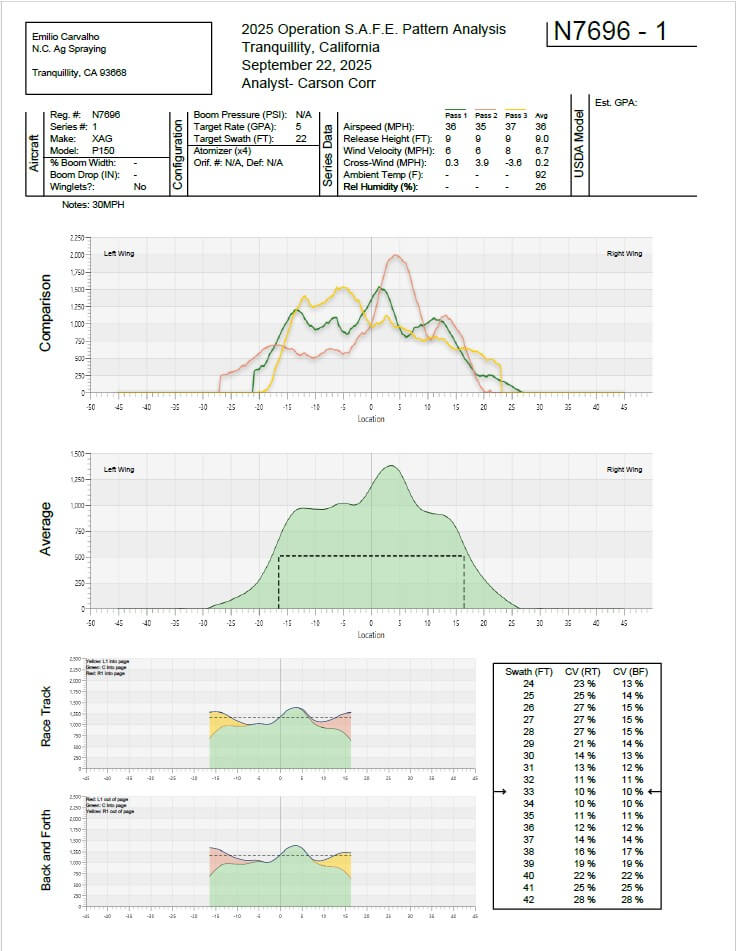
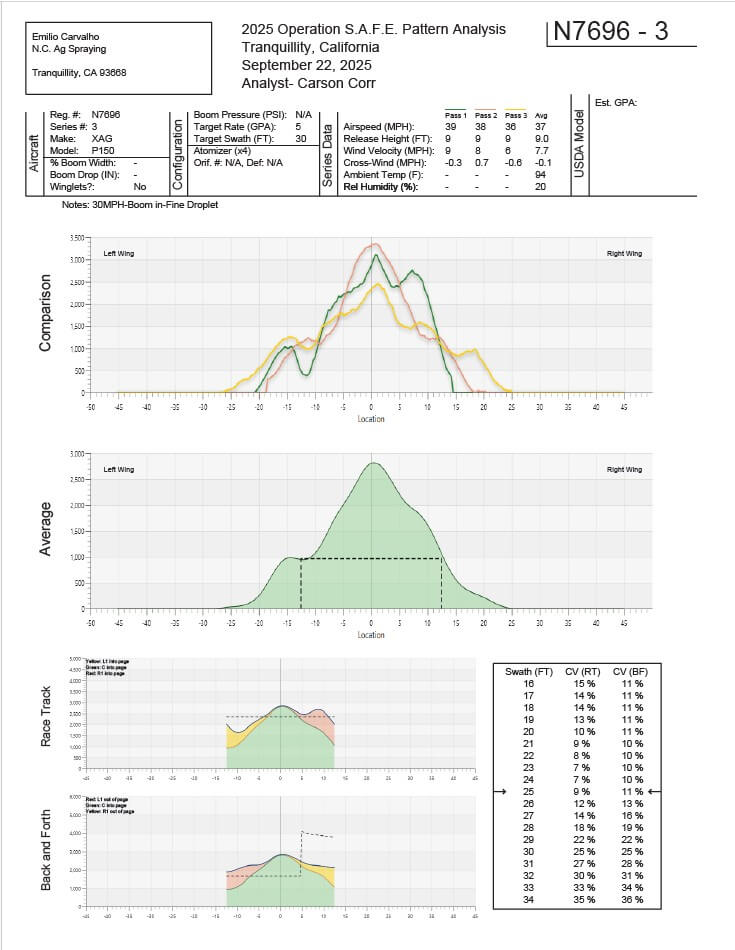
    There were more than 25 flights that day, so we’ll focus on three specific load-outs. The critical parameters are listed in the following table in the order that they flew them. The first load-out (N7696-01) was deemed the best, and was the only one with the boom extended out front, beyond the rotor tips. This information is italicized. The other two are included here for interest. N7696-03 attempted to shift the boom back under the drone for cosmetic reasons, but also for ease of transportation. N7696-04 was the same configuration as the last, but with coarser droplets in an attempt to battle the downwash. The first fly-in report (N7696-01) is shown below, but all three reports can be downloaded by clicking the links above.

    Load-OutBoom PositionVolume Speed Droplet Size (µm)Altitude Wind VelocityEffective Swath WidthC.V. (Race Track / Back & Forth)
    N7696-01Beyond Rotors50 L/ha
    (5 gpa)
    16 m/s
    (36 mph)
    2302.75 m
    (9 ft)
    10.7 kmh
    (6.7 mph)
    10 m
    (33 ft)
    10%/10%
    N7696-03Beneath Rotors50 L/ha
    (5 gpa)
    16.5 m/s
    (37 mph)
    2302.75 m
    (9 ft)
    12.5 kmh (7.7 mph)7.6 m
    (25 ft)
    9%/11%
    N7696-04Beneath Rotors50 L/ha
    (5 gpa)
    14.3 m/s
    (32 mph)
    4002.75 m
    (9 ft)
    8.5 kmh
    (5.3 mph)
    8.5 m
    (28 ft)
    18%/11%

    Observers said it looked like the swath was rolled with a paintbrush and that there were no observable vortices – just a sheet of spray. The following videos show some of the passes from that day. Actually, you can see vortices, but only in the passes where the boom is positioned beneath the rotors and not when it’s extended out front.

    A 10% CV is spectacular, and the profile of each pass (even before averaging) was far flatter than any drone deposition I’ve seen previously. This design has not yet been used for custom application because there are still questions about how flight speed and pump flow will affect performance. But, the Carvalhos are already discussing the next design, constructed with carbon fibre tubes.

    Impacts and Musings

    Perhaps our description of how the air is moving over the drone is correct, or perhaps it isn’t quite right. Dr. Fernando Kassis Carvalho (no relation to Nino and Emilio) (AgroEfetiva, Sao Paulo, Brazil) recently shared that he also observed swath width no longer changed at speeds exceeding 13 or 14 m/s (personal communication). So, whatever the aerodynamic cause, the result seems clear.

    Does this mean we’ll see a new generation of quadcopters with front mounted booms? It’s certainly possible, and kind of poetic as some early drone designs featured a centrally-mounted boom that extended beyond the rotor tips. Emilio wondered aloud about possible wear on the front motors, and likely there will be other issues as they experiment, but it’s early days and they’re enthusiastic about pursuing the design.

    Nozzle Design

    Should we also consider a return to hydraulic nozzles? The rotary atomizers on a drone currently leave a lot to be desired. Dr. Ulisses Antuniassi (Prof., Sao Paulo State University) studied the spray quality produced by rotary atomizers. He ran atomizers from a DJI T40 and from a XAG P60 in a wind tunnel spraying WG and SL formulations with either MSO or NIS adjuvants and found no logical trends in VMD, relative span or DV 0.1

    Further, work by Dr. Steven Fredericks (Land O’Lakes) showed that the rotary atomizer from a DJI T40 created droplets roughly one ASABE category smaller than the software indicated. Conversely, common knowledge is that the XAG P100 version produces a coarser spray quality than anticipated, and slow motion video produced by Mark Ledebuhr (Application Insight LLC) and Dr. Michael Reinke (Michigan State University) clearly showed the flooding issue reported by Dr. Andrew Hewitt (University of Queensland), where excessive flow to the disc interferes with its ability produce a uniform droplet size.

    I photographed no less than nine different rotary atomizer designs while at the End-User meeting. So, perhaps we should embrace a standardized design, or perhaps hydraulic nozzles should make a comeback. If the later, it would be a great opportunity to include PWM to increase their flow range.

    Acceleration and Flight Pattern

    And what of kinematics? A drone’s “acceleration time” is calculated by dividing the change in velocity by the acceleration rate. We’ve seen that a DJI T100 must travel up to 100 m before it reaches target velocity. Admittedly, it was full and attempting to fly at high speed. Kevin Falk (Corteva Agriscience) noted a 25 m acceleration distance and a 15 m deceleration distance for a T50 flying mostly-full at 6 m/s. That’s a not-insignificant distance to achieve target flight speed.

    What happens to the spray from a quadcopter drone with a front mounted boom as it transitions through the stages of flight? We don’t know for sure, but we can infer an inconsistent swath. Perhaps the prolonged acceleration time is sufficient reason for drones to start flying racetrack flight patterns like planes and helicopters, where they reach sufficient speed before passing over and spraying the target area. Current software does not allow that practice.

    All this to say that as drone design continues to evolve, we must continue to challenge and test assumptions surrounding best practices. It has been fascinating to see how spray drones are finding their place in Western crop protection systems.

    Acknowledgements

    Thanks to Mark Ledebuhr (Application Insight LLC), Dr. Michael Reinke (Michigan State University), Kevin Falk (Corteva Agriscience), Dr. Tom Wolf (Application Research & Training), Adrian Rivard (Drone Spray Canada), and Adam Pfeffer (Bayer Crop Science) for insightful discussions.

    Special thanks to Nino and Emilio Carvalho (NC Ag Spraying) for sharing their experience and practical approach to improving drone spray deposition.

    Additional Resource

    In early February, 2026, I gave a short interview with RealAgriculture. We discussed the state of spray application by drone in Canada as well as some of the possible impacts of higher speeds.

  • Canada Gazette Part II – Recent and upcoming changes to Canadian rules for operating RPAS

    Canada Gazette Part II – Recent and upcoming changes to Canadian rules for operating RPAS

    Editor’s Note: This article was posted in June 2025, and as of November 4th all rules have now come into effect.

    Summary

    The Government of Canada introduced the first set of Remote Piloted Aerial Systems (RPAS) rules in 2019, which addressed safety concerns and created a flexible and predictable environment for small RPAS flown within visual line-of-sight (VLOS). On March 6, 2025, amendments were made to the Canadian Aviation Regulations (RPAS – Beyond Visual Line-of-Sight and Other Operations): SOR/2025-70 Canada Gazette, Part II, Volume 159, Number 7. According to the Impact Analysis Statement in the document, the changes:

    • permit RPAS <150 kg to be flown within visual line-of-sight;
    • introduce rules for routine beyond visual line-of-sight (BVLOS) operations for RPAS <150 kg
      • over sparsely populated areas,
      • at low altitudes, and
      • in uncontrolled airspace;
    • remove the requirement for a Special Flight Operations Certificate (SFOC) for these operations;
    • include requirements for
      • new pilot certification,
      • new technical standards for the aircraft and supporting systems,
      • new operational procedures, such as increased distances from airports, heliports, and people, as well as
      • new requirements for individuals and organizations to operate BVLOS.

    In addition, the Regulations will update existing service fees and introduce fees for existing services that are currently provided for free and the new services that will be provided to the RPAS sector.

    These regulatory changes are driven by agriculture, but also increasing utility in package delivery, use in emergency response (e.g. fire assessment), environmental impact assessment and infrastructure inspection.

    The original document is lengthy, so only those changes that relate to the use of spray drones are reproduced here. For more details, refer to the Regulations Amending the Canadian Aviation Regulations (RPAS – Beyond Visual Line-of-Sight and Other Operations) Canada Gazette, Part II, Volume 159, Number 7. Transport Canada has a summary of the changes here.

    At the time of writing, there are no agricultural, terrestrial pesticides registered for application by RPAS in Canada. Health Canada’s Pesticide Compliance Program (PCP) is responsible for promoting, monitoring and enforcing the Pest Control Products Act (PCPA). Their factsheet can be downloaded here.

    Objectives

    There are three objectives to the new regulations:

    • Regulatory predictability, economic growth, and innovation
    • Safety risk mitigation
    • Fee modernization

    The regulations build upon Part IX of the CARs and introduce new requirements to reflect the increased risks of the two new categories of operation:

    • Medium drones that weigh above 25 kg up to and including 150 kg flying within VLOS near and over people, in both controlled and uncontrolled airspace; and
    • Drones that weigh 250 g up to and including 150 kg flying BVLOS in unpopulated and sparsely populated areas, below 400 feet above ground level, and in uncontrolled airspace.

    Grouping the new regulations – The 3 P’s

    The new regulations can be grouped into:

    • Pilot (pilot training and certification)
    • Product (aircraft and supporting systems)
    • Procedures (operational rules)

    In addition, there are new requirements for individuals and organizations operating BVLOS, such as appointing an accountable executive, and requirements to establish training programs and risk management processes, which are discussed in more detail below. These new requirements will allow for clearer organizational oversight with larger-scale operations, covering larger geographic areas, as well as an increase in the number and types of drones being operated.

    The Pilot

    Advanced Pilot Certificate

    TC has determined that the following operations may be added to the types of operations conducted by Advanced Pilot Certificate holders, without the requirement to obtain a new pilot certificate:

    • VLOS operations with a medium-sized drone (above 25 kg up to and including 150 kg).
    • Extended VLOS operations (EVLOS), using a visual observer to scan the airspace.
    • Sheltered operations, which allow the drone to be flown around a building or structure without the use of a visual observer.

    Advanced Pilot Certificate operators will be required to pay fees associated with the obtaining the certificate:

    • $10 exam fee, paid to the Government of Canada (GoF).
    • $25 certificate issuance fee, paid to the GoC.
    • $257 flight review fee, paid to the flight reviewer.

    Pilot Certificate for Level 1 Complex Operations (Lower-risk BVLOS)

    The Regulations will introduce a new pilot certification process for lower-risk BVLOS called Level 1 Complex Operations. A pilot must be at least 18 years old and have their Advanced operations certification.

    • Pilot must attend RPAS training (“ground school”).
    • Pilot will need to pass a new online multiple-choice exam delivered through TC’s DMP.
    • Pilot will need to visit a flight reviewer to do an in-person flight review.

    Every two years, pilots will need to do at least one training renewal activity recognized by TC (e.g. flight review, training activities, or retaking one of the pilot exams in the DMP.)

    CARs 901.19, Fitness of Crew Members, and the requirements of the RPAS Operator Certificate (RPOC) provide sufficient mitigations to maintain safety within the level of risk for BVLOS operations. However, a medical standard for operations outside the lower-risk category may be considered in future regulatory work.

    Commercial RPAS operators will need to hold a Level 1 Complex Certificate to conduct lower-risk BVLOS operations. To receive their Level 1 Complex Certificate, operators will need to pay a certificate fee of $125 to TC.

    Advertised Events

    Part IX of the CARs requires operators of RPAS of at least 250 g to obtain an SFOC to operate at an advertised event, which is defined as “an outdoor event that is advertised to the general public, including a concert, festival, market or sporting event.” The Regulations will expand this requirement to all RPAS, including microdrones weighing less than 250 g.

    The Product

    Drone registration is expanded to all drones 250 g and above.

    Declaration

    A drone won’t be permitted to fly in an operating environment unless the manufacturer supplies a Declaration (online form, Standard 992) or a Pre-Validated Declaration (PVD) for that respective operating environment. Operating environments include medium-sized drone in controlled, or uncontrolled airspace, or away from people, or BVLOS operation away from populated areas below 400 ft and in uncontrolled airspace.

    The PVD is a two-step process where the plan for the aircraft design is submitted in the context of Standard 922, and when approved, then they complete the Declaration. Operating environments include VLOS with medium-sized drones near and over people, and certain BVLOS operations over sparsely populated areas, below 400 ft and in uncontrolled airspace.

    Maintaining a PVD requires annual reports of the estimated number of flight hours, a description of any safety-related issues, and any relevant design changes.

    The Procedures

    Advanced Pilot Certificate holders can perform Extended VLOS (EVLOS) operations and sheltered operations if:

    • The drone is within a certain distance from the pilot, while a second person with a Basic Pilot Certificate scans the airspace and notifies the pilot of any other airspace users or hazards.
    • Performing a sheltered operation, the pilot may fly their drone around a structure without keeping the drone in direct line-of-sight, if they keep the drone within a certain distance to the structure (intended for building inspections).
    • The Regulations increase the minimum distance from people not involved in the operation and require additional planning considerations such as weather conditions that could affect the pilot’s ability to maintain line-of-sight.

    Lower-risk BVLOS

    Pilots will need to remain in uncontrolled airspace away from aerodromes, below 400 feet, and over unpopulated or sparsely populated areas (i.e. <25 people/km2 per Stats Canada and the Drone Site Selection Tool.

    RPAS Operator Certificate (RPOC)

    The new RPOC focuses on risk management and addresses the trend of larger fleets, longer flight times and BVLOS operations. The RPOC is an assurance there are policies and procedures in place that reflect the size and complexity of the operations. It is a Declaration to TC that the pilot or organization meets requirements in CARs (via the DMP) and there is no requirement for renewal.

    Fees for services

    Basically, the RPAS Operator Certificate fee is $125 CDN with the goal to lower the cumulative cost of BVLOS. The SFOC structure, which originally proposed two steps (Low-Complexity and High-Complexity) now has two new categories: Very-Low and Medium Complexity. Fees were revised to reflect the different levels of complexity and the related levels of effort that would be required by TC. These fees will be adjusted for inflation.

    Fines (Administrative Monetary Penalties)

    Under the Aeronautics Act, the Minister of Transport has the authority to issue administrative monetary penalties (AMPs) to anyone who violates designated provisions of the Act and the CARs. Most of the provisions in Part IX of the CARs are enforced through the assessment of AMPs imposed in accordance with sections 7.6 to 8.2 of the Act, which carry a maximum fine of $5,000 for individuals and $25,000 for corporations and include the potential suspension or cancellation of a person’s Canadian Aviation Document.

    When do the new regulations come into force?

    New regulations will be introduced in stages to give stakeholders the opportunity to become certified and to familiarize themselves with the new requirements before the 2026 season. Some regulations will come into force on April 1, 2025, but others will activate when they are published in the Canada Gazette, Part II, including:

    • the ability to register drones
    • submit declarations and take new pilot exams

    The remaining provisions will come into force on November 4, 2025, such as:

    • provisions relating operating medium-sized drones in beyond visual line-of-sight (BVLOS) in lower-risk environments.

    For more information, see the Regulations Amending the Canadian Aviation Regulations (RPAS – Beyond Visual Line-of-Sight and Other Operations) Canada Gazette, Part II, Volume 159, Number 7.

    Also see this short-and-sweet summary from RealAgriculture.

  • Exploring the Accuracy of Drone-Applied Herbicide Treatments

    Exploring the Accuracy of Drone-Applied Herbicide Treatments

    Author’s note: Minor edits were made to this article on December 12, 2025. While the results remain unchanged, aspects of the interpretation have been adjusted upon reflection.

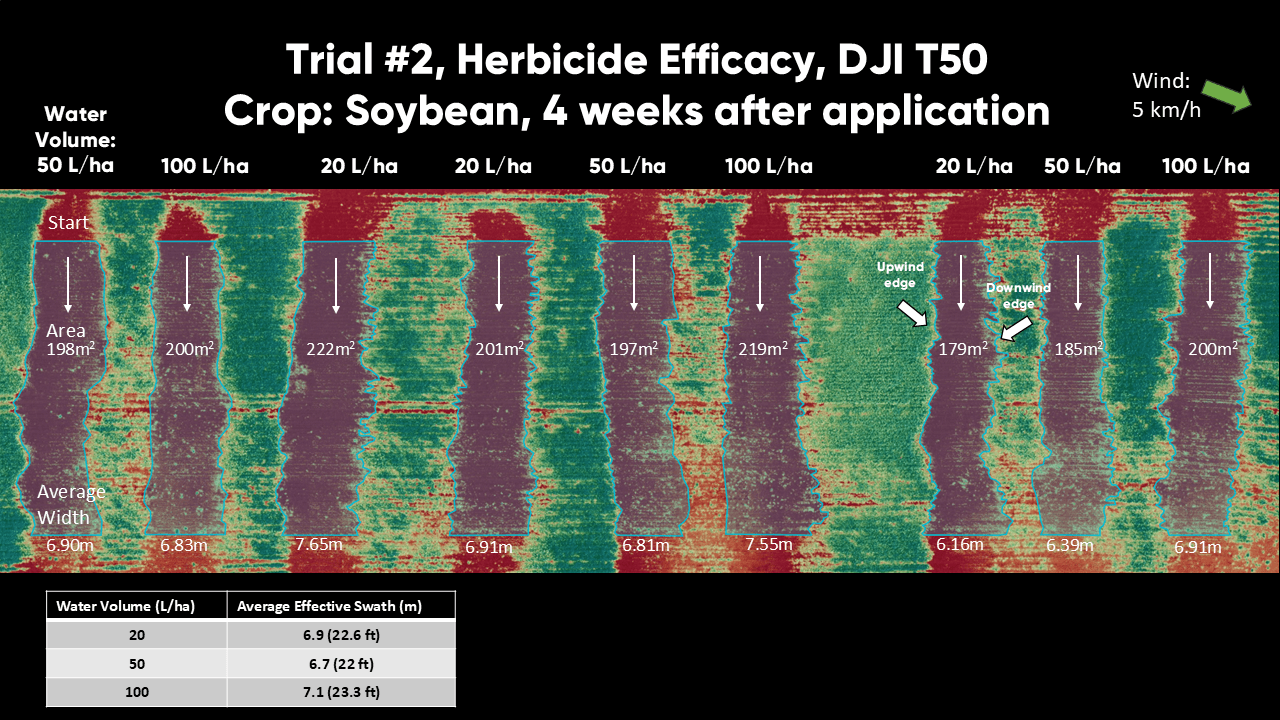
    In 2024, Corteva conducted a study entitled “Drone-Delivered Herbicides: Comparing LontrelTM XC (Clopyralid) Efficacy Across Application Techniques and Water Volumes”. Go read all about it here. Their objective was to compare the relative efficacy of hand booms and drones, and to determine if drone efficacy was affected by low water rates. The researchers evaluated the area treated and the effective swath width by manually tracing the burned areas from an aerial NDVI image.

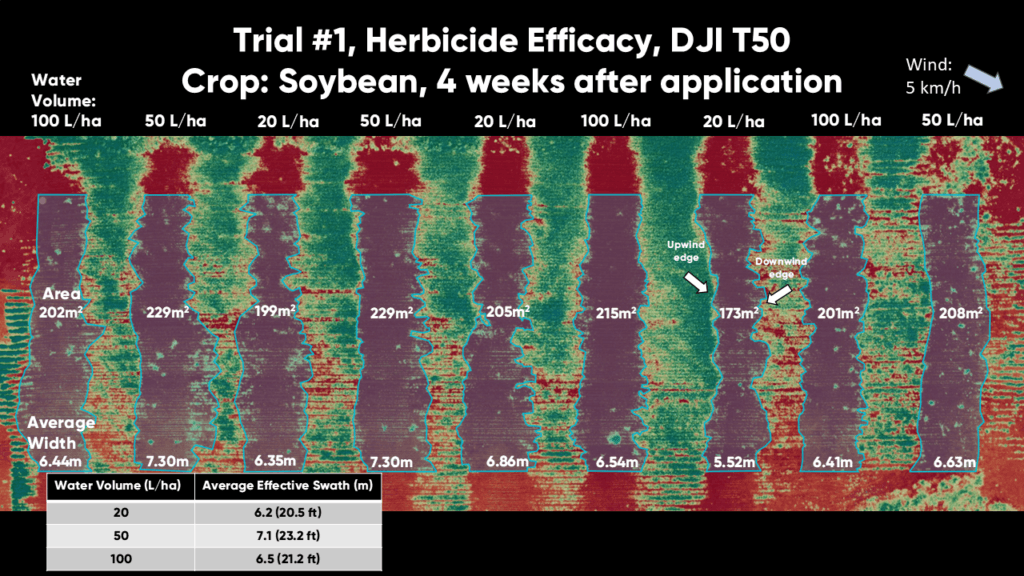
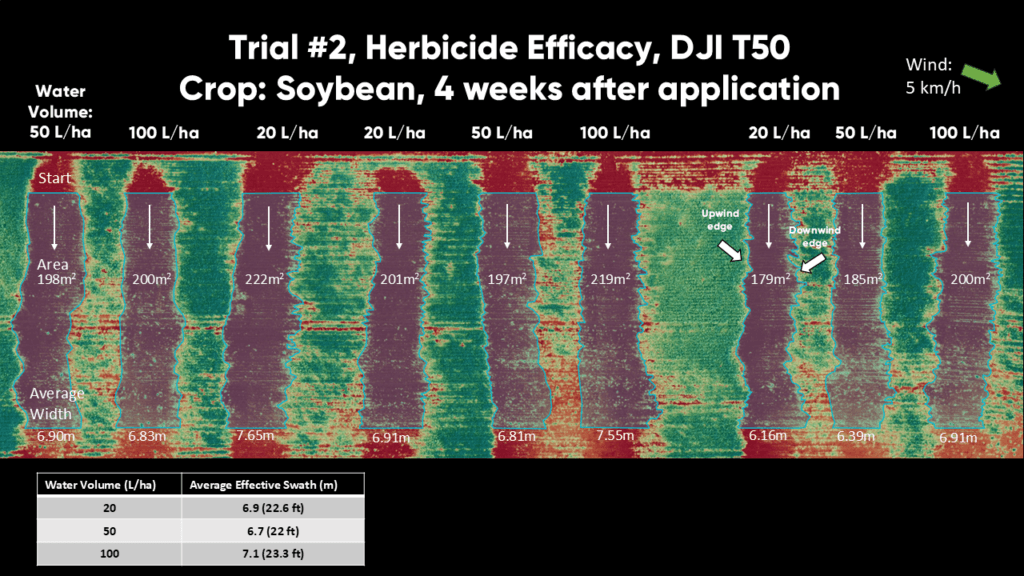
    Interestingly, the study found that water volume had an insignificant impact on herbicide efficacy. But what really caught our attention was the inconsistent and variable shape of the treated area along each flight path (Figure 1).

    Figure 1 – Image from work performed by Kevin Falk, Rory Degenhardt, Angela Fawcett and Neil Spomer, as presented at the 2025 Canadian Weed Science Society annual meeting in Vancouver, BC.

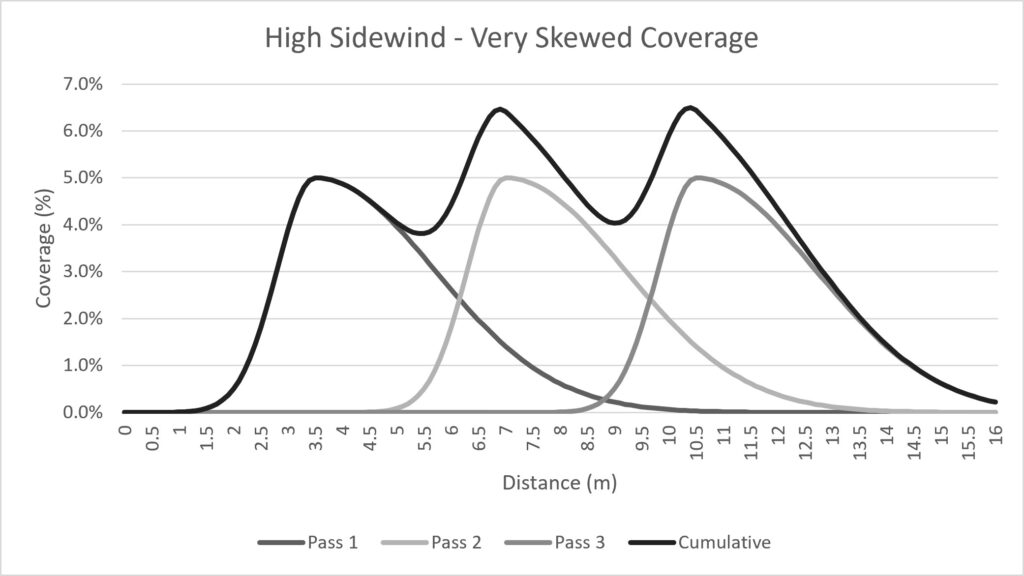
    If the swath width fluctuates and vacillates along the flight path, then there is great potential for overlaps and misses throughout a treated area. Common practice is to rely on displacement (and drift) from upwind passes to deposit a sufficient cumulative dose of herbicide to mask areas of low coverage. This would be facilitated by consistent wind direction, higher altitudes, and a surface with little or no canopy to interfere with secondary deposition.

    On the other hand, if the programmed swath width (i.e. route spacing) is too wide, and/or the the droplet size too large to permit sufficient displacement, then gaps in coverage would appear. And there is always the consideration of restricting the deposit to field boundaries and margins, particularly on the downwind side of the treatment area.

    We explored these considerations by conducting a study that emulated aspects of Corteva’s work. We applied Roundup Transorb HC (a non-selective herbicide) instead of Lontrel (a selective herbicide specifically for broadleaf weeds). We used the DJI Agras T50 and the new T100 with two atomizers and a DJI RTK-2 base station, employing an array of operational settings. And, we flew multiple passes rather than a single pass for each treatment.

    Part one of the study examined three programmed swath widths from both drones to compare their performances directly. Part two of the study evaluated the T100’s performance over a series of flight speeds and spray qualities. Burndown was evaluated using post-application orthomosaic images taken at 200 feet using a DJI M3M drone. Images were analyzed using Pix4D software.

    Materials and Methods

    Field Conditions

    Applications took place in a 160-acre field of wheat stubble in Central Elgin, Ontario (42°45’29.3″N 81°05’58.9″W) on September 13, 2025.

    Treatments

    Each flight was centred on the right boundary of the treatment block, as indicated by a pin flag. Four passes were flown per treatment (i.e. two out-and-backs). There were no repetitions for treatments, so there was no need to randomize them.

    Part One

    The intent of this part of the study was to make a direct comparison of the swaths produced by the T50 and the T100. The T100 is heavier, has a larger volumetric capacity (100 L vs. 40 L) and is capable of faster flight (20 m/s or 64 km/h vs, 10 m/s or 23 km/h). We wrote about our first impressions of the T100, here.

    Drone operational settings were selected to replicate those used in previous corn and wheat fungicide experiments with the T50. These settings are admittedly more restrictive (from the perspective of productivity) than those commonly used for herbicide applications. For example, and anecdotally, we have been told the T100 can spray a full section (~260 hectares or 640 acres) at 2.8 gpa and 20 m/s on one tank and one battery charge. However, we have no information about subsequent coverage, efficacy or off-target deposition.

    Maintaining these operational settings allowed us to make a more direct comparison of herbicide vs. fungicide placement and efficacy. All applications were performed using a 250 µm spray quality (Table 1).

    Treatment CodeRPASProgrammed Swath (m)Speed
    (m/s, km/h)
    Altitude (m)Volume (gpa)
    AUnsprayed
    BT5066, 21.635
    CT5086, 21.635
    DT50106, 21.635
    ET50610, 3635
    FT50810, 3635
    GT50108, 28.8*35
    HT10066, 21.635
    IT10086, 21.635
    JT100106, 21.635
    KT100610, 3635
    LT100810, 3635
    MT1001010, 36*35
    Table 1 – Part one: Drone settings. (*10 m/s was intended, but the T50’s pumps could not produce a 10 m swath at 5 gpa at that speed.)

    Each treatment block was 150 m long, 50 m wide and a 20 m buffer was maintained between treatments (Figure 2). Two, 1 m scale indicators were placed in Treatment B to confirm scale during image analysis.

    Figure 2 – Part one treatment layout.

    Part Two

    The intent of this part of the study was to explore the new drone design and its capabilities. Particularly, the impact of high-speed flight on effective swath width, displacement and drift. The DJI controller advises an altitude of 5 m or higher (likely a safety consideration). We felt this was too high for consistent coverage, and compromised by flying at 4 m (Table 2).

    Treatment CodeRPASSpray Quality (µm)Speed
    (m/s, km/h)
    Altitude (m)Volume (gpa)
    NT10050018.3, 65.843
    OT10025018.3, 65.843
    PT10080*12.5, 45*43
    QT10025018.3, 65.843
    RT10025015, 5443
    ST10025010, 7243
    Table 2 – Part two: Drone settings (20 m/s was intended, but the drone only reached a maximum of 18.3 m/s before slowing as it approached the end of the treatment. *50 µm and 20 m/s was intended, but the T100 controller would not permit those settings, so a compromise was made.)

    Given the greater potential for displacement and drift in this part of the study, we established wider and longer treatments blocks, and wider buffers between treatments. Each treatment was 250 m long, 70 m wide and a 40 m buffer was maintained between treatments (Figure 3).

    Figure 3 – Part two treatment layout.

    Chemistry

    The spray solution (PMRA research authorization 0054-RA-25) was premixed in a single batch. For part one, 80 L Roundup Transorb HC in 1,000 L water plus 0.05% Halt (defoamer). For part two, 700 L of the solution remained, so we added an additional 20 L of Roundup to approximately maintain the dose when dropping from 5 gpa to 3 gpa. This is a high dose of Roundup (~1.5 L/ac), selected to ensure that every drop that landed would create an obvious burn for easier analysis. It does, however, also mean that any reduced dose (i.e. striping) between passes would likely be masked. Drones were refilled after each treatment (to 40 L for T50 and to 65 L for T100) to negate any weight effect on the magnitude of the downwash.

    Weather

    Weather data was collected using a Kestrel 3550AG weather meter (Kestrel Instruments) in a vane mount positioned 2.5 m above ground (Table 3). For part one, conditions were ideal: humid with a light wind in a consistent direction. For part two, afternoon wind speed increased, but predominant direction remained consistent (Figure 4A).

    TimeExperiment PartTreatmentWeather
    10:05 – 10:581B – G18.6 ̊C, 78% RH, 0.0 km/h wind.
    10:58 – 12:401H – M19.8 ̊C, 72% RH, 2.0 km/h wind.
    12:40 – 1:502N – S22 ̊C, 61.2% RH, 7.0 km/h wind.
    Table 3 – Treatment times and weather conditions
    Figure 4 – Left (a): Prevailing wind direction overlaid on orthoscopic image. Right (b): Polygons representing manual traces of the perimeter of the burned treatment areas. Areas are noted for each treatment.

    Estimating Effective Swath Width

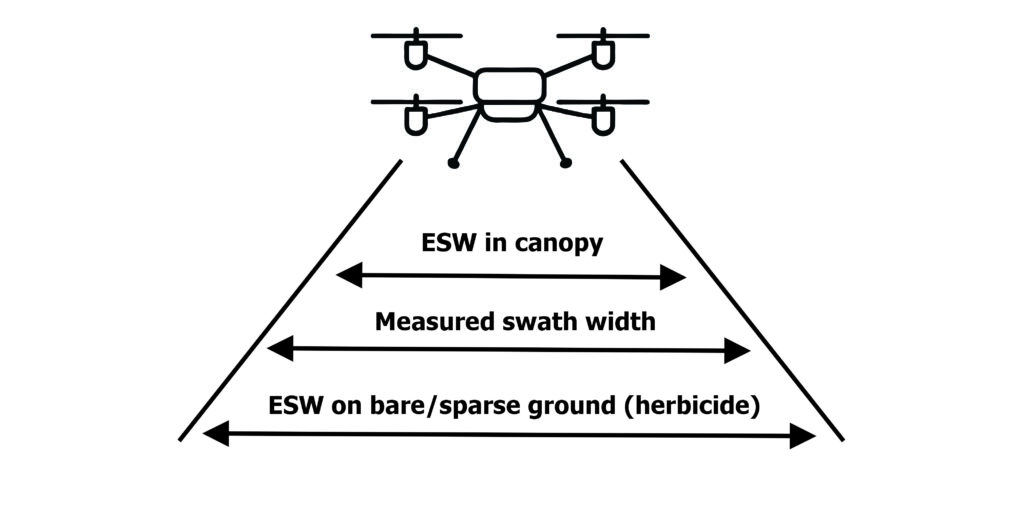
    The burned area indicates that the spray deposited met or exceeded an efficacious dose. This agronomic consideration of real-world efficacy sets the Effective Swath Width (ESW) apart from a swath width measured during calibration. Methods for calculating swath width utilize a sampling system aligned perpendicular to the flight path. Whether continuous or discreet samplers, this approach produces a coefficient of variation and some measure of over- and under-dose based on an assumed target threshold (dose or coverage). By measuring the biological effect (i.e. the burned area), we need not assume a target threshold – it’s indicated by the burn. Work with fungicides has demonstrated that the ESW can be a fraction of the measured swath width.

    ESW was estimated using two methods, and while both approaches have inherent flaws, they still provide valuable information. A more realistic representation of ESW likely falls between the two.

    In the first method, the perimeter of the area burned was traced to create a polygon (above, in Figure 4B). Then, the average width of that area was established from measured spans along the block. Finally, that average was divided by the four passes. Hereafter referred to as the “treatment width ÷ passes” method. This method produces an underestimate of ESW because each upwind drone pass can overlap and hide any displacement (and drift) from the previous. It divides the drift over however many passes are made.

    The second method overlays the flight path onto the area burned. The upwind side of the swath was determined from an average of at least five measurements along the upwind flight path. The downwind side of the swath was calculated the same way (Figure 5). Both the average upwind and downwind distances were added to arrive at the ESW. Hereafter referred to as the “port + starboard extent” method. This approach captures a clear representation of the upwind side of a single pass, but overestimates ESW by including any cumulative increase in drift from multiple passes on the downwind side.

    Figure 5 – Example of port and starboard measurements along the downwind and upwind-most flight paths. The averages were calculated and added to estimate effective swath width.

    Results – Part One

    Planned versus Measured Treatment Area

    The “programmed swath width” is something of a misnomer. More accurately, it is the route spacing and it describes the distance between passes over a target area. However, most drone manufacturers refer to this variable as programmed swath width, so that’s what we’ll do.

    Planned treatment areas were calculated from distance flown × programmed swath width × number of passes. Measured treatment areas were calculated by tracing a polygon along the perimeter of the area burned. In all cases, actual was larger than planned by an average 36.1%. The T50 treated 32% more area than planned and the T100 treated 40% more area than planned, or 8% more than the T50 (Figure 6).

    Figure 6 – Planned and Measured Swath Widths for T50 and T100.

    Programmed and Effective Swath Widths

    In all cases, the “treatment width ÷ passes” method produced an estimated ESW that was greater than, and positively correlated with, programmed swath width (Figure 7). For the T50, it was an average 26.8% wider. For the T100, it was an average 38.3% wider. The ESW calculated by the “port + starboard extent” method was larger still, but was not positively correlated with programmed swath width. For the T50, it was an average 52.8% wider. For the T100, it was an average 62.5% wider.

    No matter the method used to estimate ESW, the T100 exceeded the planned swath width by more than the T50. Using the “port + starboard extent” method, the average T100 ESW was 21.3 m, which is an average 15.4% wider than the average 17 m ESW produced by the T50.

    Figure 7 – Average measured swath width (two methods) compared to planned swath width for the T50 and T100 flown at 5 gpa, 3 m altitude, 250 µm spray quality and multiple speeds.

    T50 ESW by Travel Speed

    When travel speed becomes the independent variable for the T50, the “treatment width ÷ passes” method produces an average ESW that positively correlates with flight speed. At 21.5 km/h, the average ESW was 10 m, increasing to 11.9 at 30-36 km/h (Figure 8). This is typical and expected as higher speeds have been shown to produce wider swaths with the T10 and T50.

    However, the relationship between speed and ESW is less clear when estimated using the “port + starboard extent” method. At 21.5 km/h the average swath was 18.2 m, but reduced to 15.8 km/h at 30-36 km/h (Figure 8).

    Figure 8 – Average measured swath width by speed for the T50.

    T100 ESW by Travel Speed

    When travel speed becomes the independent variable for the T100, neither method for estimating ESW show an effect from flight speed. The “treatment width ÷ passes” method produced an average ESW of 13 m at 21.5 km/h and 12.9 at 30-36 km/h (Figure 9). The “port + starboard extent” method produced an average ESW of 21.7 m at 21.5 km/h and 21 at 30-36 km/h.

    Figure 9 – Average measured swath width by speed for the T100.

    Results – Part Two

    T100 ESW by Travel Speed

    The effect of flight speed on treated area and ESW was examined. In each case, the treated area was significantly larger than the programmed area (Figure 10).

    Figure 10 – Actual treatment areas compared to expected for the T100; three speeds.

    Similar to Part one, travel speed did not appear to influence ESW in any consistent or significant way (Figure 11).

    Figure 11 – Average swath width for T100 calculated using two methods at three speeds.

    T100 ESW by Spray Quality

    The effect of spray quality on treated area and ESW was examined. Once again, in each case, the treated area was significantly larger than the programmed area (Figure 12).

    Figure 12 – Actual treatment areas compared to expected for the T100 using three spray qualities.

    Effective swath widths estimated from both methods were negatively correlated with spray quality (Figure 13). Coarser droplets have greater mass, making them are less prone to displacement by wind than finer droplets. The “treatment width ÷ passes” saw an 80 µm spray quality produce an ESW 46.8% larger than a 500 µm spray quality. The “port + starboard extent” method saw an 80 µm spray quality produce an ESW 22.6% larger than a 500 µm spray quality.

    Figure 13 – Average swath width for T100 calculated using two methods for three spray qualities.

    Discussion

    In all cases, the area treated (i.e. burned) exceeded the area planned. The T50 covered 32% more area while the T100 (with the same operational use case) covered 40% more. This implies that the T100 created wider swaths and/or drifted more than the T50.

    The ESW estimated from herbicide efficacy appears to be considerably larger than those observed in fungicide efficacy / coverage studies. This is likely the result of the agronomic use case. Consider that herbicides have a relatively lower threshold dose than fungicides. Further, herbicide application on bare earth or into sparse canopies permits the lateral spread of droplets, where spraying fungicides into a dense canopy limits penetration in all directions. Even the sparsest coverage from a systemic herbicide produces a visual effect, and this binary result (i.e. hit or miss) extends the effective swath width. This should raise awareness of the importance of field boundaries and margins, particularly with herbicides.

    When estimating ESW, the method used affected the results. The “port + starboard extent” method resulted in large and low-resolution estimations of ESW, whereas the “treatment width ÷ passes” method seemed to respond in a more predictable way, even if it underestimates the ESW. Ultimately, both methods produce rough estimates; they are not intended to replace traditional, quantifiable assessment methods. The “truth” is likely somewhere in between.

    With that caveat reaffirmed, we assessed ESW using the “treatment width ÷ passes”. It was positively correlated with flight speed for the T50, as observed in previous work. However, this was not the case with the T100. Given that both drones were operated using the same settings, it is unclear why the T100 would produce such erratic results. Future work will evaluate T100 ESW using conventional methods.

    When the T100 was flown using a span of three droplet sizes, there was a strong negative correlation between average droplet size and ESW. Once again, this aligned with previous experience. While rotary atomizers on drones tend to create smaller droplet sizes than reported by the flight controller, coarser droplets have greater mass, making them less prone to displacement by wind.

    However, when the T100 was flown at at three speeds, the relationship with ESW was once again unclear. When flown at 36 km/h (~10 m/s) the T100 was flying at the top speed of the T50. It also flew at 54 km/h and at 66 km/h, which was the highest speed we could achieve at 5 gpa. The ESW (as estimated using the “treatment width ÷ passes” method) was essentially unchanged. While it is possible (and likely) that any increase in effective swath width due to travel speed was obscured by drift, pervious work has shown that drift increases concomitantly with speed. That does not appear to have happened here.

    Perhaps this is a function of a greatly reduced dwell time diminishing the effect of the downwash. Or, perhaps, the T100’s capacity for higher speeds has allowed it to pass beyond translational lift into true forward flight, similar to a helicopter. Translational lift occurs any time there is relative airflow over the rotor disk. As headwind and/or forward speed increase, translational lift increases, resulting in less power required to hover. According to Transport Canada, it is present with any horizontal flow of air across the rotor but most noticeable when the airspeed reaches 16 to 24 knots flight (8.25 to 12.8 m/s or 30 km/h to 46 km/h). This would greatly reduce the effect of the downwash on droplet movement. In our first impressions of the T100, we found that flying slower overheated the battery. This did not occur at higher speeds, and this efficiency supports the premise that it moved past translational lift, perhaps achieving true forward flight.

    If this theory is correct, it’s a new development for rotary drones, which were not previously capable of reaching these speeds. Downwash was an unavoidable side effect of the flight, but may now be a tool for the operator to use as the situation warrants – battery temperature notwithstanding. Perhaps it warrants a return to horizontal booms positioned beyond the downwash in order to improve coverage uniformity. On the other hand, we saw that it took the T100 roughly 100 m to reach the target 66 km/h, meaning it moved from hover to translational flight and beyond over that distance. This raises questions about how they spray would respond throughout that transition.

    More work is required.

    Acknowledgements

    Adrian Rivard and Stuart Hunter (Drone Spray Canada), Adam Pfeffer (Bayer Canada) and Mike Cowbrough (Ontario Ministry of Agriculture, Food and Agribusiness) are gratefully acknowledged for their participation, and both in kind and financial support of this study. Thanks also to Mark Ledebuhr and Tom Wolf for discussions surrounding the interpretation of these results.