Category: General Operation

Articles that discuss general field sprayer operation and productivity factors

  • Recirculating Boom Options

    Recirculating Boom Options

    If you read this site, you know we’re fans of recirculating booms. We love them for three reasons:

    1. They save money and waste by recovering spray back to the tank during priming and rinsing
    2. They make boom cleaning easier by eliminating boom-ends
    3. Most require individual nozzle shutoff, which makes for better sectional control

    If you’re new to the concept of recirculating booms, read more here.

    Until recently, these booms were only available on sprayers imported from outside North America (Horsch, Amazone, Agrifac to mention three), or via France’s Pommier booms that have been available as retrofits for many years. In 2018, Agco introduced their Liquid Logic system on the Rogator line, becoming the first North American manufacturer to offer a recirculating boom at the factory. Pattison Liquid also offers Recirculating booms as standard equipment on their Connect Sniper pull-type sprayer.

    In the meantime, three boom retrofit kits and one sectional conversion kit have become available.

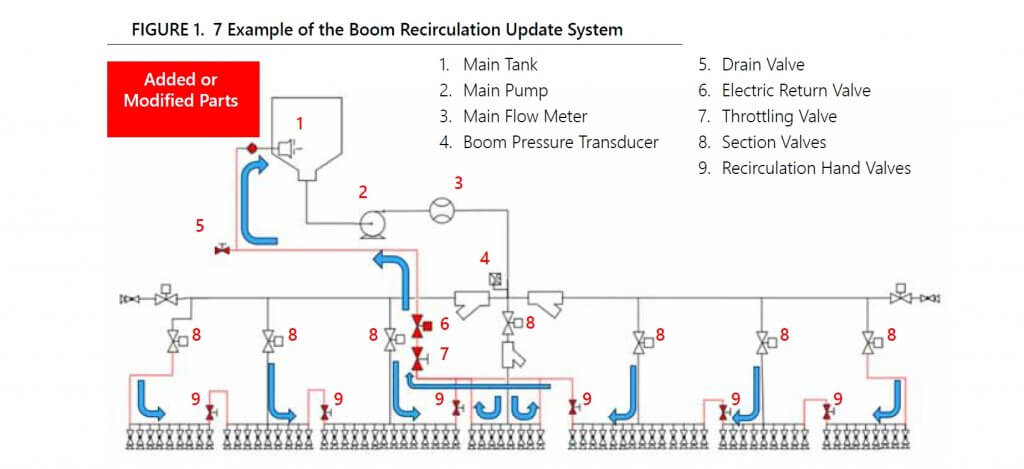
    Arag Australia‘s BRS (Boom Recirculation System)

    The first was developed by Arag Australia, and is available there via Nozzles Online, and in Canada through Nozzle Ninja. Designed for John Deere R-Series and Case Patriot sprayers, the kit uses the existing line that feeds liquid to the outermost section and simply extend that line to the end where it enters the boom via two installed elbows. The liquid returns to the centre via the installed boom sections which are connected together by removing the boom end cap (or “aspirator” for John Deere) and replacing the gap with a section of hose. Back at the centre rack, the liquid from both booms meet in the middle. At this point, a three-way valve gives the choice to return the spray to the tank, or to receive pressure from the pump. There is also a manual valve that allows the return to be dumped for safe disposal.

    Arag Boom Recirculation System (Spray Mode)
    Arag Boom Recirculation System (Recirculation Mode)

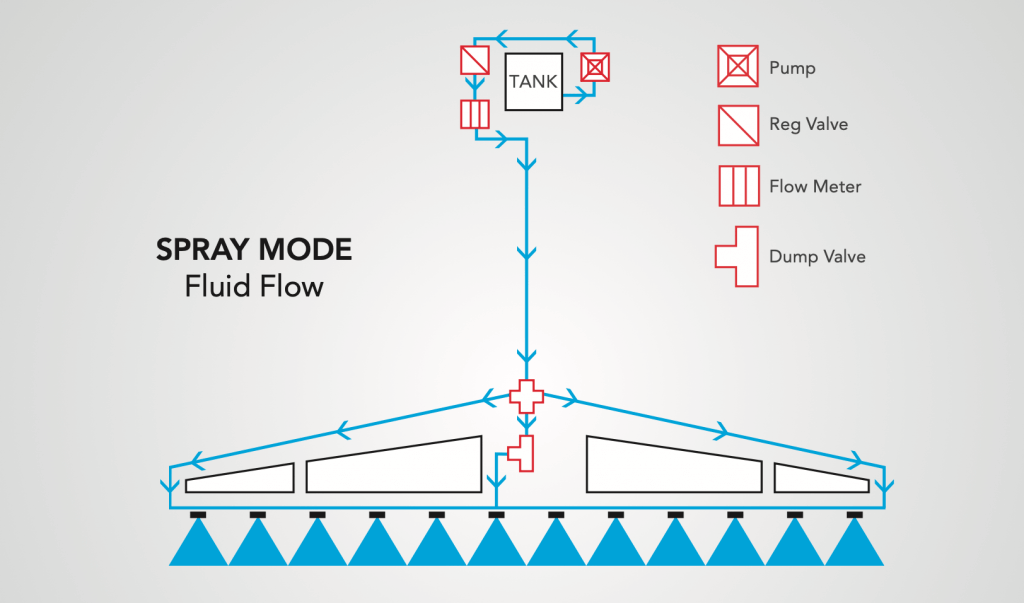
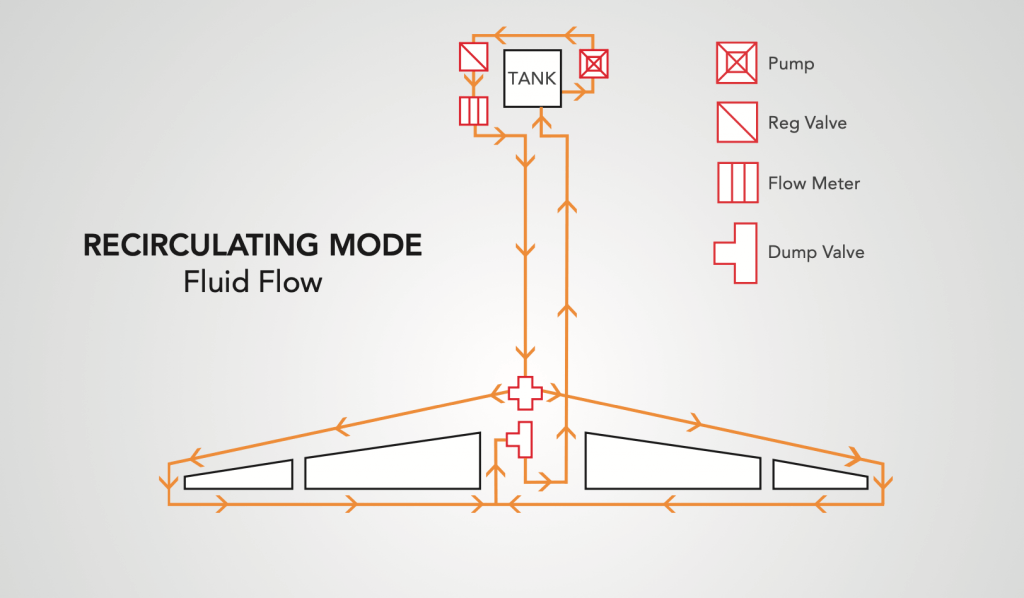
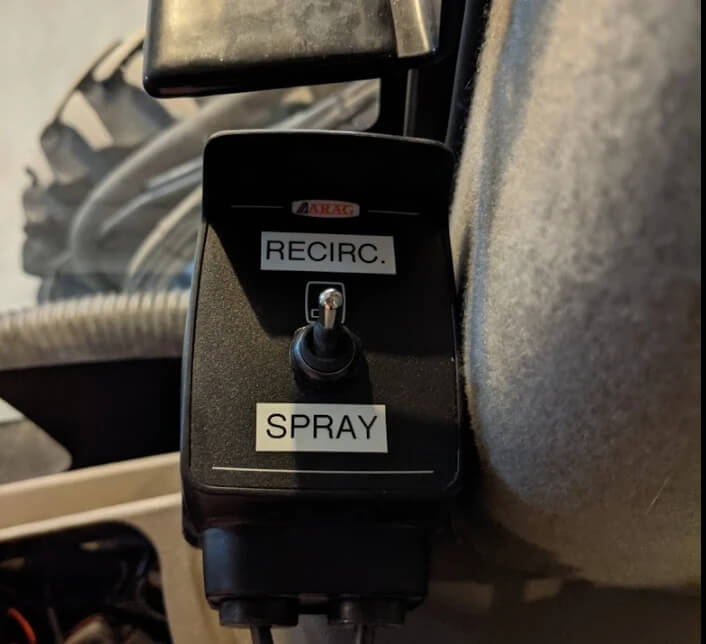
    The system does not tie into the sprayer’s electronics. instead, it adds a switch in the cab that the operator uses to switch from spray mode to recirculation mode. The switch is not activated at the end of each swath, but instead to prime or flush the boom.

    A switch is added so the user chooses recirculation or spray mode. The boom would recirculate to prime or flush, and remain in spray mode during the spray operation.

    Raven

    Raven offers a recirculation kit for 3000, 4000, and 5000 series Case Patriot sprayers with Aim Command HD and an ISOBUS terminal. The approach is slightly different, as they retain the pressure feed through individual sections but also tie the sections together so the spray is returned to the tank. By including a shutoff valve between each section, the system retains the option to use conventional sectional control for high flow situations, or to isolate a section should a leak occur. The system can be configured and controlled from the sprayer monitor, either a Viper 4+, CR7, or CR12.

    Raven Boom Recircualtion System schematic (from Raven manual). Note the retention of section valves and the addition of manual valves between sections.

    John Deere

    On March 2, 2021, John Deere announced a 2022 factory option called Pressure Recirculation and Product Reclaim. The system keeps several existing sections and adds two steel lines the flull length of each boom wing. One is for supply, the other return. As these lines approach a section, the supply is fed to one end of the section and the return is connected to the other end. On a 120′ boom, there are five recirculating sections, two on each wing and the centre.

    This approach adds one more line than the other designs, and this line will hold materials that ultimately need to be cleaned, flushed, and possibly dumped or sprayed out for cleanout. A possible reason for the extra line is the ability to deliver 220 gpm to the boom, an advertised feature of John Deere high flow booms that may come in handy for topdressing liquid fertilizer. These levels of volume are not needed for pesticides.

    John Deere Boom Recirculation and Reclaim. Top two lines are supply and return and extend the length of each boom wing. These connect to the existing sections on each wing, creating several smaller recirculating sections.

    Latitude Ag

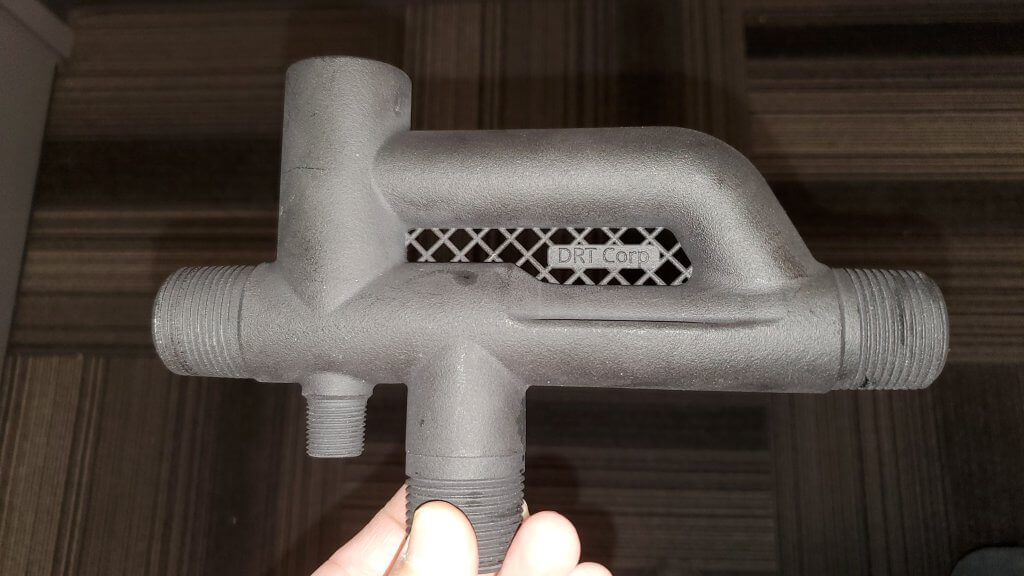
    This Wisconsin company has developed an innovative product that converts any existing plumbed section that contains boom ends into a recirculating section. It does this by incorporating a boom recirculation valve” (the “Merlin IC System“) into the original section feed line. Boom end caps are removed and replaced with sweeps and hoses that return flow to these boom valves. The flow from the boom ends is incorporated back into the sectional feed thanks to a venturi design in the recirculation valve.

    A prototype of the Merlin IC System valve made by Latitude Ag

    Advantages of this design include simplicity. No moving parts are required, the valve simply recirculates the flow from the boom ends automatically whenever that section operates. Existing sectional control, whether it’s by plumbed section or individual nozzle bodies, is unaffected. Flushing the boom with water is done with normal spraying. It takes some extra time to incorporate and dilute the contents of the boom end return lines but results in a clean boom and no section end residue. We’ve seen the results of testing and agree that it works.

    This product does not allow boom priming without spraying. However, a key advantage is that it can be used with direct injection since no product is returned to the tank. Latitude Ag says it will provide the necessary flow sensor and software to make this possible. As of 2025, this system may no longer be commercially available.

    Precision Planting ReClaim

    ReClaim is capable of operating on a sprayer with or without individual nozzle shutoff. For conventional nozzle bodies containing the original spring-loaded diaphragm check valves, the concept is to drop the liquid pressure below the cracking point of the check valves so flow continues through the sections and back to the tank without engaging the nozzles.

    Recirculation fittings are added to the end of each boom section. These feed into 3/4″ lines are installed on section ends, which in turn feed increasing diameter collector lines that eventually return all flow to the tank. Flow reaches the sections as before. When recirculation is turned on, flow exits the boom section through the new fittings and returns through 3/4″ lines to the centre of each section, where it enters 1” lines that take the flow to the center of each boom wing. There the flow in the 1” lines is combined moves to the center of the sprayer on 1.5” lines where it meets the flow from the other wing.  From there, the flow returns to the tank through an electronic ball valve and 2” line. This system ensures no back-pressure and balanced flow from each section.

    For some sprayer rate control systems such as John Deere, the pump won’t operate below about 20 psi despite operator settings. This means the priming or flushing procedure would trigger nozzles to spray if the bodies were fitted with spring-loaded diaphragm check valves. A pressure reduction kit (a second restrictor valve) is required to reduce the pressure sufficiently for ReClaim to work in these instances. More here.

    ReClaim operates independently of any electronic control systems, relying on a toggle switch to initiate recirculation. When flow back to the tank is detected, a light indicates that recirculation is working, and the operator waits approximately 60 sections for a 120’ boom to circulate all volume back to the tank. Download the operator’s guide, here.

    This system requires a lot of additional lines. A 120’ boom would require 120’ of additional 1” line and 60’ of 1.5” line. The manufacturer states that ReClaim adds about 14 gallons of volume that would need to be displaced back to the tank, adding to the standing volume. This volume can be circulated using solution from the main solution tank, or displaced back to the tank using flow from an existing clean water tank, or displaced using compressed air via an optional pneumatic port. It is not clear how spray mix in the ReClaim system can be removed from lines without returning it to the tank and draining it from there. Users should consider the additional surface area and volume that will have to be addressed during cleanout.

    Do It Yourself

    If none of the available options work for your sprayer, consider building your own system. Sprayer plumbing parts are available from the major manufacturers Banjo, Hypro, TeeJet, and Wilger. Wilger, in particular, has developed a nice suite of parts well suited to recirculating booms, including flanged sweeps and thin gauge steel booms, punched for nozzle bodies or unpunched to move product. See their support for DIY projects on this dedicated page: Wilger Retrofit.

    Take Home

    All these recirculation options improve the status quo of plumbed boom sections with boom ends. They should be considered essential equipment on sprayers.

  • Spraying Weather

    Spraying Weather

    It’s time to spray and what’s the first thing you do? Check the weather forecast, of course. More often than not, the suitability of the weather is the main factor in the decision to spray. Let’s have a closer look at what each weather component contributes to the decision.

    Wind:

    Everyone knows that small droplets can drift if it’s windy, and the windier, the worse it is. But that’s hardly the whole story.  Here’s how can we improve our understanding of wind and its impact.

    • Look beyond the wind forecast. It’s standard practice to look a day or two ahead for wind forecasts. At any instant, the wind speed and direction may be acceptable for our planned spray job, but we know that it will change. Consider wind speed sites such as Windfinder, Ventusky, or Windy for added insight. These services show trends over time in a great visual interface, allowing users to anticipate changes in wind speed and direction for better planning. While they aren’t forecasts per se, visualizing wind patterns over a larger region allows a better understanding of what’s coming your way.
    Figure 1: Sites such as Windy.com offer powerful visualizations of current and future wind conditions.
    • Use wind as an ally. We’re conditioned to think of wind as having a negative effect on spray drift. The less the better. Yes, droplet displacement increases with wind speed. But the “negative-only” perspective is being re-evaluated in light of dangers associated with wind-free conditions that often occur during temperature inversions (see “Temperature”, below). In fact, wind provides several advantages over calm conditions:
      1. Directional certainty. We can assess the risk to downwind sensitive areas. This is not possible with calm conditions because inversion air flow may follow terrain, and as inversions dissipate, the first daily winds can be changeable and unpredictable in direction.
      2. Turbulence. Wind creates mechanical turbulence which helps sprays deposit and disperse.  Both of these effects have value. In a calm environment, such turbulent eddies don’t exist.
      3. Low drift options. If it’s windy, we have options to respond. We can lower the boom or lower the spray pressure. We can mix the next tank in higher water volume, forcing either a larger nozzle (larger flow rates of the same model nozzle usually produce coarser sprays) or slower travel speeds. All these practices reduce drift when it’s windy. In comparison, nothing (except not spraying) can be done to reduce risk during inversion conditions. This is because even low-drift spray contain enough fine droplets to cause damage if they linger.
    • Know your wind speed. The international standard for wind speed measurement is 10 m above ground level. When 25 km/h wind speeds are reported, they are at 10 m, not the 1 m height where the boom is located. Within the surface boundary layer, the part of the atmosphere closest to the ground, wind speeds typically increase linearly with the natural log of the height above the canopy. The slope of that line depends on atmospheric stability and roughness length. Very close to the ground, the wind speed reaches zero, and that height is a function of the roughness of the surrounding terrain.

      As a rule of thumb, over a short crop canopy, expect the wind speed at 1 m above ground to be about 0.67x of the speed at 10 m. So if the weather reports 25 km/h, the actual wind speed at boom height is closer to 17 km/h. Remember that weather stations can be far away, and local conditions will vary. Always measure your local wind speed and direction with your own weather station or handheld device, and keep a record.
    Figure 2: Relationship of wind speed and height, for three roughness conditions (Source: Oke et al, 2017)
    Figure 3: Hand-held wind meters or weather stations are an essential part of a spray operation and record keeping.

    Wind and Mode of Action. Coarser sprays are a common way to reduce drift in windy conditions. But some modes of action aren’t well suited to coarser sprays. We can schedule our spray jobs throughout the day to correspond to spray quality tolerance. Apply the products that require the finest sprays (contact products, grassy herbicides, insecticides) when conditions are best, and save the sprays that tolerate the coarser sprays (systemic products, broadleaf targets) for less certain conditions later in the day. Or treat the fields whose downwind edges border a sensitive crop during better conditions. Here’s a rough guide to spray quality and herbicide mode of action.

    Temperature

    Like wind, air temperature is more complex than it appears at first sight. Here are some other aspects to consider:

    • Understand temperature inversions. Temperature matters. But perhaps the most important aspect of temperature when it comes to spraying isn’t the temperature per se, but how it changes with height. The temperature change with height is used to identify dangerous temperature inversions.

      Here’s how temperature profiles work (for a quick Sprayers101 overview, here, for the best in-depth explanation (NDSU), here): Due to atmospheric pressure, there is always a slight temperature decrease with height, about 1 ºC per 100 m (the dry adiabatic lapse rate). This temperature profile describes a “neutral” atmosphere, i.e., no thermal effects.

      When it’s sunny, solar radiation heats the earth, which in turn warms the air near it. As a result, the rate of cooling with height is greater than the adiabatic lapse rate, and we have “unstable” conditions that are characterized by thermal turbulence (warm air rising, cold air falling) that actively mixes air parcels. Thermal turbulence is very good at dispersing anything in the air, including spray droplets.

      When solar radiation is low or absent, the earth cools and this mostly affects the air near it. As a result, air temperature rises with height, and the daytime temperature / height profile is inverted. Air parcels no longer move up or down, in fact they return to their original location if displaced. This results in a “stable” atmosphere, also called an inversion.

      Inversions are dangerous because they are associated with very low dispersion, and a spray cloud will remain concentrated and may linger over the ground for a long time, like ground fog.

      Most weather services do not actively measure inversions. Instead, their presence has to be inferred by clues. For example, inversions:
      (a) occur primarily when solar radiation is low, from early evening, overnight, to early morning;
      (b) are more likely on clear nights, when soils cool more;
      (c) can be seen when ground fog is present, or when dust hangs, moving slowly;
      (d) are associated with low ground temperatures that also cause dew. 

    Recent findings about inversion in Missouri were summed up in this excellent webinar by Dr. Mandy Bish, Extension Weed Specialist at the University of Missouri. Her studies showed that inversions can begin hours before sunset, their presence and duration are dependent on local conditions such as topography and windbreaks, and recognition of telltale signs of inversions such as lack of windspeed are important for accurate local assessments.

    Figure 4: Morning ground fog in Australia (picture provided to author).
    • Use Mesonets if you have them. Mesonets are networks of weather stations, and they can add valuable information. For example, North Dakota has an extensive network of about 130 weather stations that, among other things, measures and reports temperature inversions. NDAWN (ndawn.ndsu.nodak.edu) reports temperatures at 3 m and 1 m, and issues warnings of temperature inversions as they develop at a specific location. NDAWN information is available as an app. North Dakota isn’t the only place to have a public mesonet, check to see what’s available in your area. The added information is worth subscribing to.
    • Know the volatility of the product. Some pesticide active ingredients are volatile. This means they can evaporate from a wet or dry deposit during and after application (more here). Dicamba is a prominent example, but there are others, like trifluralin and ethalfluralin, 2,4-D and MCPA ester, and clomazone. Formulation can affect volatility, and the use of lower volatile esters of 2,4-D and better salts of dicamba have helped. Microencapsulation has been used to reduce the problem with clomazone. Volatility is strongly affected by surface temperature, and volatile products should not be sprayed on hot days or when the forecast calls for hot days following application. Volatile products have been found to evaporate from dry deposits for several days after application, and their vapours move under inversion conditions, causing widespread damage.

    Sun

    The sun plays a large role in spraying. Plants’ active growth improves herbicide translocation as well as activity in the photosystem, or in amino acid or fatty acid synthesis. The activity of herbicides has been shown to improve under sunny conditions for that reason.

    Some herbicides, most notably diquat (Reglone), work too quickly when it’s sunny, and improved performance can be gained by spraying under cloudy or low-light conditions. The lack of photosynthesis allows for some passive translocation before the product causes tissue necrosis.

    Sunny conditions also increase thermal turbulence we mentioned earlier, which is useful for burning off morning inversions. But what usually follows a sunny day is a strong inversion as the sun sets and the clear sky facilitates the earth’s rapid cooling. It would be possible to spray a bit later into the evening when it’s cloudy.

    Humidity

    Since about 99% of the spray volume is comprised of water, evaporation of this water can have strong effects on droplet behaviour. Droplets begin to evaporate as soon as they leave the nozzle, becoming smaller and more drift-prone while still in flight. Higher booms and finer sprays increase the flight-time of droplets, and this increases the sensitivity to evaporation.

    The most common measure of water in air is relative humidity (RH). RH doesn’t tell the whole story, though, because the same RH at different temperatures results in two different rates of water evaporation. A better measure is wet bulb depression. Wet bulb depression is defines as the difference in temperature reported by a dry bulb vs. a wet bulb thermometer. Wet bulb depression has more recently been coined as “Delta T” in Australia. The Delta T value is directly related to water evaporation, and charts have been published showing acceptable values for spraying. A Delta T of >10 ºC is considered too high.

    Figure 5: Delta T, also known as wet bulb depression, provides an indication of water evaporation rate.

    After they deposit on a leaf, droplets can evaporate to dryness within seconds, and a dry atmosphere can result in rapid drying that reduces herbicide uptake. In one study, a Group 2 herbicide was applied to weeds in a normal sized spray, and also as a fine mist, both under very dry conditions. The normal spray showed the expected herbicide efficacy. The finely misted herbicide had no effect on the weeds, likely because the rapid drying prevented uptake. Interestingly, the product began to work again when the plants were later placed in a humid environment.

    High humidity can also work against an application. Since humidity is often high during temperature inversions, droplets remain potent while they linger and drift over sensitive terrain. It would be better if they had evaporated and lost their effectiveness.

    Some proponents of low water volumes and fine sprays have suggested oily formulations or adjuvants prevent evaporation. While this may slow evaporation, it also creates a dangerous condition in which many small droplets remain aloft and liquid for a long time, with high activity on any target they may encounter. The bottom line: Don’t spray low volumes with oily adjuvants.

    The Perfect Day

    We know that the ideal spray day is sunny, starts a few hours after sunrise once the dew has mostly burned off, and has consistent winds away from sensitive areas. Spraying should end well before before sunset, before calm conditions signal the onset of the inversion.

    But what to do when that day never happens? All too often, high winds persist day after day, and night spraying is the only alternative. In that case, do what you can to minimize potential damage. Survey downwind areas. Choose cloudy skies that suppress inversions. Incoming weather systems are usually associated with consistent winds, and these may reduce inversion risk. If drift is a possibility, apply more water and use the coarser nozzles at your disposal to minimize it. Any investments made to boost productivity will pay dividends, allowing you to get a greater proportion of your work done when conditions are better.

    Additional Resource

    If you want an excellent resource for spray weather best practices, grab a free copy of Graeme Tepper’s “Weather Essentials for Pesticide Application” published by Australia’s GRDC.

  • The Label Summary Sheet Proposal

    The Label Summary Sheet Proposal

    We’ve identified and discussed shortcomings in the content and design of today’s pesticide labels in an earlier article. From the perspective of the spray applicator, the information needed most often can be difficult to locate, anachronistic, contradictory, subjective or even missing from the label altogether. To truly encourage an applicator to read and follow the label we need a consistent, concise and clear format that summarizes critical content.

    To that end, we have worked with growers, university/government extension and industry to develop a prototype we’re calling the “Label Summary Sheet”, or LSS for short. We presented the concept in a series of public presentations in western Canada as part of the RealAgriculture TechTour Live event in 2018. You can watch a recording of part of that event at the end of this article.

    The LSS does not replace or interpret the current label, which is a legal document. It is a summary intended to accompany it. At this stage the LSS is simply a proposal. These documents are not intended for use right now; we hope they will grow and change for the better as they stimulate discussion.

    Consider this metaphor: You have just purchased a laptop. When you unbox it, you get an in-depth instruction guide that covers everything from operation to trouble shooting and includes all the legal riders. It’s a daunting technical document that you likely won’t read unless something goes wrong. Knowing that, manufacturers include a graphic and accessible quick start-up guide that summarizes the most common and critical issues. It doesn’t replace the instruction manual, it just augments it. If you can’t find what you need in the quick start-up guide, you are referred to the more fulsome description in the instruction manual. Think of the pesticide label as the instruction manual and the LSS as the quick start-up guide.

    Some agrichemcial companies recognize this need and have developed short documents to summarize key aspects of the label, but they are inconsistent and brand-specific marketing documents that do not always contain the information we are proposing. Here, for example, is the technology sheet for Integrity herbicide.

    We tested the versatility of our LSS format by summarizing four diverse pesticide labels. Our selections are not intended to imply that these labels are particularly deficient. Only that they are commonly used, somewhat complicated and represent the spectrum of pesticide categories and application methods.

    Download and look at the variety of labels we have summarized as examples. They are available here:

    • Pristine (LSS: 3 pages. Pesticide Label: 25 pages)
    • Dual II Magnum (LSS: 3 pages. Pesticide Label: 38 pages)
    • Liberty 150 (LSS: 2 pages. Pesticide Label 20 pages)
    • Traxos (LSS: 2 pages. Pesticide Label: 12 pages)

    Note that each LSS features the same section headings and a relatively consistent layout, no matter the manufacturer. Generic icons are used to illustrate content and make it easier for users to navigate without language barriers. The LSS are black and white to facilitate reproduction and refer back to their respective pesticide labels (i.e. the online PDF, not the booklets that come with the pesticides).

    LSS Sections

    Here is the Pristine LSS broken down by section to highlight the key features.

    1. Banner Section

    The banner is at the top of every LSS. It gives the commercial product name and the date to ensure the LSS reflects the current pesticide label. Four icons represent the most common application technologies: Horizontal boom sprayer, airblast, aerial and handheld. If an application method is prohibited, a banned symbol appears (such as aerial in this case). Note we have left room for RPAAS (UAV’s) anticipating the day we have products registered for that technology. The table notes the type of pesticide (e.g. fungicide, insecticide, adjuvant, etc.). The mode of action and active ingredient(s) are noted, as well as the formulation and the Pest Control Product number.

    2. Resistance Management / Planting Restrictions

    Intended to provide key information on managing pesticide resistance, this section reflects label content about carry over and the rotation of active ingredients. Further, to aid in application decisions, it reflects any restrictions around maximum number of applications, sequential applications or plant back issues following use.

    3. Environmental Conditions


    Any restrictions regarding weather conditions during or after application are noted here. This includes set-backs or buffer zones that reflect method of application and the nature of the adjacent or downwind area in question.

    4. Sprayer Settings

    This section includes the six most commonly asked questions an applicator has when calibrating or adjusting their sprayer prior to use. It is organized by target crop and method of application. When the label provides a high level of detail, the user is referred to the correct page. Note the use of graphics to quickly direct the reader to the information they need. Any additional qualifications found in the label relating to sprayer settings are indicated in the notes beneath the table.

    5. Handling Safety (PPE)

    The concept for this simple and graphic table originated in France, and was communicated to us by Dr. Carol Black of Washington State University. This unambiguous  format encourages the use of PPE while ensuring the handler uses the appropriate level of protection for each activity.

    6. Mixing


    As operators tank mix more products to curtail resistance, improve efficacy or improve productivity, there is a greater chance of chemical or physical incompatibility. This section summarizes any restrictions noted in the label. Learn more by downloading Purdue Universities’ publication “Avoid Tank Mixing Errors“.

    7. Rates and Restricted Entry Intervals

    This table can be quite complicated depending on the pesticide label. It summarizes the rates, volumes and restricted entry intervals by crop. It reflects the broadest range of product rates listed in the label. Restricted entry duration is affected by the post application activity, and this is captured in the REI column. If more detail is required, the user is referred to the appropriate page(s) of the label. Any additional qualifications found in the label relating to rates, volumes or REI are indicated in the notes beneath the table.

    8. Equipment Cleanout

    Finally, equipment cleanout is summarized (where possible) in a sequence of steps. When the pesticide label is silent on the cleanout procedure, the user is provided with the triple rinse protocol, which is generally held to be the industry best-practice.

    Adoption

    To date, this proposal has been made to Croplife Canada, the American Society of Agricultural and Biological Engineers (ASABE), an International Organization for Standardization (ISO) mirror committee (Equipment for crop protection) and more than 1,400 growers and stakeholders across Canada.

    Our suggestion for adoption of the LSS (in its current form or something similar)  is that regulatory agencies commission a working group comprised of representatives from grower groups, industry and government to oversee the process. The working group would support registrants as they populate (or update) the LSS template when a new product is submitted for registration, or as part of the natural review cycle.

    Should the registrant encounter duplicate, missing or contradictory information while completing the LSS, it should be considered an opportunity to remedy the problem on the pesticide label. This will clarify the safest and most effective use of the pesticide for the applicator, who is currently forced to selectively ignore or interpret such errors. To our minds, this was the intent of the original labelling system, and the inclusion of the LSS is a simple and effective way to achieve that goal.

    The Confusicol Sketch

    In 2018 we participated in Real Agriculture’s TechTour Live event that toured four major cities in Western Canada in four days. We presented the “Confusicol sketch” as a light-hearted way to open a discussion with the audience on the strengths and weaknesses of Canadian pesticide labels and how the Label Summary Sheet might be a viable supplement. Here’s one of the live takes, warts and all. Turns out live sketch comedy is tricky…

  • Dealing with Pesticide Shortages in 2022

    Dealing with Pesticide Shortages in 2022

    We’ve had dire warnings about possible pesticide shortages and price hikes for 2022. Price hikes are one thing. But if the products we need simply won’t be available, we have a tougher challenge.  It’s time to plan pesticide conservation.

    But first, what’s behind the product shortage?

    Emily Unglesby of dtnpf.com provided an excellent overview of the issue here and here. She said the reasons for the shortage are many-fold and came together in a perfect storm. Starting about 2017 or so, pesticide manufacturers tried to reduce the overall inventory of products to improve logistical efficiencies.  That effort was rewarded in 2019 when a wet spring in the US dramatically reduced seeded area to a low of 165 M acres. The resulting lower demand again provided incentives to reduce inventories. At the same time, US trade sanctions against China in the form of tariffs impacted production and shipment of many active ingredients to US markets. When Covid-19 happened, it affected both production and shipping of many goods, including pesticides. Container shipment costs increased sharply, and the ability to move them to and from ports was hampered. This then coincided with record seeded area in the US of 180 M acres in 2021, creating higher than usual demand. By that time, very little buffer remained in the system. The growth of Enlist E3 and Xtend Flex has placed additional pressure on glufosinate.

    Then two further events occurred. Hurricane Ida forced a shutdown of Bayer’s Louisiana glyphosate plant. And China, in late 2021, legislated a temporary 90% reduction of yellow phosphorus production in Yunnan Province in anticipation of the 2022 Olympic Winter Games. With phosphorus as a fundamental ingredient in glyphosate, glufosinate, and some fertilizers, this loss of production places significant strain on many products. The usual habit of returning unused pesticides to the retailer also became less common amidst shortage news, adding difficulty to planning inventories and demand.

    Shortages of popular herbicides like glyphosate, glufosinate, and clethodim will put demand on alternatives. Spreading out risk by implementing pre-emergent products where possible will pay dividends. But the ability to ramp up production of minor products is just as dependent on the supply chain, and these alternatives may therefore not offer reprieve if ordering is left to the bitter end. Planning ahead and staying in touch with retailers about your plans and your own inventory will assist the entire system in managing production and redistributing existing stocks.

    Safe to say products will be more expensive, and possibly impossible to obtain. Here are some things to consider to minimize the impact.

    1.Grow crops that require less pesticides. Crops which have good genetic resistance to insects and disease will be more likely to cope without a protective spray. Some crops are inherently competitive early on and give less time and space for weeds to become established. Remember that the relative time of emergence is important for crop yield loss from weeds. If crops emerge before weeds, they have the upper hand and will maintain higher yield potential. Crops that can be seeded early will prevent weeds from occupying that niche.

    A competitive crop is the best herbicide.

    2. The most powerful herbicide is a competitive crop. Use agronomic tools that favour good seedling establishment. The usual advice of seeding into a warm, firm, moist seedbed, should we be fortunate enough for the weather to cooperate, applies here. There is value in higher seeding rates to help outcompete weeds. Use fertilizer placement that favours crops, not weeds, such as side banding.

    3. Sample the spray water source and have it professionally tested. After a record drought in western North America, aquifers are low and surface waters have receded. Water quality will probably not be the same it has historically been. Use water conditioners to reduce effect of hard cations and bicarbonates. Ammonium Sulphate (21-0-0-24) at 1% w/v is a general treatment, harder water may require up to 3%.

    Conduct a water test in 2022 and condition spray water if necessary.

    4. Do not use untested mixes of pesticides with specialty foliar fertilizers. These may impact herbicide performance, or worse, result in an incompatible mix.

    5. Use the lowest label rate of product that is relevant for the pest you’re trying to control. Many products have a range of rates depending on the weed species and stage. Scout your fields and take advantage of the lower rate option if you can.

    Invest in logistics and be prepared to respond to a good spray day to get the timing right.

    6. Spray herbicides early. It’s been shown that crop plants can sense the presence of weeds before they compete for resources, causing a physiological adjustment that results in irreversible yield loss. The shorter the time that weeds and crops co-exist, the better. Also, smaller weeds are easier to control. Weeds that escape this early application will need to compete with an established crop and won’t thrive or impact yield as much.

    Smaller weeds are easier to control and may allow a lower label rate.

    7. It’s not advisable to reduce product rates from the one recommended on the label. Although label rates contain a margin for poor conditions, the risk of selecting for polygenic resistance exists. Polygenic resistance occurs when some weeds happen to be slightly more tolerant to the herbicide than the rest of their cohort. These weeds may survive a lower rate, and go on to produce seeds. If these outcross with other survivors, their more tolerant offspring will increase in relative abundance. With further such selections in subsequent generations, weeds become even more tolerant and eventually dominate.

    8. Apply the spray as uniformly as possible. Make sure the spray nozzles are within a 5% flow rate tolerance along the entire boom. If the set is older, consider a wholesale replacement. But the biggest enemy of uniform deposition seems to be turbulence created by wind and driving speed around the tractor unit. Slower wind and travel speeds help somewhat. Variable deposition means that some regions receive up to 50% more than intended, and others receive 50% less. This means weeds in the lower deposit regions may survive the application. The more variable the application, the higher the rate that is needed for acceptable control.

    Slower travel speed reduces variability of the spray deposit, limiting escapes.

    9. Use finer sprays whenever the tank mix contains a contact mode of action product (e.g., Group 1, 6, 10, 14, 15, 22, 27) or targets grassy weeds. Both situations require smaller droplets for best performance. The use of finer sprays may mean fewer hours in the day when drift is acceptable, and as a result, investment in efficient tendering and cleaning as well as overall time management pays dividends.

    10. Make efficient use of the product in the tank, preventing waste. The amount of product being discarded can range to over 10% of the total needed to treat a field, but this can be reduced to 3% with the proper steps. The following are areas where improvement is possible:

    (a) Prime the boom efficiently using sectional shutoffs or better yet, a recirculating boom. These can be primed without any spray leaving the nozzle or boom ends.

    Conserve product by eliminating priming waste with a recirculating boom.

    (b) Measure the spray mix of the last tank accurately, minimizing leftover. Consider the AccuVolume system that weighs the tank contents to the closest gallon. Tanks can be filled with the exact amount, and rates can be adjusted as the leftover becomes apparent on the last passes.

    Accurate measurement of tank volumes prevents leftovers.

    (c) Invest in individual nozzle shutoffs to improve sectional control resolution. These are part of any Pulse Width Modulation system but can also be obtained as air-actuated valves that are very affordable. Such capability is necessary for recirculating booms.

    Nozzle sectional control can save 4 to 5% product use.

    14. Consider an optical spot spray system such as the WEEDit Quadro, the Trimble WeedSeeker, or the John Deere See & Spray Select, available for 2022. These systems are “Green on Brown”, meaning they selectively spray just weeds in a burnoff or chem-fallow. This can save about 70% of the spray depending on weed density. More such systems are on the way, some even offering “Green on Green” that selectively identifies weeds among a crop. The return on investment of these systems is directly related to the pesticide cost, meaning in a year with high pesticide prices they pay off faster. If shortages of product become a reality, a spot sprayer may be the only way that some fields get treated at all.

    Pesticide shortages will not be fun. Unfortunately, their appearance coincides with higher fertilizer prices, meaning crop establishment will need to overcome that factor as well. But there are tools to minimize the impact if we’re willing to implement them. Just as necessity is the mother of invention, scarcity is the father of conservation.

  • Broadcast Boom Nozzle Spacing

    Broadcast Boom Nozzle Spacing

    North American built boom sprayers have nozzle spacings of 20” (50 cm in the rest of the world), but other spacings such as 15” (37 cm) and 10” (25 cm) also exist. What are the reasons for these alternative spacings and do they offer any inherent advantages?

    Why spacing matters

    Nozzles are spaced along a boom to allow their fans (patterns) to overlap sufficiently at the target. In broadcast spraying, a uniform distribution of spray volume gives us the best chance for consistent coverage along the boom. Since flat fan nozzles produce a tapered pattern (i.e. the volume is highest in the centre and diminishes towards the edges), approximately 100% overlap (i.e. 50% from each neighbour) will produce a uniform swath.

    Figure 1: Tapered flat fans that require some overlap are the default pattern type for agricultural boom nozzles. This is true of conventional and low-drift styles. Note that the flat fans are turned 15° to prevent the spray patterns from interfering with one another.

    The 100% overlap isn’t just for volumetric distribution. Flat fan spray patterns tend to have more and finer droplets in the centre and fewer and coarser droplets at the edges. All droplet sizes contribute to coverage in different ways, so the overlap ensures both number and sizes are evenly distributed along the entire boom.

    Figure 2: 30% overlap may achieve volumetric uniformity. But because the centre of the pattern contains the majority of the smaller droplets, low overlap may result in low coverage in the overlap regions, resulting in striping.
    Figure 3: Consistent droplet number distribution along the boom requires at minimum 100% overlap (50% from each neighbouring nozzle). This blends those regions of the patterns with high and low droplet densities.

    The generic 20” spacing arose from long-held conventions about boom height, fan angle, and travel speed. Specifically, this spacing required a boom height of 20” to obtain good overlap of the once-dominant 80° fan angle. Combined with 0.15 to 0.3 US gallon per minute (gpm) nozzles and travel speeds of 6 to 8 mph, operators were able to apply 5 to 15 US gallons per acre (gpa) volumes. Using nozzles with smaller flow rates would generally result in nozzle blockages.

    But what if we want to change any of those variables? How does this affect nozzle spacing? Figuring out the pros and cons of an alternate spacing requires a little math and some contingency management.

    Boom Height Math

    First the math. If the boom has 20” nozzle spacing and we need 100% overlap, the width of the spray pattern at target height must be two times the nozzle spacing, which is 40″. You must calculate the required fan angle and boom height to achieve this. Most nozzle catalogues have tables to help with this, or you can download a handy spreadsheet to calculate your own scenarios here.

    For today’s standard 110° fans, a minimum boom height of 14” is needed to achieve 100% overlap. For 15” spacing, the height is reduced to 11”. For 10” spacing, we drop to a mere 7”. However, consider that most modern suspended booms are not operated at heights less than 24” to allow for sway. At that height, there’s plenty of overlap to go around for 20″ nozzle spacing. For those booms that are able to operate at a consistent height, narrower spacings permit lower heights that will reduce drift potential significantly. Every time we halve boom height, we also halve drift potential.

    Figure 4: Using 110° tips with 20″ spacing, the theoretical height at which we achieve 50% overlap is 11″ above target.

    By tilting the nozzles forward or backward from the vertical, we can reduce the boom height somewhat further and still get the same overlap. For example, for 20 and 15” spacings, angling nozzles forward or backwards by 30° allows us to drop the boom another 2” closer to the target.

    Contingencies

    A suspended boom hardly ever stays at a uniform height; It sways up and down with field conditions, topography, etc. This is why many operators set their booms above the minimum height – to prevent striping when the boom sways low. The penalty is that this increases the distance droplets need to travel, increasing drift potential and any turbulent displacement problems arising from the moving boom.

    Assuming a 110° flat fan at 24” boom height, each nozzle achieves a theoretical pattern width of about 70”, which is an overlap of 70÷20=3.4-fold or 240% on 20” nozzle spacing. Given a minimally-acceptable overlap of 50% (25% from each neighbouring nozzle), the boom could be as low as 11”. For 15” spacing, the minimum height for 50% overlap is 8”, and for 10” spacing it’s 5”. This means the narrower spray patterns gain 3” to 6” in allowed downward boom movement.

    Figure 5: Using 110° tips on 15″ spacing, the height for 50% overlap is 8″ above target.

    A second contingency is that spray patterns are rarely the exact value that the nozzle catalogues specify. A so-called 110° nozzle may operate at only 90°, or up to 150°, depending on the nozzle model, the spray pressure, and the tank mix. Learn more here and here. Patterns also don’t continue to grow at their rated fan angle, as droplets slow due to air-resistance and fall more vertically due to gravity. For that reason, a visual check is recommended to ensure the expected overlap is achieved.

    Figure 6: Fan angles indicate initial trajectories of droplets at the edge. With distance, gravity pulls these droplets downward, narrowing the pattern width from that achieved theoretically (figure adapted from image in TeeJet catalogue).

    A third issue to consider is less related to boom height but nonetheless affects spray distribution. Small droplets move with air currents, and the turbulence created by large, fast sprayers creates enough turbulence to move these droplets significantly. A perfect pattern under static conditions can look quite different at a fast travel speed with a modest side wind. Low booms may help prevent some of this displacement because droplets spend less time in flight, and their average velocity is faster.

    Figure 7: Spray deposition onto a 2 mm string to measure deposit uniformity for a fast travel speed and high boom and a slow speed, low boom configuration.

    Flow Rate Math

    Flow rate requirements per nozzle change whenever we equip a boom at an alternate spacing. The basic formulae are shown below.

    Moving from a 20″ to a 15″ spacing would require a nozzle with 0.75 of the flow rate, approximately from a 02 to 015 size, or 03 to a 025 size, or 04 to 03 size, etc.

    Pulse Width Modulation

    The use of Pulse Width Modulation (PWM) has increased the overlap requirement. With PWM, alternate nozzles are on a 180° timing offset from their neighbours. This means that when running >50% duty cycle, when one nozzle is temporarily off, its neighbours are on. These neighbours’ patterns must now span the gap, and 100% overlap is the absolute minimum to achieve this. PWM users therefore select the wider pattern angles and some opt for >100% overlap.

    Figure 8: Pulse Width Modulated booms require 200% overlap so that the entire boom receives proper coverage when the alternate set of nozzles is off. For 110° fans at 20″ spacing, the minimum boom height would be 21″

    PWM Considerations

    • High flows (greater than 1 US gpm at the nozzle) that are common for fertilizer top-dressing may require higher-flow PWM valves.
    • Narrow spacings reduce the individual nozzle flow rates and can therefore support higher application rates before triggering a larger valve requirement.
    • PWM valves aren’t cheap and for example 15″ spacing compared to 20″ spacing adds 24 valves on a 120′ boom.

    Banding

    We noted that 20” nozzle spacing is a standard because it corresponds to what has traditionally been achievable with available boom heights and spray pattern angles. But things can change.

    Narrower spacings such as 15” originate with row crops and planter row spacings of 15” or 30”. These spacings exist so the spray pattern can be placed either over the top of a crop row, or in between the rows for banding. Using narrower fan angles and/or lower boom heights, together with “even” (as opposed to “tapered”) fans, banding sprays can be applied over the top of, or between crop rows. Or drop hoses can reach between the rows for top-dressing or directed sprays into the canopy.

    Canopy Penetration

    With narrower spacing, it can be argued that a greater proportion of the boom length has spray directed directly downward (corresponding to the centre of the pattern). Whether or not this translates into better penetration of a canopy is a fair question. In laboratory trials, use of 10” or 20” spacing did not improve penetration into a broadleaf canopy. But if the lower boom height afforded by the narrower spacing was utilized, some improvements in the deposit of angled sprays onto vertical targets was observed.

    Adjusting to Narrower Spacings

    As we showed earlier, use of 15” or 10” spacing booms for broadcast sprays requires a smaller nozzle size to achieve the same spray volumes as the 20” spacing. If boom height remains constant, narrower spacings result in greater pattern overlap which provides more latitude for sway. Alternately, lower boom heights can be used.

    Using smaller nozzles on narrower spacing presents some challenges. Generally, smaller nozzle size means finer spray quality. If an operator wants to retain the spray quality they had on a 20″ spacing, they may opt to use lower pressure (not advisable for non-PWM systems) or swap to different nozzle design that can produce the desired spray quality at the lower flow rate.

    Smaller nozzles are more prone to plugging, so that needs to be managed with filtration, filling practices and water sourcing. Be aware of the the product formulations and their requirements for filter mesh size. Most dry products specify a 50 mesh filter (or coarser). Also, check size options for nozzles. The smallest size for most nozzle models is 015, but certain PWM-specific nozzles are only available in 03 or larger.

    The marriage of narrow spacings with individual nozzle shutoff can result in a versatile system capable of producing high resolution banded sprays in narrow seeded crops. For example, consider a boom with a 10” nozzle spacing spacing that matches the seeder row spacing. The operator can shift from 10” to 20” or 30” from the cab if the valve control software allows it. With accurate guidance and good boom levelling, topdressing foliar products (e.g. nutrients, fungicides) can follow the crop row precisely.

    Spot Sprays

    Spot sprays present a situation where compromises are needed. Some, such as WEEDit, utilize narrower nozzle spacings to allow better treatment resolution and increase product savings. Any one nozzle or sets of adjacent nozzles may be triggered by the sensor. For single nozzle activation, to preserve the value of the better resolution a uniform, narrow band of spray needs to be created. This means a 30° or 40° fan angle from a banding nozzle will be necessary. For example, a 24” boom height will result in a 13” band with a 30° fan, and an 18” band with a 40° fan. In the latter case, the dose would be diluted by 80%, wasting much of the potential savings.

    Figure 10: Boom height is critical for banded sprays and for spot sprays. Too wide a pattern on a single nozzle reduces dose, too narrow creates misses.

    Frequently, a patch of weeds will trigger several adjacent nozzles. Now these individual bands need to work together to create a uniform swath. This will inevitably require some overlap to avoid gaps, but too much overlap will result in bands where twice the dose will be applied. A tapered fan may suit this situation better. As a result of these varying needs, tolerances for spot spray boom height are even more strict than for broadcast spraying. More thoughts on spot spray nozzle selection are here.

    Conclusions

    Narrower nozzle spacings on a broadcast boom allow somewhat lower boom heights and these can in turn reduce drift and improve deposition of sprays. Lower flow nozzles will be needed with narrower spacings, requiring management of plugging and potentially a more drift-prone spray quality. The value of narrower spacings depends on the availability of booms that control sway, allowing them to operate at uniform, low heights.