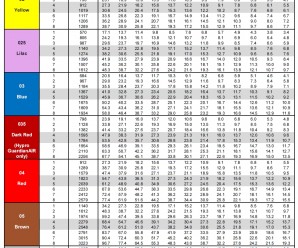
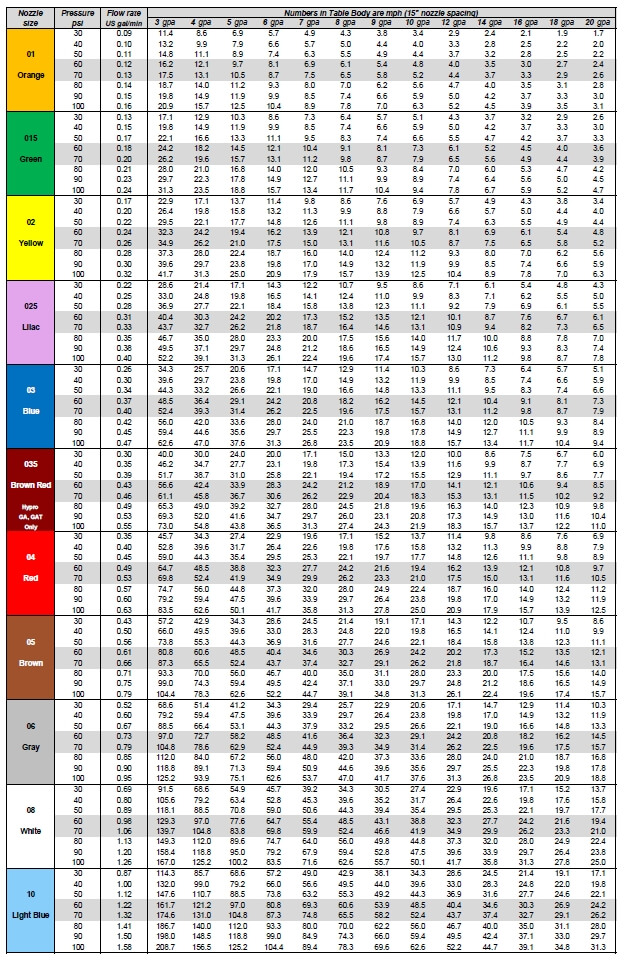
Need to find the right nozzle size for your application? Sometimes a simple chart is the easiest way to figure things out. Print it and place it in your sprayer cab.
In this chart, identify your water volume along the top row, and follow the column until you encounter the travel speeds you’re interested in.
Once you’ve encountered your travel speed, move along the row to the left to identify the nozzle size and spray pressure.
Make sure that your travel speeds are achieved at a pressure that’s right for the nozzle you’re using. For most air-induced nozzles, this will be about 60 to 70 psi (highlighted).
Once you’ve decided on a nozzle size, the travel speed column for that size becomes the travel speed range at various pressures. Avoid operating a low-drift spray below 30 psi – its pattern will be too narrow and likely its spray quality will be too coarse for good results.
Click on the images or text below to download a high quality pdf version of each chart, starting from the top with US, 15″ spacing, then US, 20″, then US 30″, then metric, 50 cm. Print, laminate, and place them in your sprayer cab.
A very common question we hear at sprayer demonstrations is:
“I want to drive the spray deeper into the canopy – does higher pressure help?”
Well, here’s the classic government answer:
“…yes and no.”
It depends on two things. First, the size of the droplet and second, your tolerance for drift (ours is almost zero, BTW). The following video explains how Fine droplets behave very differently than Coarse droplets. It’s always nice to get outside and toss a few balls around:
Well, that last statement in the video isn’t strictly correct…
It’s true that changes in pressure have greater impact on the momentum of coarser droplets, but there is some impact on finer droplets, too. Sufficiently high pressure makes for a finer spray quality and finer sprays have been shown to penetrate dense canopies more effectively. We have seen improved canopy penetration in ginseng, field peppers and matted-row strawberry using finer spray under higher pressure. If pressure is high enough, it will create air-inclusion and impart additional momentum to even Fine spray droplets over a short distance, but it’s a case of diminishing return. That is, it takes a lot of pressure to do it and relatively speaking they only got a bit faster/further. In our work, we used pressures between 90 and 300 psi. Excepting hollow cones, that’s generally on the upper end, or beyond a nozzles rated pressure range and it may even be outside the pumps capacity.
The reason we downplay pressure as a tool for improving canopy penetration is because finer spray under high pressure causes unbelievable drift. A fraction of the spray does get deeper into canopies when you “fog it in”, but the plume of spray blowing beyond the sprayer is entirely unacceptable. Slowing down the travel speed, spraying on cool, humid, low-wind days and lowering boom height can help, but in every trial where we’ve used high pressure and Fine spray quality, we see the image below… or far worse:
Staged drift in peppers using water and high pressure combined with Fine spray quality
The compromise in canopy penetration is to use a Medium spray quality and higher water volume. Stay within the pressure range the nozzle requires to achieve that Medium spray quality. If canopy penetration is still insufficient, consider canopy management (like planting density and pruning) and explore drop-arms to direct the spray, or booms that offer an air-assist or air-deflection option (a few shown here) to entrain and carry spray into the canopy.
Don’t use higher pressure to increase canopy penetration.
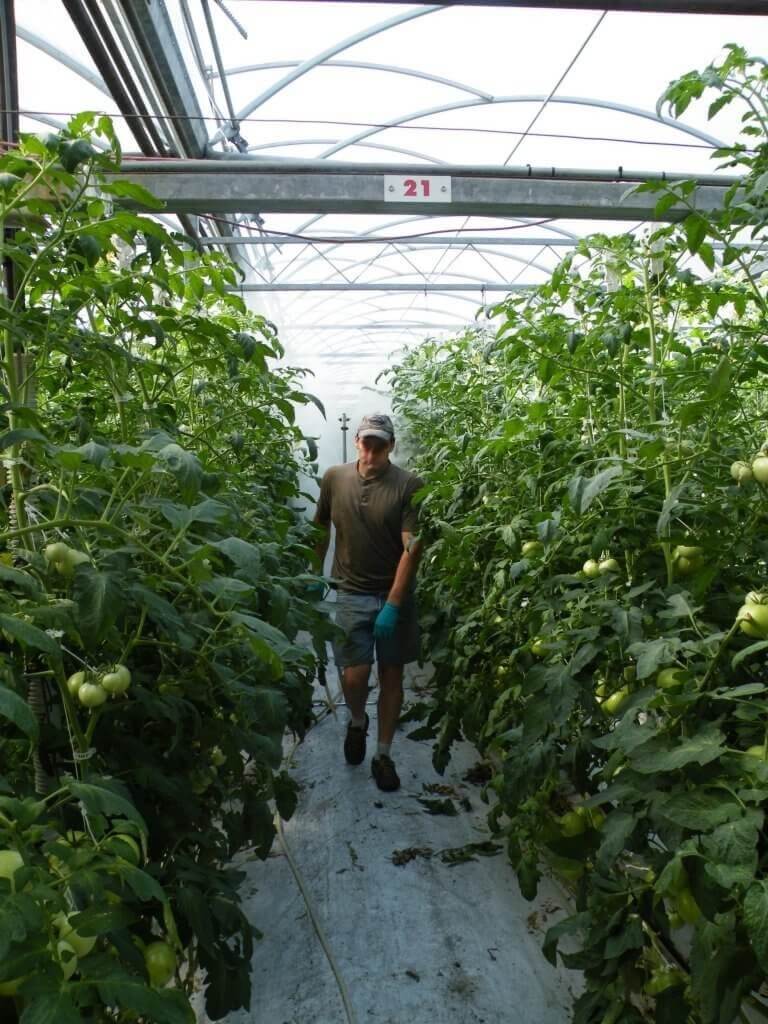
Back in 2011 we toured a few vegetable greenhouses in Southern Ontario. I wanted to learn more about how greenhouses used hydraulic sprayers (i.e. not misting or fogging systems) to apply pesticides to tomatoes, cucumbers and peppers. It was an eye-opening experience for me, because like every commodity group I’ve encountered, they had their own unique way of doing things.
Manually-towed sprayers
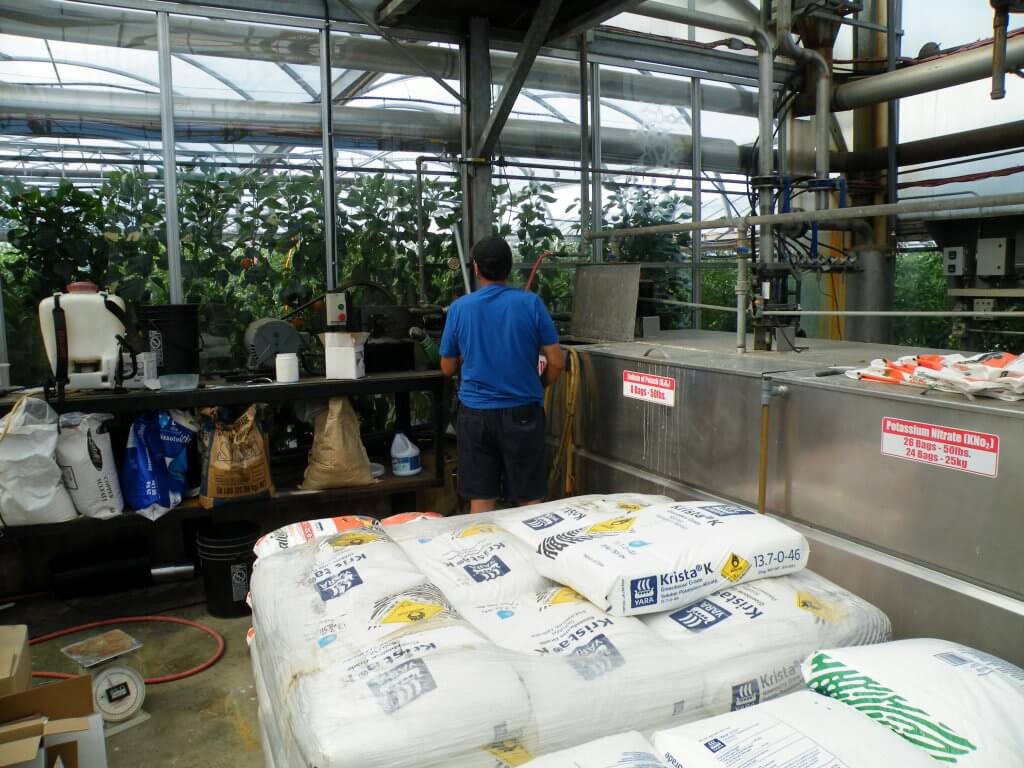
The first operation employed a system that I’ve come to learn is fairly common in greenhouses. There is a centralized tank and pump, located outside the growing area. Products are mixed and pumped from there.
Mixing area
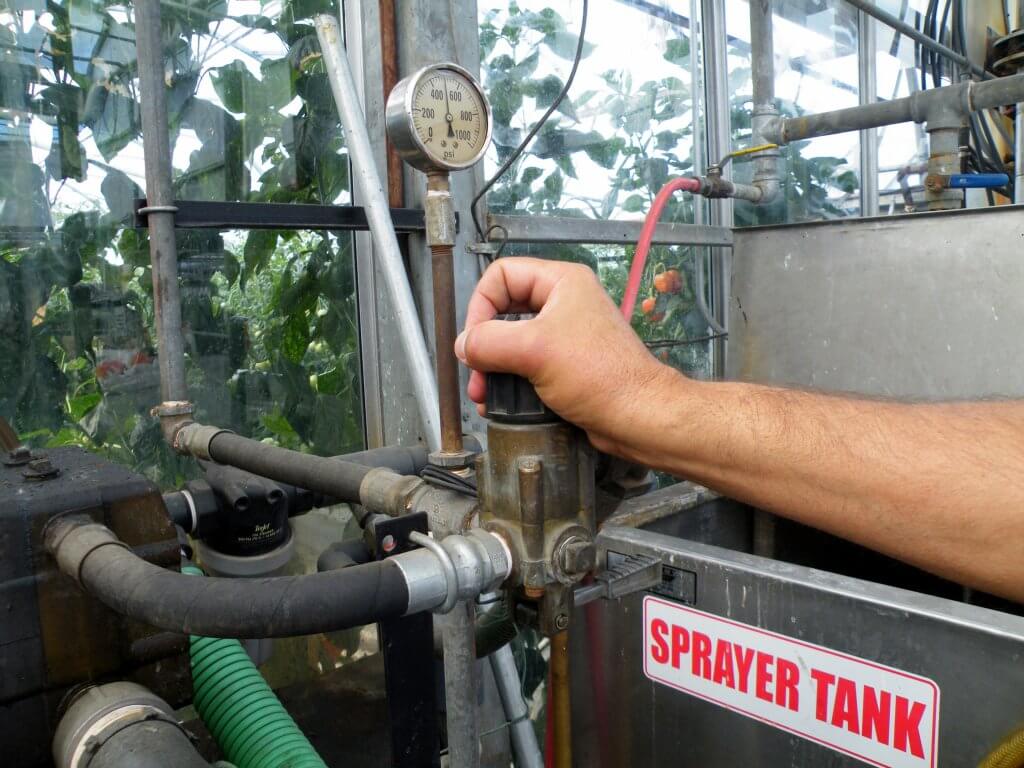
The pressure is set at the source so the spray mix is pumped to the rest of the greenhouse where the sprayer can be quick-connected to one of a number of outlets along a central line. I’ve been surprised in the past to see airblast sprayers set as high as 300 psi, so it really surprised me to see the pressure set to 500 psi! I was told this was necessary to counter the pressure-drop experienced at the far reaches of the greenhouse (see below).
Pressure regulator on a clearly-labeled tank.
The sprayer itself was a manually-towed vertical boom and a coil of hose. The operator would wear appropriate personal-protective equipment and tow the sprayer between the rows at a constant speed. They may or may not have the ability to control the pressure with a regulator on the boom – the nozzle selection and travel speed dictate the rate.
Manually-towed vertical boom.Demonstrating how an operator spays greenhouse tomatoes with a towed vertical boom. This was just water, so no PPE required.
In this demo, the operator was using yellow TeeJet VisiFlo hollow cones (TX-VK3) which, despite the pressure-drop, were still operating at >300 psi and therefore beyond what the manufacturer lists in their rate charts. The resultant spray quality was Very Fine. We’ve said before that increasing the pressure does not increase the speed of tiny droplets appreciably, but that’s when we’re talking about going from, say, 60 to 90 psi. At pressures as high as 300 psi the droplets are moving fast enough to generate some air movement (i.e. making their own light wind) and there was a visible distortion of the outer potion of the crop canopy. The resultant coverage, even on the underside of a leaf (see below), was hard to fault.
Under-leaf coverage
However, as one would expect with Very Fine spray, a lot of the mist didn’t go anywhere. So while the coverage was very good, it was not terribly efficient. I was left thinking there might be an opportunity to find a savings in spray mix and reduce the potential for operator exposure by lowering the pressure. Unfortunately the regulator would not allow us to reduce the source pressure appreciably, so we weren’t able to experiment.
Automated sprayers
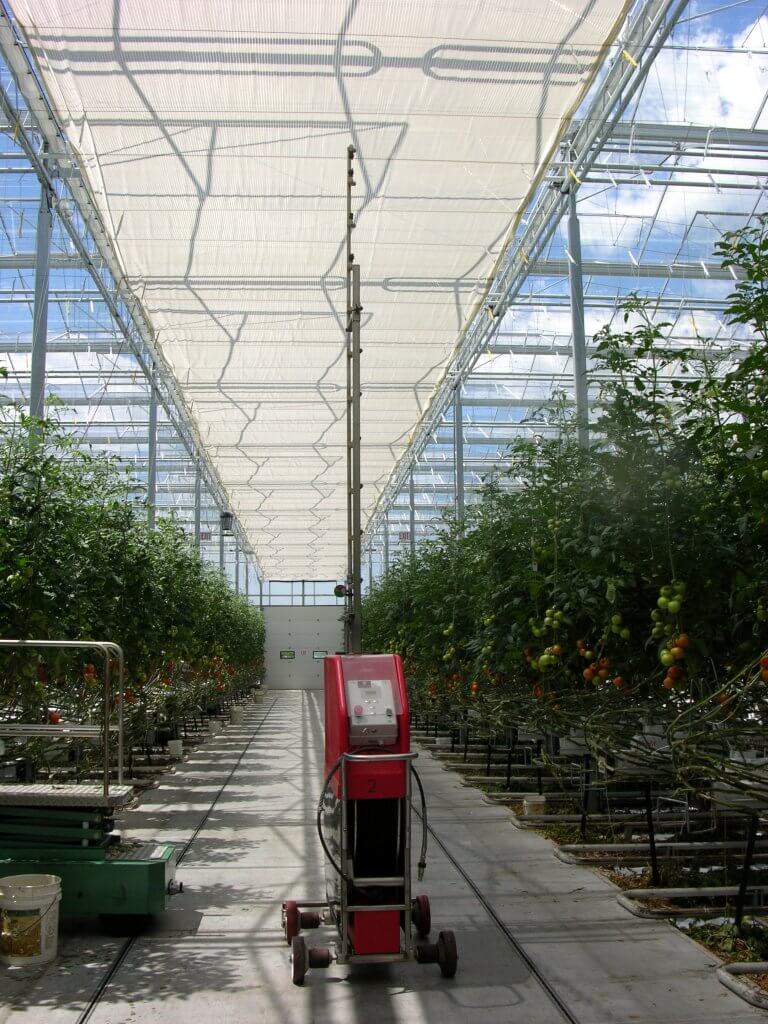
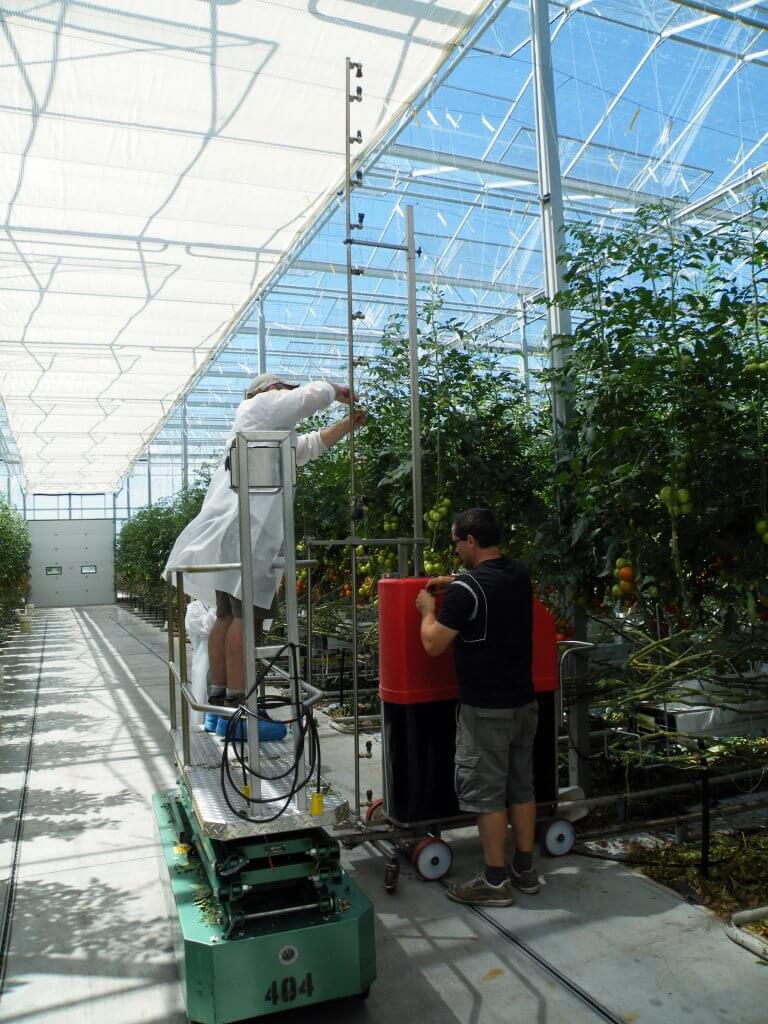
The next greenhouse we toured used a far more sophisticated method for applying pesticides. While they still used a centralized tank and pump, the sprayers were not hand-pulled trolleys; They were robots! Well, they were automated vertical booms that rode along the hot water pipes in the alleys between the crops. The operator would stand in the corridor and send one sprayer hurdling down the left-hand alley. The sprayer sprayed from only one side of the boom as it went. When it reached the end of the alley, the boom would rotate 180°. Just as it began the return trip, spraying the other side of the alley, the operator would send a second sprayer down the right-hand alley. As the second sprayer reached the end of it’s run, the operator would retrieve the first sprayer, and set it rocketing down the next left-hand alley. In that fashion, alternating back and forth, the greenhouse got sprayed.
Automated vertical boom sprayer
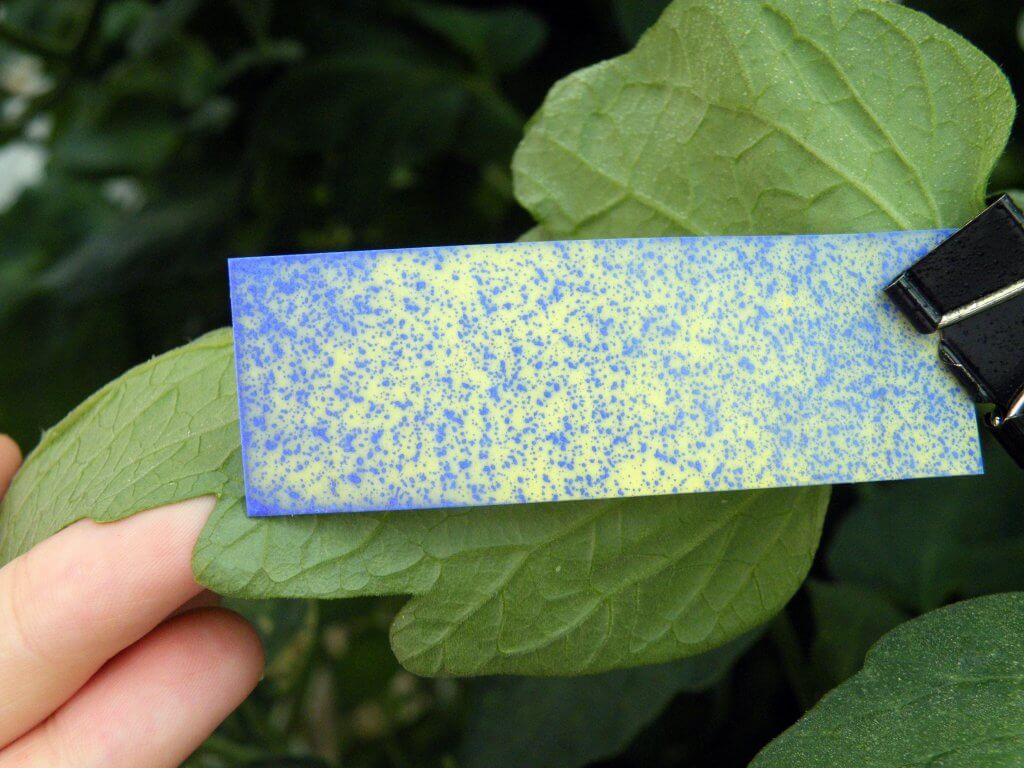
The automated sprayer was set to operate at ~350 psi, traveling at a rate of 75 meters per minute, spraying from a vertical boom equipped with five flat fan nozzles oriented vertically. Water sensitive paper (which has one face that goes from yellow to blue when water contacts it) was placed in three locations in the tomato canopy.
One was placed directly behind the fruit with the sensitive face square to the sprayer.
One was placed with the sensitive face facing the ground (this upside-down orientation exposed only the edge of the card to the sprayer).
The last was oriented with the sensitive face aimed into the direction of the sprayer’s travel, again only exposing the thin edge of the card to the sprayer.
Water-sensitive paper shielded by a fruit. Sprayed with flat fan nozzles.
Flat fan nozzles
The sprayer was released to spray the 125 metre row using the flat fans. To the observer, it produced a cloud of spray that appeared to completely envelop the target row. Very little was seen to escape through the tomato canopy into the next row. When the cards were retrieved, however, the coverage was disappointing. See the right-hand column of papers entitled “Flat fan” in the image below. This goes to show that a spray cloud can fool you – always use water-sensitive paper to confirm spray coverage.
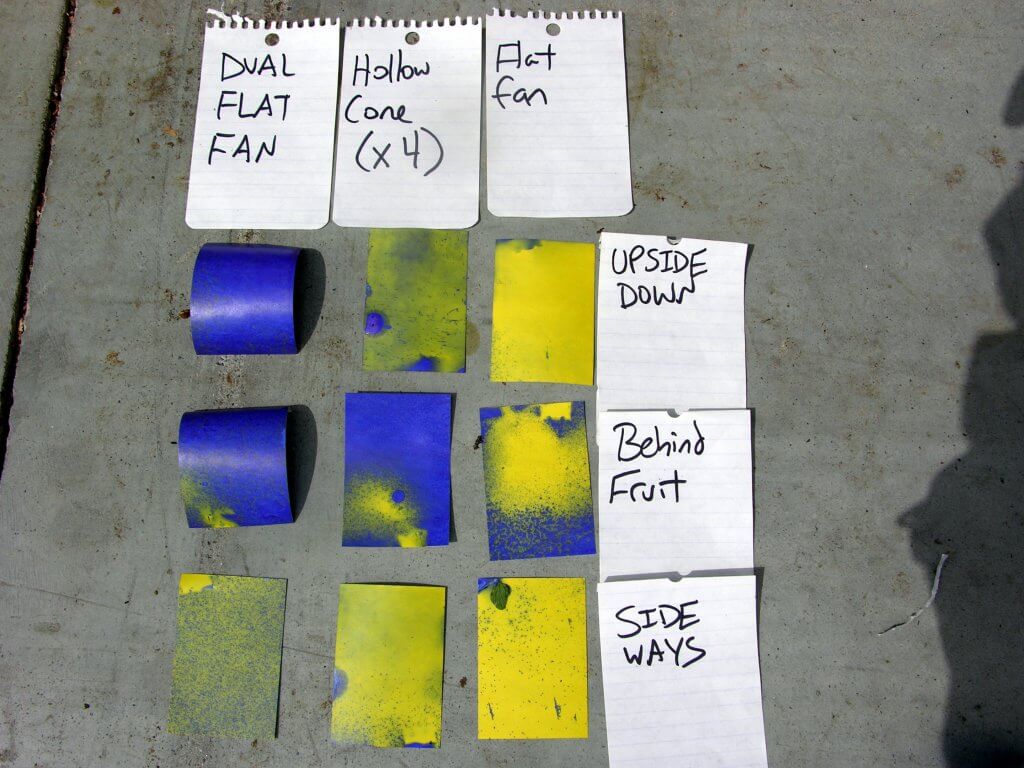
Coverage from three sets of nozzles. Papers oriented in three different ways in a tomato vine.
Hollow cone nozzles
Now, don’t look at the centre column of papers just yet (you just did, didn’t you?).
We chose to switch from the vertically-aligned flat fans to hollow cones. The concept was that the spray would be emitted from so many new angles that it would penetrate the canopy more effectively and hopefully cover more of the targets. I’ll note that we had to use extra gaskets to hold the nozzles firmly in place. The sprayer was re-nozzled, the paper targets replaced, and the sprayer sent back down the alley. Once again, the spray swath looked good to us, but when we retrieved the papers, there was almost no coverage; It was far worse than the flat fans.
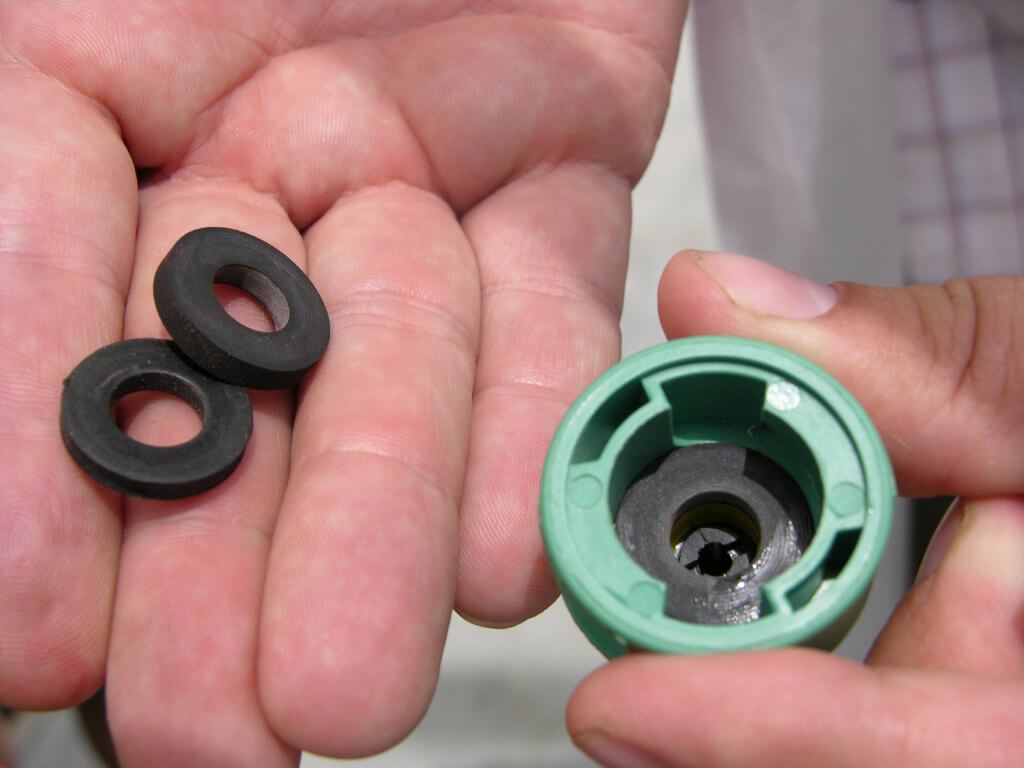
Multiple gaskets were required to hold hollow cone nozzle tightly in place.
Finer droplets have very little inertia, so perhaps the high pressure made the droplets too fine for them to move very far. To test this, we reduced the pressure to 100 psi and re-sprayed the same cards, which were simply left in place. The resultant coverage was not improved.
We left the papers in place for a third pass. This time we thought perhaps the spray was still too fine because of the nozzle itself. We replaced the hollow cones with a different set of hollow cones that produced coarser droplets and the same cards were re-sprayed. Still no practicable improvement.
We were getting desperate, now. Cards were left for a fourth pass. It has been demonstrated that a slower travel speed can improve canopy penetration in orchards, berry crops and and grapes, so perhaps the sprayer was moving too quickly? The sprayer was slowed to 50 metres per minute and the cards sprayed for a fourth time. Now look at the centre column entitled “Hollow Cone (x4)” in the figure below. This coverage is the result of four passes with hollow cones. It was disappointing.
Note: a greenhouse is a very hot and humid place. Water-sensitive paper begins to discolour quickly, so don’t leave them out for longer than you have to. That’s why the top paper is cloudy-looking.
Coverage from three sets of nozzles. Papers oriented in three different ways in a tomato vine.
Twin-fan nozzles
Finally, and only because I had them with me, we decided to try dual flat fans (in this case, TeeJet DG TwinJets). Symmetrical and asymmetrical dual fans are often used to spray vertical targets in field crops (e.g. to control fusarium in wheat heads). We oriented the nozzles so they alternated 45° left, then 45° right. We also turned off every second nozzle. The idea was to prevent the fans from physically intersecting, but still create an overlapping swath. The paper targets were replaced and the sprayer was returned to its original settings (i.e. 350 psi and 75 m/sec). We managed to twist them into that orientation by using a cap with a circular opening and additional gaskets to hold the nozzle snugly. Plus, at 350 psi, we had to get the nozzles extra tight to prevent leaks.
Nozzling a vertical boom.
The result was spectacular. Here are the results once more (below). See the left-hand column entitled “Dual Flat Fan”. The cards received so much coverage that two became drenched and curled. Even the card with the worst coverage received more than enough. I will point out that this was achieved with about 2/3 the spray volume the operator typically used to spray with flat fans.
Coverage from three sets of nozzles. Papers oriented in three different ways in a tomato vine.
And, this is where the tour and our trials ended. The operator was happy with the improved coverage and so was I. I was sure to tell them that now that more spray was hitting the target, they should explore reducing the spray volume (either via reduced pressure or lower-rate nozzles) until all the papers looked more like the one in the bottom-left. I suggested a goal of about 85 drops per square centimetre (a benchmark for good coverage) rather than the drench/run-off we were currently getting. The spray mix would continue to be the same ratio of formulated product-to-carrier, but a judicious reduction in overall volume would result in reduced pesticide costs and reduced wastage as long as coverage was never compromised.
And now, a warning…
Unfortunately, as I heard two years later from a miffed agrichemical dealer, the operator did not follow through with the volume reduction. I was told the tomatoes began to exhibit symptoms that looked like blossom end-rot but he suspected it might be chemical burn. His hypothesis was that so much spray was getting to the tomatoes that it was accumulating at the bottom of the fruit during run-off, concentrating as the spray dried, and damaging the area. We may never know what really happened.
And so, it’s important to remember that whenever you adjust or calibrate your sprayer to improve spray coverage, you should reconsider how much spray you need to accomplish your goals. If you were getting poor control before the adjustment, improved coverage might help. If your level of control was already satisfactory, and your adjustments were intended to reduce wastage, consider reducing how much spray volume you use. This is called crop-adapted spraying.
Note: If you are concerned that changes to your spray practices might cause unwanted side effects, always perform trials on small test-plots and monitor the crop closely to ensure there are no negative impacts.
Take home
Greenhouse vegetable producers should consider using water-sensitive paper to test nozzle arrangement on their high volume sprayers. From our preliminary work here, dual flat fans at alternating angles might be worth exploring in hanging tomatoes. And, because it cannot be overstated, consider making changes in small test plots first and monitor the results closely.
In the spring of 2016, the Ontario Berry Growers Association (OBGA) conducted a survey of its membership to poll how fungicides were being applied. The results were very interesting.
Fungicide basics
Generally, fungicides registered for berry crops are contact products, so coverage and timing are very important. The fungicide has to be distributed evenly on the target before disease has a chance to infect the crop. That means the sprayer operator must be aware of the susceptibility of the crop to the level of disease pressure to ensure timing is appropriate. While kickback and post-application distribution of pesticide residue is sometimes possible, sprayer operators should not rely on it. The following table outlines application recommendations for a fungicide commonly used in Ontario. It combines labelled information and provincial recommendations and is representative of most fungicides.
Summer-fruiting and Fall-bearing Raspberry / Blackberry
Highbush Blueberry
Day-neutral and June-bearing Strawberry
Labelled rate
2.5 kg/ha
2.25 kg in 1,000 L/ha
2.75-4.25 kg in 1,000 L/ha
Diseases (Labelled and Ontario provincial recommendations)
Anthracnose fruit rot, Spur blight, Leaf spot, Botrytis grey mould
Flower bud, First bloom, 7-10 days after bloom, Pre-harvest, Through to fall
As of 2016
The spray target
The applicator reading the recommendations should be considering the best way to get the fungicide to the target. But, what is the target, and what is the best way to apply it? It seems the recommendations raise as many questions as they answer:
With the possible exception of blueberry, this fungicide can be applied through much of the growing season (especially when it’s been a wet season). That means the crop staging is highly variable.
The primary target is blossoms, but depending on the disease, leaves and stems are also important.
The label states a volume of carrier (i.e. 1,000 L/ha) for strawberry and blueberry, but not the cane fruit. It does not specify highbush blueberry versus the sessile, ground cover variety.
So, this means is the sprayer operator has to spray crops with highly variable physiology (e.g. bush, cane or sessile row crops), onto very different targets (e.g. leaves, canes, stems, flowers) throughout much of the season as the crop canopies grow and fill. This is a very challenging spray application. It would be wrong to suggest a single spray quality, water volume or sprayer set-up to efficiently accomplish all these goals (more on that later). The first consideration is the application equipment itself.
The application equipment
Berry growers employ a variety of sprayers to protect berries. Without considering models or optional features, there are three fundamentally different styles: Airblast, backpack and boom. According to the survey, the following table shows which sprayers are used in which berry crop in Ontario. Approximately 60 growers responded, and many grow more than one variety of berry and use more than one style of sprayer.
Jacto airblast in raspberry
Airblast Sprayer
Backpack or Wand Sprayer
Vert. or Hor. Boom Sprayer
Total
Highbush blueberry
8
1
0
9
Day-neutral Strawberry
3
0
21
24
June-bearing Strawberry
5
0
32
37
Raspberries & Blackberries
21
1
7
29
Total
37
2
60
So, generally, cane and bush berries are sprayed using airblast sprayers and strawberries using horizontal booms. The survey didn’t specify features such as air-assist on booms, or whether or not those booms are trailed or self-propelled. The type of, and features on, any given sprayer dictate the limits of what an operator can adjust to improve coverage.
Water volume
Respondents also reported on how much carrier (i.e. water) they used to spray fungicide on their crops. Given Canada’s propensity to report volumes in many different forms, I have converted all values into the most common units: L/ha, US g/ac and the dreaded L/ac:
n
L/ha ± std (max./min.)
US g/ac ± std (max./min.)
L/ac ± std (max./min.)
Highbush Blueberries
7
534.2 ± 340.1 (1,000/150)
57.1 ± 36.4 (106.9/16)
216.2 ± 138 (404.7/60.7)
Day-neutral Strawberries
22
418.5 ± 192.2 (1,000/224.5)
44.7 ± 20.6 (106.9/24)
169.4 ± 77.8 (404.7/90.8)
June-bearing Strawberries
33
403.1 ± 235.1 (1,000/50)
43.1 ± 25.1 (106.9/5.3)
163.1 ± 95.1 (404.7/20.2)
Raspberries & Blackberries
27
450.1 ± 279.4 (1,200/50)
48.1 ± 29.9 (128.3/5.3)
182.1 ± 113.1 (485.6/20.2)
Trailed horizontal boom in strawberry
There appears to be a lot of variability in the volumes applied, but on the whole, very few are using the 1,000 l/ha indicated in the fungicide recommendations. The ~430 l/ha overall average is no surprise; labelled volumes are quite often higher than what sprayer operators use. In some cases, high label volumes are warranted because the product requires a “drench” application to totally saturate the target, or to penetrate very dense canopies. Conversely, a high label volume might reflect outdated practices if that label hasn’t kept up with current cropping methods or application technology. Sometimes label volumes are suspiciously large, round numbers that suggest they are intended to encompass a worst-case scenario (e.g. a large, unmanaged crop with high disease pressure and a less-than-accurate spray application). In the particular case of crops sprayed with an airblast sprayer, it is very difficult for a label to accurately predict an appropriate volume due to the variability in crop size, density and plant spacing. This has led to methods to interpret labels, such as crop-adapted spraying.
The disparity between label language and grower practices is not entirely the fault of the label. Most sprayer operators don’t want to carry a lot of water because more refills prolong the spray day. In situations where the crop has reached a critical disease threshold, or bad weather has compressed the spray window, sprayer operators sometimes reduce the volumes in the belief that “getting something on” trumps “good coverage”. Perhaps that’s true, but insufficient volumes greatly reduce coverage. This can be further exacerbated when operators do not account for the increase in crop size and density over the season, or the impact of hot dry weather on droplet evaporation.
Improving coverage
So, is there an ideal sprayer set up and volume? As previously alluded, the variability in crop staging, crop morphology, target location and spray equipment make a single recommendation impossible. But that doesn’t mean there aren’t diagnostic tools and a few simple rules to help a sprayer operator determine a volume to suit their particular needs. Much can be accomplished with these three things:
Water-sensitive paper
A modest selection of nozzles and a nozzle catalogue
An open-minded sprayer operator willing to spend a little time and reconsider traditional practices
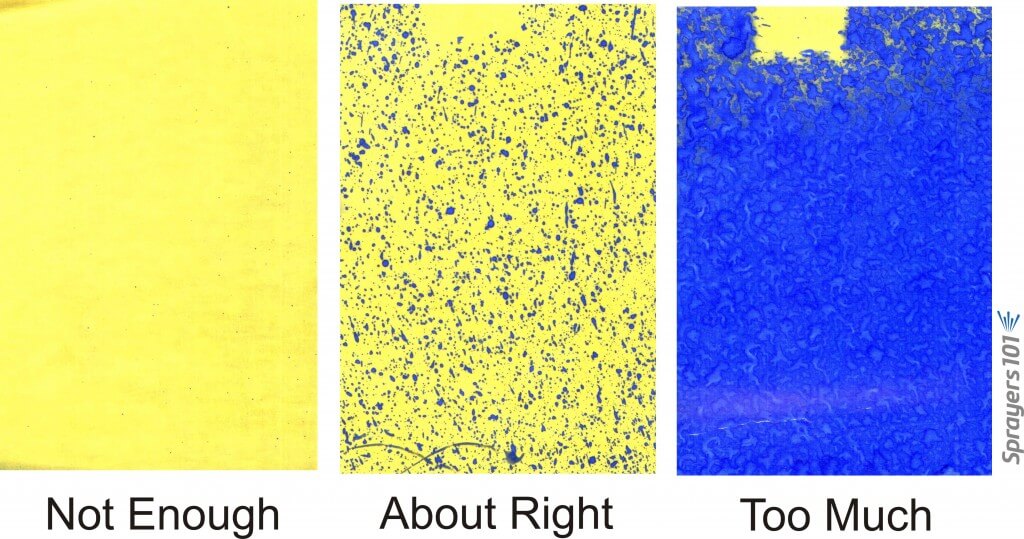
Rule-of-thumb fungicide coverage on water-sensitive paper.
Water-sensitive paper is placed in the canopy, oriented to represent the target (e.g. leaf, bloom, etc.). It is important to put multiple papers in at least three plants to ensure the coverage reflects a typical application. The paper changes colour when it’s sprayed and this provides valuable and immediate feedback. Did the spray go where it was supposed to go and did it distribute throughout the target? If so, then the operator now knows that they can safely focus on timing rather than targeting. If not, a little diagnosis is required:
1. Were targets completely drenched? If so, there is too much coverage. Operators can drive faster (if possible, and as long as it doesn’t create drift), reduce operating pressure (if possible, and as long as the nozzle is still operating in the middle of its registered range), or change nozzles to lower rates (as long as spray quality is constant).
2 .Were targets only partially covered, as if a leaf obstructed part of the target and created a shadow? This mutual-shading is the bane of spraying dense canopies. One possible solution lies in understanding droplet behaviour: Coarser sprays generally mean fewer droplets and they move in straight lines. Therefore, when they hit a target, they might splatter or run-off, but typically their journey is over. If the spray is too Coarse, a slightly Finer spray quality increases droplet counts and may help droplets navigate around obstacles and adhere to more surfaces. Sprays that are too Fine will not penetrate dense canopies without some form of air assist. They slow very quickly and tend to drift and evaporate before they get deep enough into a canopy to do any good. A Medium droplet size is a good compromise because it produces some Fines and some Coarser drops – the best of both worlds.
Increasing volumes and reconsidering spray quality often helps, but there might be other options. If using air assist, there are tests that can confirm the air volume and direction are appropriate. Another solution might lie in canopy management (where pruning bushes and canes can help spray penetration immensely). Still another might lie in the use of adjuvants to improve droplet spread on the target.
3. Were targets missed entirely, or coverage is consistent but sparse? The operator is likely not using enough water, and/or the spray quality is too fine. It has been demonstrated time and again that higher volumes improve coverage, but operators can try any of the options listed previously for partially-obstructed coverage. All the reasoning is the same.
Conclusion
Spraying fungicides effectively requires an attentive sprayer operator. Timing and product choice are very important, but when it is time to spray the sprayer operator should diagnose coverage with water-sensitive paper, and be willing to make changes to the sprayer set-up to reflect changing conditions. Thanks to the OBGA for sharing the survey data.
This article was written by Tom Wolf for “PEI Potato News Magazine”, a publication of the Prince Edward Island Potato Board (http://peipotato.org/). It is reprinted with permission.
PEI Potato News Magazine
“Should I be using low-drift nozzles?” It seems like a simple question with an obvious answer. We all want to reduce spray drift, and this easy-to-use technology is the fastest way to get there.
And yet, the question is more complicated than it first appears. Yes, all applicators want to reduce drift, but many worry about the coarse sprays produced by low-drift nozzles. As a spray volume is divided into coarser (i.e. larger) droplets, there are fewer of them, and that can reduce coverage. It’s a legitimate concern.
Let’s start with our shared value first – the desire to reduce spray drift.
Given the economic, environmental and health impacts of spray drift, the importance is hard to over-state. That’s why spray drift management is a primary concern of our federal regulators whose job is to protect the public interest. It’s also a concern for the neighbours who have a right to keep unwanted products off their property, whether it’s residential or agricultural.
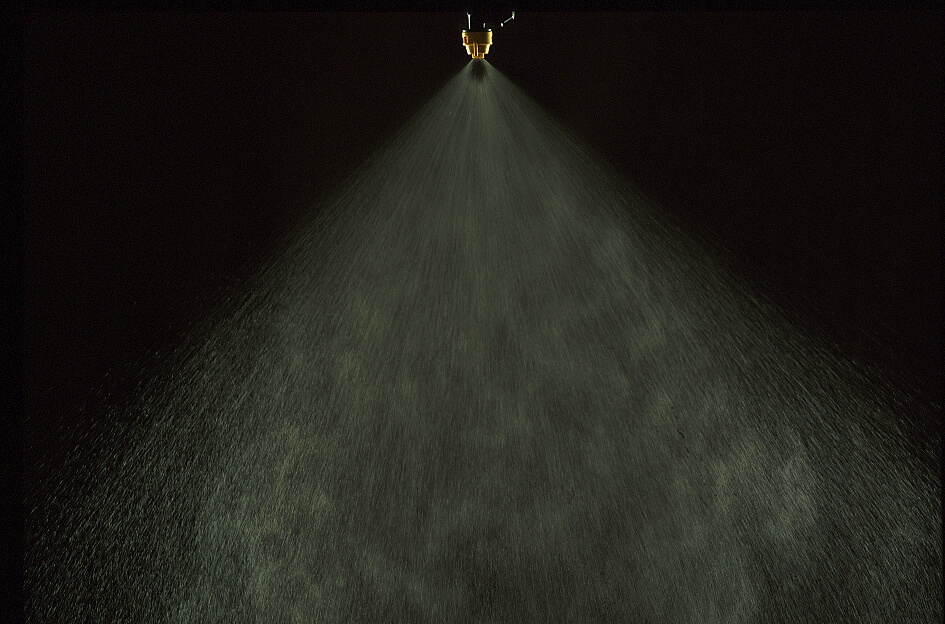
Conventional flat fan nozzles (XR8004) operating at 40 psi
Glyphosate drift with 20 km/h side wind, XR8004 40 psi
Low-drift nozzles (TD11004) operating at 60 psi
Glyphosate drift with 20 km/h side wind, TD11004 60 psi
For these reason, managing drift should be a foremost concern for applicators. The technology is vital to the crop production industry, and if we don’t take care of the issue, someone else will take care of it for us. That’s not the best path.
Of these, the most economical and practical is using coarser sprays via low-drift nozzles. Engineered to emit fewer fine droplets, they are proven to reduce drift by anywhere from 50 to 95% compared to a standard flat fan of the same size. When it comes to reducing drift, they work.
When these tips first hit the mainstream as “pre-orifice” nozzles in the late 1980s, and later as “venturi” nozzles in the mid 1990s, we were impressed with their ability to reduce drift. And the obvious question was, what about product efficacy? Can fewer, larger droplets do the job? The answer, to our initial surprise, was yes.
In the late 1990s, the crop protection industry (including governments, universities, and the private sector), participated in studies throughout Europe, Australasia, and North America looking at low-drift spray performance. In Canada alone, we conducted over 100 studies and concluded that pesticide efficacy was not harmed when a properly adjusted low-drift nozzle was used. A surprising result showed that fungicides did not seem to need finer sprays, contrary to popular opinion, as long as water volumes were sufficient to provide adequate coverage.
As we did more and more studies, it became apparent which points were critical:
When using venturi nozzles, spray pressure had to be increased from the industry standard of 40 psi to about 70 psi. This is because of a venturi nozzle’s two-stage design. The high pressure compensated for an internal pressure drop inside the nozzle. Sprays remained low-drift, but patterns and overall efficacy were better at this higher pressure.
Spray pattern of conventional spray (XR8002, 40 psi)
Spray pattern of low-drift spray (ULD12002, 60 psi)
Spray deposit of conventional spray (XR8002, 40 psi. ~10 gpa)
Spray deposit of low-drift spray (ULD12002, 60 psi, ~10 gpa)
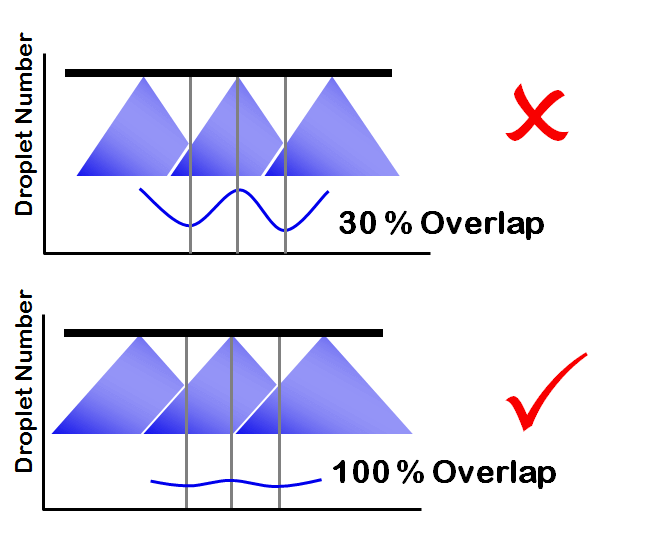
Spray pattern overlap needed to be greater with low-drift sprays – a full 100%. In other words, the edge of one nozzle’s spray pattern should reach the middle of the adjacent nozzles’ patterns. The pattern width at target height was now twice the nozzle spacing and this ensured good distribution of not only the spray volume, but droplet numbers, along the boom.
We needed to pay attention to the target plant architecture and leaf surface properties. Plants such as grasses (with vertical surfaces and difficult-to-wet leaves) often had less spray retention with coarser sprays. Low-drift nozzles worked, but we couldn’t go as coarse in these cases. Careful selection of low-drift nozzles as well as more attention paid to operating pressure solved these issues.
Our minimum water volumes had to increase slightly to compensate for the fewer drops produced by low-drift sprays. This was especially true for contact modes of action where too few droplets-per-area reduced performance. Using an Extremely Coarse spray at a very low water volume was asking for trouble.
Much of my efforts in recent years have been to advise applicators just how coarse they can safely go without harming product performance. This involves things we’ve touched on in this article, like water volumes, modes of action in the tank mix, target plant or canopy architecture, growing conditions, and the like. We’ve arrived at a few rules of thumb, like those above, but as always, it’s dangerous to oversimplify and there are always new situations to grapple with.
While we were learning how to tweak low drift nozzles to get them to perform, we also learned there were significant advantages to using coarser spray qualities.
Foremost, there was an immediate reduction in drift. One applicator told me years ago that switching to a low-drift spray removed a huge burden of worry from him, and that alone was worth it.
Low-drift sprays made it easier to spray on-time, even if weather conditions were marginal for conventional sprays. The result: the timely removal of weeds, or the correct staging of fungicides and insecticides. This has paid large dividends in terms of protected yield.
Coarser sprays can protect product performance from some adverse conditions, such as days with high evaporation rates. On such days, fine sprays evaporate to dryness so quickly that uptake can be limited. Larger drops stay liquid longer, with more uptake the result.
Directed sprays, be they banded sprays or twin fan nozzles for fungicides, make more sense from coarser nozzles. The reason is that these coarser sprays go where they’re pointed, whereas fine sprays lose their path in wind or through travel-induced deflection, very quickly.
We also learned about the air-entrainment that coarser sprays can produce. Large droplets dragged air with them, and smaller droplets could hitch a ride in their wake. This provided a form of air-assistance that reduced drift and carried small droplets into the canopy. Finer sprays had a harder time producing this type of drag, and sustaining it in the canopy.
When we analyzed the droplet size spectrum of coarse and fine sprays, we confirmed that the total number of droplets produced by any given volume of water had been reduced. Not a surprise. But two things struck us.
First, even though the average size of droplets in coarse sprays were very large, they still contained a population of small droplets. In fact, if you counted every single droplet in the spray, the vast majority were small and they were still taking care of coverage.
Second, the critical amount of coverage (measured as the percent of the surface area covered by spray deposits) that was necessary for a given product to work was lower than what we’d been aiming for. In other words, we didn’t need as much coverage as we thought we did, and any excess didn’t actually add to product performance in most cases.
We later analyzed the relationship between spray coverage and herbicide performance and found that the uniformity of the deposits was actually more important than the amount of coverage per se. So, if we focussed on proper overlap and spray pressure there was greater benefit than increased coverage alone. Deposit uniformity has become our research focus of late.
So, should you be using low-drift nozzles? By adopting the changes in pressure, overlap, and water volume outlined above, and paying more attention to the plant architecture and pesticide mode of action, we’ve been very successful in implementing low-drift sprays in all field crops. In my view, we can safely retire Fine sprays for all field crop pesticides. This means conventional flat fan nozzles, hollow cone nozzles, and the like. Get rid of them. All they do is add drift potential.
It’s safe to adopt low-drift sprays. Research and experience from the field prove that they work. Low-drift sprays should be viewed as an agronomic tool that improves application timing and accuracy. And with less drift, we show that agricultural practice can be both efficient and environmentally responsible. That’s going to be a very important story to tell, now and in the future.