This is part two of a two part article on how to optimize the match between the sprayer air and the target canopy. You can find the first part here. For a more fulsome description of the process, consult chapters 3, 9, 10, and 11 of Airblast101.
Evaluating air energy – Ribbon test part 2
Air behaviour can change radically between stationary operation and driving. We learned in part one of this article that slower travel speeds increase the throw and the spray height. The simplest way to monitor where air is going is for a partner to watch the leaves in the target canopy. Leaves that are ruffling indicate that air is reaching them.
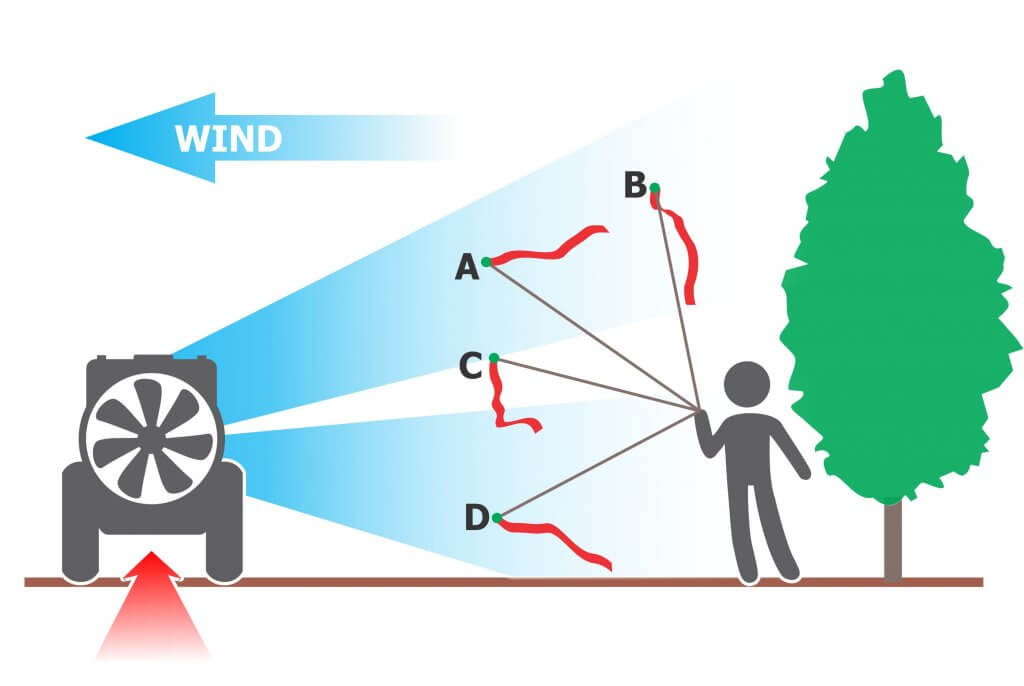
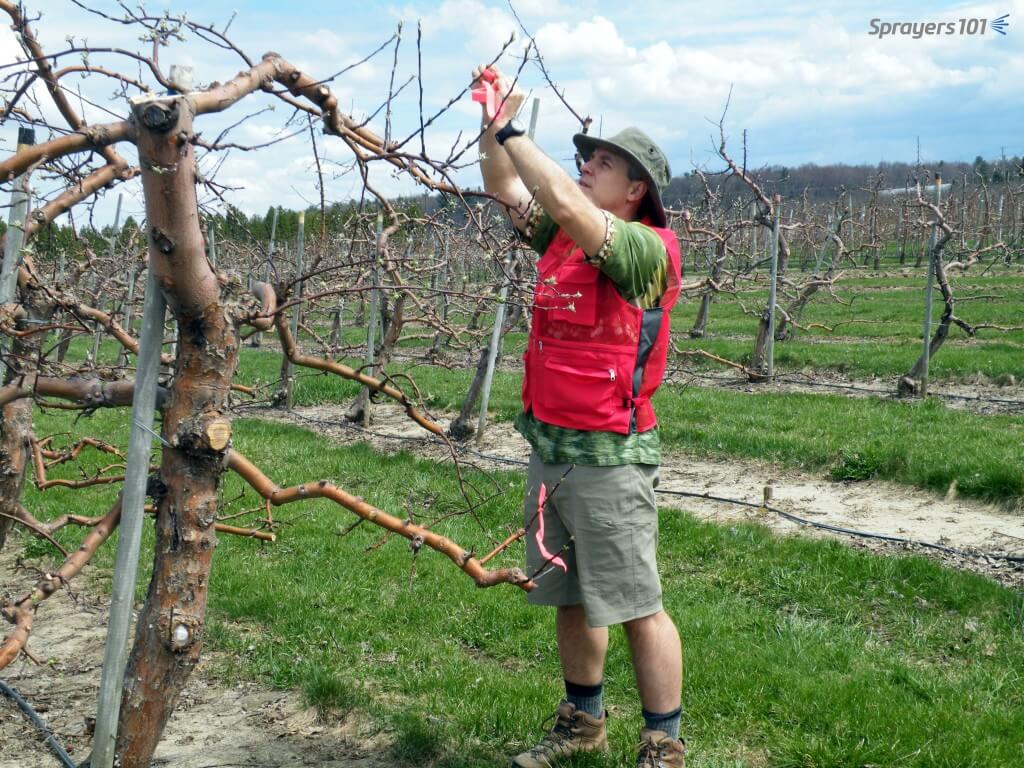
A more informative method, and one that works during dormancy, requires a length of flagging tape tied to the end of a long stick. The partner (wearing eye and ear protection) can move the ribbon around in the air wash, extending it into areas of interest. The ribbon’s behaviour will indicate gaps, the air angle and relative air energy. The ribbon can be interpreted using the following figure.
Evaluating canopy penetration – Ribbon test part 3
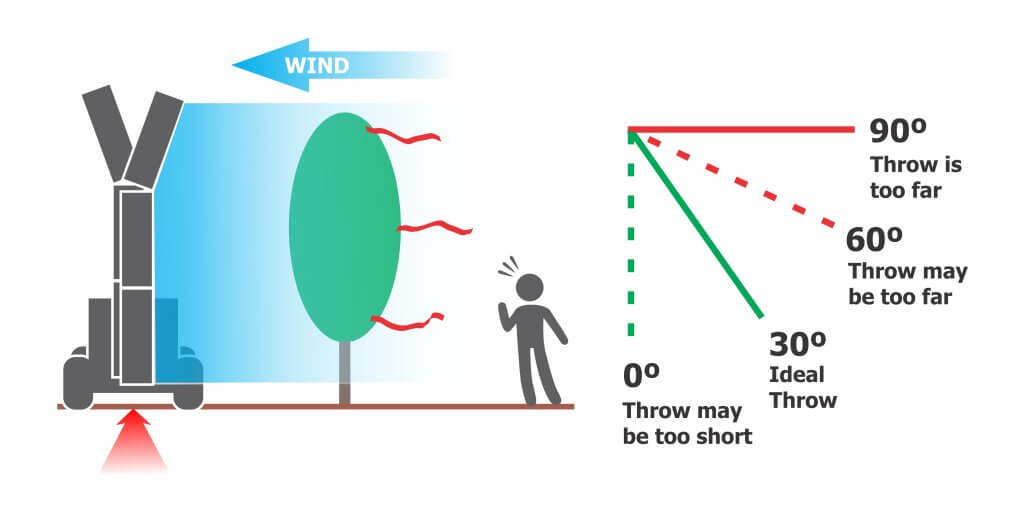
This final diagnostic accounts for the influence of any intervening canopy (or canopies for multiple-row strategies). It confirms that the air energy has the potential to carry droplets the full extent of the swath. Evaluating one side will give you a lot of insight but if you have the time it’s better to do both sides. Since most sprayers have at least some imbalance in air handling, the results may surprise you.
- Choose a canopy that is upwind and on the lift side of the sprayer (if applicable).
- Move the sprayer a distance into the row to allow it to reach target speed and to avoid wind effects on the periphery.
- Attach 25 cm (10 in.) lengths of flagging tape on the far side of the target canopy. Do this at the top, middle and bottom of the canopy. In tall canopies this might require a ladder, telescoping pole, or sections of galvanized pipe to raise the ribbons.
- With deflectors/spray outlets adjusted and the desired fan gear (or fan speed) selected, start the air without spraying and bring the sprayer up to the target travel speed. A partner wearing eye and ear protection will stand in the next alley and observe the ribbons as the sprayer passes (preferably recording a video for the operator).
Repeat this process this for EACH significantly different crop sprayed with the sprayer. As with air direction settings, multiple set-ups might be needed to reflect each block, or you might choose to group of similarly-sized blocks and calibrate air to the worst case scenario. Record the set-up for each sprayer/block combination and keep a copy in the tractor cab(s).
Interpreting the ribbon tests
Interpreting the ribbons is not always straightforward. When they don’t behave as anticipated they may be indicating one or more of the following problems:
- The air angle is incorrect.
- The air energy is too low.
- The air energy is too high.
There might be a single cause or several contributing factors. As you diagnose and attempt to correct these problems be aware that addressing one may create others. If the problem cannot be corrected, the sprayer configuration (or design) may be inappropriate for the canopy or the environmental conditions.
Ribbons that don’t point from the sprayer to the canopy may indicate a misalignment of spray outlets or deflectors. The bottom of the air should align with the bottom of the target. More critically, the top of the air should slightly overshoot the top of the target. We want to avoid spray drift, but we must account for wind speed increasing with height and vertical booms that rock on uneven alleys. If the spray does not slightly overshoot the top of the target, it may miss it entirely.
Adjusting horizontal alignment, when possible, can significantly impact sprayer performance. It can be tricky to optimize the angle because it represents the sum of several complicated interactions. Air outlets on wrap-around sprayers may be positioned too close to the target canopy to permit a ribbon test. However, you can still use the ribbon-on-a-stick technique to visualize how the air is behaving. Consider the following when positioning air outlets on either side of a canopy:
Unresponsive ribbons are often observed during a ribbon test. Depending on where the ribbon is located, this may or may not indicate a problem. Ideally, the top ribbon should always move in response to sprayer air. In larger canopies, this location represents the greatest distance sprayer air must travel and the highest wind speed it will encounter. The middle and bottom ribbons may or may not move in response to sprayer air. This is common in larger, denser canopies. To confirm this, an observer would have to stand at the trunk and watch the leaves rather than the ribbons.
Shingling and canopy distortion
When possible, do not position laminar air outlets in direct opposition. The convergence creates a high pressure zone that reduces spray penetration. Laminar flows will deflect unpredictably around this pressurized area and carry droplets back out of the canopy. Unless the canopy is narrow and sparse, turbulent air handling systems do not typically create this problem. In both cases, canopy penetration is improved when fans are staggered and/or are angled slightly forward or backward.
When too much air is vectored directly at the canopy face, it may close and compress that canopy rather than penetrate it. This is more likely when air is high energy, has a narrow air wash or is more laminar in nature. When leaves shingle, the overlap blocks spray and creates resistance to sprayer air. Air will then take the path of least resistance and either deflect around the canopy or channel through any openings. Shingling can be corrected by angling air outlets slightly forward or backward. A little goes a long way as small changes can have big effects.
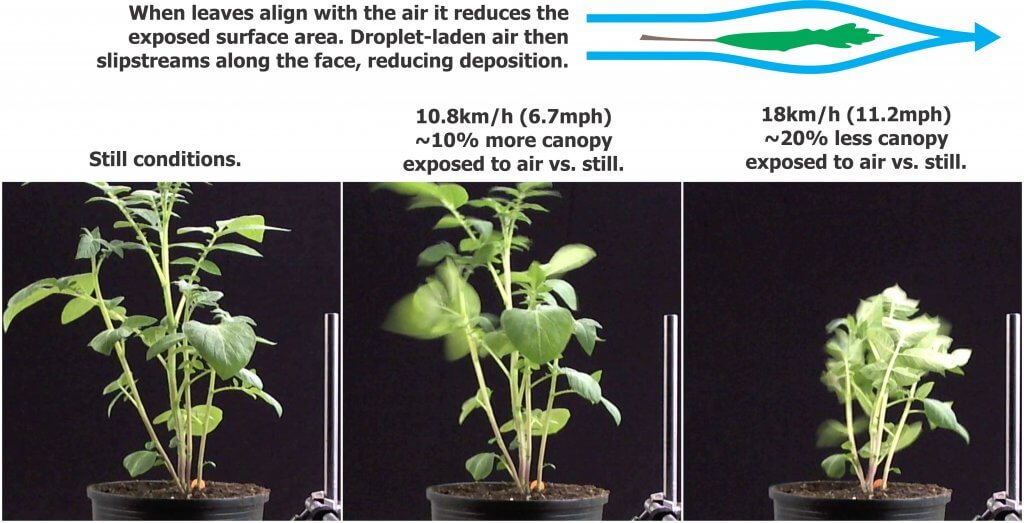
Dr. Bernard Panneton (formally with the Horticultural R&D Centre, Agriculture and Agri-Food Canada) performed a series of experiments exploring the relationship between potato canopies and wind and his observations extend to all broad leaf crops. Bernard showed that as wind speed increased, the percent of leaf surface area exposed to spray also increased, but only to a point. If the wind got too fast, the percent of leaf surface exposed to spray dropped significantly: ~20% less!
His interpretation was that low to moderate air speeds just ruffled the leaves, exposing their broad surfaces to spray more consistently. When air speed became excessive, leaves and twigs aligned with the wind, exposing only their thin edge to spray. The take home lesson is that spray will be more likely to impinge on all target surfaces when air speed and volume are calibrated correctly.
Bernard summed this article up succinctly: “More air is not better!”
Video summary
We’ll finish the article with a light-hearted video describing how the process works. It doesn’t explore the second ribbon test, but that’s more of a concern with distant targets or alternate row spraying strategies where the sprayer must penetrate one or more canopies in a single pass.