One of the pleasures of working in agricultural extension is when you’re able to help a grower solve a problem. This was one of those happy occasions. An orchardist purchased a Lipco multi-row recycling sprayer and wanted help evaluating their spray coverage.
We worked in 3.7 m (12 foot), mature, high-density Royal Gala trees. The sprayer was driving at 5.0 km/h (3.1 mph), operating at 11 bar (160 psi) using orange Albuz 80 degree air-induction flat fans. This resulted in about 350 L/ha (~37 gpa).
This grower wisely invested in the air-assist option, which produces a vertical plane of somewhat laminar air to entrain the spray and carry it into the centre of the target canopy. Whatever spray blows through the tree should impact the opposing shroud and get recycled back to the tank. All in all, how could you miss?
…we managed to.
Water sensitive papers were placed back-to-back facing each alley (in other words, facing the spray booms). Despite our best efforts, each pass resulted in inconsistent coverage. Papers were replaced in the same location and orientation for each pass and no settings were changed. Nevertheless, sometimes a paper got spray and sometimes it didn’t. What was going on? It was as if the two air streams were interfering with one another – almost cancelling each other out.
Air from tangential (cross-flow) fans oriented perpendicular to the canopy in direct opposition will cancel out. This reduces canopy penetration.
Where possible, do not position laminar air outlets in direct opposition. The convergence creates a high-pressure zone that reduces spray penetration. Some sprayers are designed to avoid this by staggering air outlets one ahead of the other. Laminar flows will deflect unpredictably around this pressurized area and carry droplets back out of the canopy. Unless the canopy is particularly narrow and sparse, turbulent air handling systems do not typically create this problem. In both cases, canopy penetration is improved when fans are staggered and/or are angled slightly forward or backward.
Grey arrows indicate direction of travel. The air outlets of wrap-around sprayers should be symmetrical when viewed from behind. A. Tangential fans in direct opposition: Poor coverage. B. Tangential fans angled forward/backward: Possible vortices and good coverage. C. Tangential fans angled backward: Good coverage, but if the angle is too steep, air will not penetrate the canopy. D. Straight-through axial fans in direct opposition: Good coverage in denser canopies. E. Straight-through axial fans angled slightly backward: Good coverage but limit the angle to prevent the trailing edge of the air wash from missing the canopy entirely. F. Straight-through axial fans angled forward: Slight angles are acceptable, but too much in this image. Wind created by travel speed subtracts from air energy. This creates a risk of reduced coverage and increased operator exposure.
We decided to turn the outer boom/shroud/fan assemblies 10˚ backward by loosening the four bolts at the top of the gantry (see below). This minor change in configuration improved spray coverage significantly. Increasing the angle beyond 10° might have caused the air wash to trail along the canopy face and would have made sprayer turns difficult at the row ends.
We loosened the four clamping screws to adjust the fan angle on the outer boom of this Lipco Recycling Tunnel sprayer.
We replaced the water sensitive papers and ran another pass. The operator later told me he could see the leaves and branches rustling in the row where we made the adjustment, but not in the unadjusted row. The result on water-sensitive paper was dramatic.
Since experiencing this in 2013, I have been told that the Lipco instruction manual advises against air in direct opposition. It was a poorly translated and somewhat obscure sentence buried in the manual, but I concede that it was there. Determine whether your sprayer produces more laminar or more turbulent air, and explore how their relative orientation impacts canopy penetration.
Why aren’t there more air-assist boom sprayers in Canada? I can understand why field croppers might hesitate to pay for the feature because it’s only been in recent years that fungicide applications have become a regular part of their annual spray program. But, high-value horticultural muck crops like onion and carrot, or field vegetables like tomato and peppers have been a great fit for many years.
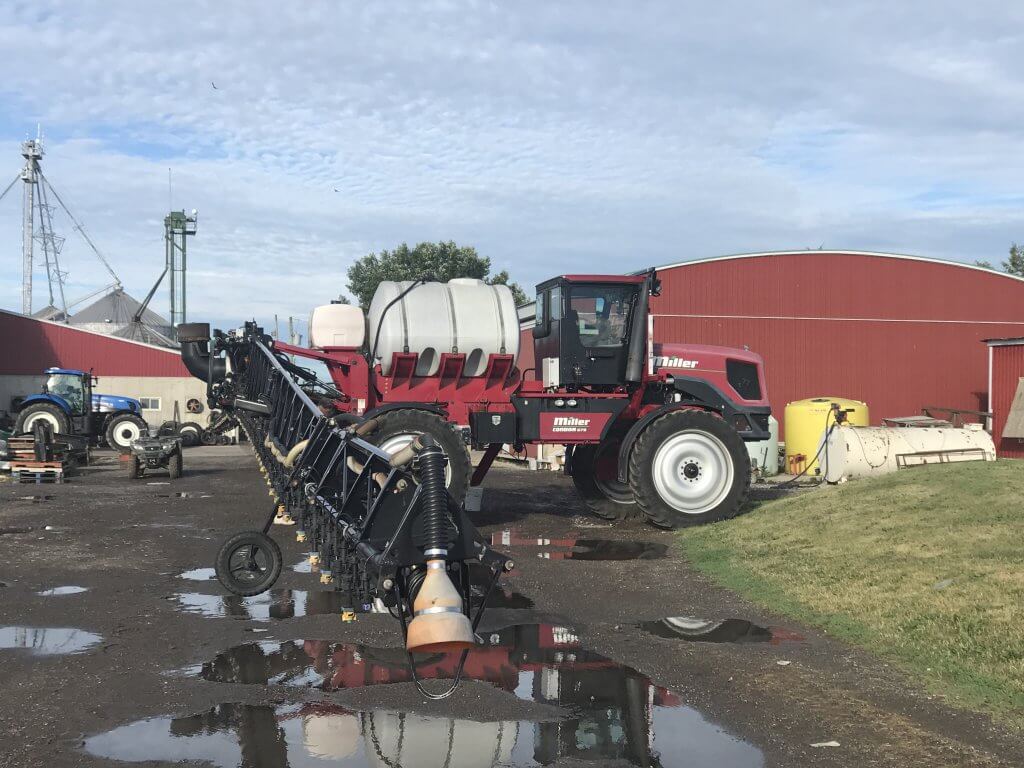
One operation near Dresden, Ontario was thinking the same way when they bought a used 2010 Miller Condor with a Spray-Air boom from Indiana. In the past, they employed a trailed Hardi sprayer applying 40 gpa using Turbo TeeJets alternating front-to-back in their field tomato and onion crops. They felt they could achieve better coverage with the air assist feature.
On June 19 the onion and tomato canopies were still too sparse to be a good testing ground (and the ground was very wet). So, we decided to run coverage trials in a stand of 3 foot high corn on 30 inch centres.
The Spray Air boom features a series of air shear nozzles on 10 inch centres. A liquid feed line meters spray mix to the orifice, where high-volume air is directed at the flow via two Cross-Flow jets. This shreds the liquid into spray and shapes a 60 inch flat fan pattern. The operator can select from a range of air speed/volume settings that affect spray quality (lower air means Coarser and fewer droplets and a smaller fan angle).
This particular boom also carried a set of hydraulic nozzles, so the operator could elect to turn off the Spray Air feature and employ a conventional application. This would be appropriate if applying a herbicide using air induction nozzles. In this case, the sprayer was equipped with TeeJet FullJet cones.
The first thing we noticed was that the air was not distributed evenly across the boom. We inspected the baffles that join each boom section, but found no problem.
We then suspected the Spray Air combination nozzles might be occluded with debris (it did come all the way from Indiana). This turned out to be the case, so we popped them out and cleared the Cross Flow jets of any obstructions.
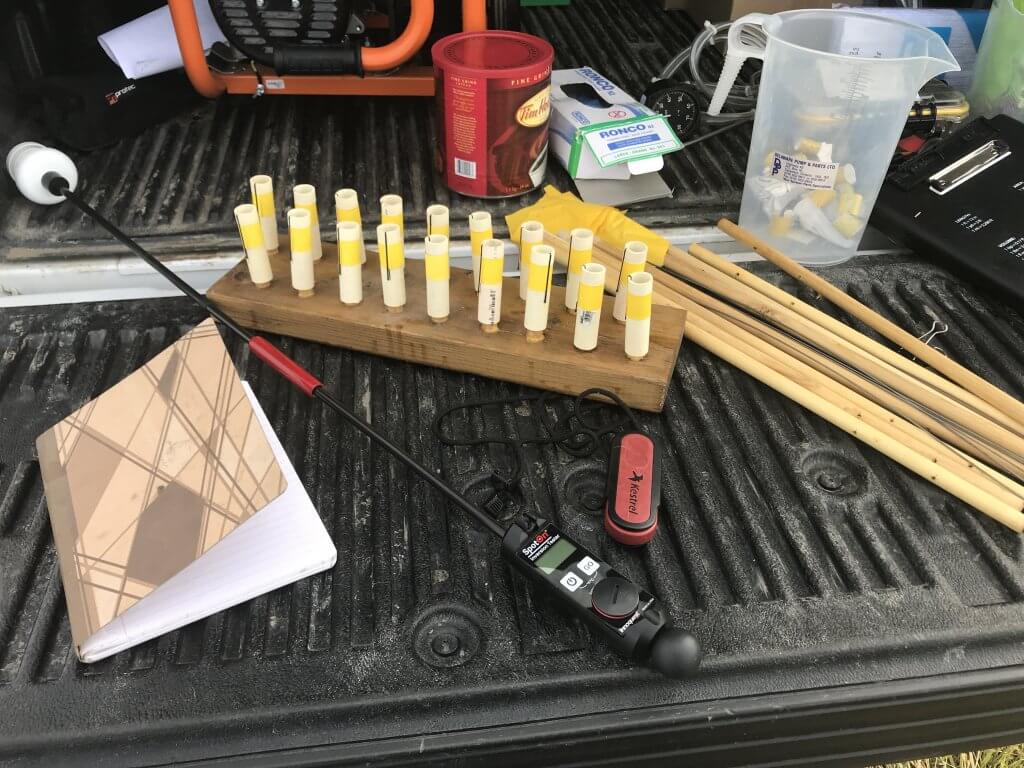
We then measured the air speed produced by the boom. A Pitot meter proved to be too finicky to get a consistent reading, so we used a Kestrel wind meter held 12 inches from the nozzle. The operator moved between the six air settings in the cab, producing the following air speeds. Note that these speeds were much slower than the 100+ mph (160+ km/h) speeds noted in the Miller brochure. The owner has since told me that they found a number of air leaks in the boom that they have been diligently repairing, and as a result he’s operating at a lower air setting.
Air Setting
Approximate Airspeed at 12”
1
4 mph (6.5 km/h)
2
6.5 mph (10.5 km/h)
3
8.5 mph (13.5 km/h)
4
12.5 mph (20 km/h)
5
15.5 mph (25 km/h)
6
17.5 mph (28 km/h)
We used water-sensitive paper wrapped around dowels to illustrate potential spray coverage.
They were placed perpendicular to the spray at three depths in the corn canopy: High, Middle and Bottom. This provided an indication of panoramic coverage and represents a very difficult-to-wet target. In the last two trials, we also added a horizontal target at the Middle (not shown) and Bottom position to illustrate overall canopy penetration, and two at the High condition, angled at 45º into the sprayer’s path and 45º away from the sprayer’s path. These gave an indication of the highest potential coverage available to the canopy. Papers were later unfurled and digitally scanned. The papers were analyzed using DepositScan to determine the total percent coverage, and the droplet density.
Trials took place between 8:30 and 11:00. Temperature slowly climbed from 20ºC to 23ºC (~ 70ºF). Relative humidity dropped from 69% to 60%. With the exception of Trial 1, we sprayed in a tail wind of 7.5 mph (12 km/h) gusting up to 10 mph (16 km/h). Travel speed was 7 mph (11 km/h).
In the first five trials we made single, progressive adjustments to the spray settings that we assumed would improve coverage. Finally, we compared what we felt were optimal settings with the Spray Air (Trial 5) to optimal settings for the conventional hydraulic nozzles (Trial 6). Details are as follows:
Trial
Air setting
Spray Volume (gpa)
Boom Height (inches)
1
2
14
20
2
3.5
14
20
3
6
14
20
4
6
14
6
5
6
20
6
6
No Air – Fullcones
20
6
You can watch the passes in the following video. Note the boom height and the trailing spray.
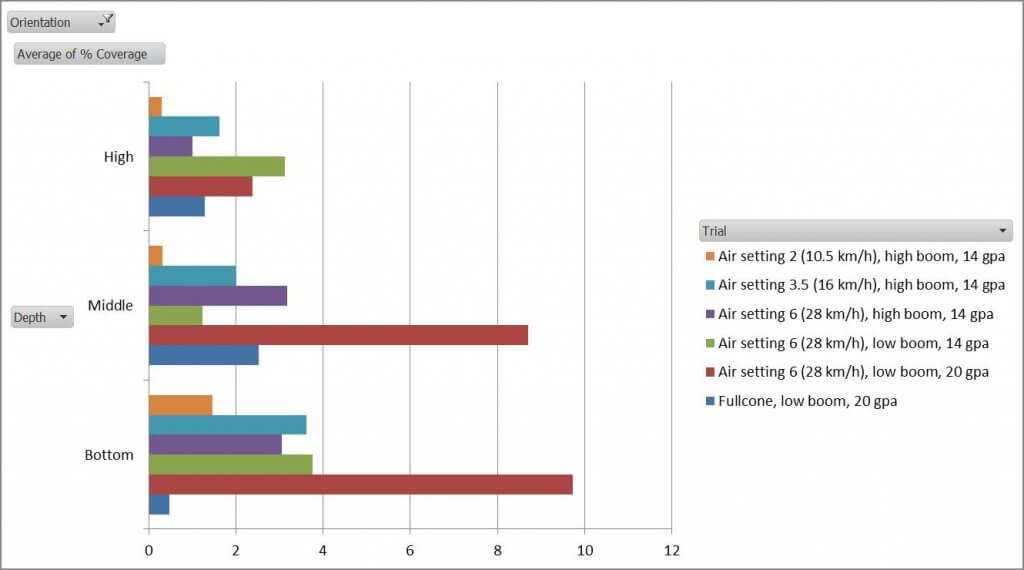
The following two graphs show the coverage obtained in the High, Middle and Bottom positions for all six trials. The first graph is percent coverage, and the second is droplet density.
In trial 1 the air was insufficient to properly atomize the spray mix (as seen in the video) and this is evident in both graphs. By increasing the air in trials 2 and 3, we see that coverage increases in the High and Middle positions, but declines a little in the Bottom position. When we lower the boom closer to the canopy in Trial 4, we see increased coverage again in the High and Bottom positions, but lose ground in the Middle. We then increase our water volume for exceptional gains in the Middle and Bottom position, but at the expense of the High. Throughout these changes, overall coverage trended up. Finally, when we turn off the Spray Air system, and switch to the Fullcones, which were set to spray the same volume via the rate controller, there is a drastic reduction in coverage in all positions.
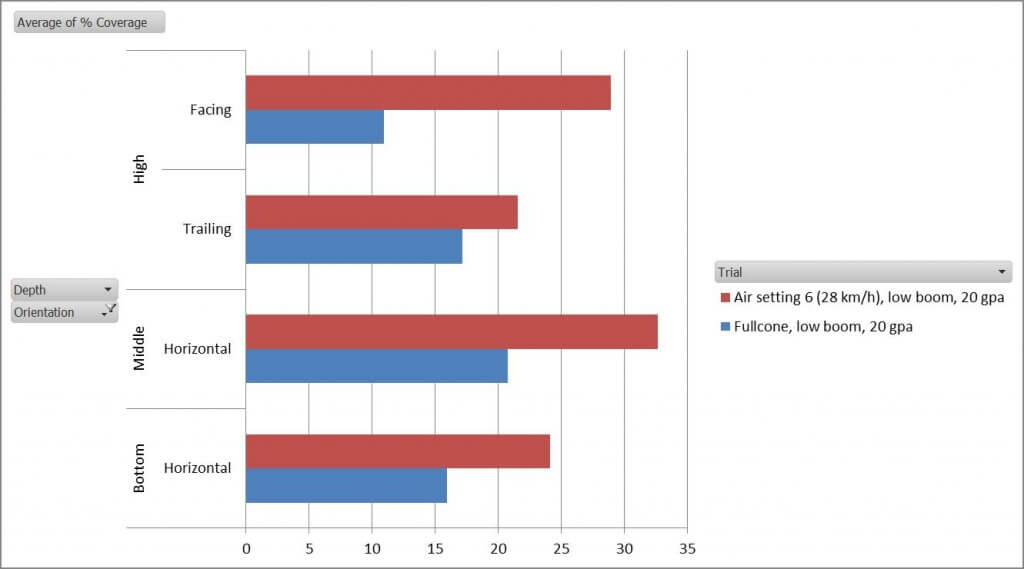
Let’s look at the additional papers placed for Trials 5 and 6 in the following graphs.
Even when papers were oriented to intercept the spray as much as possible, The Spray Air system provided superior coverage compared to the hydraulic nozzle.
This leads us to conclude that there is an advantage to air assist in overall coverage and canopy penetration. Further, it demonstrates that such a system requires careful calibration to ensure it is being used optimally. Water volume, air settings and travel speed should all be reconsidered when the environmental conditions change (e.g. temperature and wind) and when spraying different crops, at different stages of growth.
Two weeks after this trial, the corn grew too high for the Miller boom, but the grower moved into his onion and tomato and was very pleased with the overall coverage the Spray Air was providing. He’d also replaced the fullcones with 110 degree AI flat fans for herbicide spraying.
Are you considering shelling out for a tower extension for your airblast sprayer? Spray towers are an excellent investment, but they warrant special consideration. Towers move the air and nozzles closer to the target compared to the curved booms on a conventional airblast sprayer. When the distance-to-target is reduced, the odds of droplets reaching the target are improved. That means less pesticide drift and more deposit in the plant canopy.
Be Aware: Nozzles need a minimal distance from the target to create an optimal spray pattern, so do not get too close.
Many growers report savings when switching from conventional airblast to towers. The towers are more efficient at depositing the spray, so they have to reduce their typical sprayer volumes to prevent run-off. We worked with one apple grower that switched from a conventional sprayer to one with a tower. His lake-side orchard was plagued by wind, and his conventional sprayer had a relatively small fan diameter (~2 feet) that couldn’t compete. Traditionally, the grower used higher spray volumes to compensate. His new tower sprayer had a larger fan (~3 foot diameter) but perhaps equally import was that the tower reduced the distance-to-target. As a result, he was able to reduce his spray output by more than 200 L/ha while improving his overall coverage! That represented considerable cost savings and reduced environmental impact.
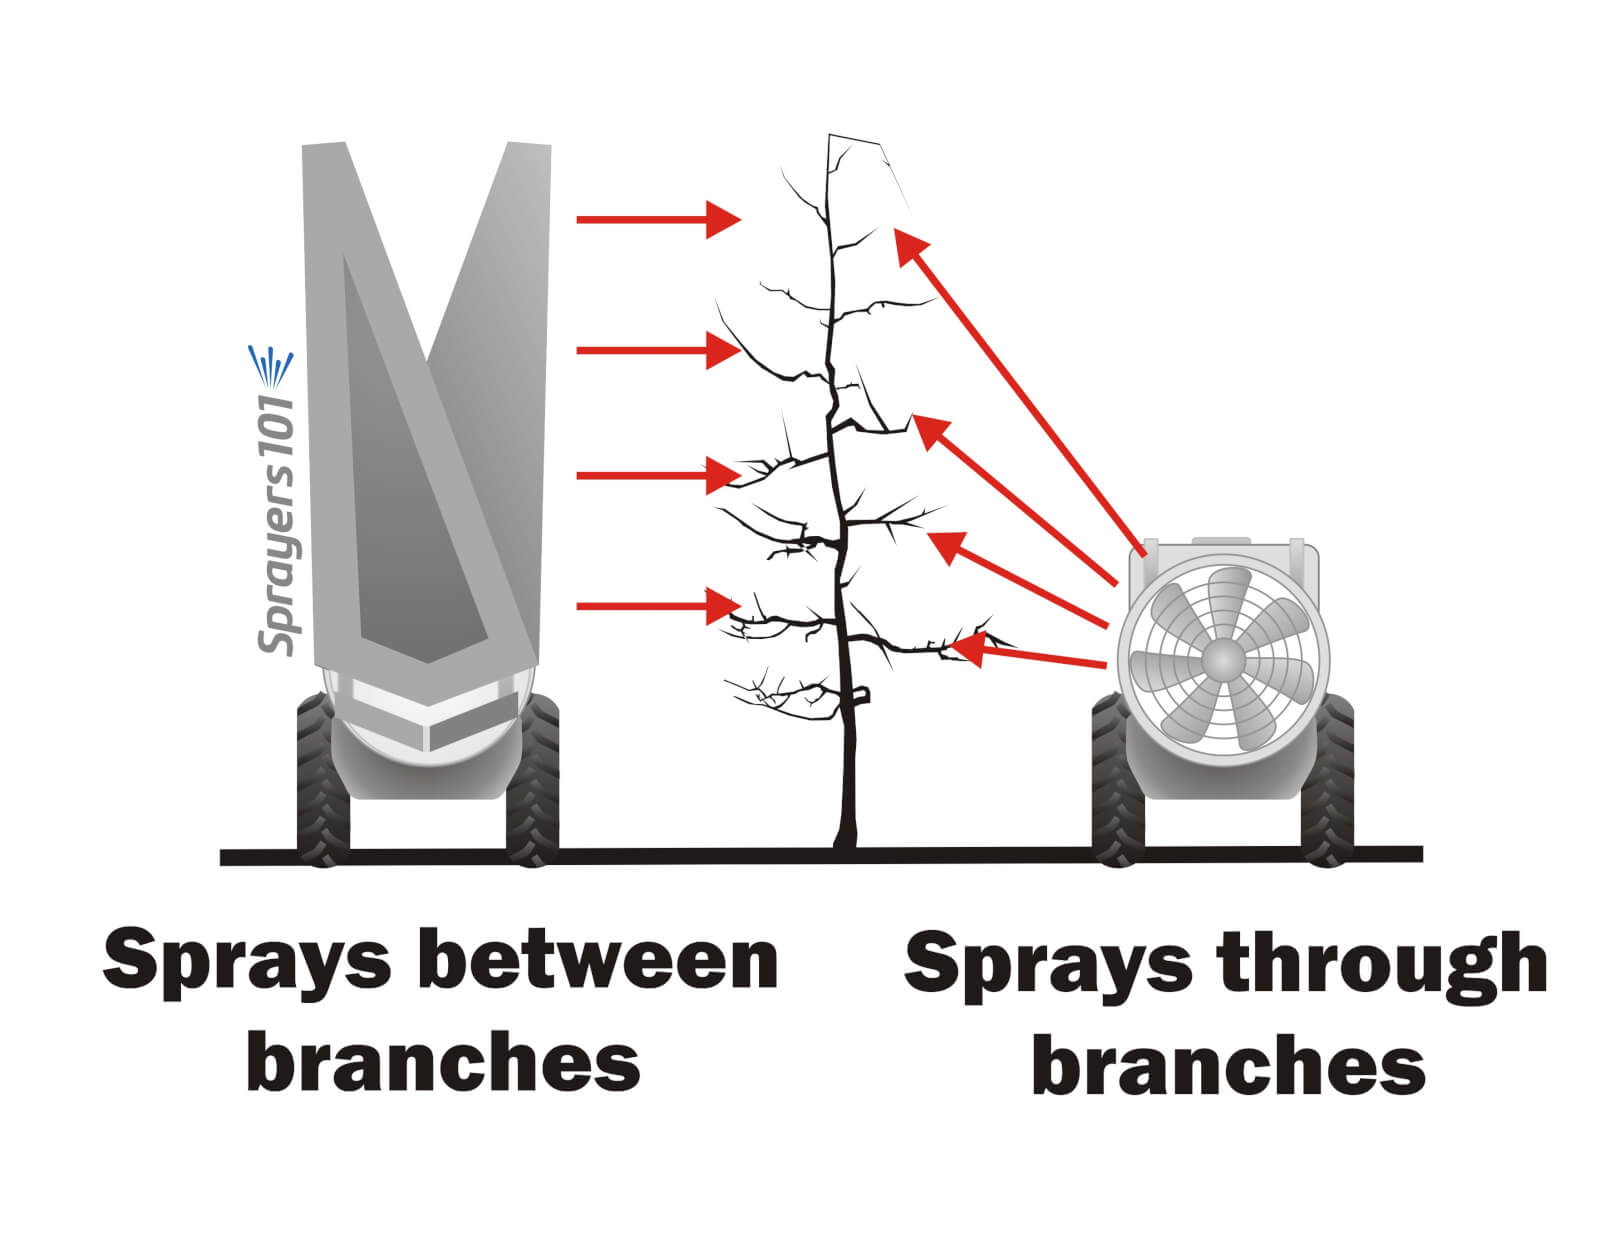
Towers may provide better coverage than conventional sprayers in orchards with horizontal scaffolding. The tower sprays between branches, penetrating more easily, while the conventional sprayer has to spray through them. Concept from K. Blagborne, British Columbia.
While there are many benefits associated with towers, they are not suitable for all situations:
Towers must be taller than the highest target (e.g. treetop)
Towers should be used on level ground. Towers will roll on the vertical axis (i.e. tip left and right) on uneven ground, potentially missing or over-shooting targets
Towers must be able to clear netting, trellises, or an overhanging canopy.
The perils of towers on uneven ground. For towers to be effective, the tower must be at least as tall as the target. When the target is only slightly higher than the tower, some sprayer operators install an additional nozzle body on the top deflector plate to extend the reach.A home-grown airblast sprayer with tower. PVC ducts, sheets of plastic, a squirrel cage blower and grower ingenuity. While it looks suspect, and difficult to clean, it reputedly works very well in highbush blueberries.
Occasionally, we have discovered areas along tower outlets where there is reduced air flow. You can usually feel these “dead zones” with your hand (beware flying debris), but it’s better to observe short ribbons attached to the nozzle bodies as described in our articles about adjusting air direction and speed/volume. In low fan gear, watch to see if any ribbons flag or appear slack from a lack of air, you can “borrow” air by re-positioning neighbouring deflectors. If that’s not possible, try replacing the conventional nozzles in the dead zone with air induction nozzles; coverage should improve in that zone because pressure propels coarser droplets further than finer droplets. We’ve seen significant improvements using this technique in high density orchards.
In the end, if a tower will fit in our operation, we suggest it’s a worthwhile investment that will make coverage more consistent, reduce off-target drift and possibly reduce the volume of spray needed per hectare.
Towers come in many shapes and sizes. Orchards aren’t the only good fit for towers; grapes, bushes and canes can also benefit from small towers.
In this, the season three finale of Exploding Sprayer Myths, we join Jason and the Tom-inator as they “tackle” airblast air settings. There are a whole suite of articles dedicated to this topic, linked below the video. It is, arguably, the most important adjustment you can make to an airblast sprayer.
Will there be more Exploding Spray Myths episodes? In the words of a great man: “We’ll be back.”
Special thanks to Don Murdoch and the Simcoe Research Station.
Orchardists, nurserymen and hop growers share something in common – they want to get spray to the top of a tall plant canopy with as little waste as possible. The tops of trees, for example, are a primary site of infection as they filter spores from the air, so fungicide coverage is critical. Spraying the tops of high canopies (e.g. too high for over-the-row style sprayers) can be a difficult proposition.
Here are a few considerations:
Wind moving through a planting, as a general rule, is twice as fast at the top of a canopy as it is at the ground. Wind carries spray off target.
The further the distance a droplet travels, the smaller it gets as it evaporates and the less momentum it has. The likelihood of it hitting the target is greatly reduced.
The top of a canopy typically has far less plant material than the rest of the canopy. Relatively speaking, there’s not much there to hit.
In order to overcome these challenges, the traditional axial orchard sprayer is nozzled with a larger proportion of spray distributed at the top of the boom. The idea is to increase the odds of some spray making it to the top of the canopy. Often, full-cone nozzles are used to accomplish this. Of course, if an estimated 10% of the spray actually impinges on the top of the canopy, the rest goes… well, somewhere else. This shotgun approach is hardly an efficient use of chemical.
Another strategy is to crank the PTO rpm’s up to 540, throw the fan in high gear and blow the spray as high as possible. The problem is, by increasing air speed and volume to carry spray to the top, the rest of the canopy (far closer to the sprayer) gets overblown and spray shoots right through. Some overspray might hit the next row, but most ends up on the alley floor. If you doubt it, consider how white your pant-legs get when you walk an orchard after spraying kaolin clay.
Others, mistakenly, might elect to raise the operating pressure to >150 psi in the hope that pressure will drive the droplets in a straight line at higher speeds. Most airblast sprayers using hollow cone patterns create very fine spray quality, even at 100 psi. Raising pressure means the droplets get even smaller, and tiny droplets have very little momentum. Increasing pressure just makes the problem worse.
Here’s what we propose.
Deflectors
If using an axial sprayer, employ air deflectors at the top of the air outlet to channel air (and spray) more effectively. The commercially-available deflectors are often just flat sheets, and air hits the surface and spills over all edges. Image pouring water onto a dinner plate – it just splashes over any which way. Better to replace those deflectors with a set that feature side-walls to channel the air. Anyone with access to a break and some sheet metal can make their own, but ensure they do not stick out beyond the wheel of the sprayer or they could snag plants and trellises. Always aim to overshoot the canopy top by a small factor to compensate for unexpected gusts of wind – better to overshoot a bit than to miss.
Commercial deflectors may or may not have channeling side walls. Inset: Homemade deflectors can do a great job.The original Munckhof deflectors were reversed, and a larger set of extensions were fabricated and attached.
Towers
Better than deflectors, some sprayers move the air and nozzles closer to the target via ducted tower assemblies. They work very well, but they must be as tall as the target you intend to spray. Even then, an uneven alley can cause them to rock and you might still miss some upper targets. Operators using adjustable towers or ducts might angle them back to aim the air (and spray) on a slight upward angle rather than parallel to the ground, and that can compensate for a slight height difference, but it begins to defeat the purpose.
Nozzle body on upper tower deflectors. Still some air assist and a good idea, but use air induction nozzles.
Extra Nozzle Bodies
Some creative operators have attached additional nozzle bodies to the tower’s top deflector plate to aim it up in the top of the canopy. Still others have extended the wet boom itself higher than the tower. Unfortunately, although the nozzle is closer to the target (good) the benefit of air assist has been greatly reduced (bad). Air induction nozzles might help on boom extensions, per below.
Wet booms can be extended to reach high canopies, but may no longer benefit from air assist. Consider using air induction nozzles in these positions.
Air Induction Nozzles
Consider using air induction nozzles in the top two positions of each boom (totaling four per sprayer), with or without towers. There are three advantages:
Coarser droplets have more mass. They move in straight lines and are less likely to be deflected by wind before they reach the target.
Coarser droplets can be propelled by pressure, so unlike finer droplets they rely less on being carried by sprayer air.
Coarser droplets that miss the target do not continue upwards; they fall back out of the air into the orchard, reducing off-target drift potential.
No matter which strategy, or combination of strategies, you use to hit the top of the canopy, always confirm coverage using water-sensitive paper. Further, recognize that it’s very difficult to compete with high winds, so know when to wait it out.
Controlling your spray at the top of the canopy means better coverage and less waste. Plus, people won’t see this (wait until the ~50 second mark).