Tag: chart

  • What’s my Spray Quality, in 3 Simple Steps

    What’s my Spray Quality, in 3 Simple Steps

    The introduction of dicamba and 2,4-D tolerance traits in corn and soybeans was accompanied by an unprecedented emphasis on spray drift management by the registrants. Product label statements for 2,4-D choline and the new formulations of dicamba emphasize spray drift control to a greater degree than previous products.

    Spray Quality Table

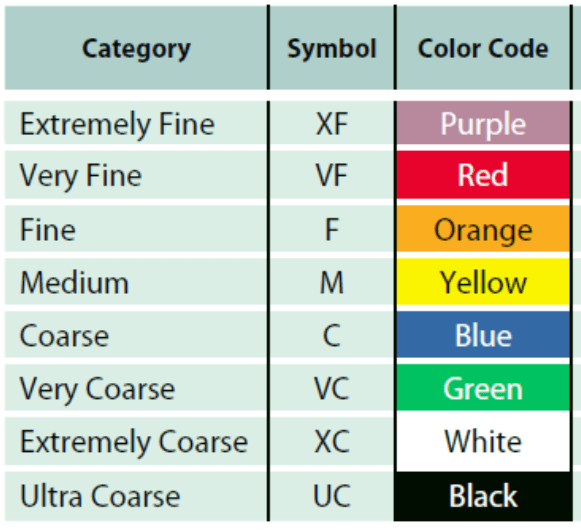
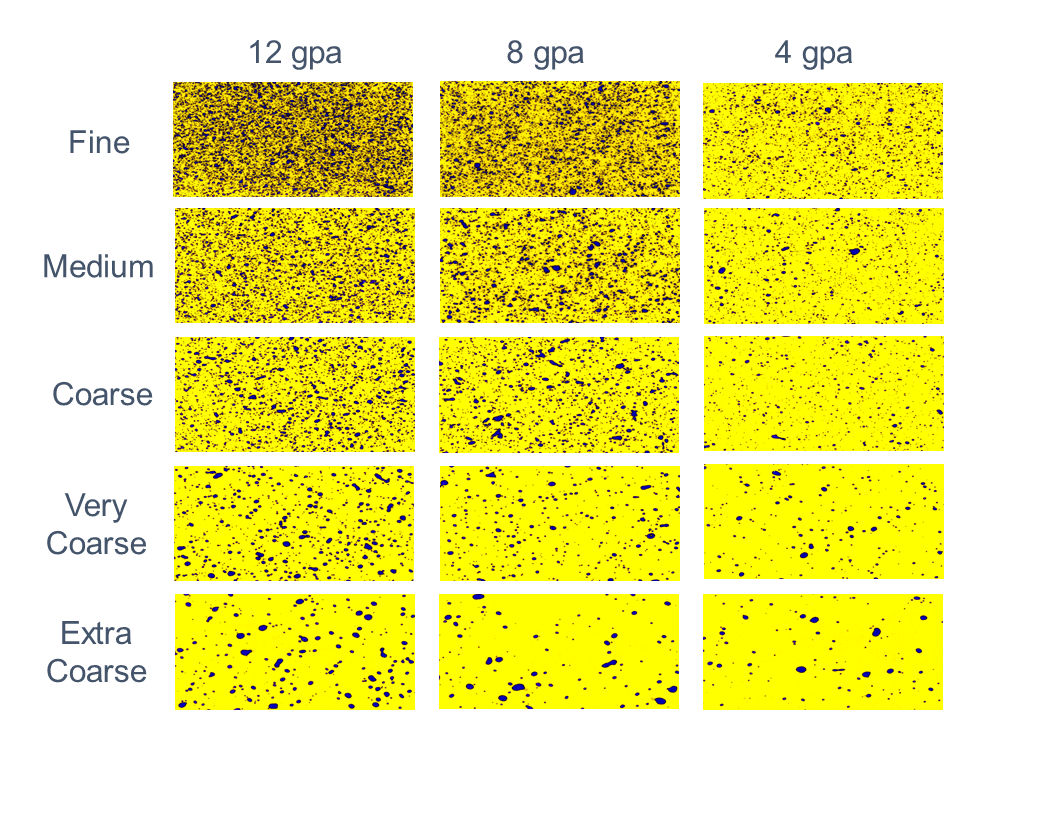
    In Canada, labels make prominent reference to the appropriate “spray quality”, a term referring to an internationally standardized droplet size classification (ASABE S572.2). In this standard, the droplet size spectrum produced by a nozzle is communicated using terms such as “Medium”, “Coarse”, “Very Coarse” etc., and used to describe the potential for spray coverage and spray drift. Spray qualities are colour coded for easy recognition.

    An example of this label language is shown for Enlist Duo below:

    “Droplet Size: Apply as a coarse to extremely coarse spray (ASABE S572 Standard). Use drift reducing nozzle tips in accordance with manufacturer directions that produce a droplet classification of coarse to extremely coarse to significantly reduce the potential for drift.”

    Although spray qualities are voluntarily measured and published by most nozzle manufacturers, their appearance on the label makes their use a legal requirement. This is because the Pest Management Regulatory Agency (PMRA) conducts a risk assessment which assumes, in this case, that a Coarse spray quality supports certain calculated buffer zones (15 m in this case) to protect sensitive ecosystems from Enlist Duo damage.

    The use of coarser sprays can be used to reduce this buffer zone somewhat, in accordance with an on-line “Site-Specific Buffer Zone Calculator” published by the PMRA.

    The challenge for applicators will be to determine the spray quality of their current application method. Here’s a relatively simple three-step process to find out.

    Step 1: Identify the nozzles currently on the sprayer.

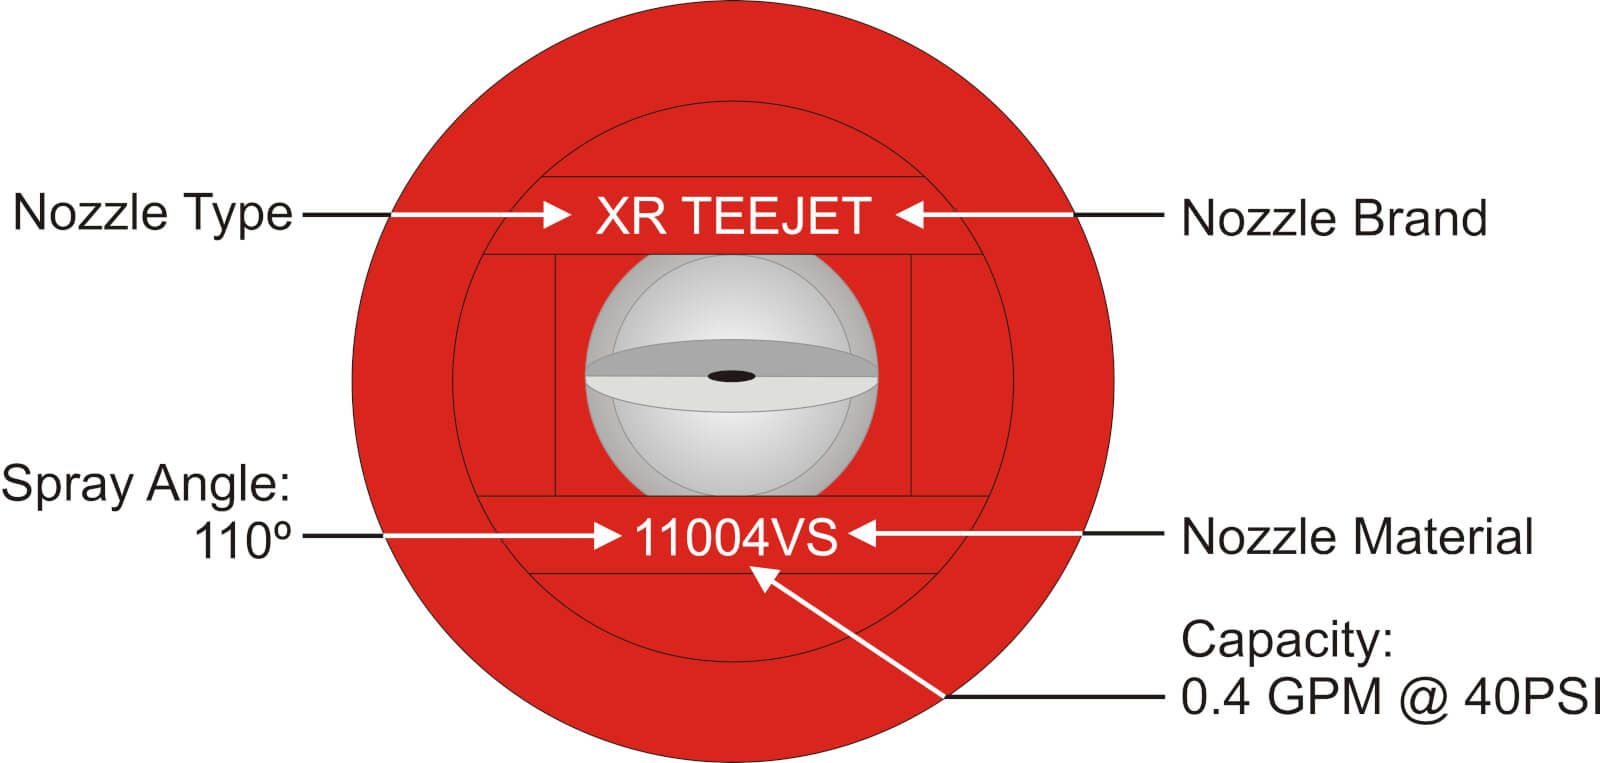
    It seems basic, but it’s surprising how many applicators can not name their spray nozzle.  If unsure, closely inspect the nozzle, looking for the manufacturer’s name, the nozzle model, and its flow rate. Most nozzles will have this information printed right on them. Here are pictures of the most common nozzles. Can’t find the info? Have a look at this article for websites with pictures.

    Major manufacturers include Hypro (John Deere via private label), Agrotop (marketed by Greenleaf in North America), Hardi, Lechler, TeeJet, Wilger, and Billericay Farm Systems (Air Bubble Jet). Manufacturers produce many models, but most are easily identified by a series of letters and numbers. For example, all nozzles will be offered in several fan angles (80º and 110º are most common), and flow rates (in US gpm).

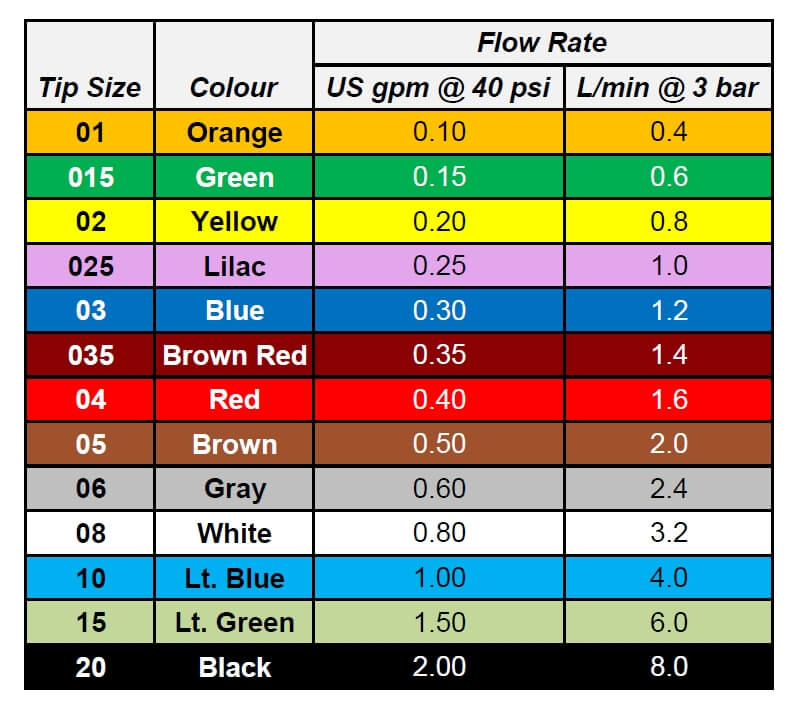
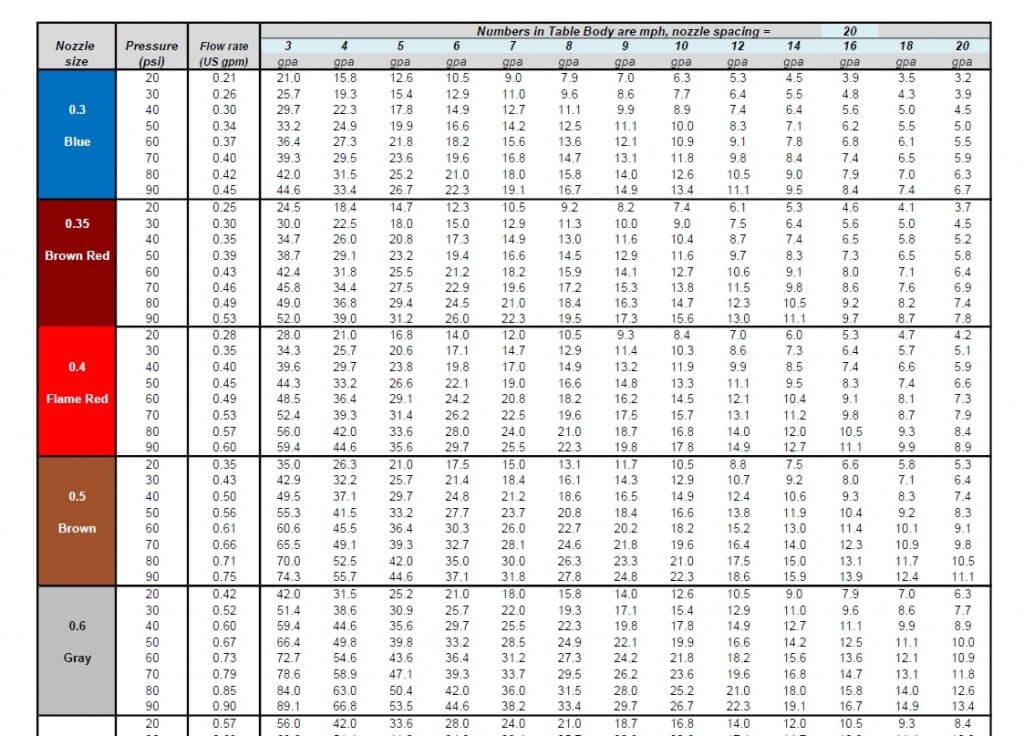
    To be more helpful, flow rates are colour coded according to an international standard. This table shows the colours and lists flow in US units in (gpm at 40 psi) and metric (L/min at 3 bar).

    The combination of series of letters or numbers shown on nozzles follows a relatively consistent pattern: Fan angle and flow rate arranged as 11003 or 03-110. In this case, the nozzle produces a 110 degree fan and has a flow rate of 0.3 US gpm. The use of US gpm at 40 psi to designate flow rate is an international standard.

    The nozzle model is frequently inserted into this stamp, and is manufacturer specific. For example, TeeJet may include “AIXR” in its stamp, and Agrotop may include “TDXL”. Hardi’s MiniDrift is abbreviated MD. Some nozzles may not list their fan angle. Others (Air Bubble Jet) are blank, creating a mystic aura of superiority.  Others leave the information printed on the nozzle cap.

    A bit of experience is very helpful, especially with John Deere nozzles, where the nomenclature inexplicably eliminates the first digit of the 110 or 120 degree fan angle. So the JD 11004 is labelled “1004”.  That’s a bit like saying “my truck sas a 50 engine”, when you mean it has a 350. How’s a city person supposed to know you don’t mean the trusty old 250 straight 6?

    Hypro SprayIT app screenshot

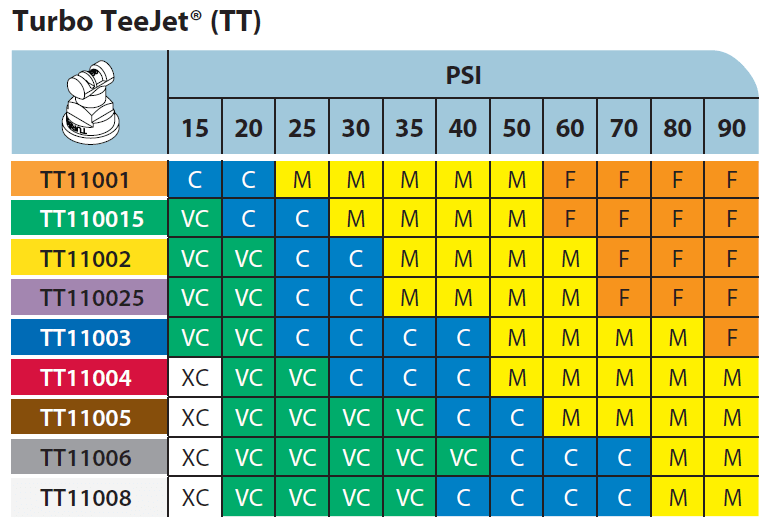
    Step 2: Obtain spray quality information on the nozzle.

    Most manufacturers publish the recommended pressure range and the spray quality of their nozzles. This information can be found in their product catalogues, or on their websites, or in smartphone apps.

    Although the designation of Spray Quality is governed by an international standard that is designed to standardize droplet sizing among various labs, we do see some variation in results.  Part of this is due to the continued evolution of the standard, requiring manufacturers to re-do some tests, or at least re-analyze their data. For example, ASABE S572.3 was released in conjunction with ISO25358 which changed the boundaries for the coarser sprays. These changes are beginning to be seen in the newer catalogues.

    Turbo TeeJet Spray Quality

    Another problem is that testing is done with plain water.  It is well known that the use of certain formulations or adjuvants can affect spray quality.  Currently, the standard does not address these effects, and data should be used with some caution.

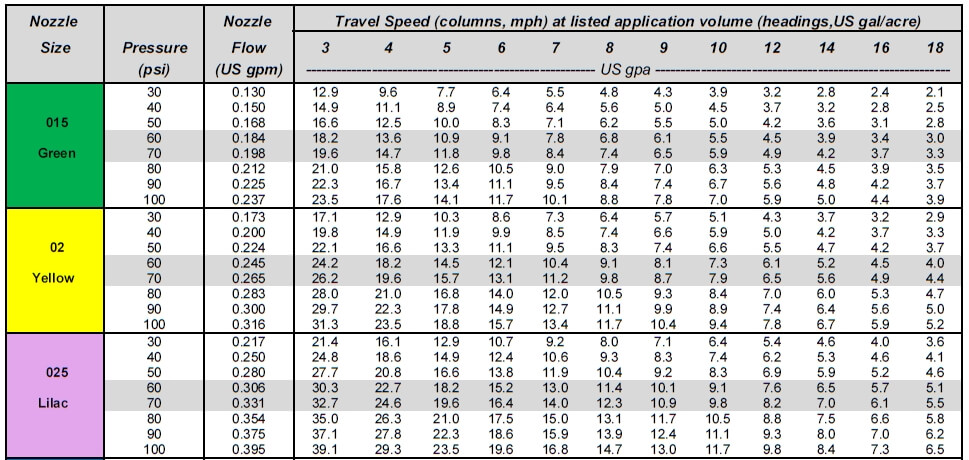
    Step 3: Identify the expected pressure for a given travel speed and water volume.

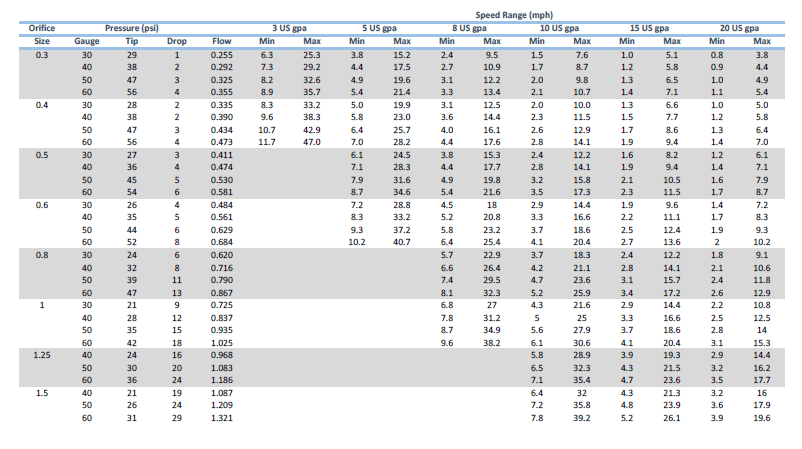
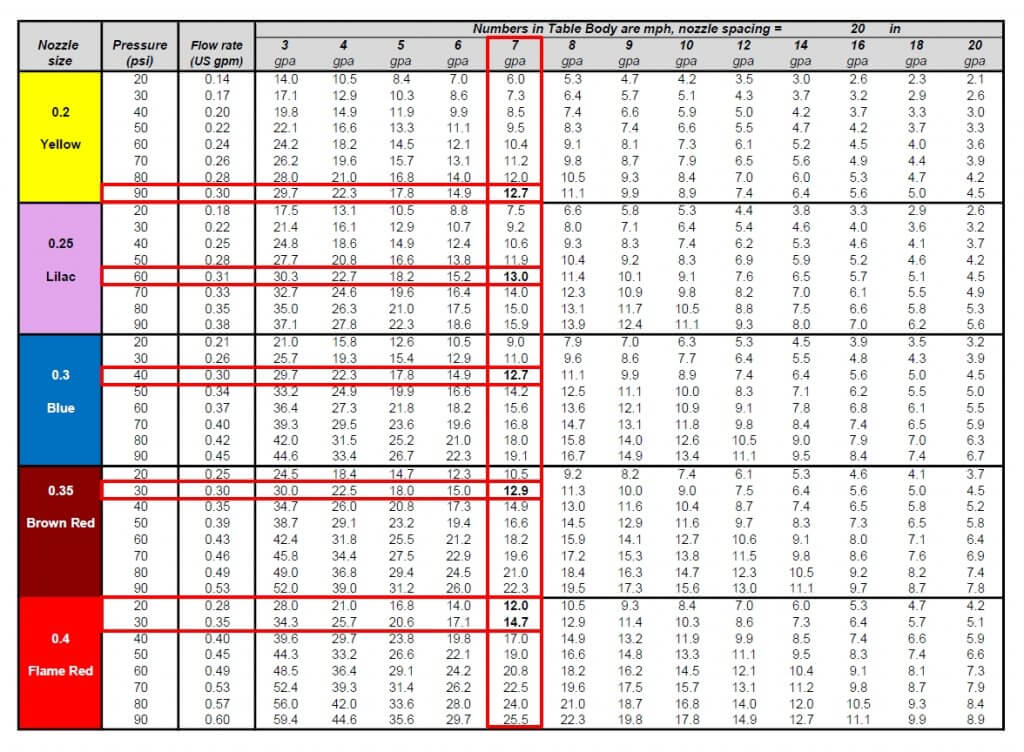
    The same catalogues or websites that publish spray quality also produce charts that list the expected spray pressures at various travel speeds and water volumes.

    Becoming familiar with using these charts enables the applicator to predict the spray pressure the nozzle will be operating at. For example, if an applicator intends to apply 10 gpa using a yellow (02) nozzle, this table shows the following: The nozzle will be operating at 30 psi at 5 mph, at 40 psi at 6 mph, at 60 psi at 7 mph, at 70 psi at 8 mph, and at 90 psi at 9 mph. The applicator should know the nozzle’s spray quality at each of those pressures.

    Nozzle sizing follows a slightly different procedure for Pulse-Width-Modulation (PWM) systems, requiring the nozzle to be over-sized about 30% or so. Since the majority of new sprayer sales now include PWM, we’ve prepared a special article just for this system here.

    Application Chart 2015 cropped

    Travel speed and/or spray volume should be adjusted to ensure the sprayer operates at a pressure which creates the desired spray quality. In other words, the pressure gauge should be used as a speedometer.  If the nozzle model or size doesn’t produce the desired results, the applicator should consider changing nozzles. Once the right combination of factors has been determined, the spray pressures that created the label-required spray quality should be noted. From that point, the applicator can choose travel speeds that maintain the necessary pressure range.

    Summary

    It is up to applicators and industry representatives to ensure that herbicide products are applied according to label requirements. We expect significant scrutiny on spray drift from new products and need to ensure that proper application methods are used at all times. It’s important that everyone understands just how to do it.

    Dr. Scott Bretthauer (U. Illinois) gives a nice summary in this video by Precision Labs:

  • Spray Quality and Volume Matrix

    Spray Quality and Volume Matrix

    We often write about how valuable water sensitive paper can be to visualize and assess the coverage we’re getting from a specific application method.  A handy reference is this matrix that combines both factors.  Print it and use it in the field to compare what your application method is doing to these relative standards.  On average, you will want to see deposits similar to those in the middle of the matrix.

    Spray Quality Matrix (US)


    Download US units Matrix here (pdf)

    Spray Quality Matrix (metric)


    Download Metric Matrix here (pdf)


  • Capstan Calibration Chart (with Pressure Drop)

    Capstan Calibration Chart (with Pressure Drop)

    Pulse-width Modulated flow control allows you to change travel speed by a factor of about five without a change in spray pressure.  This chart shows which nozzle flow rates to use. Note the significant pressure drop across the Capstan solenoid.  This value must be added to the cab spray pressure, as explained here.

    Capstan Tip Chart (with Pressure Drop).pdf

  • How to Use a Nozzle Flow Chart, With a Surprising Twist

    How to Use a Nozzle Flow Chart, With a Surprising Twist

    Undoubtedly, the number one question we get from operators is: “Which nozzle should I get”? Luckily there’s no simple answer, or we wouldn’t have jobs! The reason it’s not simple is because selecting the “right” nozzle for a sprayer is a process. It can be broken down into two steps:

    • identifying the right flow rate (aka nozzle size)
    • choosing a specific nozzle model (i.e. brand, spray pattern type, spray quality, etc.)

    It’s a big question, so let’s tackle just the first bullet: identifying the right flow rate.

    All sprayer nozzles come in standardized (ISO) sizes, and these sizes are usually identified by numbers stamped on the nozzle as well as the colour of the nozzle itself. The nozzle’s key characteristics (i.e. the fan angle and nominal flow rate), are identified in a format that looks like some version of this (Fig. 1):

    2013_Nozzle_Nomenclature
    Fig. 1: Typical information printed on modern nozzles.

    The 110 refers to the fan angle (110°) and the 04 refers to the flow rate. 04 means 0.4 US gallons of water per minute (gpm) at 40 psi. Each nozzle brand has a slightly different convention, but no matter how the information is presented it ought to be on the nozzle somewhere.

    Nozzle colour has an ISO standard across fan-style nozzles, and we have this table to match the nozzle colour to the flow rate:

    Fig 3: ISO nozzle colours and flow rates

    You’ll note that the nozzle we pictured earlier was “flame red”, matching the 0.4 gpm on the table. So how do we use the table to pick the right size nozzle?

    Application rate (i.e. gallons per acre or L/ha) is a function of travel speed, nozzle spacing along the boom, and nozzle flow rate. Traditionally, this has been expressed as the following formula in US units:

    US Calibration Formula

    This formula is famously represented in nozzle charts found in all sprayer catalogues (Fig 4). Along the left side are nozzle sizes and pressures. Along the top is sprayer speed. The body of the table contains application volume. Pick your speed, and look for your application volume in the columns. If you want to apply five gpa, you need to look for the number 5 (or as close as you can get to it), among these numbers.

    Hypro Calibration Chart
    Fig 4: Typical nozzle flow rate chart, with speed at top and volumes in body. Ugh.

    The format of the chart can be confusing because it doesn’t follow a modern sprayer operator’s priorities. Usually, an operator decides on an application volume first, and this decision is not very flexible. Travel speed, decided second, has more flexibility.

    We’ve therefore re-worked the table to make more sense (Fig. 5). Along the top are common water volumes. The body of the table are travel speeds. Pick a water volume at the top and follow the column underneath this value to find a speed range you’re comfortable with. To the left, the nozzle size and corresponding operating pressures are now visible.

    Fig. 5: Nozzle flow rate chart with volumes at top makes it user friendly.

    Try to operate at a spray pressure that’s in the middle of the nozzle’s operating range. For an air-induced nozzle, the range is usually from 30 to 90 psi, so the middle is 60 to 70 psi. That should be the target pressure. Look for a nozzle size that delivers this pressure at your expected travel speed.

    These columns can be used to work out a nozzle’s travel speed range. If a nozzle can be operated between 30 and 90 psi, for example, the corresponding speeds are listed in the same rows in the volume column.

    For example, say you want to apply seven gpa and think that 13 mph would be a good average travel speed.

    Fig 6: Five solutions for the question, “which nozzle to apply 7 gpa at 13 mph?”

    Move down the seven gpa column, and you’ll encounter a value close to 13 mph five times – the yellow nozzle at 90 psi, the lilac nozzle at 60 psi, the blue nozzle at 40 psi, the dark red at 30 psi, and the red at about 25 psi. Now use the columns to see which of these three best matches your expected travel speed range.

    The yellow nozzle would allow between seven and 12.5 mph from 30 and 90 psi, the lilac nozzle nine to 16 mph, the blue nozzle 11 to 19 mph, the dark red 13 to 22 mph, and the red 15 to 26 mph.

    The best choice for a typical air-induced tip would be the lilac 025 size, since it would meet the target speed of 13 mph at a perfect 60 psi, about right for nozzles of that size, and allowing some travel speed flex on the slower side.

    Some operators try to extend that range, but dropping below 30 psi will likely result in too narrow a pattern, or too coarse a spray quality, so it’s not advised.

    Note that the three-fold change in pressure from 30 to 90 psi translates to only a 1.73-fold change in travel speed. That’s due to the square-root nature of the relationship, as illustrated by this formula:

    Pressure Formula

    This exercise applies to sprayers with rate controllers that adjust pressure to regulate flow rates. However, if you use pulse-width modulation (e.g. Case AIM Command, Capstan Sharpshooter, Raven Hawkeye, or TeeJet DynaJet) check out this article describing these systems.

    There are a number of apps and websites, usually developed by nozzle manufacturers, which provide similar answers. These are also very useful, and all of them rely on the same formulas used in our new, simplified table. You can go here to download a high resolution version, suitable for framing, in both US and metric units.