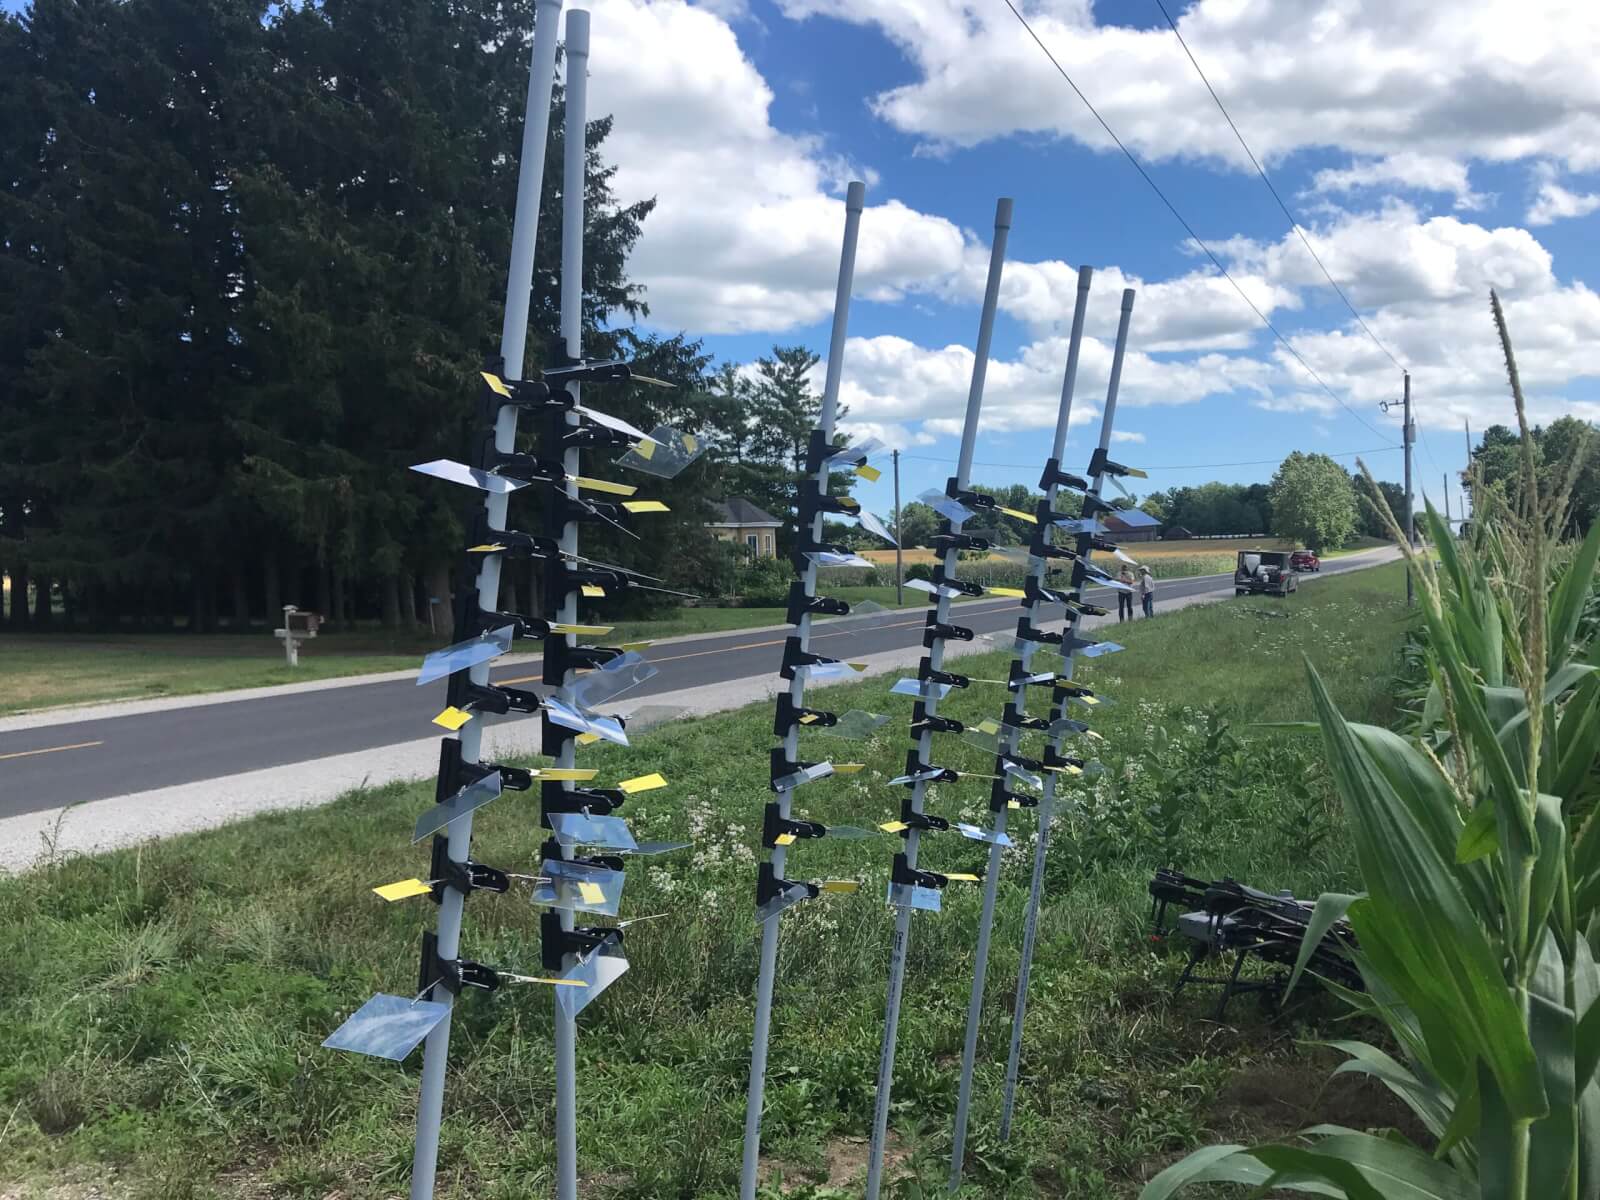
“This year was the first year we used a growth regulator on our wheat. After heading, we noticed a wavy pattern of different plant heights between 30 and 45° to the operating direction. It was only a couple inches difference and was difficult to photograph. We sprayed 12 gpa at 9 mph using TT11005 nozzles alternating forward and back at 35 psi and a 70% duty cycle. I’ve talked to other operators in Canada and in Europe and several customers have reported seeing this pattern, no matter which model of PWM sprayer. What’s happening?”
Skips in cereal that are obvious to the eye can be difficult to photograph.
The pulse width modulation is very likely responsible for the waves. We have a number of articles describing how PWM works, but here’s a brief recap of the relevant bits.
A solenoid intermittently interrupts nozzle flow with a frequency between 10 and 100 times per second (depending on manufacturer). The proportion of the time the nozzle remains open is called the Duty Cycle. Each nozzle is linked to the neighbouring nozzles so that when one pulses on, the neighbour pulses off. So although you may only have half the nozzles spraying at any moment in time, sufficient overlap ensures there are no gaps in the pattern.
However, depending on the combination of frequency and duty cycle, it is possible to lose that overlap between nozzles. This can cause a checkerboard pattern that appears to repeat in a diagonal line. The following two images are from www.Capstanag.com and they illustrate an ideal overlapping pattern and a pattern that creates skips.
Here’s a 11008 at 10 gpa, 15 mph, 60% DC, 10 Hz, 21” boom.Here’s an 8008 tip at 5 gpa, 15 mph, 30% DC, 10 Hz, 21” boom.
We can also sometimes see skips on the outer edges of sharp turns. In that case the outer boom section can be travelling two or three times as fast as the cab. In a conventional system, this would produce under-dosing in the outer region and over-dosing closer to the cab.
Some degree of skipping may be more common than we realize. It’s only when we spray products that produce obvious visual symptoms at low doses that we can see a biological response. In the case of plant growth modifiers used to prevent lodging in cereals, we have a perfect storm situation. A region of reduced spray overlap, applied at a time when the crop is elongating rapidly, perhaps on rolling ground from an unstable boom height, can all conspire to create regions of reduced dose with striking visual symptoms.
The following list describes conditions that can increase the potential for skips, and what you can do to avoid them.
Low duty cycles. Cycles less than 60% should be avoided.
Fast travel speeds. Faster speeds may help blend the spray in the swath a little, but too fast can create gaps and increase drift potential. At high travel speeds the system is usually operating at a high duty cycle unless an especially large nozzle size has been selected. Ideally, we want to run the duty cycle at 60-80%, but there are always exceptions. For example, according to Wilger, 90-92% is fine when you run at 20 gal/ac with their “15 gal tips”.
Low booms. The lower the boom, the less overlap. Raising the boom to 24″ above the crop may help, but beware of drift.
Narrow fan angles. Nozzle angles less than 110° reduce the degree of overlap and are less forgiving if the distance between nozzle and target decreases.
Low pressure. Avoid operating at pressures below 35 PSI. Due to pressure drop at the solenoid, 40 PSI on the monitor might mean 28 PSI at the nozzle. Some nozzle tables account for solenoid-induced pressure drop and some do not. Low pressure may be insufficient to establish the full 110° pattern, and the resulting marginal overlap not only means inconsistent dose, but inconsistent droplet size because droplets are coarsest at the edge of the pattern. And, if that’s not already enough, note that air induction nozzles intended for use with PWM tend to create messy patterns at low pressures and low duty cycles.
Especially coarse spray quality. Unless the label requires it, consider using spray qualities no larger than Very Coarse, particularly at low volumes. PWM frees the operator to use pressure independent of rate, so you may be able to accomplish this without swapping nozzles.
Products that are highly dose-dependent. This one is likely unavoidable, but be aware they are the products most likely to produce obvious visual symptoms. In the case of PGR’s, we have not (yet?) seen any evidence that skips translate to reduced yield. Weed misses or sub-lethal doses of fungicide or insecticide might be another matter.
If you read this site, you know we’re fans of recirculating booms. We love them for three reasons:
They save money and waste by recovering spray back to the tank during priming and rinsing
They make boom cleaning easier by eliminating boom-ends
Most require individual nozzle shutoff, which makes for better sectional control
If you’re new to the concept of recirculating booms, read more here.
Until recently, these booms were only available on sprayers imported from outside North America (Horsch, Amazone, Agrifac to mention three), or via France’s Pommier booms that have been available as retrofits for many years. In 2018, Agco introduced their Liquid Logic system on the Rogator line, becoming the first North American manufacturer to offer a recirculating boom at the factory. Pattison Liquid also offers Recirculating booms as standard equipment on their Connect Sniper pull-type sprayer.
In the meantime, three boom retrofit kits and one sectional conversion kit have become available.
Arag Australia‘s BRS (Boom Recirculation System)
The first was developed by Arag Australia, and is available there via Nozzles Online, and in Canada through Nozzle Ninja. Designed for John Deere R-Series and Case Patriot sprayers, the kit uses the existing line that feeds liquid to the outermost section and simply extend that line to the end where it enters the boom via two installed elbows. The liquid returns to the centre via the installed boom sections which are connected together by removing the boom end cap (or “aspirator” for John Deere) and replacing the gap with a section of hose. Back at the centre rack, the liquid from both booms meet in the middle. At this point, a three-way valve gives the choice to return the spray to the tank, or to receive pressure from the pump. There is also a manual valve that allows the return to be dumped for safe disposal.
Arag Boom Recirculation System (Spray Mode)Arag Boom Recirculation System (Recirculation Mode)
The system does not tie into the sprayer’s electronics. instead, it adds a switch in the cab that the operator uses to switch from spray mode to recirculation mode. The switch is not activated at the end of each swath, but instead to prime or flush the boom.
A switch is added so the user chooses recirculation or spray mode. The boom would recirculate to prime or flush, and remain in spray mode during the spray operation.
Raven
Raven offers a recirculation kit for 3000, 4000, and 5000 series Case Patriot sprayers with Aim Command HD and an ISOBUS terminal. The approach is slightly different, as they retain the pressure feed through individual sections but also tie the sections together so the spray is returned to the tank. By including a shutoff valve between each section, the system retains the option to use conventional sectional control for high flow situations, or to isolate a section should a leak occur. The system can be configured and controlled from the sprayer monitor, either a Viper 4+, CR7, or CR12.
Raven Boom Recircualtion System schematic (from Raven manual). Note the retention of section valves and the addition of manual valves between sections.
John Deere
On March 2, 2021, John Deere announced a 2022 factory option called Pressure Recirculation and Product Reclaim. The system keeps several existing sections and adds two steel lines the flull length of each boom wing. One is for supply, the other return. As these lines approach a section, the supply is fed to one end of the section and the return is connected to the other end. On a 120′ boom, there are five recirculating sections, two on each wing and the centre.
This approach adds one more line than the other designs, and this line will hold materials that ultimately need to be cleaned, flushed, and possibly dumped or sprayed out for cleanout. A possible reason for the extra line is the ability to deliver 220 gpm to the boom, an advertised feature of John Deere high flow booms that may come in handy for topdressing liquid fertilizer. These levels of volume are not needed for pesticides.
John Deere Boom Recirculation and Reclaim. Top two lines are supply and return and extend the length of each boom wing. These connect to the existing sections on each wing, creating several smaller recirculating sections.
Latitude Ag
This Wisconsin company has developed an innovative product that converts any existing plumbed section that contains boom ends into a recirculating section. It does this by incorporating a boom recirculation valve” (the “Merlin IC System“) into the original section feed line. Boom end caps are removed and replaced with sweeps and hoses that return flow to these boom valves. The flow from the boom ends is incorporated back into the sectional feed thanks to a venturi design in the recirculation valve.
A prototype of the Merlin IC System valve made by Latitude Ag
Advantages of this design include simplicity. No moving parts are required, the valve simply recirculates the flow from the boom ends automatically whenever that section operates. Existing sectional control, whether it’s by plumbed section or individual nozzle bodies, is unaffected. Flushing the boom with water is done with normal spraying. It takes some extra time to incorporate and dilute the contents of the boom end return lines but results in a clean boom and no section end residue. We’ve seen the results of testing and agree that it works.
This product does not allow boom priming without spraying. However, a key advantage is that it can be used with direct injection since no product is returned to the tank. Latitude Ag says it will provide the necessary flow sensor and software to make this possible. As of 2025, this system may no longer be commercially available.
Precision Planting ReClaim
ReClaim is capable of operating on a sprayer with or without individual nozzle shutoff. For conventional nozzle bodies containing the original spring-loaded diaphragm check valves, the concept is to drop the liquid pressure below the cracking point of the check valves so flow continues through the sections and back to the tank without engaging the nozzles.
Recirculation fittings are added to the end of each boom section. These feed into 3/4″ lines are installed on section ends, which in turn feed increasing diameter collector lines that eventually return all flow to the tank. Flow reaches the sections as before. When recirculation is turned on, flow exits the boom section through the new fittings and returns through 3/4″ lines to the centre of each section, where it enters 1” lines that take the flow to the center of each boom wing. There the flow in the 1” lines is combined moves to the center of the sprayer on 1.5” lines where it meets the flow from the other wing. From there, the flow returns to the tank through an electronic ball valve and 2” line. This system ensures no back-pressure and balanced flow from each section.
For some sprayer rate control systems such as John Deere, the pump won’t operate below about 20 psi despite operator settings. This means the priming or flushing procedure would trigger nozzles to spray if the bodies were fitted with spring-loaded diaphragm check valves. A pressure reduction kit (a second restrictor valve) is required to reduce the pressure sufficiently for ReClaim to work in these instances. More here.
ReClaim operates independently of any electronic control systems, relying on a toggle switch to initiate recirculation. When flow back to the tank is detected, a light indicates that recirculation is working, and the operator waits approximately 60 sections for a 120’ boom to circulate all volume back to the tank. Download the operator’s guide, here.
This system requires a lot of additional lines. A 120’ boom would require 120’ of additional 1” line and 60’ of 1.5” line. The manufacturer states that ReClaim adds about 14 gallons of volume that would need to be displaced back to the tank, adding to the standing volume. This volume can be circulated using solution from the main solution tank, or displaced back to the tank using flow from an existing clean water tank, or displaced using compressed air via an optional pneumatic port. It is not clear how spray mix in the ReClaim system can be removed from lines without returning it to the tank and draining it from there. Users should consider the additional surface area and volume that will have to be addressed during cleanout.
Do It Yourself
If none of the available options work for your sprayer, consider building your own system. Sprayer plumbing parts are available from the major manufacturers Banjo, Hypro, TeeJet, and Wilger. Wilger, in particular, has developed a nice suite of parts well suited to recirculating booms, including flanged sweeps and thin gauge steel booms, punched for nozzle bodies or unpunched to move product. See their support for DIY projects on this dedicated page: Wilger Retrofit.
Take Home
All these recirculation options improve the status quo of plumbed boom sections with boom ends. They should be considered essential equipment on sprayers.
Cleaning, flushing, triple-rinsing… whatever you call it, sprayer sanitation is a time-consuming and distasteful task.
Methods vary, but they generally span from the classic triple rinse (30-45 minutes) to a full tear-down and decontamination (many hours and likely an overnight soak). The operator decides how much time and effort to invest depending on the chemistry they’ve just used and the crop they intend to spray next. Learn more about the power of dilution in this article and in this article.
Unfortunately, two facts are certain:
At minimum, operators should rinse the sprayer at the end of each day… and they generally don’t.
It is only after spraying a sensitive crop that the operator truly knows whether the sprayer was cleaned sufficiently.
Continuous Rinsing
We’ve promoted Continuous Rinsing as a viable alternative to Triple Rinsing in previous articles (see HERE and HERE). Executed correctly, the method:
greatly reduces the time required,
is as effective,
eliminates operator exposure, and
reduces potential environmental contamination.
Continuous rinsing requires the installation of a dedicated “rinse pump” to transfer clean water to the product tank from the rinse tank via the wash-down nozzles. This permits the main product pump to operate simultaneously, emptying the product tank and spraying the rinsate out the boom.
Imagine your sprayer empties at the end of the row. You position the sprayer at a headland or a row you sprayed earlier. A toggle switch in the cab engages the rinse pump and the wash-down nozzles start spraying clean water into the product tank. You then resume driving and spray until the rinse tank is empty. During the process, any solution in the return/bypass line is quickly diluted, and any standing volume in the system is displaced by clean water.
It takes five minutes and you never left the cab.
Remember: Rinsing can dilute residue to ~2-5% in most of the sprayer plumbing, but it is not intended to replace the more rigorous decontamination process. Closed circuits, filters and dead-end plumbing can still harbour residue >15%.
Installation
Working with GreenLea Ag Center in 2017, we installed a Continuous Rinse system on a Case IH Patriot 4440. It has a 1,200 gal. product tank, a 140 gal. rinse tank and a 120 foot boom. A parts/price list for the Patriot installation appears at the end of this article.
Additionally, we have included the parts/price list from our 2016 HJV Equipment installation on a RoGator 700, which had a 700 gal. product tank, 50 gal. rinse tank and a 90 foot boom.
Still further, we have included three homegrown solutions from operators that developed their own continuous rinse systems.
Sizing the Rinse Pump
It is very important that the rinse pump has the capacity to operate the wash-down nozzles and still supply clean water at a rate approximately equal to the rate at the boom. Basically, “in must equal out”. If the rinse pump supplies too much clean water, the volume rises in the product tank and efficiency is reduced. If it cannot supply enough, the main product pump will lose suction and not function correctly.
We installed a Hypro 9303C-HM1C centrifugal pump (max flow rate of 114 gpm at 130 psi), matching the make and model of the exiting product pump. A length of channel was installed on the chassis to mount the pump and close-coupled hydraulic rinse pump motor, and a valve block.
Really, electric pump installation is easiest. An alternate pump that has been used is this one from Pattison Liquid. For added benefit, it’s a chem transfer pump that can handle the pesticide formulations. If the pump doesn’t give enough flow, a second one can be installed parallel to double the flow.
Hydraulics
Let’s being with advising caution: If you are uncertain about your hydraulic capacity (and tightly designed systems rarely have extra) then consult with a manufacturer-certified service technician, or consider an electrical alternative.
For the Patriot, the auxiliary hydraulic circuit was used to drive the hydraulic rinse pump; we piggy-backed off of that existing system. In this case, Continuous Rinsing increased the load on the auxiliary hydraulic circuit, but only marginally, so performance was acceptable.
We drew that hydraulic flow directly from the auxiliary pump output using a ‘T’ piece to ensure full pressure was available when needed. Then we broke into a common low pressure return manifold using another ‘T’ piece to provide the return flow.
Originally, we were concerned that robbing too much hydraulic flow could compromise sprayer operations. We therefore exchanged the hydraulic motor that came with the pump for one that required less hydraulic flow. However, the pump operated at such a high speed that the rinse tank was drained in two minutes! We felt this would not give the operator enough time to make minor adjustments (see the “Avoid Airlock” section later in the article). We also felt the rinsate would not have enough time to hyrdate any residue in the tank and lines. We therefore returned to the motor that came with the pump, slowing the pump and bringing our rinse time to approximately five minutes.
We installed an on/off hydraulic control valve block and solenoid controlled by a toggle switch in the cab. When the rinse switch was engaged, 12 volt DC opened the solenoid, allowing hydraulic oil from the auxiliary pump to turn the rinse motor, which in turn powered the rinse product pump.
Avoid Airlock by Balancing Flow
While Continuous Rinsing works well with an unbroken stream of clean water, there is demonstrated benefit to allowing the pump to draw a small amount of air. The bubbles are reputed to scrub the lines more effectively than water alone. It is possible that the new Hypro 9307 series centrifugal pump, which claims to eliminate dry run, would facilitate this.
However, avoid excessive cavitation or airlock of the main product pump. This will damage the pump seals and interfere with pump suction. If the main product pump is a piston-diaphragm pump, avoid losing the prime by letting a small volume of rinse water build up in the product tank before spraying the rinsate.
Maintaining the balance between the supply from the rinse pump, and demand by the product pump, will take careful trial and error. If the sprayer employs a rate controller, speeding up or slowing down travel speed is a means for making adjustments to match the two flows. Alternately, an operator can adjust the pressure regulator manually. Remember, the nozzles won’t need to work optimally so you have the option to use fairly low pressures to match flows.
In the case of an operator applying 28-0-0 using dribble bars or fertilizer nozzles, there is likely too much flow at the boom for the rinse pump to keep up. While we have not tried it, but as long as there was sufficient volume in the clean water tank, it might be possible to rinse the boom section by section, starting with the outside sections and moving in towards the centre.
Lessons Learned
The installation was a learning process, during which we noted the following:
At first, the rinse tank slowly emptied through the rinse pump, even when it wasn’t in use. We prevented this by installing a 10 psi check valve between the pump and main tank.
The rinse pump ran dry and burned the seals when the operator forgot to turn it off after the rinse tank was empty. We considered a timer or alarms to prevent this, but chose to install a level sensor (essentially a float) which would cut the 12 Volt DC feed to the on /off solenoid, effectively turning the system off when the rinse tank was empty. Note: the sensor is not in the parts list – it was purchased for ~$10.00 CAD from Amazon.
When deciding where to draw hydraulic flow to run the rinse pump, we first tied into the main hydraulic circuit (i.e. not the auxiliary). This negatively affected both steering and boom control. Beware drawing flow from critical safety systems such as steering.
Future Development and Other Advantages
GreenLea was exploring an option to use the rinse pump to bypass the product tank, and flow directly to the boom. This can be accomplished by teeing an electrical 3-way ball valve just after the pump to allow flow directly from the rinse tank (see dashed line in the flow schematic shown earlier in the article). Imagine being rained out, or having excess mix left in the tank at the end of the day. This system would allow the dilution of any corrosive chemical from a sensitive precision application system without losing or contaminating the spray tank. It should be noted, however, that high precision spray systems (e.g. AIM Command, Pro and Flex) would still require the operator to open the boom flush valves manually to allow the boom purge.
Growers have suggested the system might also be used to get a sprayer to end of a row if it threatens to run empty before completing the pass. A small volume of clean water added to the tank would displace the 15-30 gallons of unusable volume and stretch the application. Be aware that this would also dilute the product due to the agitation/bypass and should only be considered when a minute or less of additional spray is required.
Homegrown Solutions
Tyler Patriot (Electrical)
David Kucher (@DavidKucher) from Saskatchewan installed Continuous Rinse on his Tyler Patriot (75 foot boom, 800 gal. product tank).
Here’s what he had to say:
The rinse system I was using on my sprayer previously involved a lot of time and effort. Plus, the quality of job it did was sometimes imperfect (I keep pictures on my phone of a canola crop that was damaged because of a poor rinse job from a few years ago). The old system used the main product pump to rinse, so there was a bunch of valves under the sprayer that needed to be turned, and the pump had to reprime for each rinse. It was tedious.
Uncertain about the hydraulics, David elected to use an electrical pump, but had difficulty finding one that would produce enough pressure and flow. Most electric pumps were too small and it would have taken more than one, plumbed in parallel, to achieve the volume numbers required. However, David found a high-flow 489G-95 AMT High Head Washdown Pump (1 HP, 1-1/4×1 IN/OUT, 12 VDC,Cast Iron,Buna-N) which he got from the US for about $1,200.00 CAD. Max flow was 56 gpm.
Note: In 2020 this pump model changed to the 12DC-95.
He removed the majority of plumbing, valves, and related complexity from the old rinse system. The Continuous Rinse was comparably simpler and isolated from the rest of the sprayer plumbing. It just involved a fill line from his two clean water tanks, the new rinse pump, and the existing rinse nozzle inside the product tank.
When the product tank empties, David holds down a push button dead-man switch he installed to activate the rinse pump. If he wants to do a more thorough job, he flushes the product tank and plumbing for about two minutes, then stops, gets out and opens the boom end valves. Then he climbs back in and does another one minute flush.
Approximately 30 gallons of water go through on each flush and my only issue is that I waited so long to install the system.
Author’s note: Positive displacement electrical pumps (which have zero risk of seal loss) are reasonable alternatives to centrifugal pumps. Depending on the size of the sprayer, multiple pumps plumbed in parallel can provide sufficient flow. We elected to use two Hypro electric roller pumps (model 4101 N-H) for the 2016 RoGator 700 installation. Cheaper, low amperage 12V diaphragm pumps from Delevan and FLOJET with capacities of 5-8 gpm are also available.
John Deere 4830 (Hydraulic)
Russ Enns (@EnnsFarms) from Saskatchewan installed a Delavan HD Magnum 125 hydraulic driven pump (1-1/4” suction, 1” discharge, 5-7 gpm of hydraulic flow). He mounted it on the same mounting plate as the main product pump, just on the opposite side, using the same bolt holes.
It was tied hydraulically to the main product pump, so the rinse pump could only run when the product pump was operating. The hydraulic supply from the sprayer went through an electric/hydraulic block via a solenoid resting in the closed position. A rocker switch in the cab used 12V to activate the rinse pump from the cab. Return hydraulic pressure from the rinse pump was tee’d into the main solution pump hydraulic return.
The clean water intake for the rinse pump was tee’d into the factory rinse tank. The discharge side of the rinse pump was plumbed to a check valve and tee’d into factory tank rinse system. Here’s the discharge line, check valve and tee into factory rinse (below).
Russ mounted a large pressure gauge on front right axle to monitor rinse pressure. It’s easy to see from the cab, and easy to tell from the pressure when the rinse tank is empty.
In this case, Continuous Rinse is used in tandem with an Accu-volume tank gauge so Russ could monitor the level in the main product tank from the cab. Depending on the nozzles being used, he found that the rinse pump supplied clean water faster than the rinsate could be sprayed.
So, after finishing a field (or changing chemical, etc.) Russ turned on the rinse system while spraying the rinsate out on the field. The Accu-volume alerted him if clean water was accumulating in the product tank. If it got to ~20 gallons, he would briefly suspend the rinse pump while spraying to allow the level to drop. Then, he would start the rinse pump back up. He repeated this process until the clean water tank was empty.
Russ had many of the main components on hand, but estimates replacement value at ~$1,200.00 CAD. He noted that while installation was straight-forward, he originally piggy-backed the rinse pump’s hydraulic supply off the main solution pump, and it didn’t work correctly. We did that too, Russ 🙁
“Time savings and environmental considerations are the biggest benefit of this system to me. Being able to finish spraying a field, and immediately start rinsing and spraying the diluted solution is a huge time saver. I feel it’s a far more thorough rinse and a better/quicker dilution rate compared to how I previously handled rinsing and spraying out the diluted solution. Another benefit is that even though it’s plumbed into the factory rinse, the factory rinse system can still be used normally if for some reason the continuous rinse pump quits.”
Gregson Trailed (Electrical)
Continuous Rinse isn’t only for grains and beans. Matthew Droogendyk installed two 12v pumps on his trailed vegetable sprayer that matched the flow of the main pump. They had an electrician install a box for switching the the pumps and two solenoid valves on at the same time.
They noted an issue when trying to prime the main pump after emptying the tank. If the tank was sprayed completely empty, the main pump took time to get primed again. This affected rinsing time as well as the balance between supply and demand. Through trial and error they determined that running the rinse pumps for 1 minute (~15 gal) gave enough time to rid the main pump of air. Then the flows matched at about 15 gpa. Re-priming took about 5 minutes, and then an additional 2 or 3 to rinse using about 45 gallons of clean water. They found there was no need to replace their original tank rinse nozzles.
Tank Rinse Nozzles
One of the challenges of installing continuous rinse is ensuring the tank rinse nozzles are capable of rinsing the entire solution tank interior at potentially low pressure and low flow. In 2019, Lechler released the ContiCleaner range of rinse nozzle. Four ISO colour-coded nozzles capable of operating from 2-5 bar (29-72.5 psi), with flows from 6.5-32.3 L/min. (1.7-8.5 gpm). This will enable operators to better match the rinse nozzle(s) to the clean water pump. Be aware they are very difficult to source in North America. We tried and weren’t able to get them.
Parts / Price List
The following two parts/price lists are in Canadian Dollars. They do not include tax or labour and prices change depending on where and when parts are purchased. As you have read from the operators that installed their own Continuous Rinse systems, there are many possible solutions, so these lists are provided only for reference. Click the link to download a PDF.
Before contacting them, have the following information on hand:
Sprayer tank volume (both product and rinse, if applicable)
Boom length
Nozzle spacing
Largest nozzles mounted/used on the sprayer (excluding fertilizer nozzles)
Power available on sprayer (e.g. 12V available? Max amp? Hydraulic capacity?)
Thanks to Russ Enns, David Kucher and Matthew Droogendyk for sharing their install stories. Thanks to Adam Beaumont and Ehrin Frid for the Case IH and RoGator installations, and to Mike Cowbrough (@cowbrough) of OMAFRA and the Ontario Soil and Crop Improvement Association for collaborative support.