Tag: gauge

  • Venting Liquid-Filled Pressure Gauges

    Venting Liquid-Filled Pressure Gauges

    Liquid-Filled or Dry?

    Small-plot agricultural sprayers should have a pressure gauge on the wand or boom to ensure accurate application rates. Most are added after-market and the operator has the choice of buying liquid-filled or dry gauges.

    Glycerine- or silicone-filled gauges are preferred because they dampen pressure spikes, pulsation and mechanical vibration. Compared to dry gauges, they are available in higher ranges and are less prone to moisture problems (which cause corrosion, accuracy and visibility issues).

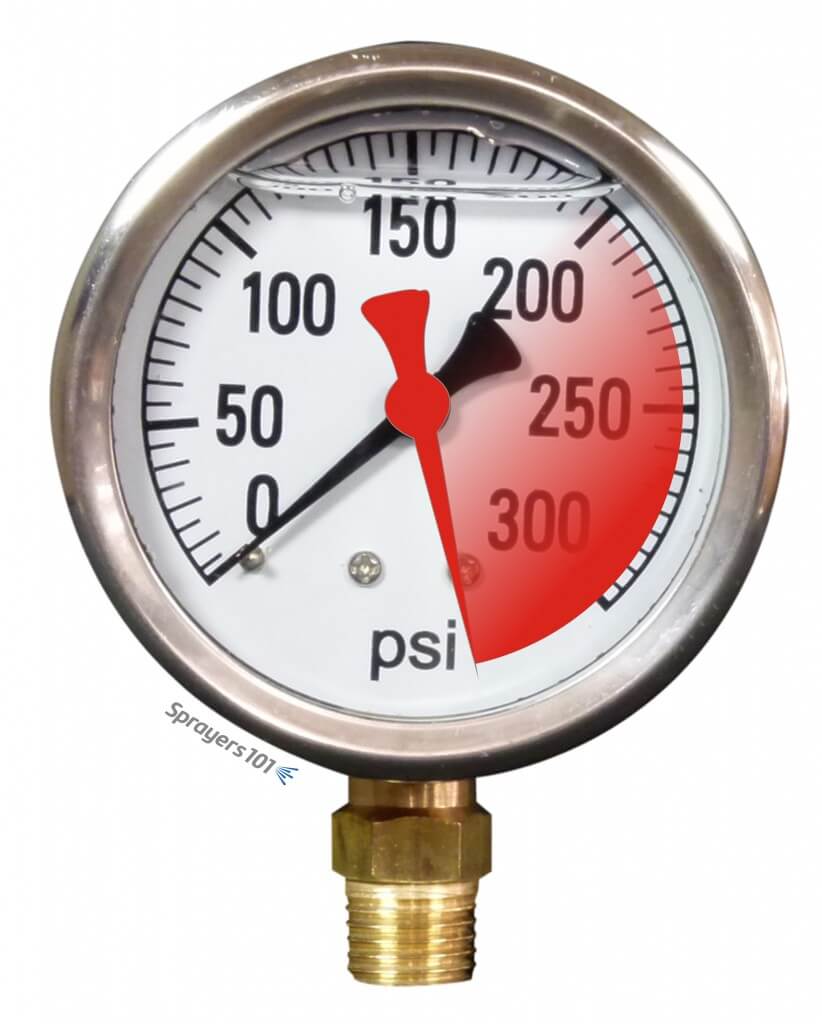
    We use 100 psi (~7 bar) liquid-filled gauges for our handheld sprayers. Only recently did we acknowledge the sticker affixed to the glass advising the user to cut the nipple off the rubber plug located at the top. Preferring to avoid messy leaks, we have always left it intact.

    We wondered what impact, if any, this was having…

    What are Vents?

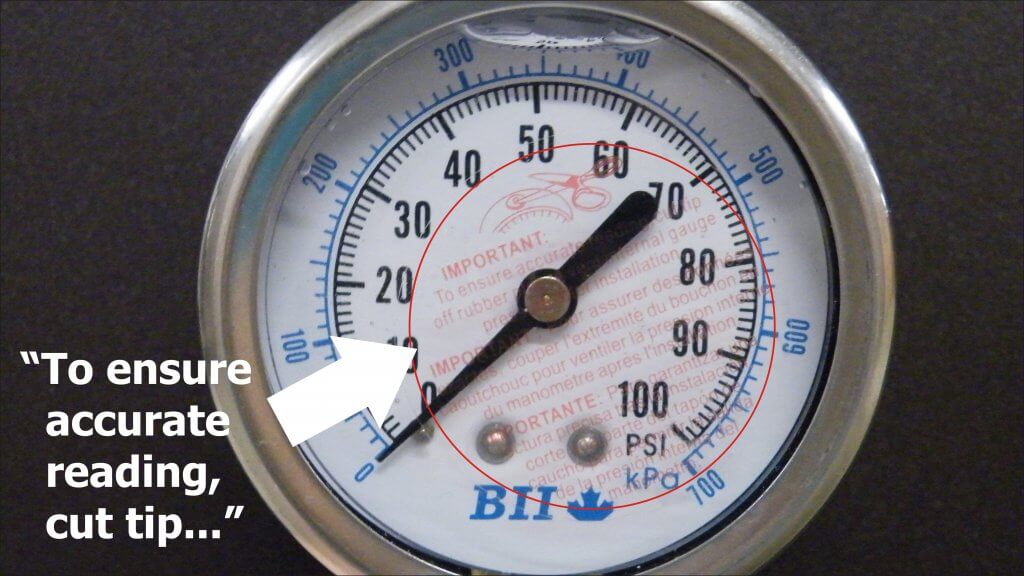
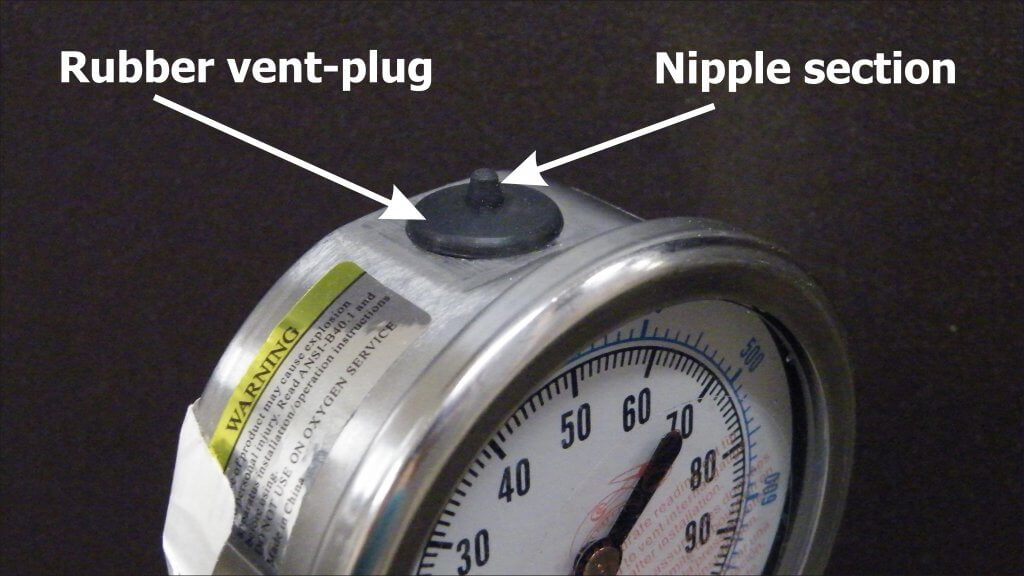
    Expensive gauges have mechanical vents that can be opened prior to use and closed to retain liquid when stored. More commonly, there is a rubber plug with a protrusion (referred to as a nipple).

    Why Vent?

    Mechanical, liquid-filled gauges are sealed to keep the liquid in. When there are temperature fluctuations, the liquid expands or contracts and creates “case pressure”. This exerts a force that interferes with the pressure reading.

    According to Marshall Instruments, case pressure can offset the accuracy by approximately 1 psi (0.07 bar) for every 35˚F (20˚C) temperature change, but is only noticeable when measuring lower pressures (0-15 psi or 0-1 bar). Nevertheless, they advise all gauges should be vented prior to use.

    The plug can be removed to allow the user to refill the gauge, maintaining an air space of about ½” at the top of the window. If the nipple is cut off, the gauge is permanently vented and will leak if the gauge is not kept vertical.

    Testing

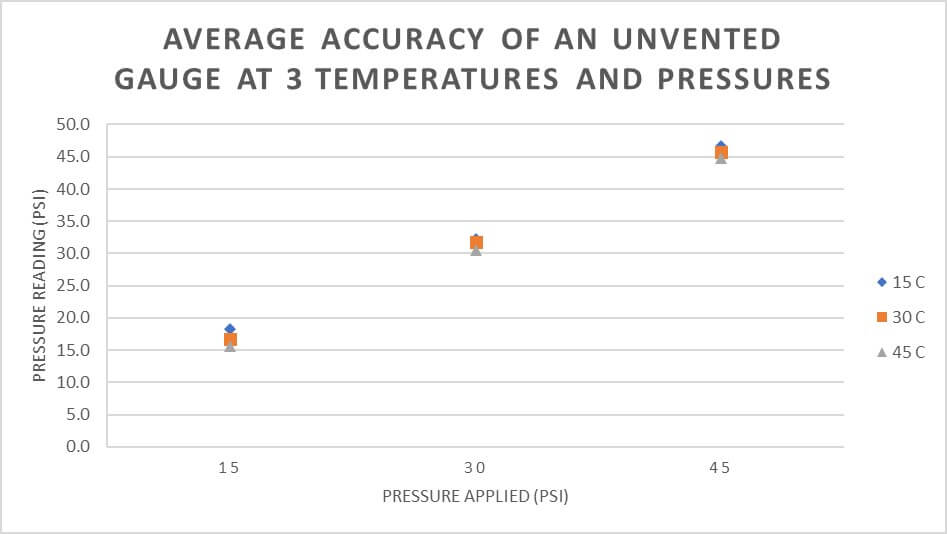
    We performed an experiment to see if typical working temperatures had a practical impact on the accuracy of an unvented gauge. We suspended an unvented, liquid-filled gauge upright in a water bath at approximately 15˚C, 30˚C or 45˚C (59˚F, 83˚F or 113˚F) until it equilibrated. The high temperature may seem unreasonable, but gauges left in trucks on summer days get far hotter.

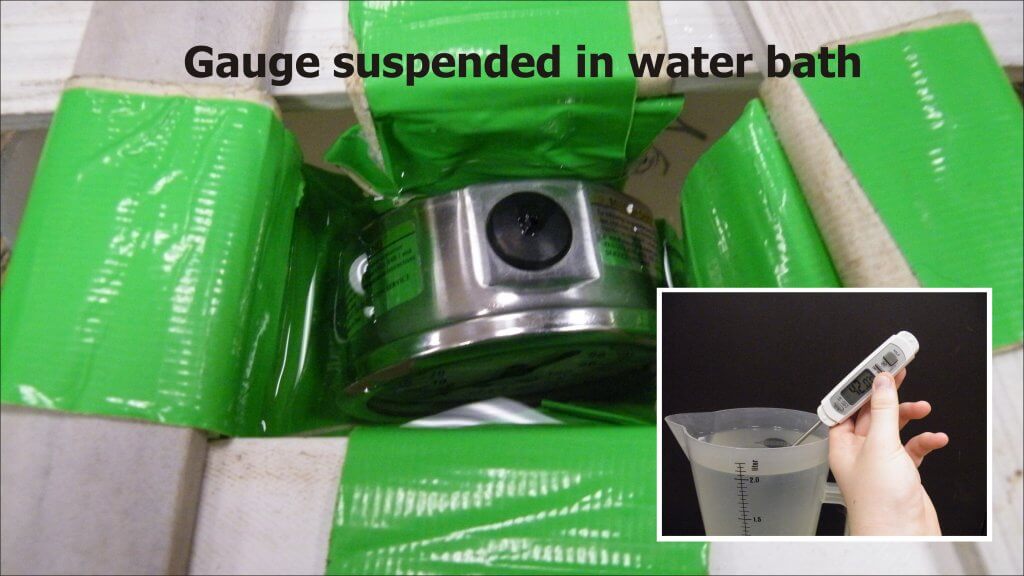
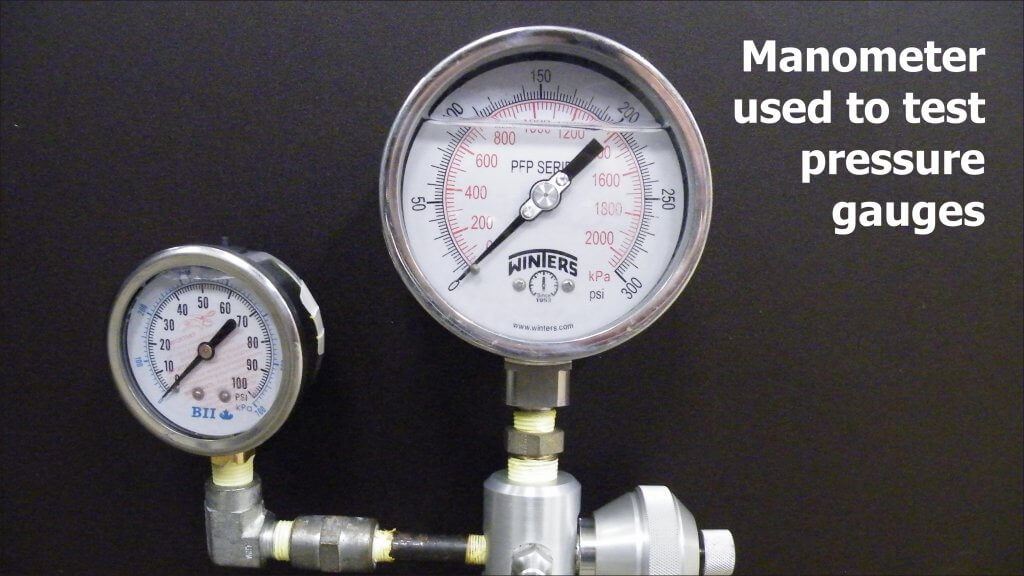
    The gauge was quickly removed and placed in a manometer (Ametek T-975) where it was subjected to pressures of 15, 30 and 45 psi (1 bar, 2 bar and 3.1 bar) and readings recorded. This was repeated five times. We then vented the gauge and repeated the process.

    Results

    At first, there appeared to be very little difference in average accuracy of vented and unvented gauges. Accuracy refers to the closeness of a measured value to a standard or known value. Perhaps there was some small increase in the pressure reported by an unvented gauge, but very little practical difference.

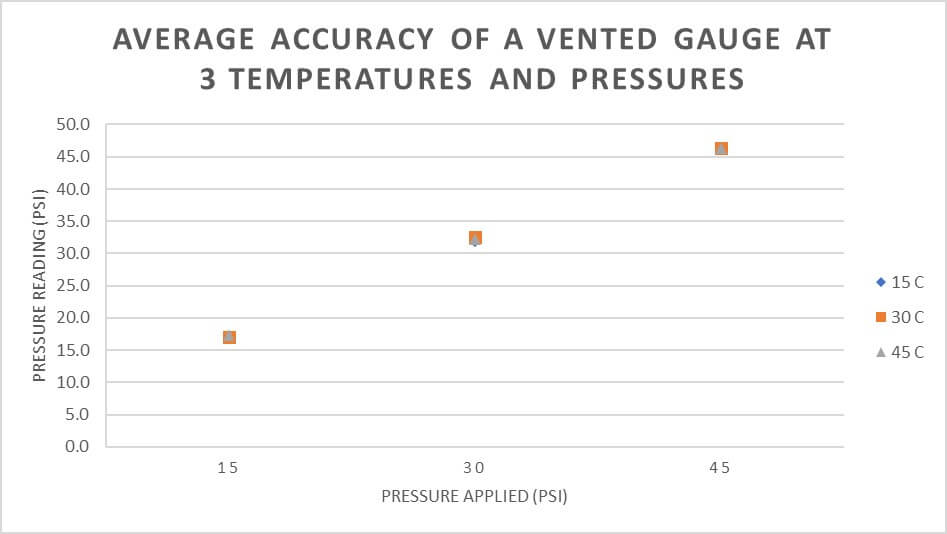
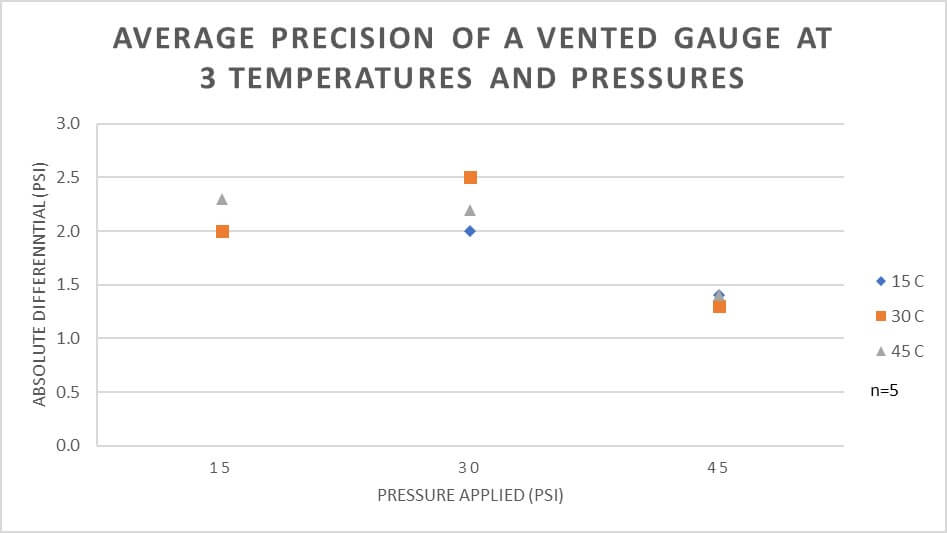
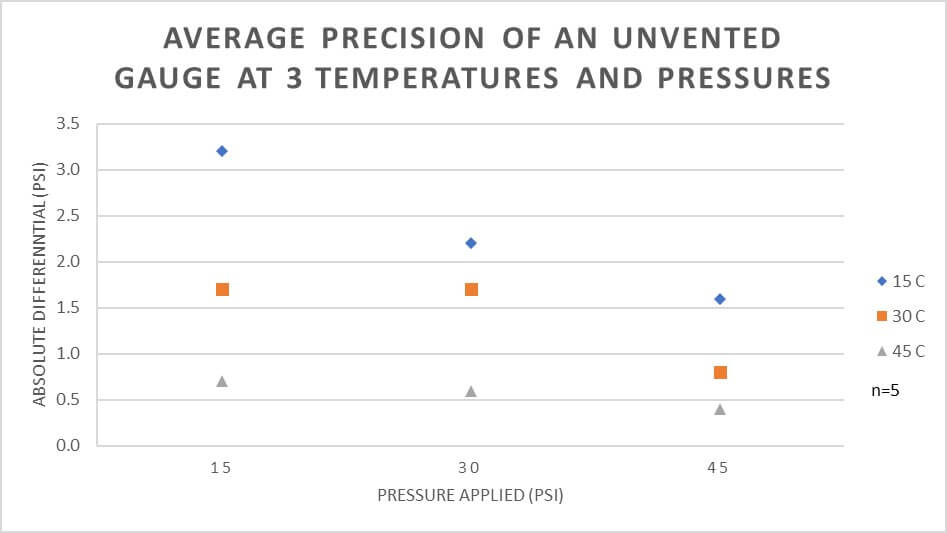
    However, when we look at variability we get a different picture. Variability is a measure of precision, which refers to the closeness of measurements to one another. The graphs show that an unvented gauge has greater variability (less precision) at lower temperatures and lower pressures.

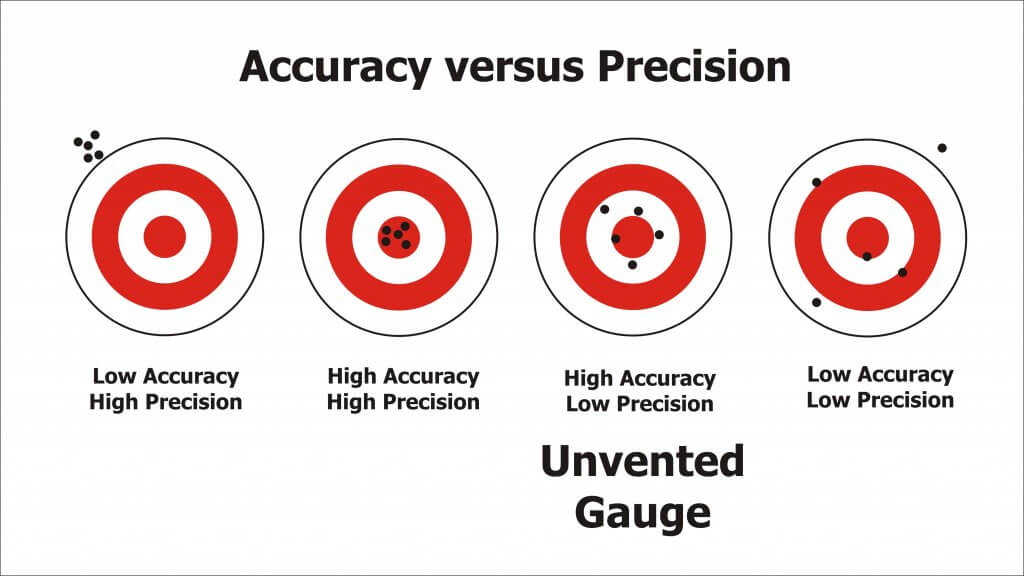
    A good way to think of accuracy and precision is using the classic archery bulls-eye metaphor. The unvented pressure gauge is best represented by the third image, where it is accurate (on average) but not precise (variable).

    Real-World Example

    What does this mean in practice? Consider someone spraying a small plot using a TeeJet XR8002 nozzle on a CO2-powered hand boom at 30 psi. The difference in output between 30 psi and 40 psi is about 0.003 gpm / psi.

    An unvented pressure gauge used on a hot day may read 1.5 psi lower, causing you to overcompensate and raise the pressure 1.5 psi higher than intended. That would result in 0.0045 gpm (0.5%) more applied. Compensating for an unvented gauge on a colder day might be closer to 0.009 gpm (1%) more applied.

    Assuming a walking speed of 3.1 mph (5 km/h) and a swath of 20” (50 cm), the nozzle should emit about16.3 gpa at 30 psi. Unvented in the heat, that’s 16.7 gpa. At 33 psi, that’s 17.15 gpa. That’s almost 1 gpa more than intended. Potentially, the lack of precision could make a significant difference.

    Conclusion

    • Liquid-filled gauges are preferred over dry gauges.
    • To ensure precision, the gauge should be vented prior to use.
    • Permanent venting on a hand-held sprayer causes leaks, which is a nuisance, so we suggest simply lifting the edge of the plug with a screwdriver or fingernail to vent the gauge prior to each use.

    This work was performed by OMAFRA summer student, Aidan Morgan.

  • Pressure Spikes and Relief Valves on Air-Assist Sprayers

    Pressure Spikes and Relief Valves on Air-Assist Sprayers

    A properly-sized pump should produce more flow than is needed and work in conjunction with the atomizers to regulate that flow. Typical to high pressure pumps, a piston relief valve (aka regulator) should maintain the desired system pressure through the normal speed range of the sprayer, regardless of the number of booms (or boom-sections) that are on or off. This is achieved by balancing the sprayer pressure against the relief valve spring, which must move freely across a range of flows.

    But what does it mean when the pressure gauge briefly spikes off-scale when boom are turned on or off? This is bad for the gauge and will eventually cause it to fail. Quite often, pressure spikes are an indication of one of two things:

    • A dirty or stuck valve
    • An inappropriate spring size
    A pressure gauge spiking beyond its range.
    A pressure gauge spiking beyond its range.

    Relief valve maintenance

    Sometimes, pressure spikes indicate a need for valve cleaning and maintenance.

    • The regulator spring cavity may be packed with dirt, which limits valve travel. Clean the housing and spring, and then lubricate and adjust.
    • The regulator may be partially seized or sticky. If the regulator piston and cylinder bores are caked with spray they will ‘hold’ the valve until the pressure/spring balance overcomes the friction.
    • Sometimes valve, and/or the valve guide pin are seized. Disassemble them, clean all sliding surfaces, then lubricate and adjust.
    • Valve/seat wear may have created a leak. You may have already tightened the spring to compensate, but this loads the spring past the pressure balance point you want to spray at. This means that when the booms are shut off, the pressure increases until it reaches the ‘new’ spring balance point. Repair (or replace) the regulator, then lubricate and adjust. Be aware that any leak (external or internal) can contribute to this condition and tightening the spring isn’t the solution.
    • The spring may be damaged (e.g. bent, corroded, etc.). Replace the spring, lubricate and adjust.

    Note: Be sure to read the operator’s manual before you do anything. You should understand your sprayer’s design before you perform any maintenance, adjustments or calibration.

    Spring size

    Sometimes, the relief valve may be mechanically sound, but the spring may not be sized to match a reduced operating pressure. Relief valve springs match the maximum pressure range of the pump. Sprayers operated at lower pressure may be unable to compress the spring. This is common when people switch from disc-core nozzles operated at higher pressure to molded nozzles operated at lower pressure.

    This would manifest when one boom is shut off for single-boom operation; there may not be enough pressure to open the bypass. As a result, flow increases over the remaining boom.

    Recognizing this problem, some operators have teed-in a second relief valve capable of finer adjustments at lower pressures. Make sure you know what you’re doing if you’re considering this option.

    Technically, a spring can either be too weak, or too heavy:

    • The spring may be too weak for the pressure being used (i.e. any adjustment bottoms out). In order to obtain sufficient pressure the operator tightens the spring until it is virtually collapsed, essentially creating a fixed orifice. When the booms are closed the ‘fixed orifice’ doesn’t compensate and pressure rises to force the increased flow through that small orifice.
    • If the spring is too heavy for the pressure being used (any adjustment barely touches the spring when pump is turned off). In this case, the pressure being used will not deflect the spring, so the operator closes the regulator until the ‘fixed orifice’ creates sufficient restriction to flow to achieve the desired pressure. When the booms are closed the ‘fixed orifice’ doesn’t compensate and pressure rises to force the increased flow through, or until the spring begins to deflect.
    • In either situation the spring must be sized so it is in the centre-third of its flex range (i.e. rest state > fully collapsed) at the desired pressure. You can buy springs from the sprayer dealer or hardware supply. Try to maintain original length and diameter of the coil, while varying the diameter of the wire.

    Engineering

    In some cases, it is not a matter of valve maintenance, or spring size, but poor engineering. Consider the following:

    • The valve supply and return may be too small for the pump flow. Consult hose and fitting catalogs for flow capacities and lengths. Re-size the hoses and fittings appropriately, and then adjust the regulator.
    • There may be kinks or sharp bends in in the supply and return lines. Re-route the hoses and/or fittings to avoid kinks and sharp bends, and then adjust the regulator.
    • The relief valve may be too small for the pump flow. Consult a regulator catalog for flow capacities and replace the regulator with an appropriate size. Calibrate the regulator spring and adjust.
    • Relief valves have a ‘cracking’ pressure (that’s when the valve just starts to open). Well-designed regulators have small pressure changes from ‘cracking’ to full flow. That information is in their catalogs. Poorly designed regulators have large pressure changes between these two ratings and these regulators should be avoided.
    • The pump may be too big for system. This often happens when sprayers are upgraded and pumps are replaced. Consult the catalogs and reduce pump size or speed, or increase the sizes of the hoses, fittings and regulator.
    • There may be a hydraulic agitator jet on the regulator ‘tank’ line. An agitator jet applies considerable back pressure to a system, and when booms are closed the increased flow causes more than a linear increase in pressure.
    • Broadly, the sprayer system as a whole may be poorly engineered. Inspect and draw a flow path of the sprayer system. Examine where everything is going (or not going). Is it possible someone made changes that the manufacturer did not intend? Consult the manufacturer if you are uncertain. Sometimes, it will have to be re-engineered, which may require expert consultation.

    Note: Your pressure gauge can tell you a lot more than your operating pressure – it can indicate a problem with your regulator, pump, lines or overall sprayer engineering. Don’t ignore it – address it.

    Thanks to Murray Thiessen, Consulting Agricultural Mechanic, for his contribution to this article.

  • Does Higher Pressure Increase Spray Penetration?

    Does Higher Pressure Increase Spray Penetration?

    A very common question we hear at sprayer demonstrations is:

    “I want to drive the spray deeper into the canopy – does higher pressure help?”

    Well, here’s the classic government answer:

    “…yes and no.”

    It depends on two things. First, the size of the droplet and second, your tolerance for drift (ours is almost zero, BTW). The following video explains how Fine droplets behave very differently than Coarse droplets. It’s always nice to get outside and toss a few balls around:

    Well, that last statement in the video isn’t strictly correct…

    It’s true that changes in pressure have greater impact on the momentum of coarser droplets, but there is some impact on finer droplets, too. Sufficiently high pressure makes for a finer spray quality and finer sprays have been shown to penetrate dense canopies more effectively. We have seen improved canopy penetration in ginseng, field peppers and matted-row strawberry using finer spray under higher pressure. If pressure is high enough, it will create air-inclusion and impart additional momentum to even Fine spray droplets over a short distance, but it’s a case of diminishing return. That is, it takes a lot of pressure to do it and relatively speaking they only got a bit faster/further. In our work, we used pressures between 90 and 300 psi. Excepting hollow cones, that’s generally on the upper end, or beyond a nozzles rated pressure range and it may even be outside the pumps capacity.

    The reason we downplay pressure as a tool for improving canopy penetration is because finer spray under high pressure causes unbelievable drift. A fraction of the spray does get deeper into canopies when you “fog it in”, but the plume of spray blowing beyond the sprayer is entirely unacceptable. Slowing down the travel speed, spraying on cool, humid, low-wind days and lowering boom height can help, but in every trial where we’ve used high pressure and Fine spray quality, we see the image below… or far worse:

    Staged drift in peppers using water
    Staged drift in peppers using water and high pressure combined with Fine spray quality

    The compromise in canopy penetration is to use a Medium spray quality and higher water volume. Stay within the pressure range the nozzle requires to achieve that Medium spray quality. If canopy penetration is still insufficient, consider canopy management (like planting density and pruning) and explore drop-arms to direct the spray, or booms that offer an air-assist or air-deflection option (a few shown here) to entrain and carry spray into the canopy.

    Don’t use higher pressure to increase canopy penetration.

  • The Pressure Gauge Shows More Than Pressure

    The Pressure Gauge Shows More Than Pressure

    Kim Blagborne (formally with Slimline Manufacturing) has long said that the pressure gauge on an airblast sprayer indicates more than just pressure. It can be used to diagnose a number of pump and plumbing issues… if you know what to look for. Here’s Kim’s troubleshooting guide to reading into what your gauge is REALLY telling you:

    Scenario One

    “As the tank empties, the pressure drops”

    First, try adjusting the pressure regulator (assuming a positive displacement pump). If you can maintain the pressure up until the tank empties, your intake line may be loose and it’s sucking the bottom of the tank. Check the fitting between the suction filter and the pump. Apply a light coating of grease to the O-rings on the elbows and filter to ensure a complete seal.

    Second, try stopping mid-tank (that is, turn off the tractor PTO and let the sprayer sit for a few minutes). Does the pressure gauge return to the original set pressure? If so, then the intake line inside sprayer has likely come loose entirely. Open the lid, and using a straightened-out coat hanger, hook the intake line and give a few gentle tugs – it should not be able to move. If it does, you’ll have to re-fasten the intake line so it’s not sucking the bottom of the tank.

    The humble coat hanger. It opens our cars and now fixes our sprayers. Remarkable!
    The humble coat hanger. It opens our cars and now fixes our sprayers. Remarkable!

    Scenario Two

    “When I first start the sprayer, the pressure drops or fails to maintain constant pressure as the tank empties”

    This might indicate improper mixing practices because the filter is probably plugging with product. Alternately, your PTO speed may be too slow to drive sufficient mechanical agitation. Check the suction filter as soon as the problem occurs (don’t finish spraying). If you wait to check when the tank is empty, the evidence of a plugged filter could be washed away before you can confirm it. This problem often happens when spraying nutrients, or when products aren’t compatible.

    If that’s not it, it could be a collapsed suction valve. The pump will sound like it’s “missing” (like an misfiring engine). The suction valve might need to be replaced.

    Or, perhaps you notice that you can compensate for the pressure drop by adjusting the regulator on the first tank. But it has to be dropped back down again for the second tank. In this case, the regulator might be sticking or jamming. Disassemble it and look for grit in the barrel of the regulator, then lubricate the parts.

    Scenario Three

    “I lose pressure when I turn my boom(s) on or off”

    In this scenario, the pressure is fine as you approach the end of the row. You turn off the outside boom (or both) and finish the turn. But, when you re-engage both booms, the pressure drops. Even when you adjust the pressure regulator to compensate (assuming a positive displacement pump), the unit only gains the lost pressure slowly. In this case, the regulator might be sticking or jamming. Disassemble it and look for grit in the barrel of the regulator, then lubricate the parts.

    Scenario Four

    “The pressure gauge spikes when I turn off the boom(s)”

    If you run a Turbomist, it could be the bypass balance. To solve this issue, head over to this article and pan down to see the step-by-step. If it isn’t the balance, then it’s likely the regulator. The issue of a spiking gauge and how to correct for it is covered thoroughly in this article by Ag mechanic extraordinaire Murray Thiessen.

    Scenario Five (a positive displacement pump issue)

    “My gauge pulses”

    Is it more than a 20 psi range? Have you noticed that the deviation gets less as the PTO speed increases? Well, the pump pressure check-valve may have collapsed. Check the pressure check valves in the pump for broken springs on the suction valve plate.

    Does the needle move rapidly through a 5 to 10 psi range? The accumulator pressure might be low. Try adjusting system pressure via the regulator and if that changes how the needle is responding, then set an air compressor to 90 psi (or manufacturer’s recommended pressure) and charge the accumulator.

    Perhaps the needle movement is not affected by system pressure changes or the PTO speed. In this case the accumulator may have failed entirely and the diaphragm will need replacement.

    Scenario Six

    “My calibration is going farther than expected”

    Sure, that sounds pretty good at first, but it may be that the gauge is stuck. With the PTO off and the spray boom on, the gauge must read “ZERO”. If it doesn’t, pony up the $50.00 and get a new one.

  • Making the Pressure Gauge your Speedometer – Tips with Tom #4

    Making the Pressure Gauge your Speedometer – Tips with Tom #4

    Good spray quality is essential in application, but all of the factors involved can make getting there quite a challenge. In reviewing magazines, you may see that publishers will bold a certain pressure (like 40 psi). They do this not because that is the pressure the nozzle must experience, but because that is the pressure at which the nozzle produces its nominal flow rate.

    So if you don’t have to spray at that bolded/highlighted number, how do you decide on your ideal pressure?

    Tom Wolf talks about the evolution of pressure ranges in nozzles and walks us through an applicator’s decision-making process. After following the tips in the video, calibrating your sprayer and driving out to the field, you should be able to maximize spray quality by simply using your pressure gauge as the speedometer.