Tag: pesticide

  • Biobeds for Pesticide Waste Disposal

    Biobeds for Pesticide Waste Disposal

    One of the most challenging aspects of a spray operation is the disposal of leftovers or rinsate containing pesticides. Let’s be honest, too much of it is drained onto the ground in a corner of the yard or the field. Nobody’s happy about that, nobody’s proud of it, but what are the alternatives?

    Waste disposal is a skeleton in the closet of the pesticide industry. One of the problems is the time-consuming nature of sprayer cleaning, and the lack of clear guidelines on product labels that pass the buck.  Too often, the applicator is asked to “act in accordance with provincial or state guidelines”, which is essentially a dead end.
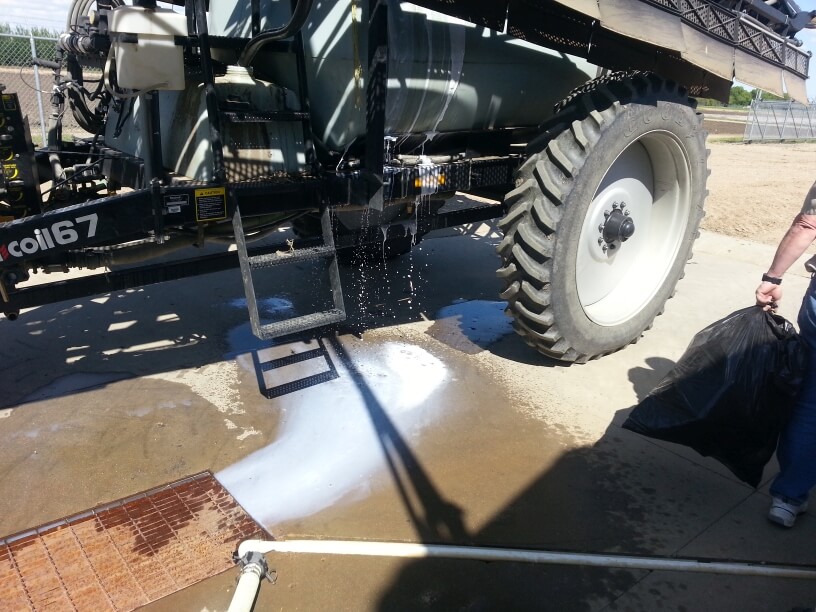
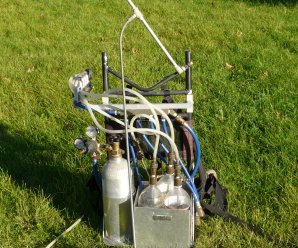
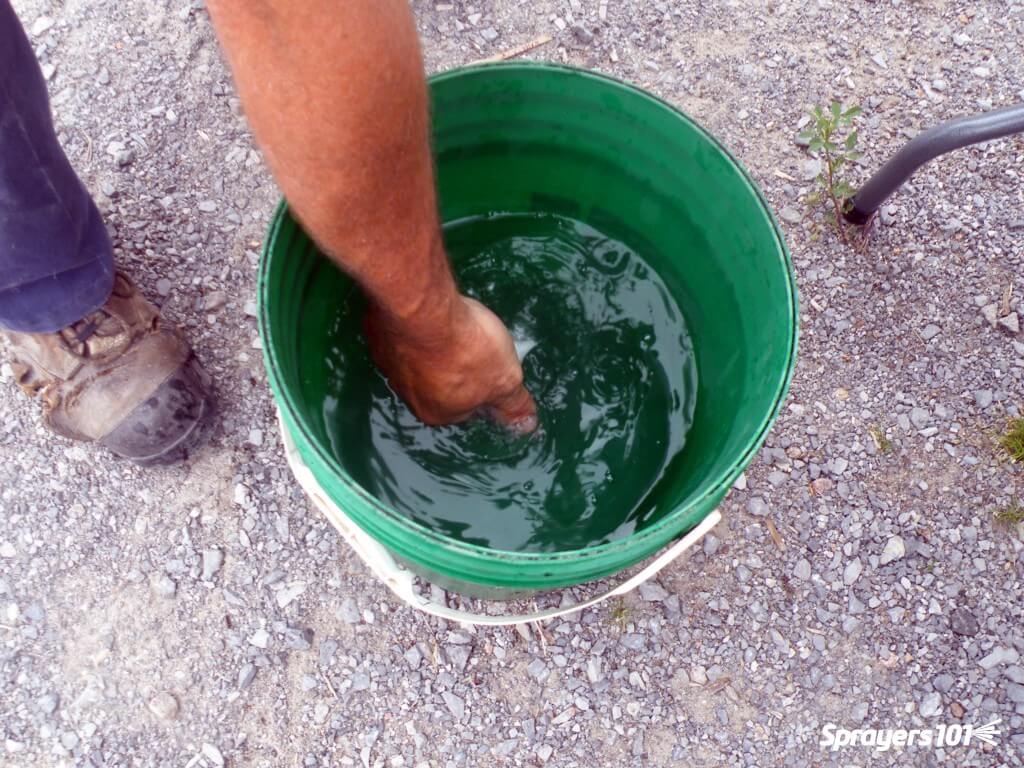
    Figure 1: Sprayer fill station

    At Sprayers101.com, we’ve tried to tackle the problem by finding ways to generate less waste (Express End Caps, Accu-Volume), by disposing of the rinsate by spraying it out, or by installing an efficient continuous rinsing system. We’d now like to talk about another component, biobeds.

    What is a biobed?

    Simply put, a biobed is a place where it’s safe and acceptable to dump dilute pesticide waste. First implemented in Sweden about 20 years ago, a biobed typically consists of a 1-m deep pit measuring about 3 m x 6 m or so. The pit is filled with a biomix, a mixture of cereal straw, compost or peat, and soil. The biomix, when properly prepared, acts to absorb a large amount of moisture, adsorb the pesticide molecules, and provide an environment in which microbes break down the residues.
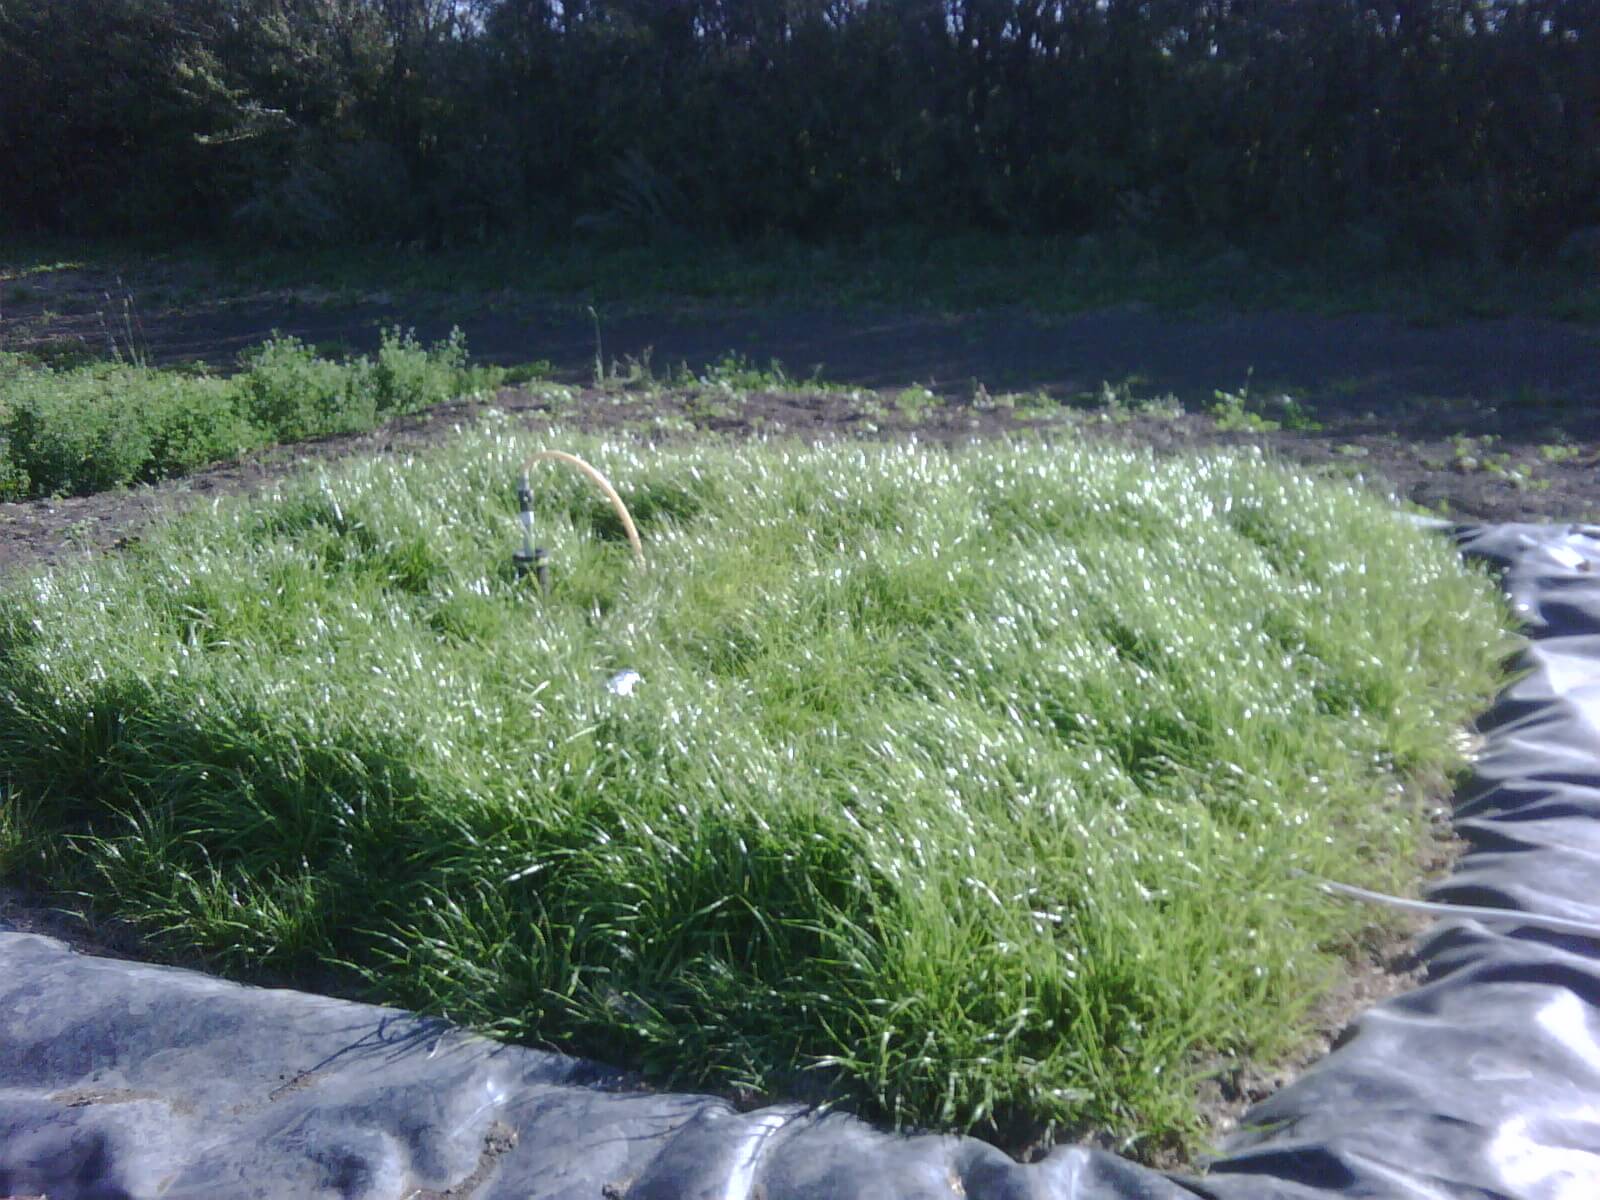
    Figure 2: Canada’s first commercial biobed installation at Indian Head, SK, 2009 (Source: Murray Belyk, Bayer CropScience (retired)).

    The effluent from a properly constructed biobed system contains 90 to 99% less pesticide than what was introduced, depending on the pesticide.

    Biobeds have been extensively studied and are now found throughout Europe and many parts of Central and South America. Canada currently has 6 research biobed sites in the West, and a further 17 in Quebec. The systems have been researched by Agriculture & Agri-Food Canada (AAFC) in recent years, with promising results.
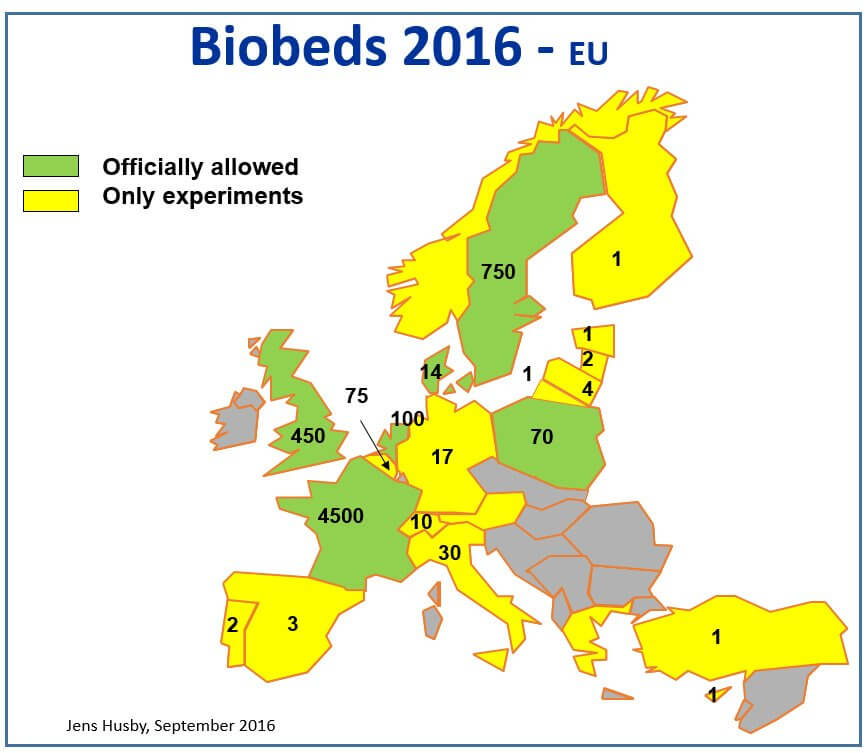
    Figure 3: European biobed installations, 2016 (Source: Jens Husby, Biobeds.org).
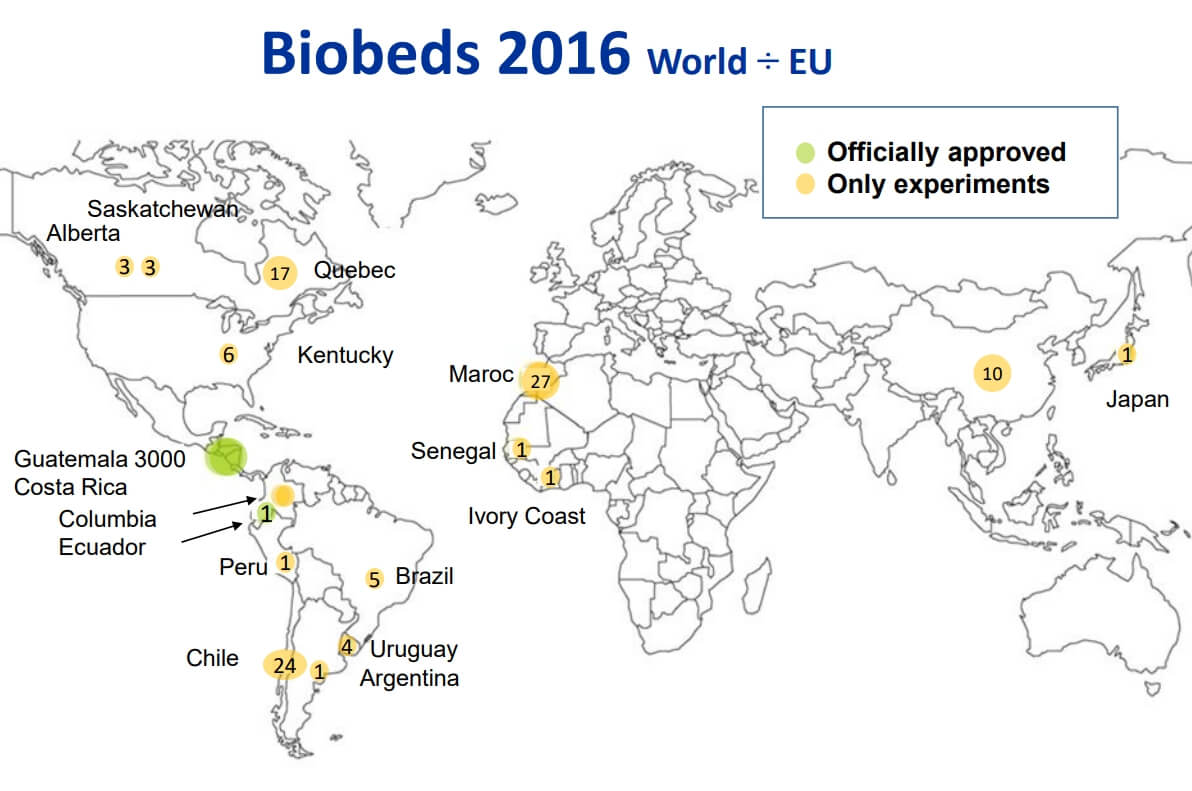
    Figure 4: Global biobed installations, 2016 (Source: Jens Husby, Biobeds.org).

    Constructing a biobed

    There are many possible variations of biobeds, some relatively simple and others engineered to address certain specific needs. A great deal of creativity can be used to customize a biobed for any operation.

    A simple biobed

    The following is a variation of the simplest biobeds, and these are the types first tested by AAFC in Saskatoon and Indian Head, Saskatchewan about 10 years ago. This design is based on the biobeds established in Sweden and the UK, and is a good way to learn about the system.

    Note that this biobed has an impermeable liner, so it’s a closed system. Excess water that leaches to the bottom must be removed and cycled back to the top of the biobed.

    • Create the biomix by blending two parts, by volume, chopped cereal straw or wood chips (not cedar), one part mature plant-sourced compost or peat and one part relatively coarse-textured soil (for optimal drainage). Add water as necessary as if making compost. Allow to sit for four to six weeks.

    Figure 5: Biomix preparation.

    • During this waiting time, the biomix will warm and form a white-mold complex. This is the microbial basis for its ability to break down pesticide residues. White mold will be visible on the cellulose portions of the biomix.
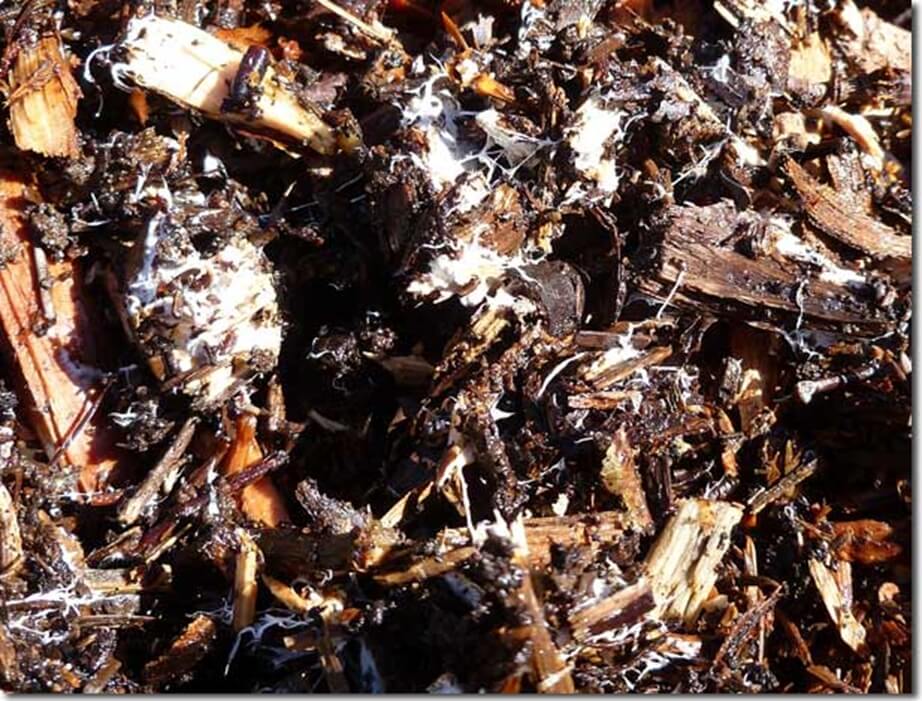
    Figure 6: white mold (Source: AAFC).

    • Identify a well-drained site easily accessible by spray equipment. Avoid low spots as water management becomes problematic.
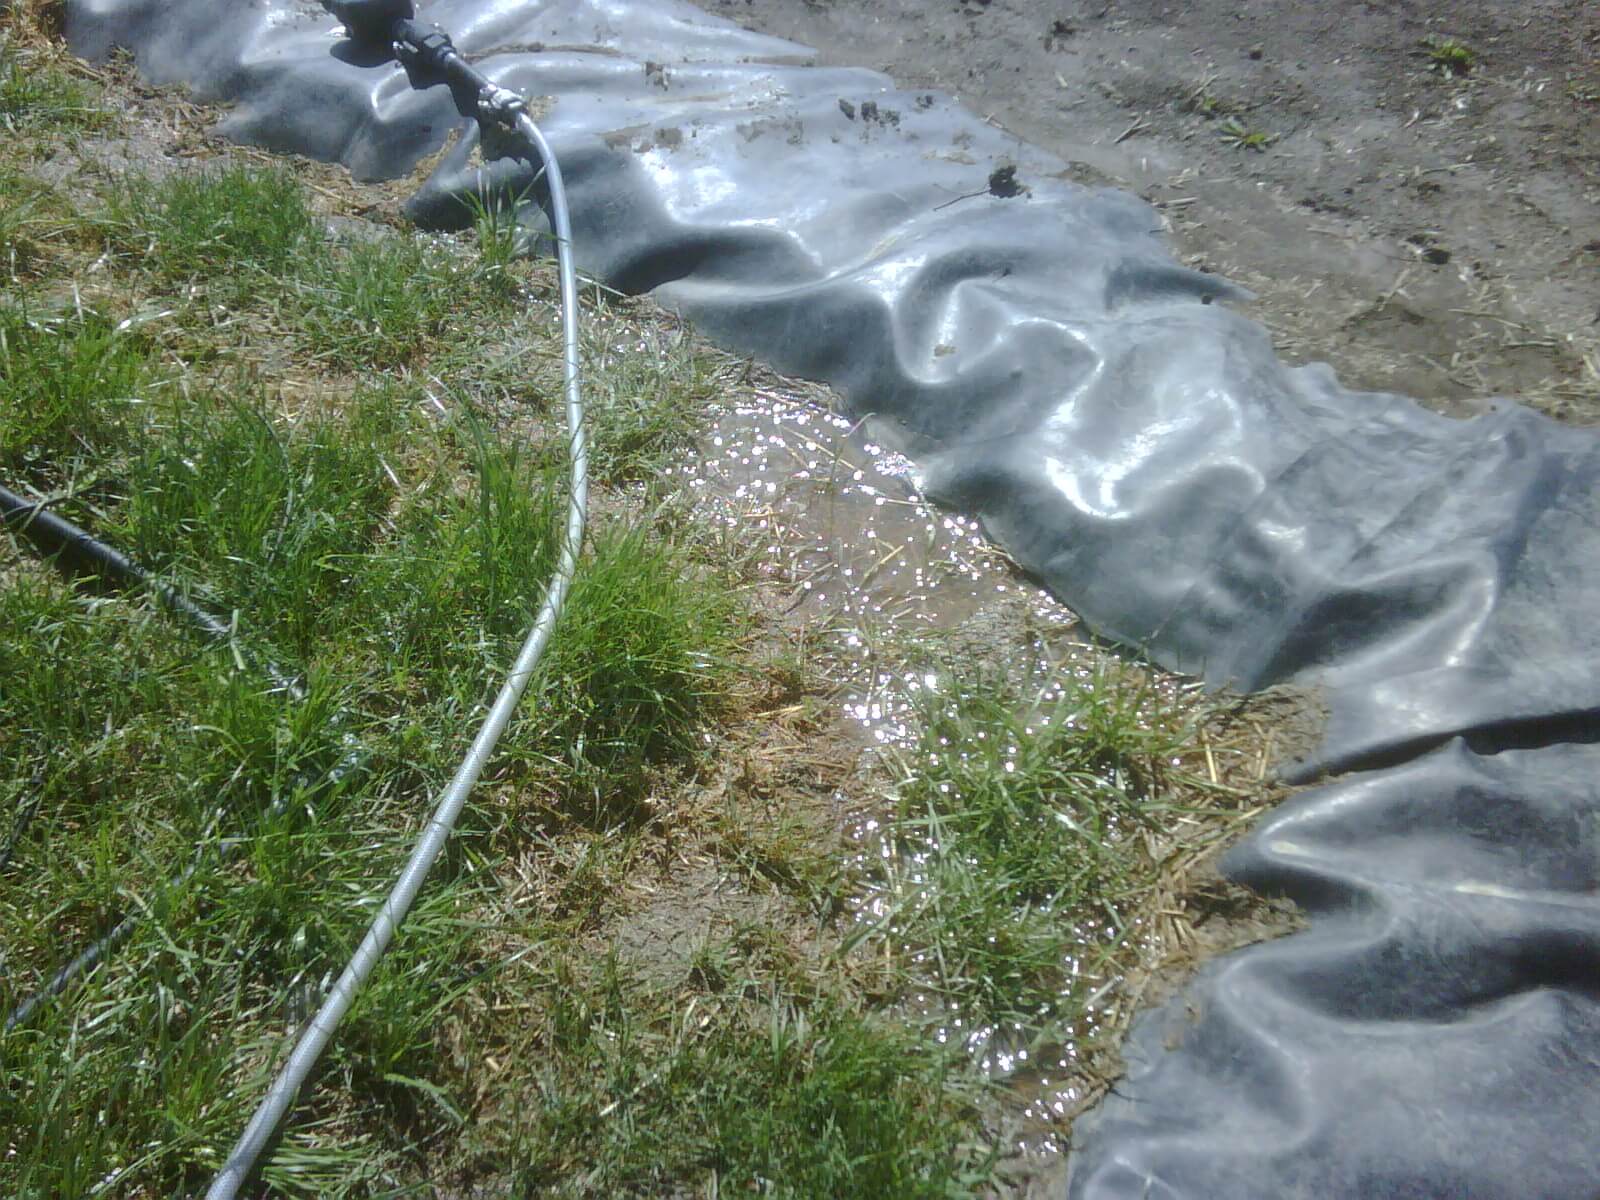
    Figure 7: Site selection and/or biobed covering are essential to avoid waterlogging (Source: Murray Belyk, Bayer CropScience (retired)).

    • Dig a pit sized to suit your requirements. As a rule of thumb, 1 m3 can process about 1000 L of liquid in a season. Rainfall is included in this amount.
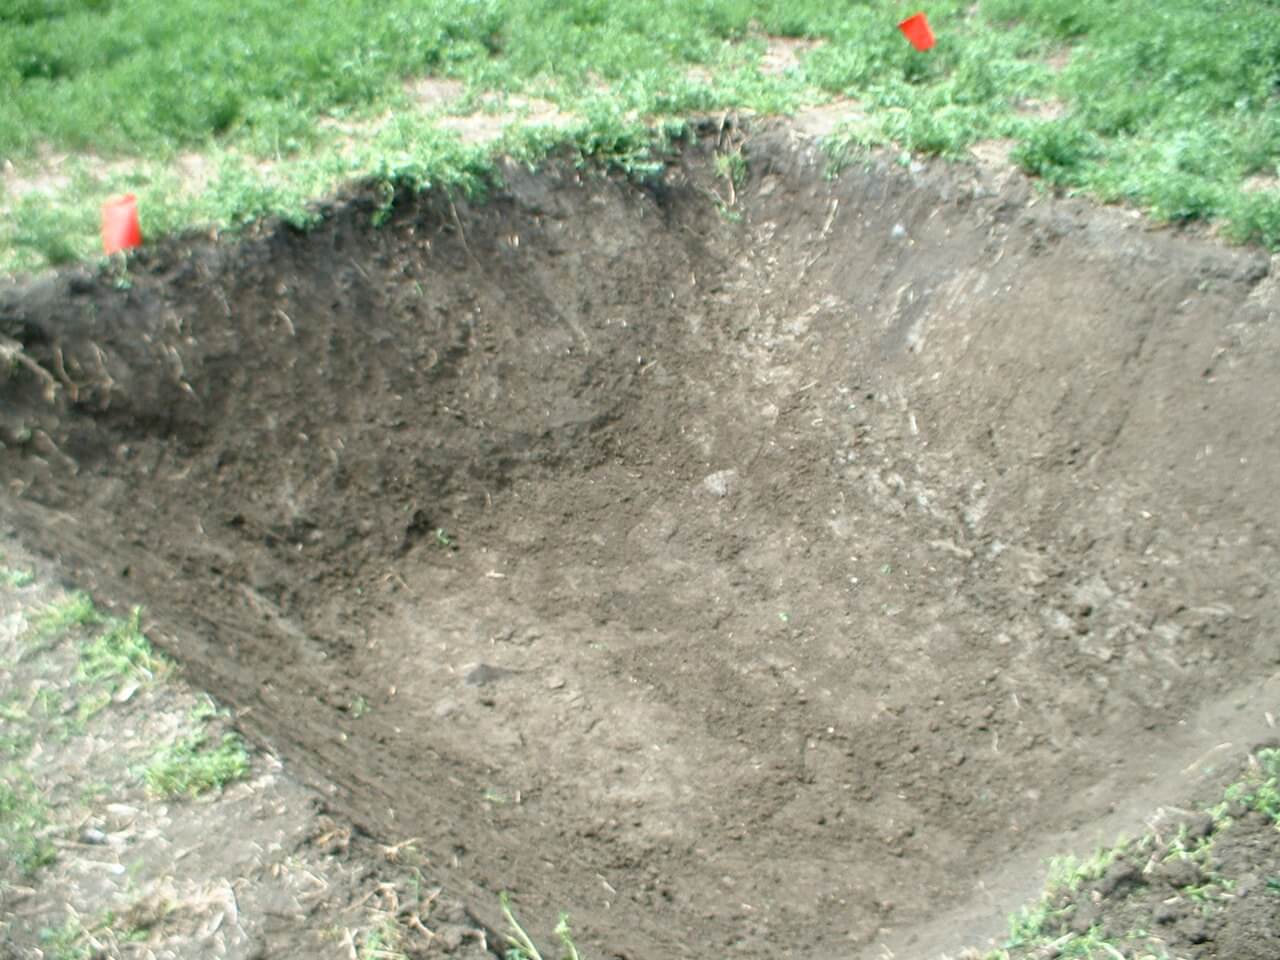
    Figure 8: A nice looking pit.

    • Line the pit with a geomembrane liner. 40 mil is plenty thick; any thicker and it gets hard to handle. Include a raised berm at the edge.
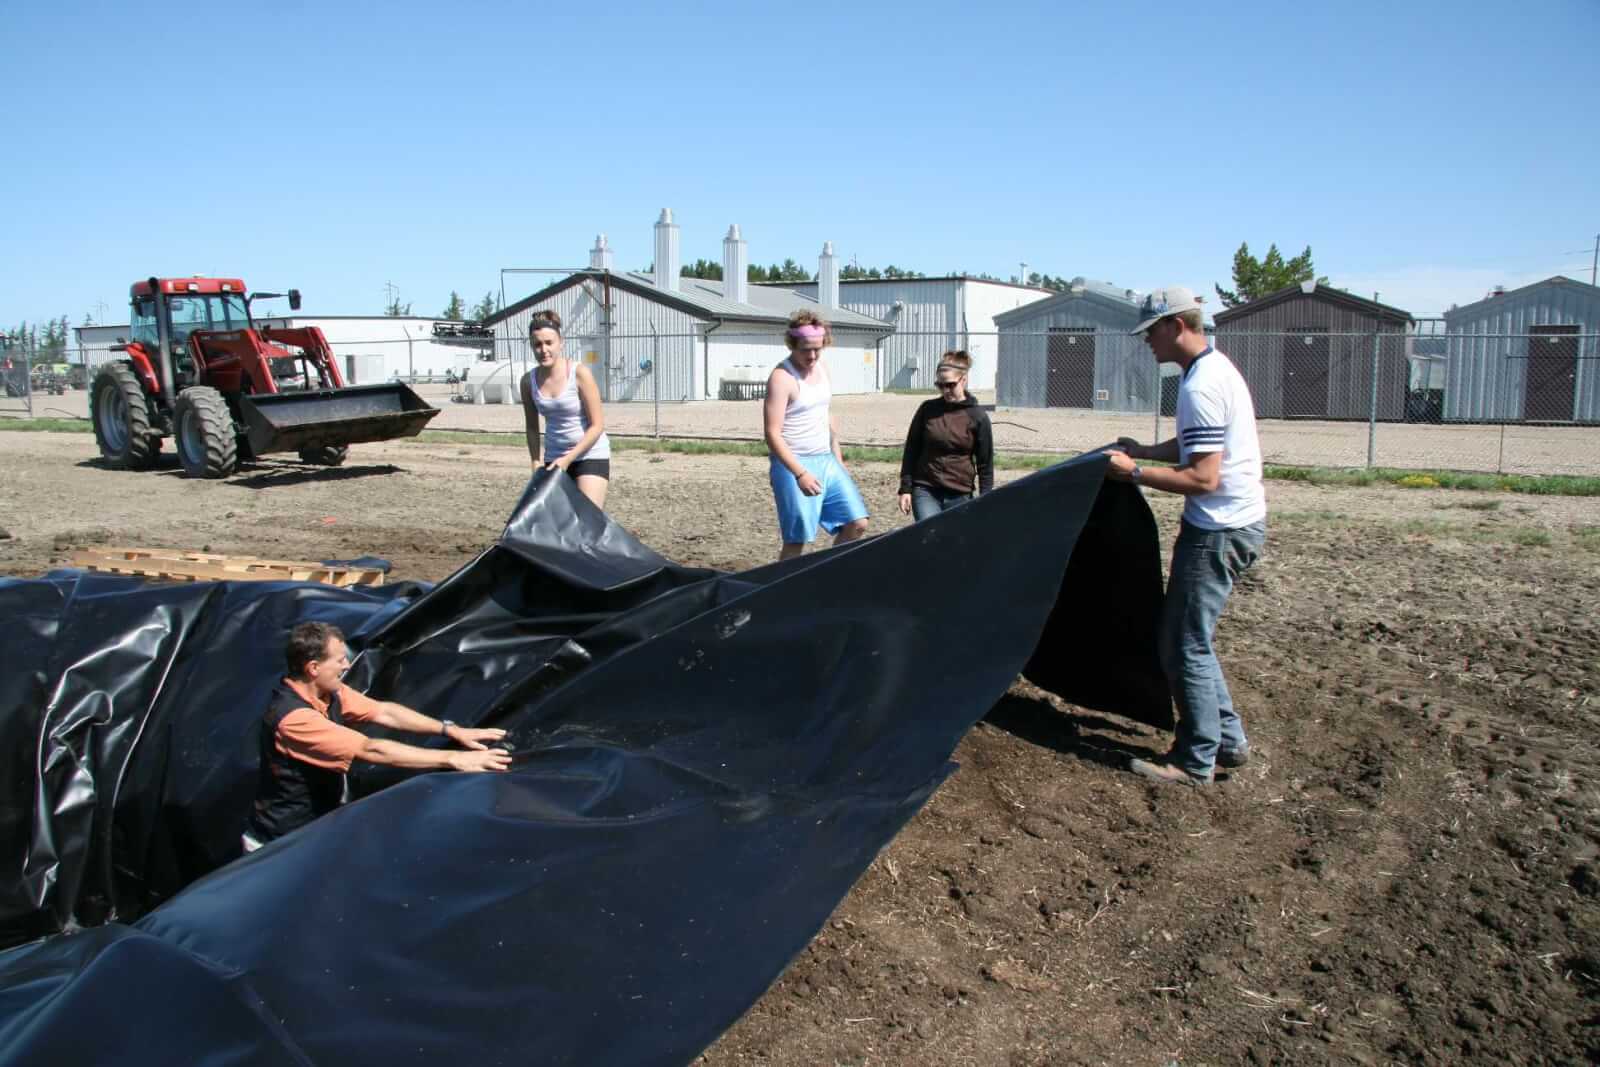
    Figure 9: Liner creates a closed system that will require a way to remove leached water.

    • Install weeping tile at bottom of pit, and extend it to ground level. This will be useful to determine water status and remove water if necessary.
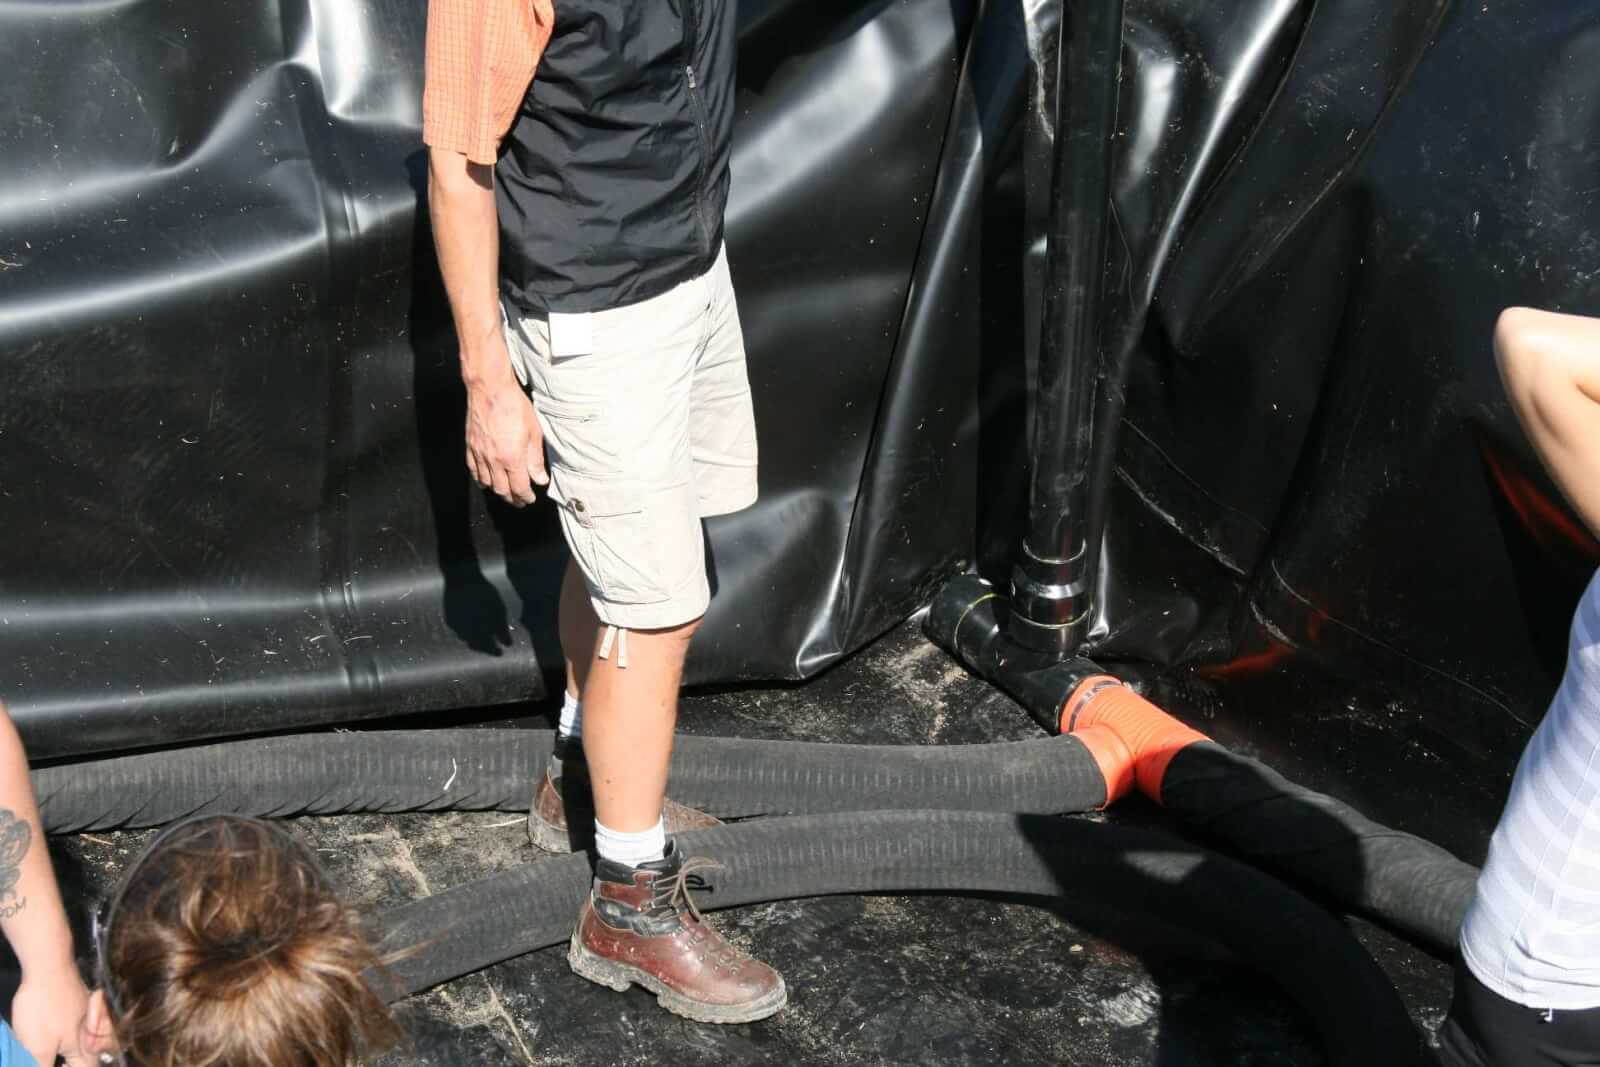
    Figure 10: Weeping tile to collect excess water.

    • Cover weeping tile with pea gravel and a silt trap. This serves to make leached water freely available for removal.
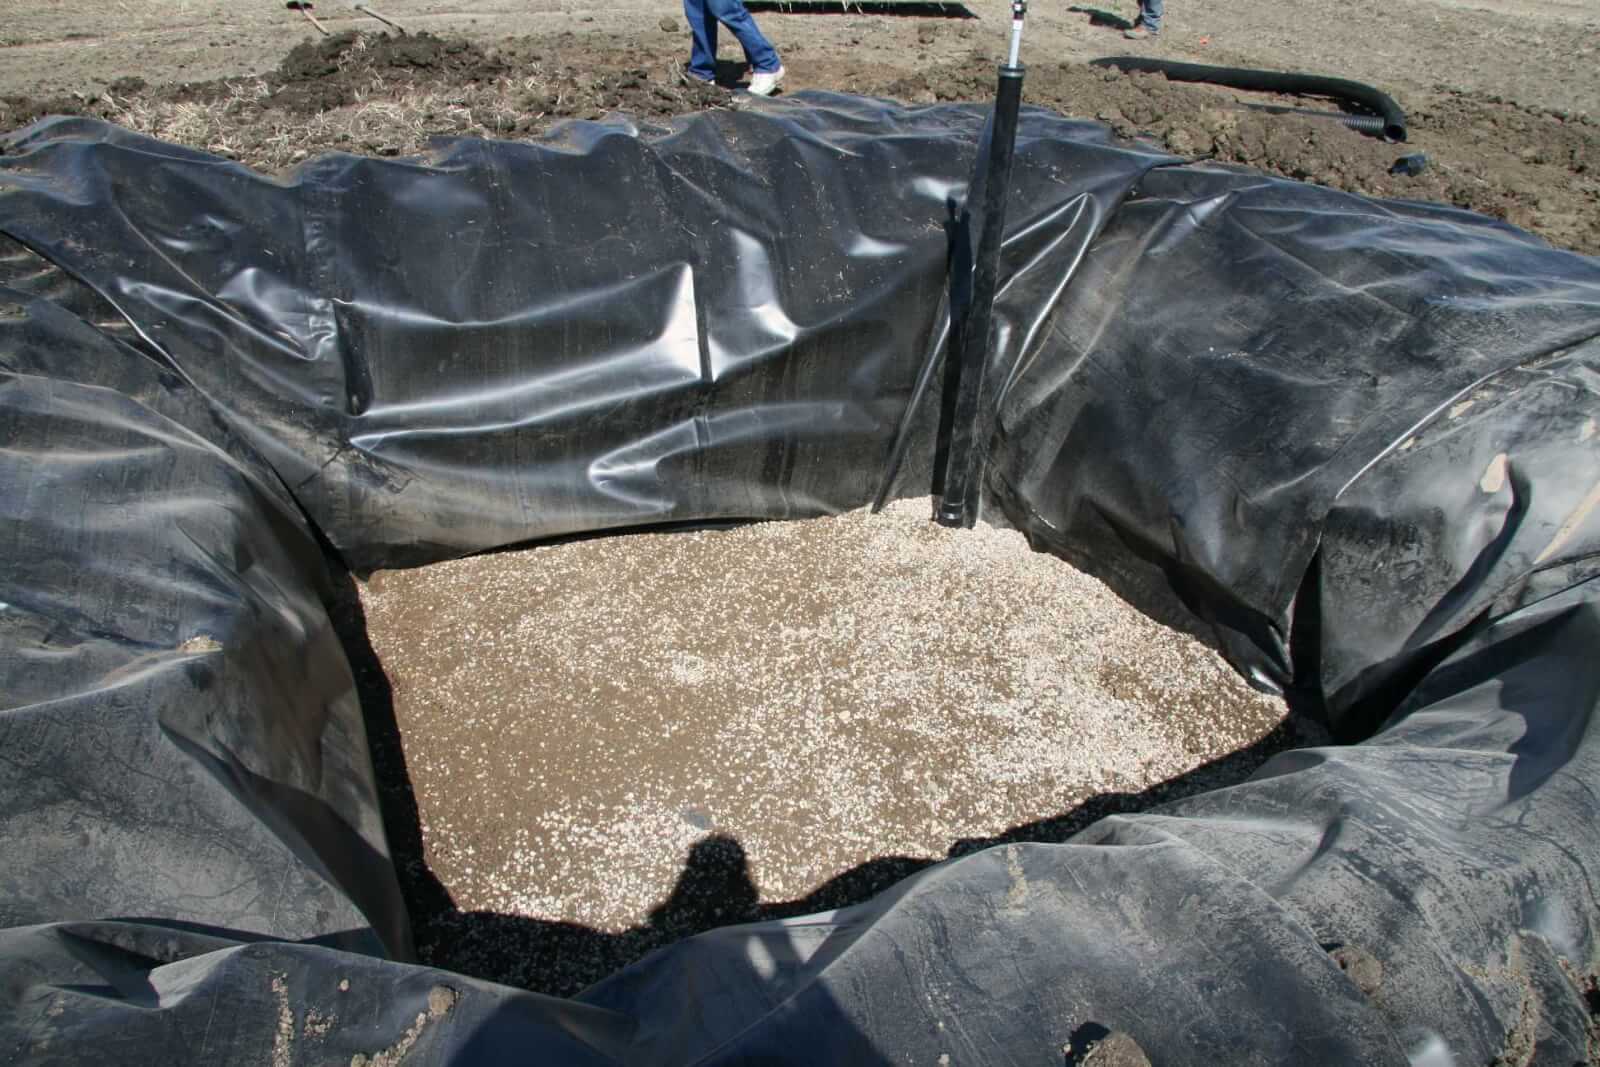
    Figure 11: Pea gravel over weeping tile.

    • Fill pit with biomix, anticipating significant settling. Top up as necessary over next few weeks. Use extra biomix to create a slope away from berm.
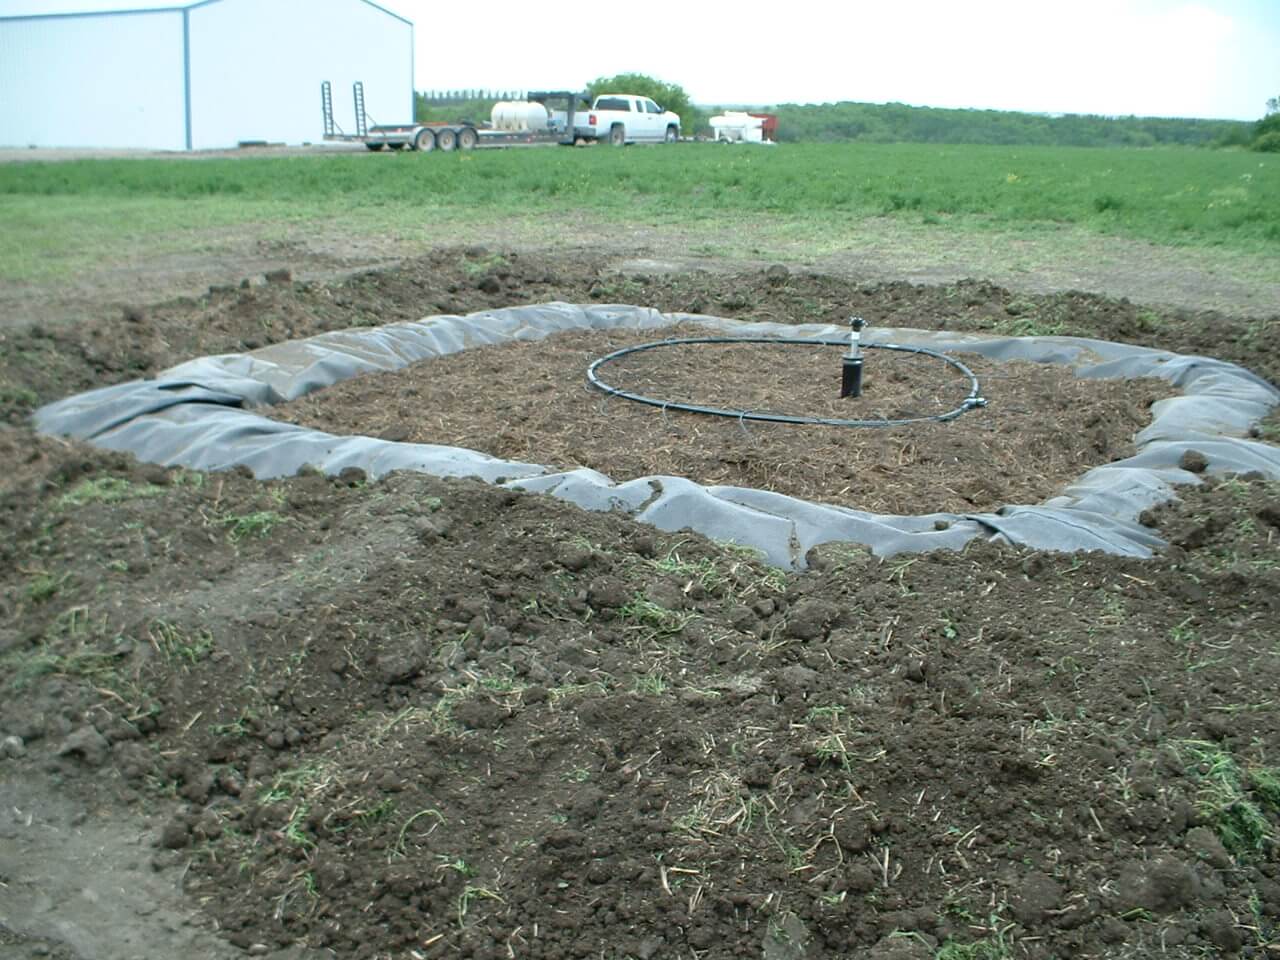
    Figure 12: Filled biobed.

    • Establish a bromegrass cover by transplanting or sodding. This is an important way to remove excess water via evapotranspiration.
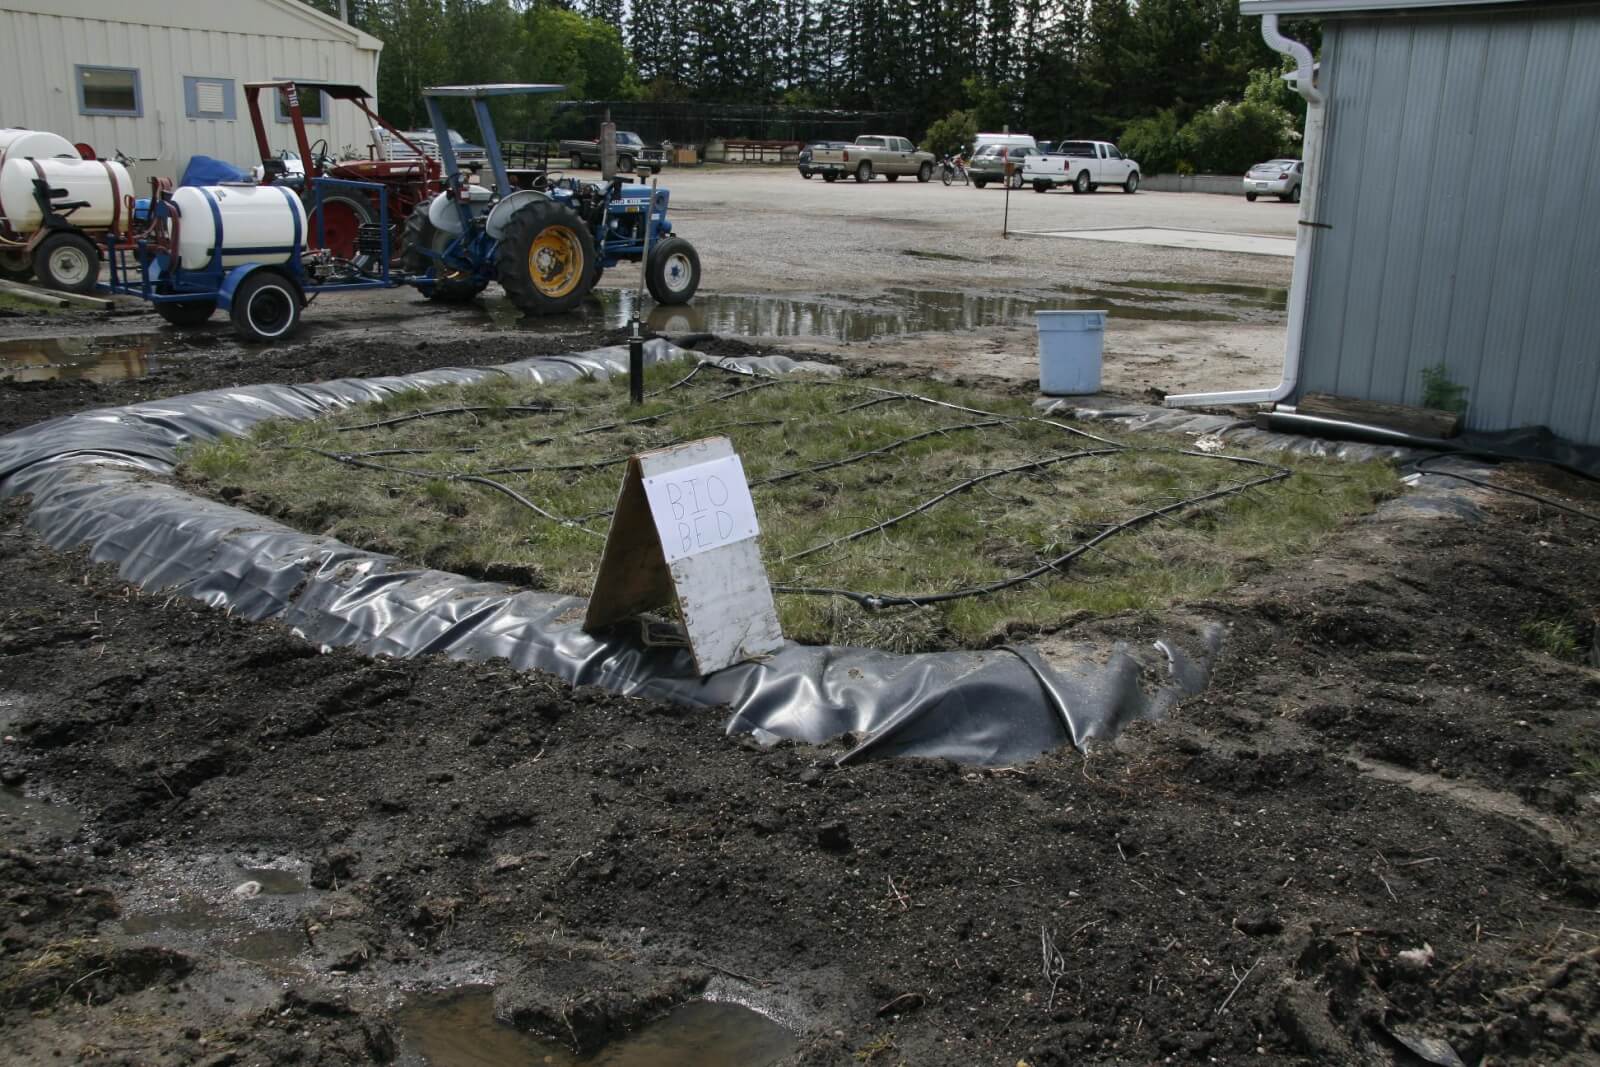
    Figure 13: Early sod growth on biobed at Indian Head, SK.

    • Introduce pesticide waste to biobed, managing moisture content to avoid waterlogging.
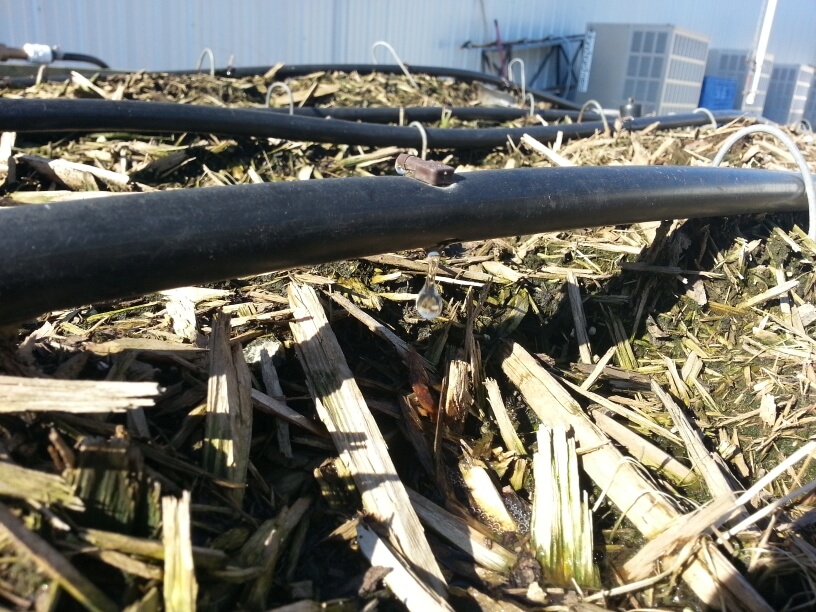
    Figure 14:  Pesticide waste entering biobed via drip irrigation.

    Introduction of pesticide waste to the biobed

    Moving pesticide waste from the sprayer to the biobed should be easy and trouble free. A simple pad built beside biobeds, either sealed with concrete or asphalt, or with a hardy geomembrane liner, works well. The sprayer is cleaned on this pad and rinsate flows into a drain. A sump pump lifts the rinsate to a storage tank from which it is introduced via gravity or pumped drip irrigation.

    Figure 15: Biobed system in Simpson, SK. Rinsate from sprayer is collected in a sump, which is pumped to the black storage tank in background. Rinsate is introduced into biobed (blue tub) as needed (Brian Caldwell in foreground, left, Larry Braul, right).

    When not in use, the sump drains freely to dispose of rain water.

    Others choose to pump or dump rinsate directly into a holding tank, from where it can be pumped onto the biobed.
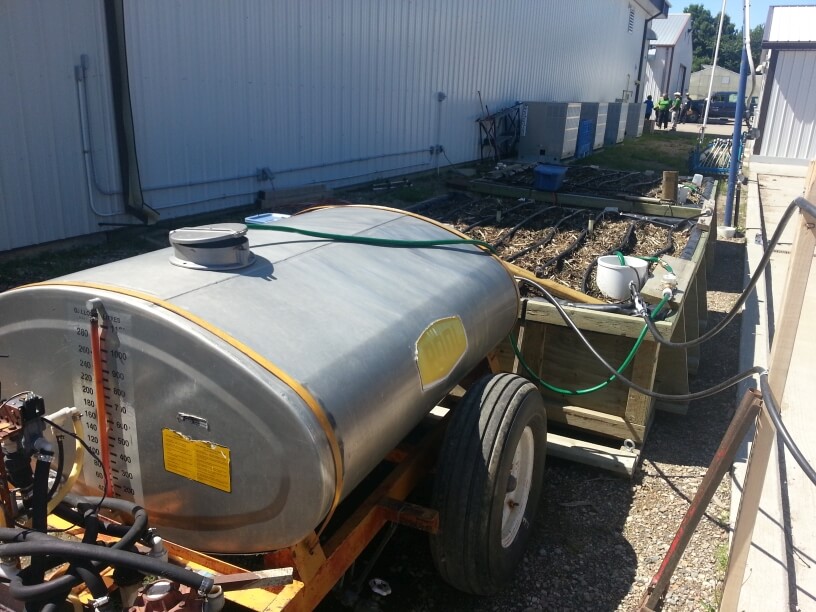
    Figure 16: Holding tank at biobed in Outlook, SK.

    Some European systems include driving supports on the biobed so the sprayer can be parked directly over top.
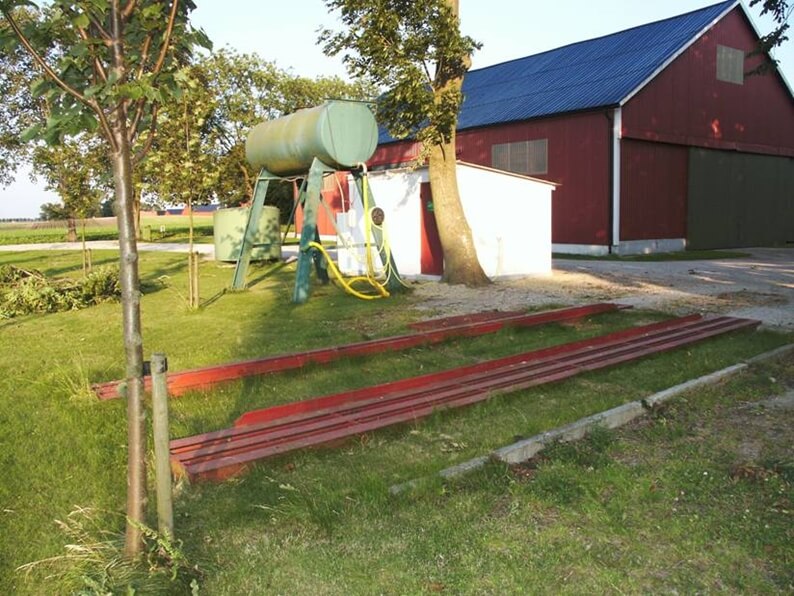
    Figure 17: Steel beams can allow (light) sprayer access (Source: Eskil Nilsson via Biobeds.org).

    A two-stage biobed

    The same basic building principles apply as in the original simple biobed. However, instead of reintroducing the effluent to the top of the biomix as it collects on the bottom, it is instead pumped onto a second biobed. This biobed then degrades any remaining product. This system is more efficient at degrading persistent products, and allows for better water management.
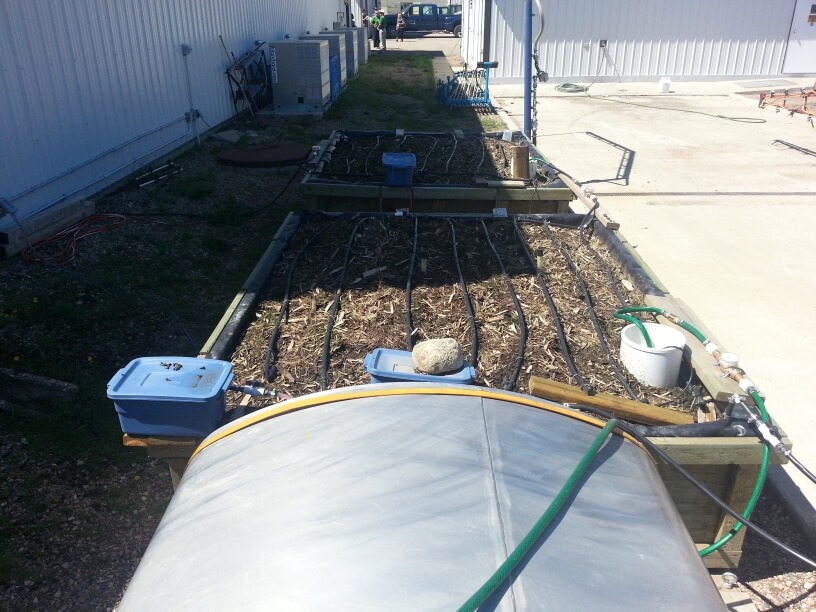
    Figure 18: Two-stage biobed system at Outlook, SK.

    The principle has proven effective, helping degrade more difficult pesticides to acceptable levels.

    Above-ground biobeds

    One of the problems with below-ground biobeds in wet climates is the difficulty managing water. Above-ground biobeds can address this issue by eliminating the possibility of surface runoff being added to the biomix. Adding a rain cover would also be easier and more effective.

    Above-ground biobeds can be edged with plywood, or placed entirely into plastic tanks whose tops have been removed.
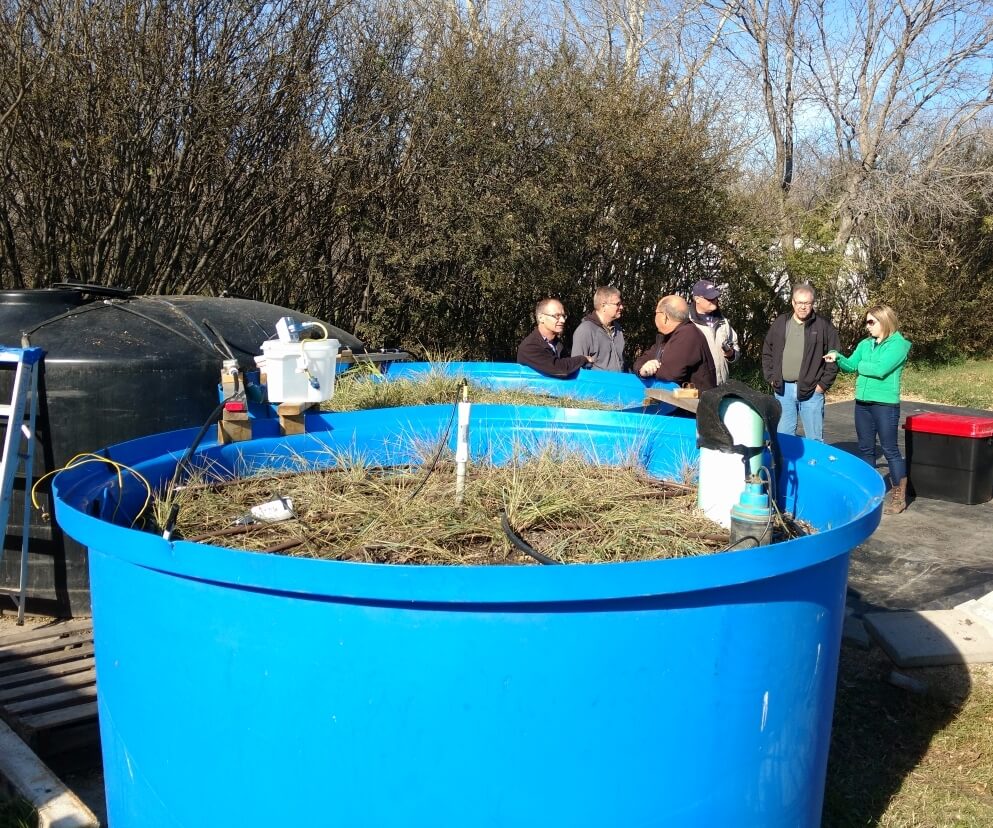
    Figure 19: Above ground biobed installation with plastic tub.

    One potential problem with above-ground biobeds is the later spring warming of this installation compared to below-ground types. Cold temperature reduces the effectiveness of biobeds due to the reliance on microbial activity. Heat tape has been tested by AAFC and shown to be very effective at warming the biomix and stimulating initial microbial activity. Passive solar systems have also been studied but are more difficult to install.

    Figure 20: Heat tape (Source: AAFC).

    Figure 21: Passive solar biomix heating system.

    Phytobac and Biofilters

    European designs have utilized plastic containers to form of various designs, including the commercial “Phytobac” systems from France and developed with the support of Bayer CropScience.

    Sequential biofilters have also been implemented. The leachate simply migrates through the biomix into the next container below. Eventually, adjacent biofilters containing plants act to remove the moisture.
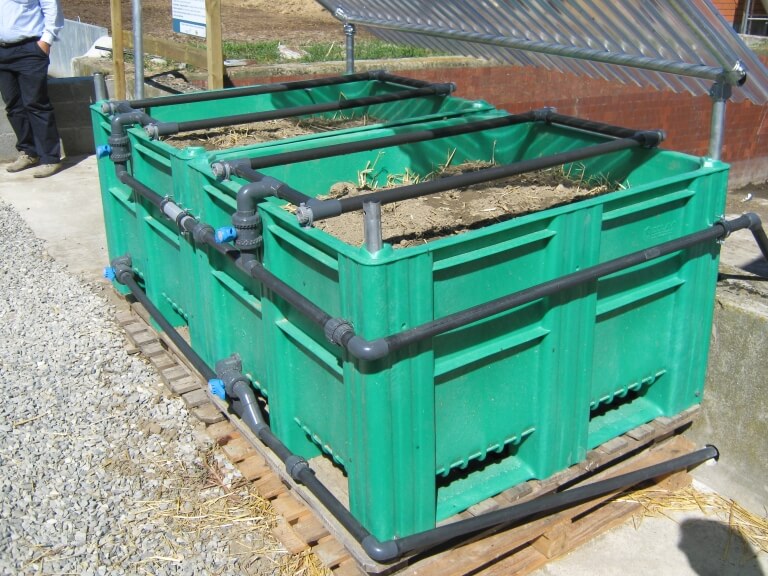
    Figure 22: Phytobac installation, cross-section.
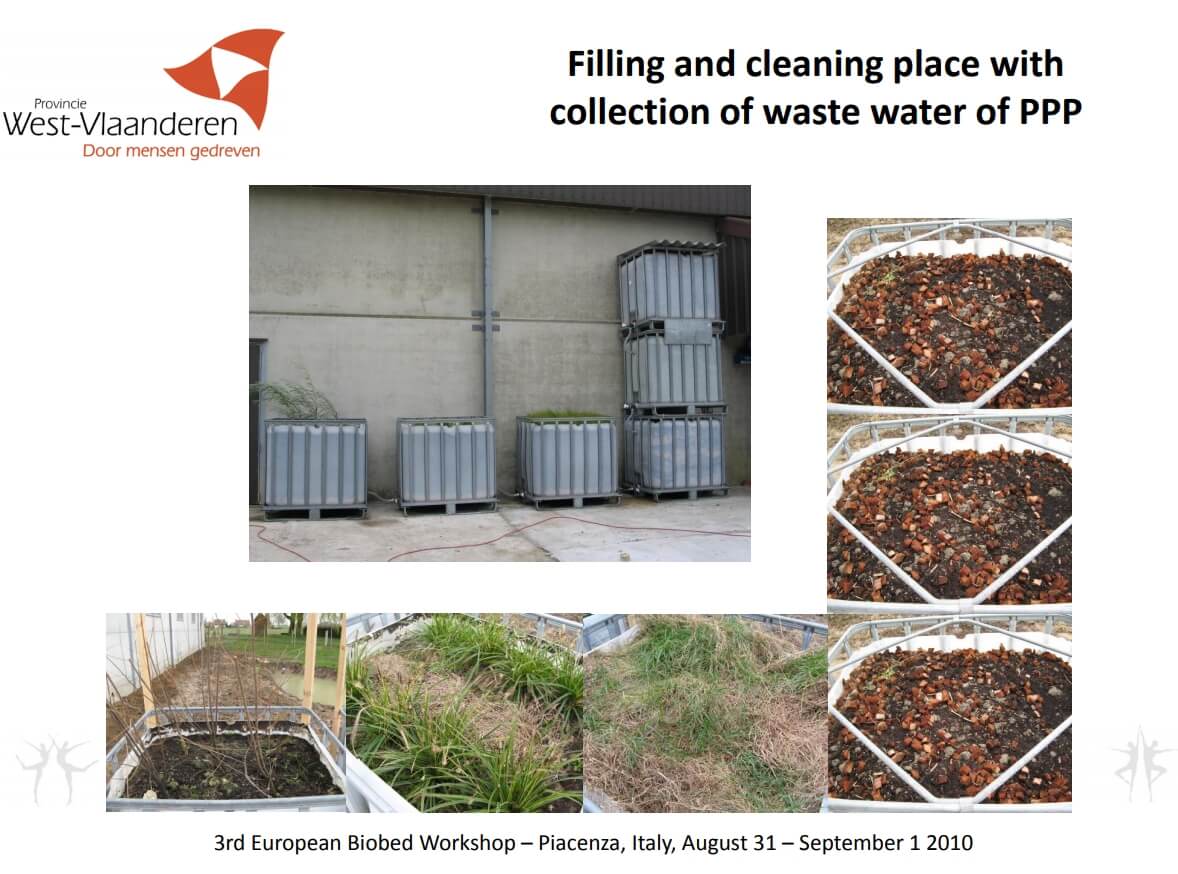
    Figure 23: Biofilter installation in Belgium (Source: Inge Mestdagh via Biobeds.org).

    Biomix longevity

    Swedish and UK research has suggested that biobeds require minimal maintenance aside from water management in closed systems. Biomix will settle over time and may need to be topped up. After five to eight years of use, it has been recommended to remove biomix and distribute it over a field with a manure spreader.

    Canadian research results

    Extensive analysis of pesticide degradation in five biobeds across Western Canada was conducted as part of a three-year study led by AAFC. Between eight and 51 products were analyzed per site, including herbicides, fungicides, and insecticides. Their results showed that single biobeds could remove about 90% of the introduced pesticide, and two in sequence usually removed more than 98%.

    Pesticides that tended not to degrade rapidly were removed to a greater degree in the second biobed.

    In the AAFC studies, three herbicides were more difficult to remove in the tested biobeds: clopyralid (e.g., Lontrel, Stinger), bentazon (Basagran, Storm) and imazethapyr (Pursuit, Arsenal). For these three, roughly 60% was removed in a two-biobed system.

    Concentrated pesticides should not be introduced to a biobed as this will kill the microbial populations.

    Some fungicides were shown to depress microbial populations but only temporarily. Microbial breakdown still occurred.

    Biobed manual

    AAFC has authored a comprehensive manual on biobed operation and installation based on research experience in Canada and elsewhere. It will be available here in late June 2018.

    The future of biobeds

    Research into biobeds remains active around the world. Different substrates for the biomix are being studied to suit local availabilities. Various systems, ranging from simple to highly engineered are being studied. Degradation effectiveness for various influents remains a topic of significant interest. Producer adoption and implementation are being reported.

    Thanks to funded research projects, biobeds are up and working at Canadian institutional sites such as government research centres, and there are opportunities for county and municipal government sites. For biobeds to be a viable option on North American farms, their design needs to remain simple and their integration into established practices needs to be seamless. Producer experience and feedback are essential

    Learn more

    Valuable information on biobeds can be obtained from these two websites:

    Voluntary Initiative (UK industry)

    Biobeds.org (International research)

    Note: Brian Caldwell and I first learned about biobeds from Eskil Nilsson (website) during a visit to Sweden in 2001, and obtained support for initial studies in Saskatoon and Indian Head from the Pest Management Centre as well as Bayer CropScience. Brian took a lead in our creative and technical efforts over many years. Dean Ngombe, under the co-supervision of Diane Knight at the U of S and myself, produced the first M.Sc. thesis, and with significant input from Allan Cessna, the first scientific publications in Canada on biobeds. Thanks for Larry Braul and many collaborators for leading the most recent AAFC study and generously sharing resources, and Erl Svendsen, Bruce Gossen, and Claudia Sheedy for editorial input.

  • Storing Pesticide Mix Overnight

    Storing Pesticide Mix Overnight

    Not being able to finish a tank due to weather or any other reason happens to just about everyone. Is it OK to simply leave the sprayer as is, and resume spraying later after some agitation?

    In many cases, the answer is yes. Most pesticide mixtures are stable in short term storage. On resuming spraying, an agitation could be all that’s needed to get back to where you started a day or so earlier.

    But there are three important exceptions.

    When the active ingredient is formulated as a suspension. Suspensions are typically wettable powders and flowables, and rely on a clay carrier to distribute the active in the tank. Because clay is denser than water, these formulations settle out quickly after agitation stops. Sure, they can be brought back into suspension with vigorous agitation. But in lines and booms, boom ends and screens, dislodging a settled clay carrier is much more difficult. It’s also hard to tell if the cleaning has been successful because the problem spots are hidden.

    The best solution is to flush the spray boom with water before materials can settle and lodge. A visual inspection where access is possible, such as strainer bowls and boom ends, is part of the process to ensure the formulated product has been removed.

    Learn to identify which formulations are suspensions. There’s lots of jargon out there. Look for terms such as DC, DF, DG, DS, F, Gr, SP. Even EC formulations are suspensions (oil in water) and require agitation.

    When the active ingredient is chemically unstable. Some pesticides can degrade in the tank, usually due to alkaline (high pH) hydrolysis. The effect is very pesticide specific, but in general, insecticides (particularly organophosphates and carbamates) are more susceptible than other pesticides. This fact sheet by Michigan State University describes the impact of pH on a the half-life of a large number of pesticides.

    Note that in the examples in the MSU fact sheets, pesticide half lives are typically days and weeks, and only rarely hours. Also note that while high pH is most often problematic, low pH can lead to faster breakdown in a small number of products.

    Ensuring tank mix stability requires a pH meter or paper, and possibly a pH modifier such as citric acid. But do your research first! Here’s an article on pH and water quality.

    When the tank previously contained a product known to harm the current crop. This situation is most common and most difficult to address. Some examples from western Canada are Group 2 modes of action sprayed prior to a canola crop. Why are Group 2 products implicated?  Many are formulated as dry products on a clay base, and these can settle in boom ends, adhere to tank walls, or get stuck on screens. Their solubility is pH dependent, as we explain in this article.

    Canola is particularly sensitive to this mode of action, and the most common canola herbicides, Liberty and glyphosate, are formulated with strong detergents that act as tank cleaners.

    Even when applicators think that their tank is clean, they can’t actually be sure and can’t do much about it at that stage. The stripping of tiny amounts of residue off the tank walls, filter screens, or plumbing, can happen during a mid-day stop or an overnight break.  Applicators eventually find out that this happened, usually about two weeks after spraying.

    Our advice is:

    After spraying a herbicide to which a subsequent crop may be sensitive, with the classic case being a Group 2 and moving to canola, be extra diligent with cleaning and pay attention to the tank walls, all screens, and boom ends.

    The best way to solve issues is to avoid them in the first place. If the weather looks unsettled and may interrupt your spray operation, consider mixing smaller batches that can be sprayed out completely even if conditions change quickly. This allows you to rinse the tank and spray water through the boom, thus avoiding a contamination problem developing overnight.

    If that’s not possible, at least do not let a tank mix sit in the boom overnight. Instead, use your clean water tank to push water through the boom prior to storage and double check the screens. The following day, prime the boom with your tank mix as usual and resume spraying the crop.

    If you’re not sure that your sprayer can draw from the clean water tank and push through the booms (the wash-down nozzles are, after all, the intended destination for that water), decipher your system and add the necessary valves that make this possible.

    A useful design that helps flush and prime a boom quickly is the recirculating boom offered by some aftermarket boom manufacturers. These booms are also more common on European sprayers. A nice feature of such designs is that the tank contents can be pumped through the entire boom assembly without actually spraying. This ensures that the boom is primed without any soil contamination. It also dilutes whatever residue there may be in the boom plumbing with the entire tank, likely reducing its concentration enough to be of little concern.

    An additional feature of recirculating booms is that many offer stainless steel tubing throughout most of their feed and return length, minimizing the black rubber hose products that often adsorb, and later release, herbicide contamination.

    Even if a wholesale boom or sprayer change is impractical, consider switching to steel boom lines and tanks tank to minimize residue carryover.

    As is often the case in the spraying business, prevention is easier and less costly than solving a big problem later. Spray mix storage is one of those examples where a small amount of extra effort at the beginning can pay big dividends later.

  • Should Backpack Sprayers be Used to Test Airblast Products? – Part 2

    Should Backpack Sprayers be Used to Test Airblast Products? – Part 2

    In Part One of this article, we showed that approximately 40% of minor use label expansions and registrant submissions rely on data from hand booms and guns. We also showed that a hydraulic backpack or knapsack will not give the same coverage as an airblast sprayer, and we concluded by suggesting that small plot researchers use spray equipment that reflects grower practices.

    Unfortunately, practical logistics prevent most researchers from using a full-size airblast sprayer. They may not have access to such a sprayer, and if they do, it takes considerable time to mix and clean between treatments. Further, treatments are often only a single row, or even a single plant. It takes too much pesticide, too much time, and too much plot space to justify using a full-sized airblast sprayer, even if the relevance of the results are questionable.

    Would another method of application better emulate an airblast application but retain the convenience of a hand boom or gun?

    The motorized backpack mistblower

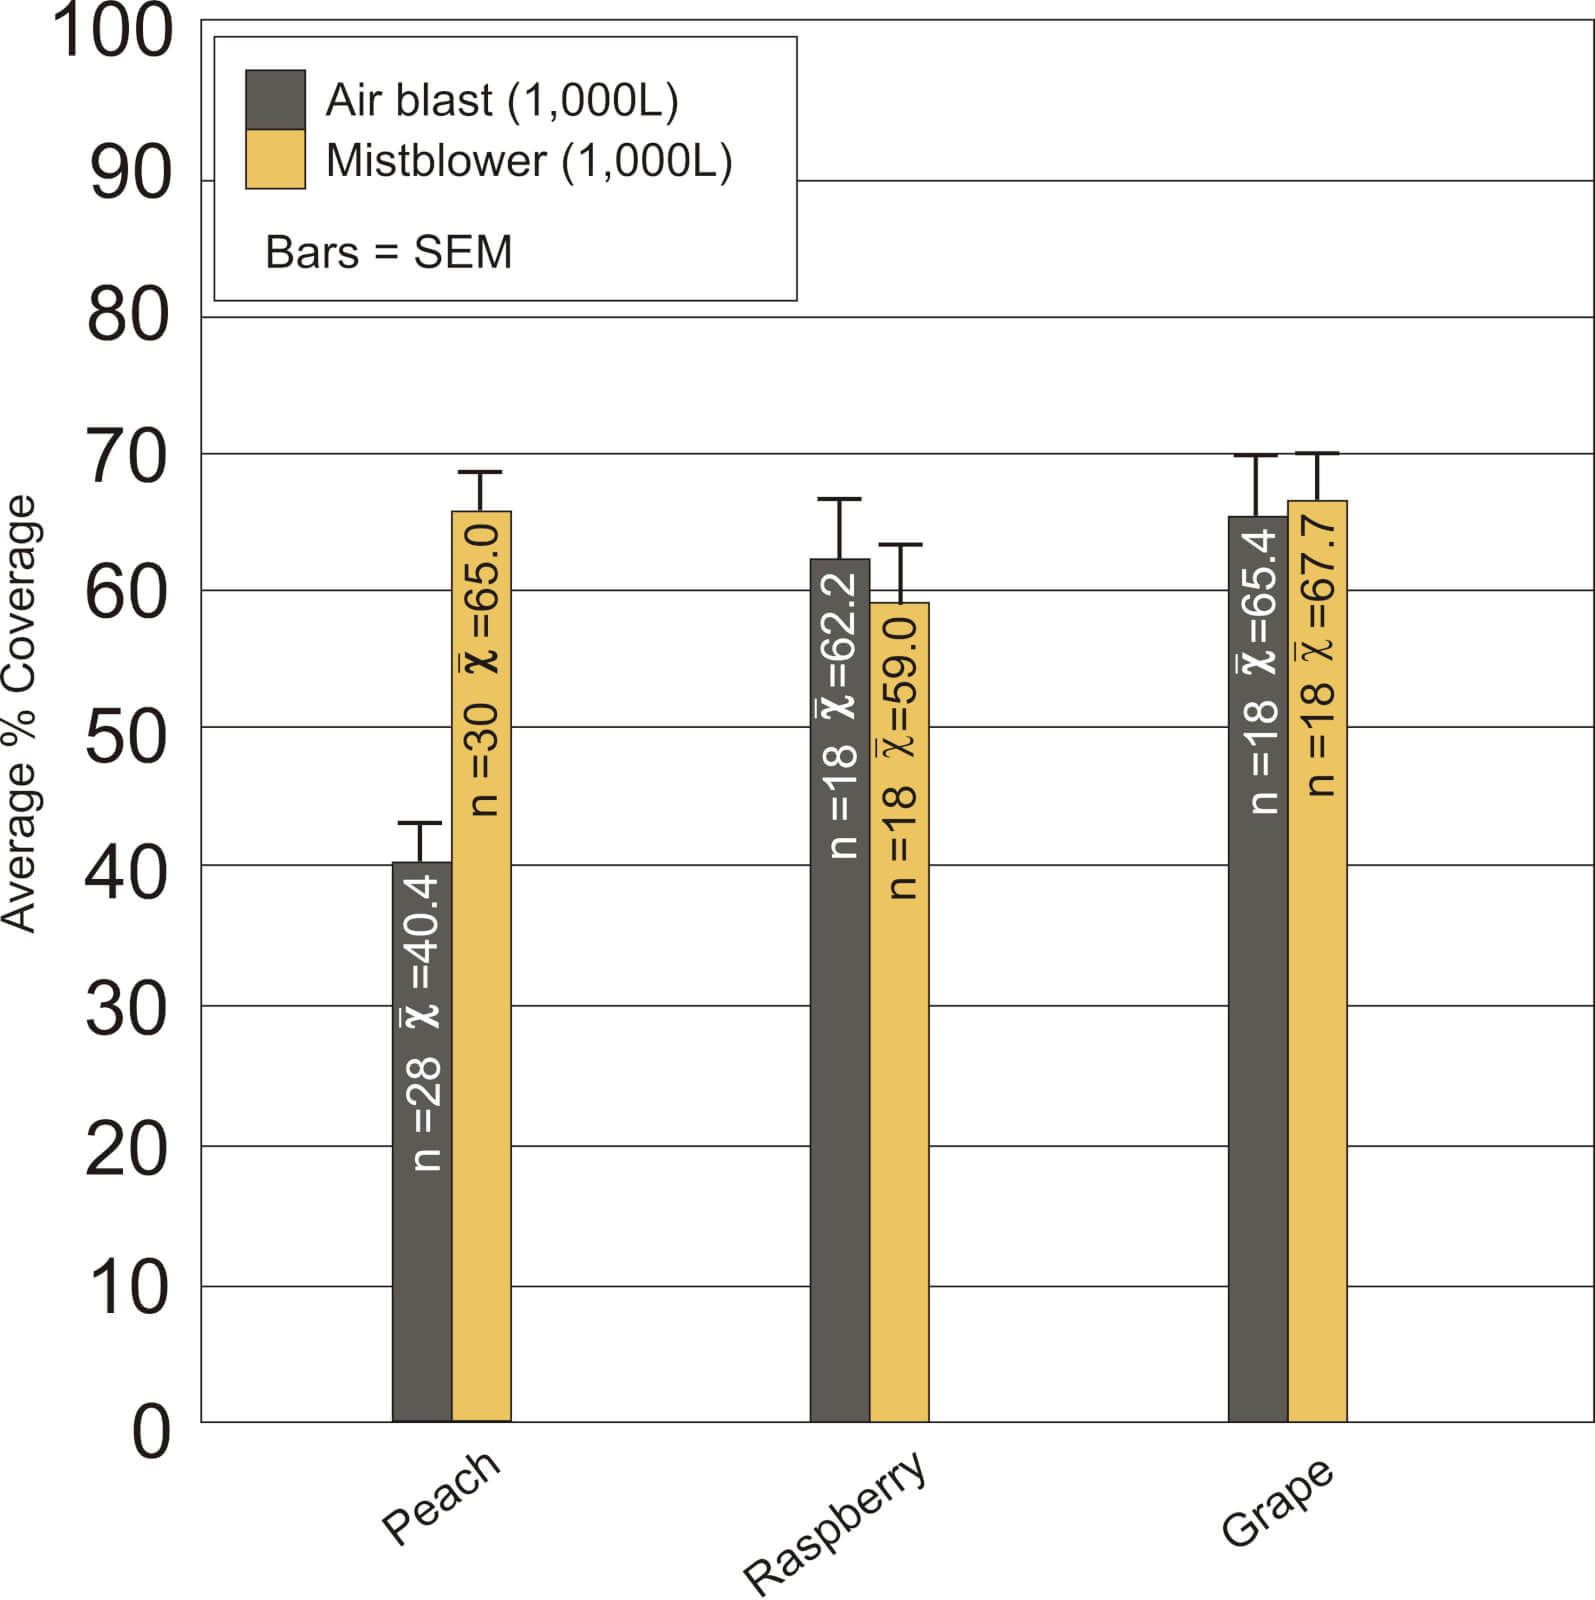
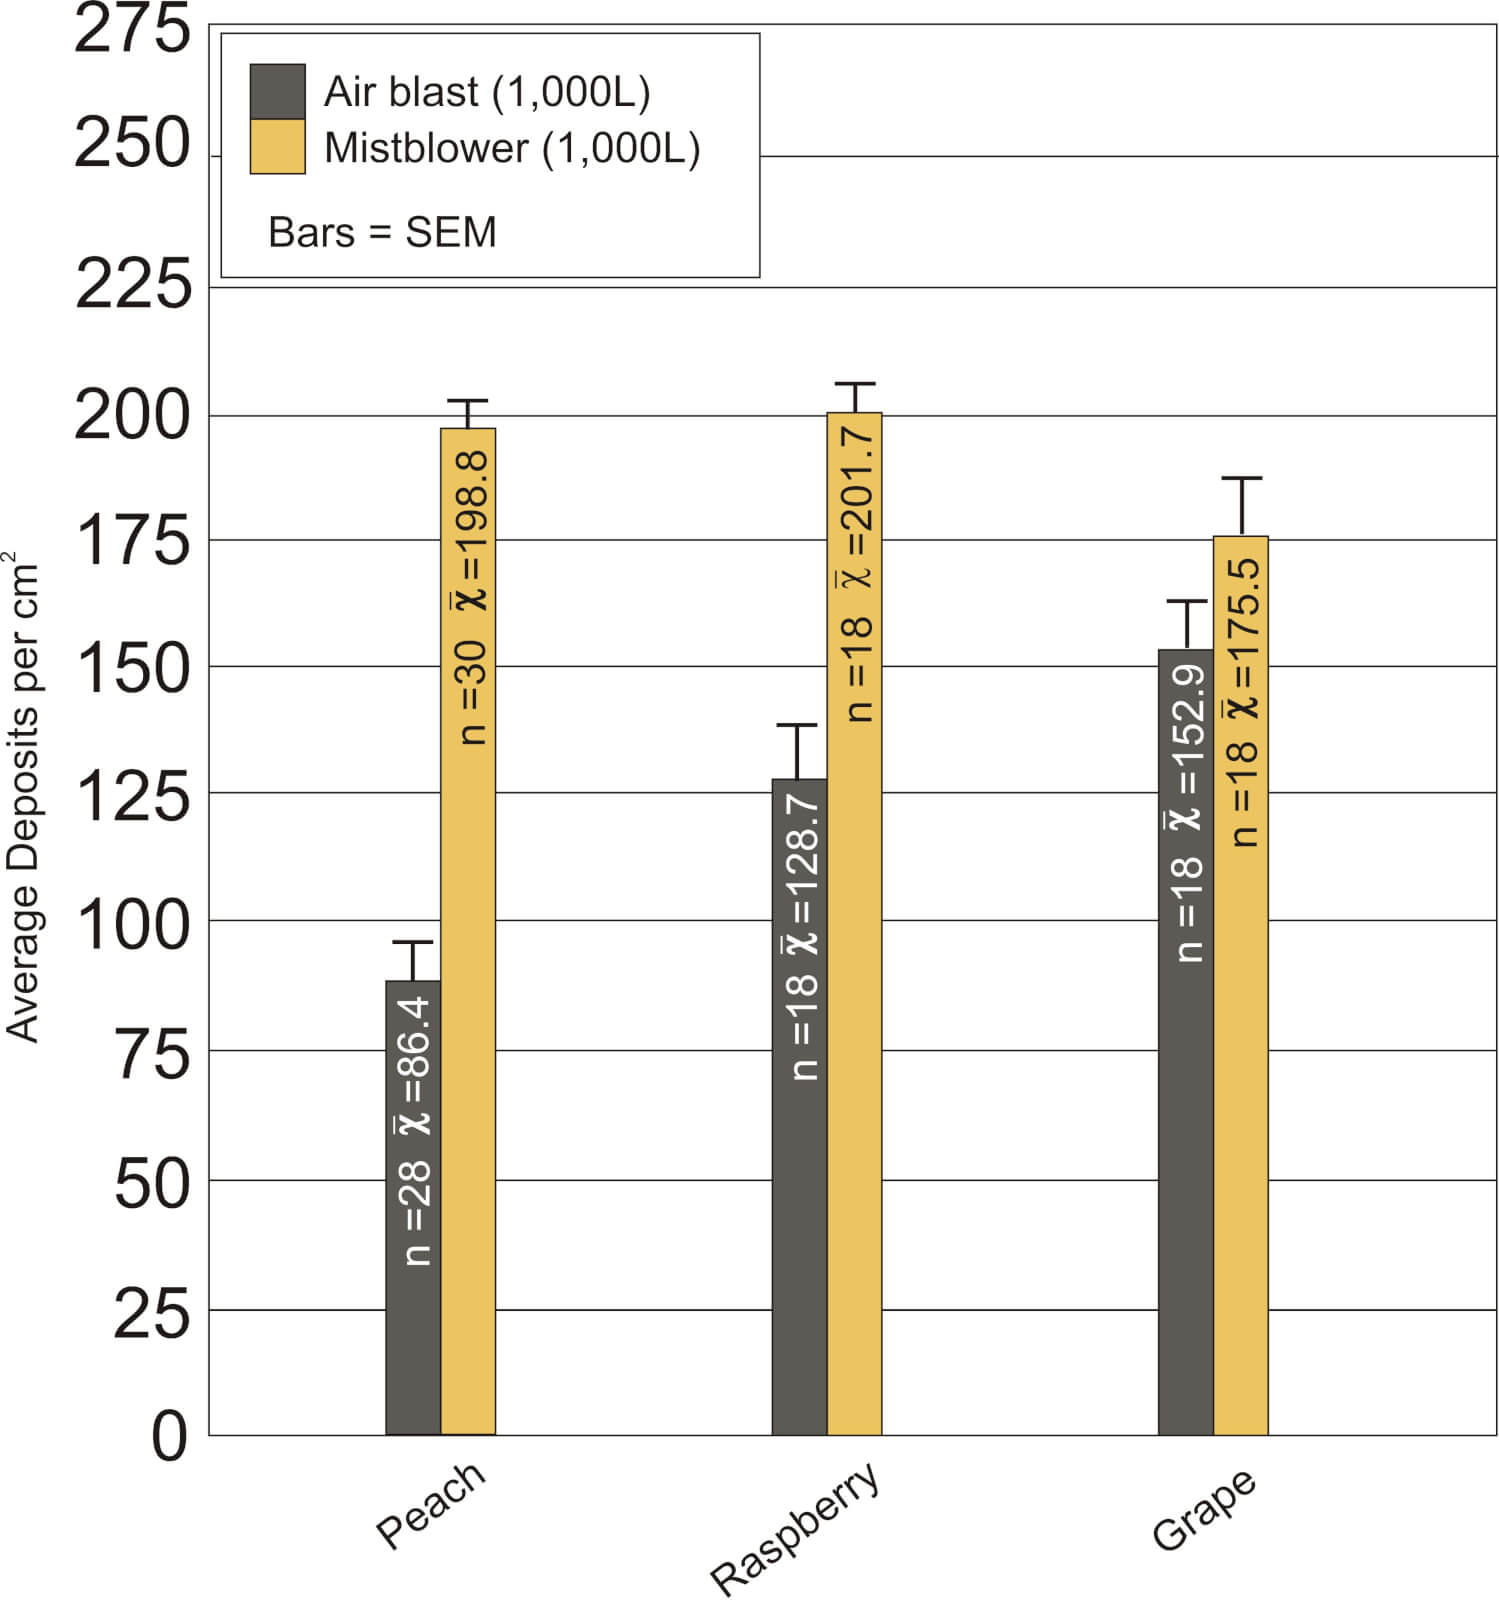
    Using the same methods used to compare airblast to hand boom spray coverage in the previous article, we compared airblast sprayer coverage to that of a motorized backpack mistblower in grape, raspberry and peach (July, 2013). Once again, coverage was analyzed as overall percent coverage (see first graph) and droplet density (average droplets per square centimeter – see second graph).

    Comparison of average % coverage in peach, raspberry and grape using a mistblower and air blast sprayer emitting he same volume
    Comparison of droplets per square centimetre in peach, raspberry and grape using a mistblower and air blast sprayer emitting the same volume

    Results and Observations

    The mistblower met, or in the case of droplet density, exceeded the coverage obtained using an air blast sprayer in most crops. The results led to a few observations:

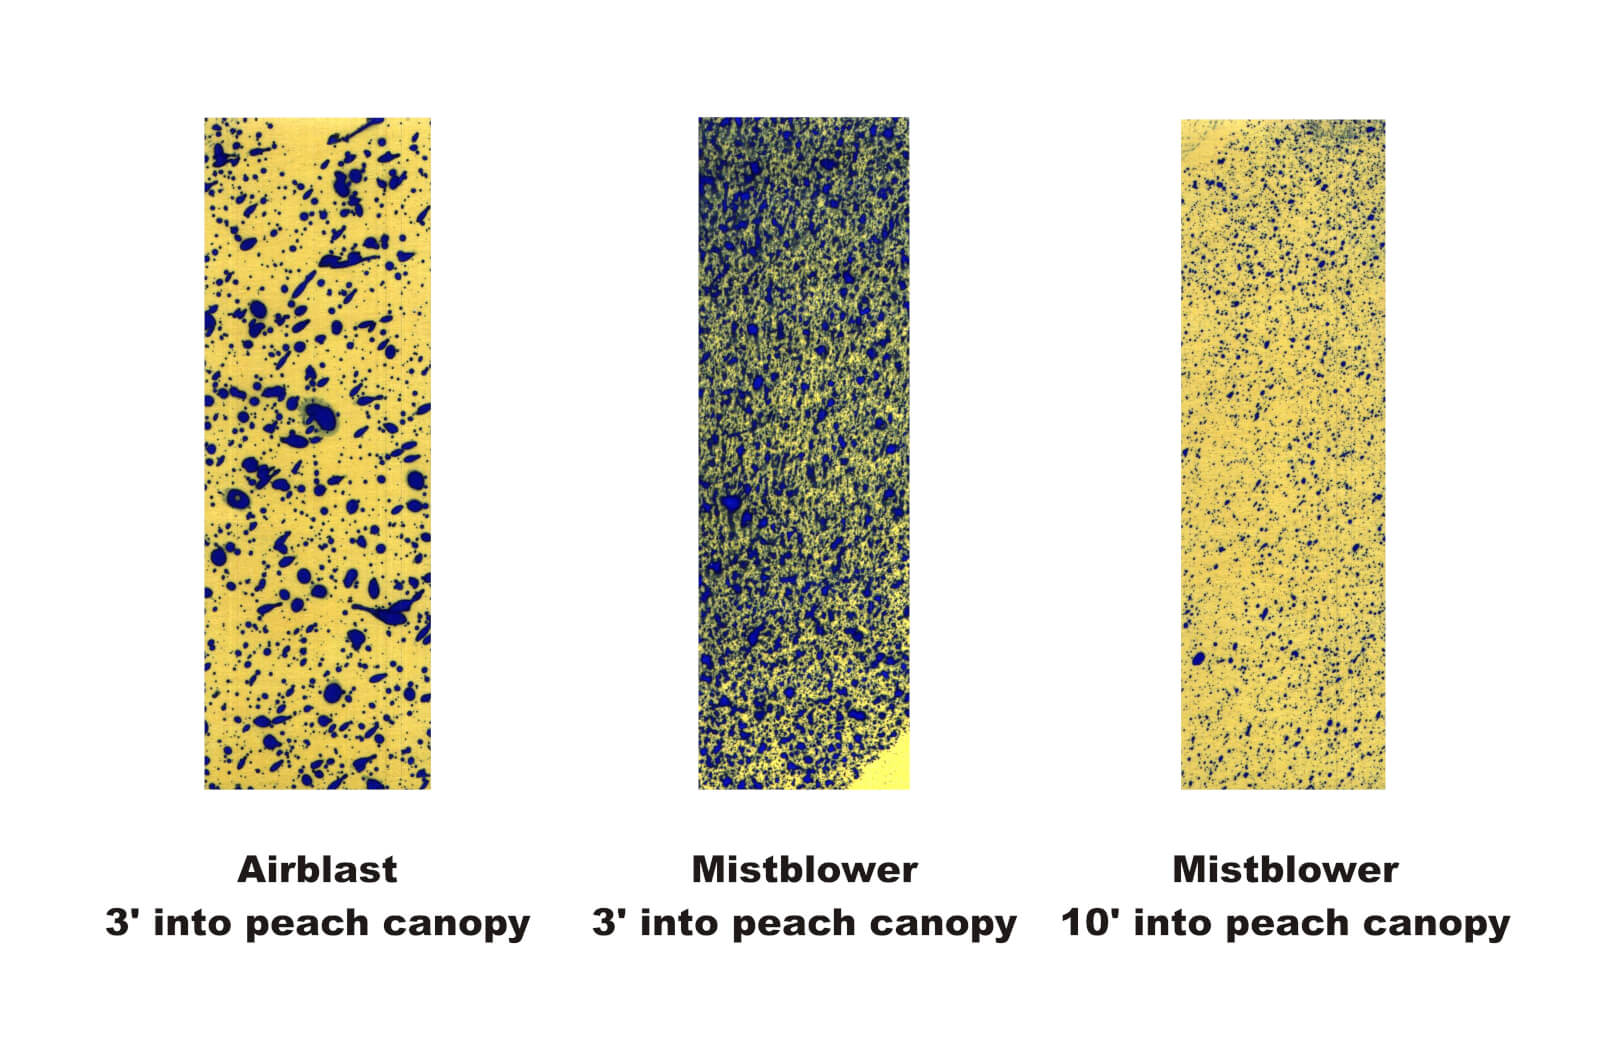
    • The significantly-higher droplet density is a function of the Finer spray quality produced by the mistblower (see water sensitive papers below). This may still represent a confound between small plot work and large scale airblast applications.
    • Drift between proximal treatments may be an issue given how far the mist was blown. This should be considered when planning plots.
    • While not shown here, spray coverage was more consistent throughout each canopy, of each crop, when using the mistblower. This is likely because the operator was able to aim the output as they swept the spray over the canopy, thereby ensuring all surfaces were hit from multiple angles.
    • While we always try to be brand-neutral, it should be noted that we’ve used multiple Solo mistblowers over the years, and all of them required significant maintenance (no matter how they were cleaned and stored). It was very difficult to find brand parts and repair expertise in Ontario. The Stihl brand currently has far more dealers, and more accessible parts, and has not caused us any difficulties (yet).
    • Always use the highest grade gasoline in two-stroke engines to avoid ethanol gumming up the carburetors!
    • Always calibrate mistblowers by volume because raising and lowering the boom will affect the flow rate.

    Conclusion

    Hand booms, and likely hand guns, are not appropriate for testing agrichemical products intended for use with an airblast sprayer. Data derived from these methods should be questioned. An airblast sprayer is the best choice for any such research, but a mistblower is a viable alternative. Transparent, standardized operating protocols for testing products intended for use in airblast sprayers should be required.

    Thanks to Vaughan Agricultural Research Services Ltd. for their assistance in the research performed for this article.

  • Should Backpack Sprayers be Used to Test Airblast Products? – Part 1

    Should Backpack Sprayers be Used to Test Airblast Products? – Part 1

    Peer-reviewed journal publications claim there is a significant difference in spray coverage and deposition patterns when an agrichemical product is applied using an airblast sprayer versus a hydraulic hand boom. An airblast sprayer creates Fine droplets that shear in entraining air and are carried into a plant canopy. Properly calibrated, the air opens the canopy to expose all target surfaces to the spray. By comparison, a hand boom relies on pressure to propel fine droplets into a canopy, and while there is some air-entrainment surrounding the spray, it cannot travel as far or displace as much canopy. As a result, most of it impacts on the outer surfaces of the canopy.

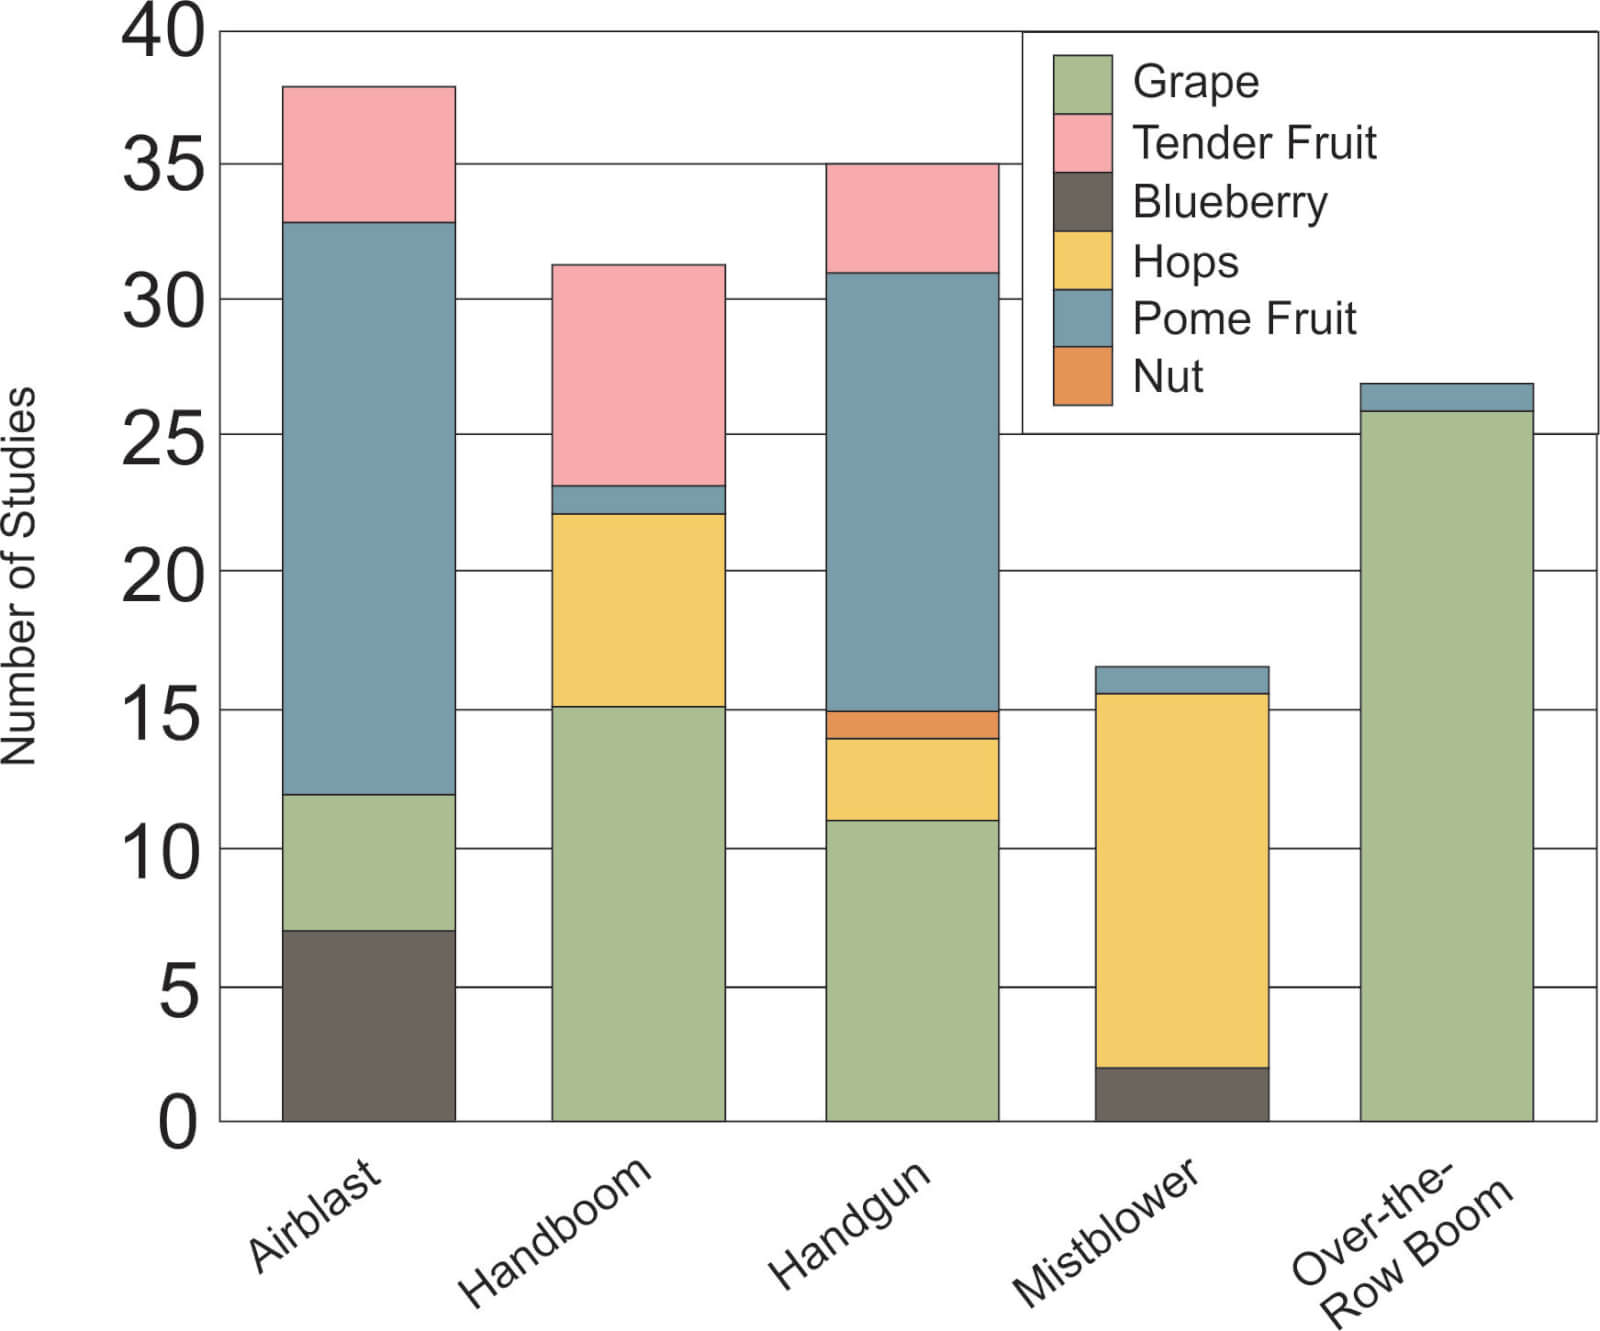
    Knowing this, it is surprising that so many products intended for use with airblast sprayers are applied by researchers and consultants using hand booms or the high-pressure arborist-style handgun (see ‘Survey of Submissions’).

    Survey of Submissions
    This graph represents a random selection of 150 minor use label expansion studies and registrant submissions from Canada and the USA spanning 1990 to 2011. It shows the application method by crop.

    In 2012, we performed some research with the following goals:

    • To demonstrate the difference between spray deposition and coverage when using a hand boom versus an airblast sprayer.
    • To create a sound basis for questioning and potentially improving how agrichemical products for orchard, bush, and vine are tested in Canada.

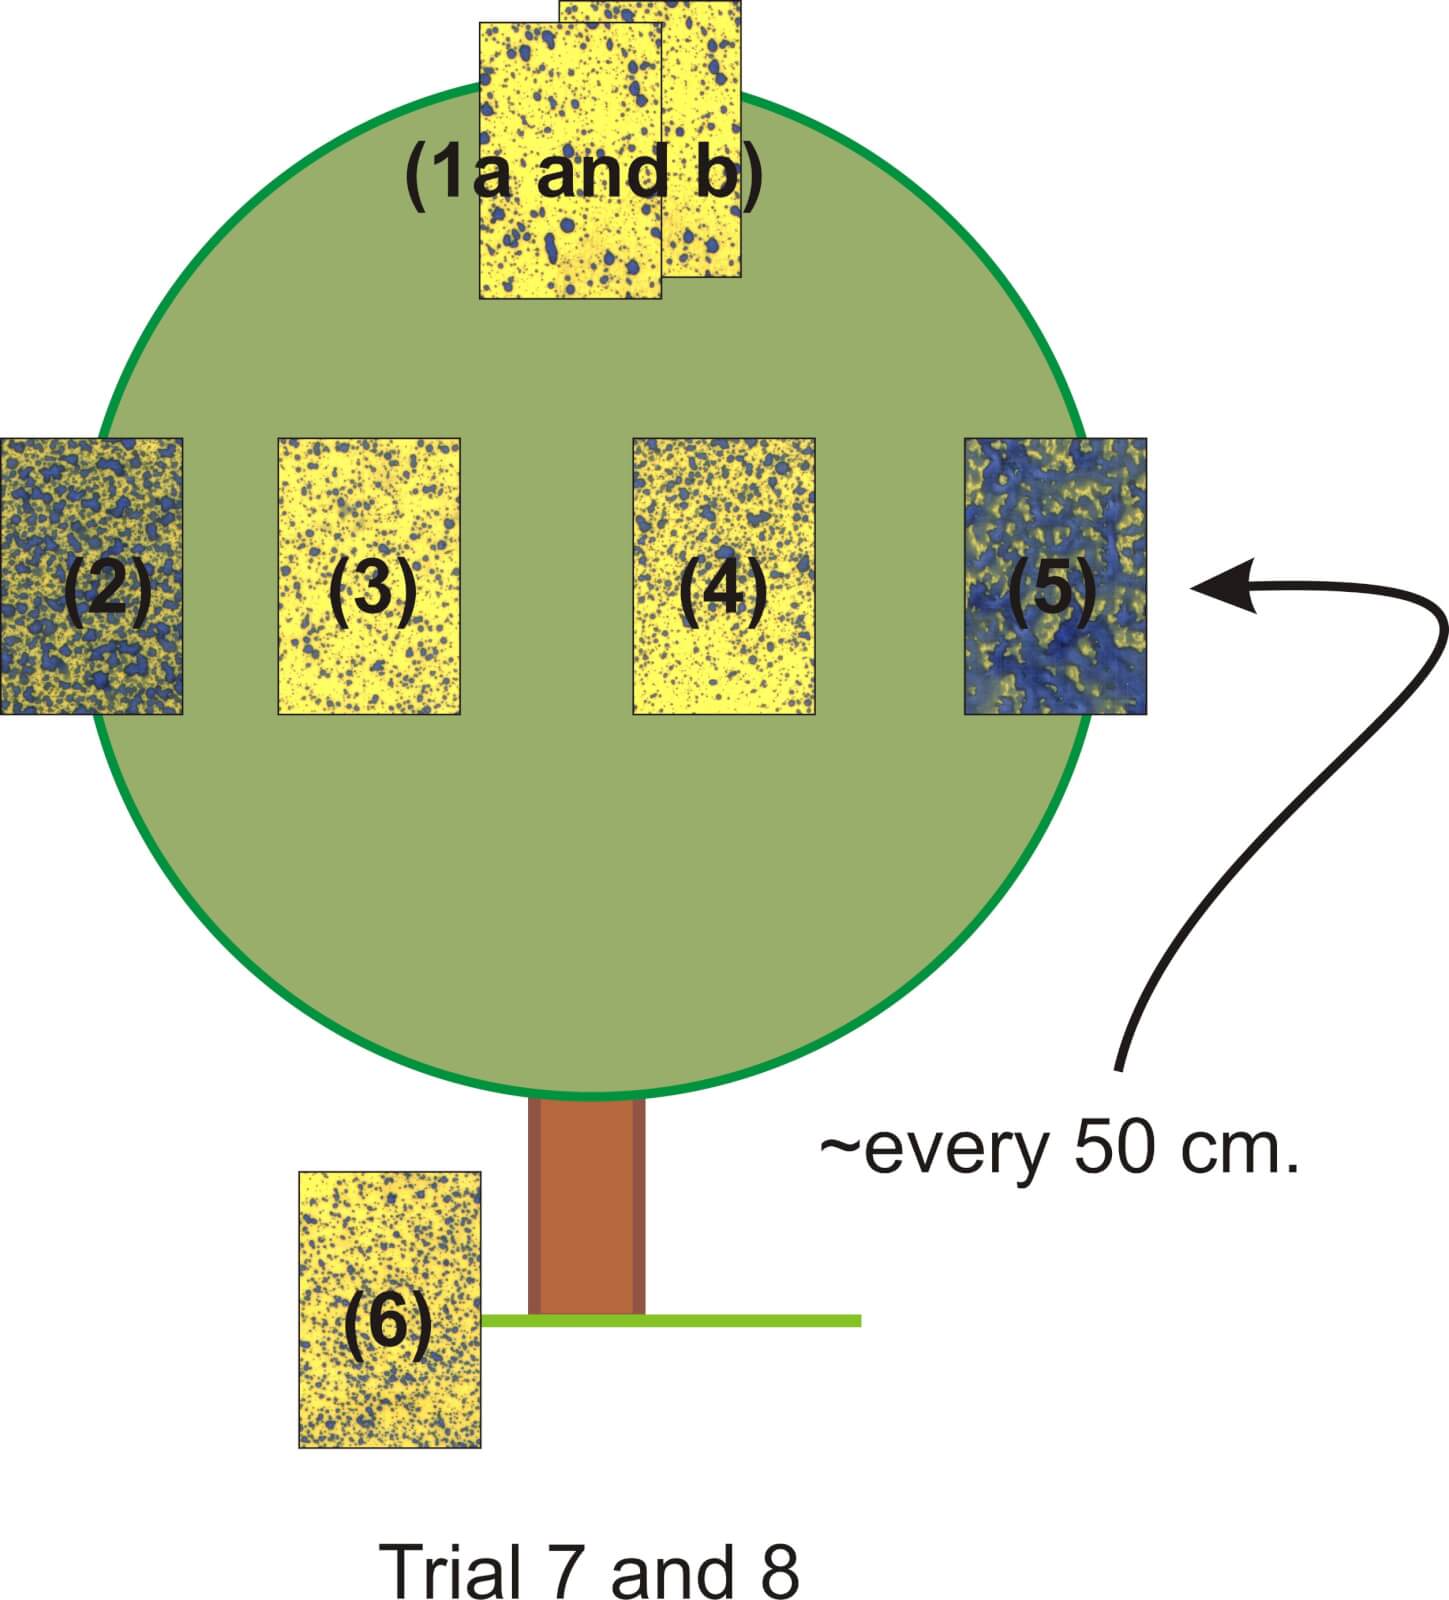
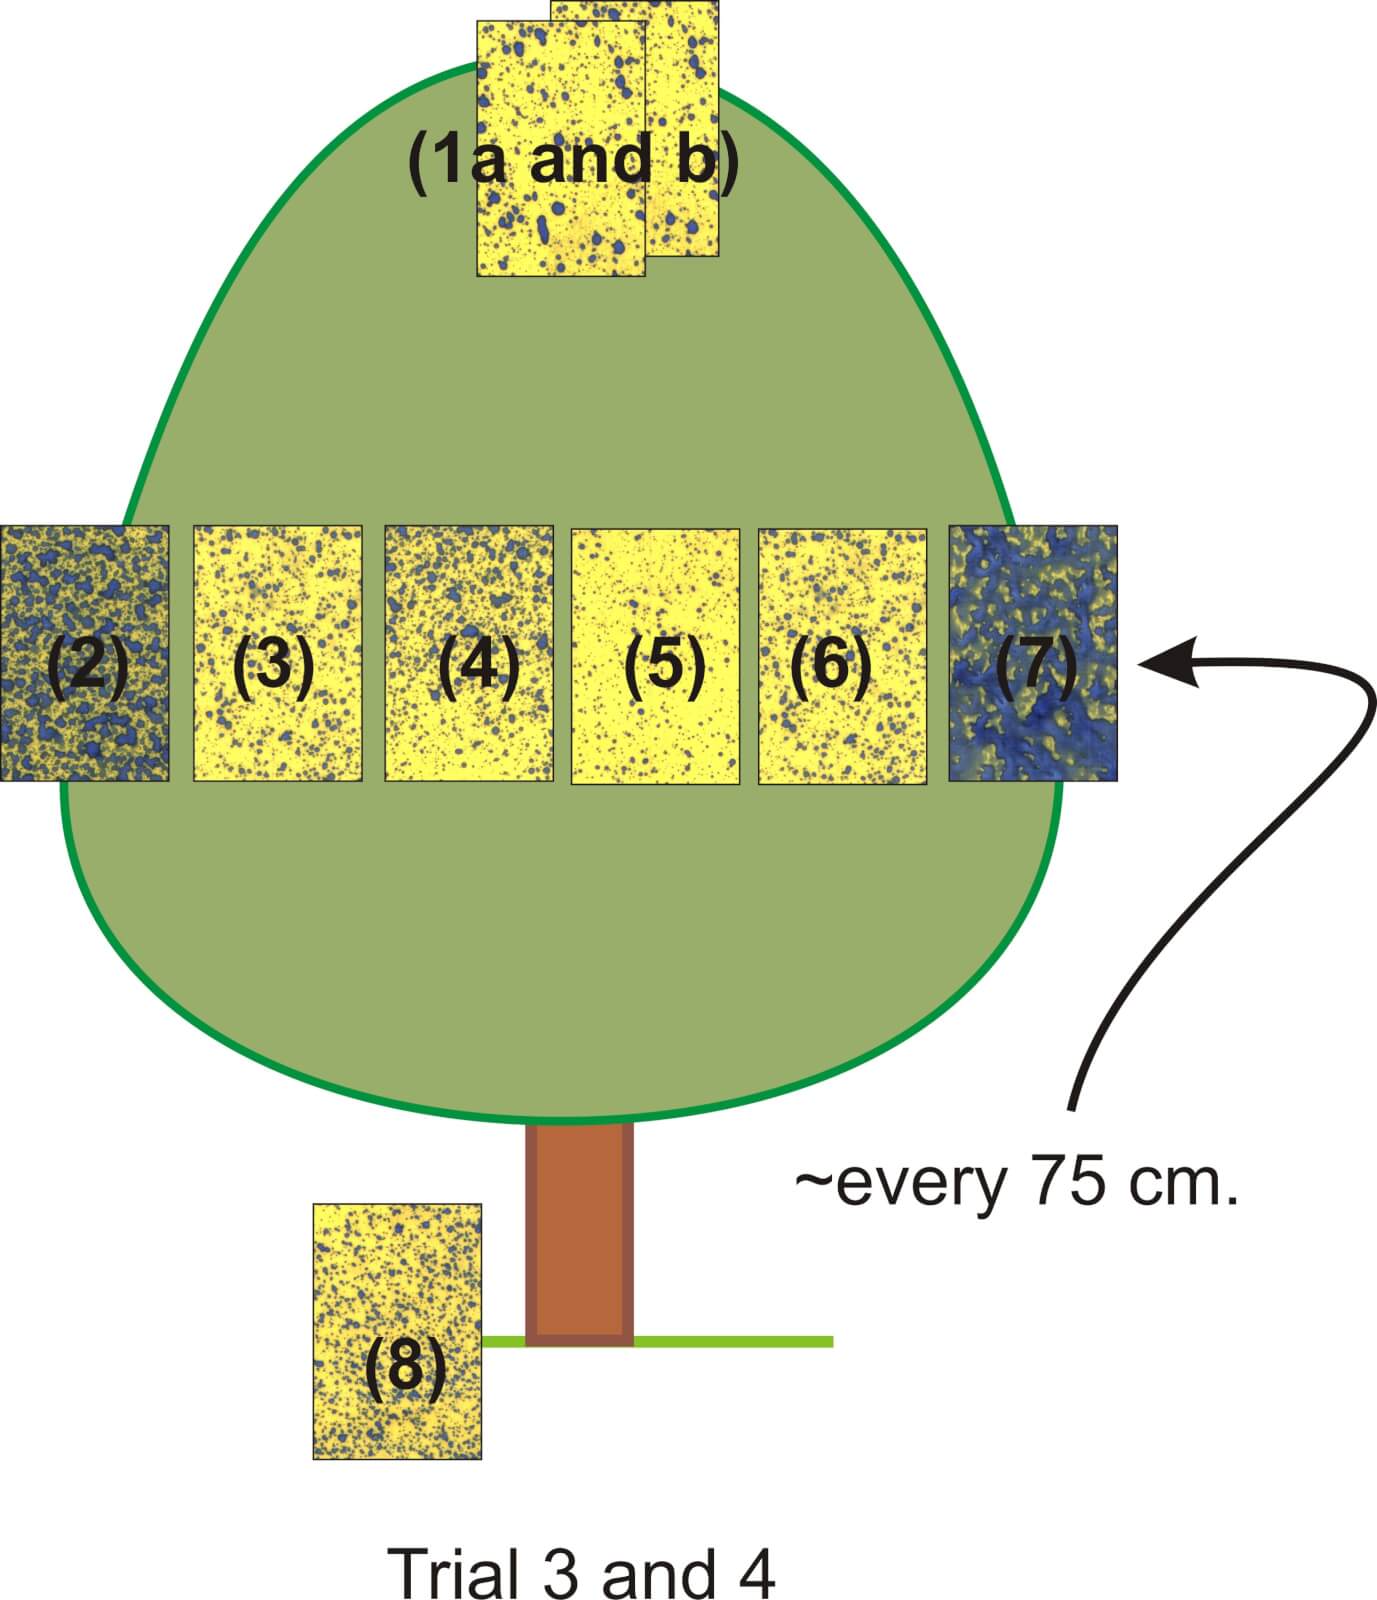
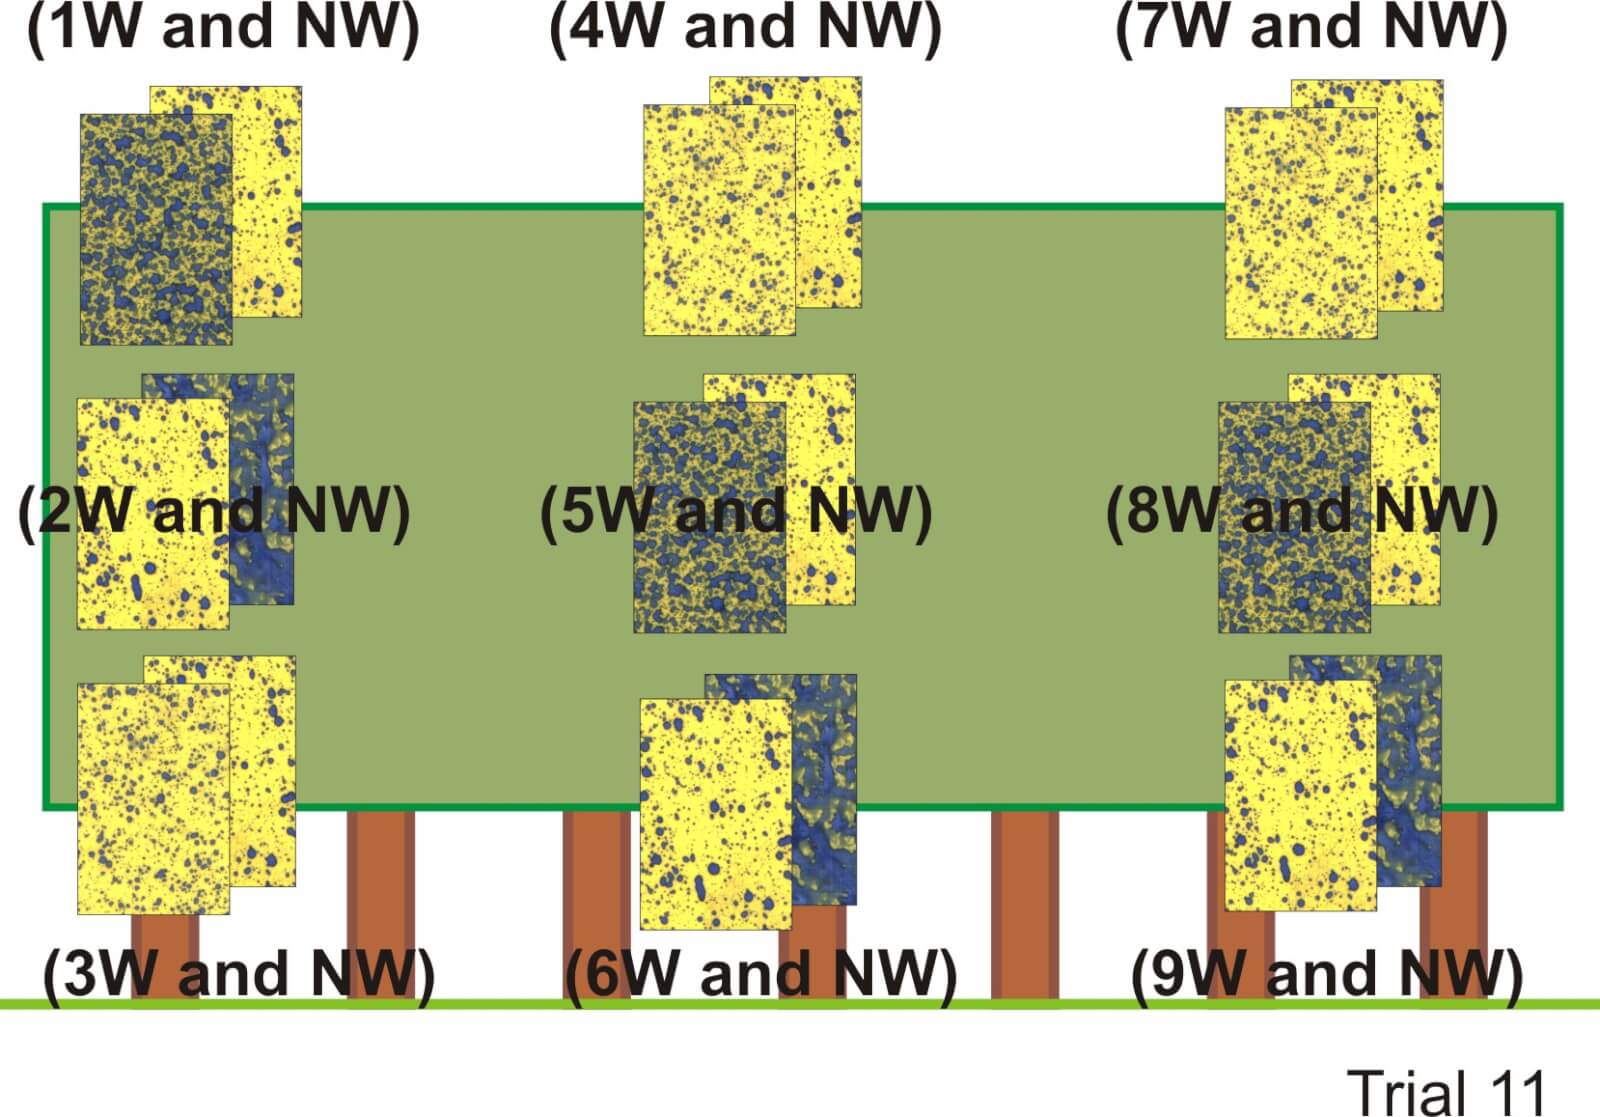
    Using water-sensitive paper to diagnose spray coverage, airblast sprayer application was compared to hand boom application in highbush blueberry, apple and grape.

    Target locations in highbush blueberry.
    Target locations in apple.
    Target locations in grape panel.

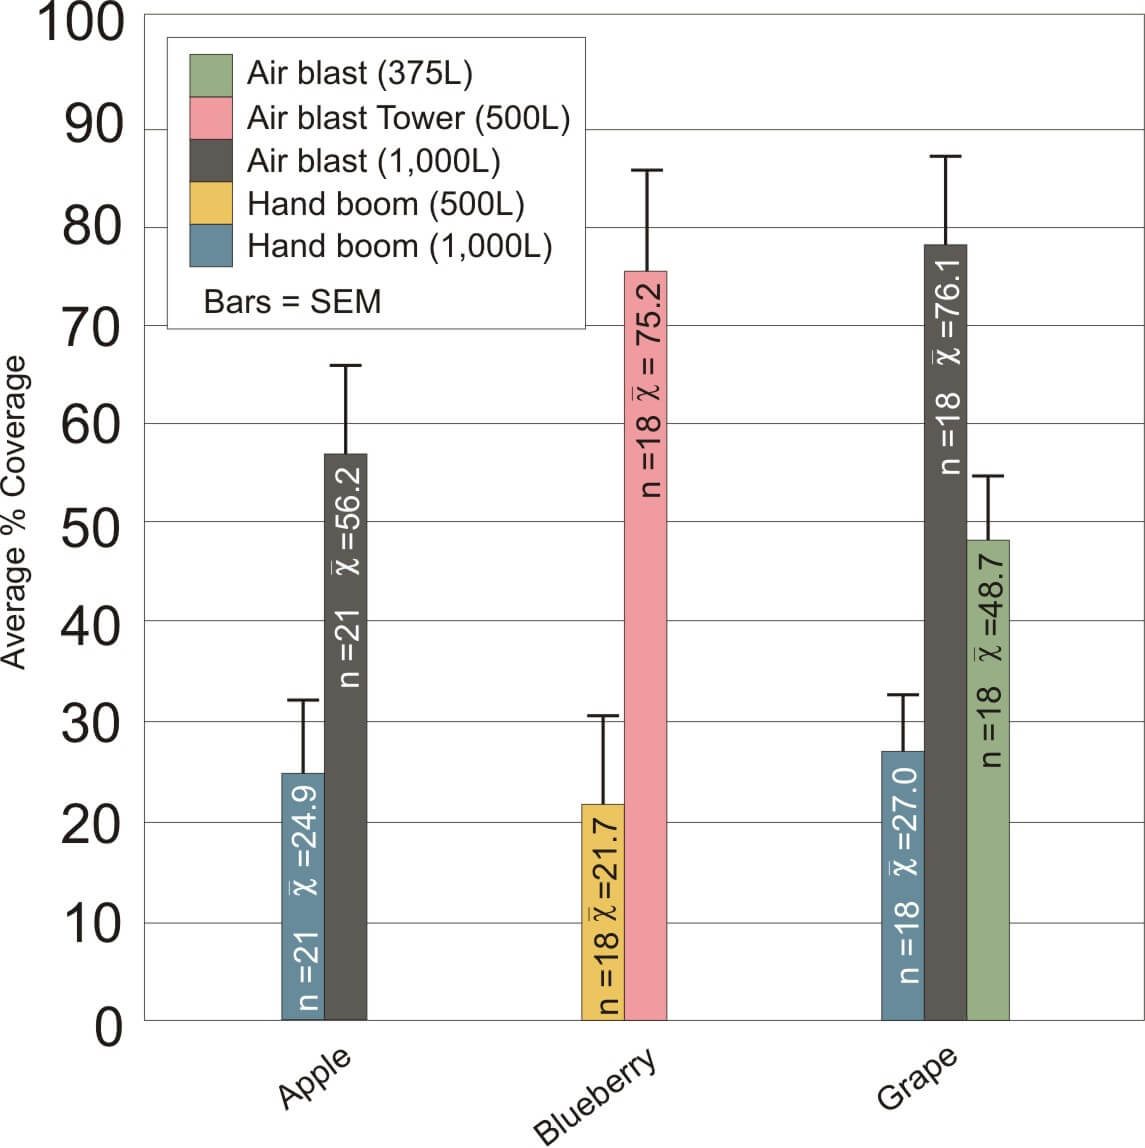
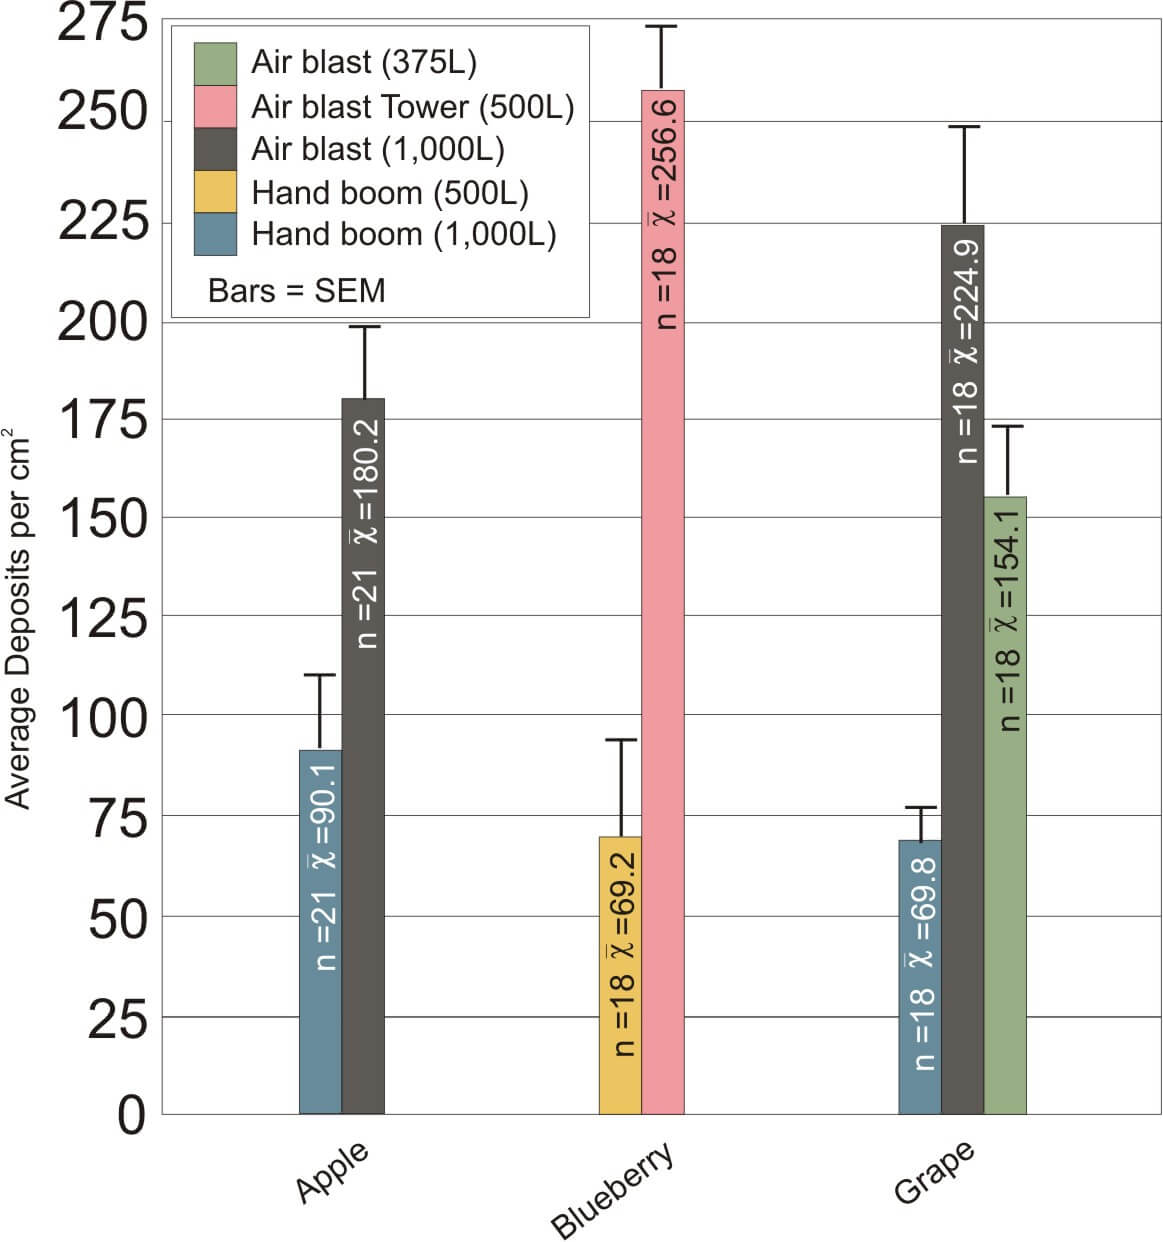
    Sprayers were calibrated to emit the same volume per planted area via hollow-cone nozzles. Volumes selected were based on typical application volumes for Pristine or Captan (commonly sprayed in Canada). While there is no standardized protocol (and there should be) we followed typical practices of 500L/ha for grapes, blueberry and apples until plant growth warrants higher carrier volumes. At that point, many researchers go up to 1,000 L/ha. Coverage was quantified by collecting and digitally scanning water-sensitive papers to calculate overall percent coverage (see graph) and droplet density (average droplets per square centimeter – see graph).

    Overall percent coverage
    Droplet density

    Conclusion

    In all cases, airblast applications deposit > %50 more spray than a hand boom. In the case of grape, you’ll note there are three bars. This is because spraying 1,000 L/ha with the airblast sprayer drenched the targets (it was late in the season and the canopy was sparse), making it impossible to discern droplet density. When we reduced the output to  375 L/ha, we were able to register droplet density, which was still significantly higher than that produced by the hand boom at 1,000 L/ha. This raises significant questions about the validity of efficacy and residue studies performed with hand booms when growers apply the same products using airblast sprayers.

    When this data was shared at extension conferences, it was sometimes noted that many researchers choose to spray the target until it is drenched, ensuring the dose administered to the crop reflects what was intended. This does not, however, invalidate the fact that a growers spray equipment and practices are significantly different, and the dose and spray distribution they achieve will not reflect the original research.

    The recommendation is that researchers use the same equipment to test products as the growers use to apply them. But, recognizing the difficulties associated with performing small plot experiments with full-sized airblast sprayers, an alternative is needed. That topic will be addressed in part two of this article.

    Horticultural Crops Ontario, the grower co-operators and former OMAFRA summer student Carly Decker are gratefully acknowledged for making this research possible.

  • Biopesticides: Holy Grail or Giant Pain?

    Biopesticides: Holy Grail or Giant Pain?

    Biopesticides are a rapidly growing segment in horticultural pest control. While they are often billed as green “miracle cures”, applicators should be aware that they require unique considerations. Issues with lifespan, target specificity, and application technology can all impact their efficacy. However, like any pesticide application, careful planning can minimize wasted time and money.

    Typically defined as pesticides derived from “natural” sources, biopesticides contain active ingredients extracted from plants, microorganisms, animals, and/or certain minerals. Given their origin, and the fact that many biopesticides are living organisms (as is the case with most of the microbial-based pesticides), they are often photo-sensitive and quickly break down. This generally means that they need to be re-applied often.

    Mixing and handling

    Pre-suspending nematodes before inoculating the spray tank.
    Pre-suspending nematodes before inoculating the spray tank.

    Consideration should also be given to the lifespan of these products during the application. Many have an optimum pH for both the carrier water and the soil, and a limited temperature range outside of which they may not be active. As already mentioned, direct sunlight can quickly degrade many biopesticides, which means they should be applied either early or late in the day. Timeliness is also a factor: efficacy can be greatly reduced if the product is not used quickly – many biopesticide organisms begin to break down as soon as they are tank mixed. Also, be aware that it can be difficult (or impossible) to find suitable tank-mix partners. For example, a fungal biopesticide obviously shouldn’t be mixed with a fungicide. That also leads the applicator to consider their spray program carefully and clean their sprayers thoroughly between applications.

    Efficacy

    Applicators should understand how each biopesticide is supposed to control (or more likely, supress) pests. Many biopesticides have to be ingested or physically contact the pest. As such, they often need high application volumes to ensure sufficient coverage of all target surfaces. Many are slow to control the pest, so the applicator may mistakenly think the product is not working, and reapply unnecessarily.

    Application equipment

    Cleaning a strainer - image courtesy of M. Lanthier.
    Cleaning a strainer – image courtesy of M. Lanthier.

    Applicators may need to reconsider their current equipment when using biopesticides. If the product has to contact the pest, high droplet density is preferred. This can be accomplished with high volumes, but also with higher droplet counts, and that means smaller droplets. Drift issues aside, many biopesticides are actually living organisms (e.g. nematodes) which might be negatively affected by the small nozzle orifice.

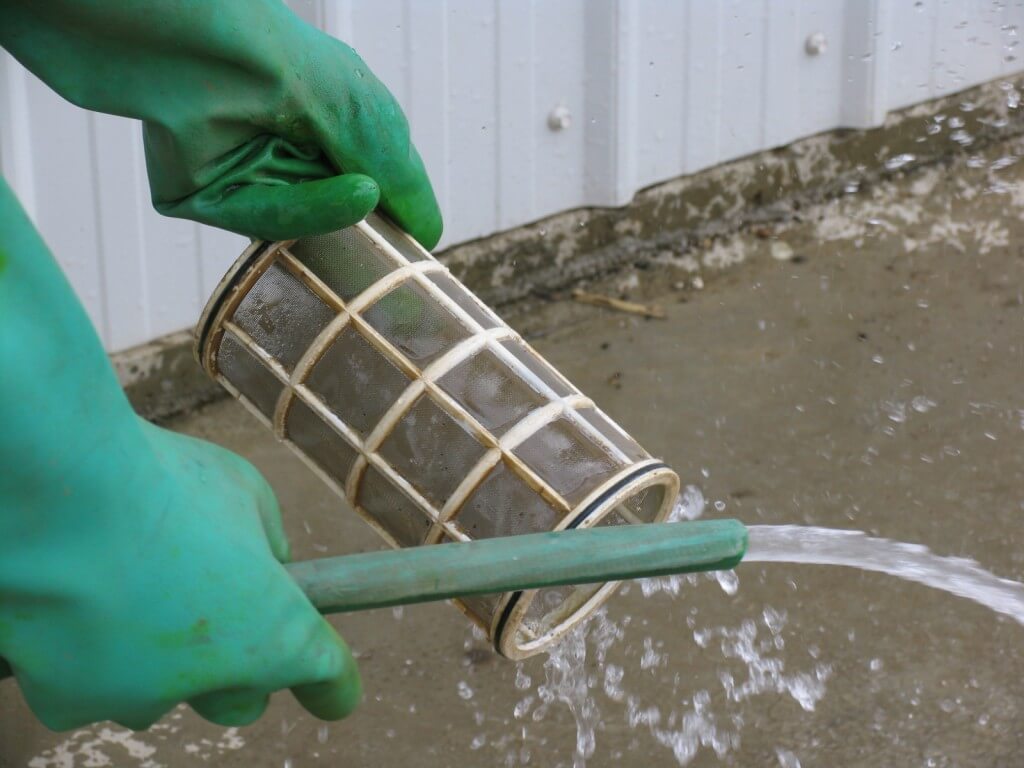
    The “Spray Guy”, Dr. Jason Deveau, (Application Technology Specialist with the Ontario Ministry of Agriculture, Food and Rural Affairs) suggests using a nozzle with a larger exit orifice and no pre-orifice to minimize clogging or any potential damage to the microorganisms. Clogging can be further reduced by using a minimum of three levels of filtration on a sprayer. With proper agitation, a tank basket, suction filter at the pump and slotted strainers behind each tip should catch any “chunks”. In-line filters at the boom are also potentially helpful. Each filter, from tank to nozzle, should be filter smaller particles than the last. Cleaning screens diligently and inspecting the effectiveness of the agitation system, should be part of every spray day.

    Applicators can account for many of these issues by understanding what the biopesticide is and how it is intended to work. Consider these questions:

    • When is the pest active/vulnerable?
    • Under what conditions does the product need to be used to be most effective?
    • Are there special handling or mixing considerations?
    • What do I need to have in place to minimize the time between mixing and applying the product?

    Ultimately, an effective application of biopesticides relies on integrated pest management (IPM). Biopesticides can work as advertised when used thoughtfully and appropriately. Understanding the products benefits and limitations will ensure applicators reap the full benefits of these new and evolving methods of control.