It’s unfortunate, but every year we encounter a few instances of mysterious crop injury following an application. Was it a product formulation issue? Was it a mismatch between genetics and chemistry? Was it a stressed crop? Or was it a contaminated sprayer? Sometimes we never find out. Sometimes we do.
The Investigation
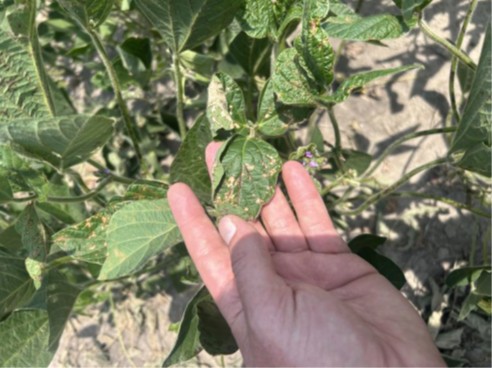
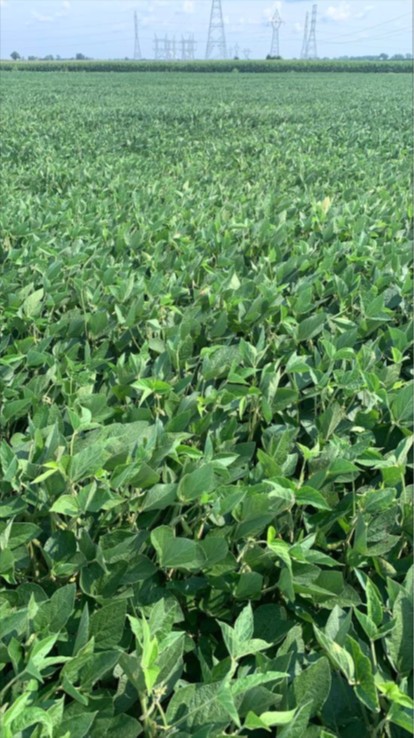
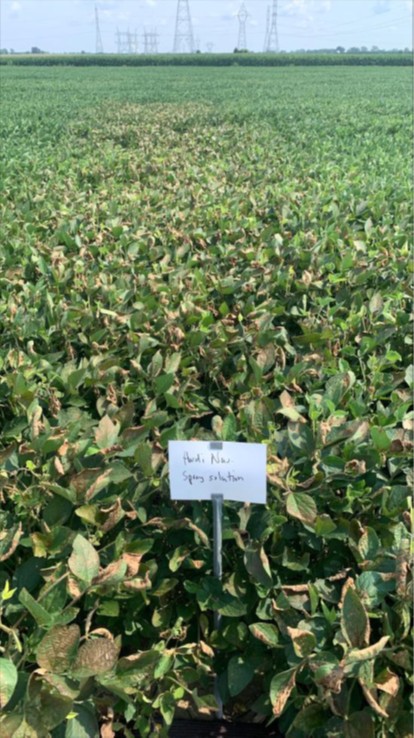
In this case study, Roundup WeatherMAX was applied to Pioneer P23Z58E (Enlist) soybean and the applicator noticed significant necrosis around 5 days after application (Figure 1). They suspected an issue with the variety and/or the product.
Figure 1 – Damaged soybean,
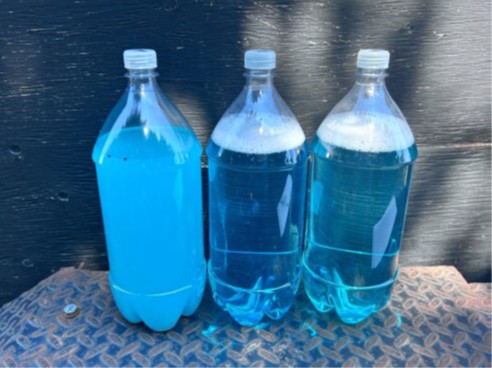
In response, we compared three spray solutions (Figure 2):
Herbicide from the grower mixed with clean water
Herbicide from an independent source mixed with clean water, and
Spray solution collected directly from the grower’s sprayer.
Figure 2 – A closer look at all 3 solutions. This bottle on the left (solution from sprayer) is clearly different from the other two, suggesting some manner of contamination. Significant or not, the freshly-mixed WeatherMAX from the grower (middle) appears to be a deeper blue colour than that from the independent source (right).
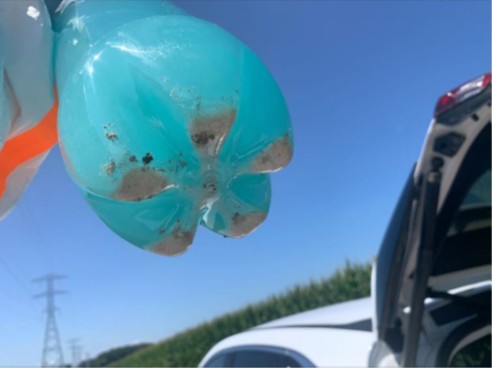
The sprayer sample contained visible sediment (Figure 3) and differed in appearance from the freshly mixed solutions, suggesting potential contamination.
Figure 3 – Sediment in sprayer solution sanple.
The treatments were applied to two soybean varieties to determine whether varietal sensitivity was involved.
What the Bioassay Showed
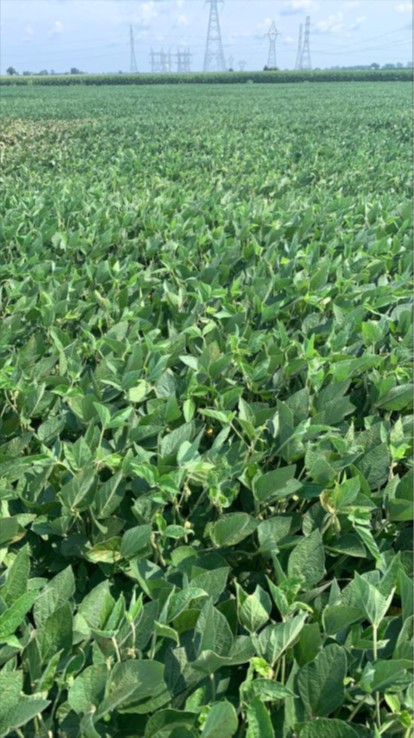
Soybeans treated with either source of freshly mixed herbicide showed no injury (Figures 4 and 5). In contrast, soybeans treated with spray solution collected from the sprayer developed significant leaf necrosis (Figure 6). Similar responses occurred across two soybean varieties, ruling out both product quality and varietal sensitivity as causes of the injury.
Figure 4 – There was no injury where the grower’s unused herbicide was mixed with deionized water and sprayed 9 days earlier.Figure 5 – The independently-sourced herbicide mixed with deionized water gave no crop injury.Figure 5 – Significant leaf necrosis from the bottle containing spray solution collected from the grower’s sprayer.
Conclusion
Field bioassays are valuable diagnostic tools that sprayer operators can use themselves to determine the cause of unexpected results. In this case, the investigation demonstrated that crop injury was caused by residual contamination within the sprayer rather than by the herbicide formulation or soybean genetics.
Visible sediment or unusual spray solution appearance may indicate contamination. Even when a sprayer has been cleaned, residues can remain in plumbing, filters, and other components if cleanout procedures are not thorough. Effective sprayer hygiene is essential when switching between products.
Thorough sprayer cleanout remains one of the most important practices for preventing avoidable crop injury and maintaining confidence in pesticide performance. The grower’s final comment following the assay was “we did it to ourselves”.
Crop spraying is one of the most important and highly skilled jobs undertaken on any arable farm, but it is facing increased public scrutiny. This is why it is vital that the kit you use as a means to apply pesticide to crops is in prime working order and is set up correctly to deliver the product safely and accurately to its target. Optimum sprayer set up will help to maximize the efficacy of applied products, reduce spray drift and keep machinery in good condition.
For this best practice guide to sprayer set up, Farmers Weekly teamed up with former Farm Sprayer Operator of the Year Iain Robertson. Mr. Robertson is assistant arable farm manager at David Foot Ltd, a 2,200ha mixed farm south of Dorchester in Dorset, growing wheat, barley, beans, oilseed rape and maize as forage for the farm’s three dairy herds. The machine used for this guide is a Bateman RB26 self-propelled sprayer and while most of these checks and tests are universally applicable to all sprayers, it is also important to refer to the handbook of the manufacturer of your specific machine.
Watch the video tutorial with Mr. Robertson and then see the step-by-step guide below for more detail.
Pre Start Checks
Before firing up the engine, the first thing to do is your pre-start checks – that means checking your machine’s vital fluids like fuel, hydraulic oil, hydrostatic oil, engine oil and coolant levels. If yours is a self-propelled sprayer, chances are you’ll need to get up on to the back of the machine to check some of these.
“While I’m up on the back of the sprayer I also have a quick look in the top of the tank to make sure that it is nice and clean and the tank rinse nozzles have worked properly – cleanliness is next to godliness,” says Mr. Robertson. Next, move on to the tires. Use a pressure gauge to check all tires are at the correct pressure and refer to the manufacturer’s guidelines. If you’ve got a trailed sprayer, don’t forget to check the tractor tire pressures as well.
Aim for tires to be run at the lowest pressure recommended for the load to be carried. This will help with boom height and stability and also helps tires act like a shock absorber to ride out bumps. If using a trailed sprayer, use a spirit level to ensure that the drawbar is level. Mr. Robertson says he tries to work around the machine in a methodical, clockwise manner to ensure that he doesn’t miss anything.
Coming to the pumps, check that they have got enough oil, check that any tool boxes have enough spare parts and any equipment needed and make sure you are carrying a spill kit with absorbent granules and a spade in case the worst happens and there is a spillage. Make sure all parts are lubricated daily and that any grease nipples are cleaned before and after use to avoid them collecting dirt and blocking.
Check all hydraulic hoses, spray lines and air lines for any signs of wear that could result in problems while operating.
It’s best to run the sprayer at a minimum of 5 bar to check for leaks. Also check the spray tank is fixed down securely, all straps and bolts are tight.
Boom checks
Once opened out, check the boom has good movement in the x- and y-axis. All machines are different so check with your manufacturer as to how the boom is set up. Mr Robertson’s Bateman has tie rods and stock bots that can be adjusted to set the boom up to ride well.
Check the tie rod nearest the back of the machine is slightly loose when moving and that the front rod is tight. Next, check for up and down movement by gently pushing the boom down by about 50cm and letting go. The boom should return to the central position without too much bouncing around.
“We want a little bit of movement but not excessive so that you can ride over the bumps as you go along without over- and under-dosing the crop,” says Mr. Robertson. Boom height is one of the most critical factors when spraying and the ideal height is 50cm above the crop. One of the easiest ways to work this out is by using a cable tie that is cut off at the correct length to use a visual aid from the sprayer cab.
Don’t forget to measure from the tip of the nozzle to the crop, not the spray line.
Good sprayer cleanliness is important, so make sure the system is rinsed through at the end of each day with clean water to make sure there’s no residue left in the boom. If your machine’s boom doesn’t have recirculation, remember to take the end caps off occasionally and flush out the whole boom.
Nozzle checks
Check that the nozzles are aligned both vertically and horizontally, according to the NSTS guidelines. Loosen clamps to adjust any nozzles that need realignment.
Check the nozzle output at least twice a year by running the sprayer with clean water at 3 bar pressure. Time the output of each nozzle for 30 seconds. If nozzles have been used previously, it’s best to check their output against that of a new pair. Mr Robertson advises using a measuring cylinder rather than a jug to measure the flow rate as a jug is less accurate “because you get a bigger variation over the wider surface area”.
With an 03 nozzle running for one minute at 3 bar pressure, the output should be 1.2 litres/minute as a rule of thumb but refer to the nozzle manufacturer’s output chart for the expected flow rate. “An easy way to remember this is: at 3 bar your nozzle size multiplied by four will give you your target litres/minute output. It works for all nozzle sizes.” If the output varies more than 4% of the average, or if the spray pattern visually doesn’t look correct, you need to change the nozzle set.
After checking the output, cross-reference this figure with the rate controller – you may need to adjust the flow figures to ensure that the two correlate. If a nozzle becomes blocked while spraying, Mr. Robertson says he will swap it for a new one and then clean it later using a toothbrush or airline. Never blow through a nozzle with your mouth.
Nozzle choice
The choice of nozzle is highly dependent on the sort of job you’re doing. “Timing is crucial but using the right nozzle at the right time will make the job so much easier, cut drift and mean that you’re getting more of the product where you want it to go. If you aim at it you will hit it,” says Mr. Robertson.
His nozzle of choice is an 03 size and he prefers to use the Defy 3D nozzle alternated forwards and backwards across the boom for pre-emergence work and T0 applications as well as the T3 ear spray. “In less than optimum conditions I may prefer to use the Amistar/Guardian Air, a fine induction nozzle. I would use this at T1 and T2 and also in sub-optimum conditions.” This nozzle has a 3-star Local Environmental Risk Assessment for Pesticides (LERAP) rating and is 75% drift reducing.
A water volume of 100 litres/ha is a good rate for spring fungicide application. It provides enough coverage for good disease control and allows maximum efficiency from the sprayer.
Forward speed
The third and final part of reducing spray drift is forward speed. Depending on nozzle size and water volume, aim to travel at 12kph.
Mr Robertson says he finds that this speed gives a good overall output and means you don’t get shadowing or turbulence behind the machine.
Tips and tricks
One of the biggest risk of contamination is at fill up. “A fantastic, cheap trick that I learned through Farm Sprayer Operator of the Year is to take a 200 litre plastic drum and cut it in half to create two drip trays to catch any spillages under the induction hopper and the tank overfill.” This eliminates point source contamination, he says.
“Finally, there’s a plethora of information out there on the internet, loads of good apps to download. The technology is there to help us do the best job possible and make our job as safe as possible.”
A Veteran Applicator’s Questions about Pesticide Handling
Time and again, after years of working with dozens of different chemicals, I would wonder to myself “How dangerous is this chemical?”, “Is glyphosate as safe as they say it is?”, “How do I find out what type of safety gear I need while handling this chemical?”
Beyond the agrichemical dealer, ag. consultants, and university or government ag. extension specialists, a quick internet search reveals many sources of pesticide information. Collectively they identify the active ingredient(s) in formulated products, they detail which pests are best controlled by the pesticide, and they provide instruction for application. But it’s more difficult to find consistent, practical information about safe pesticide handling. Sometimes it’s excessive to the point of being impractical (try finding actual “chemical proof” gloves), and sometimes it’s minimal and vague – it depends where you look. No matter the level of precaution, pesticide safety is time consuming and involves some fussing, but it is the hallmark of responsible pesticide use. Just as we ensure that we are applying “safe rates” when spraying chemicals, we must also ensure we are respecting our own well-being while handling chemicals.
In Canada, the Pesticide Regulatory Directorate (PRD) is charged with protecting human health and safety by monitoring pesticides that are sold in this country. According to the Federal Pest Control Products Act all pesticides sold in Canada must be registered with the PRD. There’s a very nice overview of how that process works here. It is during this registration process that pesticide handling precautions are identified for the label. Further classification may take place under provincial acts.
All pesticides are designed to disrupt, repel, control or kill living organisms, but when it comes to safe handling, insecticides receive the most attention. This is because herbicides and fungicides target biochemical pathways that only exist in plants or fungi. However, most pesticides can be hazardous if they are not handled correctly. The handling precautions that appear on the label are based on five factors.
Five factors that affect handling precautions:
1. Pesticide Family
This factor is the broadest way to categorize potential risk to the handler. Generally, herbicides and fungicides are considered safer than insecticides, but there are notable exceptions. Do not rely solely on the pesticide family when making decisions on pesticide handling.
2. Pesticide Mode of Action
The mode of action gives further detail into how a pesticide should be handled. Modes of action that inhibit biochemical pathways that exist in the target pest, but not in mammals (people, in particular), have lower acute toxicities. Examples include herbicides that inhibit enzymes involved in amino acid synthesis or in photosynthesis – these enzymes do not exist in mammals. However, once again, there are always exceptions. Do not rely solely on mode of action when making decisions on pesticide handling.
3. Pesticide Formulation & Route of Entry
Pesticide formulation affects how a product can potentially be absorbed into the body. Emulsifiable Concentrates (ECs), for example, have higher rates of absorption than solutions or dry products. When it comes to the route of entry, dermal contact is considered safer than inhalation or ingestion. However, not all parts of your skin are created equal, and the point of dermal contact on the body matters a great deal.
4. Pesticide Toxicity
Taken collectively, the first three factors form the overall toxicity of the pesticide. The level of toxicity cannot be predicted – it has to be tested. The LD50 (defined below) values that are reported for a pesticide come from standardized experiments such as animal feeding. Although the chosen species (usually white rats for mammalian endpoints) are known to be similar to humans in their response, there is still the possibility of error. Nevertheless, toxicity forms an important basis for establishing handling precautions.
5. Operator Exposure
People handle toxic substances every day. Household bleach, for example is surprisingly toxic, and yet it can be readily found on kitchen shelves in many homes. The risk of being harmed by a toxic product can only be determined by the likelihood of exposure. While it is possible someone might accidentally consume a hazardous dose of bleach, it’s improbable. Exposure does not just refer to a single exposure to a substance – repeated exposures to small doses of a toxic substance can have a cumulative effect. The goal when handling any pesticide is to minimize exposure, but it becomes even more critical when that pesticide is highly toxic. Together, exposure and toxicity form the basis for risk.
Risk = Hazard x Exposure
Studies have shown that exposure is greatest for handlers of agricultural pesticides during the mixing and loading phase of spraying. During this phase, the risk to the handler may be increased due to:
physical stress
the denial of risk
a negative opinion of personal protective equipment (PPE)
The main method of pesticide exposure is dermal, and many of the surfaces on a piece of equipment are already contaminated.
Health effects of pesticides: Acute and Chronic
Acute: short term
High exposure, resulting in immediate reaction due to a high dosage of pesticide exposure. The severity depends on the toxicity of the molecule and entry into the body (dermal, oral, eyes, etc.). The most common acute reaction is skin irritation, although in certain cases respiratory, digestive, and neurological systems may be affected. Organophosphate (e.g. Lorsban, Malathion) and carbamate (e.g. Sevin, Lannate) insecticides inhibit the cholinesterase enzyme, which is found in humans and affects nerve function. Frequent users of these insecticides undergo regular blood tests to ensure their levels are normal.
Chronic: long term
Chronic affects are more prolonged as they are usually due to lower doses of pesticide exposure over a longer period of time. Although some rare cancers and disruption of the reproductive system have shown to be related to this type of exposure, when the general population and farming population have been compared in studies, the farming population has shown an under-representation in the majority of cancers. In the cases were reproductive malfunctions were observed, a different cause of the malfunction, such as genetic offset, was most often observed in these situations. However, cancer types such as skin cancer and brain cancer were overrepresented in the farming community. A study in France has shown that the onset of neurological disorders in Agriculture communities shows a strong connection between Parkinson’s disease and exposure to pesticides.
Label Information
The majority of information needed to safely handle pesticides is found on the label. Pesticide labels are legal documents, meaning they can be enforced by the federal government. The problem is that most sprayer operators rarely look at the label as they are not very reader friendly and easy to skim through. Most pesticide boxes even have the recommended rate, or acres/case on the side of the box now, so there is even less reason to look at the label.
LD50– the dose of pesticide in mg per kg of the test animals body weight that is lethal to 50 percent of the group of test animals. For example, if the pesticide has an acute oral LD50 value of 1000 mg/kg, and the test animals each weigh 1 kg, then 50 percent of the animals would die if they each ate 1000 mg of pesticide at once. A 100 kg animal would need to ingest 100,000 mg (100 g) of the pesticide for the same effect. LD50 is often expressed by the route of entry – dermal, inhalation, acute oral (ingestion) are the main examples.
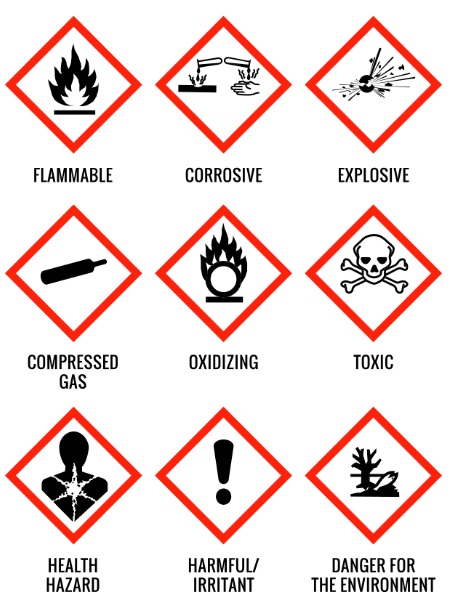
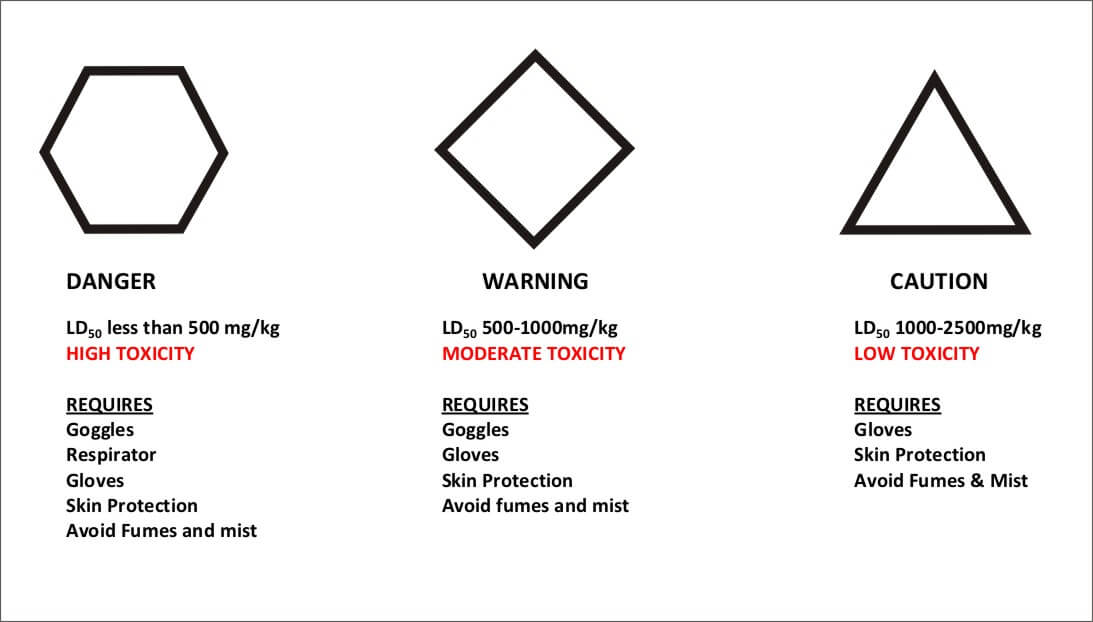
Degree of Risk and Hazard Symbols
Two Factors that Determine the Appropriate Level of PPE
The Hazard Rating (above) incorporates the minimum protection generally required for a substance with the rating.
The Label Recommendations will usually give the additional specific protective clothing and equipment needs for an applicator.
Degree of Exposure
This increases as the length of each pesticide application increases. As the number of pesticide applications increases, the time between exposures decreases. If an operator becomes exposed to spray, dust or fumes the degree of exposure increases. Essentially, more protective wear is needed as the degree of exposure becomes greater.
Knowledge
This encompasses all of the above information. In order for a pesticide applicator to avoid injury or the chances of adverse effects on the body, a pesticide applicator must be knowledgeable about pesticides. It can be overwhelming for an applicator to sort through all of the information on the label or on-line regarding pesticides. So much so, that most often applicators avoid the information altogether. Ongoing training and learning will ensure that they are effective in their work. Many aspects of pest control change continuously, as new studies are conducted on the effects of pesticide exposure.
A Safety Data Sheet (SDS) is available for each pesticides registered, and these are usually linked on manufacturers’ websites. It can be eye-opening what types of toxicity tests are done, and what the results are.
Denial that pesticides can potentially cause harm is also a major flaw in the behaviour of applicators. Maintaining a safe work environment and practicing personal safety will reduce the chances of an applicator experiencing serious injury throughout their farming career.
Unknowns
There is very little certainty in toxicology. For one, most testing is done using acute oral and dermal dosing. Basically, toxicologists expose test animals to the neat active ingredient and watch what happens. There is a lot of missing information – what about formulant like solvents, and surfactants? What about synergies in tank mixes? Some, but not all of these, undergo testing. We also have much less information on chronic (long-term) effects, and can only simulate these in quasi long-range tests. In addition, toxicological methodologies and statistical approaches can vary, and we should not be surprised that some reports disagree, and that there are outright conflicts between toxicologists and epidemiologists (scientists that study patterns of health in populations). Regulators are aware of these shortcomings and often use safety factors to account for them. But those of us that use these products regularly, the message is simple: be cautious, and protect yourself.
Avoid Cross-Contamination
Disposable nitrile gloves are the product of choice for handling pesticides. But one of the most common problems with the use of gloves is cross-contamination. You’re handling product with your gloves on, touching containers, hoses, valves, and couplers. When you’re done, you climb back into the cab where you take off your gloves. Later, someone climbs up into the cab to talk to you, using the railing and operating the door handle without gloves. Guess what’s on their hands? Even later, you put away the hose without gloves and return to the sprayer. Now it’s on the steering wheel and all the levers. There are a few solutions:
Double-glove so you can take the dirty outside glove off and still be protected.
Wipe down surfaces that you might touch with gloved or bare hands daily.
If using non-disposable gloves, avoid lined gloves and rinse the insides out daily.
Learn More
If you would like to learn more about pesticide safety, or to obtain pesticide application training, the Pesticide Applicator License can be obtained from the Ministry of Agriculture. This course offers in depth, valuable safety information for applicators, as well as general knowledge for pesticide applicators. The Pesticide Regulatory Directorate provides workers, employers, and the general public with a wide range of pesticide information. The PRD can be contacted from anywhere in Canada toll free at: 1-800-267-6315
Download this Quick Reference Guide for commonly used herbicides. Print, laminate and post it at the fill station or pesticide storage area for easy reference. Also, grab a copy of Health Canada’s “Stay Safe when using Pesticides” factsheet.
We all know the importance of cleaning out a sprayer. It protects a sensitive crop. It protects people working with the sprayer. It protects the sprayer and its components. But cleaning the sprayer is a pain. Here are some tips to make it easier.
Some herbicide label instructions are cumbersome, requiring many flushes with full tanks of water. Many applicators look for shortcuts and hope they get away with it. It doesn’t have to be guesswork. The following is a checklist that may help.
Be Prepared
A few supplies can help ensure a clean sprayer tank.
A defoaming agent saves water and time
A cleaning agent (commercial products, or simple household ammonia) is useful, and recommended, for Group 2 products except the imidazolinones.
A supply of clean water, preferably with its own pump, and a pressurized spray hose helps clean the sprayer inside and out.
A wash-down nozzle (whose flow requirements can be met by the clean water pump) can automate the tank wash-down.
A bucket and brush for rinsing screens is very useful.
Products to Watch:
The products most frequently implicated in sprayer contamination are two members of the Group 2 modes of action: the sulfonyl ureas (e.g., thifensulfuron (Refine) and tribenuron (Express)), and the triazolopyrimidines (e.g., florasulam (Frontline, PrePass) and pyroxsulam (Simplicity)). Since these herbicides dissolve better at higher pH, proper cleanout usually requires ammonia, a weak base that raises the solution pH. The third member of Group 2 products, the imidazolinones (imazethapyr (Pursuit), imazamox (Solo, Odyssey), imazamethabenz (Assert), imazamox (Ares, Adrenalin, Altitude or Viper)), tend not be implicated in as many residue issues, and don’t require ammonia for cleanout.
Be Prompt and Thorough
Remove pesticide from mixing and spray equipment immediately after spraying – it makes the job easier. The main areas of concern are the tank wall, sump, plumbing (including boom ends), and filters. First, spray the tank completely empty while still in the field. It’s sometimes OK to cover previously sprayed areas – all herbicides must be crop-safe at twice the label rate to be registered by the PMRA. Take care with residual products that may create problems down the road. Reduce the rate or choose a fallow field to be certain. Second, add 10 x the sump’s remnant of clean water, circulate, ensuring agitation is on, and spray it out in the field as well. Repeat. These two rinsing steps will take care of the majority of the cleaning and won’t take very long. The less remaining volume there is in your tank after the pump draws air, the less water is needed to dilute this remainder to an acceptable concentration. Having a clean water tank on the sprayer and a wash-down nozzle makes this job easier.
Visual Inspection
Herbicide residue may precipitate out of solution in some parts of the sprayer or plumbing. A thorough visual inspection can identify these problem areas and ensure that they are cleaned properly.
Tank Wall
Removal of residues from tank walls is best accomplished with a direct, pressurized spray. Make sure all parts of the wall have been in contact with clean water. Use a wash-down nozzle if it provides complete and vigorous coverage of the interior tank surface.
Sump
Empty the sump as completely as possible by spraying it out. Any spray liquid or herbicide concentrate remaining in the sump area will be re-circulated in the sprayer. The only way to remove any remaining herbicide is through dilution by repeatedly adding water, and leaving as small a remainder as possible.
Plumbing and Boom
Plumbing can be a significant reservoir of herbicide residue. Removal from plumbing can be achieved by pumping clean water through the boom while ensuring that all return and agitation lines also receive clean water and all residue is flushed out. This may require opening and closing various valves several times, and repeating the process with new batches of clean water. Boom ends can extend up to 6” beyond the last nozzle at each end of each boom section. These ends must be flushed to removed trapped residue. A useful product that does this automatically is the Pentair Hypro Express Nozzle Body End Cap, or better yet, consider recirculating booms.
Dilution
The most effective use of a volume of rinse water is to divide it equally across several repeat washes. Assuming a 10 gallon sump remainder, three washes with 30 gal each are as effective as two washes with 70 gallons each, and equal a single 600 gal wash.
It’s even more efficient to use a separate clean water pump, introducing clean water as the rinsate is sprayed out. This saves water and time, and results in even more dilution.
Filters
Nozzle screens and in-line filters can be a significant reservoir for undiluted or undissolved herbicide and are one of the most overlooked parts of sprayer decontamination. Remove all filters and nozzle screens and thoroughly clean these with fresh water. Run clean water through plumbing leading to the screens.
Nozzle Bodies
Nozzle bodies can harbour herbicide mixture. When cleaning a spray boom, rotate through all nozzles in a multiple body to ensure clean water reaches all parts of these assemblies. Remove screens that may have been used with herbicide.
Tank Cleaning Adjuvants
Adjuvants such as ammonia can assist the tank decontamination process, especially with sulfonyl urea and triazolopyrimidine-containing products. Ammonia does not neutralize herbicides, but it does raise the pH of the cleaning solution which helps sulfonyl urea herbicides dissolve. When decontaminating after an oily (EC) formulation, the use of a wetting agent such as AgSurf will assist in removing oily residue that may trap SU herbicide on tank and hose material. Commercial tank cleaning products that contain ingredients for removing persistent deposits are available.
Tank and Boom Material
Both plastic and stainless steel are common tank and wet boom materials, and both can be cleaned using the above procedures. However, stainless steel is easier to clean, and this means that less time may be required. Consider the choice of materials a productivity factor in your next purchase or upgrade decision.
Rinsate Disposal
Always spray out the tank in the field. Do not drain the tank while stationary unless you are certain it is free of pesticide and that you are away from sensitive areas and waterways. Consider a continuous rinse system. Consider building a biobed for safe disposal of dilute pesticide waste.
Sprayer cleanout will probably never be the easiest job on the farm. But looking at it in a smarter way can prevent frustration and save time.
Editor’s Note: Changes have been made to this article since its original publication in 2015.
When in-crop spraying is around the corner, sprayer tank clean out is an important topic to address on your farm. Many farms have done the same clean-out routine for years and not had any issues with contaminating residues in the tank resulting in crop damage. Although the old saying “If it ain’t broke, don’t fix it” definitely has some merit, in this case it is good to question whether your cleanout routine is adequate. When you consider the way chemicals have changed over the years, especially the higher reliance on oily surfactants in modern chemicals, it makes sense why we need to pay attention to spray tank cleanout.
The goal of cleaning the tank is to remove and dilute the previous chemical formulation as much as possible to prevent buildup and carryover of residues which can cause crop damage on non-target crops.
Safety First
Always wear safety gear before working around chemicals. Although it can be a hassle, we all know that it is no fun spilling chemical on your clothes and skin. What’s even worse is smelling it all day in the sprayer cab. I use a long waterproof coat, a plastic face shield to prevent back splash when spiking jugs, and of course rubber gloves (No judgment on me looking like a total dork please:).
Safety First – Are you looking at my headgear? Are you!?
1 – Get the Previous Product Out of the Tank ASAP
In my experiences spraying, I have always tried to get the previous product out of the tank as soon as possible. Spraying the extra product out of the tank is the safest and most environmentally responsible way to rid your tank of left over product. Dr. Tom Wolf of AgriMetrix Research and Training, states that spraying a crop twice is usually safe, as all herbicides must be registered to be sprayed at twice the rate in order to be registered by the Pest Management Regulatory Agency (PMRA). If one lets the product sit in the tank overnight before beginning the cleanout, there is more time for product to congeal and adhere to the tank and plumbing components.
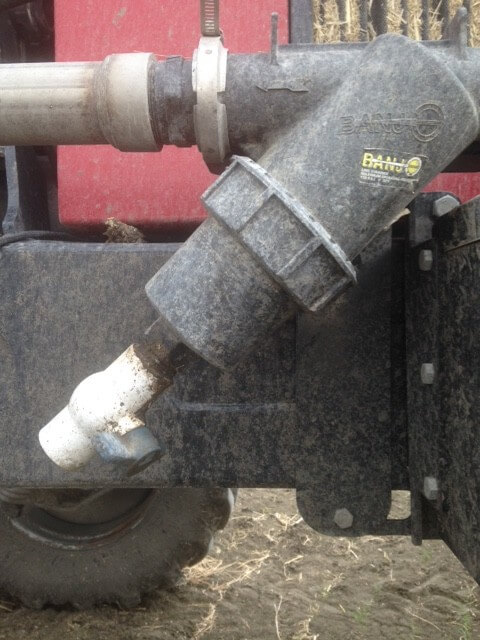
Ball valve on main filters.
I open the valve ends on my filters to empty the buildup in the bottom of the filter canister. There is often chemical residue or green slime from dug-out water in here. Next I like to go along my booms and empty out all the chemical product within the boom plumbing. Our farm runs a Patriot 4420 sprayer, with valves on each boom section to empty out product. Usually I will go to the sprayer and tip the boom ends up so that gravity allows all of the product to drain out. Then I raise the centre rack, and tip end of booms down to force the product to drain out the other way. You would be amazed at how much product comes out by doing this both directions!
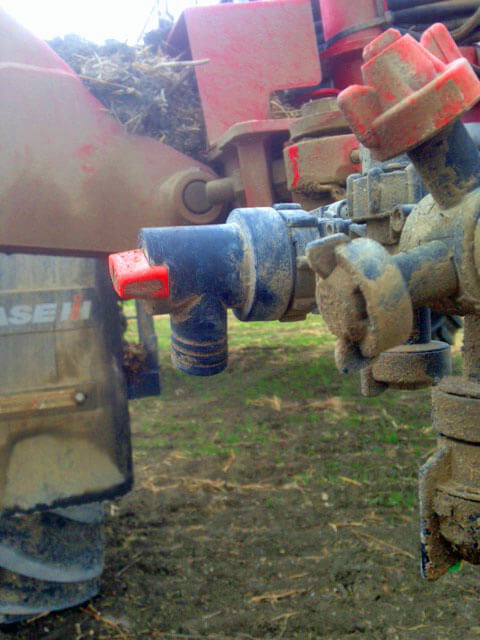
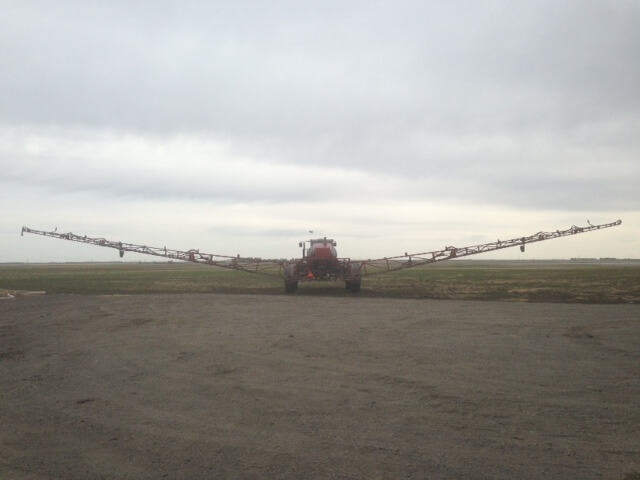
Valves on each nozzle.Tipping the boom ends up with the centre rack down.
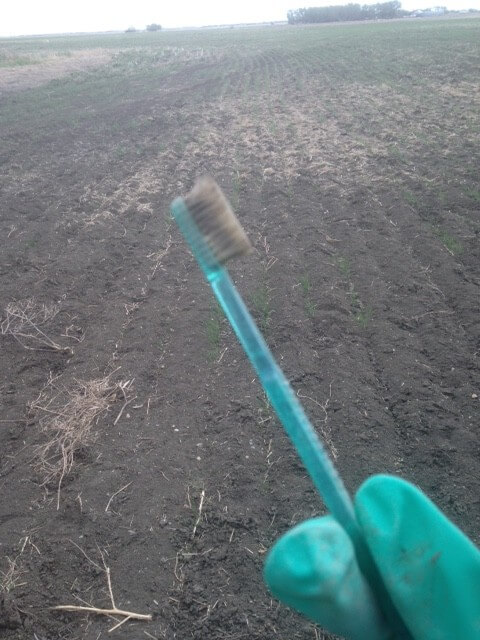
While the tank is empty and no pump is running, I will remove all the filters on the sprayer, and grab the handy dandy toothbrush – this is the most valuable tool in filter cleanout! This brush is just small enough to get it in the centre of the filter and scrub all of the residue and gunk out of the filters. A pail filled with rinsing solution is an easy way to clean filters and nozzles.
Possibly the most important cleaning tool. Don’t put it back in the bathroom afterwards.
2 – Begin Rinsing Process
I used to always put about 1,000 gallons of water to our 1,200 gallon tank, thinking that a larger volume would clean all areas of the tank better, but I’ve since changed my thinking. Research has shown that two or three smaller rinses *aka triple rinsing) is more effective for rinsing the tank than one large volume rinse. I always crank the agitation up to high and allow the cleaning solution to agitate for as long as possible.
Nowadays I try to do three 400 gallon rinses.
1st Rinse
Cleaning product plus 400 gallons water
2nd Rinse
Cleaning product plus 400 gallons water
3rd Rinse
400 gallons of just water to rinse, and run through plumbing system to check nozzles and for leaks
Many labels Recommend leaving the rinsing solution in the tank and lines overnight. This will allow more chemical deposits to loosen up. If an operator is forced to speed up the tank cleaning process due to limited time, they must understand that there are risks involved in doing a less thorough tank cleaning.
Cleaning Products
Detergent or ammonia? Check the label. If the label doesn’t specify, you can consult this table from Winfield United.
Detergent Cleaner
Ammonia
Solution contains an adjuvant
Sulfonylureas (SU’s)
Solution contains a milky looking component (an Emulsion or EC)
Thiencarbazone – methyl
Glufonsinate
Flucarbazone
Imi’s (Group 2)
Dicamba
Simplicity
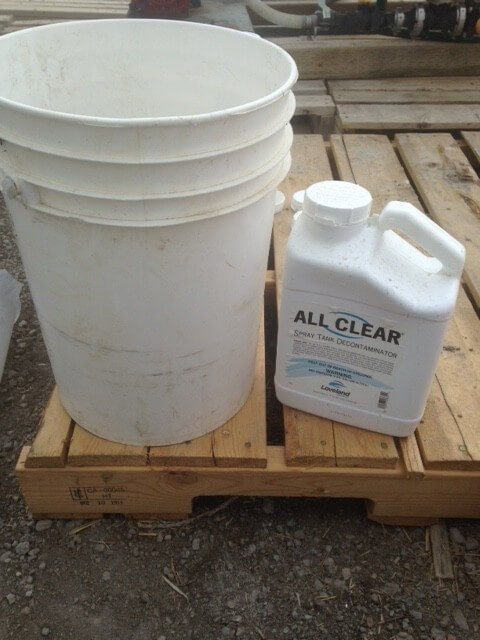
Detergent (e.g. All Clear)
This detergent cleaner is specifically designed to remove pesticide deposits and other debris, including oily substances from booms, filters, and nozzles. Use All Clear (or other detergent cleaner) if the solution is milky-looking (called an emulsion), which means it is oil-based.
Label rate is 0.25 L of All Clear/100 L of water.
If you are adding 400 gal of water, you will only need 3.78 L of cleaning product.
Decontamination rate is double this: 7.57 L of cleaning product. Use this rate if you have had residue issues, or to do a more thorough cleaning.
pH Increaser (aka Ammonia; e.g. Flush)
This is an ammonia based cleaning solution. This product is used to raise the pH to increase solubility of most Group 2 products (from FMC, Bayer, and Corteva but not BASF). Flush contains 7% ammonia. Use Flush (or other ammonia based cleaner) for most cleaning, but especially for Group 2 products listed above, such as Varro, and Velocity M3, Express, Refine, Muster, and Spectrum.
Label Rate is 0.50 L of Flush/100 L of water.
If you are adding 400 gal of water, you will need exactly 7.57 L of cleaning solution.
A pail and detergent are “must-haves” during sprayer cleanup.
Combo Products
Alternately, some solutions raise pH without ammonia. FS Rinseout is sodium hydroxide based, not ammonia based. It is a high alkaline solution that elevates and holds the pH combined with strong surfactants to help clean the tank. Another is CleanOut, which uses potassium hydroxide and disodium metasilicate, a detergent. In both cases they are both pH increases and detergents.
3 – Draining the Rinse Solution
After I have ensured all nozzles are working correctly, and there are no leaks in the system, I drain out all of the rinse water, fold in the booms, and get ready to fill the tank with chemical solution for spraying!
More Information
Learn where residue can hide. This video was filmed for the Environmental Farm Plan with the nice people at Clean Field Services in Drayton, Ontario. Hardly the height of our acting careers, but good messaging nonetheless.