Tag: boom

  • The Carvalho Boom and the Stages of Quadcopter Flight

    The Carvalho Boom and the Stages of Quadcopter Flight

    The Hypothesis

    The results of a recent herbicide deposition study performed with the DJI T100 led us to observe that after ~13 m/s, swath width and drift were no longer directly related to travel speed; They appeared unaffected. The result was completely unexpected as it was counter to several years of prior study with smaller drones. This led to a hypothesis that the aerodynamics of this new generation of quadcopters might be similar to that of a helicopter, and it was impacting spray deposition in a similar fashion.

    Let’s use the stages of quadcopter flight to set up the premise.

    1. Hover

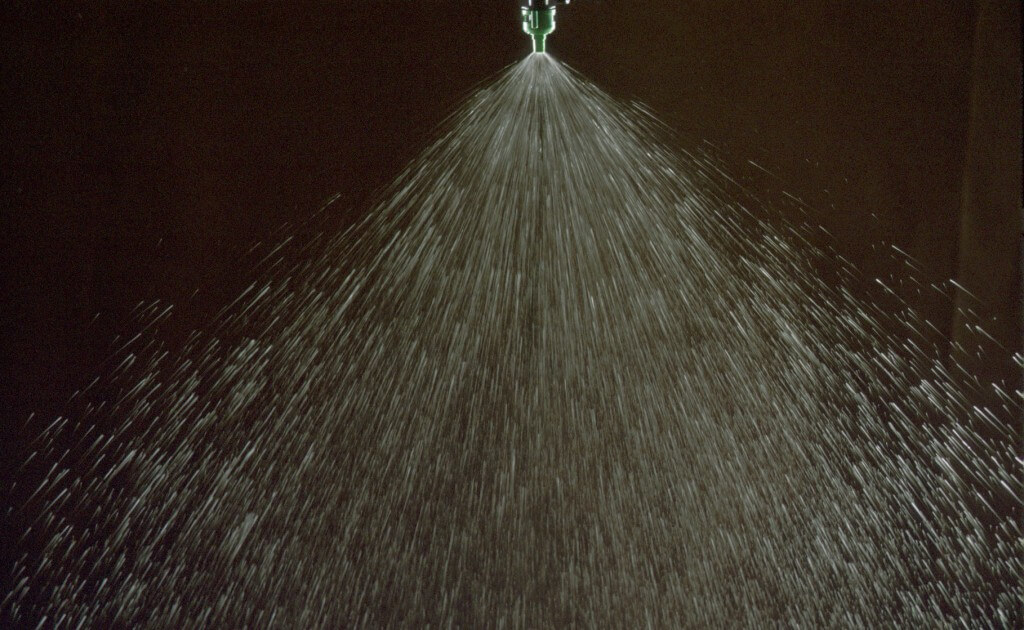
    When a drone hovers, each rotor draws air from above and accelerates it downward in a high-velocity blast. The cumulative effect is a vertical component referred to as the “downwash” and the turbulent splash of air that hits the ground and spreads laterally is the “outwash”.

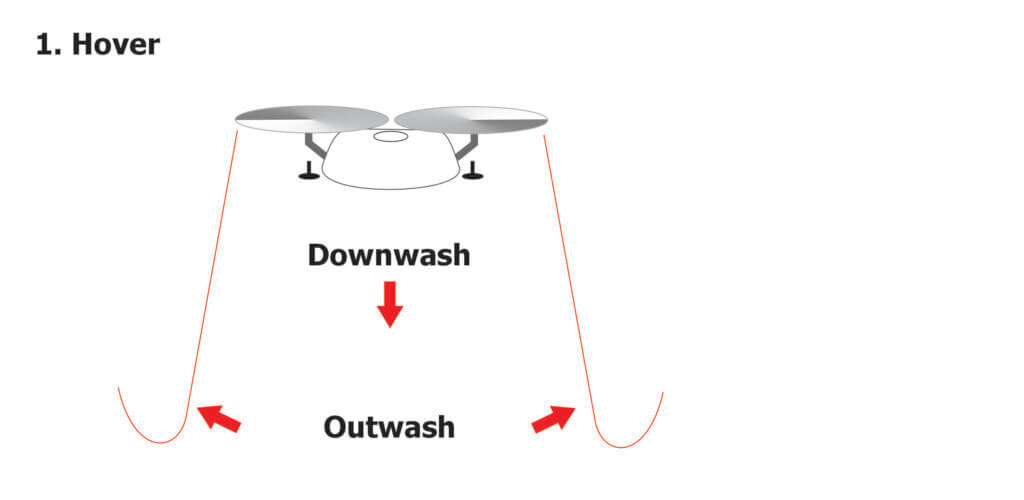
    The initial strength of the downwash depends on the degree of “disc loading” which is the weight of the drone divided by the rotor area. The intensity of the downwash wanes with distance from the rotor, spreading out in three dimensions until it impacts the ground and becomes the outwash.

    During hover, the drone recycles some of its downwash. This turbulence affects the stability of the drone, requiring a great deal of power to stay aloft, especially when it’s full.
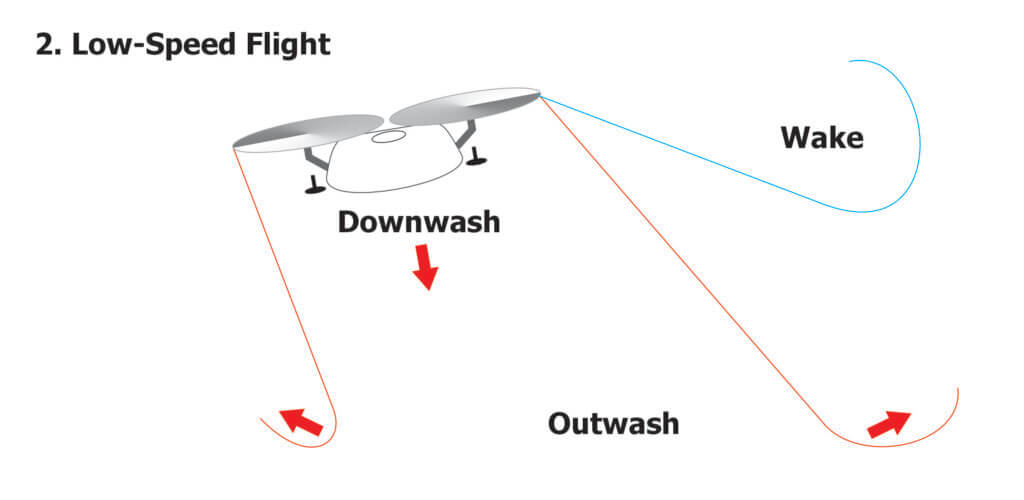
    2. Low-speed flight

    A helicopter achieves forward thrust by changing the pitch of its rotor blades. Most drones have fixed-pitch rotors, so the entire drone must tilt forward to enter low-speed flight. This causes the column of downwash to tilt backward.

    While the downwash is created by lift, “wake turbulence” is created at the tips of the rotors as high-pressure air beneath the rotor wraps around to the low-pressure area above. As the drone flies at low speed (~<3 m/s) the wake is visualized by a pair of counter-rotating, cylindrical vortices that trail behind. Some journal articles suggest the downwash for medium-sized drones (e.g. < 50 L capacity) detach from the ground at speeds as low as 3 m/s.

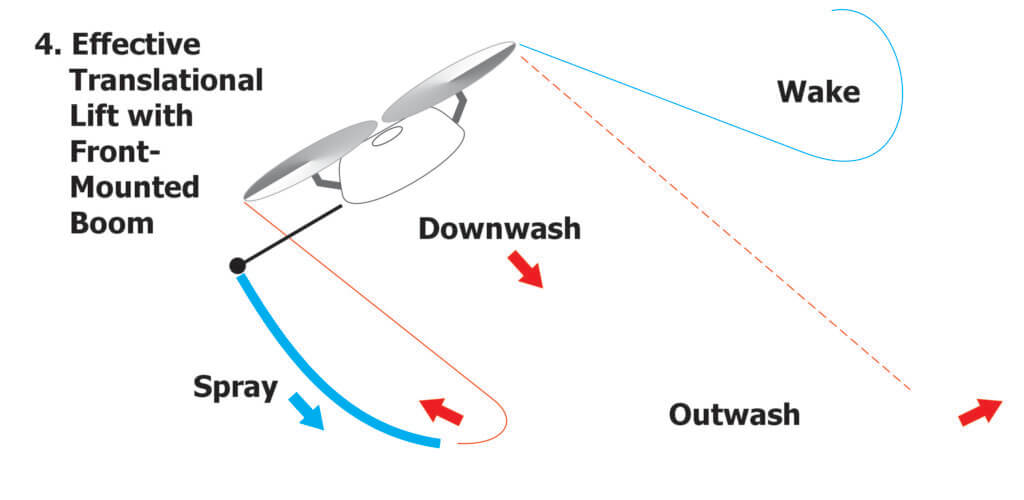
    3. Effective Translational Lift (EFT)

    As the drone accelerates it continues to angle forward, likely not exceeding 30°. At some point (~15 m/s?), we suggest it enters a state of “effective translational lift”, becoming more stable and therefore more energy efficient. This speed is notably slower than is commonly reported for a helicopter.

    During the transition, the drone behaves more like a wing as it essentially outruns its downwash, moving undisturbed air over the rotors. This horizontal air provides some lift, making flight more energy efficient, at least until drag begins to pull on the drone.

    The Possible Effect of Flight Stage on Spray Behaviour

    Droplets released beneath a drone at hover are completely entrained by the downwash. The majority get driven to the ground and then laterally along the outwash, while some small portion (likely smaller droplets) recirculate back up through the rotors.

    At low-speed flight, the downwash begins to tip backwards and the downwash trails behind and at some point detaches from the ground. Spray released beneath the drone is still entrained and will trail on a downward and rearward vector in that downwash. However, a portion will get caught in the wake. We can sometimes see this spray separation occur when lighting conditions are just right.

    As speed continues to increase, much of the spray would still be entrained in the downwash, but a greater portion would get caught in the wake, appearing as spray curling at the extremes of the swath. At some point, perhaps if and when the drone enters EFT, the the downwash might be less chaotic and behave more like laminar air. In which case some spray would still curl in the wake, but much of it would fall in a more stable sheet. Further increases in speed would not affect spray behaviour appreciably.

    Taking Advantage of ETL

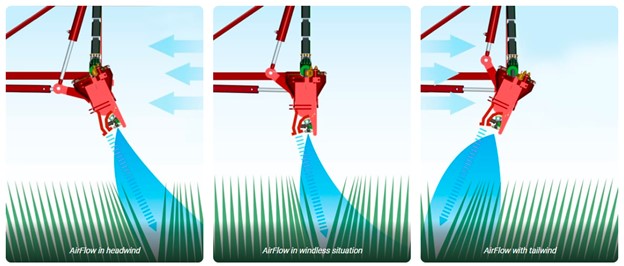
    If this is the case, it is conceivable that rotary atomizers positioned under the front rotors could fling some droplets beyond the leading edge of the downwash. What if instead, it were a horizontal boom positioned out in front of the rotors, transecting the chord line?

    As the drone tipped forward during high-speed flight, so too would the boom, bringing it closer to the ground and releasing droplets ahead of, and below, the leading edge of the downwash. This should produce a more uniform swath, perhaps subsequently pushed down as the drone passed over.

    It’s an interesting idea that is only made possible when drones are capable of high-speed flight.

    Reception

    In January 2026 I presented this concept during a lecture at the 4th annual Drone End-User meeting in Kansas City. The response was polite, but skeptical. I then shopped the idea around the trade show floor where drone manufacturers suggested a front-mounted boom would interfere with obstacle avoidance sensors, or shift the centre of gravity, making the drone difficult to fly and to land. And what about the impact of wind speed and direction? All good points. Then, Nino Carvalho introduced himself.

    The Carvalho Boom

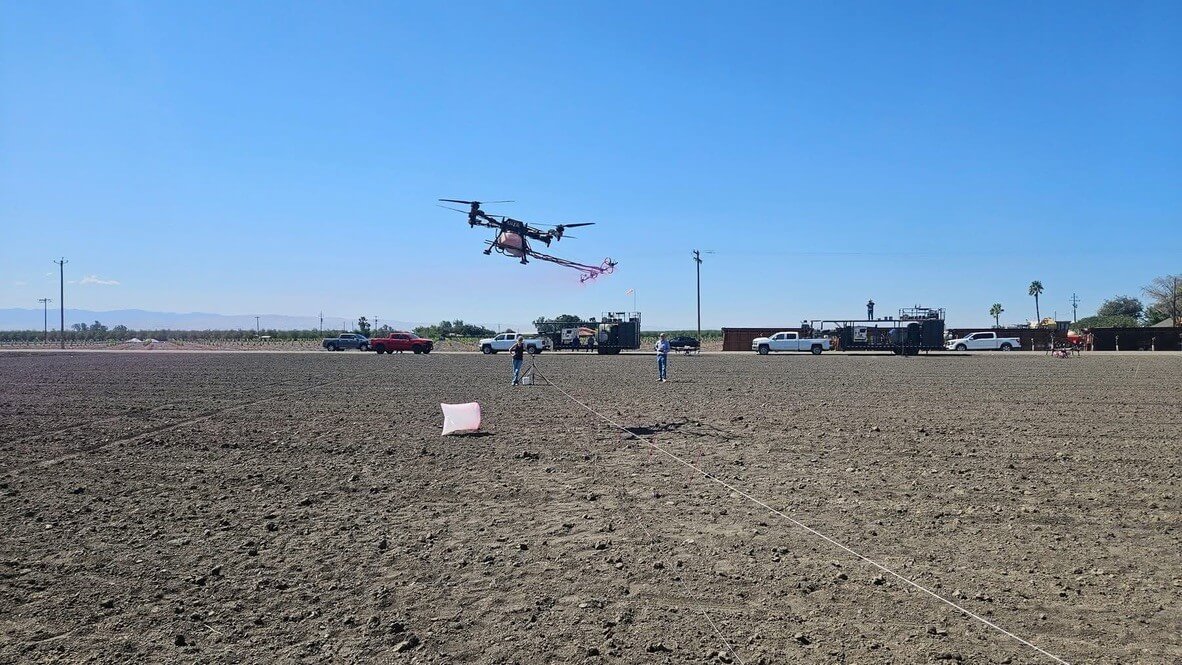
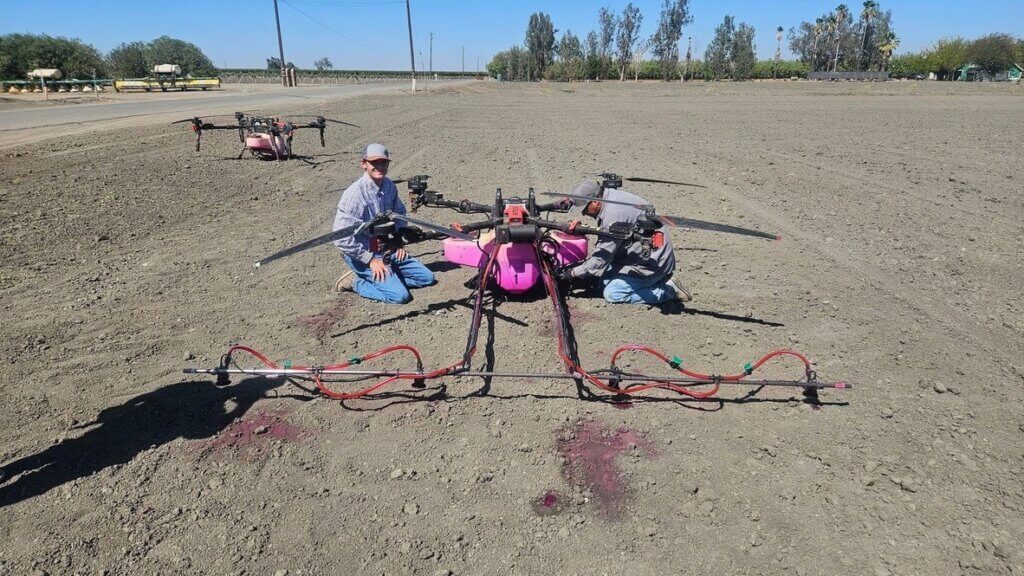
    Nino Carvalho and his son, Emilio, own and operate NC Ag Spraying in the Central Valley of California, USA. Emilio was inspired to modify his drone after discussing matters with his mentors; one who owns and operates a fixed wing aerial business, and another that pilots a Huey helicopter. In late 2025, they designed and built a horizontal boom which I’ve dubbed “The Carvalho Boom”.

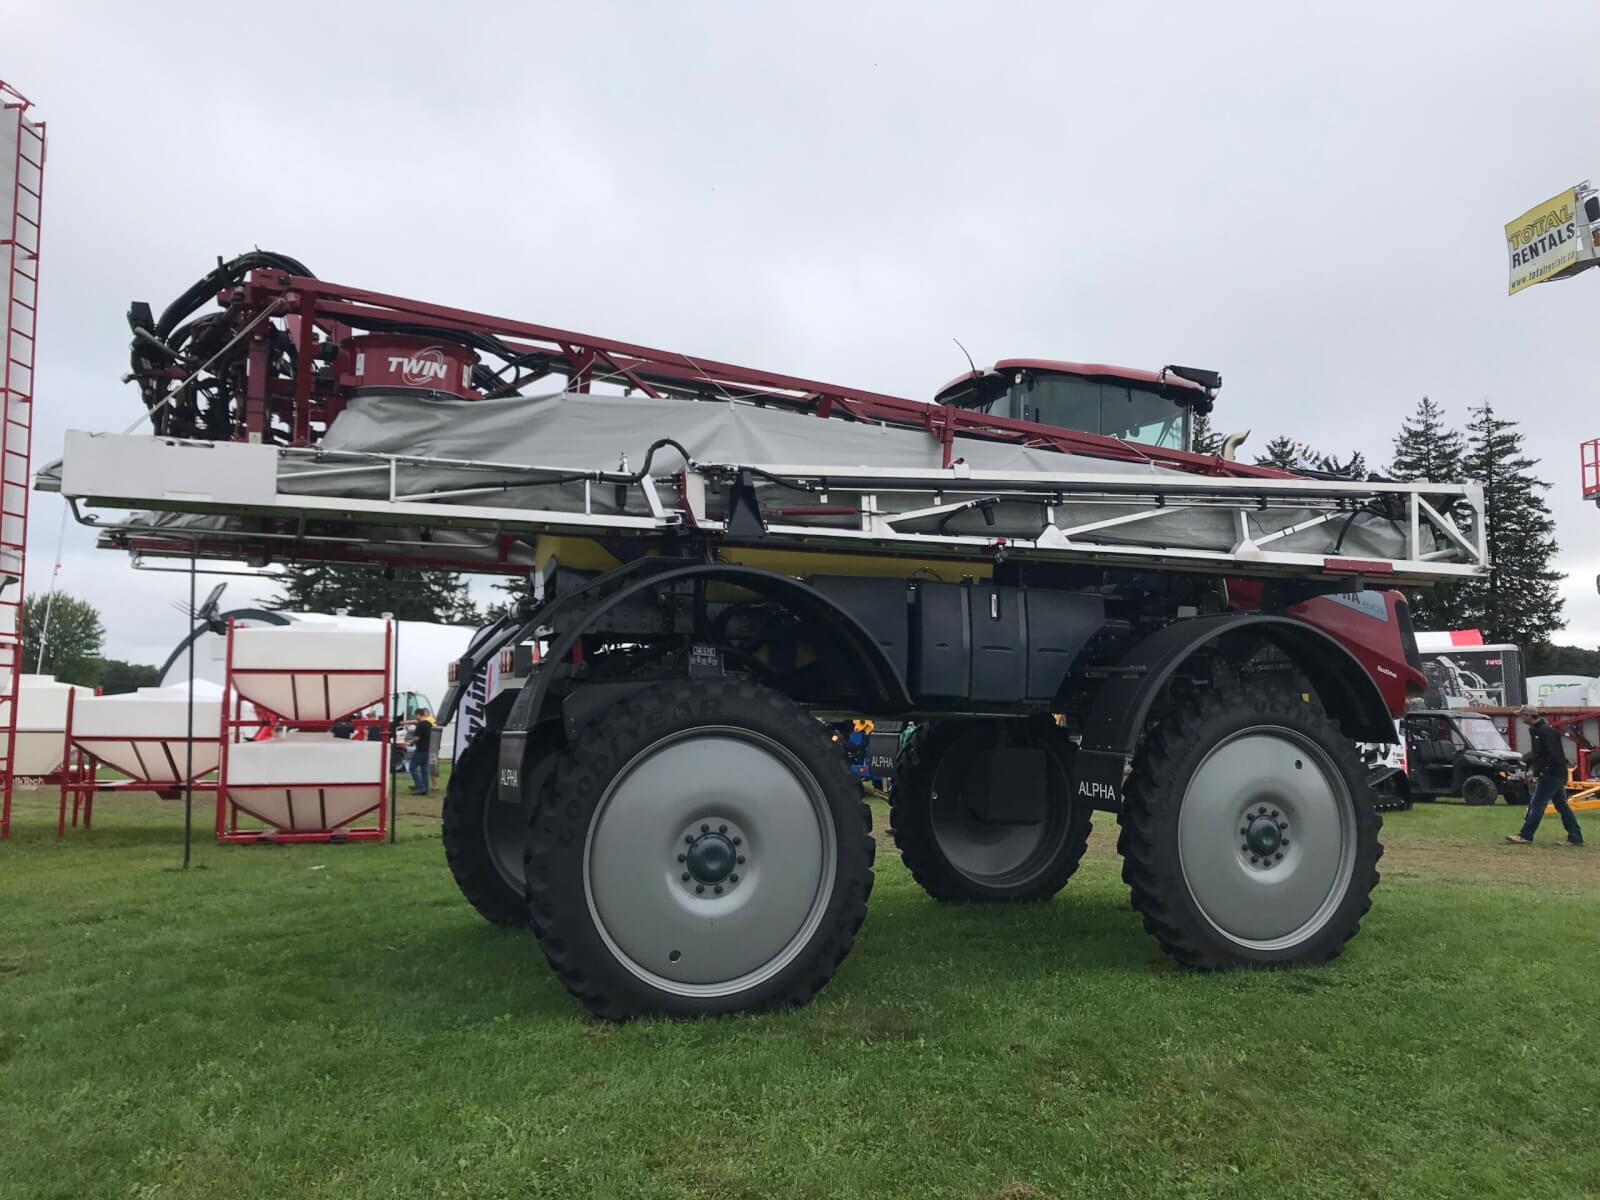
    Their first attempt was with a DJI T50, but the boom mount interfered with the stacked rotors, and the atomizer cables were difficult to extend. The XAG P150 had fewer cables and only top-mounted rotors, so it was a better fit. After experimenting with various materials (PVC was too flimsy, steel too heavy) they mounted a length of ½ inch metal conduit directly under the drone.

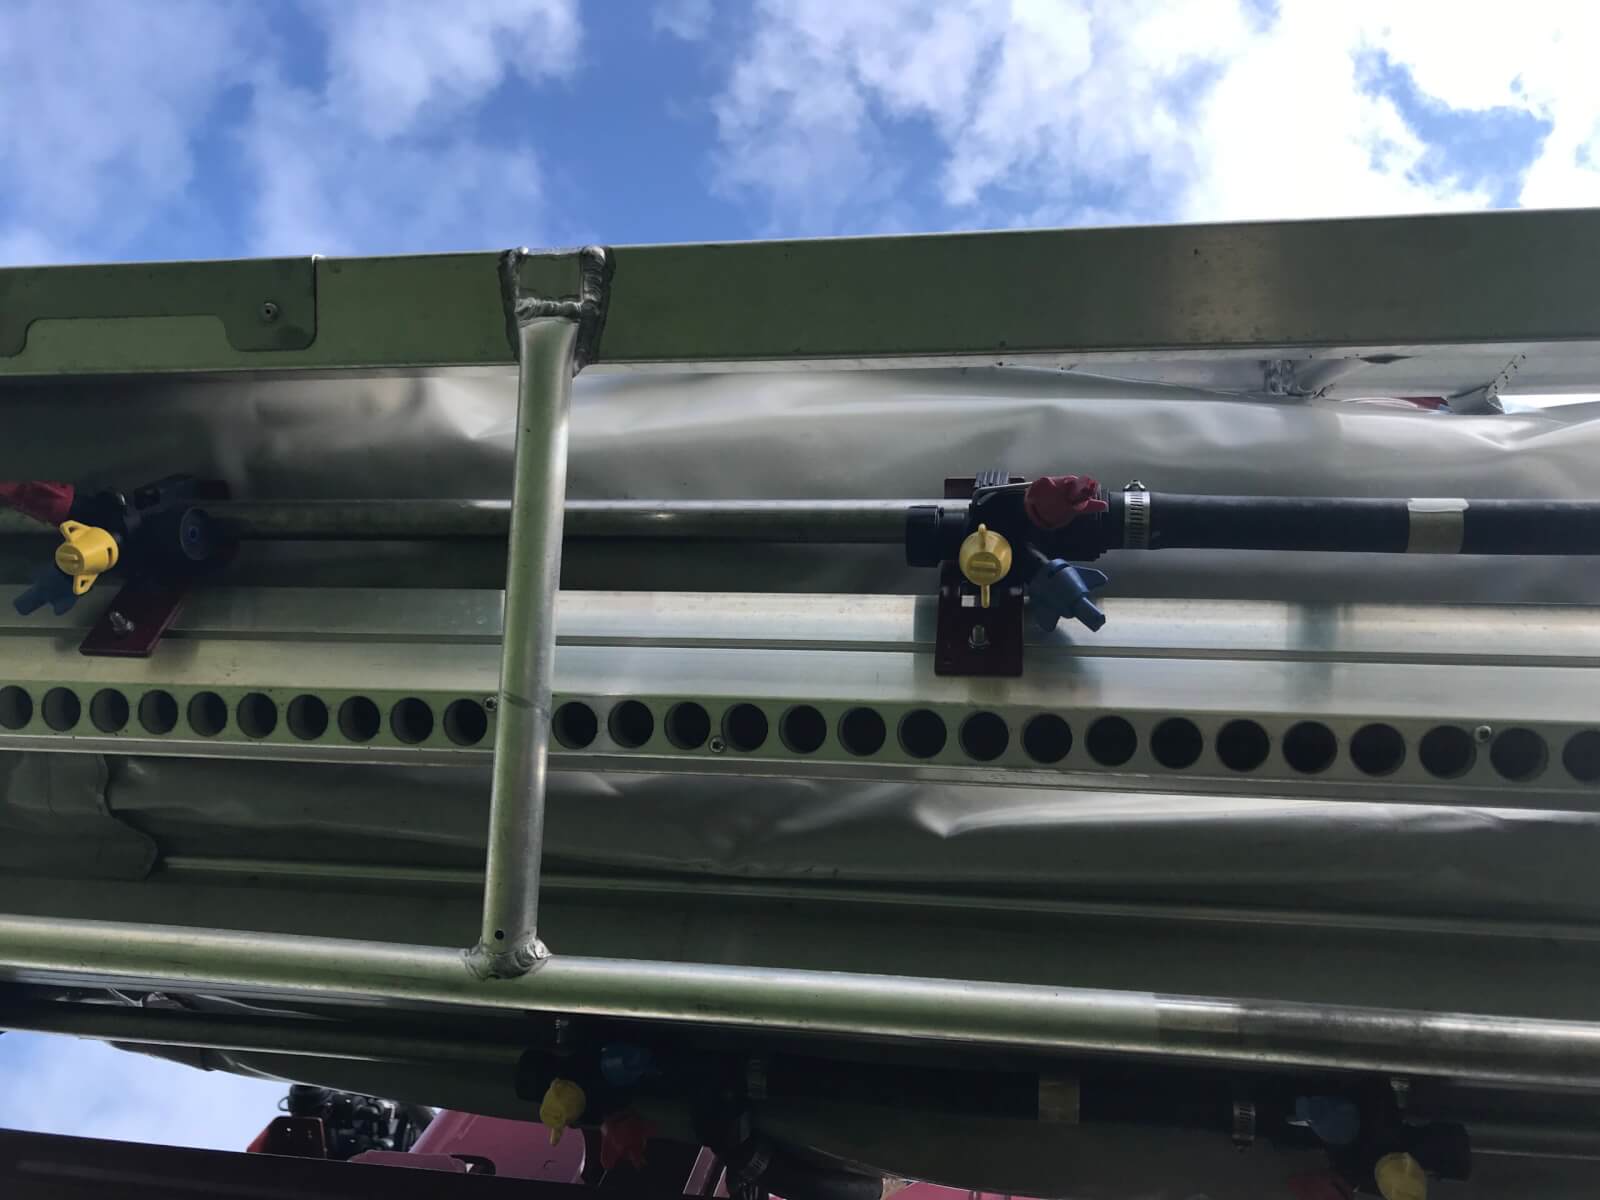
    In California, aircraft booms must be limited to 90% of the rotor width (because of rotor tip vortices). The greatest span of the rotors was 312 cm (122.8 in), so they made the boom 275 cm (~9 ft) long. They spaced the rotary atomizers evenly along the boom every 69 cm (~ 2 ft 3 in), extended the original 30.5 cm (12 in) nozzle cables to 305 cm (10 ft) to reach their respective electronic speed controllers, and plumbed them using 1.25 cm (0.5 in) diameter tubing.

    They flew this first prototype over water sensitive papers. Dropping from a 3 m (10 ft) altitude to 2 m (6.6 ft) improved coverage uniformity and resulted in a 10.3 m (34 ft) effective swath width. They could see the downwash was interfering with deposition, and while increasing to a larger droplet size helped, it didn’t help enough. Then they made some design changes, extending the boom 30.5 cm (12 in) beyond the rotors, and they saw they had something. They reached out to Agri-Spray Consulting (Nebraska) and arranged to run a series of Operation S.A.F.E. fly-ins.

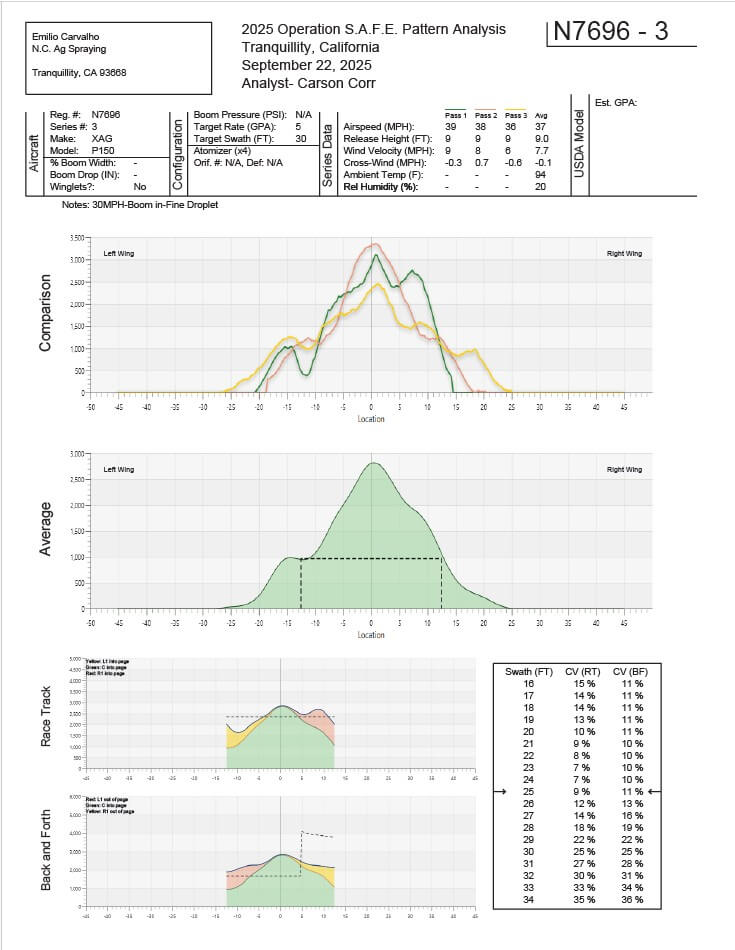
    There were more than 25 flights that day, so we’ll focus on three specific load-outs. The critical parameters are listed in the following table in the order that they flew them. The first load-out (N7696-01) was deemed the best, and was the only one with the boom extended out front, beyond the rotor tips. This information is italicized. The other two are included here for interest. N7696-03 attempted to shift the boom back under the drone for cosmetic reasons, but also for ease of transportation. N7696-04 was the same configuration as the last, but with coarser droplets in an attempt to battle the downwash. The first fly-in report (N7696-01) is shown below, but all three reports can be downloaded by clicking the links above.

    Load-OutBoom PositionVolume Speed Droplet Size (µm)Altitude Wind VelocityEffective Swath WidthC.V. (Race Track / Back & Forth)
    N7696-01Beyond Rotors50 L/ha
    (5 gpa)
    16 m/s
    (36 mph)
    2302.75 m
    (9 ft)
    10.7 kmh
    (6.7 mph)
    10 m
    (33 ft)
    10%/10%
    N7696-03Beneath Rotors50 L/ha
    (5 gpa)
    16.5 m/s
    (37 mph)
    2302.75 m
    (9 ft)
    12.5 kmh (7.7 mph)7.6 m
    (25 ft)
    9%/11%
    N7696-04Beneath Rotors50 L/ha
    (5 gpa)
    14.3 m/s
    (32 mph)
    4002.75 m
    (9 ft)
    8.5 kmh
    (5.3 mph)
    8.5 m
    (28 ft)
    18%/11%

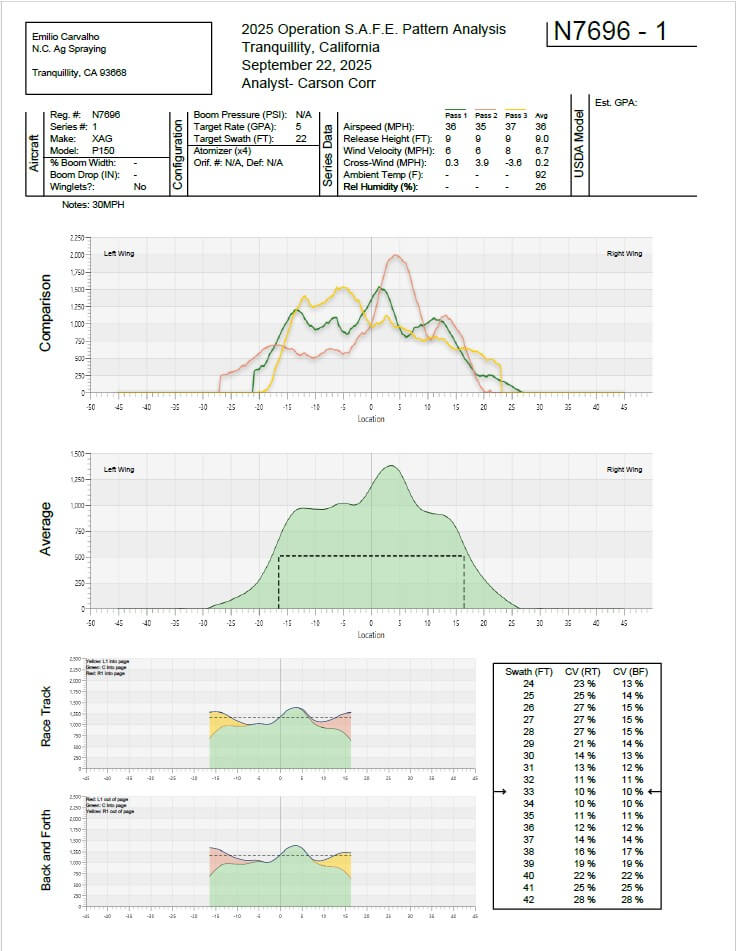
    Observers said it looked like the swath was rolled with a paintbrush and that there were no observable vortices – just a sheet of spray. The following videos show some of the passes from that day. Actually, you can see vortices, but only in the passes where the boom is positioned beneath the rotors and not when it’s extended out front.

    A 10% CV is spectacular, and the profile of each pass (even before averaging) was far flatter than any drone deposition I’ve seen previously. This design has not yet been used for custom application because there are still questions about how flight speed and pump flow will affect performance. But, the Carvalhos are already discussing the next design, constructed with carbon fibre tubes.

    Impacts and Musings

    Perhaps our description of how the air is moving over the drone is correct, or perhaps it isn’t quite right. Dr. Fernando Kassis Carvalho (no relation to Nino and Emilio) (AgroEfetiva, Sao Paulo, Brazil) recently shared that he also observed swath width no longer changed at speeds exceeding 13 or 14 m/s (personal communication). So, whatever the aerodynamic cause, the result seems clear.

    Does this mean we’ll see a new generation of quadcopters with front mounted booms? It’s certainly possible, and kind of poetic as some early drone designs featured a centrally-mounted boom that extended beyond the rotor tips. Emilio wondered aloud about possible wear on the front motors, and likely there will be other issues as they experiment, but it’s early days and they’re enthusiastic about pursuing the design.

    Nozzle Design

    Should we also consider a return to hydraulic nozzles? The rotary atomizers on a drone currently leave a lot to be desired. Dr. Ulisses Antuniassi (Prof., Sao Paulo State University) studied the spray quality produced by rotary atomizers. He ran atomizers from a DJI T40 and from a XAG P60 in a wind tunnel spraying WG and SL formulations with either MSO or NIS adjuvants and found no logical trends in VMD, relative span or DV 0.1

    Further, work by Dr. Steven Fredericks (Land O’Lakes) showed that the rotary atomizer from a DJI T40 created droplets roughly one ASABE category smaller than the software indicated. Conversely, common knowledge is that the XAG P100 version produces a coarser spray quality than anticipated, and slow motion video produced by Mark Ledebuhr (Application Insight LLC) and Dr. Michael Reinke (Michigan State University) clearly showed the flooding issue reported by Dr. Andrew Hewitt (University of Queensland), where excessive flow to the disc interferes with its ability produce a uniform droplet size.

    I photographed no less than nine different rotary atomizer designs while at the End-User meeting. So, perhaps we should embrace a standardized design, or perhaps hydraulic nozzles should make a comeback. If the later, it would be a great opportunity to include PWM to increase their flow range.

    Acceleration and Flight Pattern

    And what of kinematics? A drone’s “acceleration time” is calculated by dividing the change in velocity by the acceleration rate. We’ve seen that a DJI T100 must travel up to 100 m before it reaches target velocity. Admittedly, it was full and attempting to fly at high speed. Kevin Falk (Corteva Agriscience) noted a 25 m acceleration distance and a 15 m deceleration distance for a T50 flying mostly-full at 6 m/s. That’s a not-insignificant distance to achieve target flight speed.

    What happens to the spray from a quadcopter drone with a front mounted boom as it transitions through the stages of flight? We don’t know for sure, but we can infer an inconsistent swath. Perhaps the prolonged acceleration time is sufficient reason for drones to start flying racetrack flight patterns like planes and helicopters, where they reach sufficient speed before passing over and spraying the target area. Current software does not allow that practice.

    All this to say that as drone design continues to evolve, we must continue to challenge and test assumptions surrounding best practices. It has been fascinating to see how spray drones are finding their place in Western crop protection systems.

    Acknowledgements

    Thanks to Mark Ledebuhr (Application Insight LLC), Dr. Michael Reinke (Michigan State University), Kevin Falk (Corteva Agriscience), Dr. Tom Wolf (Application Research & Training), Adrian Rivard (Drone Spray Canada), and Adam Pfeffer (Bayer Crop Science) for insightful discussions.

    Special thanks to Nino and Emilio Carvalho (NC Ag Spraying) for sharing their experience and practical approach to improving drone spray deposition.

    Additional Resource

    In early February, 2026, I gave a short interview with RealAgriculture. We discussed the state of spray application by drone in Canada as well as some of the possible impacts of higher speeds.

  • Air-Assisted Boom Sprayers

    Air-Assisted Boom Sprayers

    Air-assisted boom sprayers have been around since the 70s. More common in Europe than North America, they have demonstrated value in mitigating drift and improving canopy penetration. The majority of air-assist systems are found on three-point-hitch or trailed sprayers, which is fine (and perhaps even preferable) as long as clearance, travel speed and acreage aren’t limiting factors. In North America, trailed air-assist sprayers are used by some vegetable and strawberry growers, but air-assist in general is rare among field croppers. There are a few possible reasons for this:

    • North American field croppers are predominantly concerned with work rate and prefer the larger, faster, self-propelled option.
    • Air-assist is not ideal for herbicide applications to bare soil because unless it’s perfectly adjusted, it tends to bounce spray off the ground. A canopy is preferred to capture the spray and exhaust the air energy. This reduces the overall utility of air-assist.
    • The air-assist feature is expensive and growers are either unaware or unconvinced of its value.
    • There are few, if any, after-market air-assist upgrade kits available. This is because installations are bespoke; The apparatus is heavy, adds load to existing electrical and hydraulic systems and can interfere with boom folding. So, getting air-assist means purchasing a new (and perhaps unfamiliar) brand of self-propelled sprayer… and there aren’t many on offer.
    Figure 1 – Dammann’s massive three-axel DT3200H S4 self-propelled air-assist sprayer at Canada’s Outdoor Farm Show in 2018.
    Figure 2 – Agrifac’s AirFlowPlus (Image from Agrifac website)
    Figure 3 – Agrifac’s AirFlowPlus depicting adjustable angle (Image from Agrifac website)
    Figure 4 – This photo of a John Deere with air-assist was taken at a dealer’s lot in Southwestern Ontario in 2014. We have no idea what the history is, or who added the air-assist feature (it looks similar to a Miller Spray-Air with two blowers).

    Air assist booms came to Western Canada in the early 1980s in the form of the “Spray-Foil” sprayer, later renamed Spray-Air. This sprayer was developed and manufactured in Carseland, Alberta. It used a shear-atomizer nozzle, a “foil”, that required a strong airblast to properly atomize a liquid feed that was introduced on the foil’s leading edge. As a result, it created a powerful airblast and a very fine spray. It was marketed as a way to reduce herbicide rates, an attractive feature during the times of drought, high interest rates, low commodity prices, and general economic malaise of farming on the prairies during the 1980s. Neighbours of Spray-Foils didn’t like the drift potential of the machines, and chemical companies objected to the claims of reduced water volumes (2 gpa) and lower product rates which contravened label directions. An unflattering test report of the sprayer by PAMI in Lethbridge resulted in a protracted lawsuit which helped cast the fate of the company. A Danish company licensed the design and sold it in Europe under the name Danfoil, where it continues to exist and @Nozzle_Guy saw it in person during the 2019 Agritechnica.

    Figure 5 – A Spray-Air Trident pull-type made in Carseland, Alberta, for sale.

    Eventually, Spray-Air rose from litigation and developed an improved nozzle with the assistance of the National Research Council (the “Shear Guard”) and introduced the Trident boom which gave users the option of atomizing spray with a conventional boom with or without air assistance, in addition the the native choice of shear-atomization. The sprayer chassis itself also continued to improve with a better overall design. Nonetheless, it was sold to Miller in the 2000s after a period of sales stagnation.

    Figure 6 – A trailed one-sided Kyndestoft Air-Sprayer in Ontario field tomatoes (c. 2010)
    Figure 7 – Everyone’s favourite sprayer, the Spra-Coupe, sporting a Kyndestoft Air-Spray system (1996, PAMI)
    Figure 8 – An innovative prototype out of Alberta, the “Kaletsch fan sprayer” used pulleys to power the fans (1996, PAMI)

    A fundamental problem with shear-atomization on sprayers like the Spray-Air is the requirement for significant air velocity for the atomization to occur properly. When the canopy cannot absorb that energy, air rebounds and creates drift. And if the operator cannot reduce the airblast strength without adversely affecting atomization, it leads to problems.

    This photo (Figure 9) was submitted by Mr. L. Jones, a cash-cropper in ND, USA. It’s his JD4710 (circa 2004), which has 100′ booms and an 800 gallon tank. What’s interesting is that it has a Miller’s Spray-Air. This air-assist system is available on Miller’s Nitro and Condor line as well as New Holland sprayers (which are built by Miller). @spray_guy did some work with it on a Condor in field corn. It comes with their dual-flow nozzle system (Shear Guard™ PLUS Air Nozzles plus Dial-A-Drop™) for fungicides (applied at low volume) but you can also use conventional tips for coarser herbicide work.

    Figure 9 – A JD4710 with Miller’s Spray-Air and conventional nozzles.

    Mr. Jones says they use the flat fans when spraying a soil-applied herbicide. If it’s moderately windy, they engage the air to reduce drift. When they apply fungicide on wheat they use only enough air to move the heads as they pass over. Bystanders can see the spray enter the canopy and a portion rebounds, which they suggest (and hope) provides some underside coverage. That’s possible, but it’s generally better to keep all the spray in the canopy. This can be achieved by further reducing air speed, increasing travel speed, and/or aiming the air slightly backwards to increase the cross-sectional distance the spray has to travel and slow the spray velocity relative to the sprayer speed.

    Generally, we’re proponents of using air when spraying. It opens the crop canopy, exposes otherwise-hidden surfaces, entrains and carries droplets to the target (reducing drift and improving coverage) and it extends the spray window by out-competing moderate winds. We have no proof, but wonder if it might also help alleviate the negative impact of tire and chassis turbulence on coverage uniformity under the boom. And, before you feel we’ve ignored a big benefit, we’d would be very cautious about using air-assist as a means for reducing carrier volume. The debate about finer sprays at less volume giving greater efficacy continues. While true at times, any benefit needs to be balanced with the downsides of potentially more drift and evaporation.

    Here’s some 2018 footage from an assessment of canopy penetration in field pea using a Miller Nitro with Spray-Air. We see coverage extends deeply into the canopy, the degree of which shares an inverse relationship with depth (fairly classic). Note the heterogeneous mix of smaller and larger deposits from the air-shear nozzles. While some heterogeneity is good, this extreme span represents waste. The product tied up in the largest droplets could have been more gainfully employed as several smaller droplets. This pattern may be the result of using insufficient air energy, preventing the air-shear nozzle from fully atomizing the spray liquid.

    In 2015 we felt air-assist needed some exposure, so we held a demonstration at Canada’s Outdoor Farm Show. Over three days we used water-sensitive paper to evaluate coverage in a soybean canopy (moderately dense, planted on seven inch centres) from a Hardi Commander (Figure 10) with and without air-assistance. We originally wanted to get our hands on a self-propelled Hardi Alpha Evo (Figure 11), but there were only two in North America at the time and neither were available. By the way, the Alpha Evo is now on the third iteration, but still uses the Twin Force air-assist system which allows the operator to change the angle of the air and the air speed. Each blower can be steplessly adjusted to a maximum output of 2,000 m³/h per m of boom and a maximum (and we’d wager, often excessive) air speed of 35 m/sec. You can watch a video explaining how to dial-in a Twin Force sprayer here.

    Hardi Commander (118 foot boom) with TWIN air-assist
    Figure 10 – The Hardi Commander (118 foot boom) with Twin Force air-assist used in a spray demo at Canada’s Outdoor Farm Show.
    Figure 11 – Hardi’s Alpha Evo self-propelled sprayer employs their their Twin Force air-assist system.
    Figure 12 – Looking up from under the Hardi Alpha Evo boom. Air angle and speed can be adjusted.

    The demo treatments

    The sprayer was calibrated for 93.5 L/ha (10 gpa) at 2.75 bar (40 psi) at 9.7 km/h (6 mph). The boom was suspended 50 cm (20 inches) above the top of the canopy. On one side of the boom, we ran yellow mini drift nozzles (MD 11002’s) to create a Coarse spray quality, and on the other side we ran conventional yellow flat fans (F 11002’s) to produce a Fine spray quality.

    Water-sensitive paper was attached to rods at three canopy depths: at the top, midway down and at the bottom of the canopy. Papers were oriented both face-up and face-down (Figure 13). Following each application, papers were collected for digital analysis using “DepositScan” which calculates the percent surface coverage and the deposit density. Both of these factors contribute to overall coverage.

    We collected papers from three treatments:

    1. Fine spray quality, No air assist
    2. Coarse spray quality, No air assist
    3. Fine spray quality, Air assist
    Figure 2 - Water-sensitive papers were placed at three levels in a dense soybean canopy, facing up and down, for three conditions. Condition 1 - Air off, conventional 11002’s (medium-fine spray quality). Condition 2 - Air off, mini drift AI11002’s (very coarse spray quality). Condition 3 - Air on, conventional 11002’s (medium-fine spray quality).
    Figure 13 – Water-sensitive papers were placed at three levels in a dense soybean canopy, facing up and down, for three treatments. Treatment 1 (Fine spray quality, No air assist). Treatment 2 (Coarse spray quality, No air assist). Treatment 3 (Fine spray quality, Air assist).

    We held two demos per day at noon and 3:00 pm for three days, giving us six sets of papers to analyze for each treatment. The weather ranged from 25-29°C, 30-58% relative humidity and winds of variable direction from 3-11 km/h.

    This was a simple randomized complete block design, but it was not a rigorous experiment. We simply took the opportunity to gather numbers from the demonstration. A more fulsome experiment would require many, many more passes under more stable conditions. For example, we set the angle of the air and nozzles to about 30° forward and the air speed at maximum, which wasn’t necessarily correct. Ideally, these settings should have been fine-tuned to match the forward speed of the sprayer, the density of the crop and the weather conditions. There was a lot of boom sway (watch the video below).

    And so, caveats aside, the following graph illustrates the mean percent coverage and mean deposit density for papers in each treatment, for papers that were facing up (Figure 14). Standard error of the mean is presented alongside the average (x% ± y).

    Results

    Figure 3 – Average percent coverage (red) and droplet density (blue) for upward-facing water-sensitive papers in three canopy depths for each of three conditions. Averages rounded to the nearest 0.5 and Standard Error is indicated. * indicates significance with 95% confidence.
    Figure 14 – Average percent coverage (red) and deposit density (blue) for upward-facing water-sensitive papers in three canopy depths for each of three treatments. Averages rounded to the nearest 0.5 +/- standard error. “*” indicates significance with 95% confidence. Condition 1: Fine, No Air. Condition 2: Coarse, No Air. Condition 3: Fine, Air Assist.

    Treatment 1 (Fine, No Air) reflects a typical coverage pattern for a dense canopy. Coverage declines as a function of canopy depth because spray droplets are intercepted by plant material before they reach the ground. This is particularly evident with broadleaf canopies that create shading. The coverage data doesn’t show it, but there was an obvious (and unacceptable) plume of spray drift during these applications (see Figure 15).

    Figure 4 – The effect of air-assist on downwind drift from a medium-fine spray quality. Note that the nozzles and air are directed 30° forward. When sprayed over bare ground, the air-assist bounces spray back up, as pictured here. However, when sprayed into a canopy with the correct air settings, bounce (and drift) is virtually eliminated.
    Figure 15 – The effect of air-assist on downwind drift from a Medium-Fine spray quality. Note that the nozzles and air are directed 30° forward. When sprayed over relatively bare ground, the air-assist bounces spray back up, as pictured here. However, when sprayed into a canopy with the correct air settings, bounce is virtually eliminated.

    Treatment 2 (Coarse, No Air) follows the same coverage trend as Treatment 1. This treatment represents much larger, and fewer, droplets than Treatment 1, and yet the only obvious difference is reduced coverage in the middle of the canopy. There was little or no plume of spray drift during these applications.

    Treatment 3 (Fine, Air) also followed the trend of reduced coverage as a function of canopy depth. Mean coverage was higher at the top of the canopy compared to the other two treatments. In fact, according to an ANOVA, deposit density was significantly higher in this canopy position than the other treatments, with 95% confidence. While mean coverage in the middle of the canopy was more than 2x that of Treatment 2, it was not statistically significant. There was no apparent difference at the bottom of the canopy. It is important to note that unlike Treatment 1, there was little or no spray drift plume during these applications.

    Figure 5 – Upward-facing water-sensitive paper from mid-way into the canopy (position B) for condition 2 (very coarse droplets, air off) and condition 3 (medium-fine droplets, air on). The difference in coverage is obvious.
    Figure 16 – Upward-facing water-sensitive paper from mid-way into the canopy (position B) for Treatment 2 (Coarse spray quality, no air assist) and Treatment 3 (fine spray quality, Air assist). The difference in coverage is obvious.

    DepositScan was unable to detect coverage on any of the downward-facing papers. However, close visual inspection did reveal differences. Unsurprisingly, Treatment 2 (Coarse, No air)  did not produce any underside coverage; Large droplets do not change direction mid-flight unless acted upon by some other force. Droplets can bounce and shatter, but that did not occur here. The Medium-Fine droplets created in Treatment 1 (Fine, No Air) and Treatment 3 (Fine, Air) did leave trace coverage on the downward-facing surfaces. Generally no more than 10-30 deposits on the entire 1 x 3″ surface, representing less than 1% total surface coverage. It could not be determined if the air used in Treatment 3 improved underside coverage over that of Treatment 1.

    Did air-assist make a difference?

    Let’s start with the literature. Many experiments in peer-reviewed journals show that it does. A perfunctory literature review reveals improved coverage in the middle and lower portions of cotton, potato, soybean and wheat canopies. Some of these experiments were based on coverage using fluorescent dyes, and some with water-sensitive paper. Others were based on efficacy and report improved crop protection. The actual implementation was highly variable with some authors recommending angling the air and nozzles forward 20-25°. Others proposed 30° backwards. Most agreed (as do I) that the air speed should be set relative to the canopy density where higher speeds improved coverage deeper in the canopy, but did so at the expense of coverage in the higher canopy. Picture a bell curve on it’s side where the Y axis is canopy depth and the X axis is coverage; More air shifts the peak of the curve down the Y axis, into the canopy.

    As for our demonstration, some interpretation is required. If an operator is spraying a contact product with limited or no translocative properties, then coverage becomes especially important. In order to improve coverage, higher volumes and finer droplets combined with slower travel speeds are often advised. This may be impractical, as most operators prefer to use less water and drive faster.

    When we used Medium-Fine droplets with no air assist, coverage was good (Figure 14) and better than coverage obtained using Very Coarse droplets. However, spray drift was unacceptable (Figure 15). When air-assist was engaged, we reaped the coverage advantage of smaller droplets and drift reduction as good or better than what we saw with coarser droplets. Unexpectedly, we did not see an obvious improvement in coverage from the air assist. This begs the question “If the spray didn’t drift, where did it go?” This demo was a far cry from a formal mass accounting exercise, but my guess is it wasn’t effectively captured by our collectors and that a hefty fraction ended up on the ground. We would expect more uniform coverage under the boom, and some improvement in canopy penetration, but our ad hoc experiment wasn’t sophisticated enough to reveal it.

    In the end, we feel there are advantages to the air-assist mechanism. The ability to employ a finer spray quality when required, while greatly reducing spray drift and combating inclement weather to extend the spray window are appealing features. Research has clearly demonstrated that deep-canopy spray coverage and overall efficacy are improved when this system is properly adjusted to match spray conditions. We’re not comfortable with suggesting it warrants lower carrier volumes (i.e. not dose) because of the expertise required to adjust the system. However, to be fair, experienced operators have accomplished it

    We hope to see more air-assist options on boom sprayers.

  • Recirculating Boom Options

    Recirculating Boom Options

    If you read this site, you know we’re fans of recirculating booms. We love them for three reasons:

    1. They save money and waste by recovering spray back to the tank during priming and rinsing
    2. They make boom cleaning easier by eliminating boom-ends
    3. Most require individual nozzle shutoff, which makes for better sectional control

    If you’re new to the concept of recirculating booms, read more here.

    Until recently, these booms were only available on sprayers imported from outside North America (Horsch, Amazone, Agrifac to mention three), or via France’s Pommier booms that have been available as retrofits for many years. In 2018, Agco introduced their Liquid Logic system on the Rogator line, becoming the first North American manufacturer to offer a recirculating boom at the factory. Pattison Liquid also offers Recirculating booms as standard equipment on their Connect Sniper pull-type sprayer.

    In the meantime, three boom retrofit kits and one sectional conversion kit have become available.

    Arag Australia‘s BRS (Boom Recirculation System)

    The first was developed by Arag Australia, and is available there via Nozzles Online, and in Canada through Nozzle Ninja. Designed for John Deere R-Series and Case Patriot sprayers, the kit uses the existing line that feeds liquid to the outermost section and simply extend that line to the end where it enters the boom via two installed elbows. The liquid returns to the centre via the installed boom sections which are connected together by removing the boom end cap (or “aspirator” for John Deere) and replacing the gap with a section of hose. Back at the centre rack, the liquid from both booms meet in the middle. At this point, a three-way valve gives the choice to return the spray to the tank, or to receive pressure from the pump. There is also a manual valve that allows the return to be dumped for safe disposal.

    Arag Boom Recirculation System (Spray Mode)
    Arag Boom Recirculation System (Recirculation Mode)

    The system does not tie into the sprayer’s electronics. instead, it adds a switch in the cab that the operator uses to switch from spray mode to recirculation mode. The switch is not activated at the end of each swath, but instead to prime or flush the boom.

    A switch is added so the user chooses recirculation or spray mode. The boom would recirculate to prime or flush, and remain in spray mode during the spray operation.

    Raven

    Raven offers a recirculation kit for 3000, 4000, and 5000 series Case Patriot sprayers with Aim Command HD and an ISOBUS terminal. The approach is slightly different, as they retain the pressure feed through individual sections but also tie the sections together so the spray is returned to the tank. By including a shutoff valve between each section, the system retains the option to use conventional sectional control for high flow situations, or to isolate a section should a leak occur. The system can be configured and controlled from the sprayer monitor, either a Viper 4+, CR7, or CR12.

    Raven Boom Recircualtion System schematic (from Raven manual). Note the retention of section valves and the addition of manual valves between sections.

    John Deere

    On March 2, 2021, John Deere announced a 2022 factory option called Pressure Recirculation and Product Reclaim. The system keeps several existing sections and adds two steel lines the flull length of each boom wing. One is for supply, the other return. As these lines approach a section, the supply is fed to one end of the section and the return is connected to the other end. On a 120′ boom, there are five recirculating sections, two on each wing and the centre.

    This approach adds one more line than the other designs, and this line will hold materials that ultimately need to be cleaned, flushed, and possibly dumped or sprayed out for cleanout. A possible reason for the extra line is the ability to deliver 220 gpm to the boom, an advertised feature of John Deere high flow booms that may come in handy for topdressing liquid fertilizer. These levels of volume are not needed for pesticides.

    John Deere Boom Recirculation and Reclaim. Top two lines are supply and return and extend the length of each boom wing. These connect to the existing sections on each wing, creating several smaller recirculating sections.

    Latitude Ag

    This Wisconsin company has developed an innovative product that converts any existing plumbed section that contains boom ends into a recirculating section. It does this by incorporating a boom recirculation valve” (the “Merlin IC System“) into the original section feed line. Boom end caps are removed and replaced with sweeps and hoses that return flow to these boom valves. The flow from the boom ends is incorporated back into the sectional feed thanks to a venturi design in the recirculation valve.

    A prototype of the Merlin IC System valve made by Latitude Ag

    Advantages of this design include simplicity. No moving parts are required, the valve simply recirculates the flow from the boom ends automatically whenever that section operates. Existing sectional control, whether it’s by plumbed section or individual nozzle bodies, is unaffected. Flushing the boom with water is done with normal spraying. It takes some extra time to incorporate and dilute the contents of the boom end return lines but results in a clean boom and no section end residue. We’ve seen the results of testing and agree that it works.

    This product does not allow boom priming without spraying. However, a key advantage is that it can be used with direct injection since no product is returned to the tank. Latitude Ag says it will provide the necessary flow sensor and software to make this possible. As of 2025, this system may no longer be commercially available.

    Precision Planting ReClaim

    ReClaim is capable of operating on a sprayer with or without individual nozzle shutoff. For conventional nozzle bodies containing the original spring-loaded diaphragm check valves, the concept is to drop the liquid pressure below the cracking point of the check valves so flow continues through the sections and back to the tank without engaging the nozzles.

    Recirculation fittings are added to the end of each boom section. These feed into 3/4″ lines are installed on section ends, which in turn feed increasing diameter collector lines that eventually return all flow to the tank. Flow reaches the sections as before. When recirculation is turned on, flow exits the boom section through the new fittings and returns through 3/4″ lines to the centre of each section, where it enters 1” lines that take the flow to the center of each boom wing. There the flow in the 1” lines is combined moves to the center of the sprayer on 1.5” lines where it meets the flow from the other wing.  From there, the flow returns to the tank through an electronic ball valve and 2” line. This system ensures no back-pressure and balanced flow from each section.

    For some sprayer rate control systems such as John Deere, the pump won’t operate below about 20 psi despite operator settings. This means the priming or flushing procedure would trigger nozzles to spray if the bodies were fitted with spring-loaded diaphragm check valves. A pressure reduction kit (a second restrictor valve) is required to reduce the pressure sufficiently for ReClaim to work in these instances. More here.

    ReClaim operates independently of any electronic control systems, relying on a toggle switch to initiate recirculation. When flow back to the tank is detected, a light indicates that recirculation is working, and the operator waits approximately 60 sections for a 120’ boom to circulate all volume back to the tank. Download the operator’s guide, here.

    This system requires a lot of additional lines. A 120’ boom would require 120’ of additional 1” line and 60’ of 1.5” line. The manufacturer states that ReClaim adds about 14 gallons of volume that would need to be displaced back to the tank, adding to the standing volume. This volume can be circulated using solution from the main solution tank, or displaced back to the tank using flow from an existing clean water tank, or displaced using compressed air via an optional pneumatic port. It is not clear how spray mix in the ReClaim system can be removed from lines without returning it to the tank and draining it from there. Users should consider the additional surface area and volume that will have to be addressed during cleanout.

    Do It Yourself

    If none of the available options work for your sprayer, consider building your own system. Sprayer plumbing parts are available from the major manufacturers Banjo, Hypro, TeeJet, and Wilger. Wilger, in particular, has developed a nice suite of parts well suited to recirculating booms, including flanged sweeps and thin gauge steel booms, punched for nozzle bodies or unpunched to move product. See their support for DIY projects on this dedicated page: Wilger Retrofit.

    Take Home

    All these recirculation options improve the status quo of plumbed boom sections with boom ends. They should be considered essential equipment on sprayers.

  • How Low Can You Go?

    How Low Can You Go?

    Listen to an audio recording of this article by clicking here

    There’s a lot of talk about lowering the boom to reduce drift and make twin fan nozzles more effective. But how low can we actually go with a boom before striping becomes a problem?

    We’ve done some calculating and have come up with answers.

    First, a few guidelines. Tapered flat fan nozzles require overlap to generate a uniform volume distribution under the boom. Traditionally, we’ve recommended 30 to 50% overlap with fine flat fan sprays. The small droplets tended to redistribute to fill in any gaps that might occur.

    Overlap from fine sprays is less critical than from coarser sprays because the small droplets redistribute readily.

    The advent of low-drift nozzles changed that advice. This nozzle type produces fewer droplets overall, and, like all fan-style nozzles, puts the coarser ones towards the outside edges of the fan. These don’t redistribute.

    A typical flat fan spray places the coarser droplets at its periphery, and the smaller ones in the middle. When only the outed edges overlap, that can creates a band of poor coverage.

    When we had 30% overlap and these two edges met, a region of relatively few, coarse droplets was formed, and this region contained almost no small droplets. On a patternator, the volume distribution was still good. But when we measured the droplet density, we saw a deficit in coverage at the overlap.

    With low-drift nozzles, we need 100% overlap to distribute both small and large droplets uniformly under the spray swath. Too little overlap and we create bands of relatively few but large droplets that can cause striping.

    Since then, we’ve been recommending 100% overlap for low-drift sprays. This means that the pattern width at the target will be twice the nozzle spacing, and all regions under the boom receive droplets from two adjacent nozzles.

    With this adjustment, small droplets appeared throughout the spray swath, and striping was eliminated.

    That leaves the question, just how low can a boom be set without creating this problem? The following tables provide some theoretical numbers.

    Minimum boom heights for achieving 50% and 100% overlap of flat fan spray nozzles (US units)

    Minimum boom heights for achieving 50% and 100% overlap of flat fan spray nozzles (metric units)

    A word of caution: The advertised fan angle on a sprayer nozzle often differs in practice. Not only will it be slightly different by design, it also depends on spray pressure and tank mix. As a result, it’s best to do a visual check. Set the spray pressure to the minimum you expect to use. Inspect the spray patterns and set the boom height so that the edge of each nozzle pattern reaches to the middle of the next nozzle. That means your pattern width is twice the spacing and will give 100% overlap. No tape measure required.

    The tables were generated from a spreadsheet which can be downloaded here:

    • The values are theoretical and assume the fan angles are accurate. Some nozzles don’t produce the advertised fan angle. Enter your actual angle in the spreadsheet if you know it.
    • The theory assumes that the droplets at the edge of the fan always move in their projected direction. In fact, after some distance, say 50 to 75 cm, gravity pulls the droplets down and the pattern no longer widens at the same rate. The rate of pattern collapse depends on the droplet sizes.
    • Use the 0% overlap column to help with banding nozzle pattern width. Simply use the nozzle spacing column to enter your desired band width.
    • Note that angling the nozzles forward or backward decreases your minimum boom height, but depending on the deflection of the spray in the wind, this too has limits.
    • Too high a boom obviously increases drift. But patternation from overlap isn’t affected that much, largely because the pattern is now subject to aerodynamics and that becomes more important.

    Pro Tip: Attach a length of plastic hose or a large zip tie to the boom, cut to your minimum boom height. This makes it easier to see what your boom height is, from the cab or the ground.

    The bottom line is that a boom can be quite low and still allow excellent overlap and pattern uniformity from the nozzles. Yet we all know that most sprayer booms can’t reliably operate that low because they don’t control sway well enough. The ball’s in your court, sprayer manufacturers!

  • Boom Heights at Fan Angles Worksheet

    Boom Heights at Fan Angles Worksheet

    Use this spreadsheet to calculate the minimum boom heights needed for various applications.

    Some caution:

    • The values are theoretical and assume the fan angles are accurate. Some nozzles don’t produce the advertised fan angle. Enter your actual angle in the spreadsheet
    • The theory assumes that the droplets at the edge of the fan always move in their projected direction. In fact, after some distance (say 50 to 75 cm, gravity pulls the droplets down and the pattern no longer widens at the same rate. The rate of pattern collapse depends on the droplet sizes.
    • Use the 0% overlap column to help with banding nozzle pattern width. Simply use the nozzle spacing column to enter your desired band width.
    • Note that angling the nozzles forward or backward decreases your minimum boom height, but depending on the deflection of the spray in the wind, this too has limits.
    • Too high a boom obviously increases drift. But patternation from overlap isn’t affected that much, largely because the pattern is now subject to aerodynamics.