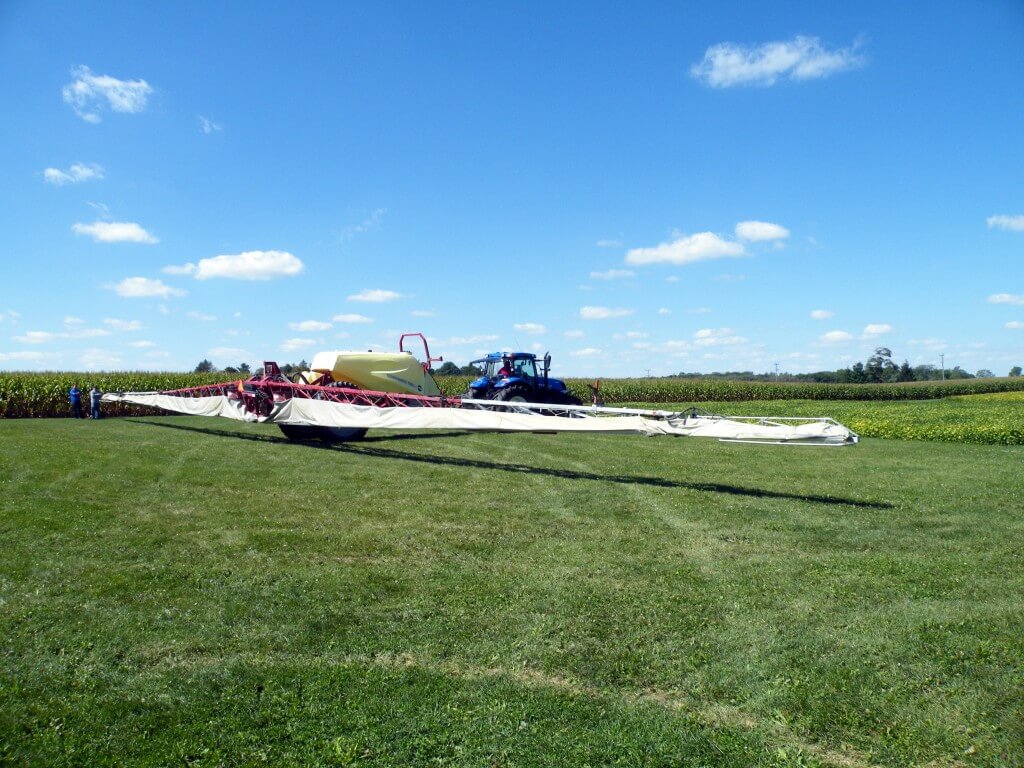
Some springs are tougher than others. This article was originally written in 2019, which was particularly challenging. The frequency and duration of rain events left limited opportunity for orchard sprays. Even then, the periods between rains were transitions between warm and moist conditions and cold fronts, which makes wind gusty and changeable. These same periods leave wet alleys prone to rutting and compaction, and conditions that favour spraying may also favour pollinator activity.
In response, applicators get frustrated. Some may be tempted to spray in sub-optimal conditions and risk drift thinking even a little coverage is better than none. But the adage that “there is no wasted fungicide spray” does not apply here. Some may disagree, but spraying in wet and high-wind situations:
greatly reduces coverage and subsequently, crop protection.
may result in repeated sub-lethal doses that can encourage resistance.
greatly increases the degree of surface run-off and off-target drift, risking environmental, commercial and residential contamination.
The argument itself may be moot because the decision to
spray is not strictly a consideration of economics, productivity, and risk
tolerance. When environmental restrictions exist on a pesticide label they are
inviolate. That is, they are not suggestions but legal requirements. Statements
might include:
Not spraying when rain is forecast within 12 hours following application. This is, in part, to prevent water-soluble products from moving in surface or channel run-off.
Not spraying in calm conditions (generally <3 km/h, as measured at the top or outside of the orchard). This is to prevent airborne spray from moving in unpredictable directions during a thermal inversion, or downhill with stratified air.
Not spraying in gusting or windy conditions (generally >10 km/h, but there is no Canadian standard). This is to prevent airborne spray from moving with the wind. This is of particular import when there are sensitive downwind areas that can bring buffer zones into play
Technologies exist that extend the spray window, but they require
long-term planning and may not be economical (or even completely proven). They
are generally a combination of orchard architecture and sprayer design. Examples
include:
Tented orchards (more common in Australia) designed to exclude pests and insulate against hail, wind and inversions.
Shrouded vertical booms (e.g. Lipco) designed for trellised orchards.
Solid-set emitters (more common in Europe and still experimental in parts of the northern US) that reduce drift and can spray large areas quickly.
Vertical towers with downward-oriented fans (e.g. Curtec Proptec or Sardi sprayers) that rely on the orchard itself to filter lateral/downward-directed spray.
Assuming the pesticide label does not prohibit application, there are adjustments that can improve coverage and reduce drift in sub-optimal conditions, but only marginally. These are compromises that sacrifice time, money, effort and/or the level of crop protection. Further, they are only intended for sprayers with towers (i.e. not low-profile axial sprayers):
Convert to air induction nozzles (at least in the top two nozzle positions, and likely at one rate higher than you usually use).
Be certain to turn off any nozzles spraying excessively over the top of the canopy. A little can’t be helped and is actually a best practice to ensure spray reaches the treetop. Be reasonable.
Reduce fan speed to only reach just past the middle of the canopy on the upwind side.
Turn off the boom on the downwind side of the sprayer and adjust airspeed and nozzle rates for upwind alternate row spraying only. Especially on the last three downwind rows, which you may have to leave unsprayed entirely.
The best advice is unpopular: Park the sprayer until conditions improve. Like hail, there are environmental factors that are out of the farmer’s control. They are inconvenient and highly frustrating, but do not be tempted to takes risks on what might ultimately result in poor coverage and accusations of pesticide drift.
For those on the fly, hit play to hear a shortened, narrated version.
I have far too many photos and videos of airblast sprayers blowing straight up through treetops, or downwind through the last row, during spring applications. I chose not to include any in this article to avoid people recognizing the operations. If you haven’t seen anyone doing it, maybe it’s you!
I recognize that it can be a tricky balance to adjust a sprayer for spring applications. It’s counterintuitive, but a bare tree can be difficult to spray. Young and/or bare trees represent small targets which have a very low catch efficiency, so a lot of spray will miss. Switching nozzles to adjust rates doesn’t help much in this regard – it’s far better to adjust travel speed and air settings, and we’ll get to that in a moment.
That lack of foliage also means wind moves through the orchard unabated, so the sprayer may have to blow a little harder into the wind to compensate. In the case of a low-profile axial sprayer, which blows laterally and upward, that means creating greater risk for blowing too high, and blowing through downwind rows.
That off-target deposition represents a huge loss of materials and potential for drift incidents. To add insult to injury, many of those early season applications often have oil components, which require a drench (higher volume) and are more easily seen by bystanders (opaque droplets). All in all, it’s a bad time of year for crop protection PR. Learn more about drift and drift prevention here: BeDriftAware.
Air Adjustments
So, let’s start with air. Air carries spray droplets, so perform a ribbon test to ensure the air outlets are oriented correctly. This is achieved by adjusting deflectors (e.g. low-profile axial), the air outlets on a tower, or the entire head on a wrap-around design with individual fan/nozzle combinations.
Spray height should always exceed the canopy height by a small degree. This compensates for the increase in wind speed with elevation, the potential loss of spray height with faster travel speeds, and uneven alleys that cause the sprayer to rock, which changes the spray angle.
It is less critical that spray align with the lower portion of the canopy. As air energy wanes, or as droplets begin to lose momentum, finer droplets will slowly fall, depositing on random surfaces. Coarser droplets will quickly fall towards the bottom of the canopy, settling primarily on upward-facing surfaces. This secondary deposition can also occur from the cumulative impact of blow-through from upwind rows.
Nozzle Adjustments
Now pay particular attention to which nozzles are on or off. Park the sprayer in an alley. Stand behind the sprayer and extrapolate a direct line from each nozzle to target canopy. Nozzles that point at the canopy should be left on. Nozzles that point above or below can be blocked, or turned off, via valves or rotating roll-overs.
Some roll-over nozzle bodies can be swiveled up or down 15 degrees to fine tune the spray angle. An alternative would be to permanently rotate the nozzle body fitting in the boom line. When aiming nozzles using a roll-over nozzle body, be careful not to swivel them too far or the valve will partially close and compromise the spray pattern.
When extrapolating, remember that the centre of a nozzle only indicates the centre of the spray pattern. Cone and fan angles can span 60 to 110 degrees, depending on the influence of air. Therefore, even though the centre of the lower-most nozzle intersects the bottom of the target canopy, you may still be able to turn it off because the nozzle above has that portion covered.
Travel Speed, Wind, and Coverage Assessment
Now let’s consider travel speed. If the wind is blowing hard through the orchard, you can increase the air speed or slow down the sprayer to focus longer. However, in both cases, you run the risk of overblowing the downwind rows by a considerable margin. Easily three rows in a high-density orchard.
This downwind coverage is cumulative, so when you assess your coverage (preferably using water sensitive paper), don’t do so until you’ve made a few upwind passes. So much of that spray ends up on the orchard floor, and still more evaporates or blows up, but some of it will hit and it adds up.
Downwind Boundary
Finally, pay attention to where you are in the block. It may be necessary to turn off the downwind bank of nozzles on the final downwind three (or more) rows. That means you’ll be performing the dreaded alternate row (one-sided) application, and I’ll be the first to say that’s not ideal. However, in this case, the spray will blow back and help cover the unsprayed side. Again, use water sensitive paper to confirm the job you’re doing.
Final Thoughts
And, of course, seriously consider when it’s time to wait for better conditions. No one likes to do that, especially when rain is imminent and the ground stays soft, but the alternative is a lot of waste and a poor application. If this always seems to be the fight you’re having, maybe it’s time to consider the return on investment of a tower sprayer, or a shrouded sprayer. Towers improve matters since they more easily reach the treetop without having to blow as hard, and without angling air upward. Shrouded recycling-style sprayers (if they fit the architecture) help even more.
Plan to do all of this (especially the capital investment number crunching) before the season starts and be prepared to change sprayer settings on the fly, as required. Don’t be the subject of my next spring drift photo.
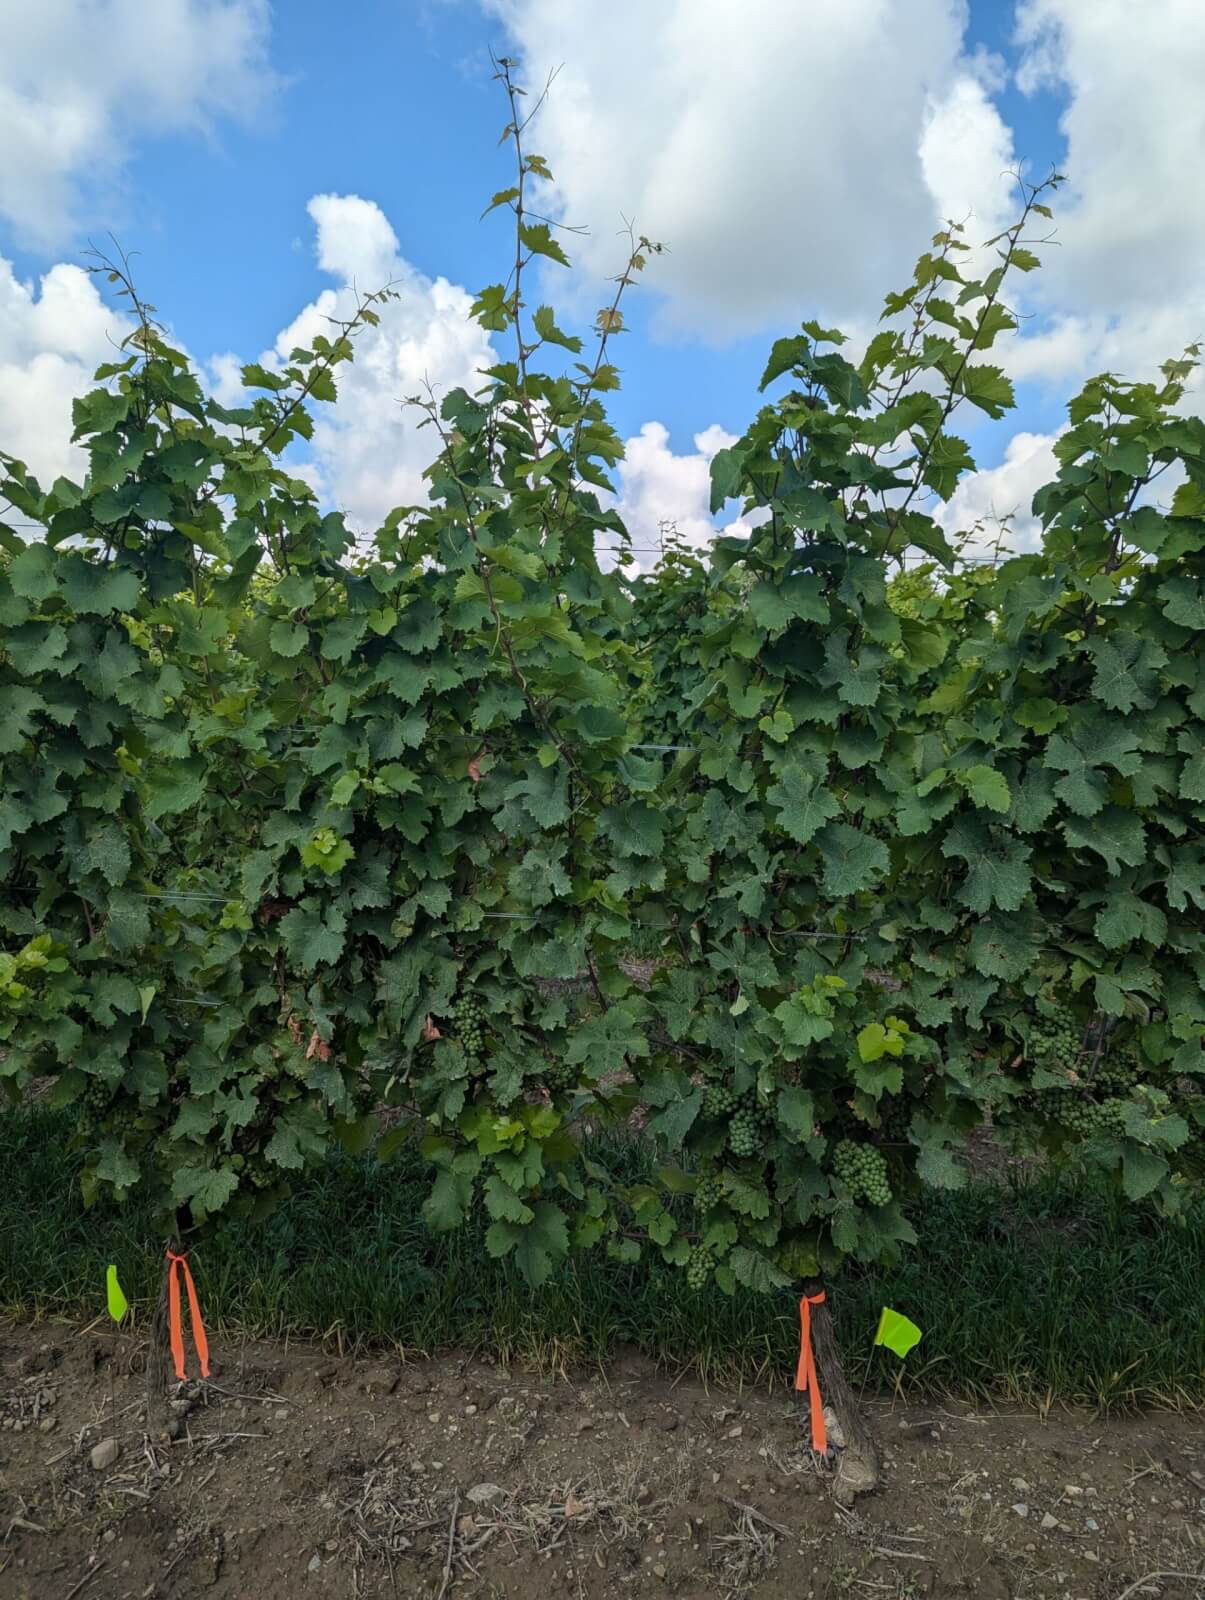
In the summer of 2024, six Ontario vineyards participated in an authorized herbicide trial. The objective was to assess efficacy as well as determine if the product fit the timing for seasonal weed and sucker management. If successful, it could replace the expensive and time-consuming manual labour required to remove suckers.
Each vineyard applied the same rate, at similar times, employing optimal sprayer settings. A few weeks after application, the researchers and registrant toured the vineyards. They were pleased with how quickly and effectively the product worked on both targets at all six locations. However, one vineyard reported visual injury on a sloped region of their operation.
This raised two questions:
Assuming the cause was drift, and not direct overspray, why did it only happen in a specific region of a single vineyard?
Whether drift or overspray, what is the potential for the applied rate to cause injury?
The vineyard manager and sprayer operator investigated the application equipment and found no problems with how the sprayer was calibrated or operated. Further, the nearby weather stations recorded reasonable environmental conditions. So, that seemed to discount accidental overspray and wind-borne drift.
Then we considered the topography. The level portion of the vineyard appeared undamaged, but as it began to slope downhill, we saw damage on leaves and shoots in the bottom half of the canopy. It was almost as if a stratum of herbicide stayed level as the ground fell away. We discussed temperature inversions, volatility, and sprayer wake, but nothing fit.
Then we stepped back and found ourselves looking up at the Niagara Escarpment. The Escarpment is a long cliff formed by erosion, separating the higher, level ground from where we stood below. And then we had an idea: Could the product have been lifted into contact with the canopy by a Katabatic wind?
The theory
On clear nights with calm winds, the ground cools rapidly. Air in contact with the colder ground cools by conducting heat to the ground and by radiating upwards. When this cooling process occurs along mountain slopes, or on top of a plateau, the cooling air becomes colder and denser, causing it flow downslope like water. Perhaps a layer of relatively cool Katabatic wind off the escarpment slid under the warmer layer of air in the downslope portion of the vineyard. And, perhaps, any product still suspended in the air was lifted upwards into contact with the grape canopy.
Cold air (blue) slides under a warmer layer of air (orange) that carries traces of herbicide in the form of Very Fine, suspended droplets. It is lifted into contact with the lower portions of the grape panels.
Even the coarsest hydraulic nozzle produces a population of driftable fines. These fines take a long time to fall, and some are essentially buoyant. In the following histograms, we see actual data from a nozzle rated between Medium and Coarse. The operators actually used an air-induction nozzle with a much coarser spray quality, but we’re using this data set as a worst-case scenario example. If we divide the volume produced into its constituent droplet sizes, we see that most of the volume is comprised of droplets between 150 and 250 microns.
However, droplet diameter shares a cubic relationship with volume. If we plot that same volume by number of droplets, we see the majority are between 18 and 74 microns in diameter. These very small droplets would fall so slowly that any atmospheric disturbance would displace them. Depending on the crop’s sensitivity to the herbicide, they might carry sufficient active ingredient to cause injury, assuming they didn’t evaporate to the point that they were no longer biologically active.
There are a lot of assumptions in this theory, and perhaps it’s far fetched, but it was the best we could figure. So, if those droplets were lifted into contact with the canopy, were they capable of causing injury? To find out, we conducted a simple, non-replicated bioassay.
The bioassay
On the morning of July 12, we filled a spray bottle with 50% of the field-rate (including 1% v/v MSO) and set the nozzle to the finest setting. We applied a single spritz about mid-way up the canopy of the same Riesling grapes on a VSP flat cane training system. We did this on the upwind side on both older (lower canopy) and newer growth (upper canopy). Then we performed a series of serial dilutions, halving the concentration each time, and repeating the application.
Our hope was to see a subtle response curve when we plotted concentration against tissue damage. Perhaps we’d even see a different curve for older versus newer tissue.
The vineyard manager photographed and recorded observations on an approximately weekly schedule, with a gap in observations between weeks three and six. The following images show the results of a ½ dose treatment, and a 1/16 dose treatment tracked during that period.
The results
We observed the following:
Fruit, foliage, and shoots were injured at all doses by three days after application.
Initial injury remained stable; no secondary injury was observed.
The degree of injury at the lowest dose was significantly more severe than the injury observed following the original May 31st application.
Regular vineyard operations, such as mechanical leaf removal in the fruiting zone and hedging, removed some of the damaged leaves and shoots.
The study did not include an assessment of harvest quality.
This was severe injury, even at the lowest rate. When compared to another herbicide commonly used for perennial weed control (e.g. Ignite SN – glufosinate ammonium) the injury we saw manifested very quickly.
Recently, researchers at Cornell have been exploring the herbicide we used in this study in perennial weed and sucker control in apple orchards. They did not experience any drift issues and found it to be effective between 90-180 ml/ha (0.5-1 oz/ac) (personal communication). That’s ~4x less than the rate proposed for registration in Canada, and it suggests the herbicide in question was certainly capable of causing the damage at very low concentrations.
Ultimately, we can’t be certain how the initial off-target damage occurred, but we were able to evaluate damage potential using a rough-and-simple bioassay that any grower can try. In unusual cases of drift it’s important to know if the product we suspect is even capable of causing the damage. A simple evaluation using serial dilution and a squirt bottle can tell us if we need to look more closely, or look somewhere else to explain injury.
Thanks to Kristen Obeid, OMAFA Weed Specialist (Horticulture) and Josh Aitken, Vineyard Manager of Cave Spring Vineyard for their contributions to this work.
Air-assisted boom sprayers have been around since the 70s. More common in Europe than North America, they have demonstrated value in mitigating drift and improving canopy penetration. The majority of air-assist systems are found on three-point-hitch or trailed sprayers, which is fine (and perhaps even preferable) as long as clearance, travel speed and acreage aren’t limiting factors. In North America, trailed air-assist sprayers are used by some vegetable and strawberry growers, but air-assist in general is rare among field croppers. There are a few possible reasons for this:
North American field croppers are predominantly concerned with work rate and prefer the larger, faster, self-propelled option.
Air-assist is not ideal for herbicide applications to bare soil because unless it’s perfectly adjusted, it tends to bounce spray off the ground. A canopy is preferred to capture the spray and exhaust the air energy. This reduces the overall utility of air-assist.
The air-assist feature is expensive and growers are either unaware or unconvinced of its value.
There are few, if any, after-market air-assist upgrade kits available. This is because installations are bespoke; The apparatus is heavy, adds load to existing electrical and hydraulic systems and can interfere with boom folding. So, getting air-assist means purchasing a new (and perhaps unfamiliar) brand of self-propelled sprayer… and there aren’t many on offer.
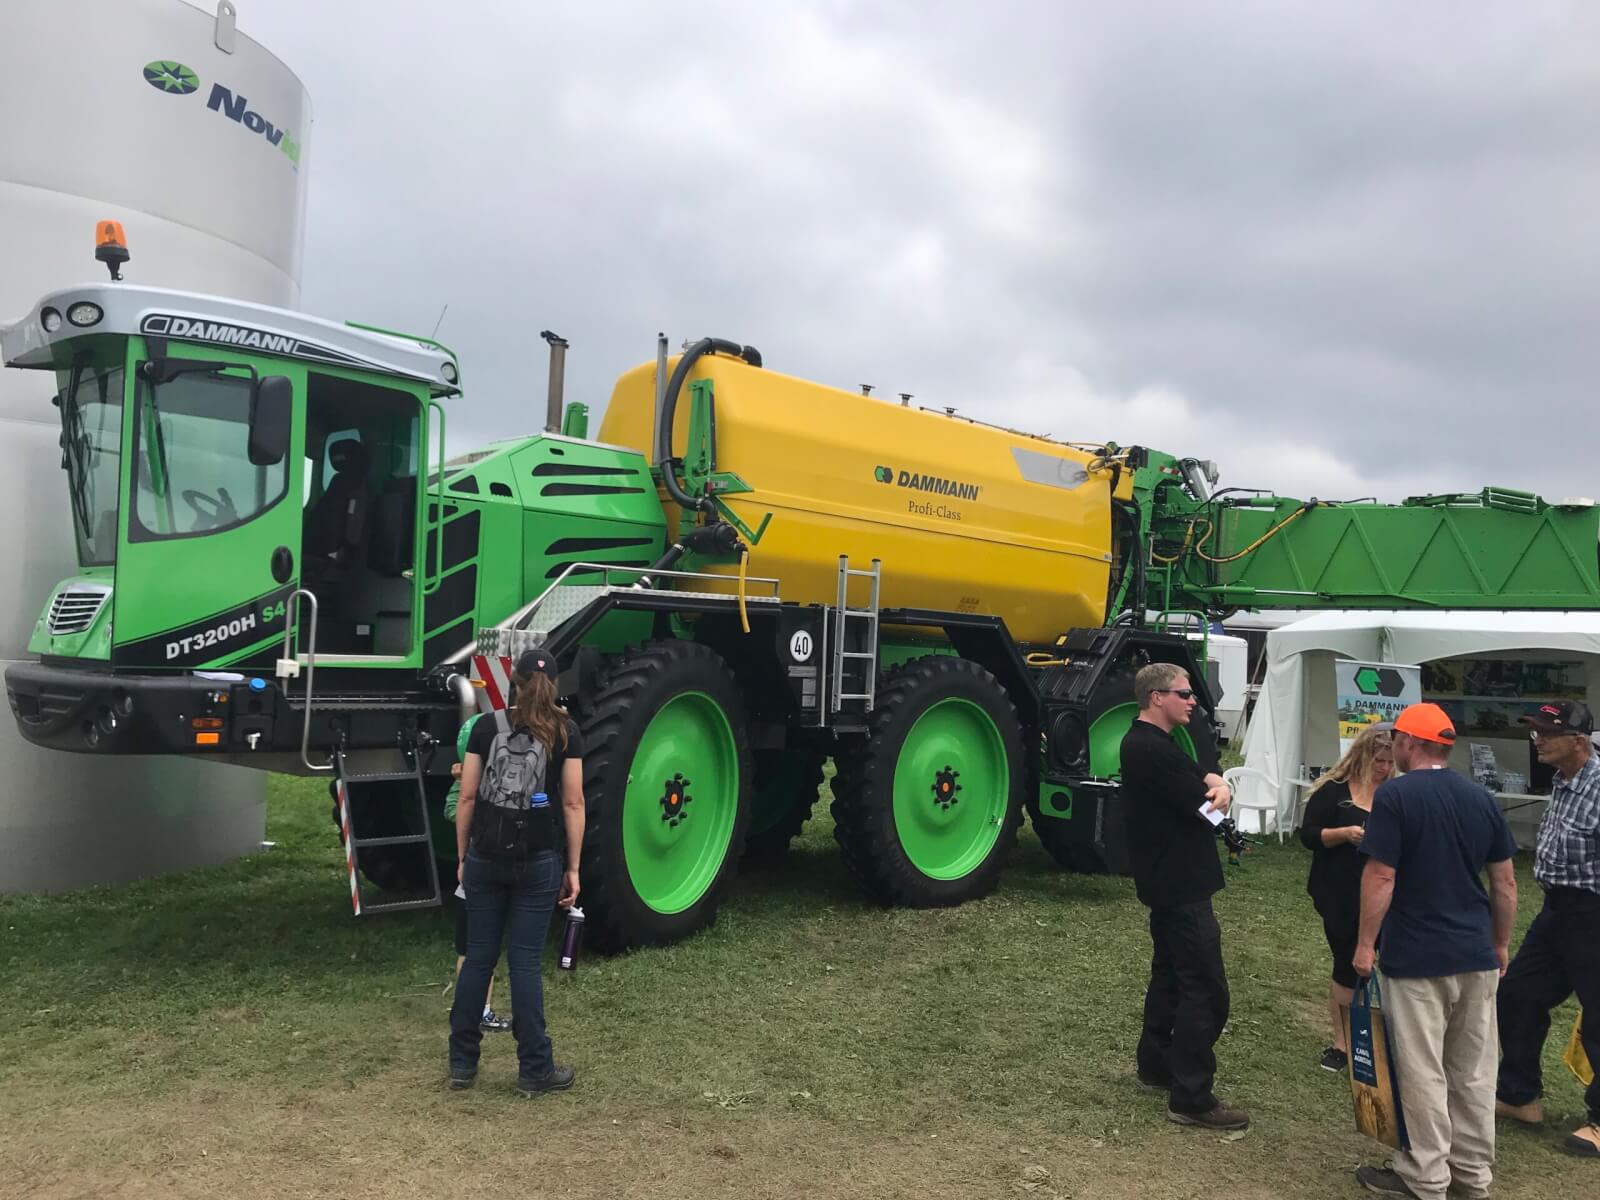
Figure 1 – Dammann’s massive three-axel DT3200H S4 self-propelled air-assist sprayer at Canada’s Outdoor Farm Show in 2018.Figure 2 – Agrifac’s AirFlowPlus (Image from Agrifac website)Figure 3 – Agrifac’s AirFlowPlus depicting adjustable angle (Image from Agrifac website)Figure 4 – This photo of a John Deere with air-assist was taken at a dealer’s lot in Southwestern Ontario in 2014. We have no idea what the history is, or who added the air-assist feature (it looks similar to a Miller Spray-Air with two blowers).
Air assist booms came to Western Canada in the early 1980s in the form of the “Spray-Foil” sprayer, later renamed Spray-Air. This sprayer was developed and manufactured in Carseland, Alberta. It used a shear-atomizer nozzle, a “foil”, that required a strong airblast to properly atomize a liquid feed that was introduced on the foil’s leading edge. As a result, it created a powerful airblast and a very fine spray. It was marketed as a way to reduce herbicide rates, an attractive feature during the times of drought, high interest rates, low commodity prices, and general economic malaise of farming on the prairies during the 1980s. Neighbours of Spray-Foils didn’t like the drift potential of the machines, and chemical companies objected to the claims of reduced water volumes (2 gpa) and lower product rates which contravened label directions. An unflattering test report of the sprayer by PAMI in Lethbridge resulted in a protracted lawsuit which helped cast the fate of the company. A Danish company licensed the design and sold it in Europe under the name Danfoil, where it continues to exist and @Nozzle_Guy saw it in person during the 2019 Agritechnica.
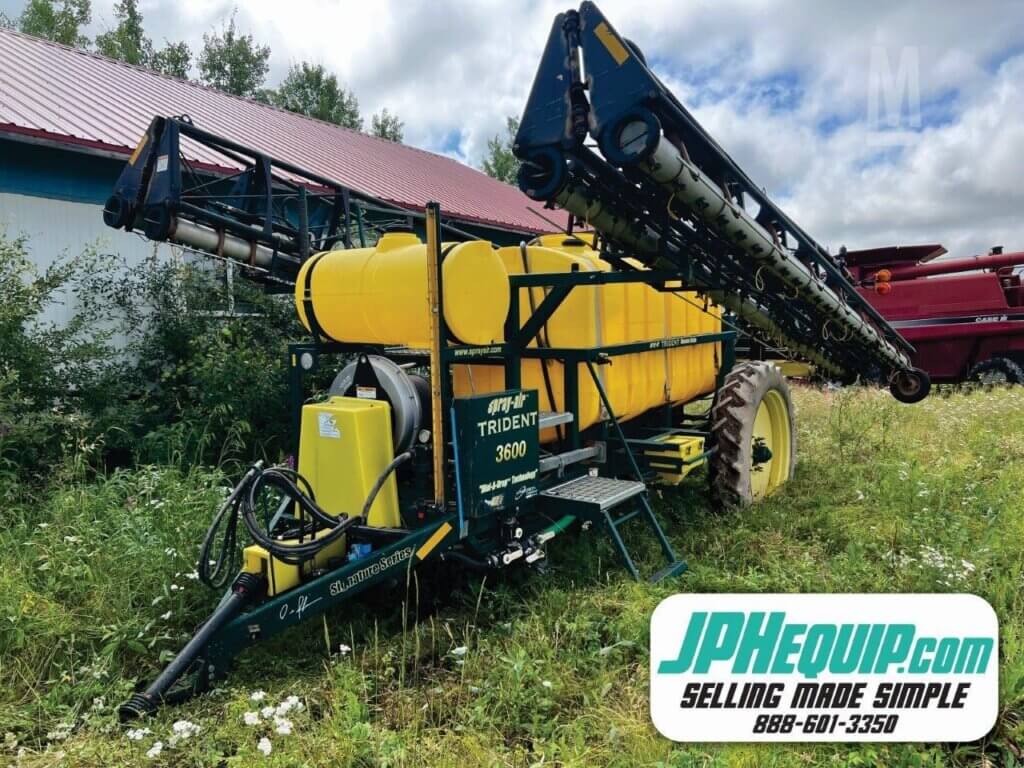
Figure 5 – A Spray-Air Trident pull-type made in Carseland, Alberta, for sale.
Eventually, Spray-Air rose from litigation and developed an improved nozzle with the assistance of the National Research Council (the “Shear Guard”) and introduced the Trident boom which gave users the option of atomizing spray with a conventional boom with or without air assistance, in addition the the native choice of shear-atomization. The sprayer chassis itself also continued to improve with a better overall design. Nonetheless, it was sold to Miller in the 2000s after a period of sales stagnation.
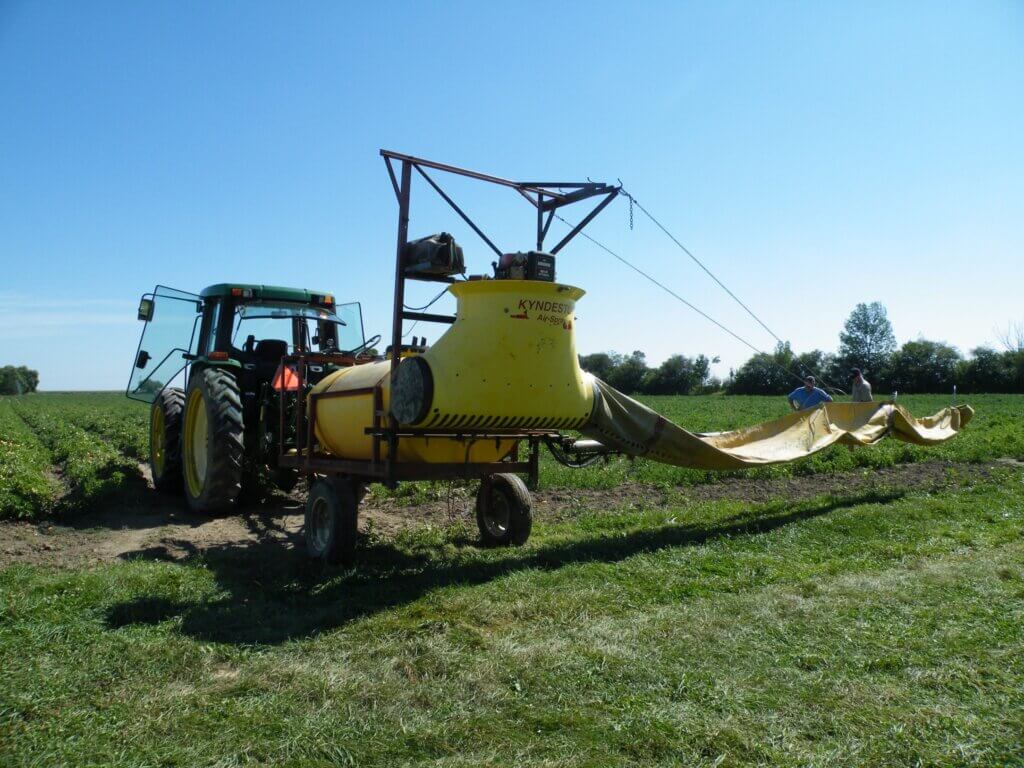
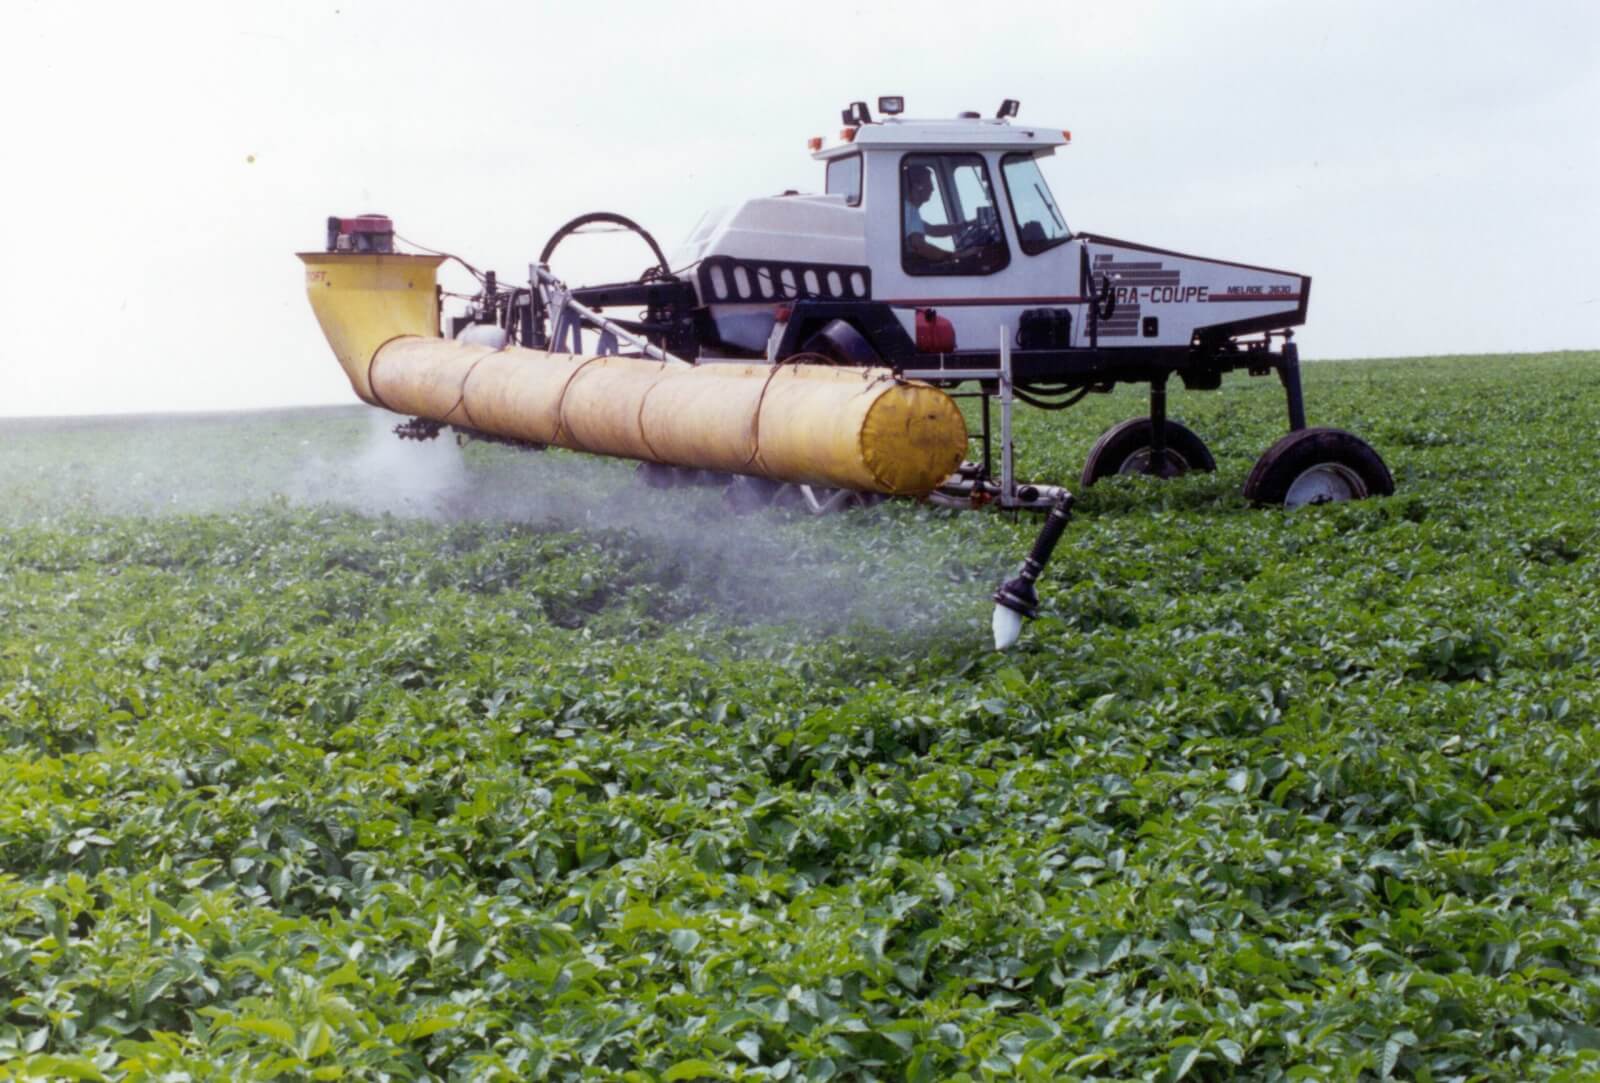
Figure 6 – A trailed one-sided Kyndestoft Air-Sprayer in Ontario field tomatoes (c. 2010)Figure 7 – Everyone’s favourite sprayer, the Spra-Coupe, sporting a Kyndestoft Air-Spray system (1996, PAMI)Figure 8 – An innovative prototype out of Alberta, the “Kaletsch fan sprayer” used pulleys to power the fans (1996, PAMI)
A fundamental problem with shear-atomization on sprayers like the Spray-Air is the requirement for significant air velocity for the atomization to occur properly. When the canopy cannot absorb that energy, air rebounds and creates drift. And if the operator cannot reduce the airblast strength without adversely affecting atomization, it leads to problems.
This photo (Figure 9) was submitted by Mr. L. Jones, a cash-cropper in ND, USA. It’s his JD4710 (circa 2004), which has 100′ booms and an 800 gallon tank. What’s interesting is that it has a Miller’s Spray-Air. This air-assist system is available on Miller’s Nitro and Condor line as well as New Holland sprayers (which are built by Miller). @spray_guy did some work with it on a Condor in field corn. It comes with their dual-flow nozzle system (Shear Guard™ PLUS Air Nozzles plus Dial-A-Drop™) for fungicides (applied at low volume) but you can also use conventional tips for coarser herbicide work.
Figure 9 – A JD4710 with Miller’s Spray-Air and conventional nozzles.
Mr. Jones says they use the flat fans when spraying a soil-applied herbicide. If it’s moderately windy, they engage the air to reduce drift. When they apply fungicide on wheat they use only enough air to move the heads as they pass over. Bystanders can see the spray enter the canopy and a portion rebounds, which they suggest (and hope) provides some underside coverage. That’s possible, but it’s generally better to keep all the spray in the canopy. This can be achieved by further reducing air speed, increasing travel speed, and/or aiming the air slightly backwards to increase the cross-sectional distance the spray has to travel and slow the spray velocity relative to the sprayer speed.
Generally, we’re proponents of using air when spraying. It opens the crop canopy, exposes otherwise-hidden surfaces, entrains and carries droplets to the target (reducing drift and improving coverage) and it extends the spray window by out-competing moderate winds. We have no proof, but wonder if it might also help alleviate the negative impact of tire and chassis turbulence on coverage uniformity under the boom. And, before you feel we’ve ignored a big benefit, we’d would be very cautious about using air-assist as a means for reducing carrier volume. The debate about finer sprays at less volume giving greater efficacy continues. While true at times, any benefit needs to be balanced with the downsides of potentially more drift and evaporation.
Here’s some 2018 footage from an assessment of canopy penetration in field pea using a Miller Nitro with Spray-Air. We see coverage extends deeply into the canopy, the degree of which shares an inverse relationship with depth (fairly classic). Note the heterogeneous mix of smaller and larger deposits from the air-shear nozzles. While some heterogeneity is good, this extreme span represents waste. The product tied up in the largest droplets could have been more gainfully employed as several smaller droplets. This pattern may be the result of using insufficient air energy, preventing the air-shear nozzle from fully atomizing the spray liquid.
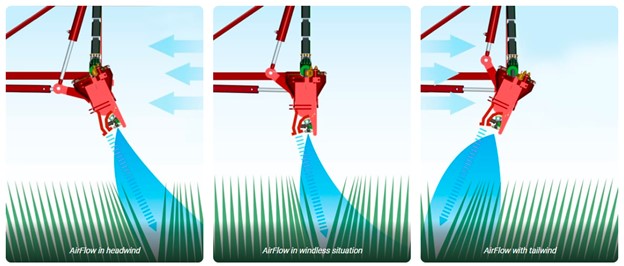
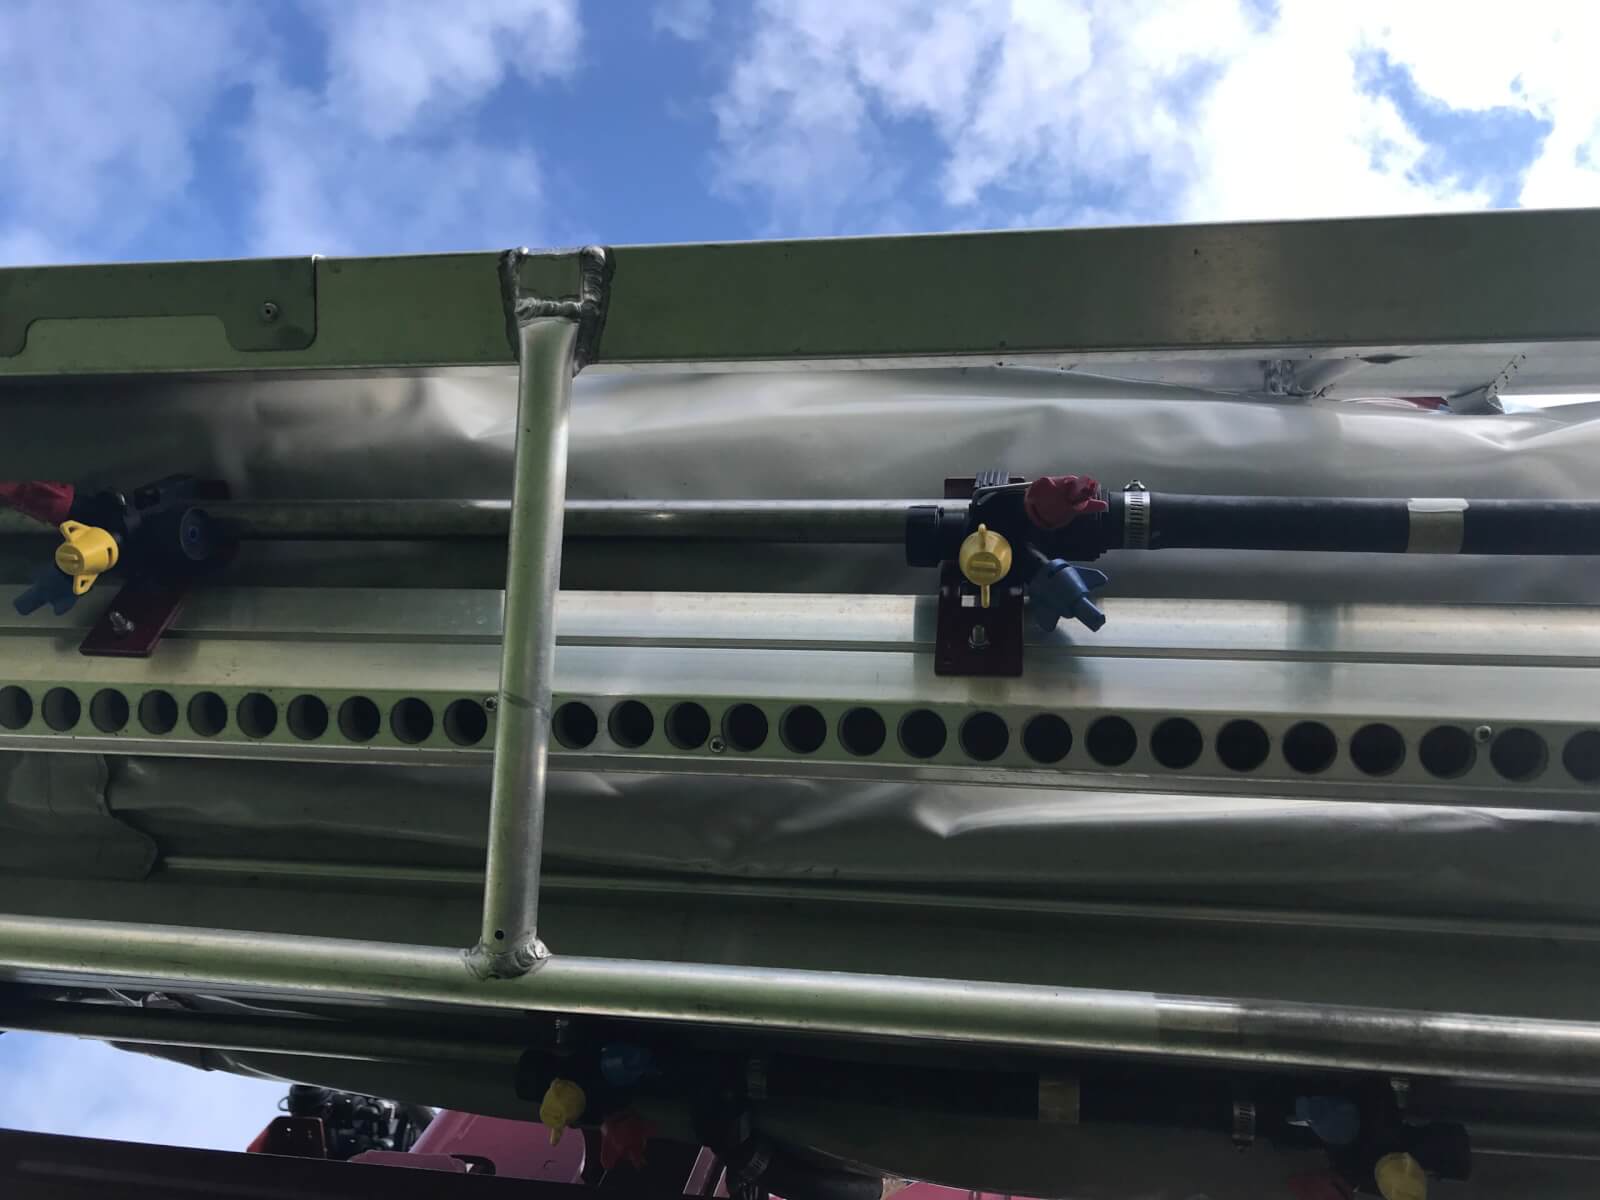
In 2015 we felt air-assist needed some exposure, so we held a demonstration at Canada’s Outdoor Farm Show. Over three days we used water-sensitive paper to evaluate coverage in a soybean canopy (moderately dense, planted on seven inch centres) from a Hardi Commander (Figure 10) with and without air-assistance. We originally wanted to get our hands on a self-propelled Hardi Alpha Evo (Figure 11), but there were only two in North America at the time and neither were available. By the way, the Alpha Evo is now on thethird iteration, but still uses the Twin Force air-assist system which allows the operator to change the angle of the air and the air speed. Each blower can be steplessly adjusted to a maximum output of 2,000 m³/h per m of boom and a maximum (and we’d wager, often excessive) air speed of 35 m/sec. You can watch a video explaining how to dial-in a Twin Force sprayer here.
Figure 10 – The Hardi Commander (118 foot boom) with Twin Force air-assist used in a spray demo at Canada’s Outdoor Farm Show.Figure 11 – Hardi’s Alpha Evo self-propelled sprayer employs their their Twin Force air-assist system.Figure 12 – Looking up from under the Hardi Alpha Evo boom. Air angle and speed can be adjusted.
The demo treatments
The sprayer was calibrated for 93.5 L/ha (10 gpa) at 2.75 bar (40 psi) at 9.7 km/h (6 mph). The boom was suspended 50 cm (20 inches) above the top of the canopy. On one side of the boom, we ran yellow mini drift nozzles (MD 11002’s) to create a Coarse spray quality, and on the other side we ran conventional yellow flat fans (F 11002’s) to produce a Fine spray quality.
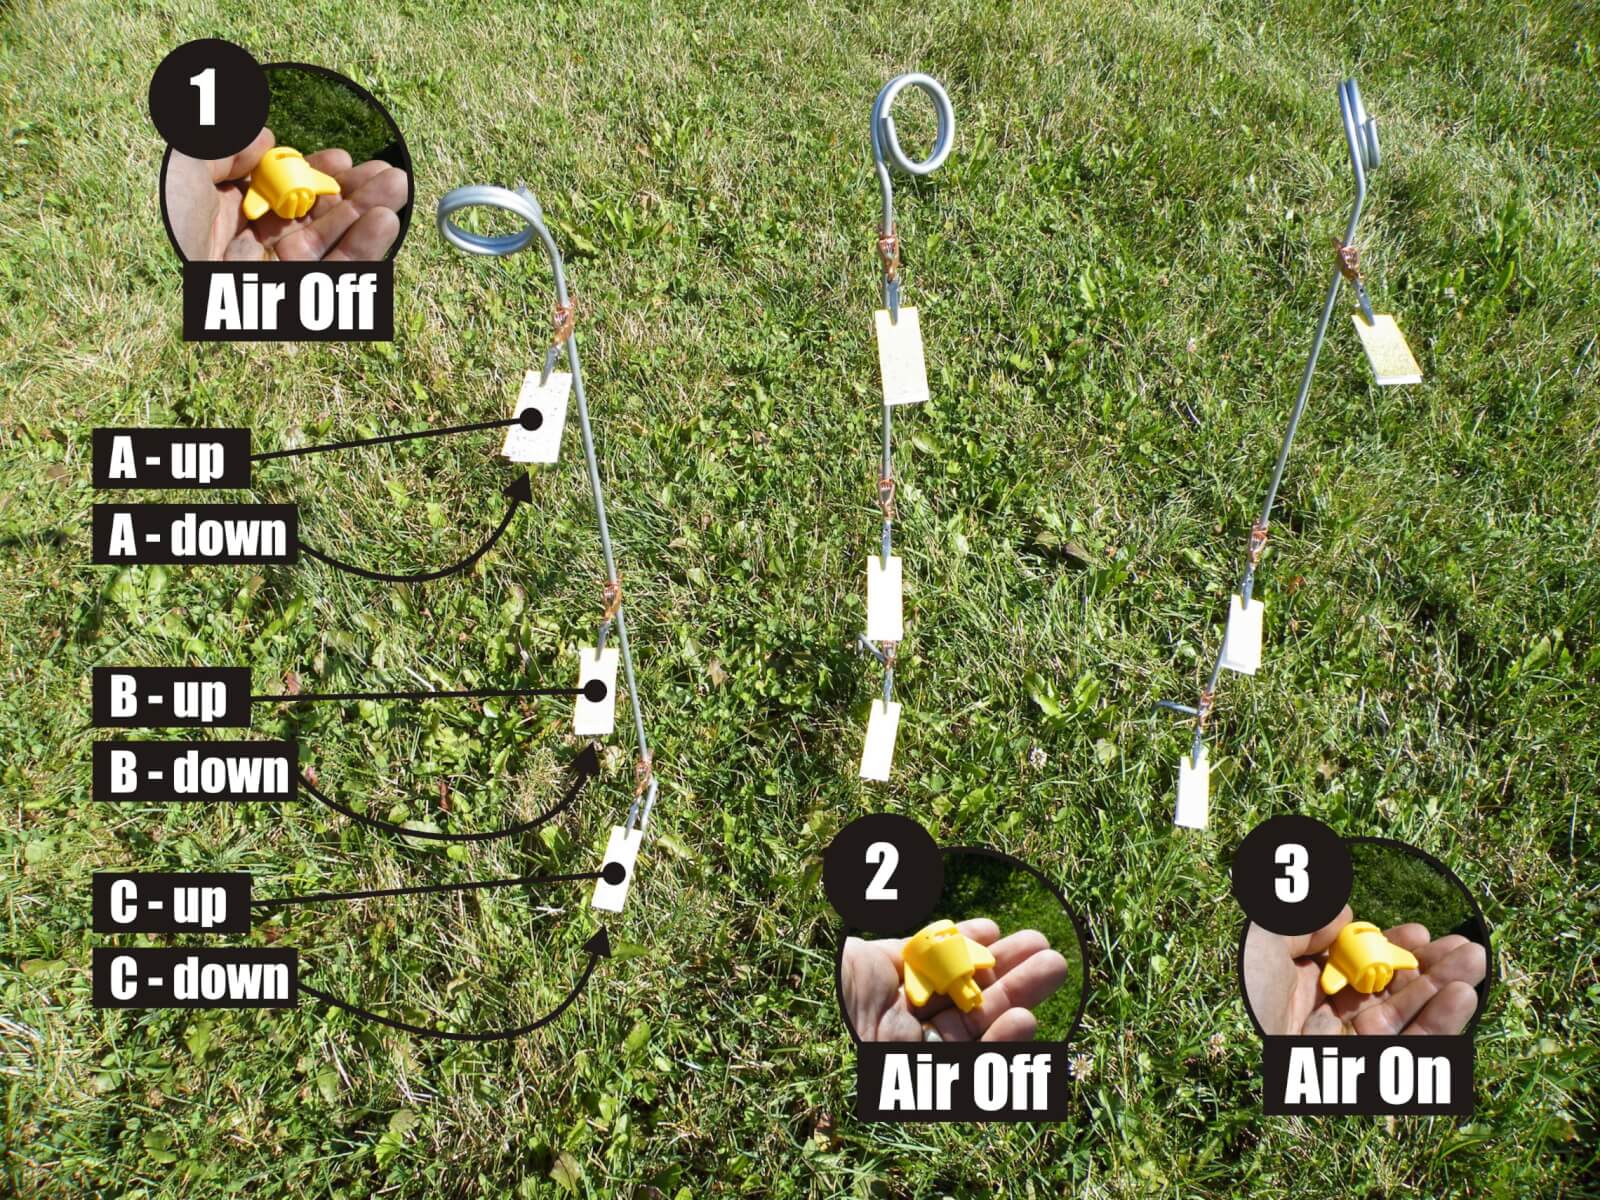
Water-sensitive paper was attached to rods at three canopy depths: at the top, midway down and at the bottom of the canopy. Papers were oriented both face-up and face-down (Figure 13). Following each application, papers were collected for digital analysis using “DepositScan” which calculates the percent surface coverage and the deposit density. Both of these factors contribute to overall coverage.
We collected papers from three treatments:
Fine spray quality, No air assist
Coarse spray quality, No air assist
Fine spray quality, Air assist
Figure 13 – Water-sensitive papers were placed at three levels in a dense soybean canopy, facing up and down, for three treatments. Treatment 1 (Fine spray quality, No air assist). Treatment 2 (Coarse spray quality, No air assist). Treatment 3 (Fine spray quality, Air assist).
We held two demos per day at noon and 3:00 pm for three days, giving us six sets of papers to analyze for each treatment. The weather ranged from 25-29°C, 30-58% relative humidity and winds of variable direction from 3-11 km/h.
This was a simple randomized complete block design, but it was not a rigorous experiment. We simply took the opportunity to gather numbers from the demonstration. A more fulsome experiment would require many, many more passes under more stable conditions. For example, we set the angle of the air and nozzles to about 30° forward and the air speed at maximum, which wasn’t necessarily correct. Ideally, these settings should have been fine-tuned to match the forward speed of the sprayer, the density of the crop and the weather conditions. There was a lot of boom sway (watch the video below).
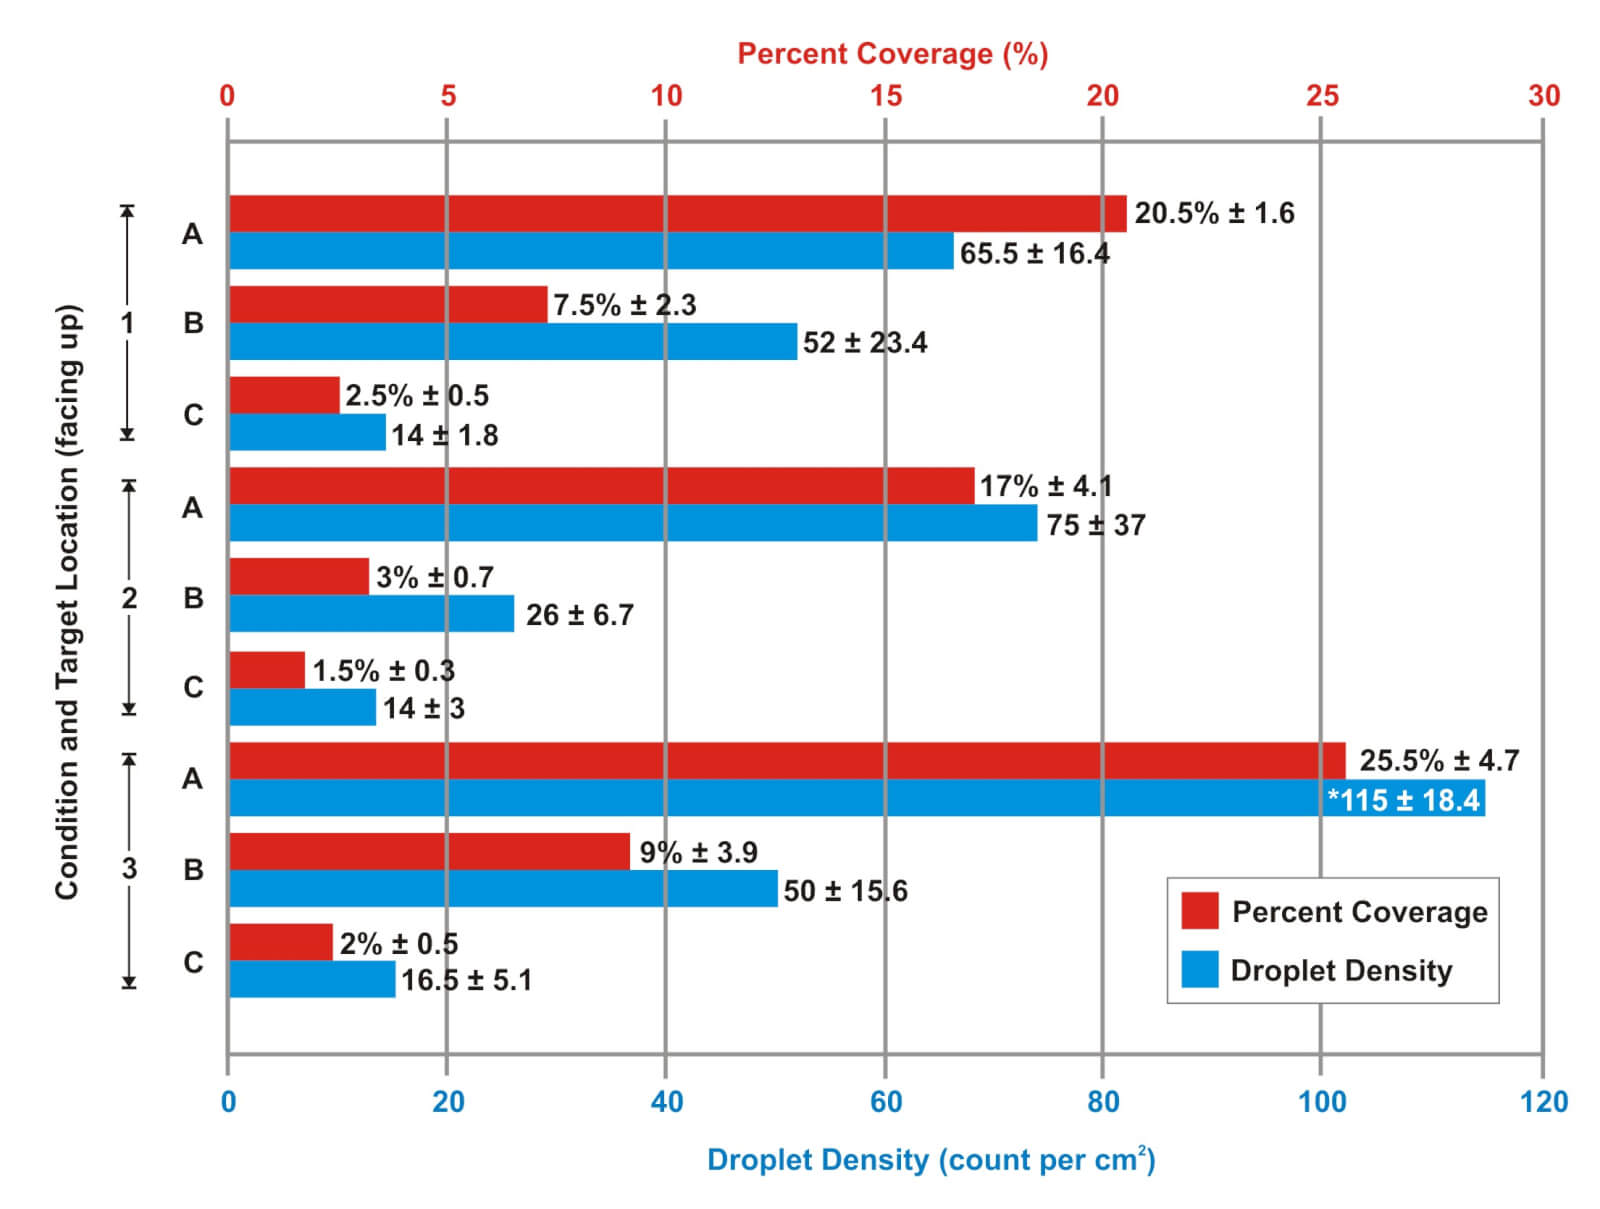
And so, caveats aside, the following graph illustrates the mean percent coverage and mean deposit density for papers in each treatment, for papers that were facing up (Figure 14). Standard error of the mean is presented alongside the average (x% ± y).
Results
Figure 14 – Average percent coverage (red) and deposit density (blue) for upward-facing water-sensitive papers in three canopy depths for each of three treatments. Averages rounded to the nearest 0.5 +/- standard error. “*” indicates significance with 95% confidence. Condition 1: Fine, No Air. Condition 2: Coarse, No Air. Condition 3: Fine, Air Assist.
Treatment 1 (Fine, No Air) reflects a typical coverage pattern for a dense canopy. Coverage declines as a function of canopy depth because spray droplets are intercepted by plant material before they reach the ground. This is particularly evident with broadleaf canopies that create shading. The coverage data doesn’t show it, but there was an obvious (and unacceptable) plume of spray drift during these applications (see Figure 15).
Figure 15 – The effect of air-assist on downwind drift from a Medium-Fine spray quality. Note that the nozzles and air are directed 30° forward. When sprayed over relatively bare ground, the air-assist bounces spray back up, as pictured here. However, when sprayed into a canopy with the correct air settings, bounce is virtually eliminated.
Treatment 2(Coarse, No Air) follows the same coverage trend as Treatment 1. This treatment represents much larger, and fewer, droplets than Treatment 1, and yet the only obvious difference is reduced coverage in the middle of the canopy. There was little or no plume of spray drift during these applications.
Treatment 3(Fine, Air) also followed the trend of reduced coverage as a function of canopy depth. Mean coverage was higher at the top of the canopy compared to the other two treatments. In fact, according to an ANOVA, deposit density was significantly higher in this canopy position than the other treatments, with 95% confidence. While mean coverage in the middle of the canopy was more than 2x that of Treatment 2, it was not statistically significant. There was no apparent difference at the bottom of the canopy. It is important to note that unlike Treatment 1, there was little or no spray drift plume during these applications.
Figure 16 – Upward-facing water-sensitive paper from mid-way into the canopy (position B) for Treatment 2 (Coarse spray quality, no air assist) and Treatment 3 (fine spray quality, Air assist). The difference in coverage is obvious.
DepositScan was unable to detect coverage on any of the downward-facing papers. However, close visual inspection did reveal differences. Unsurprisingly, Treatment 2 (Coarse, No air) did not produce any underside coverage; Large droplets do not change direction mid-flight unless acted upon by some other force. Droplets can bounce and shatter, but that did not occur here. The Medium-Fine droplets created in Treatment 1 (Fine, No Air) and Treatment 3 (Fine, Air) did leave trace coverage on the downward-facing surfaces. Generally no more than 10-30 deposits on the entire 1 x 3″ surface, representing less than 1% total surface coverage. It could not be determined if the air used in Treatment 3 improved underside coverage over that of Treatment 1.
Did air-assist make a difference?
Let’s start with the literature. Many experiments in peer-reviewed journals show that it does. A perfunctory literature review reveals improved coverage in the middle and lower portions of cotton, potato, soybean and wheat canopies. Some of these experiments were based on coverage using fluorescent dyes, and some with water-sensitive paper. Others were based on efficacy and report improved crop protection. The actual implementation was highly variable with some authors recommending angling the air and nozzles forward 20-25°. Others proposed 30° backwards. Most agreed (as do I) that the air speed should be set relative to the canopy density where higher speeds improved coverage deeper in the canopy, but did so at the expense of coverage in the higher canopy. Picture a bell curve on it’s side where the Y axis is canopy depth and the X axis is coverage; More air shifts the peak of the curve down the Y axis, into the canopy.
As for our demonstration, some interpretation is required. If an operator is spraying a contact product with limited or no translocative properties, then coverage becomes especially important. In order to improve coverage, higher volumes and finer droplets combined with slower travel speeds are often advised. This may be impractical, as most operators prefer to use less water and drive faster.
When we used Medium-Fine droplets with no air assist, coverage was good (Figure 14) and better than coverage obtained using Very Coarse droplets. However, spray drift was unacceptable (Figure 15). When air-assist was engaged, we reaped the coverage advantage of smaller droplets and drift reduction as good or better than what we saw with coarser droplets. Unexpectedly, we did not see an obvious improvement in coverage from the air assist. This begs the question “If the spray didn’t drift, where did it go?” This demo was a far cry from a formal mass accounting exercise, but my guess is it wasn’t effectively captured by our collectors and that a hefty fraction ended up on the ground. We would expect more uniform coverage under the boom, and some improvement in canopy penetration, but our ad hoc experiment wasn’t sophisticated enough to reveal it.
In the end, we feel there are advantages to the air-assist mechanism. The ability to employ a finer spray quality when required, while greatly reducing spray drift and combating inclement weather to extend the spray window are appealing features. Research has clearly demonstrated that deep-canopy spray coverage and overall efficacy are improved when this system is properly adjusted to match spray conditions. We’re not comfortable with suggesting it warrants lower carrier volumes (i.e. not dose) because of the expertise required to adjust the system. However, to be fair, experienced operators have accomplished it
We hope to see more air-assist options on boom sprayers.
This article is intended as a basic overview of what pesticide spray drift is and how to avoid it. If you want a more in-depth study of the physics of drift, head over here.
Defining Drift
Pesticide spray drift is the aerial movement, and unintentional deposit, of pesticide outside the target area. Aside from being illegal, there are a lot of compelling reasons for avoiding it. Drift can be measured in financial loss associated with wasted pesticide, wasted time and reduced crop quality/quantity. Plus, if an application is unsuccessful, the operator may have to re-apply, incurring further cost. Pesticide drift increases any risk of damage to human health, susceptible plants (e.g. adjacent crops), non-target organisms (e.g. wild and domestic animals, pollinating insects, etc.), the environment, and property.
We’ll limit our definitions to two forms of pesticide spray drift: Particle Drift and Vapour Drift.
Physical Drift is the initial off-target movement of pesticide droplets. This occurs at the time of application, and it is generally on a scale of tens-of-metres. There is a secondary component to physical drift wherein particularly small droplets (or the evaporated remains of droplets) stay aloft for longer periods of time, during which they can move laterally with wind or vertically with thermals and turbulence.
Vapour Drift is the off-target movement of pesticide vapours. This is a function of product chemistry (vapour pressure) and surface temperature. Rainfall (rewetting) can also affect vapour loss. If vapour gets caught up in a light breeze, moves downhill during a thermal inversion, or is redistributed in precipitation, movement is can be on a scale of kilometres.
Managing Drift
Drift cannot be entirely eliminated, but sprayer operators can greatly reduce the degree and impact. Much of what follows relates predominantly to particle drift from horizontal boom sprayers, but it’s never wrong to follow these best practices. Research and modeling have shown that the three biggest factors under the operator’s control are:
Apparent wind speed (i.e. the sum of wind speed and travel speed)
Boom height (i.e. release height)
Droplet size (i.e. nozzle spray quality)
Therefore, the degree and impact of drift can be greatly reduced by following these guidelines:
Reduce the distance between nozzle and target. For a herbicide application, that means lowering the boom to the lowest practicable height. There are exceptions, but a good rule of thumb is that the boom height should be approximately the same as the nozzle spacing.
Use the coarsest effective droplet size, generally achieved through the use of drift reducing nozzles such as air induction.
Work with the weather. Labels will specify appropriate weather conditions for spraying. Change sprayer settings to account for hot, dry and windy conditions or halt the job until conditions improve. Generally, avoid spraying when the weather is against you.
Identify any vulnerable nearby crop, landscape or environmental area. Choose a spray day when winds are blowing away from these sites. Explore voluntary watchdog sites like DriftWatch to see if there are registered sensitive crops nearby. Planting windbreaks or utilizing riparian areas can also help manage wind and provide localized downwind protection.
Observe labelled buffer zones and recommended sprayer settings. In Canada, using optimal sprayer settings in the right environmental conditions may reward the sprayer operator with buffer-zone reductions.
Work with your neighbours. Let them know your intentions. For example, greenhouse growers need to be notified to close vents during morning spray times to avoid any possibility of drift.
Understand the potential damage off-target herbicides can cause and make this part of your planning when selecting a herbicide. Where possible, choose herbicides with a low risk of volatility. Avoid products like dicamba near susceptible crops (grapes, tomatoes, peppers, sweet potato, tobacco, IP soybeans, etc.) or greenhouses. While not necessarily volatile, other synthetic auxins such as 2,4-D are extremely damaging to horticultural crops at very, very low doses.
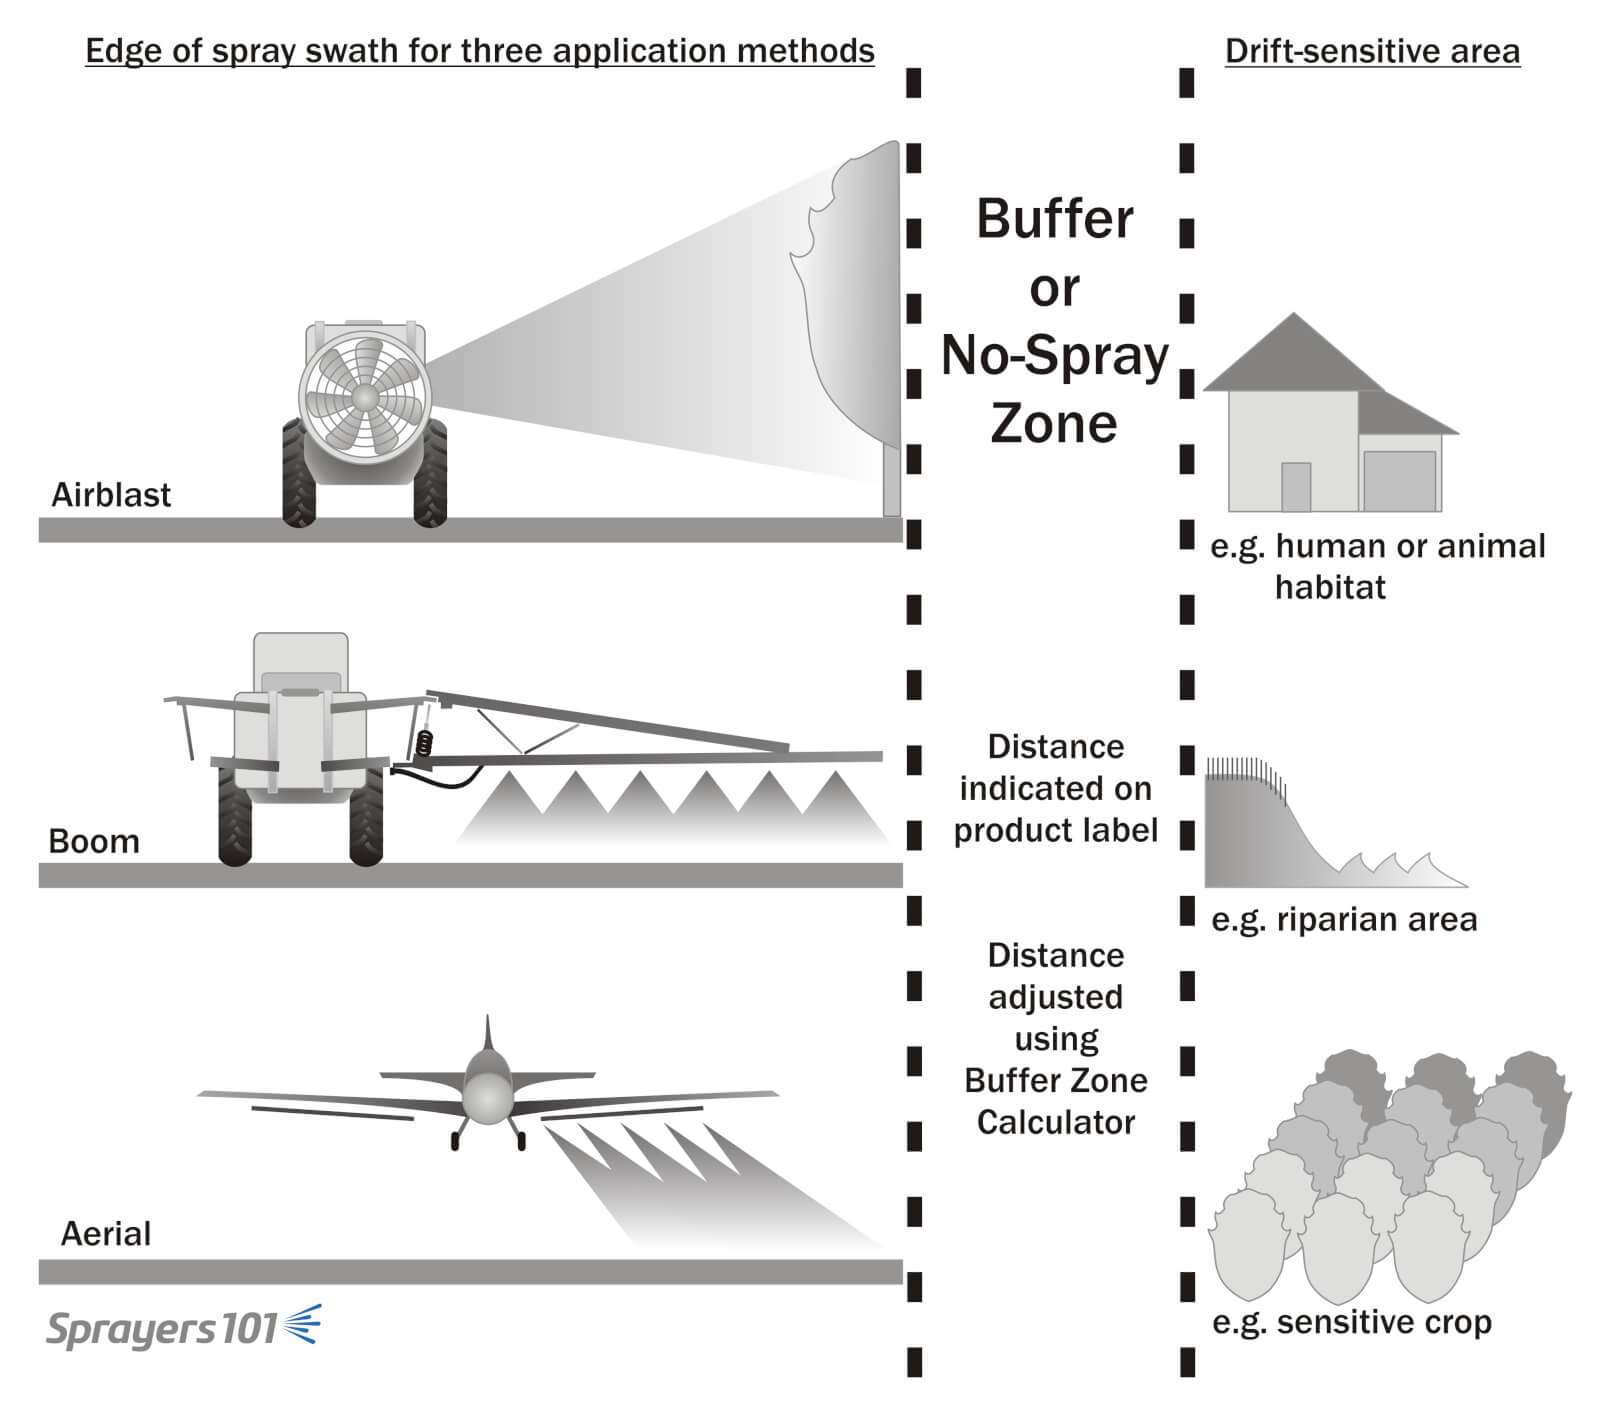
Buffer zones or No-Spray zones physically separate the end of the spray swath for the nearest downwind sensitive area.Consider planting windbreaks between your operation and sensitive downwind areas. Be aware that the windbreak should slow and filter pesticide-laden air, not block it completely (~50 % porosity). Also be aware that there are potential impacts to nearby crop rows, such as creating shade as well as cool, still air conditions. Contact your local Nature Conservancy to discuss the right plants and management plan for you.
Running an Airblast Sprayer?
For airblast sprayer operators, the environmental factors that affect drift are the same, but the rules for optimizing sprayer settings are slightly different. Droplet size is less of an issue, and in some cases droplet size cannot be controlled. Air settings are the primary tool for reducing drift potential.
Adjust fan settings to produce the minimal effective air speed throughout the season.
Use deflectors to channel air into, not over or under, the target.
If possible, increase droplet size by using air induction nozzles or disc & core (or disc & whirl) nozzles that produce a coarser droplet size. Depending on canopy size, you could use them in every nozzle position, or only in highest nozzle positions.
Any sprayer design the brings nozzles closer to the crop (e.g. tower or wrap-around designs) will reduce drift.
Canopy sensors that turn boom sections on and off to match the size and shape of the canopy will reduce drift.
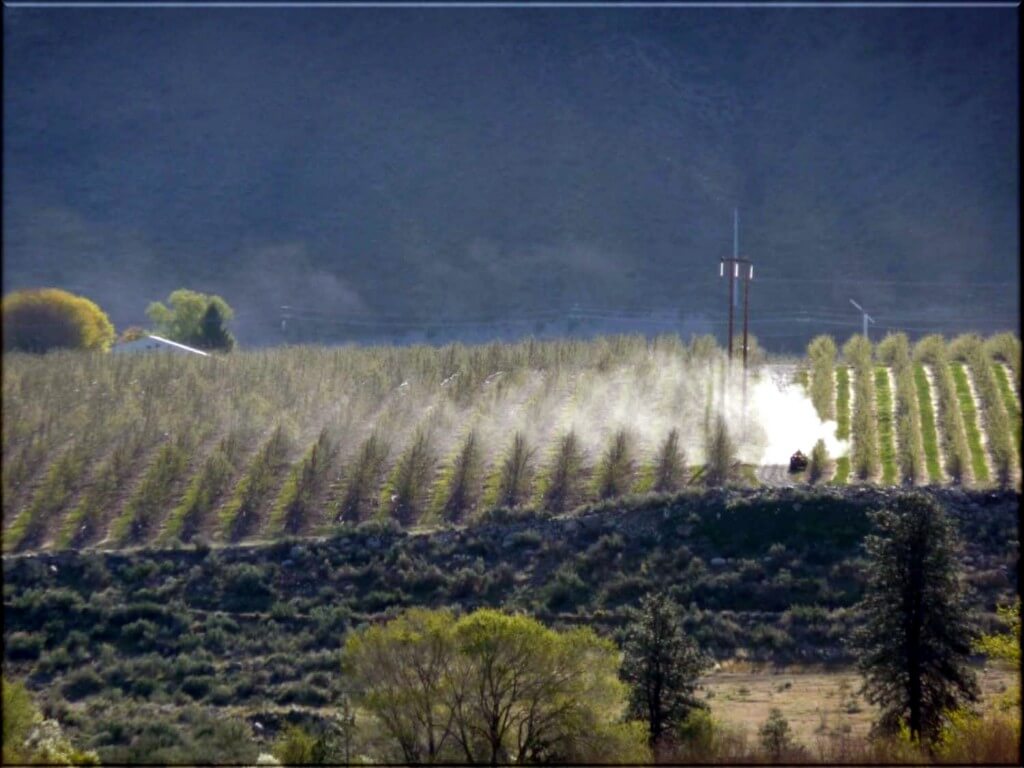
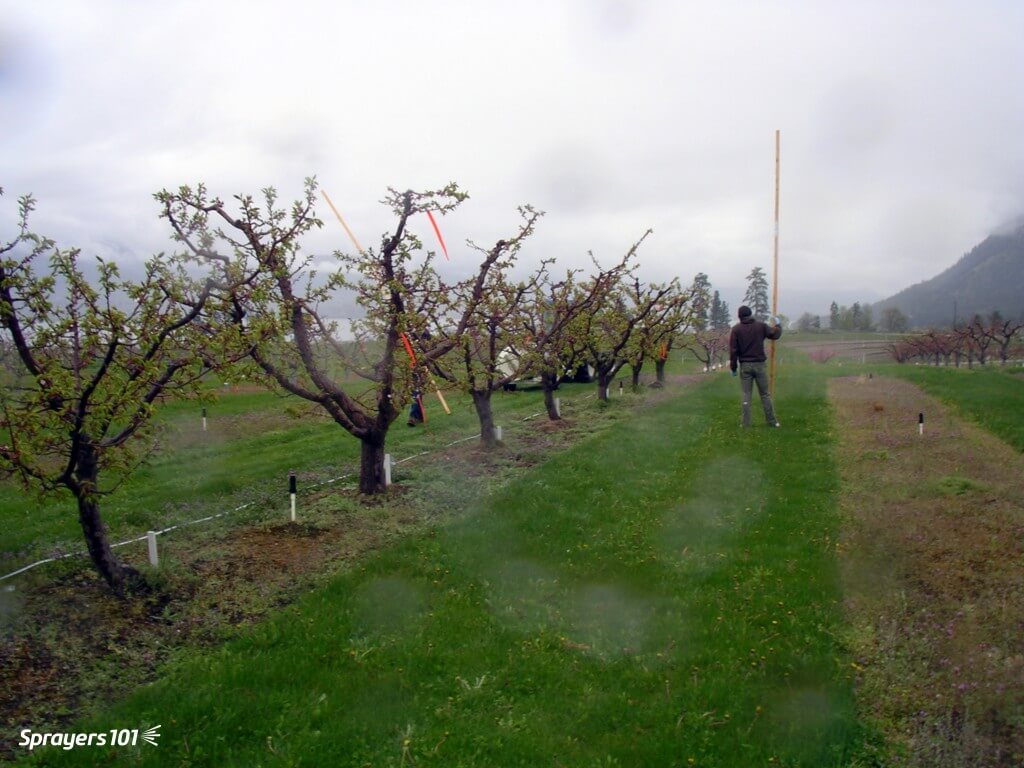
It’s not only field sprayers that drift. Photo Credit – G. Amos and D. Zamora, Washington State.Monitoring airblast drift with ribbons and a tall pole with water-sensitive papers stapled along the length. This trial was run using only water so as not to expose the person holding the pole. Photo Credit – M. Waring, British Columbia.
If You Suspect Drift
If you suspect your crops or property have been damaged by pesticide drift, follow these steps (The contact info is specific to Ontario, so substitute your local authorities). The following information is based on this article in ONFruit which focuses on herbicide drift. Drift onto an organic operation would not necessarily cause visual injury, but steps are similar.
1. Diagnose the problem
Is there evidence of a spray application (agricultural or vegetative management such as roadside spraying)? Look for wheel tracks, weed symptoms, boom patterns and overlap on the headlands. Look for spray evidence in neighbouring fields, lawns, ditches, etc.
Familiarize yourself with the symptoms of drift injury on your crops.
Eliminate other possible causes. Disease, insects, nutrient deficiency, herbicide carryover, improper sprayer cleanout, and environmental stress can resemble drift injury.
Are there damage patterns? In the case of physical drift, damage is more pronounced on the upwind side of the damaged area, tapering away with distance from the source. In the case of vapour drift, damage can be uniform throughout damaged area and not necessarily downwind from the source. Pesticides can also move in cold air drainage and in surface run-off from rain events. If damage is patchy, it may be something else, such as soil pH or carryover (look where sprayer starts and stops).
2. Contact the appropriate people
Talk to your neighbour or the sprayer operator. Ask what was sprayed, when it was applied and who performed the application.
Contact the Ministry of the Environment, Conservation and Parks District Office or Spills Action Center (SAC): 1-866-663-8477. The SAC is available 24/7 and they will then contact the appropriate Environmental Officer and pesticide specialist in your region. Local MECP offices can be found here.
It is extremely important to report as soon as possible because the concentration of herbicide drops quickly within the plant. Do NOT wait until there are symptoms. Do NOT hesitate to call, even if you are unsure if it’s pesticide drift.
MECP officers can do a site visit, take samples of tissue and soil, and have them analyzed for suspect pesticides. Where appropriate, the offending applicator may face charges under Ontario’s Pesticides Act. Charges will be pursued only if off label use is identified from the information gathered.
Because of the wording of some of the labels and the difficulty of tracking down all the information needed, this has always been a very difficult thing to pursue in grower-to-grower drift incidents.
The results from the MECP lab are available for the grower and, if enough information is collected, the grower is encouraged to pursue civil court if insurance and/or cooperation with the applicator does not work. According to the label of most pest control products, the applicator is liable for any damage caused by the misapplication of a pesticide.
Contact your (crop) insurance adjustor and advise the applicator to contact theirs. However, do not rely on your crop insurance; Insurance companies may not provide coverage for drift incidents. It is prudent to determine if you are covered before you need to file a claim.
Report the incident to the manufacturer of the pesticide product. See the label for the toll-free number. Labels can be found on the PMRA label search.
3. Document all details of the problem and consider lab analysis
Collect spray records. This includes yours (to ensure it was not your application), and the potential offending applicators’.
Collect weather records (temperatures, possible temperature inversions, wind speed, wind direction, rainfall) for the date of application).
Take timestamped, geolocated photos (most smartphones include this information automatically, but check your settings). Repeat photos several times through the season.
Document yield loss from the damaged area and an undamaged area. Choose a similar planting (same age, cultivar, rootstock, etc.). For perennial crops (e.g. vineyards, orchards, asparagus, berries) herbicides such as Group 4’s may necessitate documenting the effects for several years after the damage occurred.
Laboratory analyses of herbicide levels in plant tissue are often necessary to confirm the presence of herbicides, although symptoms may be helpful in diagnosing which herbicides caused the problem.
Research laboratories that will analyze crop samples for herbicide residues. Their requirements regarding sample size, labeling, storage, and shipping will vary, as will the list of pesticides they provide testing for and their minimal detection levels. Given the time-sensitive nature of pesticide detection, it would be prudent to know this information before need the service.
Applicator Liability
Anyone using pesticides is responsible for their safe application. For example, the Ontario Pesticides Act requires that licensed spray applicators carry a specialized liability insurance policy that provides appropriate coverage for their business. Operators who work on a “for hire” basis (e.g. a licensed spray applicator) or away from their own farm operation will need additional coverage. Where drift damages adjacent crops, insurance adjustors generally ask the following questions:
Was the damage to the applicator’s own crop? If so, it is unlikely that there will be coverage under any insurance policy.
Was the damage to a neighbour’s property? If so, the applicator’s liability policy may respond.
Was the product being applied according to label directions?
Other Resources
Managing spray drift is everyone’s responsibility. Extremely low, and often invisible, amounts of spray drift can be very damaging; even long after the application. For more information about drift mitigation, watch the following videos and download a copy of this Factsheet.
What is Pesticide Drift?- Ontario Ministry of Agriculture and Food and Ministry of Rural Affairs (2011)
Equipment and Methods to Reduce Pesticide Drift- Ontario Ministry of Agriculture and Food and Ministry of Rural Affairs (2011)
Preventing Pesticide Spray Drift- University of Missouri Extension (2013)
Three simple ways to reduce drift. Thanks to Real Agriculture for filming and editing! (2014)
Three simple ways to reduce drift. Thanks to Real Agriculture for filming and editing! (2014)