Orchardists, nurserymen and hop growers share something in common – they want to get spray to the top of a tall plant canopy with as little waste as possible. The tops of trees, for example, are a primary site of infection as they filter spores from the air, so fungicide coverage is critical. Spraying the tops of high canopies (e.g. too high for over-the-row style sprayers) can be a difficult proposition.
Here are a few considerations:
Wind moving through a planting, as a general rule, is twice as fast at the top of a canopy as it is at the ground. Wind carries spray off target.
The further the distance a droplet travels, the smaller it gets as it evaporates and the less momentum it has. The likelihood of it hitting the target is greatly reduced.
The top of a canopy typically has far less plant material than the rest of the canopy. Relatively speaking, there’s not much there to hit.
In order to overcome these challenges, the traditional axial orchard sprayer is nozzled with a larger proportion of spray distributed at the top of the boom. The idea is to increase the odds of some spray making it to the top of the canopy. Often, full-cone nozzles are used to accomplish this. Of course, if an estimated 10% of the spray actually impinges on the top of the canopy, the rest goes… well, somewhere else. This shotgun approach is hardly an efficient use of chemical.
Another strategy is to crank the PTO rpm’s up to 540, throw the fan in high gear and blow the spray as high as possible. The problem is, by increasing air speed and volume to carry spray to the top, the rest of the canopy (far closer to the sprayer) gets overblown and spray shoots right through. Some overspray might hit the next row, but most ends up on the alley floor. If you doubt it, consider how white your pant-legs get when you walk an orchard after spraying kaolin clay.
Others, mistakenly, might elect to raise the operating pressure to >150 psi in the hope that pressure will drive the droplets in a straight line at higher speeds. Most airblast sprayers using hollow cone patterns create very fine spray quality, even at 100 psi. Raising pressure means the droplets get even smaller, and tiny droplets have very little momentum. Increasing pressure just makes the problem worse.
Here’s what we propose.
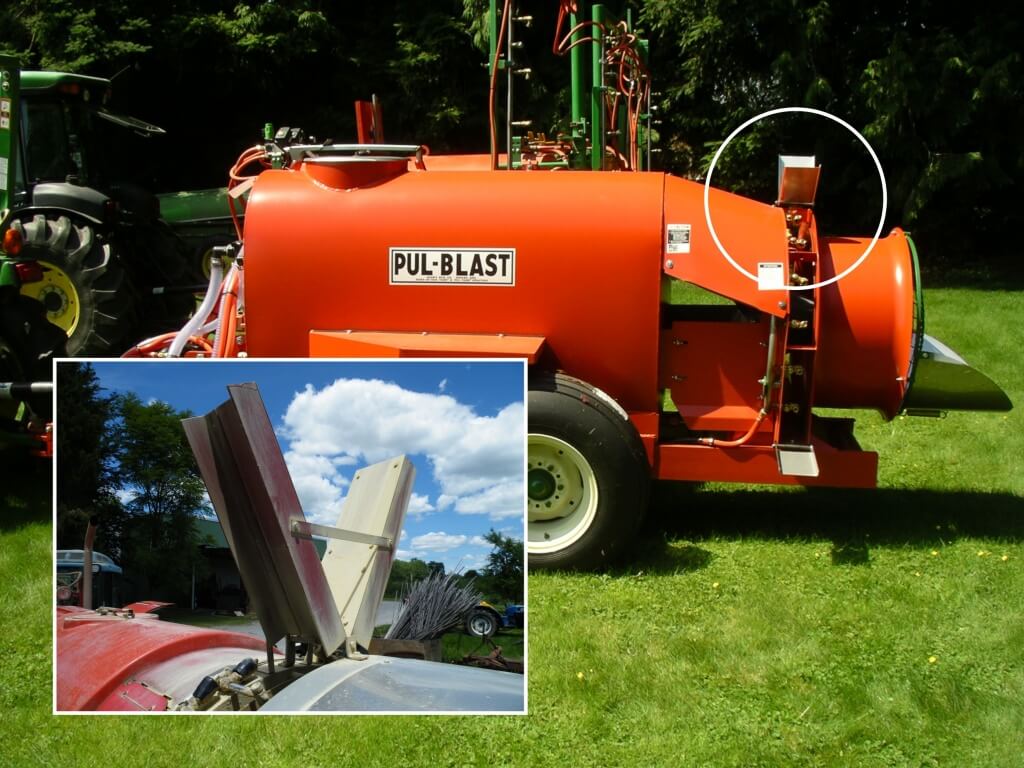
Deflectors
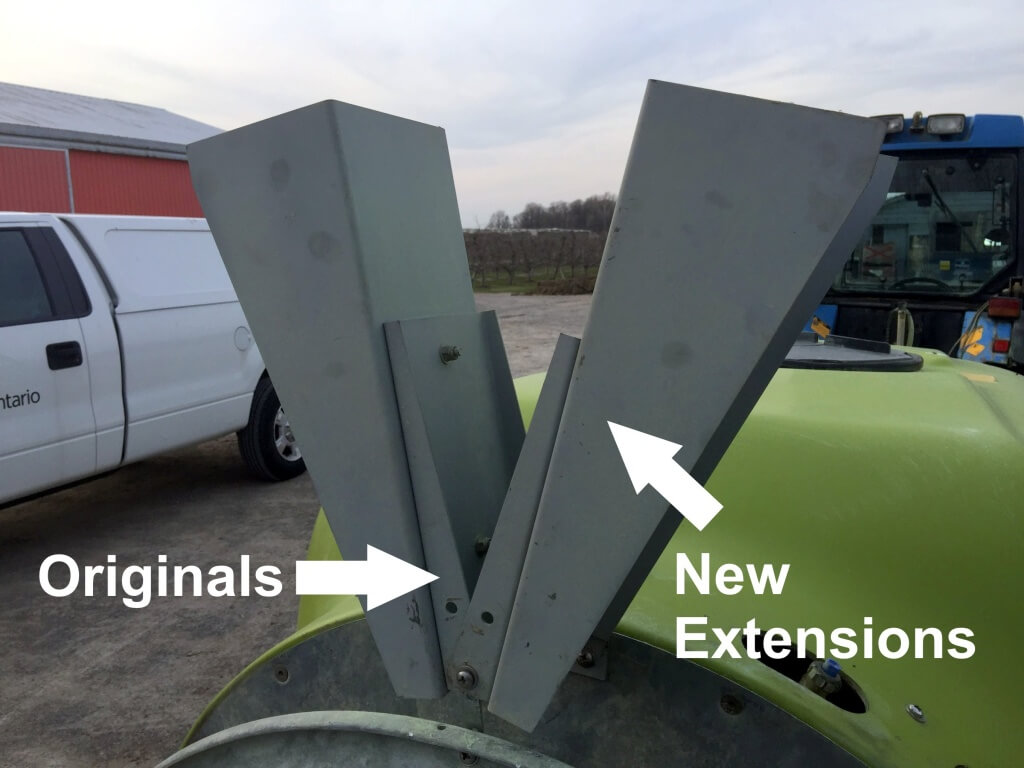
If using an axial sprayer, employ air deflectors at the top of the air outlet to channel air (and spray) more effectively. The commercially-available deflectors are often just flat sheets, and air hits the surface and spills over all edges. Image pouring water onto a dinner plate – it just splashes over any which way. Better to replace those deflectors with a set that feature side-walls to channel the air. Anyone with access to a break and some sheet metal can make their own, but ensure they do not stick out beyond the wheel of the sprayer or they could snag plants and trellises. Always aim to overshoot the canopy top by a small factor to compensate for unexpected gusts of wind – better to overshoot a bit than to miss.
Commercial deflectors may or may not have channeling side walls. Inset: Homemade deflectors can do a great job.The original Munckhof deflectors were reversed, and a larger set of extensions were fabricated and attached.
Towers
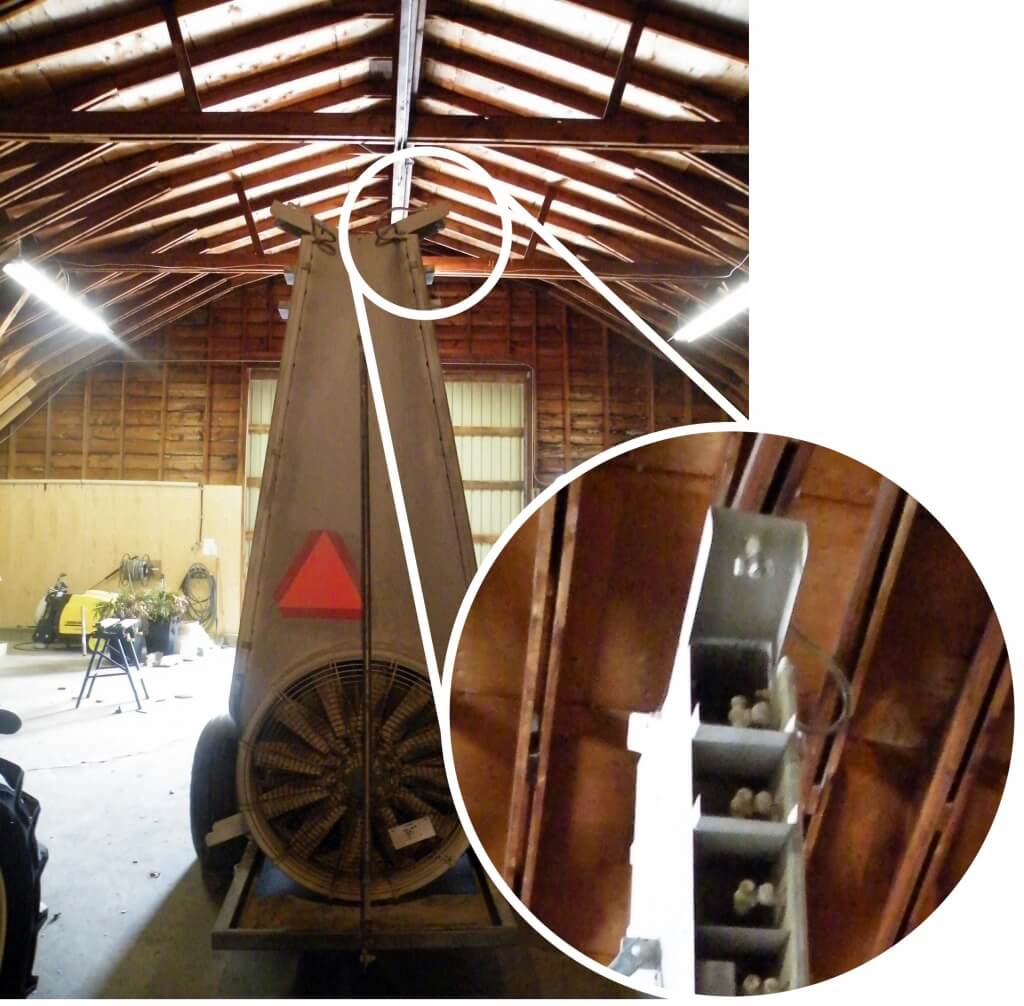
Better than deflectors, some sprayers move the air and nozzles closer to the target via ducted tower assemblies. They work very well, but they must be as tall as the target you intend to spray. Even then, an uneven alley can cause them to rock and you might still miss some upper targets. Operators using adjustable towers or ducts might angle them back to aim the air (and spray) on a slight upward angle rather than parallel to the ground, and that can compensate for a slight height difference, but it begins to defeat the purpose.
Nozzle body on upper tower deflectors. Still some air assist and a good idea, but use air induction nozzles.
Extra Nozzle Bodies
Some creative operators have attached additional nozzle bodies to the tower’s top deflector plate to aim it up in the top of the canopy. Still others have extended the wet boom itself higher than the tower. Unfortunately, although the nozzle is closer to the target (good) the benefit of air assist has been greatly reduced (bad). Air induction nozzles might help on boom extensions, per below.
Wet booms can be extended to reach high canopies, but may no longer benefit from air assist. Consider using air induction nozzles in these positions.
Air Induction Nozzles
Consider using air induction nozzles in the top two positions of each boom (totaling four per sprayer), with or without towers. There are three advantages:
Coarser droplets have more mass. They move in straight lines and are less likely to be deflected by wind before they reach the target.
Coarser droplets can be propelled by pressure, so unlike finer droplets they rely less on being carried by sprayer air.
Coarser droplets that miss the target do not continue upwards; they fall back out of the air into the orchard, reducing off-target drift potential.
No matter which strategy, or combination of strategies, you use to hit the top of the canopy, always confirm coverage using water-sensitive paper. Further, recognize that it’s very difficult to compete with high winds, so know when to wait it out.
Controlling your spray at the top of the canopy means better coverage and less waste. Plus, people won’t see this (wait until the ~50 second mark).
Here’s the third in our series of short, educational and irreverent videos made with Real Agriculture. We wanted to explain where pressure readings are taken on a sprayer and why it’s so important to know what pressure your nozzle is experiencing, rather than what the screens in your cab are telling you. Not only does pressure affect your application rate, but it affects your spray quality, which can be critical if your rate controller allows the pressure to drop below 30 psi.
This is the second of a series of short, educational and irreverent videos made with Real Agriculture to bring a little levity to sprayer education. Let’s face it – ironically, nozzles can be pretty dry.
Here we enjoy an early morning soy bean scout and a light breakfast of toast as we demonstrate how pressure, droplet size and canopy penetration interact.
This is the first of a series of short, educational and irreverent videos made with Real Agriculture to bring a little levity to sprayer education. Let’s face it – ironically, nozzles can be pretty dry.
This first video discusses what a rate controller can be expected to do, and what it cannot do. Plus, we got to blow up a sprayer in the intro… so there’s that.
In 2013, when this sprayer was constructed, Ontario’s hops acreage was expanding for the first time in many years. While there were a few large operations, most were small acreage hobbyists and part-time hops growers that did not have any experience spraying the crop. The latter operations recognized a need to spray, but couldn’t justify investing in an expensive (and complicated) airblast sprayer.
In response, we set out to design a budget-conscious, low-capacity, tower-style sprayer that small-acreage growers could build for their own operations. Our hope was that hydraulic pressure would give droplets sufficient momentum to cover all foliar surfaces, thereby eliminating the expense of an air-assist fan. Additionally, the telescoping tower would allow the operator to match the height of the crop canopy as the season progressed, reducing the amount of wasted spray mix.
Unfortunately, the results of our spray coverage trials indicated that while the upper-face of leaves received excellent coverage, the under-side received only sparse coverage. We were unable to move the trials beyond spray coverage and into the efficacy stage, and because of this, we do not know if the under-leaf coverage would be sufficient to control sucking insects or diseases with contact products.
So why publish this article? The principles behind the design, construction, and testing of this sprayer are still valuable. It led, in part, to growers attempting to modify older and inefficient airblast sprayers to duct air through homemade towers (see here). But, be advised that without efficacy data, we must recommend that budget-conscious and/or small acreage hop growers explore the use of gently used, conventional airblast sprayers.
Introduction
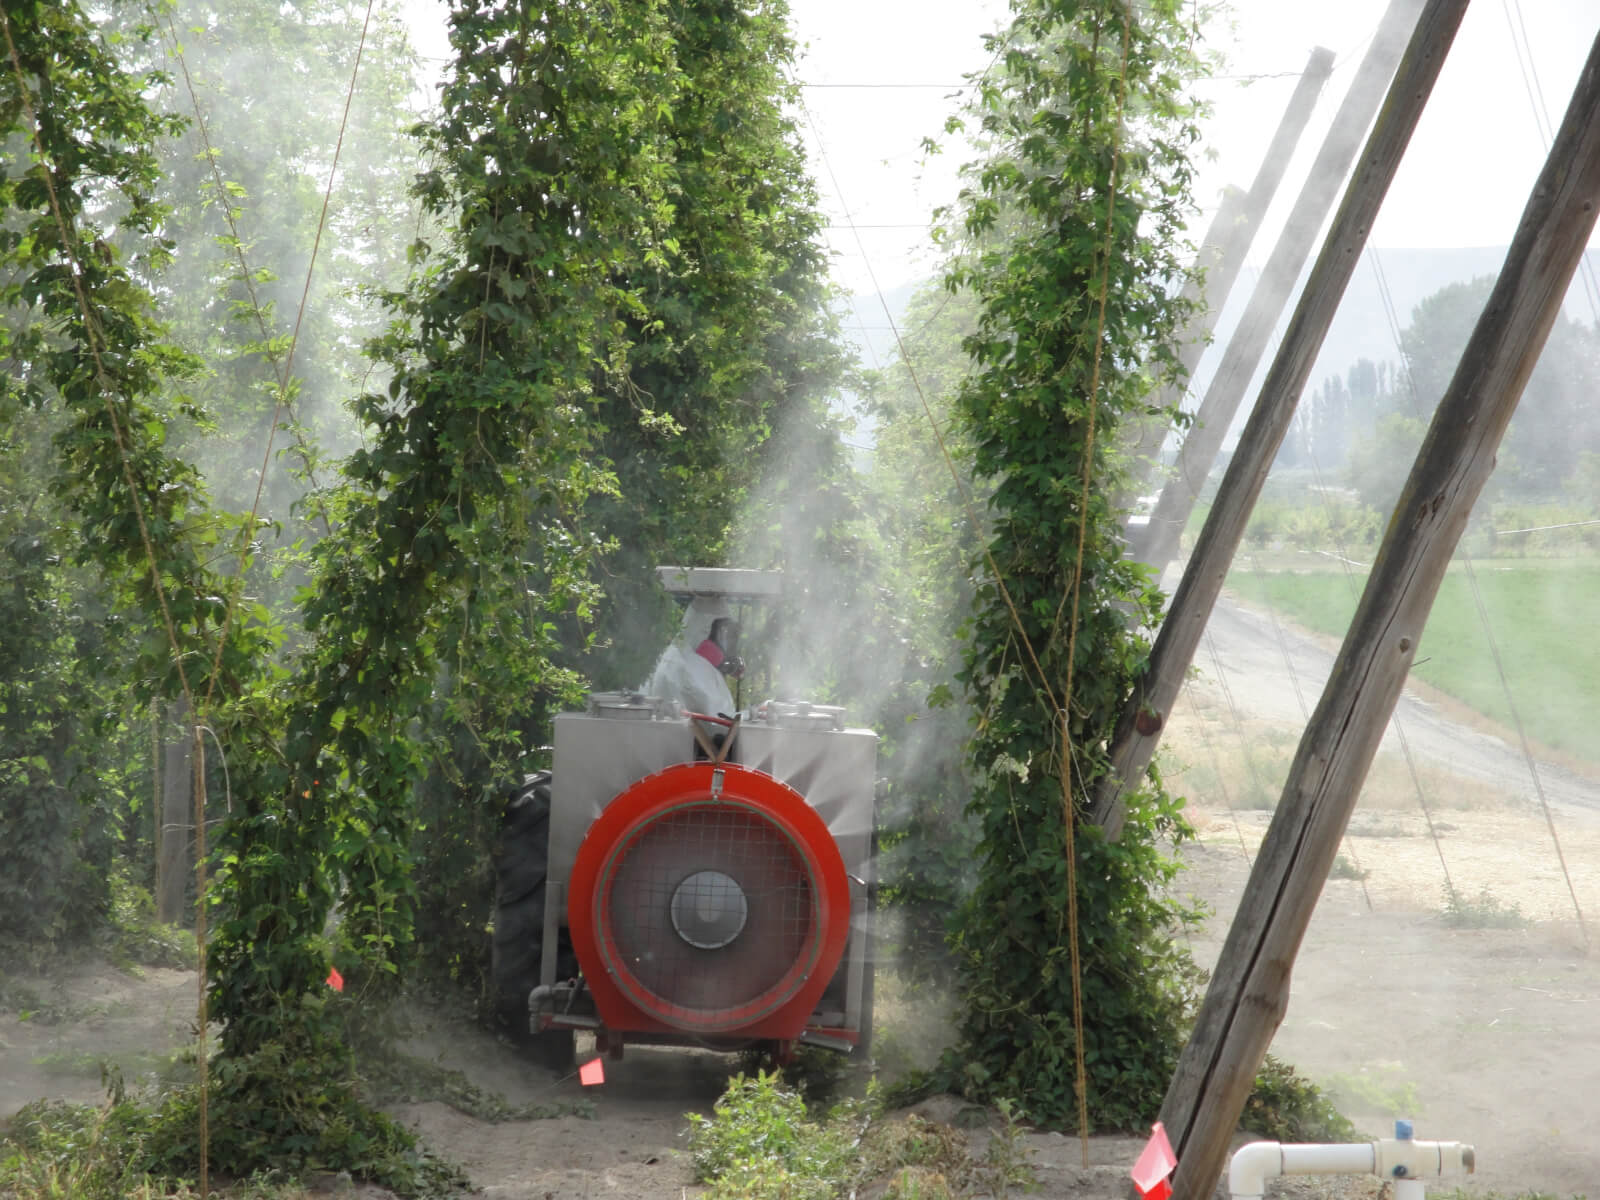
Hop bines are trained around twine lines and grown an average 5.5m (~18ft) high. Each line supports two or more bines and, when mature, the line becomes a dense column of foliage as much as 0.5m (~2ft) in diameter. Hopyards, both organic and conventional, use radial airblast sprayers to apply products to the foliage. However, the profile of the radial airblast boom does not match the profile of the target crop. The nozzles at the top of the sprayer have to spray a target 5.5m (~18ft) away, while those at the side spray a target 0.5m (~2ft) away. Additionally, the air from the fan must be calibrated to carry the spray to the highest point on the hop bine, which means it is excessive for the length of bine directly adjacent. With this in mind, it was theorized that a more efficient sprayer design would feature a vertical boom to position each nozzle as close to the target as possible.
We would build “the Hopsprayer”.
Rears airblast sprayer tackling 16-20 foot bines. Photo credit – D. Groenendale, Washington
Beyond the obvious requirements of operator safety and being mechanically sound, the design and construction of the Hopsprayer was guided by four principles:
The Hopsprayer should be less expensive than a conventional 3-point hitch airblast sprayer or small trailed airblast sprayer, making it cost-effective for Ontario’s small-acreage operations (~$4,000.00 CAD).
The Hopsprayer should be constructed of over-the-counter parts that require minimal modification and no special machining or tools to assemble.
The Hopsprayer should have the capacity to operate in the same conditions as an airblast sprayer (i.e. moderately uneven terrain, reasonable ground speeds, and through any configuration of hopyard trellising).
The Hopsprayer should achieve comparable or better spray coverage along the entire length of the hop bine, both on the upper and lower surfaces of the leaves.
Key Structural Components
In order to make construction as simple as possible, it was decided to build the sprayer from a commercially-available three-point hitch horizontal boom sprayer. After removing the horizontal boom, several concepts were examined for mounting nozzles on a dynamic vertical boom. The key requirement was that the vertical boom could be raised incrementally, and nozzles activated sequentially, to match the height of the hop bine as it grew taller over the growing season.
The boom itself went through several redesigns, each dismissed for reasons of excessive weight, lack of structural stability, or concerns about operator safety when raising and lowering (or even folding and unfolding) the boom. Finally, it was decided to use a commercially-available 6m (~20ft) sliding aluminium ladder. This had the advantage of being strong, light, easy to mount, and the hollow rungs were ideal for running spray lines from one side of the boom to the other. Plus, with the addition of a marine hand winch, the ladder could easily be extended to any height.
Regarding the nozzles, several nozzle bodies and tips were considered, but the Arag Microjet had several advantages over conventional nozzle-body-and-tip configurations. The Microjet has a mixing valve built into the nozzle body which allows the operator to turn individual nozzles off, as well make minor changes to the spray quality emitted from each unit. Further, the brass nozzle body bends 90° before terminating in a threaded male connection, ideal for fixing to the ladder and attaching spray lines.
From this point, it was a matter of positioning the key components and finding appropriate mounting hardware.
Construction
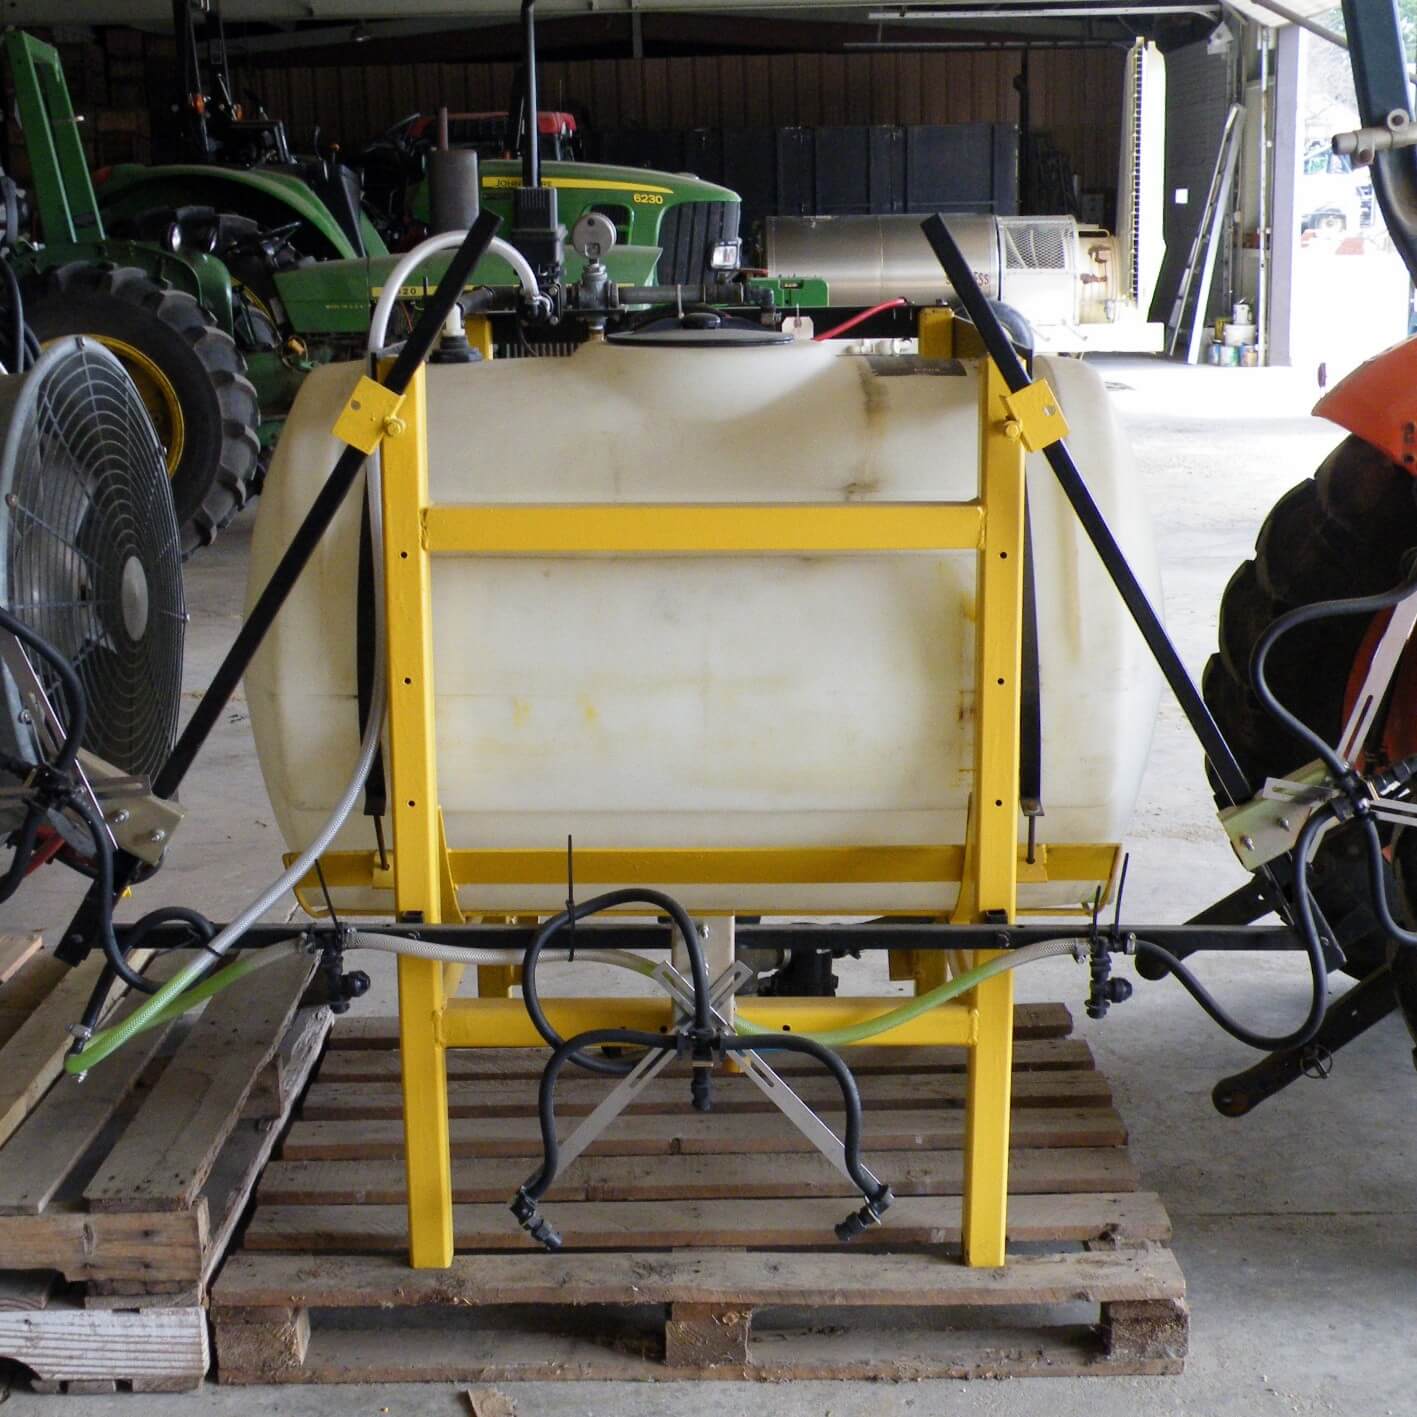
1 – Removing horizontal boom from three-point hitch sprayer
(~$2,000.00 CAD for new sprayer)
Costs vary depending on the sprayer, but the sprayer should feature a pump capable of 200 psi, a minimum capacity of 100 US gallons and a chassis that wraps around the tank to provide a sound surface in the rear for mounting he ladder. Removing the existing boom is a simple matter of disconnecting the feed line and using a set of wrenches to unbolt the boom itself.
Horizontal boom sprayer
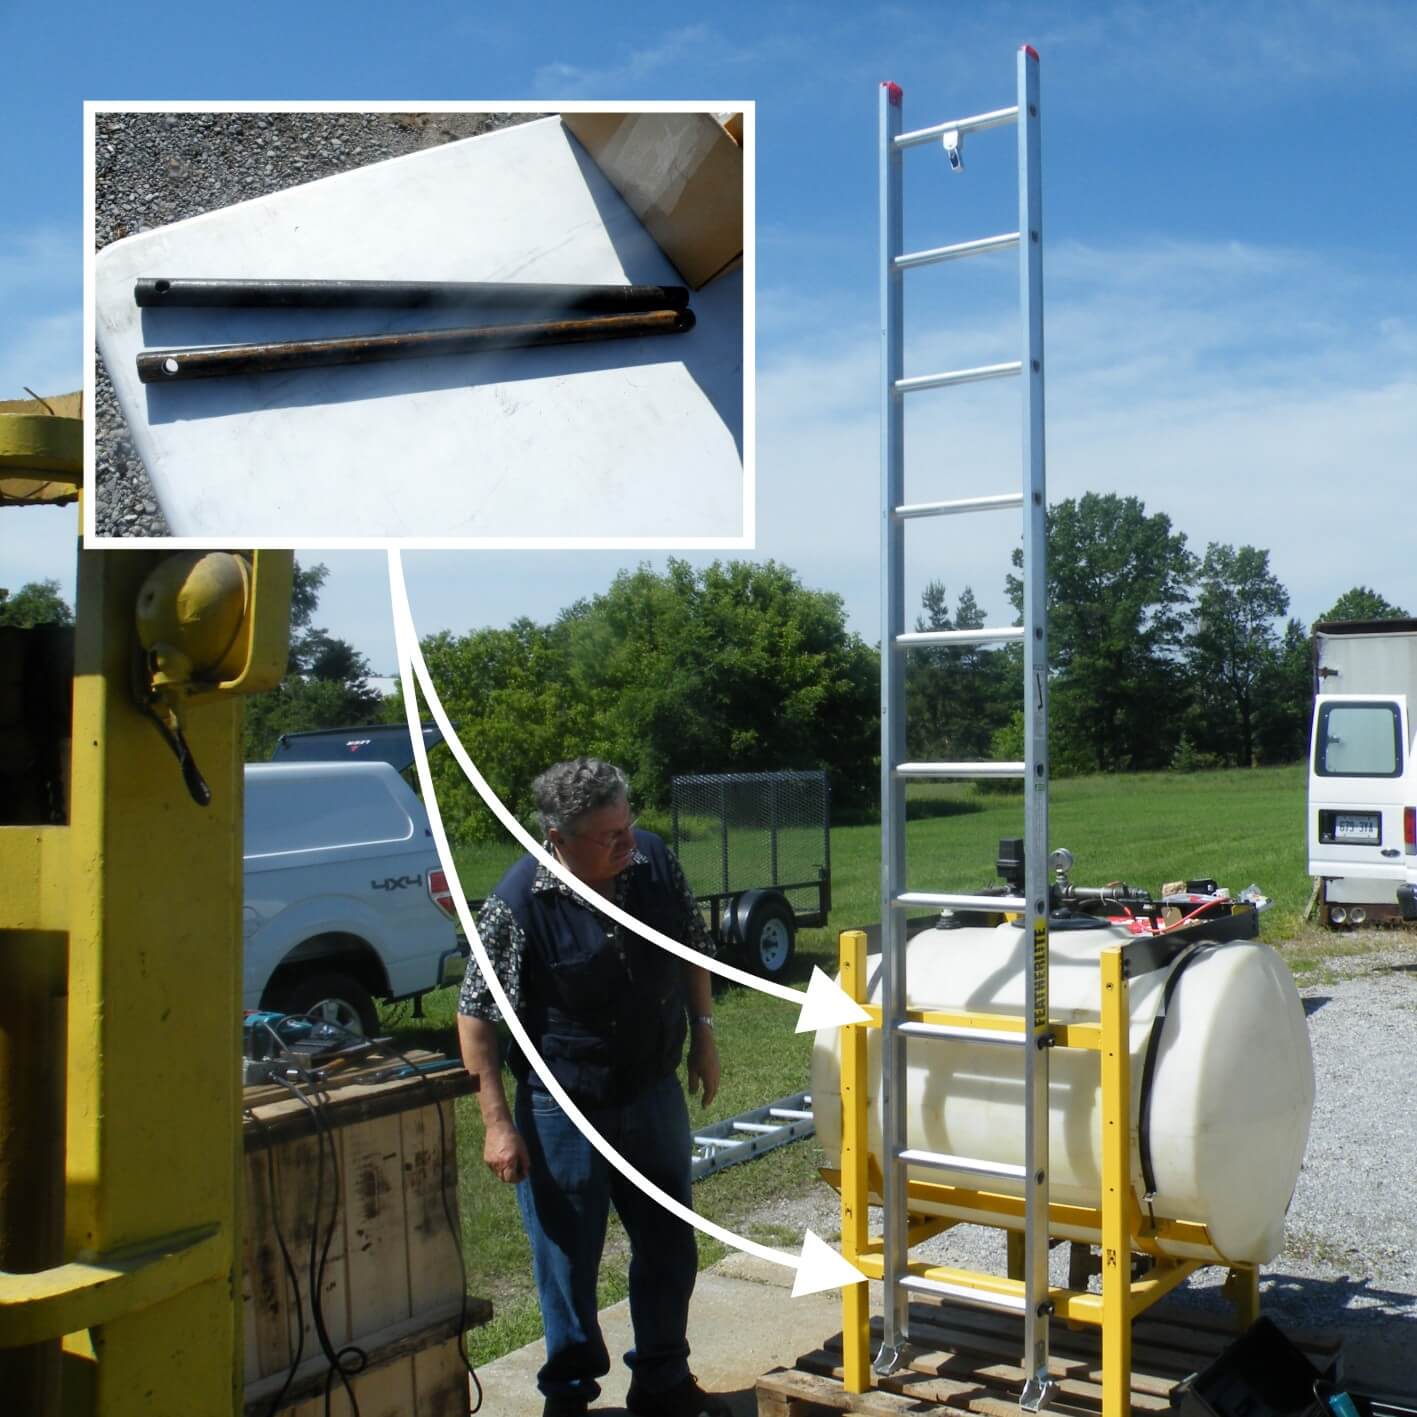
2 – Fitting the vertical boom (ladder)
(~$200.00 CAD for ladder, pipe and fasteners)
A 6m (20ft) ladder will not actually extend 6m because an overlap is required between the two lengths for stability. However, when mounted to the sprayer it will achieve a final height of 5.5m (~18ft) off the ground. Cut two lengths of black pipe with a diameter that just fits in the hollow rung (~½”) to a length that spans the chassis at the rear of the sprayer. Centre the ladder, punch, pilot and drill holes through the pipe and the sprayer chassis (take care not to hit the poly tank) to mount the ladder using bolts, lock washers and nuts.
Dry-fit the vertical boom
3 – Preparing to mount the nozzles
(~$1,000.00 CAD for 12 Arag Microjet nozzle assemblies)
Remove the ladder and separate the two lengths. Remove the two latches that lock the ladder when it slides. We mounted nozzles every 45cm (at each rung) but that was too many. Consider mounting nozzles every second rung (~90cm). We mounted the nozzles with 9/32” U-bolts but hose-hangers only require one hole and can be swiveled to position the nozzle. This is how the bottom four nozzles were attached to the chassis (see inset), not the ladder. The ladders must be able to slide past one another and the valve handle must be unobstructed.
Dry-mount a nozzle (hose-hanger in inset)
4 – Grinding and mounting the nozzles
(~$100.00 CAD for mounting hardware and grinder disc)
Remove the dry-fitted nozzle. Centre-punch and drill all the holes for the U-bolts (or preferably, the hose hangers). Remove the threaded swivel from each Microjet. Use a hand drill set to low with a Robertson bit, and an angle grinder to carefully remove the thread and taper the tip to accommodate a ½” hose. Be aware: eye protection is imperative and the brass will get hot. Replace the cool swivels and mount all the nozzles on the ladder. Use washers and set them so the hex-nut on the nozzle body is flush against the aluminium ladder.
Removing thread from brass swivel
5 – Plumbing the sprayer
(~$75.00 for hose, $20.00 CAD for Tee’s, $75.00 CAD for hose clamps)
The plumbing on the sprayer is not complicated, but takes thought. It will require 11 ½” TeeJet T-junctions and roughly 60ft of ½” braided, clear spray line rated to 200 psi. You will also need 8 hose clamps for each set of nozzles for a total of ~50 (get extras). Using hose cutters, cut appropriate lengths for a single set of nozzles and use them as a template for the rest. Pass the line through the rungs and do not make loops too tight. Use a drill with a ratcheting chuck to ensure each hose clamp is tight.
Plumbing the nozzles
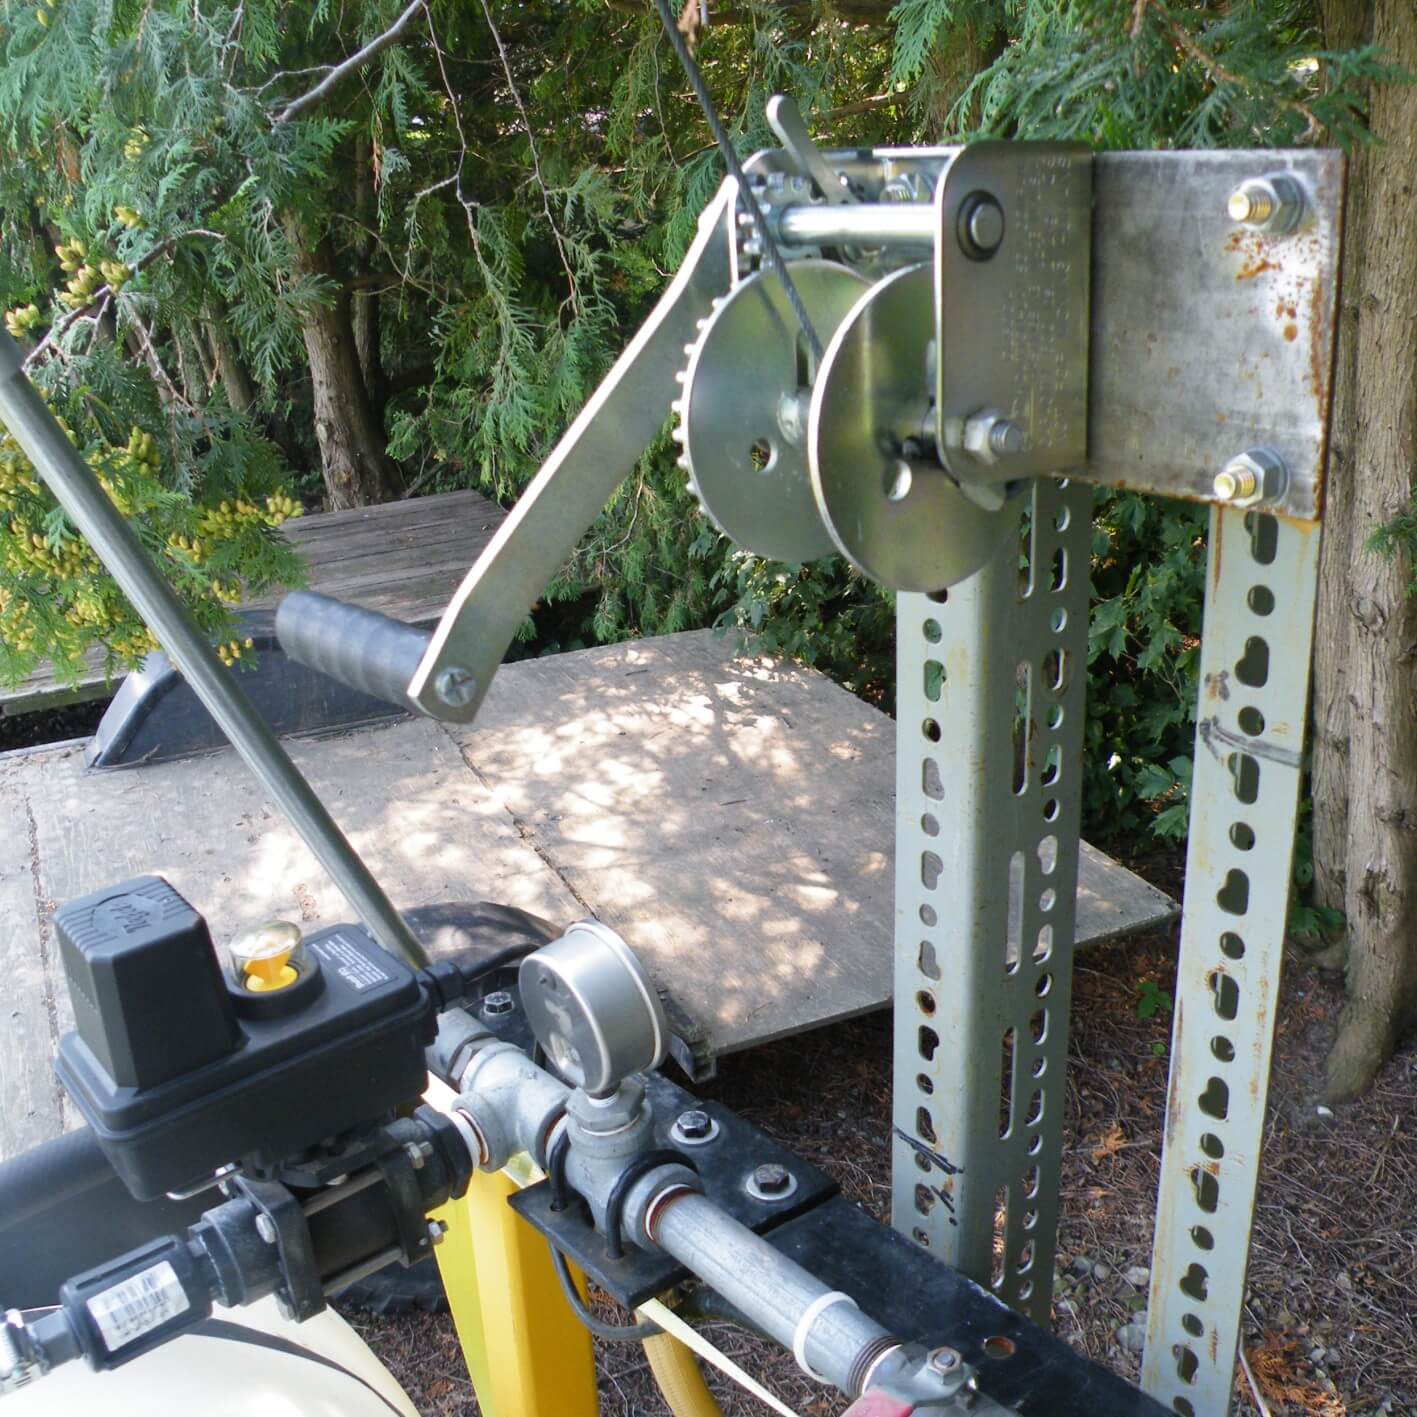
6 – Mounting the winch
(~$125.00 CAD for winch, cable, clamp, angle iron and plate)
This step is sprayer-specific. Find a spot on the chassis that you can mount a length (or two lengths) of angle iron to house the winch. On the prototype we included a sheet of plate iron to make the mount as stable as possible. Be aware that the handle (and user’s knuckles) must not hit any part of the sprayer when turning. Never let go of the handle without setting the lock, or the boom will drop and the handle will spin out of control.
Mount the winch
7 – Raising and securing the boom
This will take two people. Slide the two lengths back together and raise the boom into position. Bolt the boom into place (see Step 1). Take a ½”, 8ft length of galvanized conduit and crush 2” of one end in a vice. Punch a divot and drill a hole in the crushed end. Repeat with a ¾” length of conduit. Attach the ½” inch length to the chassis and the ¾” length to the top of the bottom boom, telescoping the two lengths together. Now you have a support that is the right length, you can screw the two lengths together and repeat on the other side. Remember not to tighten one side completely before the other is in place.
Strut + boom & chassis
8 – Tie in plumbing and winch cable
Attach the cable to the winch, pass it through the pulley on the top boom and clamp it to the lowest rung. Pass the cable between the booms. This is also how the two lengths of boom are plumbed together: A long length of hose hangs from the bottom-most nozzle on the top boom, tied to the top-most nozzle on the lower boom. All the excess hose (needed when the ladder is fully extended) hangs between the two ladders. Trust me – this makes more sense once you do it.
Nozzles on drop arms
9 – Test the plumbing
(~$150.00 CAD for PTO shaft)
Finally, the sprayer must be attached to a tractor via the 3-pt hitch and PTO shaft. Ensure the sprayer is plumb and level or the boom will bounce and sway excessively as you drive. Raise and lower the boom via the winch to ensure it moves smoothly. Bring up the rpms on the tractor and engage the boom at 100 psi. Look for any leaks. Bring it up to 200 psi and drive the sprayer around with boom fully extended. Repair any blown lines. You are now ready to calibrate your new sprayer.
Test the sprayer plumbing and stability
Calibration
Classic Arag Microjets will emit approximately 1 US gallon per minute at 200 psi. However, the position of the mixing valve will affect both the spray quality and rate of the nozzle. As such, a timed output test should be performed on each nozzle. Bring down the boom, fill the sprayer with water, bring it up to operating pressure and begin spraying. Adjust one nozzle until you achieve the desired pattern. Then, using a telescoping paint roller handle to reach the highest nozzles, place all valves in similar positions. Using a collection vessel, determine how much volume is emitted at a given pressure and valve position in one minute – this is a timed output test. You can find rates and valve settings for these nozzles in this ginseng article.
Evaluating Spray Coverage
There are two ways to evaluate spray coverage:
The amount of the surface area covered (e.g. 25%)
The droplet density (i.e.. the number of drops per square centimetre)
They are not the same thing. For example, one massive droplet covering ½ the target would leave a lot of space uncovered, and therefore lots of room for an insect to walk past and never touch it. However, an even smattering of small droplets, still covering ½ the target are better because they are distributed evenly and odds are, will hit a pest.
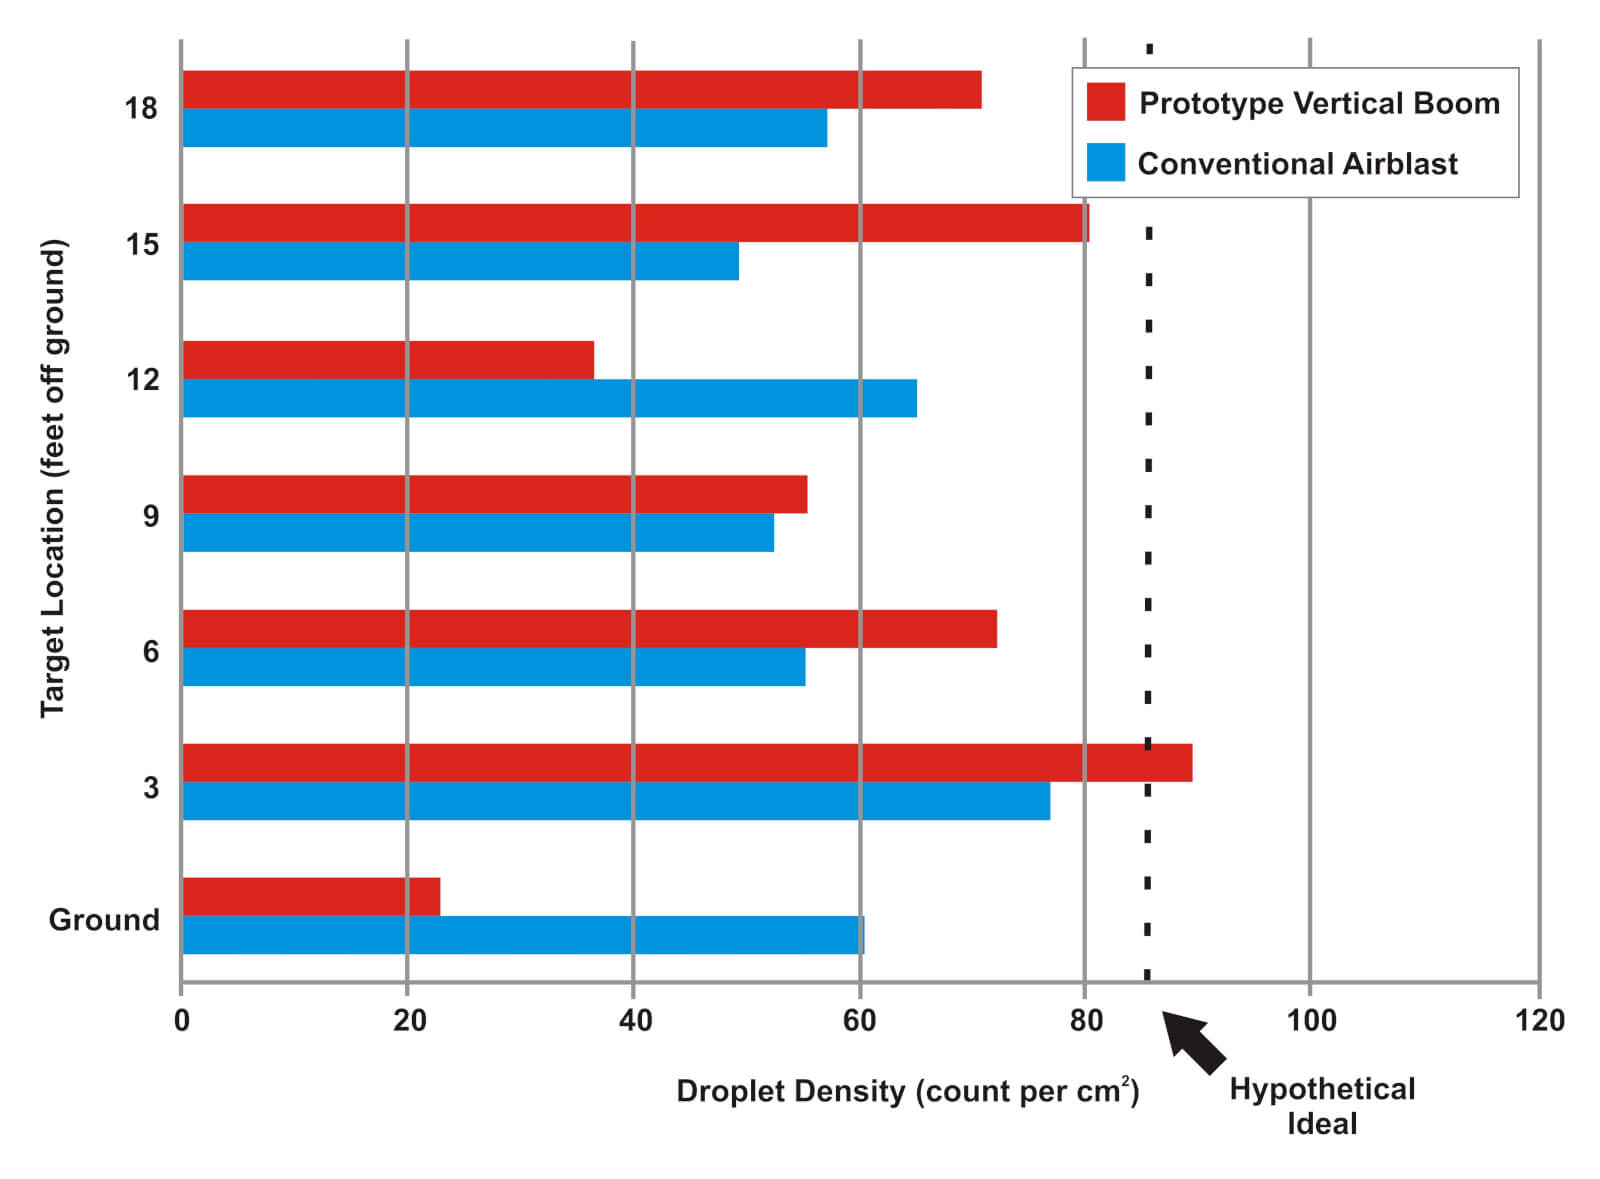
The Hopsprayer was trialed at Clear Valley Farms, Nottawa, Ontario. Water sensitive paper (which turns from yellow to blue when contacted by spray) was clipped every three feet up to 18 feet on the upper and under sides of leaves. The grower cooperators used their own airblast sprayer operated at their standard 2,340 L/ha and 2.75 km/hr. The Hopsprayer was tested at 1,220 L/ha and 7.5 km/hr – half the volume and three times as fast, even while fully-extended to its 18 foot height. The four histrograms show the coverage on top of the leaves and on the underside of the leaves.
Total % coverage on upper side of leaves (n=3)Total percent surface covered on underside of leaves (n=3)Droplet density on underside of leaves (n=3)Droplet density on underside of leaves (n=3)
Conclusion
The airblast achieved minimally-acceptable coverage on all leaf surfaces at all heights. The prototype did not cover as much of the under leaf surface (not surprising as the sprayer did not utilize air assist to lift the leaves), but it did deposit almost three times as many droplets.
The airblast did well on the tops and undersides, both for total % coverage and for droplet density. The Hopsprayer didn’t cover as much under leaf surface, but did have a higher droplet density. That means there were more drops, but they were very small.
The big question is: Did higher droplet density, but smaller droplet size, contain enough active ingredient to control insects and disease? That can only be verified through efficacy testing where the Hopsprayer is actually used for a season to evaluate its performance. For now, we just don’t know, and cannot recommend the sprayer design.
Acknowledgements
Thanks to TeeJet technologies for providing water sensitive paper and nozzles, McPhee Enterprises of Oakville, Ontario, for providing the Microjets at cost, Mr. Evan Elford (OMAFRA), Mr. Paul Splinter (University of Guelph), Ms. Megan Leedham (OMAFRA summer student), Mr. Herman Kunkel (Allparts Ltd., Simcoe, Ontario) and Clear Valley Farms for hosting the trials. This project was made possible through funding by OMAFRA and the University of Guelph.