This article was inspired by the following email:
“I’m an organic apple grower with constant nozzle-clogging problems. These problems occur when we use wettable powders such as micronized sulfur and Surround WP. We always premix before adding to the tank through its strainer. Our airblast sprayers have towers and employ mechanical agitation. The nozzle/filter combo is TeeJet TXR8001K Ceramic Conejet Visiflow Hollow Cone spray tips with TeeJet 4514NY10 50-mesh nylon slotted strainers. The nozzle strainers rarely make it through a full tank without having problems. Do I need to add an additional level of filtration or is there something that I’m missing?”


You can almost feel the frustration. When I receive grower enquiries, I first turn to the library of articles on Sprayers101 as well as the Airblast101 textbook. I was surprised to discover that we didn’t have anything that addressed this issue directly. So, I checked through university extension and industrial resources. Ultimately I couldn’t find what I was looking for, so let’s correct this oversight.
Possible causes
There may not be a single reason for why nozzles plug. It might be a combination of the following factors:
1. Product choice
While any tank mix can create clogs if they prove to be physically incompatible, there are two formulations that have a reputation for clogging nozzles.
- Wettable powder (WP) formulations such as micronized sulfur and diatomaceous earth are notorious for clogging nozzles. WPs consist of a finely ground solid active ingredient often combined with wetting and bulking agents to help hold them in a dilute suspension. They tend to be dry products rather than liquids.
- In a similar vein, suspension concentrate (SC) formulations also consist of a finely ground solid active ingredient, but this time they are suspended in a liquid and kept dispersed in the sprayer tank by wetting agents, dispersants, and thickeners. These formulations are known as “flowables” or “suspensions”.
By the way, for those thinking he should change products, he already uses Kumulus DF (or Microthiol Disperss), which are reputedly the least troublesome formulations… and smell better than other sulfurs.
2. Mixing practices
Pre-slurries are sometimes prescribed for SCs. I personally feel that pre-slurries create exposure risks and more things to clean, but this opinion is moot in the case of WPs: Micronized sulfur and diatomaceous earth are not soluble. They’re particles that are held in suspension by fluid flow or agitation, so there’s no point in a pre-slurry.
For those readers that cook, consider the corn starch metaphor. You’re making a sauce, and you choose to thicken it with a pre-slurry of corn starch and water. The particles disperse, but do not dissolve, so if you fail to use it immediately they settle to the bottom of the container. They must be forcibly scraped up and resuspended.
3. Agitation
Best practice is to fill the tank at least ½ full of water and engage agitation before you add anything. To extend the cooking metaphor, you want a simmer but not a rolling boil. Once filled, never stop agitating or WPs and SCs will settle and may not resuspend uniformly, if at all.
Your sprayer design may affect matters. Some hydraulic agitation systems flag if they have undersized pumps. If your pump is busy sending flow to the nozzles, it may not have sufficient capacity to run the agitation. When your sprayer is “empty”, is there a thick accumulation at the bottom? You may have insufficient hydraulic agitation. Mechanical (paddle) agitation does not suffer this issue because it is direct-driven off the PTO. Read more here.
4. Clean-out practices
Perhaps plugs are occurring because of the previous tank, not the current tank. WPs can leave a buildup of settled pesticide in the tank, suction strainer and nozzle strainers. If you aren’t diligent about rinsing at the end of each day, products will settle and harden. Micro sulfur particles, for example, are less than 10 µm in diameter and harden into a flakey shell that can break loose and cause plugs.
5. Flow restriction
Several things can restrict flow. Elbows, bends and fittings can increase friction, reducing flow. The greater the distance a fluid needs to travel, the more flow is reduced. The greater the head (a pump’s head is the maximum height that the pump can achieve pumping against gravity), the more flow is reduced. There is an excellent description of this relationship here.
So, if an operator is using nozzles with a particularly small orifice, plus nozzle strainers, on a vertical boom, liquid flow will be reduced. This allows particles to fall out of suspension and settle, forming further restriction to flow and eventually, plugs.
Possible solutions
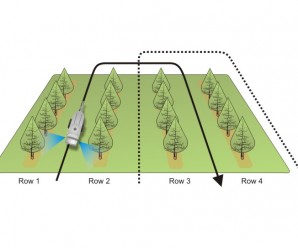
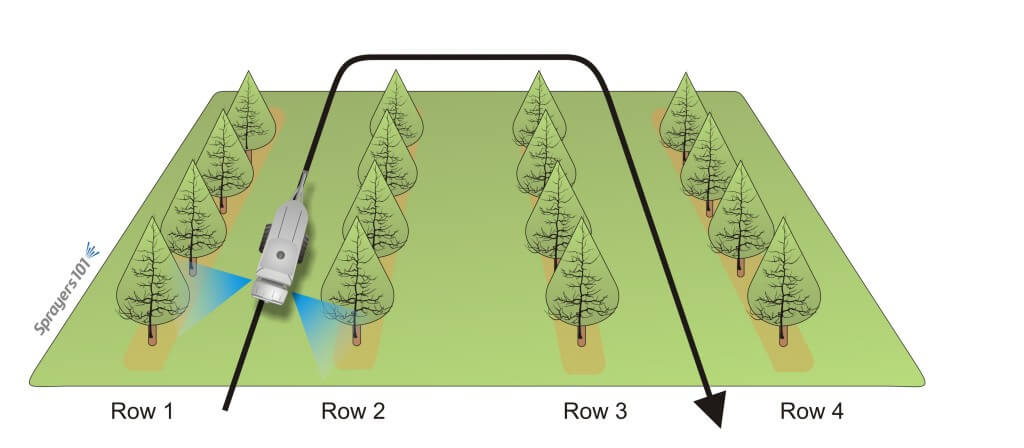
Now, armed with these potential causes, let’s return to the grower. After some back-and-forth, he clarified that the clogs were a problem, but restricted flow was worse. An operator will stop to clean or replace a plugged nozzle, but may not notice reduced flow. This has the potential to affect several rows as well as leave unsprayed product in the tank.
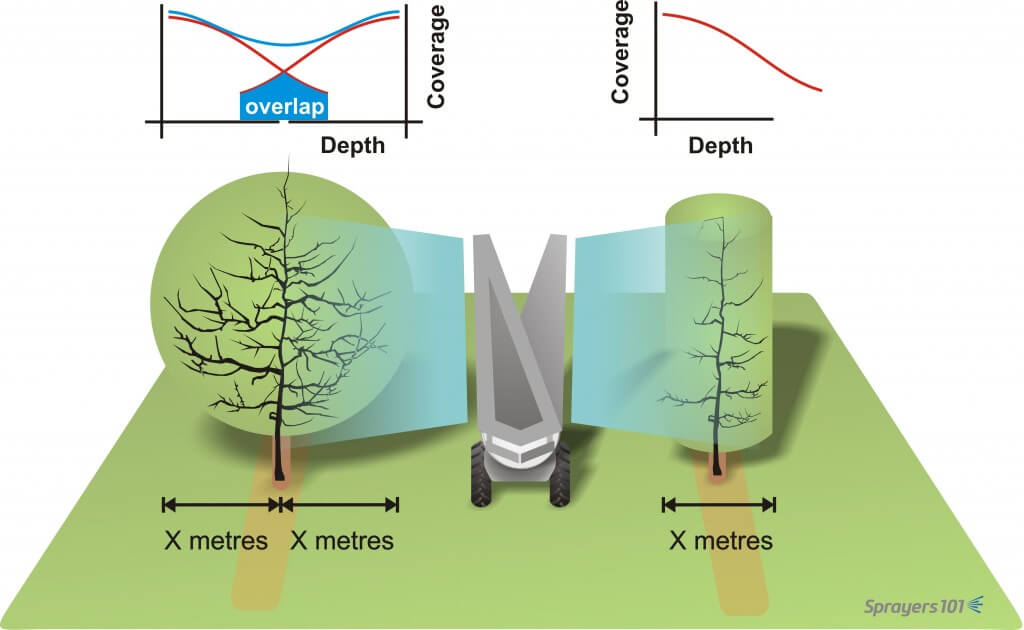
My first proposal was to increase nozzle size. An ’01 tip is very, very small and even with slotted strainers (as opposed to mesh), that’s a lot of restriction. I suggested recalibrating for larger tip orifices. This is a rather involved process, but options included using every second nozzle (as long as there were no gaps in coverage), and/or dropping pressure, and/or increasing travel speed (as long as the spray still reached the tree top and canopy centre). I shared this Excel output calculator to help with the process.
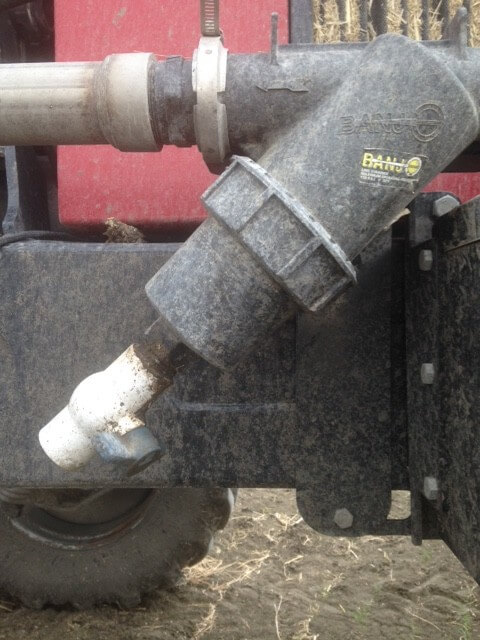
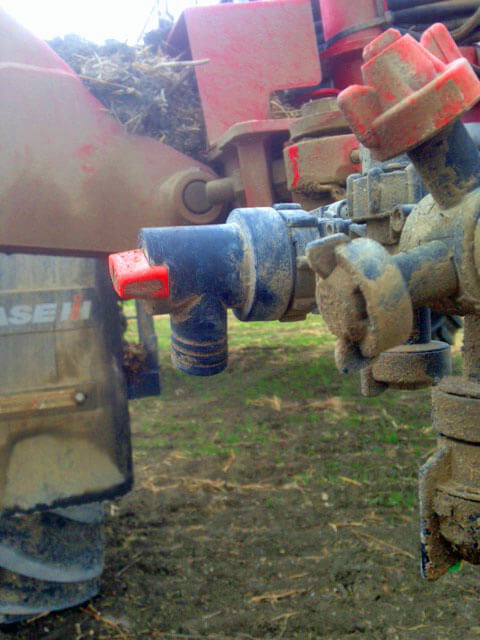
Failing that, we discussed a plumbing project. Section 5.2.1 of Airblast101 describes a way to create a self-cleaning line filter that replaces nozzle strainers. That means instead of climbing a ladder to pull tips off a tower to reach the strainers, all filtration is conveniently located at ground level for easier (and more frequent) cleaning.
The outcome
The grower felt the numbers worked best running orange 02 TXR’s in every second position. He ordered new 50 mesh slotted nozzle strainers. His new operating parameters would be 5 nozzles/side, at 8.2 bar (120 psi) and 5.1 km/h (3.2 mph) for a total 51.5 L/ha (55 gpa). He noted some incompatibility issues running Braglia nozzle bodies (spec on his Rears sprayer), TeeJet TXR’s, TeeJet slotted strainers and TeeJet CP20230 caps. That was an important observation, and you can learn more about it here.
We felt good about this, but while there was an improvement, it didn’t solve the problem. There was still strainer clogging after the first tankload. So, he added inline filters and removed the tip strainers. The result:
“Yesterday I sprayed over 350 pounds (over 1,000 gal) of Surround WP and had no issues. I’m really excited about this new setup – it looks very promising. I’ve attached more pics if you’re interested (I don’t spend a lot of time scrubbing sprayers until after Surround season). Thanks again for all your help in this matter. – Joe Fahey, Peck & Bushel Fruit Company”


Fantastic. Thanks to Joe for letting me share this story. Hopefully his experience will help you diagnose and solve any flow or nozzle plugging issues in your own operation.
Happy Spraying.
Epilogue
This article elicited some interesting comments. I’ll share two:
- One grower proposed switching from a low profile axial sprayer to an air-shear system (there are a few examples here). In this case, the grower had a European make with hydraulic agitation. The grower re-plumbed theirs by installing a bigger pump and swapping the sparge system with a 3/4″ pipe oriented toward the bottom to sweep it out. When mixing, the agitation valve is left wide open. He says he doesn’t even bother with a tank basket; he dumps the Surround (as much as 2 x 50 pound bags in 1,000 litres) and has no plugging issues.
- Another grower with considerable boom-sprayer experience was genuinely surprised this was even an issue. Self-cleaning filters have been commercially available for more than 30 years and most boom sprayers have them. This is a comment on the stagnation of the North American low-profile radial airblast design. Perhaps the long life of these sprayers (sometimes 40 years of service) makes iterative change slow, or perhaps most operators aren’t aware of new features, or perhaps change is a risky proposition in such high-value crops. This is a shame given that the first optic sensors were installed on airblast, not broad acre field sprayers. That comes as a surprise to many. But it seems to have been the exception and not the rule.