Any description of airblast sprayer start-up must, contextually, make assumptions on how it was winterized for long-term storage. This cyclic relationship is why I use a chicken-and-egg title slide when giving this presentation.
Answer: It was the rooster.
The inability to describe one process without the other is further complicated by the possibility that the sprayer is brand new and was therefore never winterized. So, what follows is an attempt at a logical sequence of pre-season maintenance activities to restore a winterized sprayer, or initiate a new sprayer.
New Equipment
If this is a new sprayer, you have an opportunity to perform some preventative maintenance.
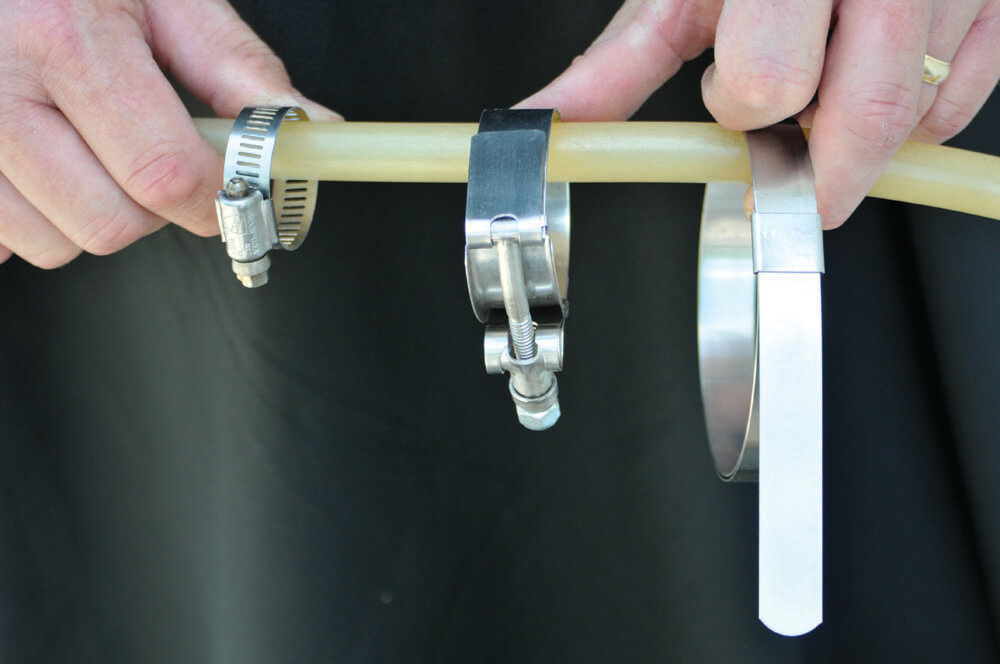
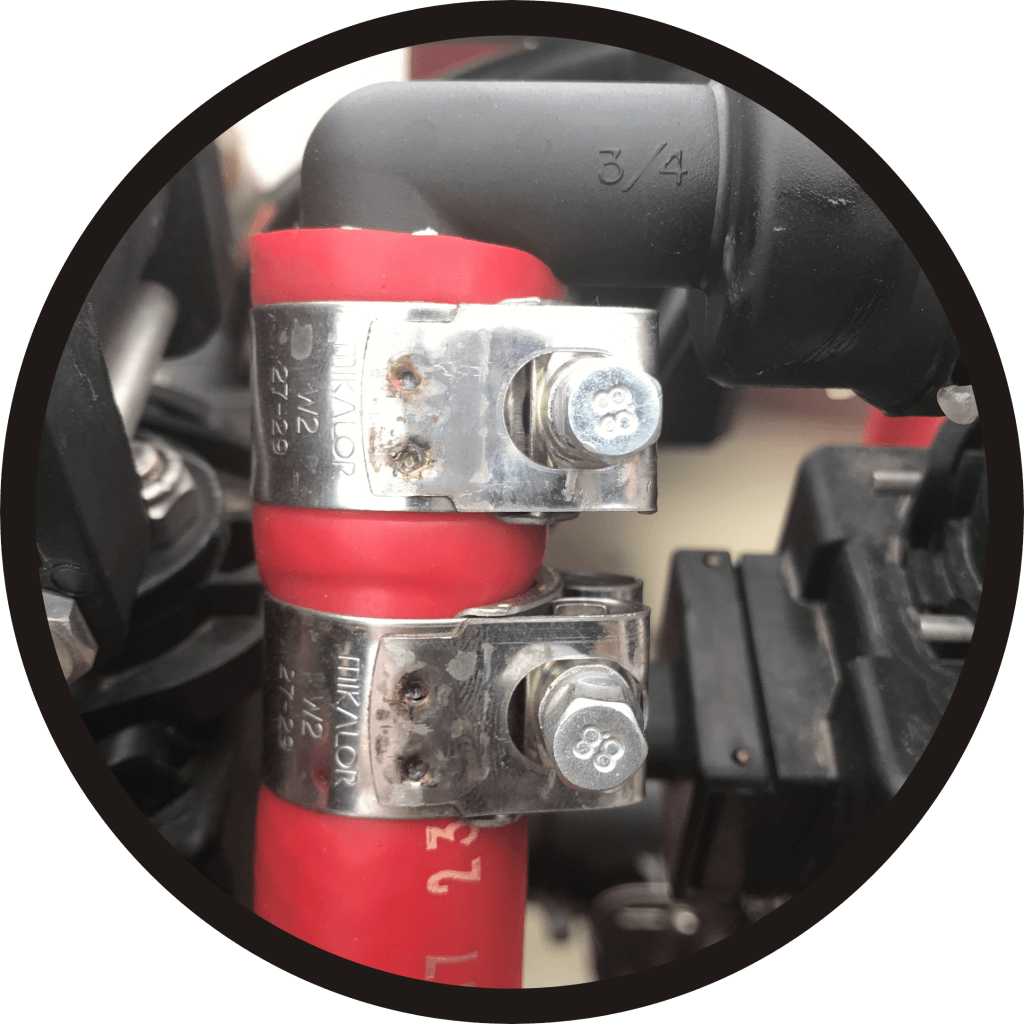
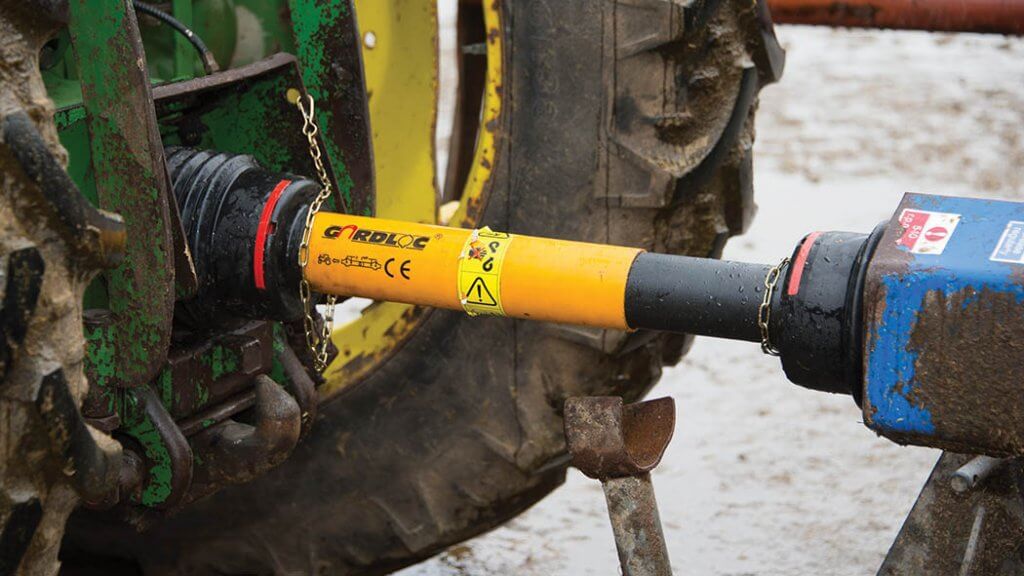
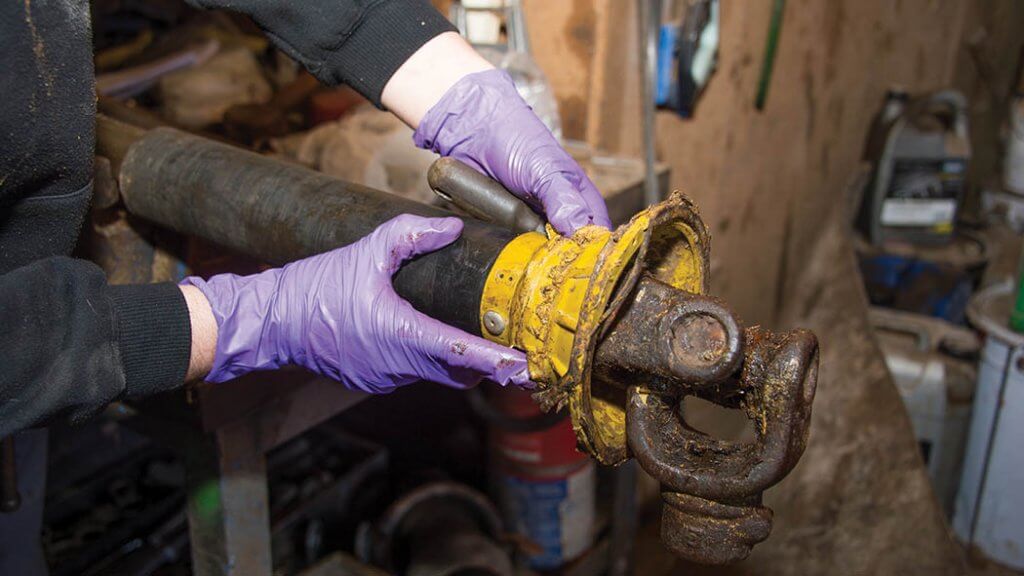
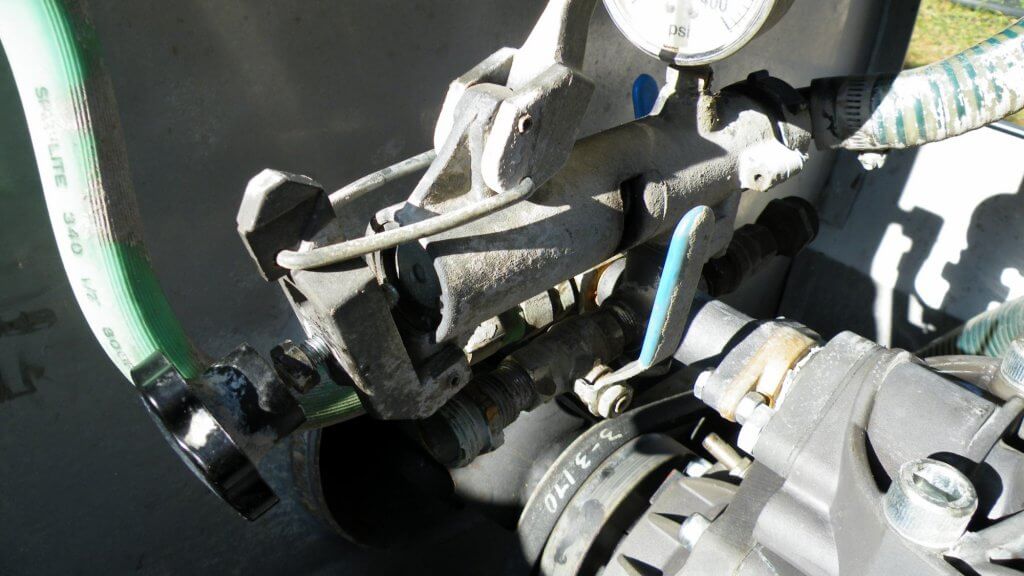
Loosen, lubricate and re-tighten clamps. Always back gears off before tightening to avoid stretching them. (Image from Purdue Extension publication PPP-121: Preparing Spray Equipment for Winter Storage and Spring Startup)Use double clamps on pressurized lines for added safety. Wider clamps are better and T-bolt clamps are better than worm-gear.Put thread release on bolts and re-tighten with a torque wrench (not an impact tool). Use a paint pen to mark nut, washer and bolt for future visual checks. This is called a “Witness Mark”.Protect hoses and wires at rub points. Follow hoses and with a paint pen, number the hose-ends and connections for future reference.Using a new tractor? You may have to re-calibrate to account for different gear ratios. When hitching a new sprayer, note that the distance from the ball on the drawbar hitch to the tip of the PTO should be ~14″. Don’t exceed maximum working angles for PTO shafts (usually <25 degrees). If your tractor or implement manufacturer says differently, go with that. And get it in writing.
Winterizing (Long-term storage)
If you are preparing the sprayer for long-term storage, follow the normal rinsing process, but don’t reinstall strainers and nozzles.
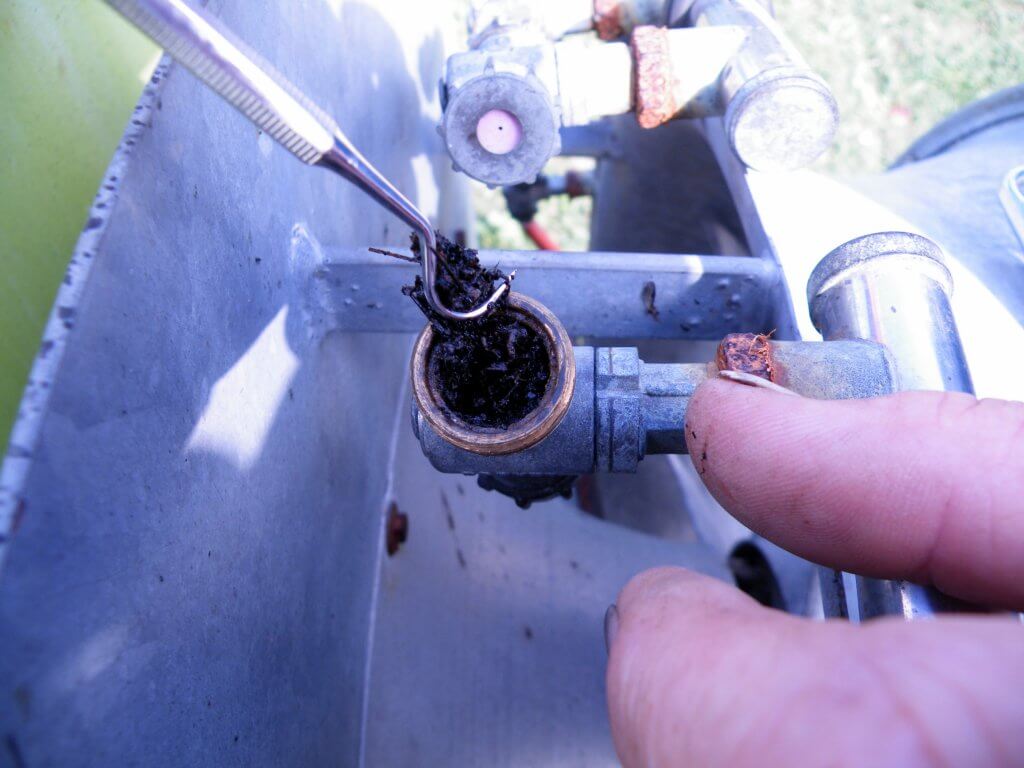
Look in the nozzle bodies for debris. Discard worn or broken nozzles.Soak, scrub, rinse and store nozzles and nozzle strainers. You may replace them once the sprayer is clean, but I prefer to store them separately since they have to come back off during start-up.
With the agitation on, circulate undiluted plumbing antifreeze (the sprayer already has 5-10 L (1.25-2.5 gallons) of water in the system from the decontamination process) for five minutes and drain it through the plumbing system (not the booms).
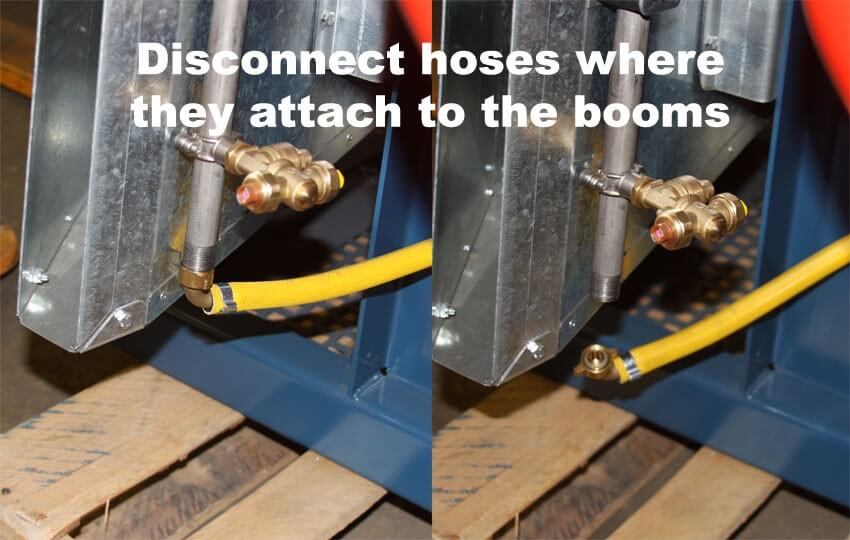
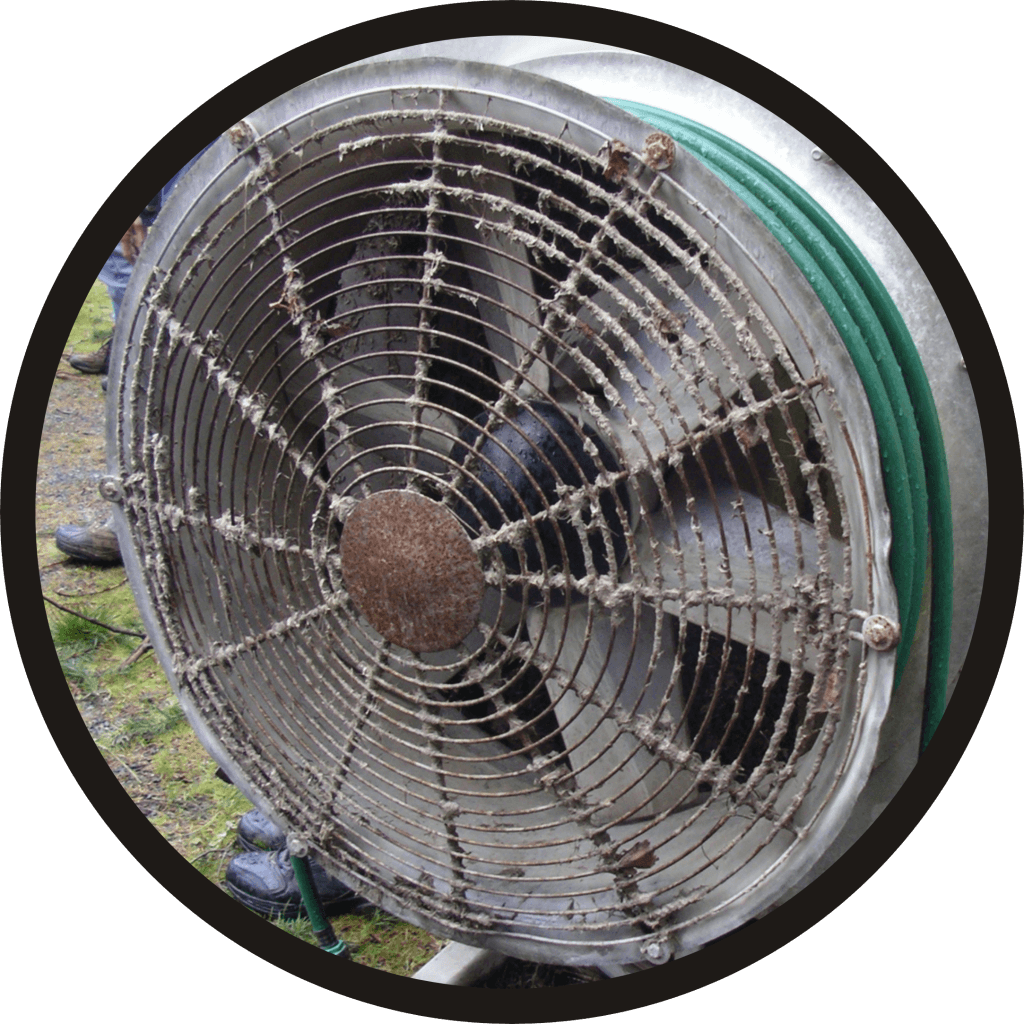
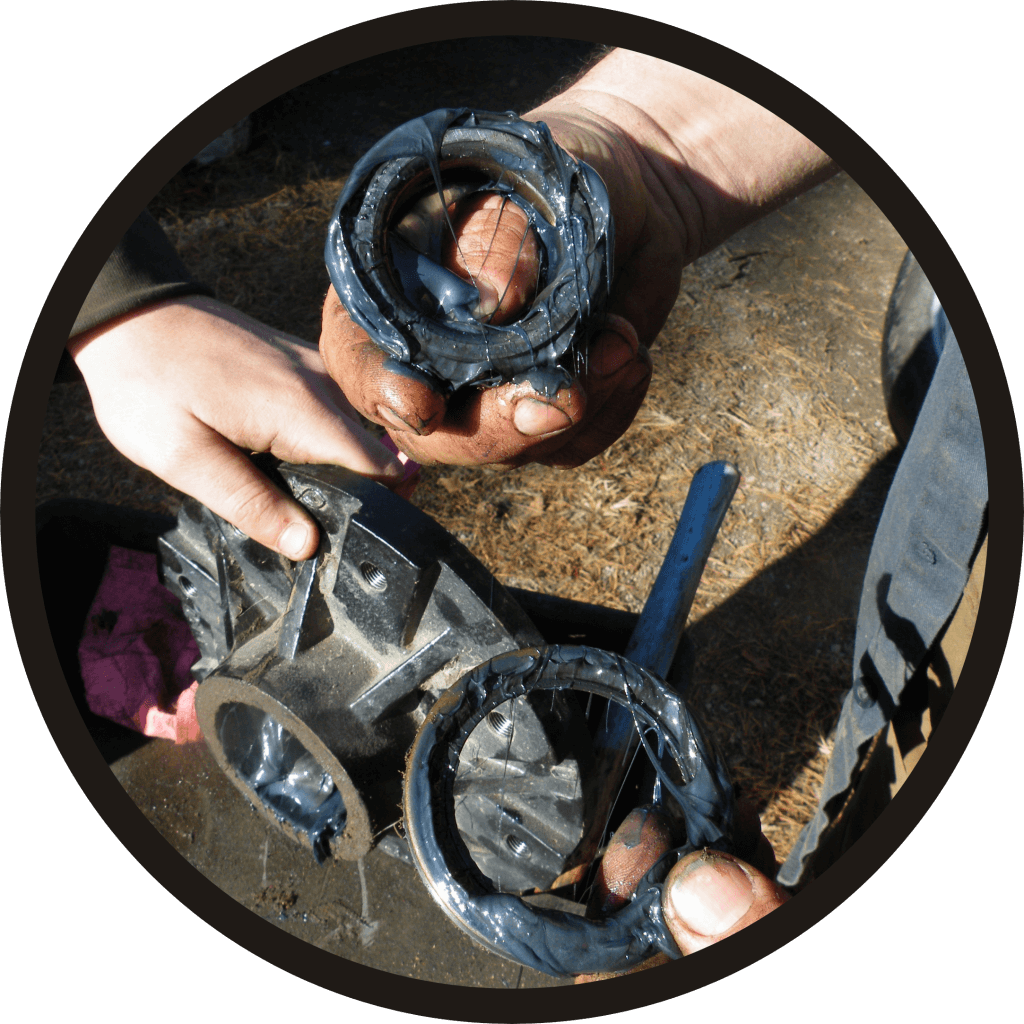
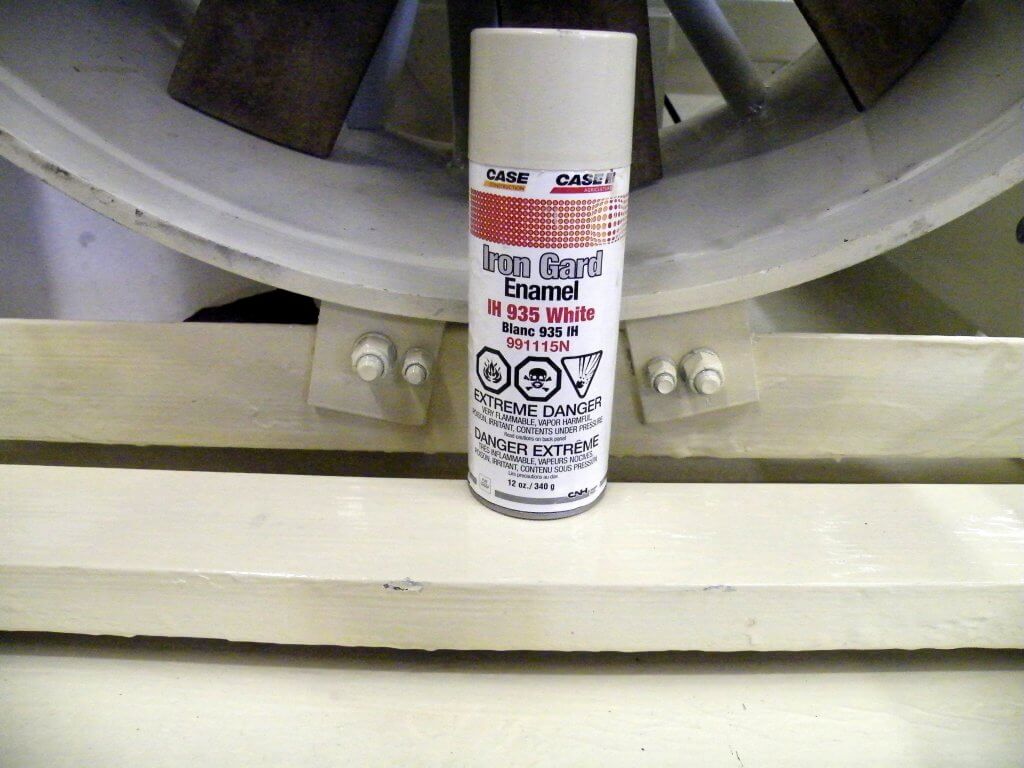
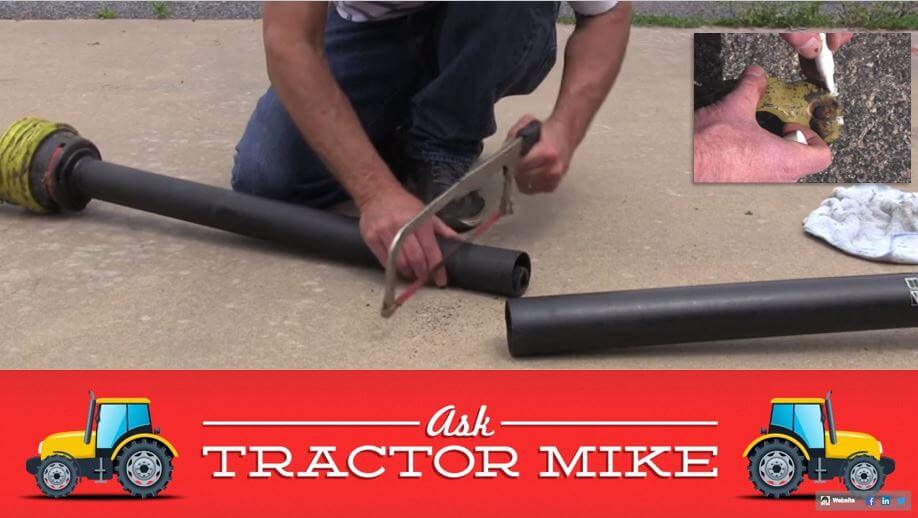
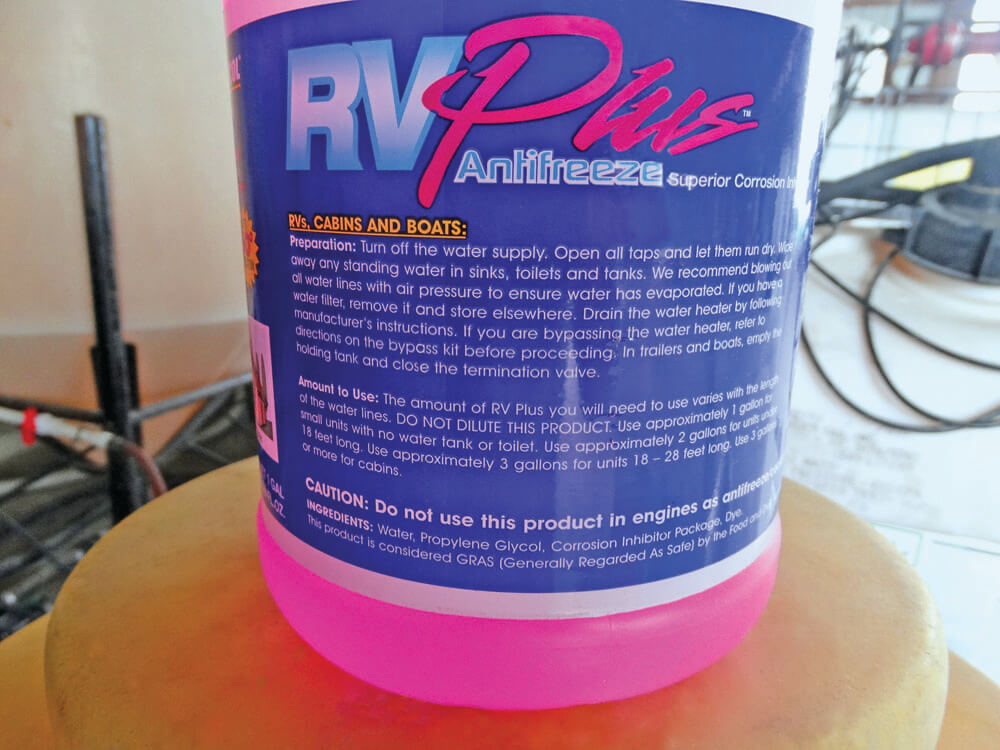
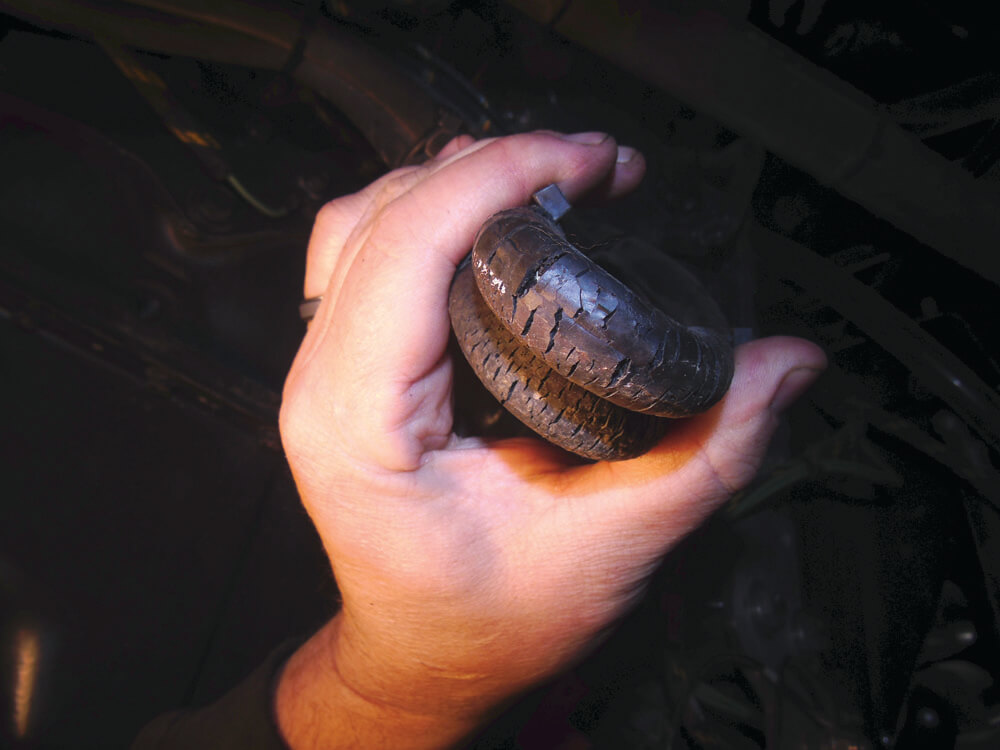
Disconnect hoses where they attach to the booms and drain as much liquid from the sprayer as possible. (Image from Munckhof Sprayers). Take the time to examine any hose fittings.Clean the sprayer (Triple rinse with a detergent) and scrub the exterior. Do not use pressure washers on bearings, fittings, pumps or any lubricated or moving parts.Examine fan blades for cracks, build-up or nicks that can cause imbalance. Replace (not just repair) punctured entrance grills.Don’t ignore tank damage. Poly tanks are prone to sun damage and cracks. Never climb into a tank to repair it. Quite often, replacement is the best option.Clean and inspect wheel assemblies. It’s best to do this during winterization to prevent bearing corrosion as the sprayer sits all winter.Remove any rust and repaint (or just touch up). Paint not only looks good, it protects.The excellent YouTube channel Ask Tractor Mike proposed storing the PTO shaft indoors in two pieces, and to cut away a portion of the interior guard to facilitate reassembly later on. Also, use a paint pen to mark the splines on the shaft for easier hook-up (see inset top-right of image).RV antifreeze is a 50% solution of antifreeze and water with a rust inhibitor. It should not cause phytotoxicity if sprayed or dumped, but be sure to dispose of it away from water sources during start-up. Turn the pump manually to get antifreeze throughout the system. Close the nozzle bodies, loosely fit the tank lid and store indoors. (Image from Purdue Extension publication PPP-121: Preparing Spray Equipment for Winter Storage and Spring Startup).
Spring Start-up
Most operators are guilty of neglecting their airblast sprayers and babying their tractors. Sprayers are precision tools that must be kept in good operating order to prevent costly breakdowns, improve their performance, and increase their lifespan.
Your car is serviced based on distance travelled. Your sprayer should receive regular maintenance based on working hours, per the manufacturer’s recommendations. Daily sprayer inspections are part of regular maintenance since the operator will (hopefully) find small problems before they become big problems.
Never assume your sprayers is ready to go right out of long-term storage. Parts seize, scale breaks away from surfaces, and small beasties sometimes choose to eat, or make their homes in, cozy sprayers.
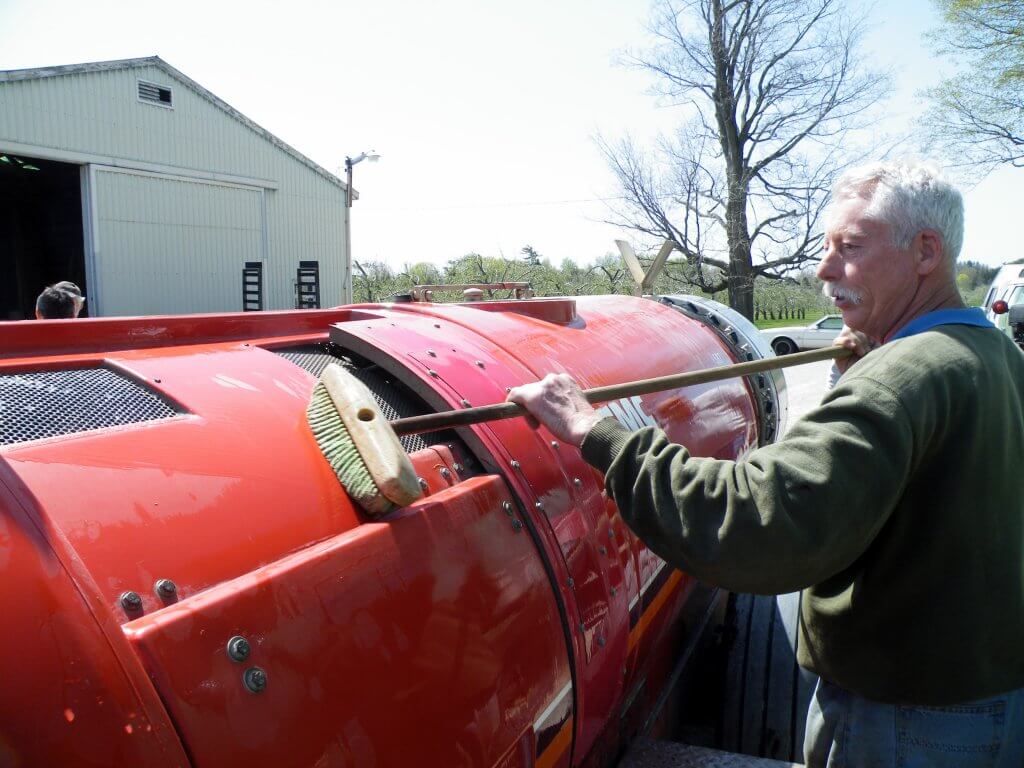
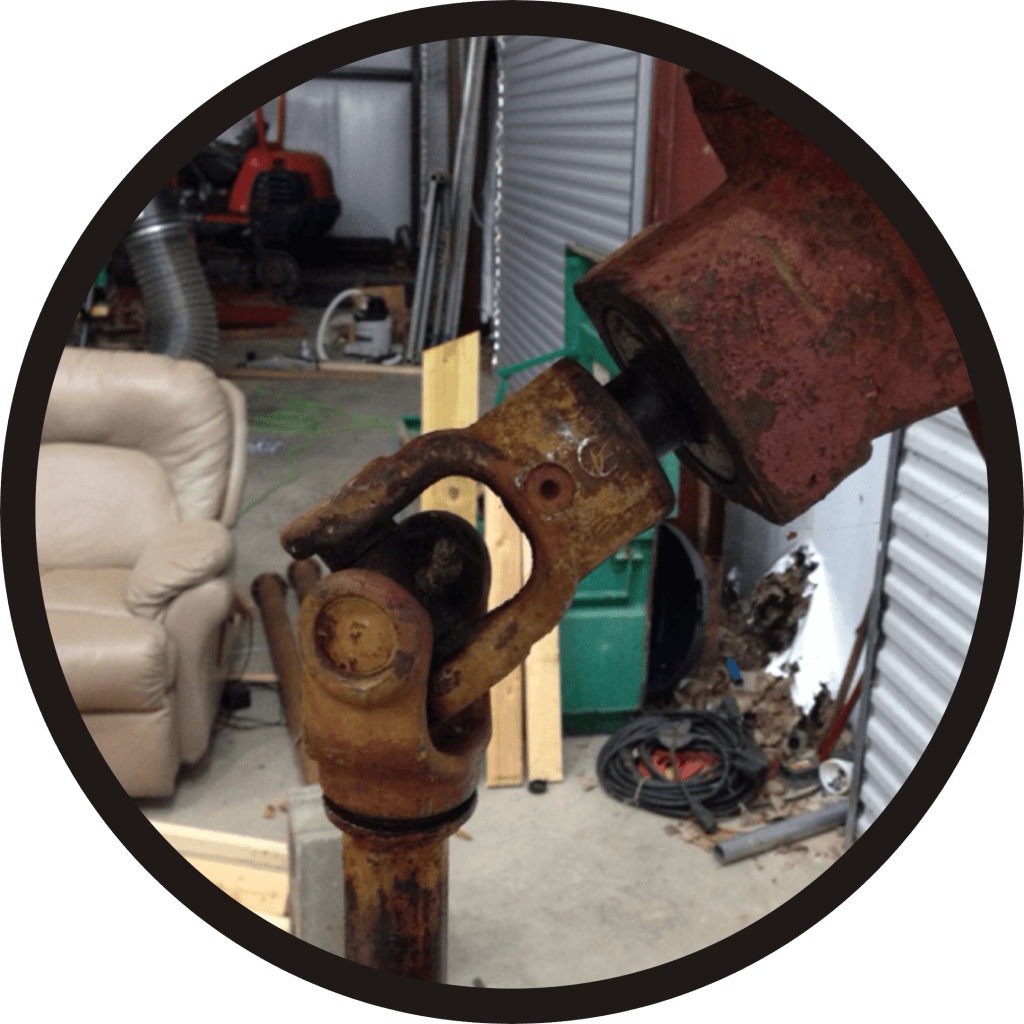
When planning spring start-up, never assume the winterized sprayer is ready for immediate hook-up. Expect a minimum half day per sprayer.Attempting to loosen or shift something that hasn’t moved in several months is risky. Pressure gauges snap off, fittings crack, welds break. Expect the unexpected and either have spare parts on hand, or a plan to get them quickly.Parts are most likely to seize during the first spray. Bearings and PTO universal joints, especially.Start-up is a good time to lubricate parts. Grease the guard ring bearing every 100 hours, the universal joint cross every 25 hours and the shaft and shear bolt regularly.Insects, birds and rodents eat, or make homes in, sprayers. Professional rodent bait/traps, steel wool and peppermint oil/gel are possible solutions.Check belt tension, alignment and wear. (Image from Purdue Extension publication PPP-121: Preparing Spray Equipment for Winter Storage and Spring Startup).
Pump specific maintenance is beyond the scope of this article. Hypro recommends changing oil after 40 hours of break-in operation and every 500 hours after that. The diaphragms should be replaced every 1,000 hours. Generally speaking, EPDM (black) diaphragms are a better choice for airblast sprayers, while the Desmopan (amber) diaphragms are really for lawn care sprayers.
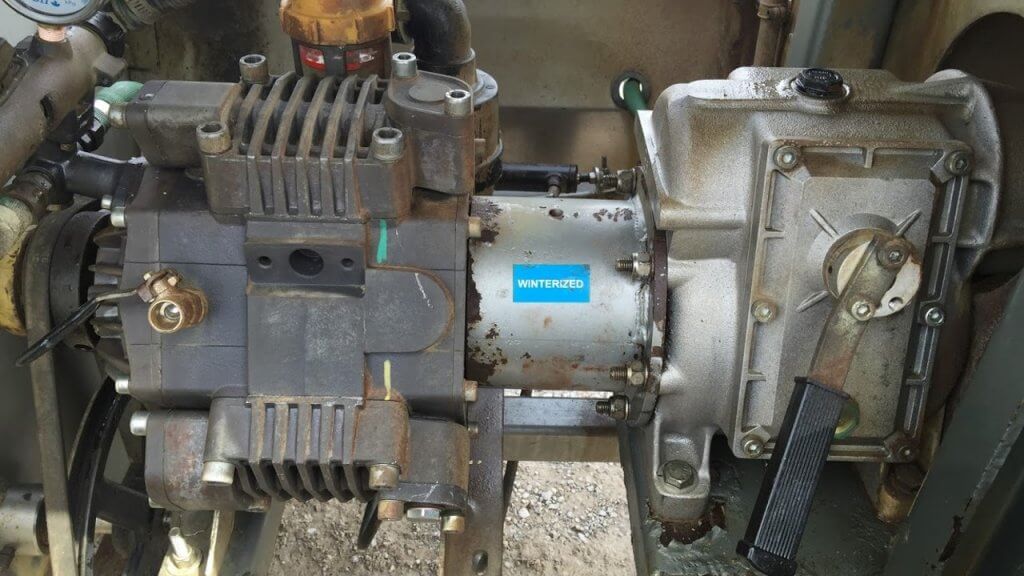
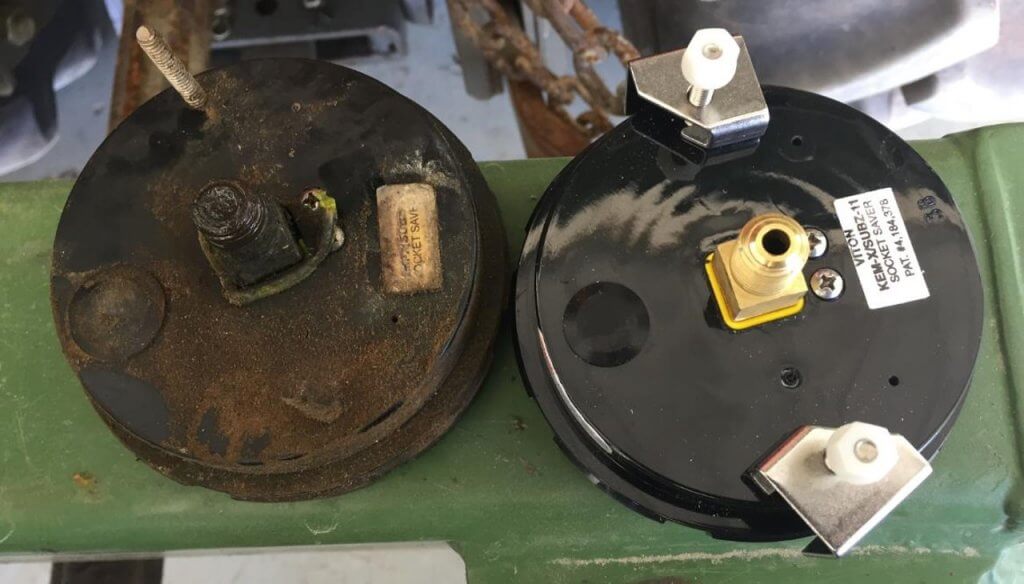
Pump maintenance is beyond this article, but change the oil every 500 hr or 3 months. Use a paint pen to write on the pump what type of oil it requires, and then date the filters. Note the “winterized” sticker.
At minimum, check the tire pressure. Hard tires drive faster, but leave compacted ruts. Soft tires drive slower, but disperse weight better. Airblast sprayer wheel assemblies should be cleaned and inspected as part of regular annual maintenance. Wheel bearing maintenance before long-term storage may prevent water from corroding the bearings.
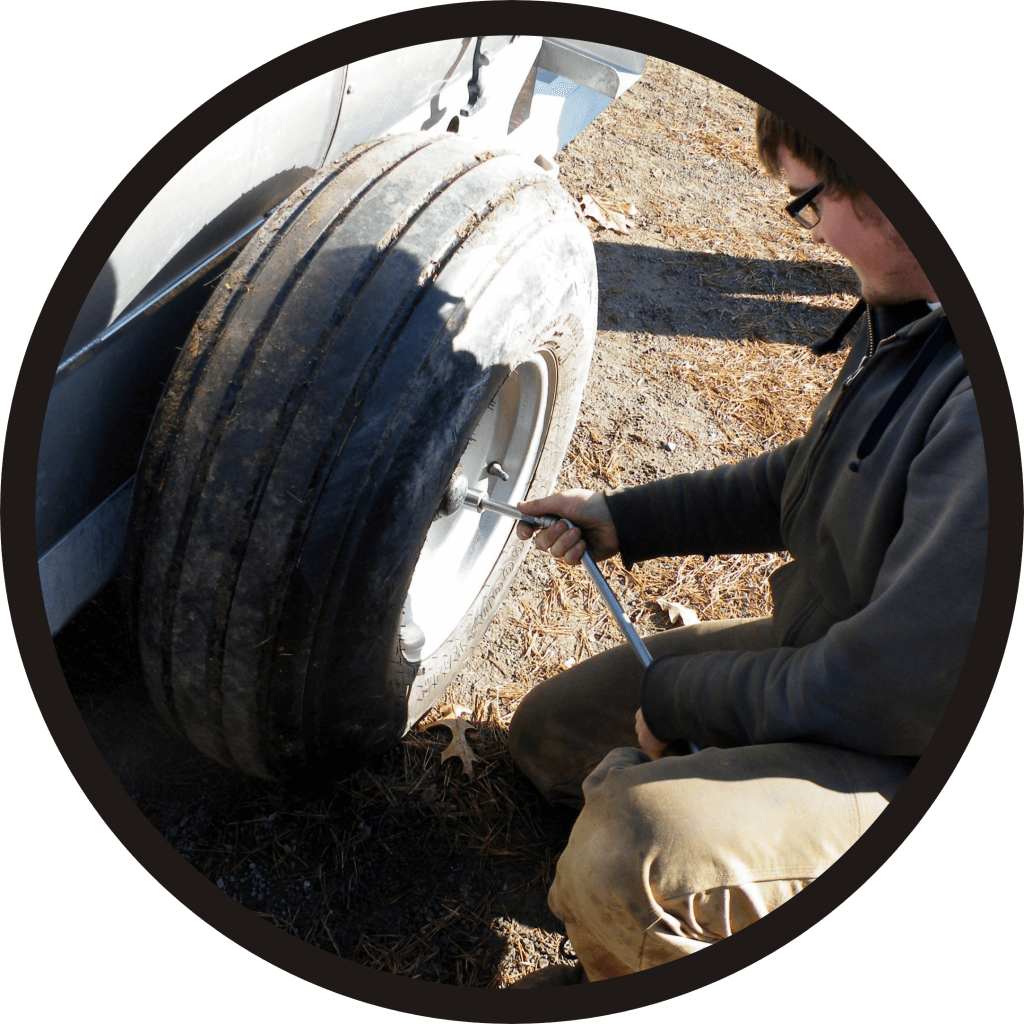
Ensure tire pressure matches the ideal stamped on the tire. Or, if using less pressure to avoid spring soil compaction, ensure both tires have the same pressure.
The relief valve on your sprayer should always be in the bypass position during start-up. If your gauge spikes then the gauge may always read high afterwards and should be replaced.
A reminder to always set the relief valve to the bypass position when starting up the sprayer. This is one reason why pressure gauges spike and can eventually fail.
Replacing leaking, opaque or inaccurate gauges improves sprayer performance. Be sure to use the oil-filled variety of gauge to eliminate a bouncing needle. You can also get suppressors that fit between the gauge and sprayer to prevent pulsing. Consult the article on testing airblast pressure gauge reliability.
Use a wrench to turn gauges at the nut. Don’t twist them by hand holding the face. Ensure they are not opaque, leaking, plugged or resting above the zero pin.
Many spray materials do not mix well and one of the common causes of uneven application is poor agitation. If you find deposits at the sump in the bottom of the sprayer after an application, your agitation is insufficient. For mechanical agitators, check for propeller wear and ensure paddles are secure on the agitator shaft. Learn more about agitation here.
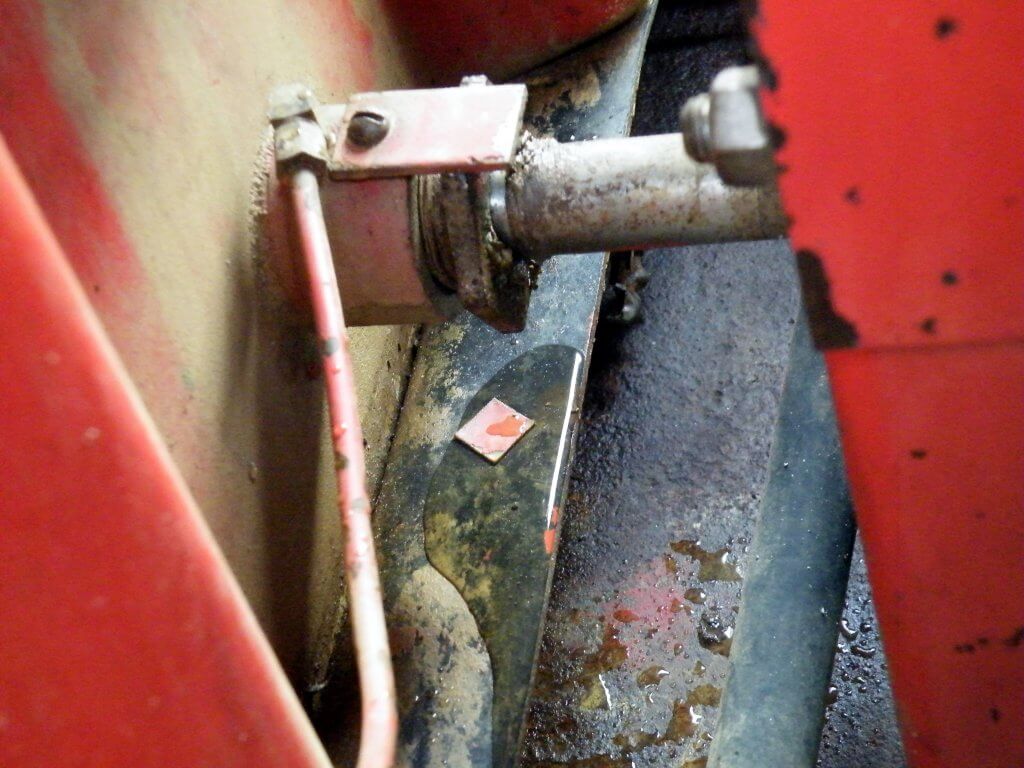
If the agitator shaft is leaking a little, tighten the packing. The packing gland is a common source of leaks. Keep it properly greased. If a leak occurs you can usually repair it by tightening the bolts on the packing gland by ½ a turn, but if that doesn’t work you may have to remove and repack (or replace) it.
On sprayers with mechanical agitators, look for prop wear and loose or damaged paddles. Fill the sprayer with water and looks for tank leaks. Tighten the bolts 1/2 turn if the packing gland on the agitator shaft is leaking. You may have to remove and repack the gland if the leak persists.Look for signs of hose wear and examine the sprayer for leaks while under pressure. Be careful when pressurizing the sprayer for the first time in the spring; this is when lines are likely to come loose or burst. (Image from Purdue Extension publication PPP-121: Preparing Spray Equipment for Winter Storage and Spring Startup).Minerals chelate (i.e. scale) more readily on stainless steel than plastic tanks. In either case, the first tank of water and leftover antifreeze should be sprayed from the nozzle bodies with no line or nozzle strainers, and no nozzles. Replace them once the tank is sprayed out.
The last step is calibrating the sprayer, and that process really depends on your definition. If the preceding steps conflict with those of the manufacturer’s, always follow the manufacturer’s. Do this for reasons of safety and to preserve any warranty.
Thanks to Fred Whitford (Purdue University), Gail Amos and Mark Ledebuhr (Application Insight LLC) for reviewing the content of this article and for their helpful edits.
Occasionally, I receive a question or concern about impacts from the previous use of pesticides on a property. These concerns could be categorized as historical or legacy concerns from the use of pesticides over 40 or 50 years ago. This article provides some context for these past concerns and some options for follow up for the current property owner.
There are several good sources of information that can help a farmer minimize the risks associated with current use of pesticides. While the current use of pesticides is not the focus of this article, a list of some of these resources can be found in the appendix for further reading. These are specific to Ontario, Canada, but your region should have similar resources.
How common is pesticide contamination of well water?
In an extensive project that collected water samples from 1,290 private wells throughout Ontario in the 1990s, University of Guelph and Waterloo University researchers found that most of the problems with well water were related to bacteria; approximately 1/3rd of well water did not meet the standard for coliforms and E. coli followed by nitrates (14% exceeded guidelines). It important to state that these problems are NOT related to previous or current pesticide management! Of the 1,290 wells sampled, water samples from six of the wells did show pesticide residue levels above the interim maximum level established at the time of publication for this study. The text below is copied from the published scientific article that discusses the findings for bacteria, nitrates, pesticides, and petroleum derivatives in the water well sample for this study.
“About 40% of the nearly 1,300 wells tested contained one or more of the target contaminants above the maximum acceptable concentration (Table 4). Bacteria were the most widespread form of contamination with about 34% of wells having more than the maximum number of coliform bacteria (faecal coliforms, or E. coli, or total coliforms) permissible in drinking water. Some 14% of the wells contained NO -N concentrations above the 10 mg/L limit and about 7% of the wells were contaminated both with bacteria and nitrate. Six wells contained pesticide residues above the interim maximum acceptable concentration (IMAC). One contained alachlor, one contained metolachlor, and the remainder contained more than 5 µg/L of atrazine, or the total concentration of atrazine plus deethylatrazine exceeded 5µg/L . Records -1 showed that a spill caused the one well to be contaminated with metolachlor. None of the wells tested contained detectable petroleum derivatives.”
While this study is almost 30 years old, there are a couple of key takeaway messages here that are still valid today. For all Ontarians that rely on private wells for their drinking water, samples should be taken for free testing through your local Health Unit for bacterial contamination. This should be done regularly, at least once or twice per year. Based on the study results, other contaminants are less likely to be found in your drinking water but water samples can be tested for these other potential contaminates including pesticides for a fee; see section below on “where can I send my water samples to test for pesticides”.
What are some other sources of information about previous pesticide use on a property?
The best source of information is likely the person who was responsible for previous pesticide management on the property; typically, this is the farmer. The farmer may be able to recall the type of pesticide products used or at least give an indication of previous cropping practices and livestock husbandry which can provide some indication to the type of products that may have been used. In addition, the farmer may be able to provide an indication where/how products were stored and mixed and application practices. But a word of caution here: some farmers might be hesitant to answer questions “out of the blue” about the past management practices with pesticides because of liability concerns.
In some cases, the Ministry of Environment, Conservation and Parks (MECP) may be helpful with this type of inquiry. MECP oversees the Pesticides Act in Ontario and as such they might be aware if there are any local legacy or historical issues with pesticides spills or pesticide contamination of groundwater in your area. Some lawyers involved in real estate transactions will query the local District MECP office to see if there have been any environmental orders filed related to a specific property prior to finalizing a sale.
What are some additional considerations when thinking about the historical use of pesticides on a property?
Based on the information from the 1990 water well study mentioned above, pesticide contamination appears to be a rare occurrence; 6 samples out 1,290 indicated some presence of pesticide residual in the samples. If there were problems with previous management, it may relate:
Equipment malfunction such as improperly closed valve on a sprayer
Concerns related to storage or mixing and handing can help to focus in on a specific area(s) on the farm. For example, if it is known or there is a strong belief that the pesticides were stored in “the old shed” or that pesticides were routinely mixed in the sprayer while filling from the tap beside the barn and there is a well near this area, then testing of a water sample for pesticides may provide some peace of mind.
If we test our well water for pesticides, what pesticides do we test for?
Because there are many different chemical formulations for current and past pesticides, the lab will ask which class or type of chemicals that you want the water analyzed for. Asking for the lab to analyze for many different types of pesticides will increase the lab cost substantially.
Having some background on the property can be helpful here. For example, if the concern is from the 1960s and 70s and the crop rotation on the property at time was hay-cereals-corn, then a couple of the commonly used pesticides at that time were atrazine (corn) and 2,4-D (cereals).
While this background information may help to narrow down the focus to fewer pesticides and save money on lab analysis, it should be noted that there were multiple pesticide formulations used 50 years ago so if the testing is narrowed too much, you might miss the pesticide(s) that was actually used on the farm at that time. There is a trade-off here by narrowing down the number of pesticides and keeping lab costs lower versus an increased risk of not analyzing for right pesticide.
Where can I send my water samples to test for pesticides?
There are several private labs that can analyze water samples for pesticide residues for a fee. Depending on the number of parameters (i.e. the number of pesticides) that you ask to be analyzed for will be a major factor in how much the analysis cost.
The Ontario Groundwater Association, the association that represents well drillers in Ontario, has a link to a water testing program called “My Water Quality” and one of its water testing packages will test for approximately 20 different pesticide residues in water. The cost for this testing package is $998 per sample at the time of writing this article in the winter of 2025.
Some concluding thoughts
It is understandable that rural residents relying on wells for their drinking water may be concerned about the quality of the water coming out of their taps. Bacteria contamination is the most common problem found with private well water and fortunately, you can test your private well water for free through your local health unit.
There is limited data on pesticide contamination of water well in Ontario and based on this limited information, it appears to be a rare problem, thankfully! However, if you are still concerned about the impacts of pesticide use and management in the past on your property, there are private laboratories that will test your water for a fee. For some people, paying the fee for this type of testing may allow them more peace-of-mind the next time that they turn on the tap.
Appendix
The following links will help Ontario farmers and landowners understand and manage the risk associated with current pesticide use and management on their properties. Again, for readers outside Ontario, there should be similar resources in your area.
Ontario.ca and search “Pesticide contamination of farm water sources”
Learn how to avoid contaminating any well or surface water source by properly mixing, loading or applying pesticides and what to do if a spill should occur. This technical information is for Ontario producers.
Ontario.ca and search “Assessing the potential for ground water contamination on your farm”
Learn about a risk assessment procedure to select best management practices to reduce groundwater contamination. This technical information is for Ontario producers.
Ontario Pesticide Education Program and Grower Pesticide Safety Course
The Ontario Pesticide Education Program supports Ontario farmers and pesticide vendors to achieve pesticide safety certification and training. Renewal is every 5 years.
Tank mixing is the practice of combining multiple registered agricultural products in the sprayer tank for application in a single pass.
The Pros of Tank Mixing
Efficiency: If the timing makes sense, a single pass saves time and reduces trample/compaction. E.g. A “weed-and-feed” application of fertilizer and herbicide in corn.
Resistance management: Multiple modes of action help prevent resistance development and combat existing problems.
Improved performance: Labels may require adjuvants to condition carrier water or reduce drift (utility adjuvants) or to improve the degree of contact between droplets and the plant surface, or enhance product uptake or rainfastness (activator adjuvants).
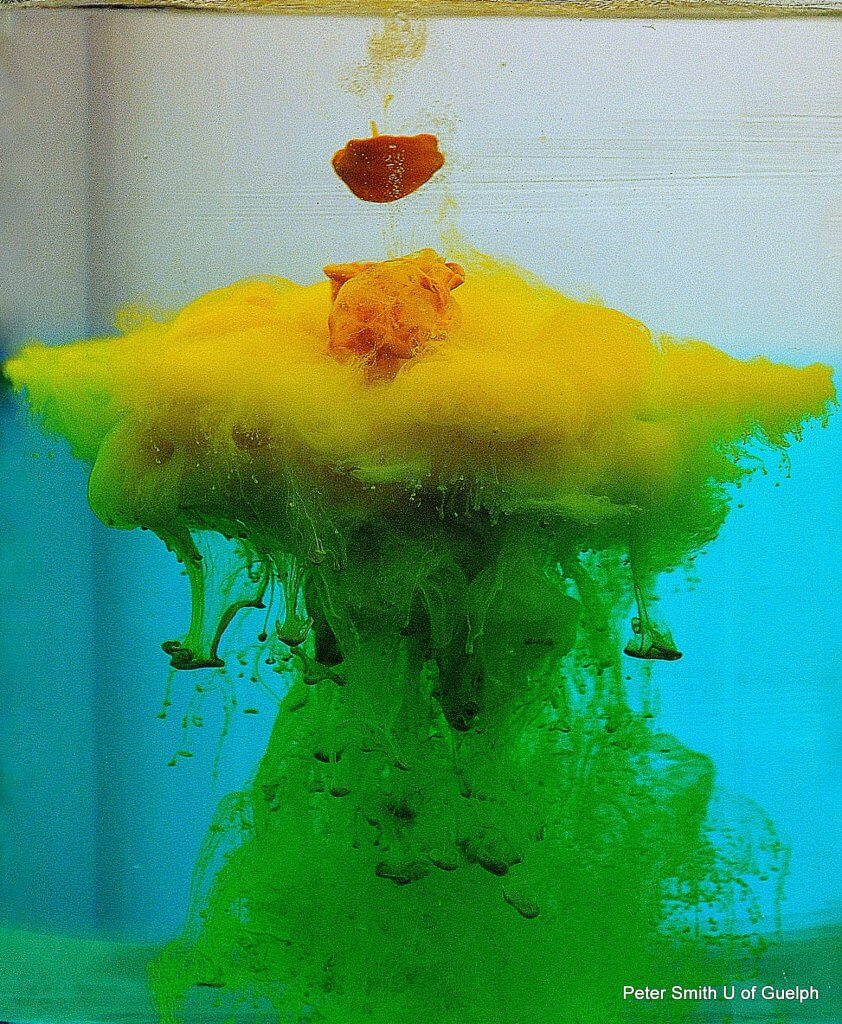
Prowl meets Roundup – A beautiful photo by Peter Smith, University of Guelph
The Cons of Tank Mixing
Tank mixing requires caution and careful investigation. Should tank mix partners prove to be incompatible, the consequences can be subtle or dramatic, but are always negative. There are two kinds of incompatibility.
1. Biological or Chemical Incompatibility
This form of incompatibility may not be immediately apparent following an application. Some level of crop damage or impaired efficacy occurs, which may impact yield or warrant an additional “clean-up” application. This is the result of product synergism or antagonism.
Synergism (Crop damage)
When products synergize, the application becomes too potent. For example, an adjuvant could affect crop retention or uptake, exposing it to more active ingredient or overwhelming crop metabolism. The result is damage to the crop we are trying to protect.
Antagonism (Reduced efficacy)
When products antagonize, the application becomes less potent. There are several examples:
pH adjusters in one product may reduce the half-life
of another product (e.g. The fungicide Captan has a half-life of 3 hours at a
pH of 7.1 and only 10 minutes at a pH of 8.2.)
Active ingredients may get tied-up on the clay-based
adjuvants in other products (e.g. glyphosate tied up by Metribuzin).
One product changes the uptake/retention of another.
For example, a contact herbicide burns weed foliage beyond its ability to take
up a lethal dose of systemic herbicide.
2. Physical Incompatibility
Physical incompatibility affects work rate and efficacy. Products form solids that interfere with, or halt, spraying. It can also make sprayer clean-up more difficult. For example, weak-acid herbicides lower the pH of the spray mix, reducing the solubility of Group 2 herbicides (i.e. imidazolinones, sulfonylureas, sulfonanilides). The oily formulation then adheres to plastic and rubber surfaces in tanks, connectors and hoses.
There are many forms of physical incompatibility:
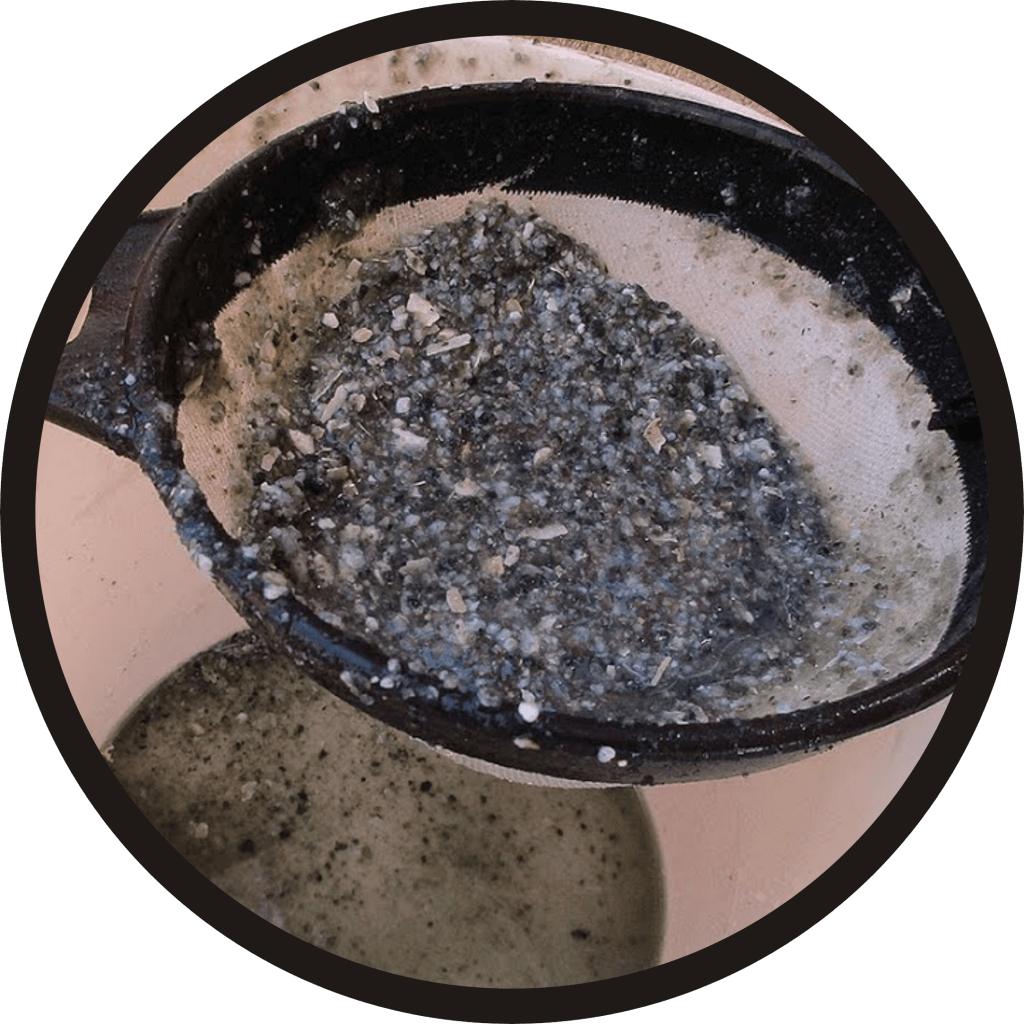
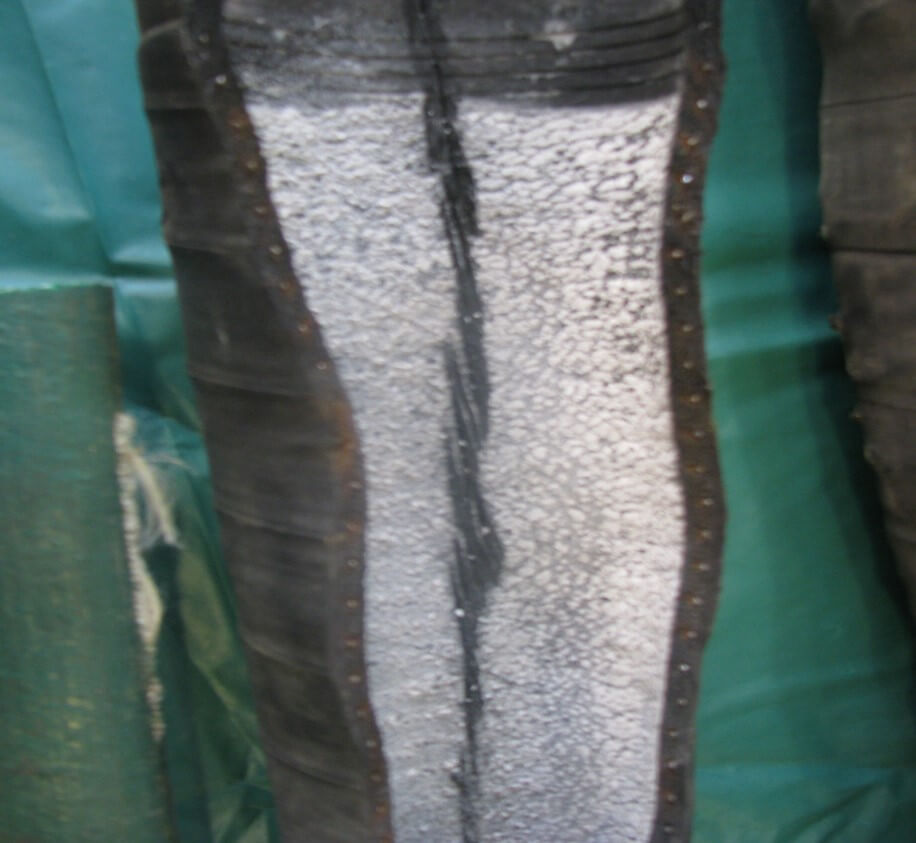
Liquids can curdle into pastes and gels that clog plumbing to such an extent that flushing cannot clear it and a manual tear down is required.
Clogged screens
Dry formulations don’t hydrate or disperse, becoming sediment that clogs screens and nozzles. Even if they are small enough to spray, they reduce coverage uniformity. For example, a dry product added behind an oil gets coated, preventing it from hydrating.
Certain product combinations may cause settling, or one partner is more prone to settling. If the sprayer sits without agitation, settled products may or may not resuspend. Even if they do resuspend in the tank, they may remain as sediment in lines.
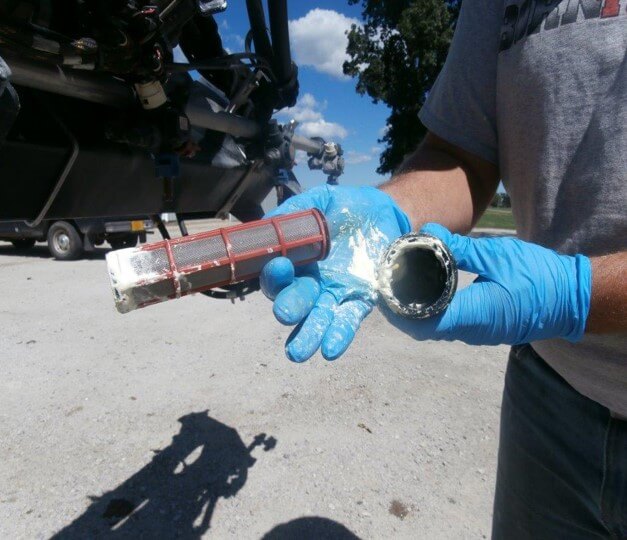
Residue in hoses – Photo courtesy of Fred Whitford, Purdue UniversityClay-based products may or may not resuspend easily in a tank. Even then, they may not resuspend in plumbing lines.
Certain product combinations may cause foaming, or one partner may be prone to foaming, causing overflows or breaking pump suction. When products foam, dry products added through the foam may swell, preventing hydration.
The Foamover Blues
Phase separation occurs when products layer in the tank. Consider oil and water. Even with agitation, the active ingredients may not be uniformly suspended in the tank and coverage uniformity will be reduced during spraying.
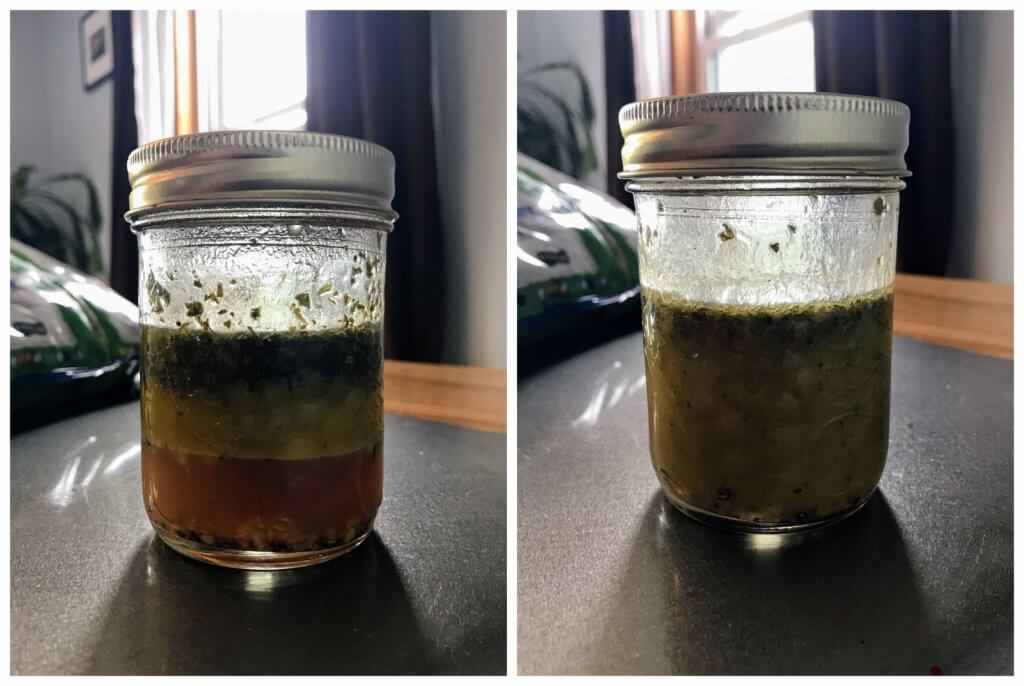
Salad dressing left to rest is a great example of separation and stratification (left). Agitation helps emulsify it (right)
Due Diligence – Preventing Tank Mixing Errors
Incompatibility is often a function of the inert ingredients in pesticide formulations (e.g. thickeners, adjuvants, defoamers, stabilizers, solvents, etc.) and not the active ingredients. The more products you add to the tank, the more likely you’ll encounter an issue. It is prudent to perform a jar test to confirm physical compatibility. Remember, even if registered tank mix partners support mixing, your pace, mixing order, and water quality/temperature could cause issues.
Do not decide to try a new-to-you registered tank mix during loading. Even if you’ve used these products successfully in the past, formulations change without notice. Plan as much as possible off season when there is time to do the following:
Consult the pesticide labels
Pesticide
labels are always the first point of reference. They should be obeyed even if they
contradict conventional practices. Booklet-style labels that come with the
products are long, difficult to search and may not be up-to-date.
In Canada, it is faster and easier to go to the PMRA Label Search website and search labels in PDF format. In other countries, consult the manufacturer’s website for label information. For each tank mix partner, use <CTRL>+F to find the following keywords:
Do Not Mix
Mix
Hours
Agitation
Fertilizers
Consult manufacturer and crop advisors
You’re likely not the first to consider a certain tank mix. Learn from those that have been there already:
Consult your chemical sales representative. They
know their products best and want to see you succeed. They may have insight that
is not found on the product label.
Consult local government or academic extension
programs for an unbiased opinion.
Enlist the help of a professional crop advisor.
It is a good practice to get tank mix recommendations in writing. If something should go wrong, liability is an important concern.
If you’ve made a mess – The Reverse Jar Test
It
happens. We’ll use this real-world situation as an example:
“I mixed up a batch of MCPA 500 A and Glyphosate at ¾ recommended label rate, but then got delayed on application with a stuck drill. I came back to the sprayer and found a nasty chemical precipitate – like waxy chunks. Agitation didn’t break them down. I dumped the tank out as I didn’t want to pump it through the booms. How do I clean up the chunks in the system?”
We forwarded
this question to ag chemists Dr. Eric Spandl (Land of Lakes) and Dr. Jim Reiss
(Precision Laboratories) and developed this response:
“Wearing appropriate personal protective equipment, physically remove the “chunky” material. A lot of time can be wasted (and rinsate water created) by experimenting with various concoctions, but if you do choose to try a compatibility agent, first try it in a mason jar. If it works to dissolve the material, it can be added to the tank with water and agitated. If not, you are down to manual cleaning: hot water under pressure.”
We dubbed this process “The Reverse Jar Test”. Do not add hot water, cleaners or compatibility agents until the reverse jar test confirms success. You may create a larger problem. Of course, the best advice is to not put yourself in this position to begin with. Once again, don’t make mixing decisions at the inductor bowl – make them before ordering product.
Tank mixing regulations in Canada (January, 2025 update)
The following legislative framework is specific to Canada, so readers in other countries should consult their own regulatory authorities.
Paragraph 6(5)(b) of the Pest Control Products Act (PCPA) states that no person shall use a pest control product in a way that is inconsistent with the directions on the label. In 2020, a public consultation was held to consolidate and clarify tank mixing requirements. This led to Regulatory Proposal PRO2020-01 (Streamlined Category B Submissions and Tank Mix Labelling – July 3, 2020). Essentially, it stated that tank mixing would be allowed if there was text on the product label that specifically permitted it. This could be a specific tank mix combination, a general statement permitting mixing, or both.
A new general label statement that permits tank mixing was proposed to consolidate tank mixing information in one place on the label and allow greater flexibility in terms of tank mixing options. The prohibition against tank mixing products with the same mode of action was removed, and the reference to tank mixing with a fertilizer is now an optional component of that statement. The general label statement reads as follows:
“This product may be tank mixed with (a fertilizer, a supplement, or with) registered pest control products, whose labels also allow tank mixing, provided the entirety of both labels, including Directions For Use, Precautions, Restrictions, Environmental Precautions, and Spray Buffer Zones are followed for each product. In cases where these requirements differ between the tank mix partner labels, the most restrictive label must be followed. Do not tank mix products containing the same active ingredient unless specifically listed on this label.
In December of 2022, Health Canada released a guidance document describing the federal tank mixing policy. This document is not part of the PCPA, but is an administrative document intended to facilitate compliance by all stakeholders. Registrants have until December, 2025 to update their extension material to align with amended product labels and guidance documents. Similarly, users of pest control products will be provided the same transitional period to adjust their purchasing and production practices to align with the provisions of this document. This means the policy will be in full effect on December , 2025. After that, applicators in Canada can only apply tank mixes that appear specifically on a product label, or tank mixes of products whose labels include the new general tank mixing statement.
Summary of the guidance document
Tank mixing is not permitted when a potential tank mix partner’s label has some exclusionary statement, such as:
Forbidding mixing. E.g. “Do not mix or apply this product with any other additive, pesticide or fertilizer except as specifically recommended on this label.”
Limiting tank mixes to only those specifically listed on the product label.
During the label transition, guidance relating to tank mixing may be found under a section specific to tank mixing, and/or under other sections as in the following examples:
Directions for use: E.g. “When tank-mixes are permitted, read and observe all label directions, including rates and restrictions for each product used in the tank-mix. Follow the more stringent label precautionary measures for mixing, loading and applying stated on both product labels.”
Buffer Zones: E.g. “When tank mixes are permitted, consult the labels of the tank-mix partners and observe the largest (most restrictive) spray buffer zone of the products involved in the tank mixture and apply using the coarsest spray (ASABE) category indicated on the labels for those tank mix partners.”
Resistance Management: E.g. “Use tank mixtures with [fungicide/bactericides/insecticides/acaricides] from a different group that is effective on the target [pathogen/pest] when such use is permitted.”
If there are no directions on the labels, don’t tank mix them.
If your situation does not fit these examples, the following table (Appendix A at the bottom of the Guidance Document), lists several other examples examples of different tank mix wording scenarios for registered pest control products.
Table 1: Permissibility of tank mixing based on various combinations of label statements related to tank mixing
Product X label says
Product Y label says
Can I tank mix? (Y/N)
Nothing (silent on tank mixing)
Nothing (silent on tank mixing)
N
General tank mix statement
Nothing (silent on tank mixing)
N
Nothing (silent on tank mixing)
General tank mix statement
N
General tank mix statement
General tank mix statement
Y
General tank mix statement
Tank mix with Product X
Y
Tank mix with Product Y
General tank mix statement
Y
Tank mix with Product Y
Nothing (silent on tank mixing)
Y
Nothing (silent on tank mixing)
Tank mix with Product X
Y
Tank mix with Product Y
Tank mix with Product X
Y
Tank mix with Product Y
Exclusionary statement (and label does not include a specific Product X tank mix)
N*
Exclusionary statement (and label does not include a specific Product Y tank mix)
Tank mix with Product X
N*
*There may be registered labels that have tank mix scenarios like this. Note that this is not allowed for new tank mix label amendments. Further, any product labels that have tank mix scenarios like this must be amended to alleviate the contradictory scenario. To do this, using the last scenario in Table 1 as an example, one of the following must occur: 1) remove the Product X tank mix from the Product Y label, 2) remove the exclusionary statement from the Product X label, or 3) add a specific tank mix for Product Y on the Product X label. Source: PMRA Guidance Document Tank Mix Labelling 2023
Tank mixing adjuvants
According to the PMRA, the rules surrounding the tank mixing of adjuvants remain the same as they have been since 2009, and are not included under the new guidance document. While the PCPA does not reference adjuvants specifically, they are prescribed to be pest control products in the regulations (Pest Control Products Regulations s.2(b)). The general reference in the PCPA that applies is s.6(5)(b).
Therefore, in the case of activator adjuvants, the label for at least one tank mix partner must specify the use of an adjuvant, and only registered adjuvants labeled for the crop and for tank mixing are permitted. For example, tank mixing the herbicide Reflex with a registered soybean oil adjuvant not labelled for the use, or with an unregistered food grade activator adjuvant, would not be acceptable. Utility adjuvants have registration numbers, but their use is not prescribed or specified on pesticide labels, leaving their use to the discretion of the operator.
For more information on Canada’s Tank Mixing Policy
In late 2022, Australia’s GRDC released a comprehensive guide on pesticide mixing and batching (within the context of the Australian agronomic environment, of course), which can be downloaded for free, here.
Finally, you can watch a 2021 presentation on tank mixing (below). It was delivered to a grape growing audience, but much of the content applies across agriculture. There are a few “oops” moments where I didn’t say quite what I meant. I misread the Sencor dissolution / filtration work. And, I really didn’t answer the last question about mixing herbicides. The answer should have been to consult labels and local resources, such as OMAFRA’s Crop Protection Hub. Note that any discussion of Canadian regulatory policy may have changed in light of the new 2022 Guidance Document.
This article was co-written with Mike Cowbrough, OMAFRA Weed Management Specialist – Field Crops
The concept of Air Displacements was developed by Dr. David Manktelow, Applied Research and Technologies Ltd.
What is the “right” speed to drive when spraying?
Airblast sprayer operators must know their average travel speed to calculate how much pesticide and time is required to complete a spray job. Note that it’s an average, not a constant, because travel speed is significantly affected by ground surface conditions (e.g. slippage), grade (e.g. hills) and the weight of the rig (e.g. as spray mix is depleted).
The pursuit of productivity and the unchallenged status quo of traditional spray volumes, blinds many operators to the fact that travel speed is a critical factor in focusing air energy on the target canopy. As long as droplets are small enough to be entrained and directed by the air, we believe that optimizing the fit between air energy and the target canopy leads to the most frugal and effective use of spray mix and should therefore dictate travel speed. If that speed proves to be painfully slow, or terrifyingly fast, then a mismatch is revealed between the sprayer design and the operational conditions and the overall spraying strategy should be reconsidered.
This article describes a method for modelling an ideal travel speed. It can be used as a sanity check for existing operations or for those seeking to evaluate the fit of a new airblast sprayer. However, this method can only approximate travel speed. A true optimization of sprayer settings will require fine tuning using the ribbon method and, ultimately, coverage feedback from water sensitive paper (see here and an older article here). We’ll begin with how to measure average travel speed.
How to measure average travel speed
Beware the tractor speedometer or rate controller that monitors wheel rotations; both can be fooled by changes in wheel size, tire wear or slippage. GPS or radar-based speed sensors are the most accurate method.
Those that prefer a manual method can follow this classic protocol for determining average travel speed:
Go to a row that is representative of the terrain in your planting. Measure out a distance of 50 m (150 ft) and mark the start and finish positions with wire marker flags.
Fill the sprayer tank half full of water.
Select the gear and engine speed in which you intend to spray. If using a pull-behind sprayer, ensure the PTO is running or you could introduce errors.
Bring the sprayer up to speed for a running start and begin timing as the front wheel passes the first flag. This is far easier when there are two people.
Stop the timer as the front wheel passes the second flag.
Stay out of any ruts and run the course two more times.
Determine the average drive time for the three runs (i.e. the sum of all three times in seconds divided by three).
Finally, calculate travel speed using one of the following formulae, depending on preferred units:
Ground Speed (km/h) = Average drive time for 50 m (s) ÷ 13.9 (a constant)
Those that prefer a less accurate but convenient hack can download any smartphone speedometer app that can calculate an average (similar to a runner’s GPS wristwatch). Fill the sprayer tank half full and drive a representative section of your operation with the fan on and the spray off. Consult the phone for your average speed for each pass. Take a screen shot and email it to yourself as a time-stamped component of your spray records.
The “Air Displacements” method
Dwell time
Airblast sprayers use fans to move a volume of air at a certain speed, often measured in m3/hr or ft3/min. Imagine that volume of air as a three dimensional shape extending from the air outlet over a distance. Likewise, imagine the void between the sprayer outlet and the target canopy as a three dimensional shape penetrating roughly halfway into that canopy (assuming we intend to spray every row).
How long must the sprayer dwell in one spot before it pushes all the intervening air out of the way and replaces it with spray-laden air? If the sprayer drives too slowly, it will wastefully push spray through and beyond the target (i.e. blow-through). If the sprayer moves too quickly, the spray will not have an opportunity to penetrate the target canopy and most certainly not reach the highest point. This concept of focusing air energy using travel speed is called Dwell Time.
We want to calculate the volume of air the sprayer generates, compare that to the volume we want displaced, and then determine how fast we must drive to optimize the fit. We can do all this with a tape measure, an anemometer, and a partner to record the data and do a little math.
1. Measure air outlet area
With the sprayer safely off, measure the area of the air outlet(s) on one side of the sprayer. We’ll use a Turbomist 30P Low Drift Tower (below) as an example. There are two air outlets that are 5 cm wide by 150 cm high for a total area of 0.075 m2 on each side. Be sure to look inside the outlet for any irregularities like baffles or obstructions intended to block air. Subtract those areas from the total. Don’t worry about small things like nozzle bodies.
For rectilinear outlets: Height (m) x width (m) = Area (m2)
For circular outlets: 3.14 x radius2 (m) = Area (m2)
The air outlet on this Turbomist 30P Low Drift tower sprayer is 5 cm wide by 150 cm tall for a total area of 0.075 m2.
2. Measure air speed
First, a few safety warnings: High speed air is loud and can carry debris, so always wear ear and eye protection and respect the hazards inherent to working with air-assist sprayers. Only use an anemometer rated for at least 160 km/h (100 mph) (e.g. here). Do not use a handheld weather meter such as a Kestrel because the impellor could be destroyed and become dangerous shrapnel.
Use an anemometer rated for at least 160 km/h (100 mph) (e.g. here). Do not use a handheld weather meter such as a Kestrel because the impellor could be destroyed and become dangerous shrapnel.
Bring the fan up to speed and holding the meter about 25 cm (10 in.) from the outlet, measure the air speed at several locations along the air outlet both vertically and horizontally. We calculate an average speed because many air outlets do not produce uniform air speed or volume along their outlets. For this example, we measured four locations along the air outlet on both sides of the sprayer and saw significant differences. We did this both in low and high gear (see table below).
High Gear
High Gear
Low Gear
Low Gear
Location Along Outlet
Left Side (m/s)
Right Side (m/s)
Left Side (m/s)
Right Side (m/s)
Top 1/4
41.1
80.3
42.9
24.6
Upper
34.9
32.2
26.4
30.8
Lower
30.8
30.0
24.0
26.4
Bottom 1/4
33.5
40.2
26.8
31.3
Average
35.1
45.7
30.0
28.3
Anemometer readings from the low drift tower sprayer outlets, on left and right side, in high and low fan gear. Four readings from bottom to top to determine the average. Readings taken 25 cm from edge of outlet and PTO set to 540 rpm.
Multiple air outlets
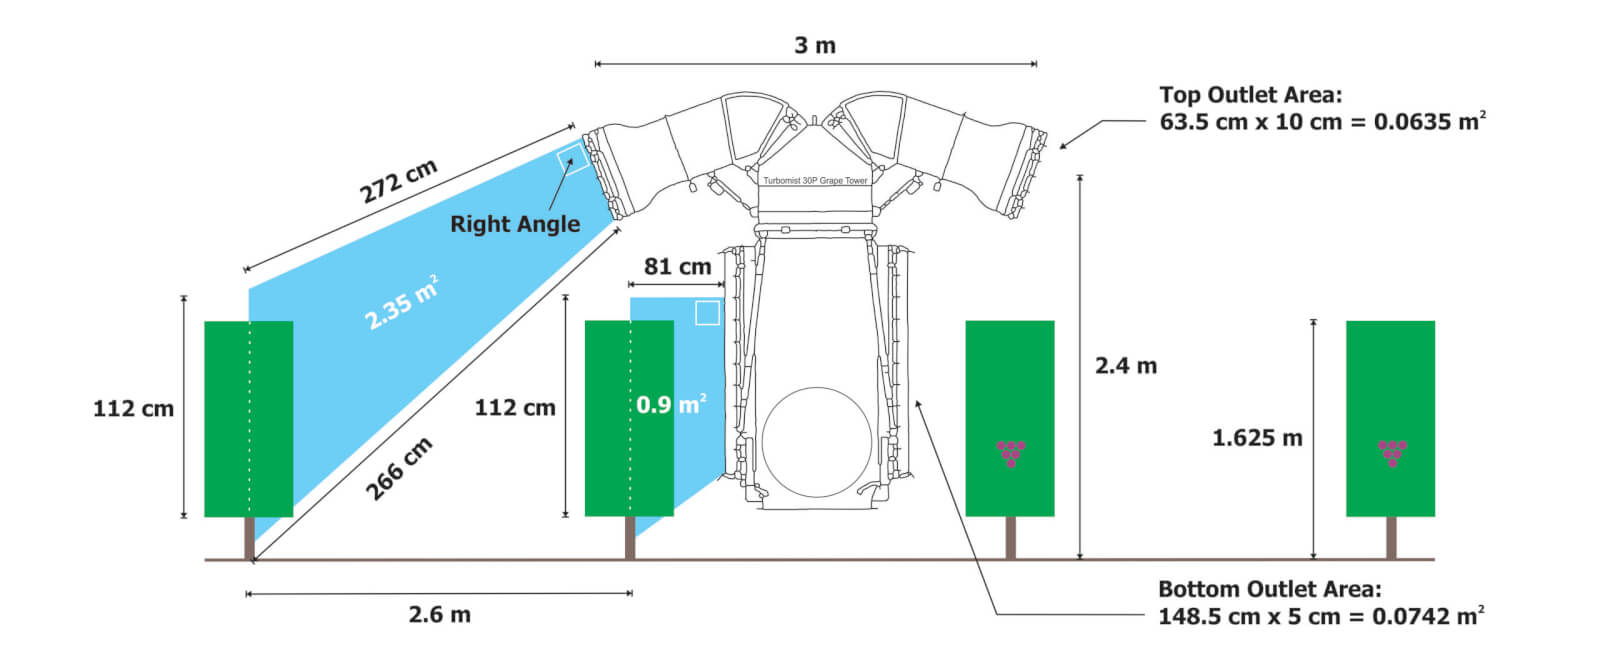
Before we continue with the method, let’s change sprayers to this Turbomist 30P Grape Tower (below). The design is intended to spray adjacent rows from the vertical outlets (5 cm x 150 cm = 0.075 m2) along the tower. The upper, inverted outlets (10 cm x 63.5 cm = 0.0635m2) throw spray over the adjacent rows and cover the outside rows. The intention is to improve productivity by covering four rows of grape (or possibly three) per pass.
The Turbomist 30P Grape Tower Sprayer is a multirow system intended to drive every third or fourth row.Lower, vertical ducts are 5 cm x 150 cm = 0.075 m2Upper, inverted ducts are 10 cm x 63.5 cm = 0.0635m2
However, when we consider this design through the Air Displacement lens, it’s almost like having two sprayers performing two jobs simultaneously. The vertical outlets and the upper, inverted outlets are different shapes. Further, their position (distance and angle, as the top outlets are angled back more aggressively) relative to their respective target canopies are significantly different. How fast must this sprayer drive to optimize the fit? Do we have to compromise coverage and incur drift and waste from one set of outlets to accommodate the other set? The manufacturer has worked to address this potential issue by partitioning the majority of the air energy to the top outlets, but let’s see how that affects travel speed.
3. Total volumetric flow
Having already measured the outlet area, we then measured average air speed (see table below).
High Gear
High Gear
Low Gear
Low Gear
Location Along Outlet
Left Side (m/s)
Right Side (m/s)
Left Side (m/s)
Right Side (m/s)
Top Outlet
27.0
26.5
27.0
26.0
Bottom Outlet
12.0
13.0
10.5
12.5
Average anemometer readings (n=4) for top and bottom outlets, on left and right side, in high and low fan gear. Readings taken 25 cm from edge of outlet and PTO set to 540 rpm.
Now we can use these two values to determine how much air the sprayer generates by calculating total volumetric flow. We first have to convert air speed from m/s to m/h to make the units work, so just multiply it by 3,600. Then we multiply that by the outlet area and we get the table below.
Average air speed (m/s) x 3,600 (a constant) = Average air speed (m/h)
Average air speed (m/h) x Outlet area (m2) = Total volumetric flow (m3/h)
High Gear
High Gear
Low Gear
Low Gear
Location Along Outlet
Left Side (m3/h)
Right Side (m3/h)
Left Side (m3/h)
Right Side (m3/h)
Top Outlet
6,172.0
6,058.0
6,172.0
5,944.0
Bottom Outlet
3,240.0
3,510.0
2,835.0
3,375.0
Total volumetric flow for top and bottom outlets, on left and right side, in high and low fan gear, with PTO at 540 rpm.
4. Target volume to displace
Now that we know the volume of air the sprayer generates, let’s determine the volume of air we need to replace with that spray laden air. This is really the only tricky bit because you have to picture a cross section and then measure the shape. See the illustration below.
For the bottom outlet, it’s simple. The outlet is 81 cm from the grape panel and the grape panel is 112 cm high. We calculate the area of a rectangle by multiplying length by width, so:
Length (cm) x Width (cm) = Area (cm2)
However, the sprayer design makes the top outlet’s job trickier to figure out. This isn’t a rectangle, it’s a “quadrilateral”. We get this odd shape when either the sprayer outlet or the target canopy are significantly taller than the other. Fortunately this one has a right angle so we don’t have to brush off our high school trigonometry textbooks. Instead, we can lean on the internet using this link and plug in the values. As we can see below, the cross sectional areas spanning from the outlets and the middle of the target canopies are 0.9 m2 for the bottom outlet, and 2.35 m2 for the upper outlets.
This gives us a cross sectional area, but we need to convert that to a volume so we can compare the air generated to the air needed. To do that, we multiply the cross sectional area by 100 m, representing how much air would be needed over 100 m of row length. The formula and the results are presented below.
Cross sectional area (m2) x 100 m of row length = Target displacement volume (m3)
Outlet
Target Displacement Volume (m3)
Top Outlet
235.0
Bottom Outlet
90.0
Target displacement volume for each outlet over 100 m of canopy row.
5. Displacement rate
We see the target displacement volumes for each outlet are significantly different. Assuming the air from the upper outlet maintains its integrity and reaches its target canopy without being blown off course, it must produce enough air energy to fill more than twice the displacement volume of the lower outlet. We can see from the earlier calculations that it does produce almost twice the total volumetric flow. But is it enough? To know we must calculate the Displacement Rate for each outlet. Let’s just focus on the left side of the sprayer in high gear.
Displacement Rate (displacements/h) for left side of sprayerin high gear
Top Outlet
26.25
Bottom Outlet
36.0
Displacement rates for the outlets on the left side of the sprayer in high gear.
So we see that the outlets at the top of the sprayer, if stationary, could displace the target volume of air 26.25 times an hour. However, the lower outlet would displace its target volume 36 times in that same hour. We see that we might have a problem. But this is for a stationary sprayer and not a sprayer in motion. The last step gives us what we came here for.
6. Ideal travel speed
We can now determine the ideal travel speed for this sprayer using that same 100 m row length.
[Displacement rate (displacements/h) x 100 m of row length] ÷ 1,000 (a constant) = Ideal travel speed (km/h)
Outlet
Ideal travel speed (km/h) based on left side of sprayer
Top Outlet
2.6
Bottom Outlet
3.6
Ideal travel speed for each outlet on the left side of the sprayer in high gear.
As we stated at the beginning of this article, this is only a model. It doesn’t account for canopy density and assumes the spray laden volume of air produced by the sprayer can reach the target intact over a given distance. However it does indicate that there is a potential issue that will lead to either over spraying the adjacent row (slower travel speed) or under spraying the distant rows (faster travel speed) which could lead to waste, drift and poor coverage.
In the image below, we chose to drive close to 2.6 km/h in high gear. No effort was made to adjust the liquid flow (i.e. change the nozzles) so there was too much spray volume here, but we can see the losses on the left (upwind) side, and the blow-through three rows over on the right (downwind) side. Leaving aside the excessive liquid volume, we could drive faster or reduce the fan gear to reduce the blow-through on the adjacent rows, but we may go too fast (or reduce the rate of air displacement) for the upper outlets to reach the target. We can already see the integrity of the upper-left outlet breaking down as it sprays into the wind.
Testing a travel speed. No effort was made to adjust liquid flow, which is excessive here. Cross wind was from the left to the right in the image. Photo by Corey Parker (Instagram: _parkerproductions)
Take home
An ideal travel speed for an airblast sprayer is more than just being productive. The spray must reach and penetrate the target. If this requires dangerously high speeds, or if you simply can’t move slowly enough, it suggests a problem with the spraying strategy. Changes will have to be made to the sprayer, the target canopy, or even the weather conditions you’re willing to spray in. Getting the job done quickly should not compromise the quality of the job. Use this method to re-evaluate your practices, or to assess the capabilities of candidate sprayers if you’re considering a new purchase. Be sure to confirm what this model is telling you using some coverage indicator, such as water sensitive paper.
There are many factors that affect the work rate of an airblast application. If an operator can improve their work rate, without compromising spray efficacy or safety, they improve operational efficiency and save money.
But how does each variable factor in? Is it worth the cost of a tender truck and operator to fill more efficiently? Should you upgrade to a multi-row sprayer? Should your next planting have longer rows? We have a simple calculator that can help you make these decisions. You can build and compare multiple scenarios to explore the relative impact of small changes to your typical spray program. We recommend making only one change for each scenario so you can better understand the results. Print the comparison page for your records.
Whether you’re a sprayer operator, or a manager of sprayer operators, this exercise will help you see your spray program in a whole new light. Download a copy of the Airblast Budget and Work Rate Calculator and explore your productivity. You must have Excel to run the spreadsheet, and you must permit the use of macros (you’ll be prompted to accept).
Spoiler: It’s amazing how changes to travel speed have only a marginal impact on work rate. Often less than 60% of the total spray job is spent actually spraying!
If you’d like to see just how productive you can be, check out this rare (possibly unique) sprayer from Ed Oxley Farms in Michigan. Built on an OXBO 7550, this sprayer is the fourth iteration of a concept developed over the last 20 years by Ed Oxley Farms and ag engineers from Michigan State University.
Capable of spraying five rows at a time, this self-propelled beast is a hybrid wrap-around and targeting-tower system that uses CurTec spray heads equipped with tangential fans and wire-mesh basket rotary atomizers.
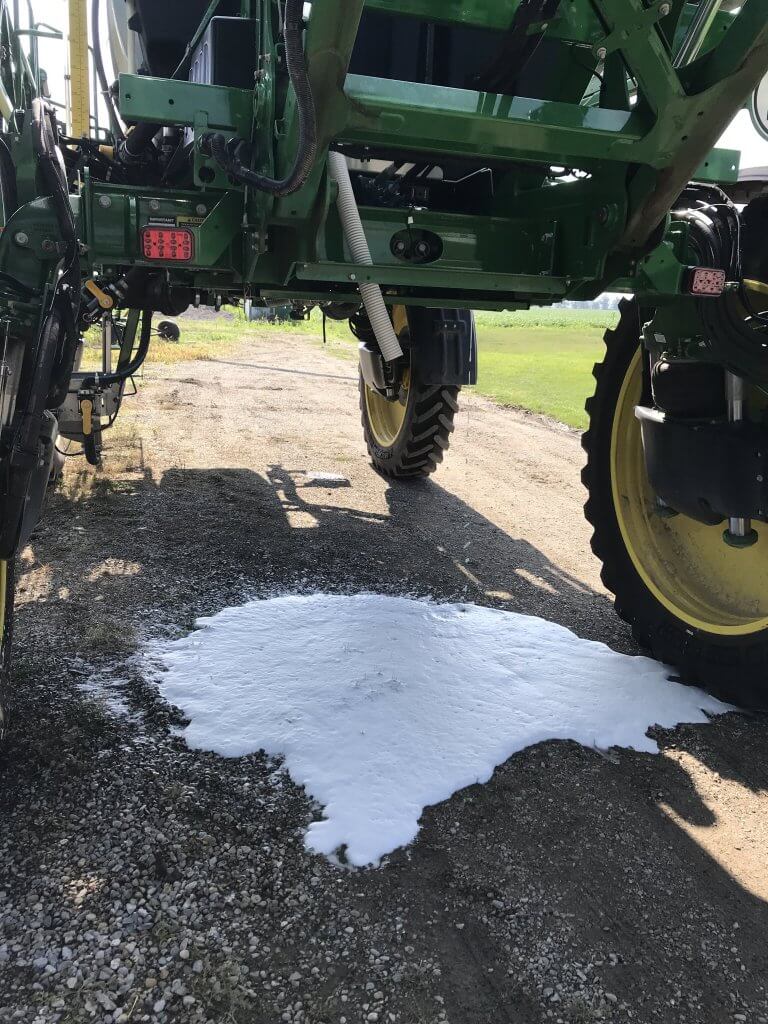
That’s not dribbling – that’s purging the boom prior to spraying.
It sprays a mere 150 L/ha (~ 15 gallons/acre) at a ripping 13 km/h (~8 mph), as seen on the Ag Leader monitor below.
When row spacing and turn time are accounted for, that means it’s capable of covering almost 15 hectares (~40 acres) per hour.
And, when not spraying grapes, the boom can be swapped to make it a high-clearance corn sprayer. It doesn’t get much more efficient than this.
The following videos will show the view from inside and outside the cab. Note that the row that’s straddled is sprayed from an overhead spray head mounted to the centre rack behind the sprayer. The two adjacent rows are covered from one side from vertical spray heads mounted on the chassis. Finally, the boom holds two more overhead spray heads for the outer-most rows.
Ideally, the boom-mounted spray heads would be suspended vertically inside the row, but it makes for such a wide turn radius that it would take too long to turn… assuming there was enough headland to allow it. They’re also swept-back to minimize the turn radius and reduce the amount of airborne spray that deposits on the sprayer itself.
A clever design that makes a few compromises to ideal coverage in order to improve productivity. The balance works for them and this sprayer might be a sign of things to come in horticultural crop production systems. Want to see how your sprayer stacks up? Download the calculator and see where you might be able to make improvements.