Tag: boom height

  • Spray Patterns for Spot Sprays

    Spray Patterns for Spot Sprays

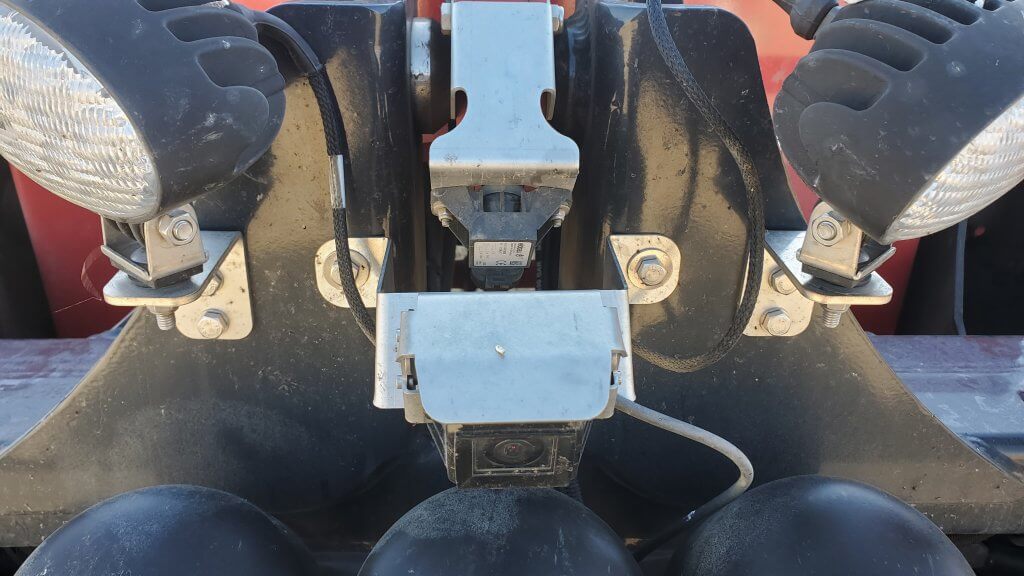
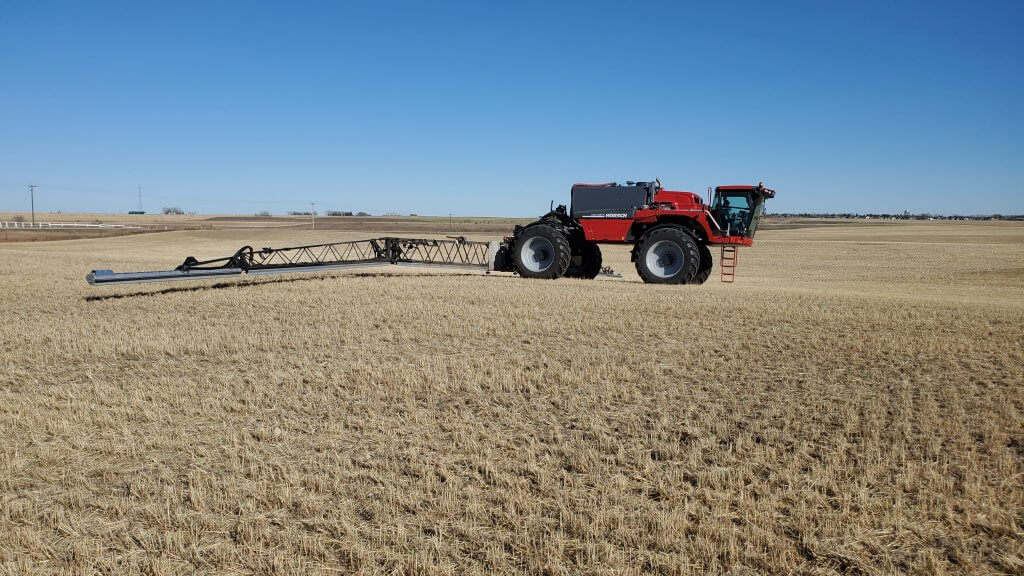
    Spot spraying promises to dramatically cut herbicide use. Data from Green-on-Brown (GoB) sprays suggest at least 50% and possibly 90% savings are possible, depending on weed density and the system employed. These savings are significant. But system performance depends on the nozzle selection even more than for broadcast sprays. What are the issues?

    Pattern Width

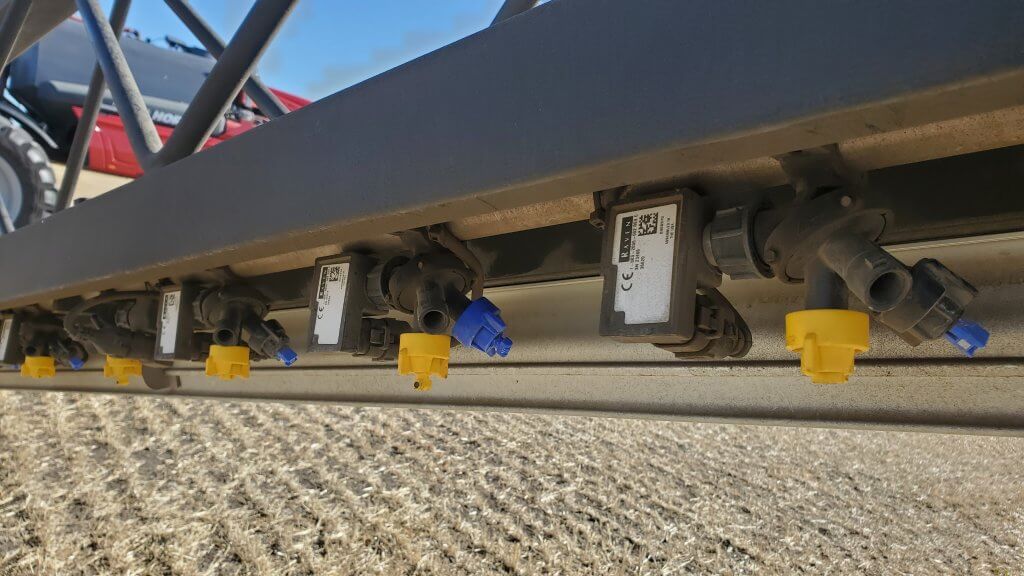
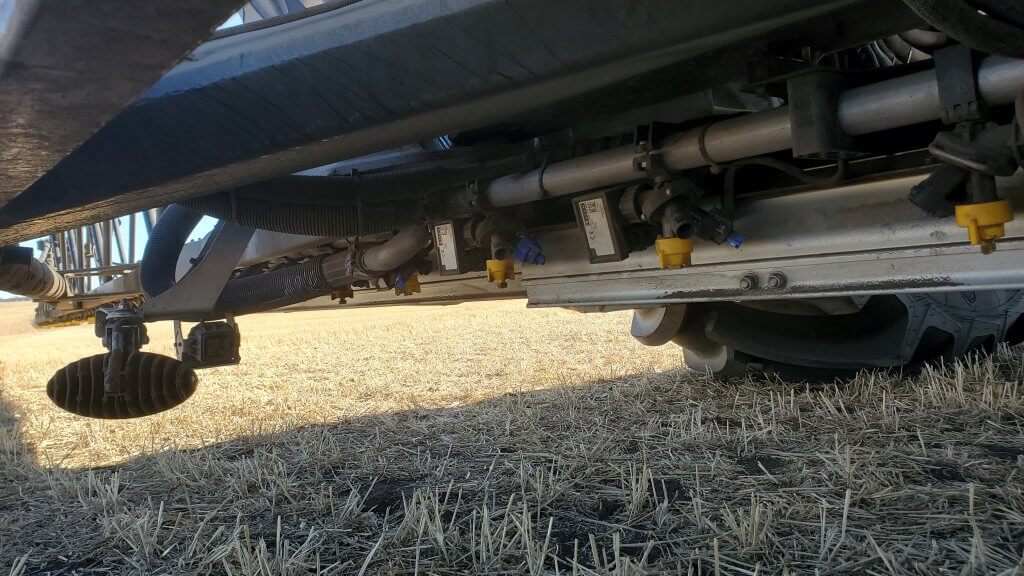
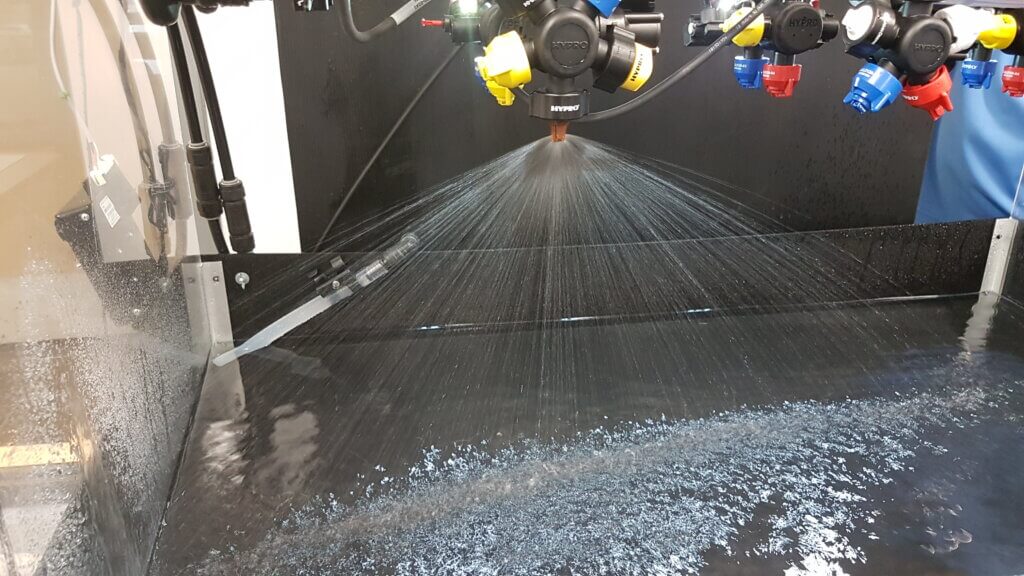
    Spot sprays represent a unique mix of single nozzle banding and multiple nozzle broadcasting on the same boom at different times and locations, depending on what the weedy spots require. Both need to be optimized to get the best performance and savings out of such a system.

    Even (Banding) Nozzles

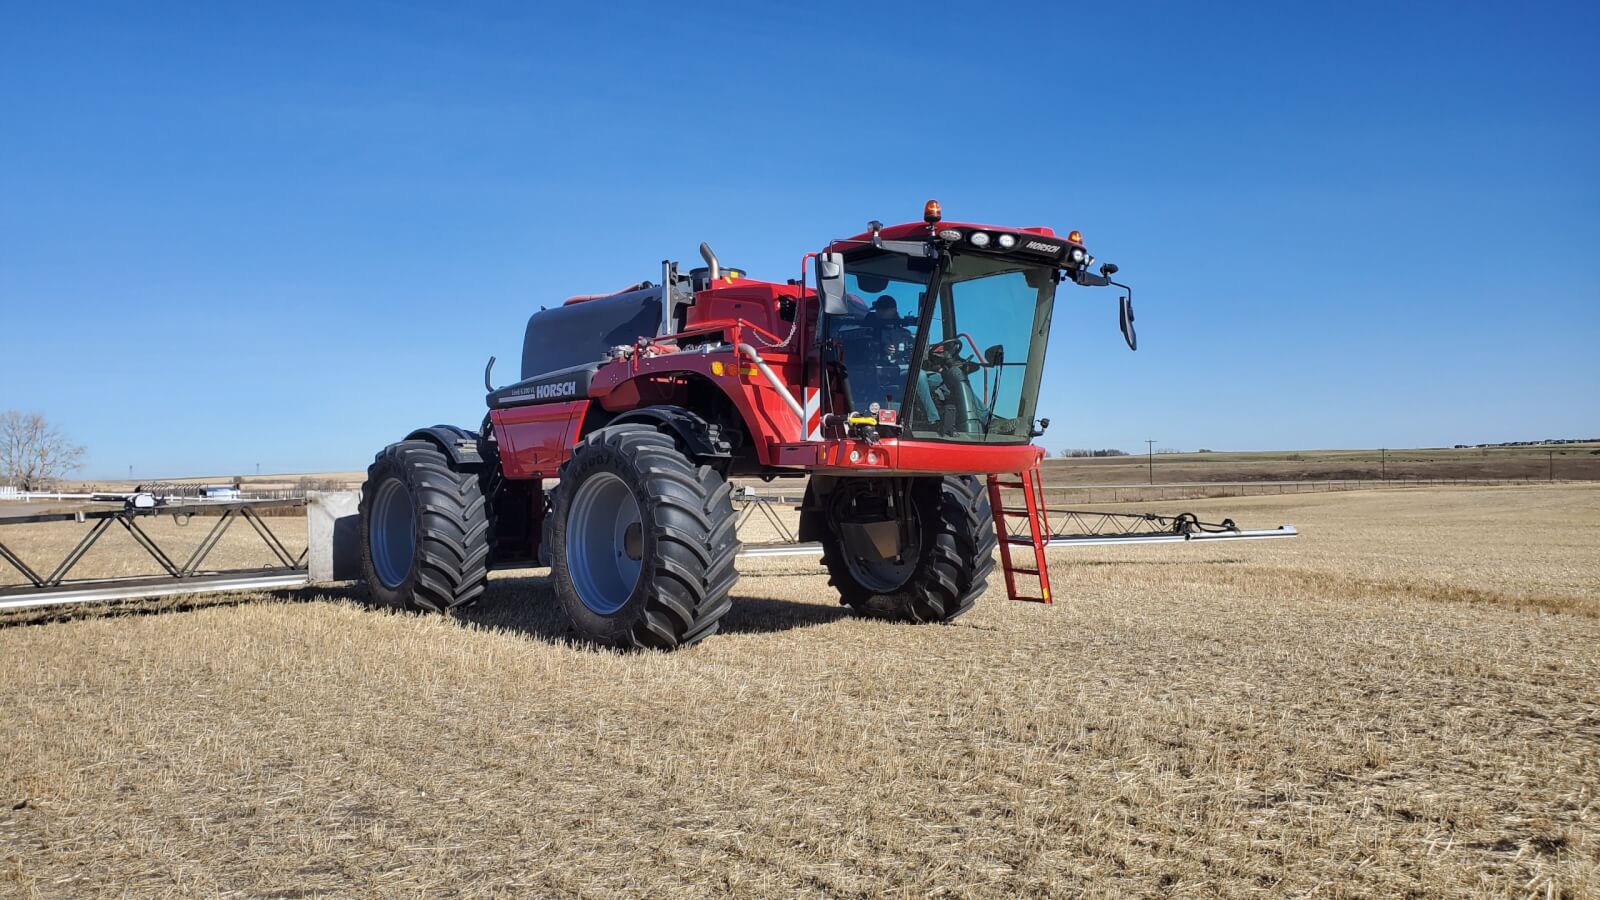
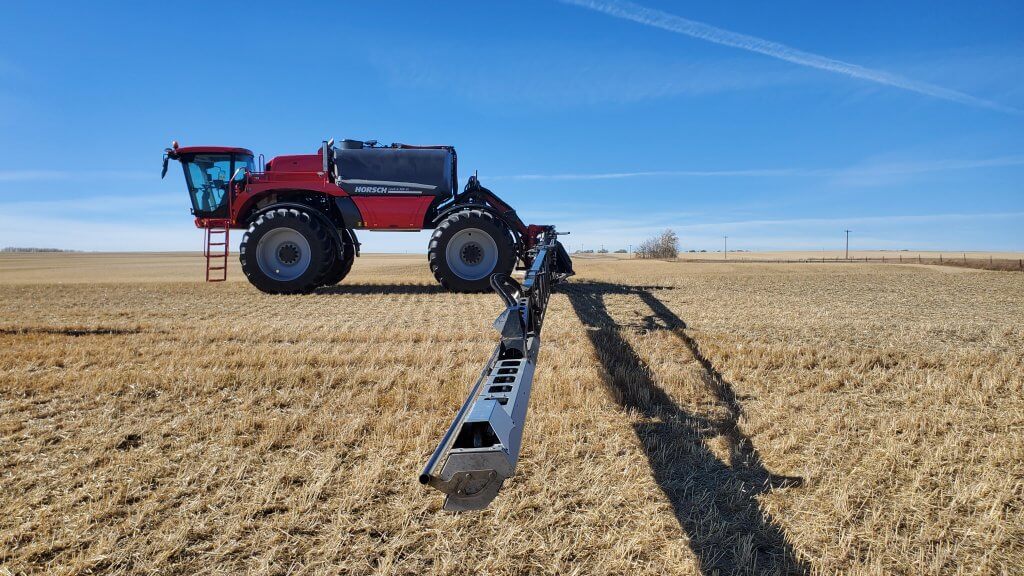
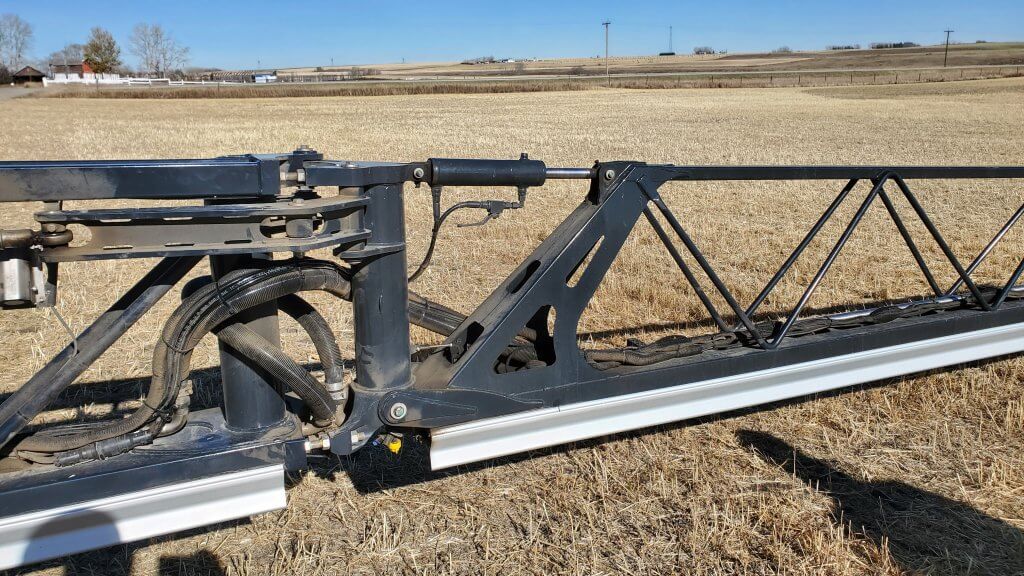
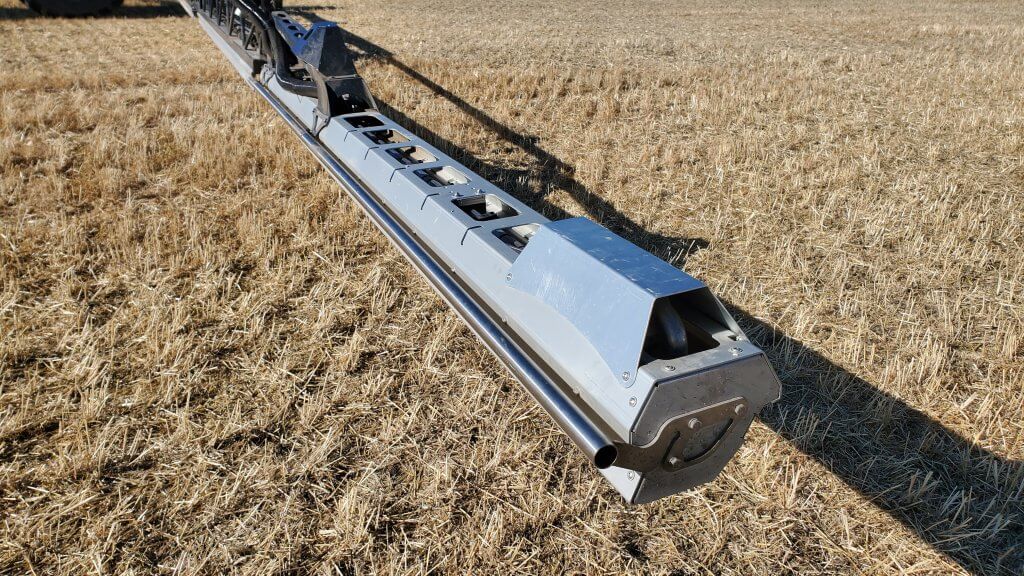
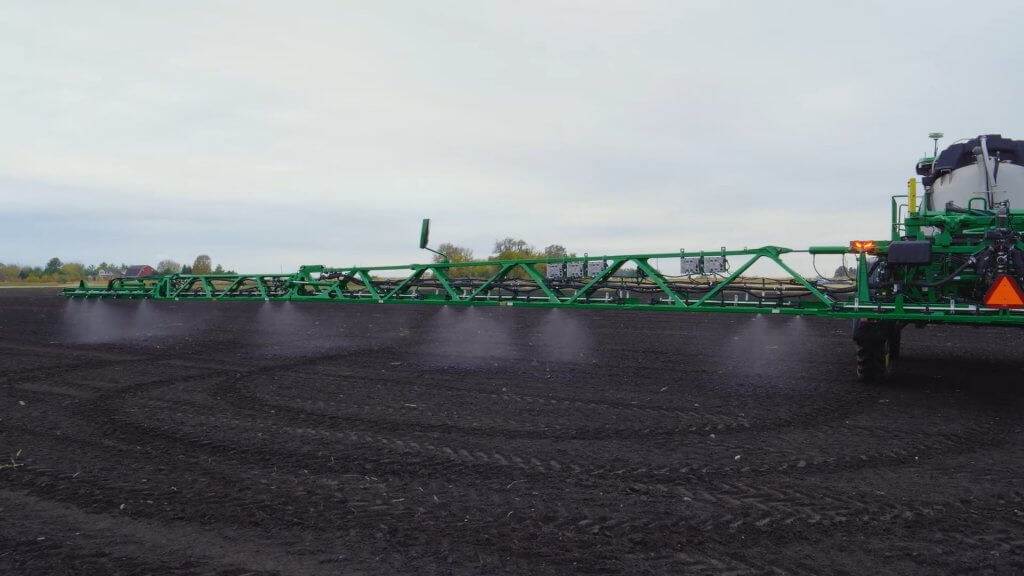
    Let’s say the spot spray boom has a spacing of 10” (25 cm) and is carried by wheels to ensure consistent height. An operator would want the spray pattern to have a very similar width as the nozzle spacing. A 30 degree even fan angle would create a band of about 10” wide at a boom height of 19” (48 cm, download a worksheet that solves this for any fan angle and boom height here). Assuming a travel speed of 12 mph (20 km/h) and a pressure of 40 psi (2.75 bar), an 03 sized nozzle would apply 14.9 US gpa (139 L/ha) in these 10” wide bands.

    But most applicators would be uncomfortable with zero overlap, and would prefer to raise the boom to allow, say, 20% overlap. This would ensure targetting of taller weeds that appear exactly between two sprays, for example. At 22” (56 cm) boom height, the pattern would be about 12” (30 cm) wide and affording 1” overlap on either edge.

    Spot spray booms activate any number of nozzles depending on the weed locations.

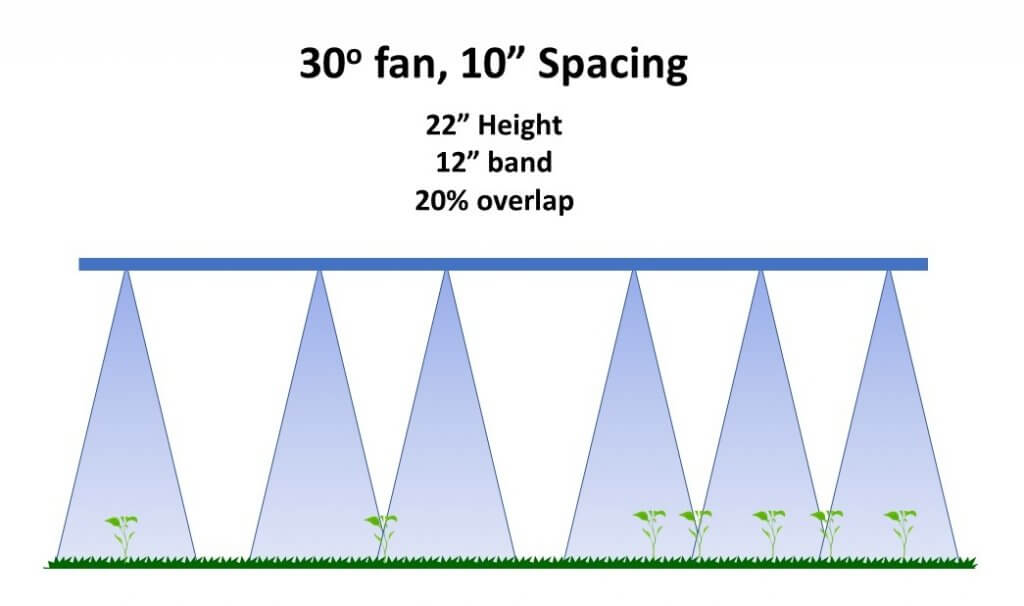
    Because the application is diluted by the extra pattern width, the applied volume is now 12.4 US gpa (116 L/ha), about 20% less than before. This change is easily accommodated by mixing the product more concentrated in the tank. The downside is that the overlap in banded sprays receives twice the dose, and this is less than ideal.

    Tapered (Overlapping) Nozzles

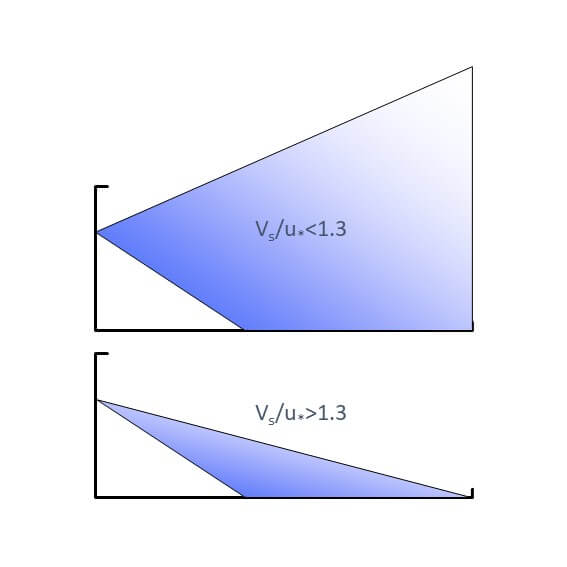
    A possible solution is to employ tapered flat fans that are the standard type on broadcast booms. These produce more of their volume in the centre, diminishing at the edges, to allow for overlapped patterns and thus functioning better when more than one nozzle is activated. In addition, the extra coverage from a wider pattern is not as wasteful as it is from an even pattern type since it comprises less volume. A single nozzle spray, however, would have a higher dose in the centre than at the edges, since a single pattern has a bell-shaped volume distribution. (note: a single nozzle moving through air loses some of its volume from the centre and places it at the edges, due to aerodynamics of the fan shape. That levels out the bell shape somewhat.)

    Broadcasting

    When more than one nozzle is triggered by the sensor, the spot spray of that region is just a small section of a broadcast boom. The average dose is now related to the nozzle spacing, not the actual band width as it was for a single nozzle. The wider the section of nozzles that are activated simultaneously, the less inefficiency a wider individual pattern creates because it’s only wasted on the outside edges of the outside nozzles.

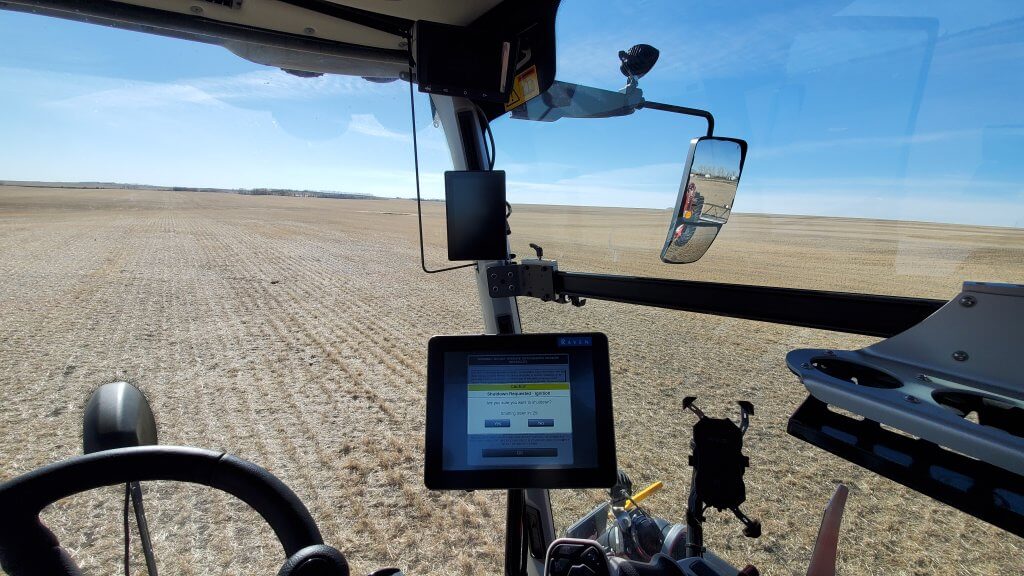
    Clearly, a sprayer that sometimes functions as a single nozzle spot spray, and at other times as a broadcast boom requires some compromises. Monitoring the activation of nozzles and learning from the relative frequency of single vs multiple nozzle activations will be useful to optimize the configuration. But when boom height is constant, a good compromise solution is possible.
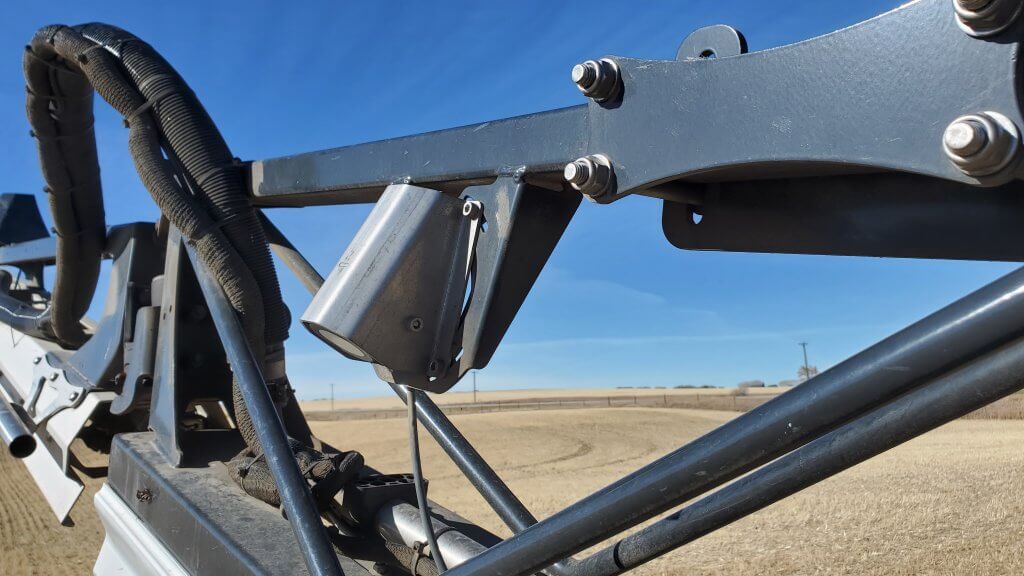
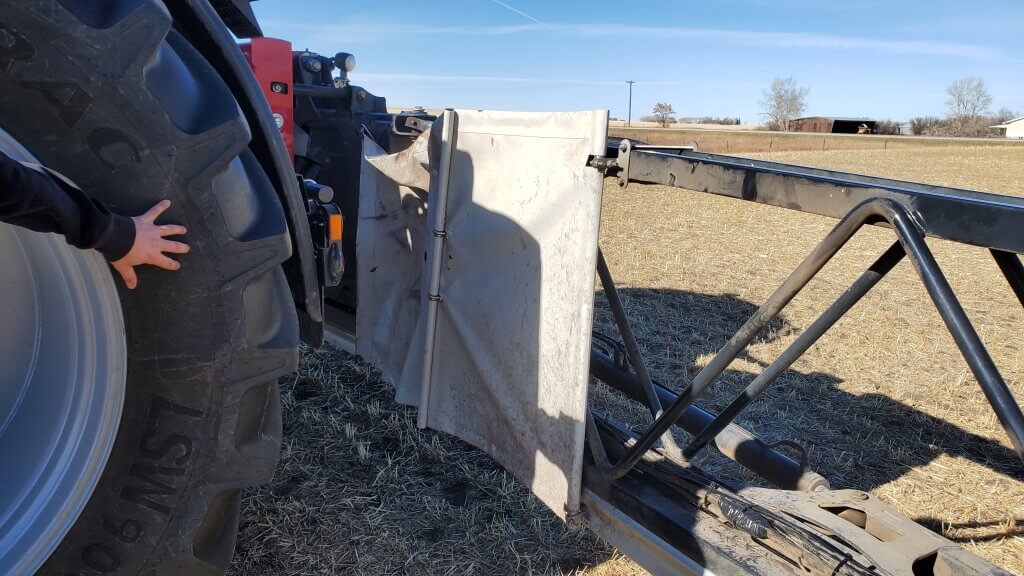
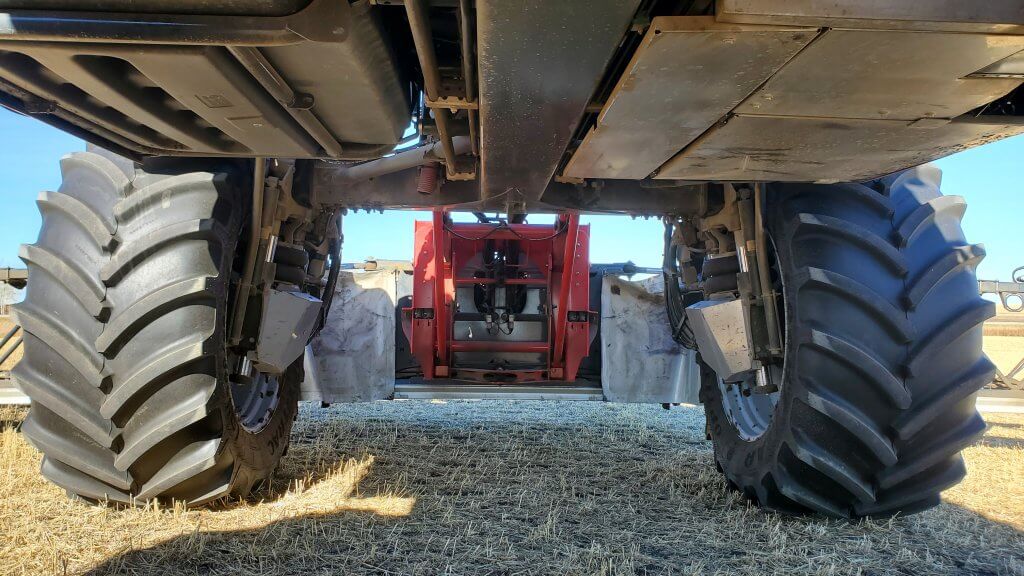
    Suspended Booms

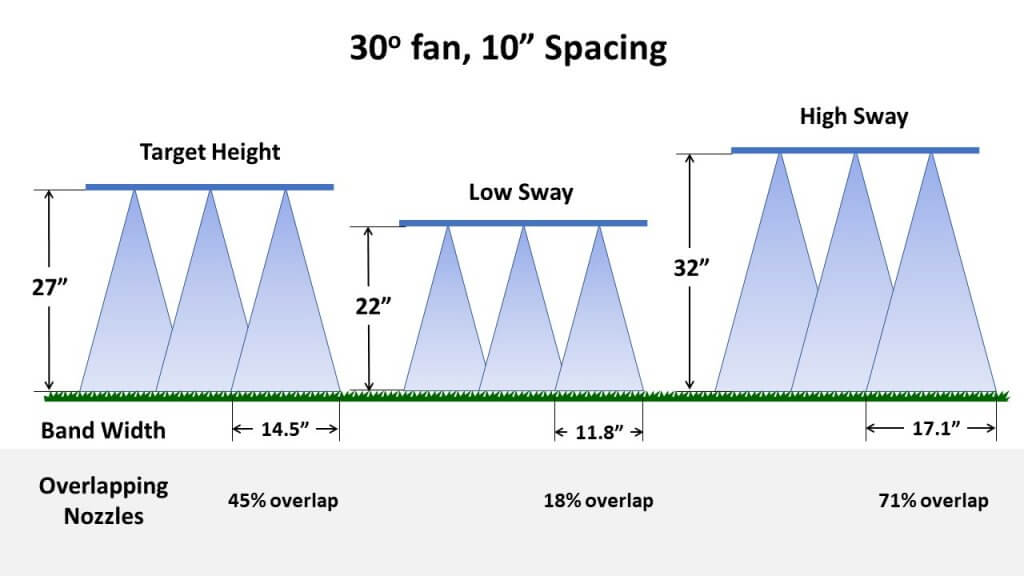
    A more challenging situation arises from suspended booms that do not hold a consistent height. Let’s assume a boom height variance of 10” (5” in either direction), and a wish to retain 20% overlap at the lowest height to avoid misses from a 30 degree nozzle.  The lowest height would have about a 12” pattern width, achieved at 22”. The boom would be set 5” higher, 27” (69 cm). At this height, a 30 degree fan would produce a band width of 14.5” (37 cm), producing a 45% overlap. If the boom sways up to 32” (81 cm), the pattern width would be 17.1” (43 cm).

    For multiple adjacent nozzles, boom height determines overlap, and a minimum overlap must be achieved even when the boom sways low.
    For single nozzles, boom height determines band width and therefore dose.

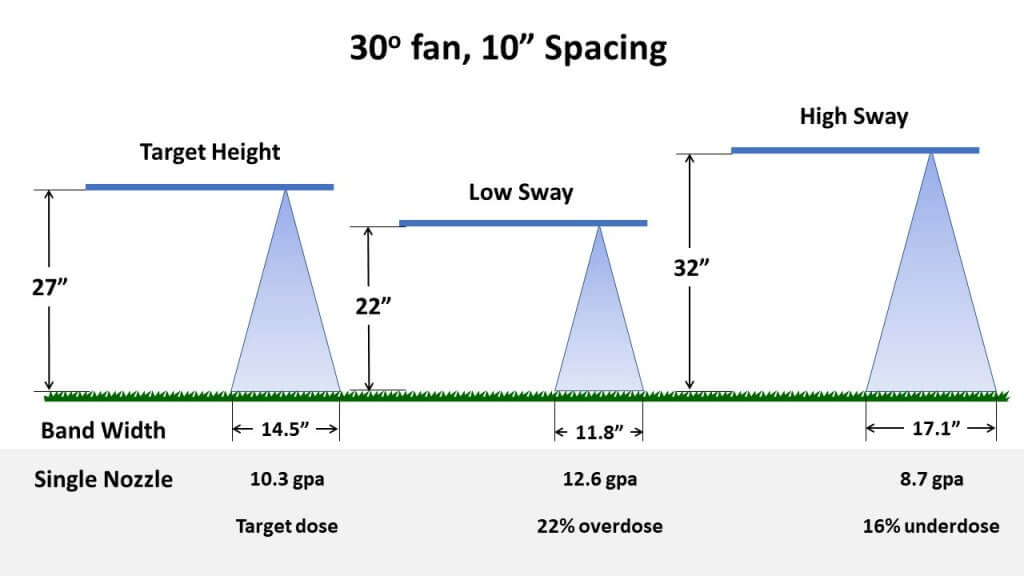
    This is where it gets tricky. At suboptimal heights, the difference between a single band and a section of overlapping patterns increases. Do we calculate the tank mix for the rate a single nozzle delivers within its band, or for a set of nozzles activated simultaneously? If we knew that the majority of activations are for a set of two or more nozzles, we could opt to assume an application rate of a boom section with 10” spacing. An 03 nozzle at 40 psi and 10” spacing would apply 14.9 gpa (139 L/ha). But when a single nozzle is activated, the application volume in the 14.5” band is just 10.2 US gpa (95 L/ha), and the plants that triggered just a single nozzle would be under-dosed.

    At the top of the sway (32”), a single nozzle’s wider pattern would deliver about 8.7 gpa (81 L/ha) , another 16% less spray volume than at 27”. At the low end of its sway, the band is 12” wide, applying about 12.4 gpa (116 L/ha) , 23% higher than the 10.2 gpa rate at the 27” boom height.

    It’s clear that to take advantage of the potential savings of spot spraying, and to ensure good success with single nozzle activation, consistent and accurate boom heights are essential.  I’m not sure how much more obvious a development priority can be.

    Band Length

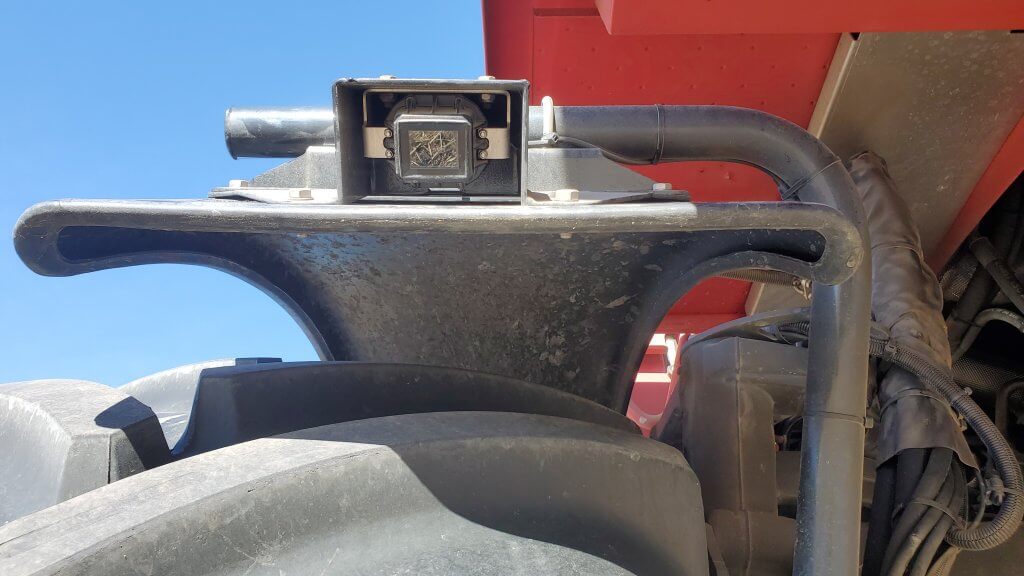
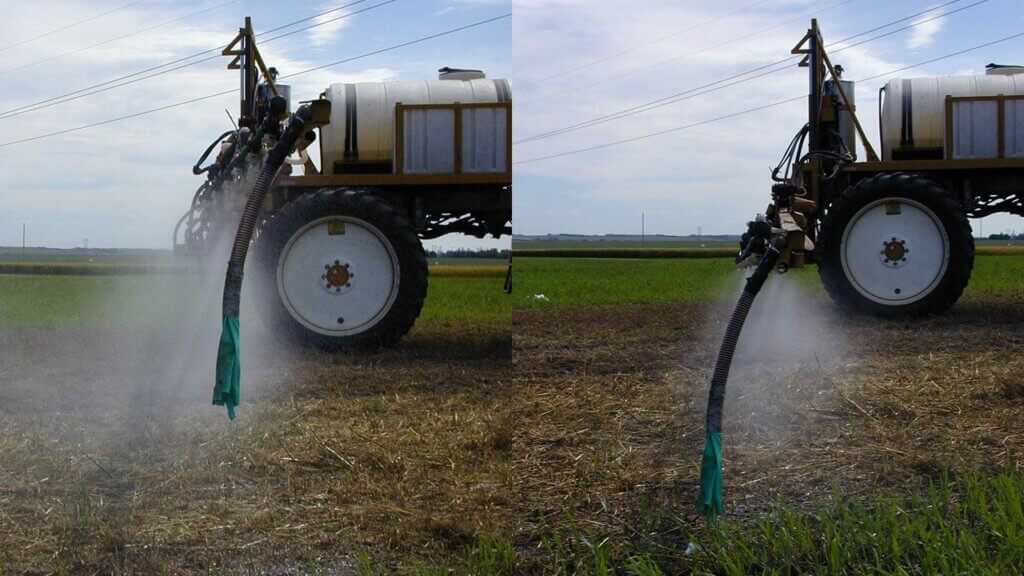
    Spot sprays allow the user to select the length of band that the spray is activated for. Shorter band lengths require more targetting certainty. If booms and travel speeds are both low, an individual detected weed can be targetted accurately with relatively short band lengths because relatively little can happen to displace the spray during its short journey. But as booms and travel speeds are higher, the time that the spray arrives at the target is more difficult to predict and longer band lengths need to be programmed. For example, wind can push the spray off its target. Or the faster speeds impart more of a horizontal vector to the spray, causing it to land further away from the point of release.

    The variances in where the spray lands along the direction of travel depend on droplet speed and boom height. A conventional flat fan nozzle produces an initial droplet velocity of about 20 m/s. These droplets slow at a rate dependent on their size and whether they’re entrained in the spray plume. At 45 cm below the nozzle, larger droplets are still moving at 10 m/s. Smaller droplets are only moving at 1 to 2 m/s.

    Droplets take time to reach their target, and the spray band length must accommodate variance in this time arising from different from boom heights or droplet speeds.

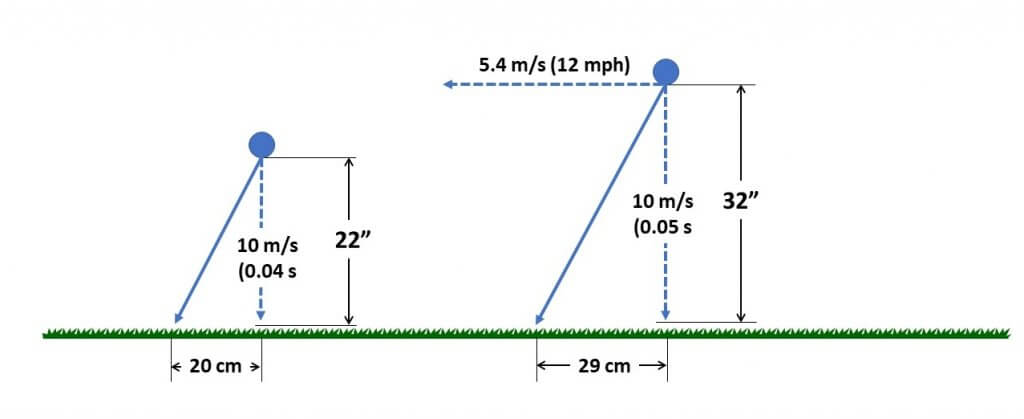
    Let’s assume an average droplet speed of 10 m/s for the journey. At that speed, the spray takes about 0.05 s to travel the 0.7 m (27”) from nozzle to target. During that time, the sprayer going 12 mph (5.6 m/s) moves about 0.25 m forward, as do the larger droplets from the released spray. If the boom sways down to 22” or up to 32”, the distance travelled by the sprayer is 0.2 and 0.3 m, respectively. In other words, the band length would need a buffer of 10 cm to accommodate the variability of the beginning and end of the band.

    Overall Efficiency

    Are these numbers such a big deal?  You might say that we’re already cashing in on some big savings here, so why sweat the details?

    It’s the principle and the resources. If we’re talking about individual nozzle band width and its change with boom height, accommodating boom sway means applying more than necessary on average to avoid under-dosing when booms sway high. The examples used here show a potential dose variance of 40% with a boom sway of 10”, a modest assumption. That’s a big number to leave on the table. If we had a constant boom height, we could decide what overlap we wanted and minimize these losses.

    One of the features on most spot sprayers is to turn on all nozzles of a section that exceed a certain boom height. While this prevents under-dosing and ensures an area is treated even when the sensor is outside of its optimal range, it is possibly an unnecessary use of product.

    If we’re talking band length, adding 10 cm to a band length of 50 cm is 20% over-application. That can also add up.

    The key to being efficient with spot sprays is accurate and consistent boom height. We know we can do that with a wheeled boom. But show me a suspended boom that can deliver on this, and I see an instant industry leader in spot spray application.

  • Horsch Leeb sprayer gives people what they want with 6.300 VL model

    Horsch Leeb sprayer gives people what they want with 6.300 VL model

    Theodor Leeb started building self-propelled sprayers in Bavaria, Germany in 2001 and formed a partnership with Horsch LLC in 2011 (Horsch has been selling tillage and seeding equipment in North America since 2001 and has 17 dealers in the prairie provinces). The resulting company, Horsch Leeb Application Systems GmbH, is headquartered in Landau a.d. Isar, about 120 km NE of Munich. There they build pull-type and self-propelled sprayers, employ 350 staff, and had sales of approximately $80 M USD in 2019.

    This is no Johnny come lately to the sprayer scene.

    Their current flagship sprayer in North America is the Horsch Leeb 6.300 VL. I spent a day with Mike Wasylyniuk, Product Marketing Manager for Horsch, in Crossfield, Alberta to look it over.

    The Numbers

    The sprayer chassis holds a 1700 US gallon stainless steel tank and two 100 gallon clean water tanks for a total liquid capacity of 1900 gallons. A stainless steel Pentair Hypro centrifugal pump provides the flow to the boom, and a second pump is dedicated to the clean water tanks. The sprayer is powered by a familiar FPT 6.7 L producing 310 hp. The boom is 120’ wide in 5 articulated sections with 10’ nozzle spacing fitted with Raven Hawkeye Pulse Width Modulation (PWM). Top spraying speed is 20 mph, top transport is 30 mph. Horsch claims a dry weight of 32,000 lbs when fitted with Goodyear LSW 900 50R46.

    The Horsch Leeb 6.300 VL near Crossfield, AB October 2021.

    A central tubular frame creates room for four-wheel steer that has an interior turning radius of 3 m. Wheels are suspended via hydropneumatics linked to the frame with double wishbones. Track width adjusts from 120″ to 160″, independently, allowing different track widths front and rear without pinning an axle in place. Standing beside the front wheel, one has with easy access to fuel and oil filters, the radiator is on top of the machine facing up with an air-chuck outlet for cleaning.

    Four wheel steer improves maneuverability but more importantly, reduces front wheel plowing and allows use of common wheel track in headland turns.

    Plumbing

    Any loyal reader of Sprayers101 knows that we believe the biggest room for improvement in spraying is in the plumbing. Horsch Leeb seems aware of this. First, it does away with sight tubes on the tank and relies on a more accurate digital float that reads down to an empty tank. Tank slope position is considered using a gyro mounted at the rear of the sprayer. The tank can be filled with the solution pump or from the tender truck using 3” side or front fill locations. It has auto shutoff when a target amount is reached. As is common, the majority of valves are motor operated to allow automation.

    Fill station on right side of sprayer contains a 3″ fill connection as well as a 2″ drain

    The recirculating boom plumbing is standard North American 1” OD stainless steel to suit any off the shelf nozzle body clamp. It pressurizes from both ends when spraying and returns to tank from the outside of the boom when nozzles shut off or when priming or flushing. The recirculation can run during transport, allowing boom priming en-route to the field, or continuous flushing with a cleaning solution in the main tank on the way home.

    Recirculating boom feed and return lines are standard 1″ OD stainless steel.

    The second pump, an Italian Annovi Reverberi 185 BP diaphragm, powers the continuous cleaning function. It draws from the clean water tank and can push this water to the boom for overnight storage when the tank has solution left, or to the tank’s wash-down nozzles for a continuous clean at the end of a job. In continuous clean mode, the solution pump continues to supply the boom while the cleaning water washes the walls and dilutes the remainder. The tank and boom can be washed with a minimum of liquid, and the process is automated using cab or side monitor controls.

    Dedicated to the clean water tanks, this diaphragm pump can push water to the boom, to the wash-down
    Stainless tank with baffle

    The system even has a winterizing button that controls all the necessary valves to distribute antifreeze from the clean water tanks throughout the plumbing system in minutes. Remaining antifreeze in the tank can be returned to the drum at the fill station with a convenient camlock drain.

    Readout of tank levels and pump pressure via the external monitor. Priming, cleaning and winterizing routines are available.

    Some may gloss over plumbing paragraphs in haste, but let’s not underestimate the magnitude of these features. We are talking about a plumbing system that can prime the boom without spraying, spray the field, then spray out any remainder while rinsing the tank, air purge the boom, then rinse the boom without leaving the cab or wasting material unnecessarily. Even the system strainers have flush capability that returns any residue to a removable fine mesh filter before the liquid dumps back to the tank. Such a design saves time and money and pays in acres per hour.

    Boom

    The 120’ boom is well built and has channels for wiring harnesses that are neatly zip-tied in place. An aluminum shield covers the nozzle bodies at the front to protect them from any ground contact.  Access is relatively convenient through ports on the other side. The fitted triple nozzle bodies should be enough to suit most needs. The swing-away has a sturdy steel tube on the leading edge to absorb and deflect any sudden impact. There is no exposed plastic. The recirculating boom plumbing is stainless steel throughout except at hinges, where the rubber hose loop is protected from chafing by an additional sleeve.

    The sturdy boom is shielded where the nozzles are mounted to protect them from impact. Note the vertical hinge that permits improved contour-following.
    The break-away section has additional protection via a stainless steel pipe that absorbs and deflects impact.
    Access to the 10″ spaced nozzles and PWM solenoids is via the rear of the boom.

    The Leeb philosophy is to design sprayers that control drift at the source without reliance on extremely coarse sprays that can hamper efficiency. They’ve chosen boom height as the key variable and built the boom to make this possible. First, they needed to design a system that can reliably hold the boom low and level.

    Low, uniform boom height for drift reduction is the stated goal of the Horsch Leeb sprayer

    To that end, three pivot points are used to provide independence of the tractor unit and the boom. The first is at the centre rack from which the boom hangs but can pivot thanks to the same gyro that helps read the tank level. A sudden tractor movement due to ruts, for example, can then be compensated. The wings are the second pivot point (as it is for all sprayers), and a third point is halfway out the wings, where a hinge allows for up or down adjustments to better suit the land contour.

    A giro, visible just above the backup camera, monitors the tractor aspect relative to the boom.
    The vertical boom pivot can help prevent unnecessarily high boom ends or ground strikes.

    The height sensors have a modest look ahead slant, and the company claims that 8” boom height at 10 mph is possible. We certainly tried that in the field, and after multiple runs up and down a local field with modest knolls we did not strike ground, although the boom ends did rise significantly on occasion. The claim of such low booms will be a point of considerable testing and debate.

    Eight sensors provide boom height feedback.

    To take advantage of the low heights, narrower 10″ nozzle spacings are needed. The boom therefore has 144 nozzles instead of the usual 72, each half the flow rate. This is new territory for PWM, where the smaller tips are not as widely available. For example, a traditional 5 gpa tip at 20” and 12 mph is 03 in size, with 10” spacing this is now 015.  Smaller sizes require more attention to filtering, and they have inherently greater drift potential. This would only be a problem at the lower application rates.

    Because PWM allows for individual nozzle control, the operator can select 20” spacing, based on either of the 10” positions. This means one can spray with 20” spacing and then switch to a different nozzle simply by selecting the alternate.

    The lower boom height can offer unique advantages. The first of these is drift control. Droplets emerge from the tip at about 70 km/h, and this initial speed prevents even the small ones from drifting. The higher the boom, the more they slow down before targetting, creating drift potential. Wind speeds also tend to be lower nearer to the ground.

    Second, the beneficial effects of twin fans or angled single tips are greater with low booms. Readers will know that one of the fundamental prerequisites for successful angled sprays in Fusarium head blight (FHB), for example, are low booms. We may be in for some positive outcomes.

    The User Experience

    The Class cab has the usual creature comforts with a buddy seat, four cup holders, bluetooth radio and a phone mount. It can be fitted with any ISOBUS monitor, the one we had was equipped with the Raven Viper 4. The climb up the ladder is not as stair-like as the North American sprayers, but the treads are large and there are plenty of handholds so you can climb one-handed and bring your lunch or toddler along for the day.

    There is one native Horsch monitor that controls the chassis, wheel spacing, engine specs, speed, etc. It’s controlled using a rotary button selector like the one in many cars, a wheel that highlights items by turning, then selects them with a push. The second, an ISOBUS monitor, handles the rate control and thus creates easy compatibility with a variety of aftermarket monitors.

    The joystick is backlit and buttons can be customized. Like the Fendt stick, a push forward sets the speed and it can return to the neutral position without changing that speed. A pull back is required to slow down.  It takes a bit of getting used to. Motion can also be foot operated with a speed pedal and foot brake.  Cruise control has two preset speeds, and boom height can be raised to preset values when the master switch is shut off to facilitate a headland turn. The top two thumb buttons are Master on/off and autosteer resume.

    There is no throttle control. The sprayer decides how much throttle is needed to maintain speed, saving noise and fuel when it can. Throttling up was noticeable as we climbed hills during our test drive, returning to lower rpm as we descended while maintaining our cruise control speed.

    Some touches

    • a hand wash station at the ladder to prevent contaminating the hand-holds or cab
    • a camera focused on the centre rack nozzles that are invisible from the cab
    • cameras showing front wheel position
    • mud guards behind rear wheels to protect boom
    • Rain cover over electronics mounted on centre rack
    • A clean underbelly with good clearance and tow hooks front and back
    • Inductive (wireless) phone charging mount

    Overall Impression

    It’s clear that Horsch Leeb wants to succeed in North America. I’ve hardly ever seen a company so bent on delivering what the market wants (for familiarity and compatibility) while delivering what it knows they need (like plumbing and drift control). Spending the day with Mike I learned how quickly the engineers and fabricators implemented his suggestions at the factory. That is perhaps the most promising aspect of all, a company that listens to its customers and continually evolves its product as a result.

  • The Ideal Sprayer (an open letter to sprayer manufacturers)

    The Ideal Sprayer (an open letter to sprayer manufacturers)

    Today’s sprayer has to excel at a lot of things. It has to have capacity and low weight. It has to go fast but be comfortable. It needs wide booms that stay level over complex terrain. It has to deliver the right spray volume at the right spray quality for the job. It has to be easy to fill and easy to clean. And of course, it has to be reliable, affordable, and come with dealer support.

    We’ve definitely made progress in many of these areas. But the overall package still leaves lots of room for improvement and doesn’t address some issues that are of importance to applicators. Is it time for a reset?

    Let’s say cost is no object. Here’s where I think the industry could go.

    Focus on spray delivery

    Spraying is done to protect crops. We need to do it without harming the environment while being economical with the inputs. These three tenets make up the Application Triangle, sometimes known as the 3 Es of spraying: Efficacy, Environment, Efficiency. The triangle represents the need for balance. A gain in one or two areas often requires a loss in another. That’s why there has never been a so-called “silver bullet” in spraying.

    Priority 1: Only spray when and where required.  Site specific treatments and IPM have been slow to make their way to the spraying world partly because of the low cost of inputs, but also because of difficulties defining and mapping areas that require different rates or products. The machine learning revolution is changing that. Green on Brown or Green on Green sensing can do more than save inputs. They can generate maps that document the change of weed patches over time, identifying priority areas and threshold densities and flagging problems early.

    Priority 2: Integrate air assist. Air carries small droplets towards the target, protecting them from displacement by travel-induced or ambient winds. Once there, air can improve target interception and retention. It has to be done right, though, as improper adjustment can result in the opposite outcome. The reason it’s high on this list is because it improves efficacy and environmental protection at a modest cost.

    Priority 3: Improve droplet size control.  Nozzle design has improved, but the overall range of spray qualities that is achievable for any specific nozzle remains narrow. Sprays can be made finer or coarser with spray pressure, but this has implications for pattern uniformity. Twin Fluid nozzles currently offer the widest range of spray qualities, allowing one nozzle to do it all. We simply need greater droplet size flexibility on the spray boom.

    Priority 4: Use nozzle-specific rate control.  At minimum, a sprayer needs a system that allows for individual nozzle rate control within a wide window, say 4:1. This allows consistent dosing over a wide speed range, turn compensation, or local adjustments to dose for specific (sensed) canopy conditions. By layering direct injection at the nozzle on top of this, the sprayer can change rate and volume independently. Being able to spray the right amount in the right spray quality at the right volume, where needed completes the opportunity created by pest and canopy sensing.

    Create better infrastructure

    The backbone of the sprayer, the frame, drivetrain, boom, tank, pump, and plumbing, are responsible for carrying and delivering the spray liquid. Poor management of these variables results in an unproductive, heavy machine.

    Priority 1: Prepare booms for future.  A limiting factor in sprayer performance is boom width and stability. Consistent and low boom heights are the cornerstone of good application, ensuring uniform distribution, reducing drift potential, and improving targeting within the canopy. But perhaps as importantly, stable booms are essential for accurate optical spot spraying and any other sensing tasks that will rise in importance. Set a standard for sway, say target height plus or minus 10 cm along the width of the boom, 90% of the time. Do the same for yaw. Accommodate brackets for sensors and wiring harnesses when designing the boom fold.

    Priority 2: Improve plumbing.  Poorly executed sprayer plumbing causes waste and decontamination headaches. Although rubber hoses attached to plastic fittings provide a very versatile and generic building block, they generate and hide countless niches in which pesticide mixtures or active ingredient residue can accumulate. A simplified design that incorporates more engineered stainless steel tubing, smooth directional and dimensional transitions, interior surfaces that don’t accumulate residues and generate more efficient flows – all these would improve many aspects of the spray operation. It needs to be goal oriented – i.e., zero waste in priming and cleaning, guaranteed decontaminated after a rinse cycle. Draining on the ground should not be necessary.

    Priority 3: Save weight. Weight causes compaction and eats fuel. Advanced materials or techniques can save weight while preserving strength. Savings can be applied to capacity. We need to explore advanced materials and trussed or exoskeletal designs (see “Aerodynamics”).

    Priority 4: Consider aerodynamics in chassis and boom design. Wind blowing past a tractor, tank or boom, or counter-rotating air from wheels creates turbulence that displaces small droplets within it, reducing uniformity. Cleaner air makes it easier to use smaller droplets, easier to implement air assist or any other drift-reducing technology. This is no small task, as air can come from any direction. But as units become larger and travel faster, this effect can’t be ignored. Monocoque designs that use aerodynamic exteriors to carry machine weight may provide an answer.

    Provide quality control

    Spraying can be a guessing game, hence the terms “Spray and Pray”. We don’t know the outcome for days or weeks, depending on the mode of action, and by the time the result is known, it is too late to do anything if it’s unsatisfactory. But we can do better in assuring some sort of standard.

    Priority 1: Confirm pressure, flow, and patterns at nozzles. The average sprayer has one flow- and one pressure-sensor. It can confirm the flow of the entire spray boom but cannot do that at the nozzle level. PWM has helped, by inferring flow from duty cycle. But actual liquid flow, and its pressure, remain unverified at the spray tip. A visual inspection of the pattern is necessary, and this is not only impractical but also wasteful and potentially hazardous.

    Priority 2: Characterize canopy. If we knew the crop canopy was dense or sparse, we could adjust the water volume or rate of the product accordingly. LiDAR (Light Detection and Ranging) can characterize the physical structure of an object that would indicate density or porosity for which a dose (or droplet size, or air) adjustment may be necessary. This is not some future technology. The iPhone 12 Pro has it. Even RGB image processing could do something very similar.

    Priority 3: Confirm coverage and drift.  Say we’ve characterized the canopy and adjusted the atomization to suit. Is it having the intended impact? We will need a way to verify that the settings of the sprayer result in the required canopy penetration and coverage, even drift, on-the-go. We would need sprayer-mounted sensors that see spray deposits or an airborne spray cloud. The verification must be fast enough to make corrections during the spray operation. This kind of quality control provides the feedback loop to the first priority, spray delivery. It creates a perfect environment for machine learning and continuous improvement.

    Priority 4: Improve user interface.  The complexity of modern equipment monitors is great if you’re familiar with their features. But if you’re a new user or less comfortable with layers of screens and buttons and warning beepers, navigating the monitor can be a game stopper. Can we have beginner modes? Or a system where the monitor more actively engages with the user, asking questions or reminding a novice of key settings? The friendliness of the interface is a sleeper issue, it seems less important at first look but can over-ride many equipment features because of the power of a positive user experience.

    I challenge sprayer manufacturers to conceptualize and show us the ideal sprayer they’re working towards. The perfect unit may never reach us, as this proposal is rife with technological and cost barriers. But it is nonetheless important to identify priorities and identify possible ways to meet them. As we creep towards the solution with incremental improvements, recall that its not the size of the step that matters, it’s the direction.

  • Ten Tips for Spraying in the Wind

    Ten Tips for Spraying in the Wind

    Choosing the right time to spray can be tricky. Our gut tells us that spraying when it’s windy is wrong.  The experts tell us that spraying when it’s calm is wrong. So when can you actually spray?

    I’ve always advised my clients to spray in some wind, because it has a few advantages. The main one is that wind helps disperse the spray upward and downward, diluting the spray cloud fairly rapidly. Another advantage is that winds tend to be reasonably steady in their direction and velocity (or at least that can be forecast), so downwind areas can be identified and potential impacts are known or predictable. It helps if it’s sunny, because that improves the dispersion of the cloud even more.

    First, let’s define “windy”. The classic wind scale is the Beaufort Scale, intended for the sea, but also used on land. The upper limit for spraying is probably Force 3 or Force 4, with upper limits of 20 – 25 km/h or so.  The Beaufort Scale calls these “Gentle or Moderate Breezes” (they had to save the alarming words for hurricanes), and the scale provides good visual clues such as what wind does to flags, leaves, or dust.

    Beaufort Scale-1

    Spraying under breezy conditions can be done fairly safely if you follow specific steps. The idea is to understand what the risks are and to manage them.

    The cornerstone is to use a low-drift spray and match it to a pesticide that will work well with larger droplets. But there are other important aspects to consider. Below are the top ten to think about:

    • Choose a herbicide that can handle large droplets. Glyphosate products are well suited to coarse droplets. But glyphosate commonly has contact actives in the mix, members of Group 6, 14, and 15, and these are less likely to perform well with big droplets than those that contain Group 2 and 4 mixes. Actives with soil activity also have more tolerance for larger droplets.
    • Use a low-drift nozzle and operate it so it produces a Coarse (C) to Very Coarse (VC) spray quality, as described by the manufacturer. Dicamba labels call for Extremely Coarse (XC) to Ultra-Coarse (UC) sprays, and Enlist requires at least Coarse. To achieve these you may need to purchase new nozzles. Low-pressure air-induced nozzles operated at about 50 – 60 psi will generally be very low-drift, but lower drift models are available. If you need a finer spray, produce it either by increasing the pressure or moving to a finer tip. Do this when the weather improves, for contact modes of action.
    The name, symbol and range of droplet sizes used to describe the median droplet diameter produced by nozzles according to ASABE S572.3
    • Keep your boom low. Lowering the boom ranks as the second-most effective way to reduce drift, after coarser sprays. But there’s a limit. For low-drift sprays, you need at least 100% overlap (more for PWM), which is for the edge of one nozzle pattern to spray into the centre of the adjacent pattern. In other words, the spray pattern should be twice as wide as your nozzle spacing at target height.  For most nozzles, a boom height of close to 20 inches is enough to achieve this overlap. That’s pretty low by current standards from suspended booms on self-propelled sprayers, so being too low for a good pattern will only happen due to boom sway.
    • Maintain reasonably slow travel speeds. These reduce the amount of fine droplets that hang behind the spray boom, reduce turbulence from sprayer wheels, and they also make low booms more practical. An added bonus is less dust generation.
    • Know what’s downwind and what harms it. Survey the fields on all sides of the parcel you’re treating. When you have a choice, avoid spraying fields that have sensitive areas downwind such as water, shelterbelts, pastures, people, etc. If you can’t avoid being upwind of these areas, make sure you check and obey the buffer zone restrictions on the label. These will also give you an idea if the product can cause harm in water or on land, or both.
    • Consider a dicamba tip for special situations, even if you don’t use dicamba. If you’re in a situation where quitting and waiting is a poor option, these tips allow you to finish the job with minimal drift risk and with only slight reductions in product performance due to poor coverage.
    • Use a low-drift adjuvant. Specific products such as Interlock or Valid have been shown to reduce driftable fines (<150 microns) by between 40 – 60%, without adding significant volume in coarser droplets. The response will depend on the nozzle and the tank mix, but can be very noticeable.
    • Study drift and how it forms and moves. It’s about more than wind speed and droplet size. Knowledge in this area can help you work out the best strategies.
    • Invest in productivity. You may not need it every day, but on occasions when you have a small window to avoid bad weather, it pays dividends.
    • If you feel that drift is unavoidable and someone might be impacted by it, talk to those people first. It’s one of the most important things you can do.

    Keeping pesticide sprays on target continues to be one of our top responsibilities.

  • John Deere See & Spray Select

    John Deere See & Spray Select

    On March 2, 2021, John Deere entered the optical spot spray (OSS) market with its first product, See & Spray Select™. This “Green on Brown” system identifies green material on a non-green background and is thus suited for pre-seed burnoff, chem fallow, or post harvest. It is competing for the same market space as Cropland’s WEEDit and Trimble’s WeedSeeker, but uses a slightly different approach.

    At the heart of the See & Spray system is a relatively simple RGB camera that is mounted directly to the boom and looks about 1.5 m ahead.  When this camera detects a spot of green colour, it assumes that this is a plant and activates a nozzle in line with that plant. John Deere says the weed size threshold is about ¼” (6 mm), and is evaluating its experimental data to identify exceptions to that rule of thumb.

    See & Spray Select uses an RGB camera to detect weeds (Image courtesy John Deere)

    In 2017, John Deere conducted a highly publicized acquisition of Blue River Technologies, a start up that pioneered artificial intelligence (AI) plant identification and coined the term “See & Spray”. However, the technology John Deere announced this time originated with the University of Southern Queensland near Toowoomba, Australia. The university’s Centre for Agricultural Engineering had received some initial seed financing from Sugar Research Australia, Cotton Research and Development Corporation, and Hort Innovation, and eventually partnered with John Deere. This is yet another example of the value of farmer investments in research.

    Blue River contributed to this project but remains committed to its path of developing Green on Green OSS through machine learning. John Deere says this first product is part of an evolution of spraying with ever-increasing precision that will culminate in spot spraying weeds within a canopy.

    The pixels in the See & Spray camera chip are mapped during its initial calibration, allowing the processor to know which nozzle to turn on. There are two user-selected modes. In “Single Nozzle” Mode, the system turns on as few nozzles as possible. If the weed is directly under a nozzle, just that nozzle is turned on. Should the weed be in between two nozzles, both will be turned on. In “Overlapping” Mode, a detection will turn on at least three, and up to six adjacent nozzles. This mode is intended for herbicides that contain specific nozzle recommendations on the label, such as dicamba. By fitting these tips on the spot spray location, the required overlap and subsequent coverage can be guaranteed to be compliant with that label, a unique feature of See & Spray.

    The number of nozzles activated by a weed detection depends on the location of the weed relative to the nozzles, and the mode selected by the user (Image courtesy John Deere)

    In all modes, the user can specify the distance before and after the detected plant that the nozzle will spray. This feature is useful when boom height varies or when travelling faster to provide extra assurance that the target will be covered by the spray. The boom height range for See & Spray is 26 to 47” (66 to 120 cm), and the maximum travel speed with nozzles pointed down is 12 mph.

    Installation of a 40 degree angled adaptor allows sprays tom be emitted backwards, and increases the spray speeds to 16 mph due to the extra distance and time afforded the sensors andoin processors to make a decision.

    See & Spray has a built in contingency for suboptimal conditions, for example when the boom falls outside its height range, or the nozzle speed (not tractor) exceeds the 12 or 16 mph maximum in a turn, or a light or sensor or processor fault occurs. Called “Fallback Mode”, the boom can be configured to shut off, or to go into broadcast mode (using the spot spray nozzles) at that time. These types of insurance are a necessary part of an OSS on the market today.

    To prevent fallback mode from occuring unecessarily, operators often choose to reduce their tractor speed one or two mph to allow for yaw without triggering all the nozzles.

    No OSS system is perfect. Tiny weeds, or those obscured from camera view by crop residue, may be missed. The contingency for WEEDit is “Combined Mode”, where the entire boom emits a broadcast spray at a user-determined fraction of the full dose, while still maintaining spot spray capability at the full dose when a detection occurs. The reduced dose is sufficient to control the smallest weeds, whereas the spot spray is emitted at the full label rate for the larger ones. This capability is made possible through Pulse-Width Modulation (PWM) control of each nozzle.

    John Deere has developed a mode of its ExactApply system to create the same outcome. Called “A & B Mode”, the rear nozzle (B location on the ExactApply nozzle body) is being activated by See & Spray. The front nozzle (A location) can be asked to spray simultaneously over the entire boom width. By choosing a smaller nozzle, a fraction of the label rate can be applied as a broadcast while maintaining spot spray capability. The broadcast boom is pulse-width modulated and retains the swath control and turn compensation of ExactApply. This mode also makes it easier to ensure coverage of these smaller weeds by selecting a finer, wider (110 degree) angles spray on the broadcast boom, and retaining a coarser, narrower fan angle banding nozzle for the spot application. The spot spray does not use PWM, relying on conventional speed and pressure to ensure the correct rate.

    If planning to use A & B Mode, a user would first need to decide if they will calculate the spot spray dosing on a single or a multiple activated nozzle system. If priorizing the single nozzle actiation, one would first determine the band width of that nozzle, and size the nozzle accordingly. The band width should be ar close to the nozzle spacing as possible to maximize savings. Say the sprayer has 15″ spacing, and the nozzle’s band width is 20″. Now, whenever multiple nozzles are activated, they would operate as a 15″ spacing and would over-apply 20/15 = 1.33, or 33%. Say you want to apply 15 gpa (you may need to boost the spot spray volume to allow you to cut that with the broadcast feature). You can do it with the band (and overdose when using multiple nozzles, or apply 15 gpa with the multiple nozzles, underdosing by 28% when a single nozzle is activated. Or split the difference.

    The next step is to select the application rate of the broadcast. If you want to apply 30% of the spot spray rate using the broadcast nozzles, size these accrodingly to apply 5 gpa.

    For band- and spot-sprays, the width of the spray pattern at the target height determines the dose, therefore careful selection is advised. A worksheet that shows boom heights at various fan angles and nozzle spacings is downloadable here. TeeJet and Hypro offer a selection of narrower flat fan tips, but none yet in a low-drift design. Other nozzles are in development. Agrotop has already developed a low-drift “Spot Fan”, and MagnoJet, a Brazilian ceramic nozzle supplier, has 30 and 40 degree low drift tips for sale. Wilger has develped the DX series ComboJet tips in 20, 40, and 60 degree fan angles, in a low drift (pre-orifice design that works with PWM.

    The camera sensing threshold can be adjusted to optimize a specific target. For example, to specify a certain weed size, that weed can be held in view of the sensor and the user can adjust the sensitivity until the weed is properly detected. As with any higher sensitivity, this runs the risk of more false detections, resulting in over-application. But it gives the user some knowledge that an important weed stage is being targeted properly.

    The See & Spray camera relies on ambient light conditions, and John Deere recommends it not be used within 30 minutes of dawn or dusk. Both WEEDit and WeedSeeker, in contrast, can operate under any light conditions.

    One of the challenges of running a OSS boom is the unpredictable fluctuation in flow requirement, which can theoretically range from just a few nozzles spraying to the whole boom activated in less than one second. While this extreme example is rare, a sophisticated and fast-responding pressure-based flow capability is nonetheless required. WEEDit uses a Ramsay Valve into their units to handle this challenge, whereas John Deere is relying on its existing plumbing design.

    As a factory install, the See & Spray is fully integrated into the Series 4 display and is tied into JD Link. As a result, it can generate a high resolution map that shows each spot spray activation, by nozzle. The agronomic utility of this capability is significant, as it provides a very high resolution plant density map. This capability is also inherent in WEEDit and most green on Green systems available..

    See & Spray Select is a factory option and comes integrated into the 4600 series monitor (Image courtesy John Deere)

    It’s no secret that I believe optical spot sprays represent the future of pesticide application (see here). And it’s great news to see John Deere enter the OSS area with a factory installed option. As an influential force in ag, it lends credence to the concept and will benefit all other companies vying for this space. As they say, a rising tide raises all ships.