The decision on which application method is best for herbicides boils down to two main factors: (a) target type and (b) mode of action. In general, it’s easier for sprays to stick to broadleaf plants on account of their comparatively larger leaf size and better wettability compared to grassy plants. There are exceptions, of course – at the cotyledon stage, broadleaf plants can be very small and a finer spray with tighter droplet spacing may be needed. Water sensitive paper is a very useful tool to make that assessment. Imagine if a tiny cotyledon could fit between deposits – that could be a miss!
Some weeds are also more difficult to wet, and those may also need a finer spray or a better surfactant for proper leaf contact. An easy test is to apply plain water to the leaf with a spray bottle. If the water beads off or the droplets remain perched on top in discrete spheres, the surface is considered hard to wet. Most grassy weeds are hard to wet, while most broadleaf weeds are easy to wet.
Grassy weeds are an especially difficult target because they have smaller, more vertically oriented leaves, and almost without exception are more difficult to wet than broadleaf species. All these factors call for finer sprays for effective targeting and spray retention.
Broadleaf weeds usually have more horizontally oriented leaves which also happen to be larger. As a result, they can intercept larger droplets quite efficiently.
There are about thirty mode of action (MOA) groups among the herbicides with about ten accounting for the majority in Canadian prairie agriculture. It’s probably an over-simplification to categorize them into just two groups – systemic and contact. But that grouping goes a long way to making an application decision.
Contact products (MOA Group 5, 6, 10, 14, 22, 27) must form a deposit that provides good coverage. Good coverage is an ambiguous term that basically means that droplets need to be closely spaced and cover a significant proportion of the surface area because their physiological effects occur under the droplet, and don’t spread far from there. One way to generate more droplets is to reduce droplet diameter, another is to add more water. A reasonable combination of both is ideal because simply making droplets smaller creates issues with evaporation and drift.
Systemic products (MOA Group 1, 2, 4, 9) will translocate within the plant to their site of action after uptake. As a result, coverage is less important as long as sufficient dose is presented to the plant. In practice, this means coarser sprays and/or less water may be acceptable.
When two factors are combined, either in a tank mix or a weed spectrum, the more limiting factor rules. Application of a tank mix or product that is active on both broadleaf and grass plants will be governed by the limitation placed on grass targets. A tank mix comprised of both systemic and contact products is governed by the limitations placed on contact products.
A factor we should also consider is soil activity and the presence of residue. Studies have shown that soil-active products are relatively insensitive to droplet size. But if they have to travel through a layer of trash to get to the soil surface, more application volume is the best tool.
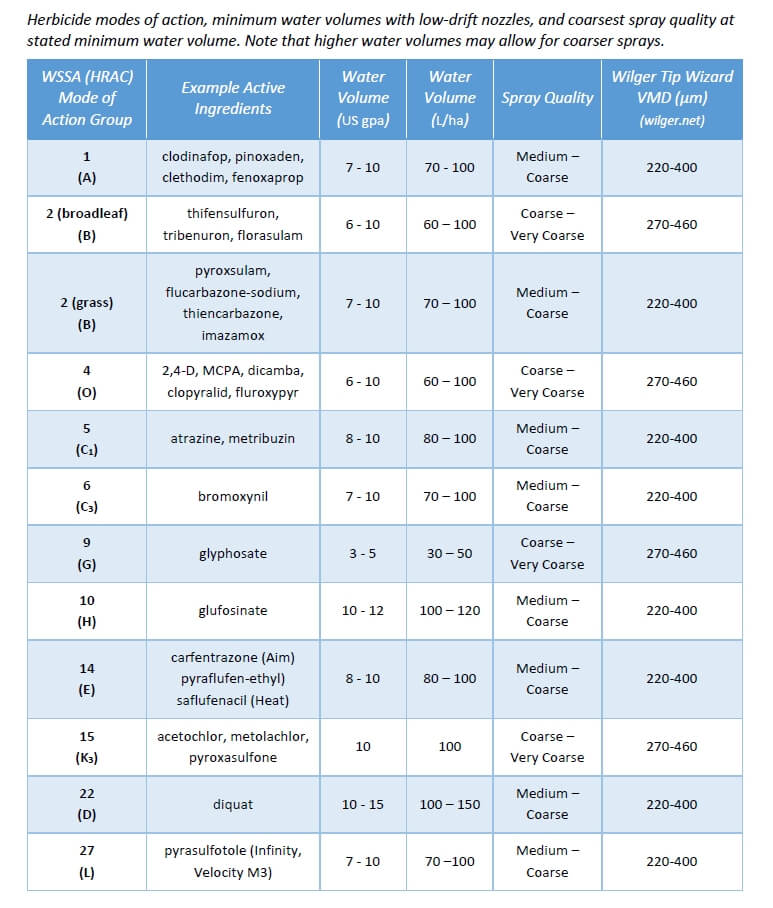
Below are some recommended spray qualities and water volumes for use in Canada. The spray qualities listed in the table can be matched to a specific nozzle by referring to nozzle manufacturer catalogues, websites, or apps. Note that Wilger also offers traditional VMD measurements on their site, allowing users to be a bit more specific if necessary.
If you read this site, you know we’re fans of recirculating booms. We love them for three reasons:
They save money and waste by recovering spray back to the tank during priming and rinsing
They make boom cleaning easier by eliminating boom-ends
Most require individual nozzle shutoff, which makes for better sectional control
If you’re new to the concept of recirculating booms, read more here.
Until recently, these booms were only available on sprayers imported from outside North America (Horsch, Amazone, Agrifac to mention three), or via France’s Pommier booms that have been available as retrofits for many years. In 2018, Agco introduced their Liquid Logic system on the Rogator line, becoming the first North American manufacturer to offer a recirculating boom at the factory. Pattison Liquid also offers Recirculating booms as standard equipment on their Connect Sniper pull-type sprayer.
In the meantime, three boom retrofit kits and one sectional conversion kit have become available.
Arag Australia‘s BRS (Boom Recirculation System)
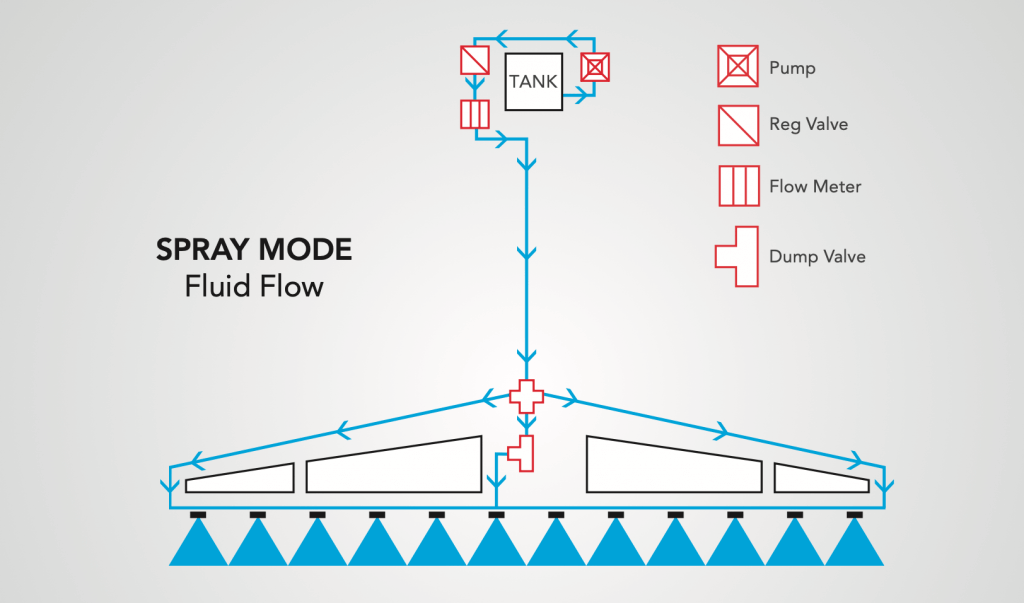
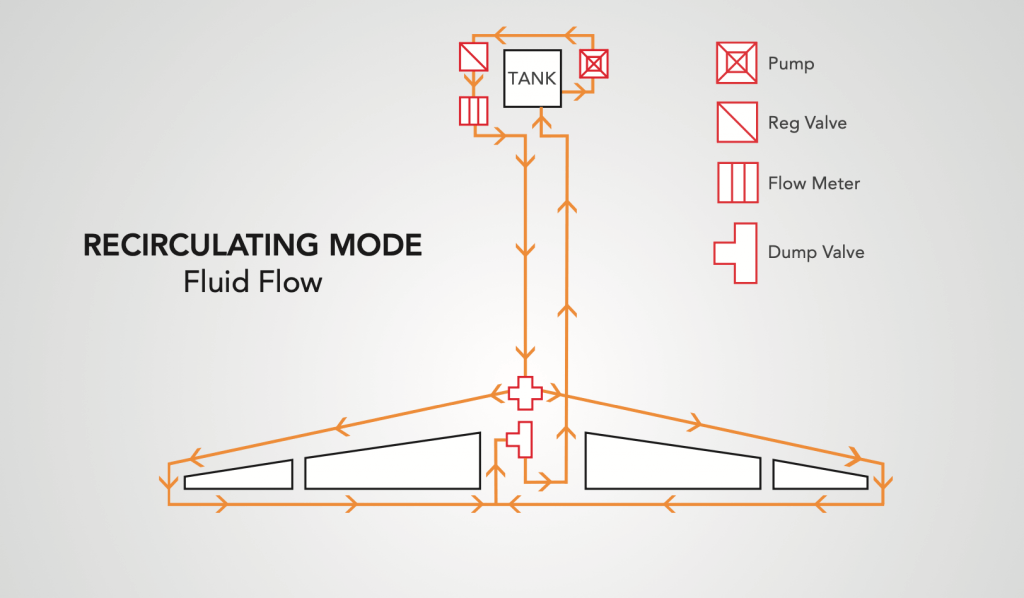
The first was developed by Arag Australia, and is available there via Nozzles Online, and in Canada through Nozzle Ninja. Designed for John Deere R-Series and Case Patriot sprayers, the kit uses the existing line that feeds liquid to the outermost section and simply extend that line to the end where it enters the boom via two installed elbows. The liquid returns to the centre via the installed boom sections which are connected together by removing the boom end cap (or “aspirator” for John Deere) and replacing the gap with a section of hose. Back at the centre rack, the liquid from both booms meet in the middle. At this point, a three-way valve gives the choice to return the spray to the tank, or to receive pressure from the pump. There is also a manual valve that allows the return to be dumped for safe disposal.
Arag Boom Recirculation System (Spray Mode)Arag Boom Recirculation System (Recirculation Mode)
The system does not tie into the sprayer’s electronics. instead, it adds a switch in the cab that the operator uses to switch from spray mode to recirculation mode. The switch is not activated at the end of each swath, but instead to prime or flush the boom.
A switch is added so the user chooses recirculation or spray mode. The boom would recirculate to prime or flush, and remain in spray mode during the spray operation.
Raven
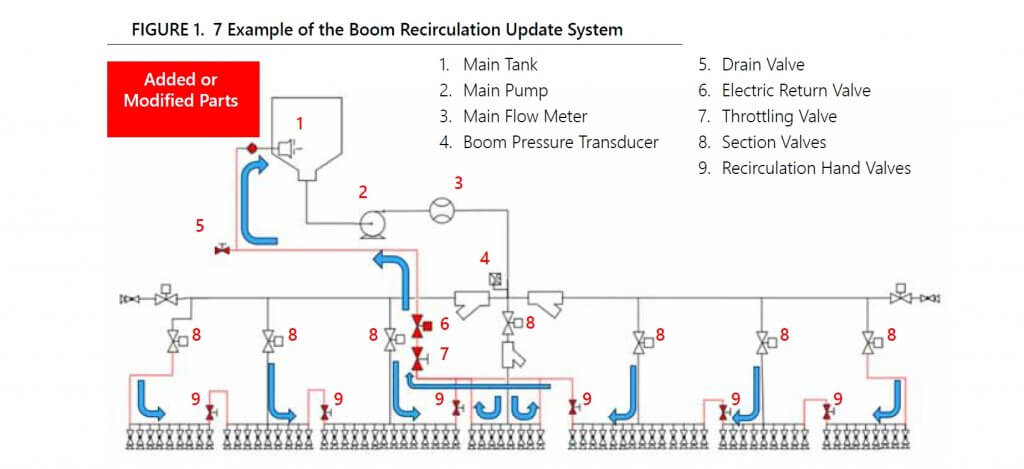
Raven offers a recirculation kit for 3000, 4000, and 5000 series Case Patriot sprayers with Aim Command HD and an ISOBUS terminal. The approach is slightly different, as they retain the pressure feed through individual sections but also tie the sections together so the spray is returned to the tank. By including a shutoff valve between each section, the system retains the option to use conventional sectional control for high flow situations, or to isolate a section should a leak occur. The system can be configured and controlled from the sprayer monitor, either a Viper 4+, CR7, or CR12.
Raven Boom Recircualtion System schematic (from Raven manual). Note the retention of section valves and the addition of manual valves between sections.
John Deere
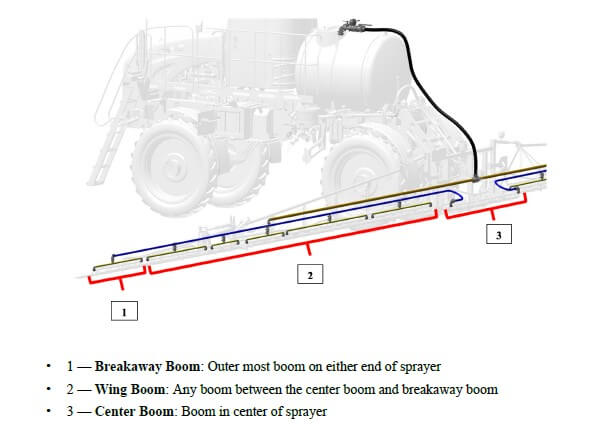
On March 2, 2021, John Deere announced a 2022 factory option called Pressure Recirculation and Product Reclaim. The system keeps several existing sections and adds two steel lines the flull length of each boom wing. One is for supply, the other return. As these lines approach a section, the supply is fed to one end of the section and the return is connected to the other end. On a 120′ boom, there are five recirculating sections, two on each wing and the centre.
This approach adds one more line than the other designs, and this line will hold materials that ultimately need to be cleaned, flushed, and possibly dumped or sprayed out for cleanout. A possible reason for the extra line is the ability to deliver 220 gpm to the boom, an advertised feature of John Deere high flow booms that may come in handy for topdressing liquid fertilizer. These levels of volume are not needed for pesticides.
John Deere Boom Recirculation and Reclaim. Top two lines are supply and return and extend the length of each boom wing. These connect to the existing sections on each wing, creating several smaller recirculating sections.
Latitude Ag
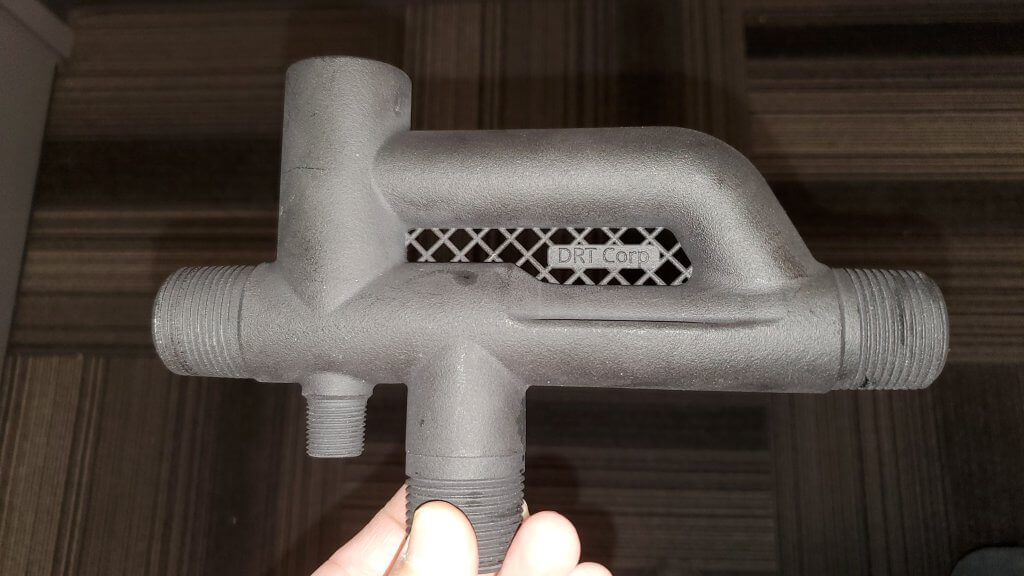
This Wisconsin company has developed an innovative product that converts any existing plumbed section that contains boom ends into a recirculating section. It does this by incorporating a boom recirculation valve” (the “Merlin IC System“) into the original section feed line. Boom end caps are removed and replaced with sweeps and hoses that return flow to these boom valves. The flow from the boom ends is incorporated back into the sectional feed thanks to a venturi design in the recirculation valve.
A prototype of the Merlin IC System valve made by Latitude Ag
Advantages of this design include simplicity. No moving parts are required, the valve simply recirculates the flow from the boom ends automatically whenever that section operates. Existing sectional control, whether it’s by plumbed section or individual nozzle bodies, is unaffected. Flushing the boom with water is done with normal spraying. It takes some extra time to incorporate and dilute the contents of the boom end return lines but results in a clean boom and no section end residue. We’ve seen the results of testing and agree that it works.
This product does not allow boom priming without spraying. However, a key advantage is that it can be used with direct injection since no product is returned to the tank. Latitude Ag says it will provide the necessary flow sensor and software to make this possible. As of 2025, this system may no longer be commercially available.
Precision Planting ReClaim
ReClaim is capable of operating on a sprayer with or without individual nozzle shutoff. For conventional nozzle bodies containing the original spring-loaded diaphragm check valves, the concept is to drop the liquid pressure below the cracking point of the check valves so flow continues through the sections and back to the tank without engaging the nozzles.
Recirculation fittings are added to the end of each boom section. These feed into 3/4″ lines are installed on section ends, which in turn feed increasing diameter collector lines that eventually return all flow to the tank. Flow reaches the sections as before. When recirculation is turned on, flow exits the boom section through the new fittings and returns through 3/4″ lines to the centre of each section, where it enters 1” lines that take the flow to the center of each boom wing. There the flow in the 1” lines is combined moves to the center of the sprayer on 1.5” lines where it meets the flow from the other wing. From there, the flow returns to the tank through an electronic ball valve and 2” line. This system ensures no back-pressure and balanced flow from each section.
For some sprayer rate control systems such as John Deere, the pump won’t operate below about 20 psi despite operator settings. This means the priming or flushing procedure would trigger nozzles to spray if the bodies were fitted with spring-loaded diaphragm check valves. A pressure reduction kit (a second restrictor valve) is required to reduce the pressure sufficiently for ReClaim to work in these instances. More here.
ReClaim operates independently of any electronic control systems, relying on a toggle switch to initiate recirculation. When flow back to the tank is detected, a light indicates that recirculation is working, and the operator waits approximately 60 sections for a 120’ boom to circulate all volume back to the tank. Download the operator’s guide, here.
This system requires a lot of additional lines. A 120’ boom would require 120’ of additional 1” line and 60’ of 1.5” line. The manufacturer states that ReClaim adds about 14 gallons of volume that would need to be displaced back to the tank, adding to the standing volume. This volume can be circulated using solution from the main solution tank, or displaced back to the tank using flow from an existing clean water tank, or displaced using compressed air via an optional pneumatic port. It is not clear how spray mix in the ReClaim system can be removed from lines without returning it to the tank and draining it from there. Users should consider the additional surface area and volume that will have to be addressed during cleanout.
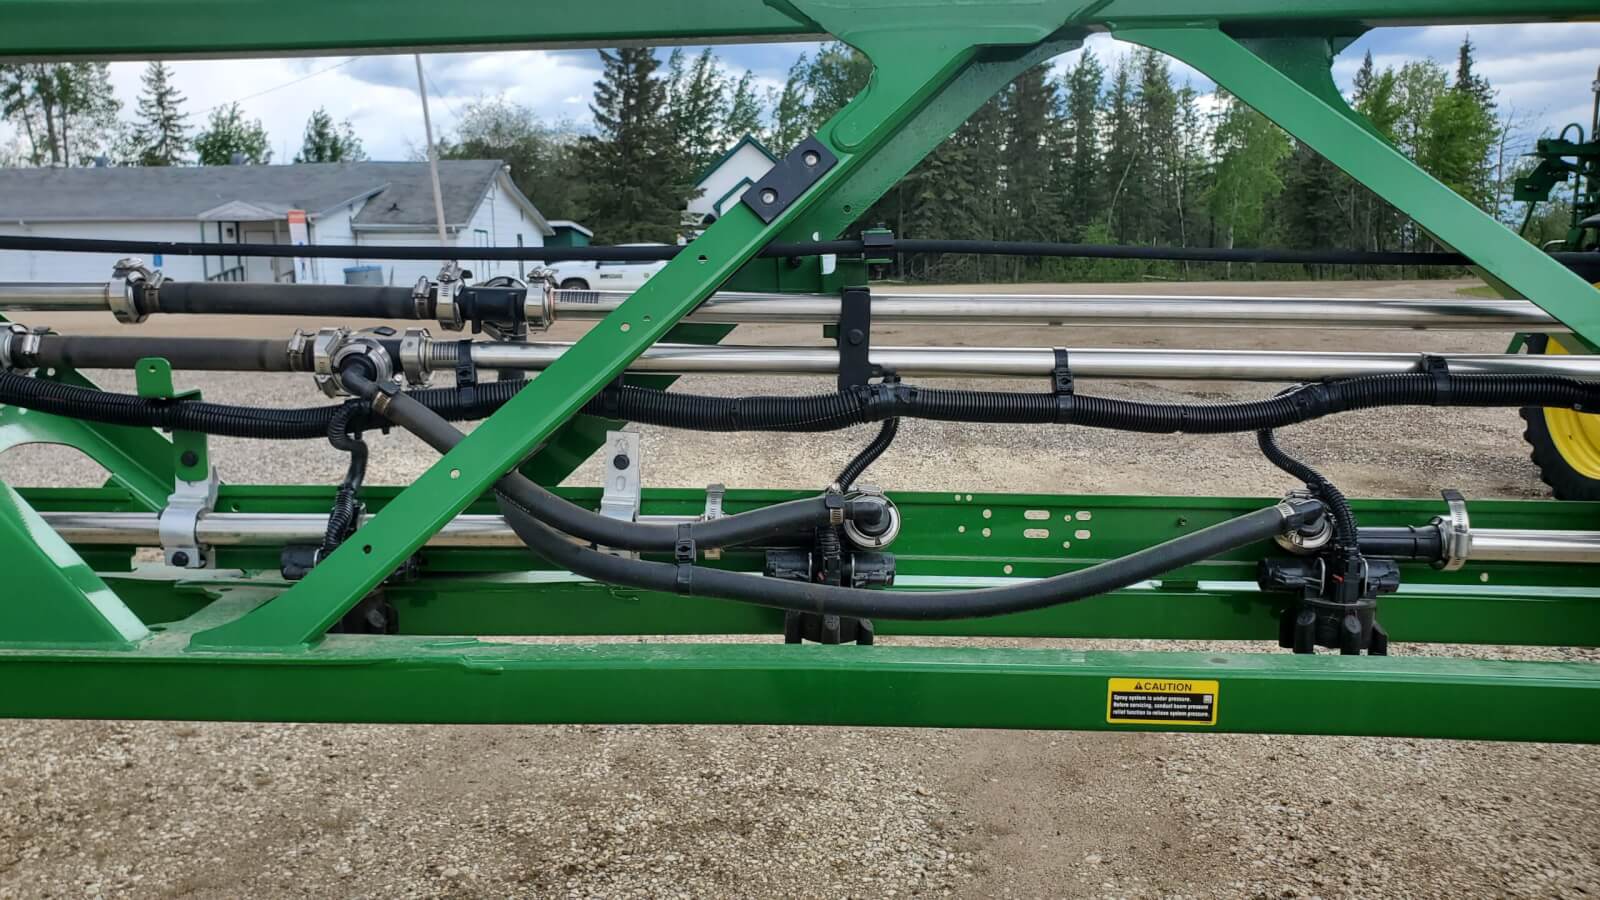
Do It Yourself
If none of the available options work for your sprayer, consider building your own system. Sprayer plumbing parts are available from the major manufacturers Banjo, Hypro, TeeJet, and Wilger. Wilger, in particular, has developed a nice suite of parts well suited to recirculating booms, including flanged sweeps and thin gauge steel booms, punched for nozzle bodies or unpunched to move product. See their support for DIY projects on this dedicated page: Wilger Retrofit.
Take Home
All these recirculation options improve the status quo of plumbed boom sections with boom ends. They should be considered essential equipment on sprayers.
No matter where you live, it’s been a long time since the last “normal” ag trade show. The pandemic forced a break in this long-standing tradition, and it wasn’t easy. Trade shows are an integral part of doing farm business. At a time when there are fewer equipment dealers offering a lower diversity of makes, a trade show may be the only place to see and thoroughly inspect what other manufacturers offer. With that in mind, I spent a full three days at the 2022 Ag in Motion Show near Langham, Sask. to see the sights.
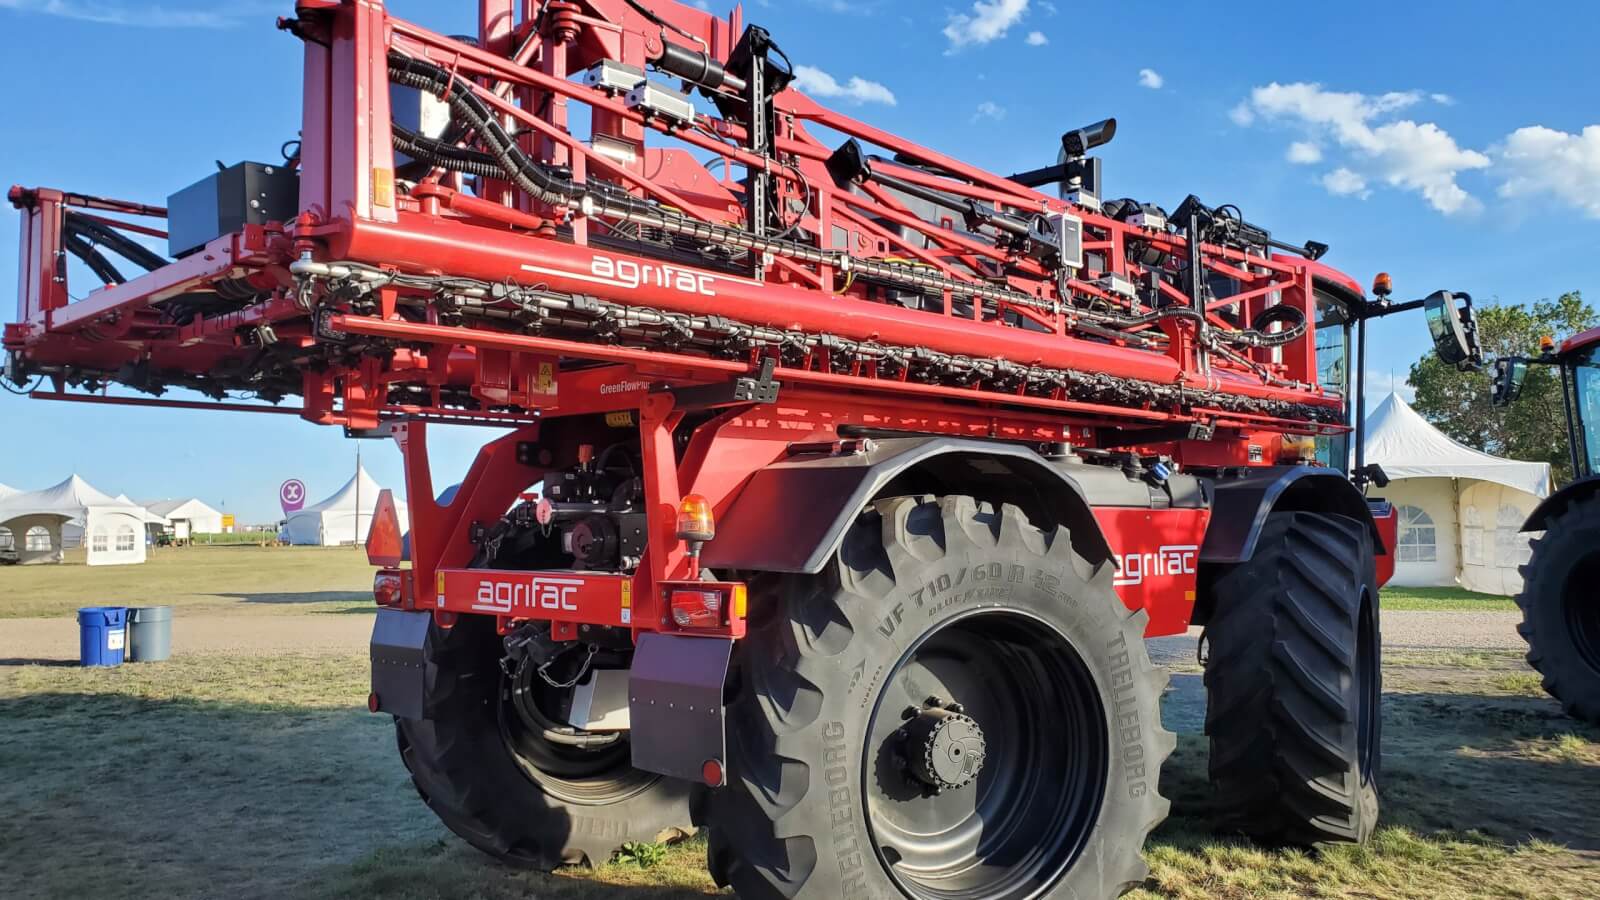
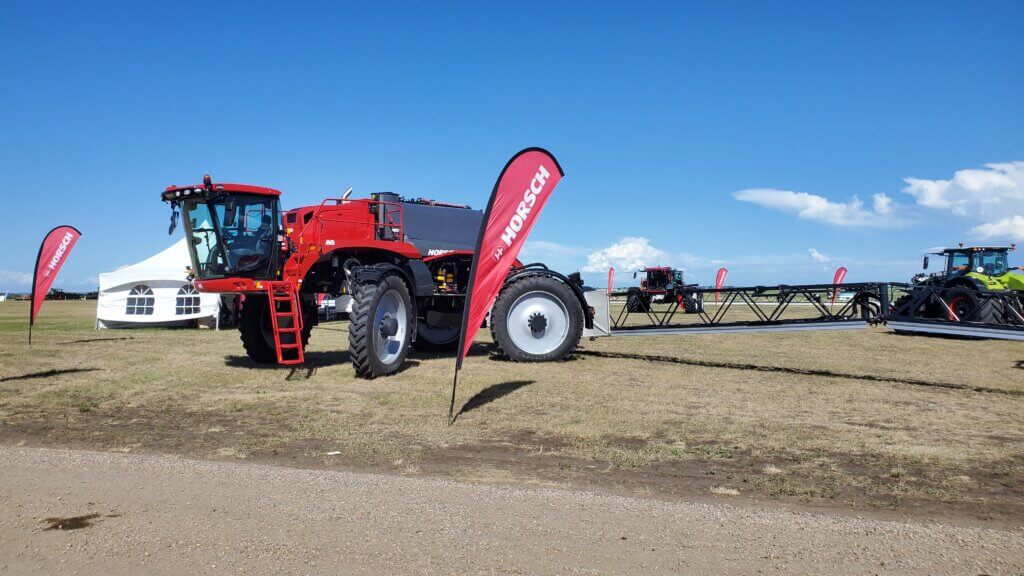
On the sprayer front, a lot has happened in the last few years. The strength within the “new kids on the block,” the Netherlands’ Agrifac sprayer and Germany’s Horsch Leeb, is noteworthy. Even with fledgling dealer networks, they’ve managed to sell dozens of units based on the strength of convincing features. These go beyond exceptionally wide booms and large tanks, and include smart plumbing designs with recirculating booms and easier cleanout. They also weigh less than their North American counterparts despite standard features like four-wheel steering and superior boom stability. Most importantly, both manufacturers are committed to innovation and offer quick iterations within their models, incorporating new ideas constantly. Often, it’s the small thoughtful things that save time and create endearment.
The Horsch-Leeb sprayer
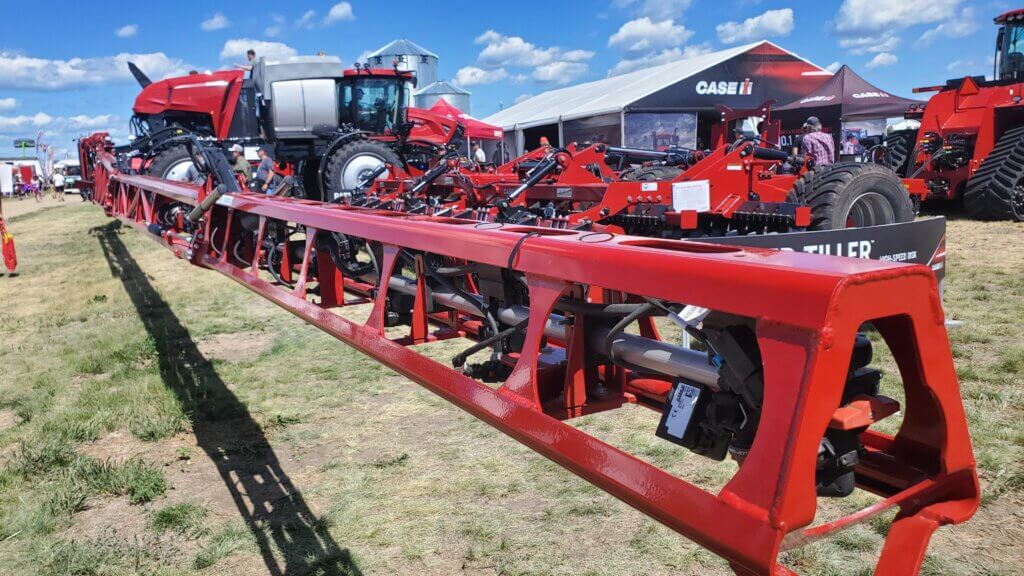
Case IH showed their new generation 4450 series sprayer. The machine has many improvements over the 4440 edition, focusing on operator comfort, digital integration and hydraulic capabilities. It weighs more than its predecessor, as to be expected. The Millennium spray boom is great, but unfortunately, there is no factory-designed recirculation, leaving owners to go to the after-market for solutions–a missed opportunity.
The Case 4450 with Millennium boom
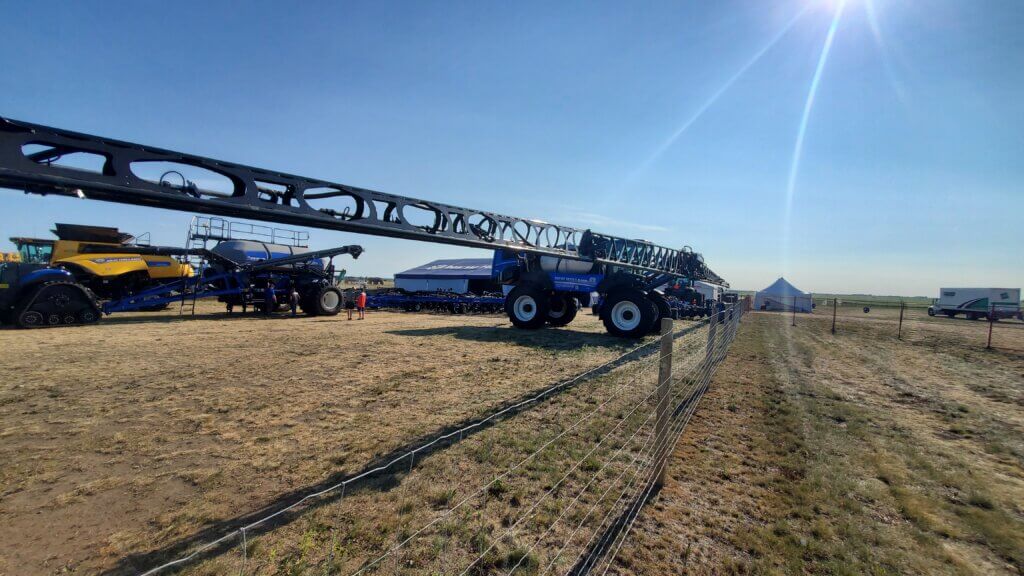
Since acquiring Miller Sprayers in 2014, New Holland has had a unique front-mount boom design, and one was on display. Nicely engineered, I’ve always liked the concept of a front-mounted boom for better visibility of the things that matter. But again, there’s no recirculation. Did they consider it yet feel it wasn’t a high priority? We know that recirculating booms perform a waste-free prime while avoiding cleanout problems with boom-ends. These are important issues for applicators. I’m also curious why NH hasn’t gone to the Wilger boom components and nozzle bodies for IntelliSpray, since the Wilger tips are still the best choice for PWM.
Front-mounted boom on New Holland SP410F
John Deere’s newly named sprayers were at the show, the new models also offering improvements in operator comfort. The one on display was fitted with its recirculating boom, a nice addition to the feature set. Like the Raven retrofit kit, it appears to be designed with 200 gpm flow needs in mind, necessitating additional pipes and hoses that other systems avoid. Such high flows are very rarely needed except for 28-0-0 topdressing. Still, kudos for having a factory installed, controller integrated option.
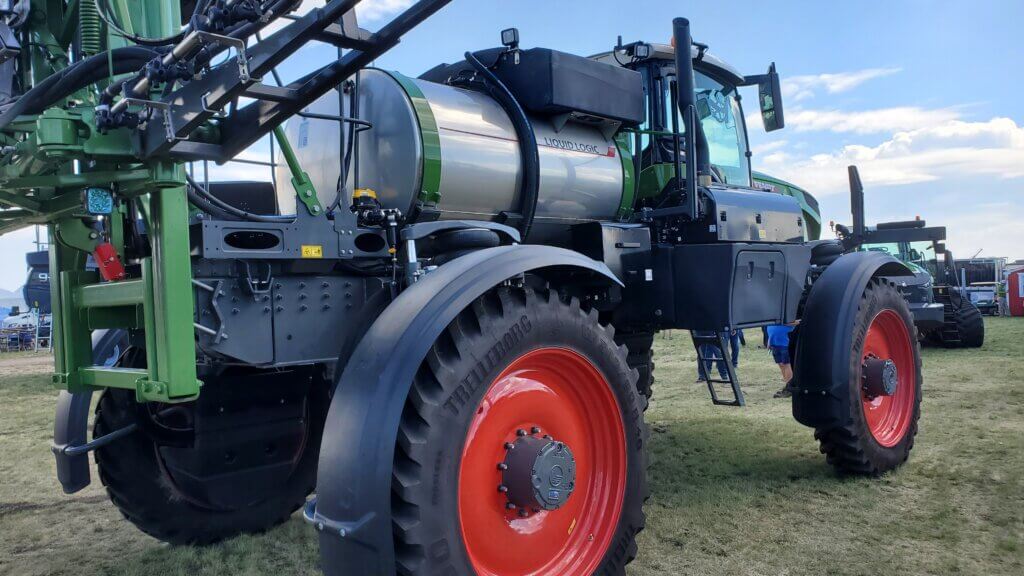
AGCO showed off its Fendt Rogator and my heart went pitter patter as I approached it, recalling seeing its namesake at Agritechnica 2019. At the time, I felt it was one of the top sprayers at the German show owing to its innovative frame and suspension systems (independent wishbone), unique pump system (centrifugal pump that can run dry and never lose prime) and efficient plumbing. But this Fendt Rogator was a traditional Rogator frame with a Fendt tractor hood and cab to fool the passer-by. It’s no slouch, with optional four-wheel steering, adjustable clearance, and Liquid Logic recirculating booms. I felt cheated, nonetheless.
Fendt Rogator, sort of.
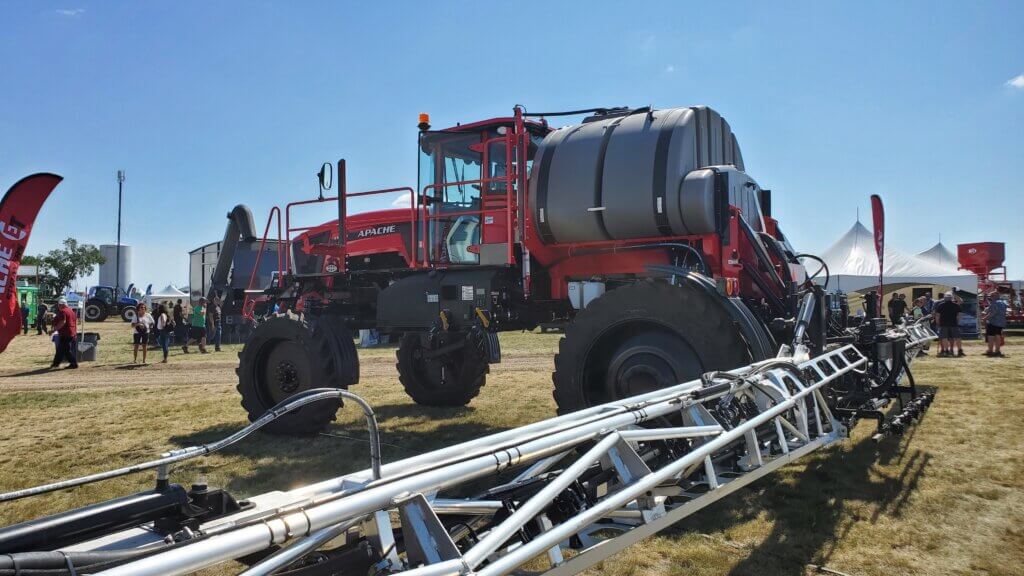
A visit to the Apache display showed why they remain a valid sprayer option. Built on mechanical two-wheel drive, they save weight and have better fuel economy than their hydrostatic counterparts. Yet, they still offer large tanks and aluminum Pommier booms when requested. Like most other brands, Pulse-width Modulation (PWM) is an available option. Personally, my soft spot for lighter sprayers is due to analysis of logistical efficiency–fill, clean and transport times. These create competent productivity values even with smaller sprayers that are more affordable to own and operate.
Light and nible Apache with strong Pommier aluminum boom
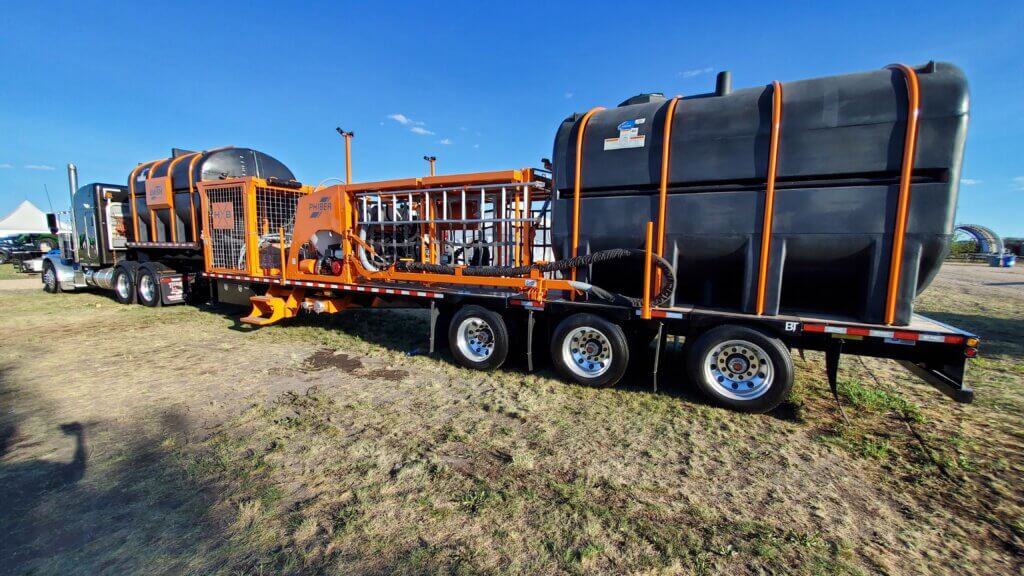
That led me to PhiBer Industries, creators of the DASH tender system. The family-owned firm from Crystal City, Man. creates custom solutions for hauling water and metering pesticides to sprayers. Thoughtful designs and use of air-driven product pumps with volumetric metering creates an efficient system that’s easy to understand and use. PhiBer joins existing products from Pattison Liquid, Free-Form Plastics or The Handler to offer a basic inductor and pump system. They will also build a complete custom trailer incorporating numerous additional features.
Phiber DASH tender system
Weed detection was shown by three exhibitors, but only one demonstrated it in action. Croplands had its field-proven green-on-brown WEEDit unit installed unit on a customer’s John Deere R4045, available for a test drive, as well as offering technical support at a booth. WEEDit remains the standard for green-on-brown and works very reliably out of the box. John Deere had an installed See & Spray Select, also green-on-brown, on a sprayer, but did not run it.
The most exciting new item sat at the Agrifac booth with their AiCPlus feature courtesy of Bilberry. Bilberry is a small French company, recently acquired by Trimble, selling green-on-green spot spray retrofits in Australia for over a year now. In Canada, they offer four algorithms at this time: green on brown for general burndown or desiccation; green-on-green for broadleaf weeds in cereals; grassy weeds in canola; and, both broadleaf and grassy weeds in corn. Powered by colour cameras and NVIDIA processors, continuous advancements in the software will improve performance as more weeds are added to its list of capabilities. Two AICPlus machines are running in Manitoba, and it’s good to see the company focusing on this market. John Deere and Greeneye, for example, are focused on the US row-crop market for the time being.
Weed detecting cameras and processors by Bilberry, featured on Agrifac AIC Plus
Perhaps the most ambitious spray technology was shown by Precision AI. Utilizing a large-fixed wing drone, the company aims to detect and spray weeds while operating at 60-to-70 km per hour. A hybrid power unit has an internal combustion motor that generates electrical power for rotors. This type of design offers significantly longer flight times than the 15 minutes currently possible with battery-driven units. Fascinating.
Precision AI concept spot spray drone, fixed wing with vertical take-off and landing
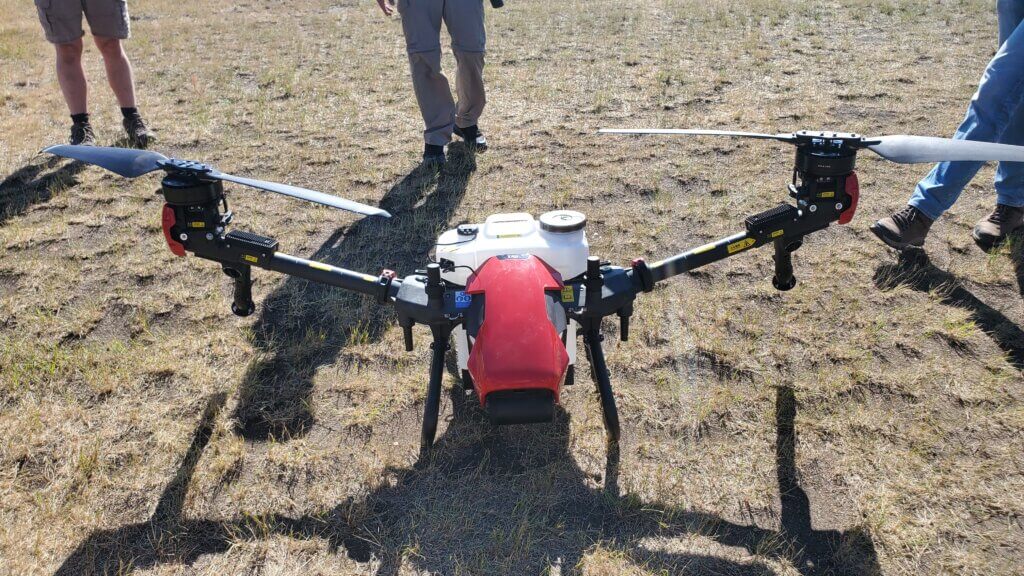
Spray drones also featured in the demonstration space at Ag in Motion despite the fact that this application method remains illegal for pesticides in Canada. It’s astounding what types of advancements each year brings. DJI is the global leader with three models available in Canada, including the 8-litre capacity T10, the 20-litre T20, 30-litre T30, and soon, the 40-litre T40. XAG, another leading manufacturer, showed a new two-rotor unit with rotary atomizers for excellent droplet size control. Flow management is nicely handled by accurate flow meters, but pressure sensors and displays are lacking in all units I’ve seen. Given that pressure is a big determinant of spray quality for hydraulic nozzles, that’s an oversight. We’ll continue to wait for this application method to be legal for pesticides in Canada.
XAG drone with two rotors and two rotary atomizers
As always, the show was full of old friends and catching up was welcome after the recent isolation. The opinions and advice from our peers play a big role in agriculture, where relationships and reputation still govern business alongside product features and cost. Trade shows are the perfect place for all of that to come together. Welcome back, old friend.
This work was performed with Mike Cowbrough, OMAFA Field Crop Weed Specialist.
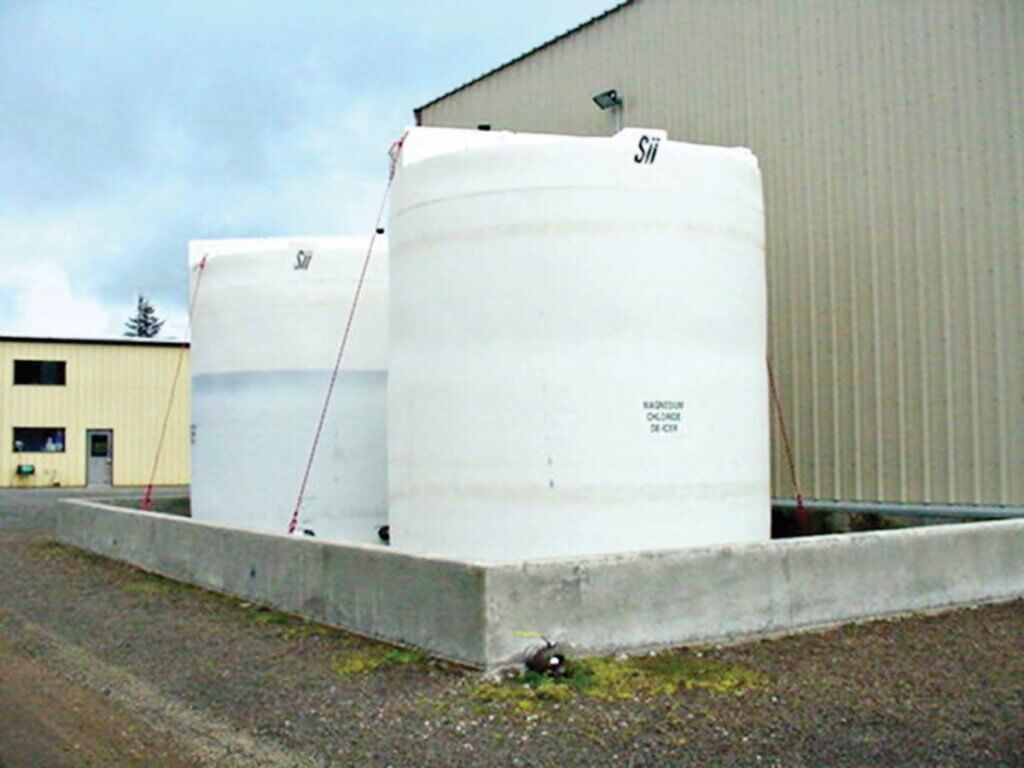
In the early summer months, many field and specialty crop operations collect rainwater (or possibly pump water from holding ponds) into storage tanks for use as a carrier in spray applications. These tanks may be stationary, or they may be part of a nurse or tender truck that delivers both water and chemistry to the field as a means of improving operational efficiency.
In the case of translucent poly tanks, which are commonly used because of their light weight, custom shape, and low price point, light exposure will grow algae. Algal populations multiply exponentially and will clog spray filters and negatively affect filling. In response, growers use home-grown algicides such as copper sulfate, lengths of copper pipe, household bleach, chlorine, bromine, etc. They do so with little or no guidance and therefore little or no consistency. Beyond the obvious questions surrounding efficacy, it is unknown whether these adjuncts create physical or chemical incompatibilities in the tank mix. If so, there is the potential for reduced efficacy and/or crop damage.
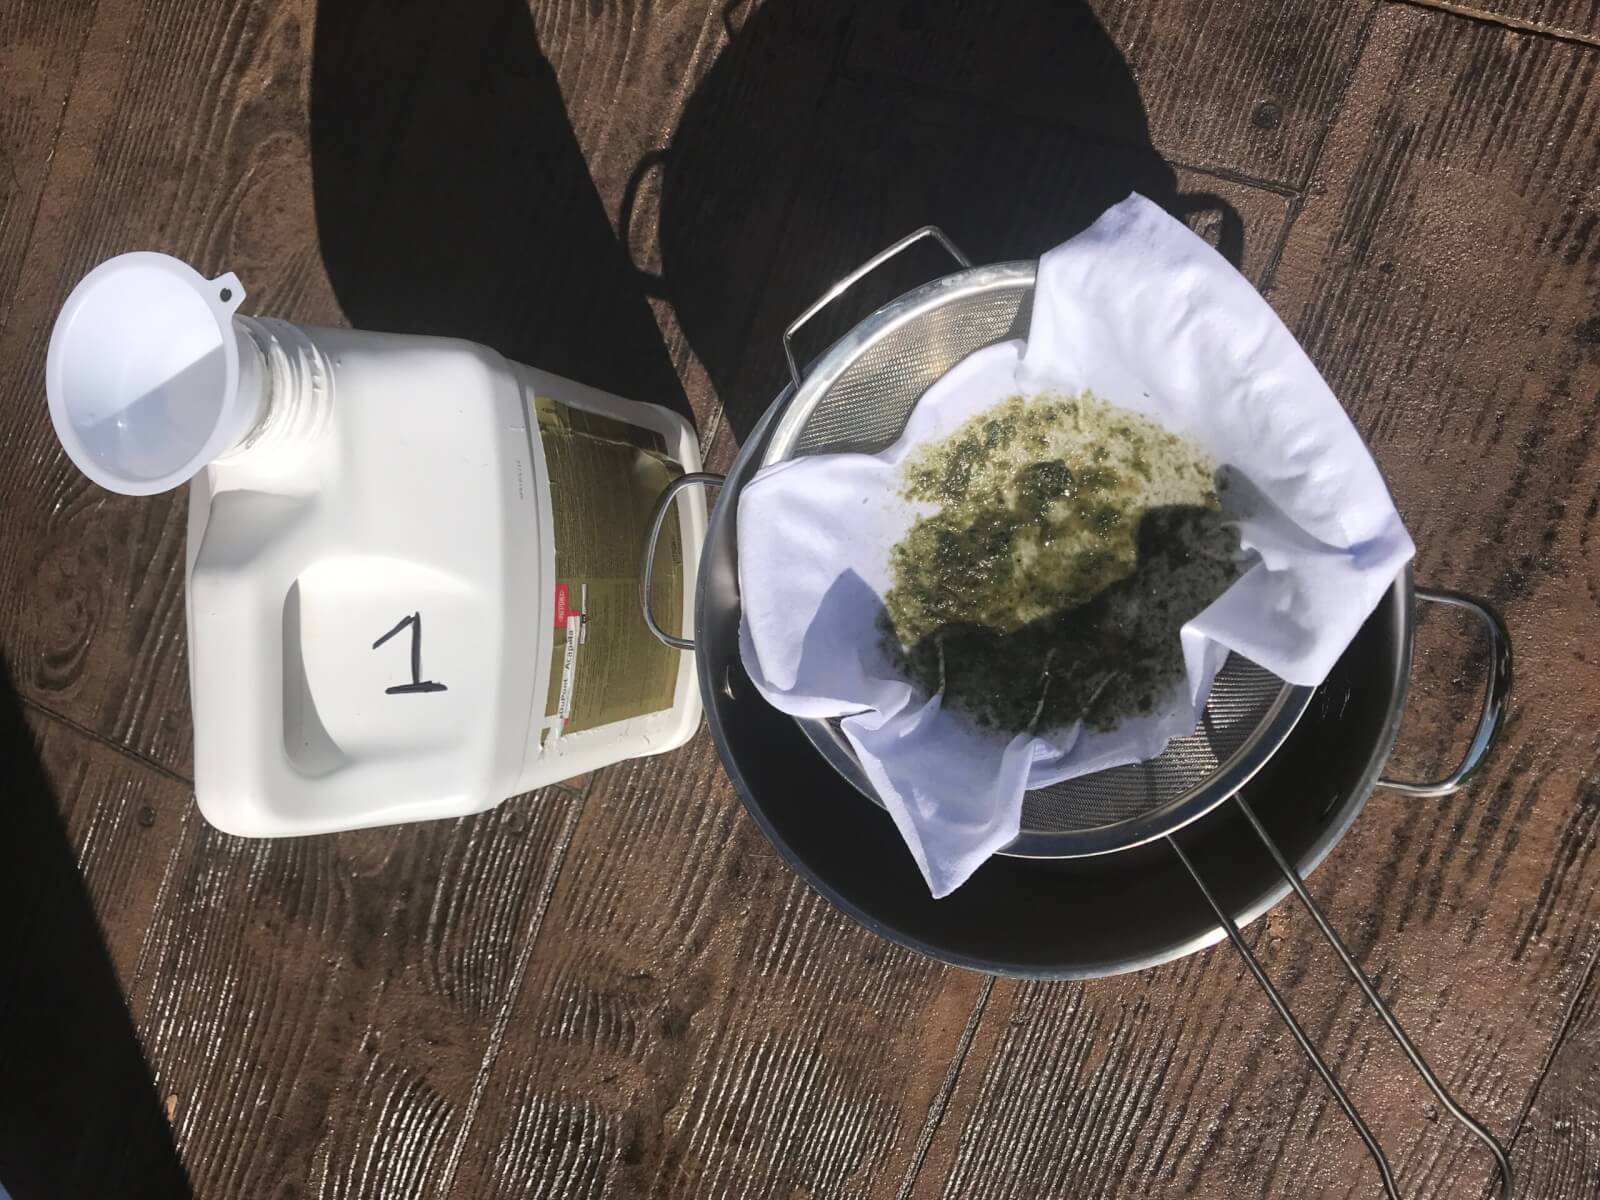
We tested popular methods for algae control by inoculating a series of 10 L translucent plastic jugs with an algal population sourced from a southern Ontario holding pond. The population was left to acclimate and generally establish itself (aka colonize) before we introduced some form of control. Each jug was then gently stirred and emptied through a sieve for qualitative assessment.
In a parallel experiment, we introduced the same algicides to fill water and conducted spray trials. 10 L volumes were mixed with a field rate of glyphosate and sprayed on RR soybeans. Weed control was assessed and soybean yield measured for each treatment.
Algicide Efficacy Experiment
In each treatment, tap water was mixed with a micronutrient growth media (from the Canadian Phycological Culture Centre at the University of Waterloo). This was an unsterilized 10% WC(ed) solution intended to provide micronutrients for algal growth while minimizing fungal and bacterial growth.
The source algae were collected from the bottom of a holding pond from a farm in Guelph, Ontario. Algae were homogenized and equal parts added to each jug. The jugs were former 10 L pesticide containers thoroughly rinsed and sprayed with Five Star’s “Star San” non-rinse sterilizer. Tank solutions were gently bubbled (one bubble every 10-15 seconds) with air from an aquarium pump. Air was balanced using a manifold and introduced via diffusion stones at the bottom of each jug.
Algae sourced from a farm’s holding pond near Guelph, Ontario. Algae was homogenized before inoculating treatment jugs with equal parts.
Treatments
Each treatment was tap water plus growth media inoculated with algae and exposed to a natural diurnal/nocturnal cycle unless otherwise indicated.
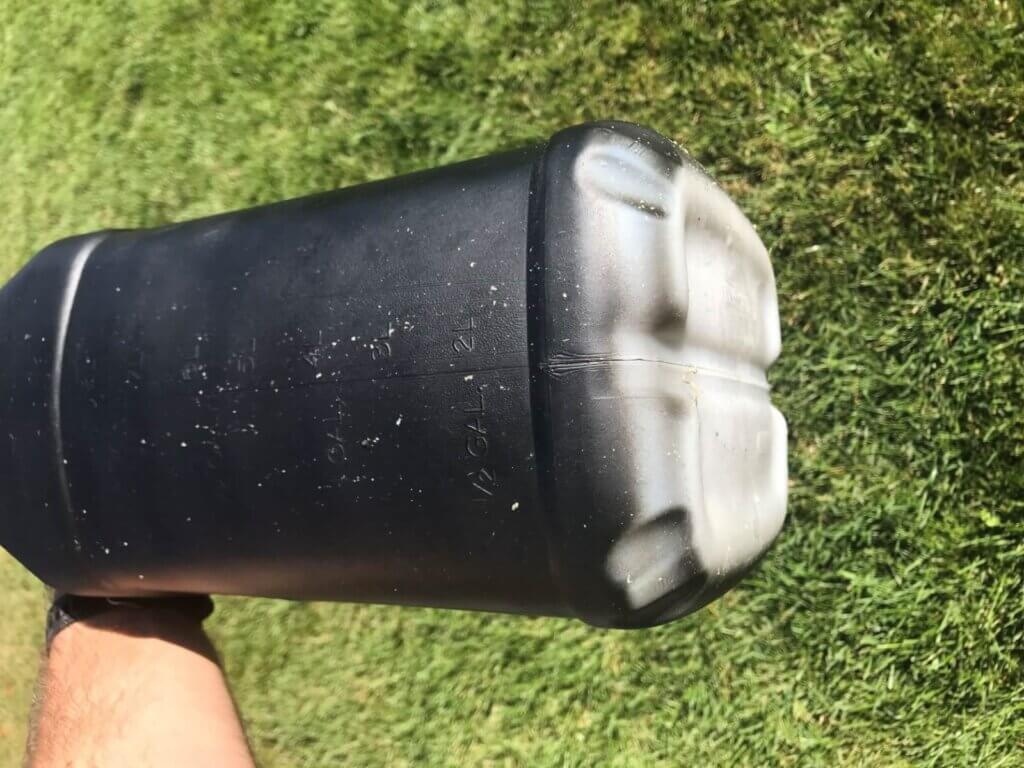
Container was spray-painted black to exclude light
Ammonia
“Scotch Bright” copper-coated scour pad. (copper is often introduced as copper sulfate at 1 cup / 1,000 US gal. or a short length of copper pipe)
Bromine (sourced from a local pool supply store)
Treatment Number
Treatment Name
Rate (/US Gal.)
Rate (% v/v)
Rate (/10 L final volume)
1
Control (no algicide)
2
Shaded
3
*Household bleach
1/4 tsp
0.00033
3.3 mL
4
Black container
5
*Ammonia solution
1/4 tsp
0.00033
3.3 mL
6
Copper-coated scour pad
7
Bromine
1/32 ml
0.000004
0.04 g
Table 1. *Bleach and ammonia should never be added together as they produce toxic chloramine gas.
Method
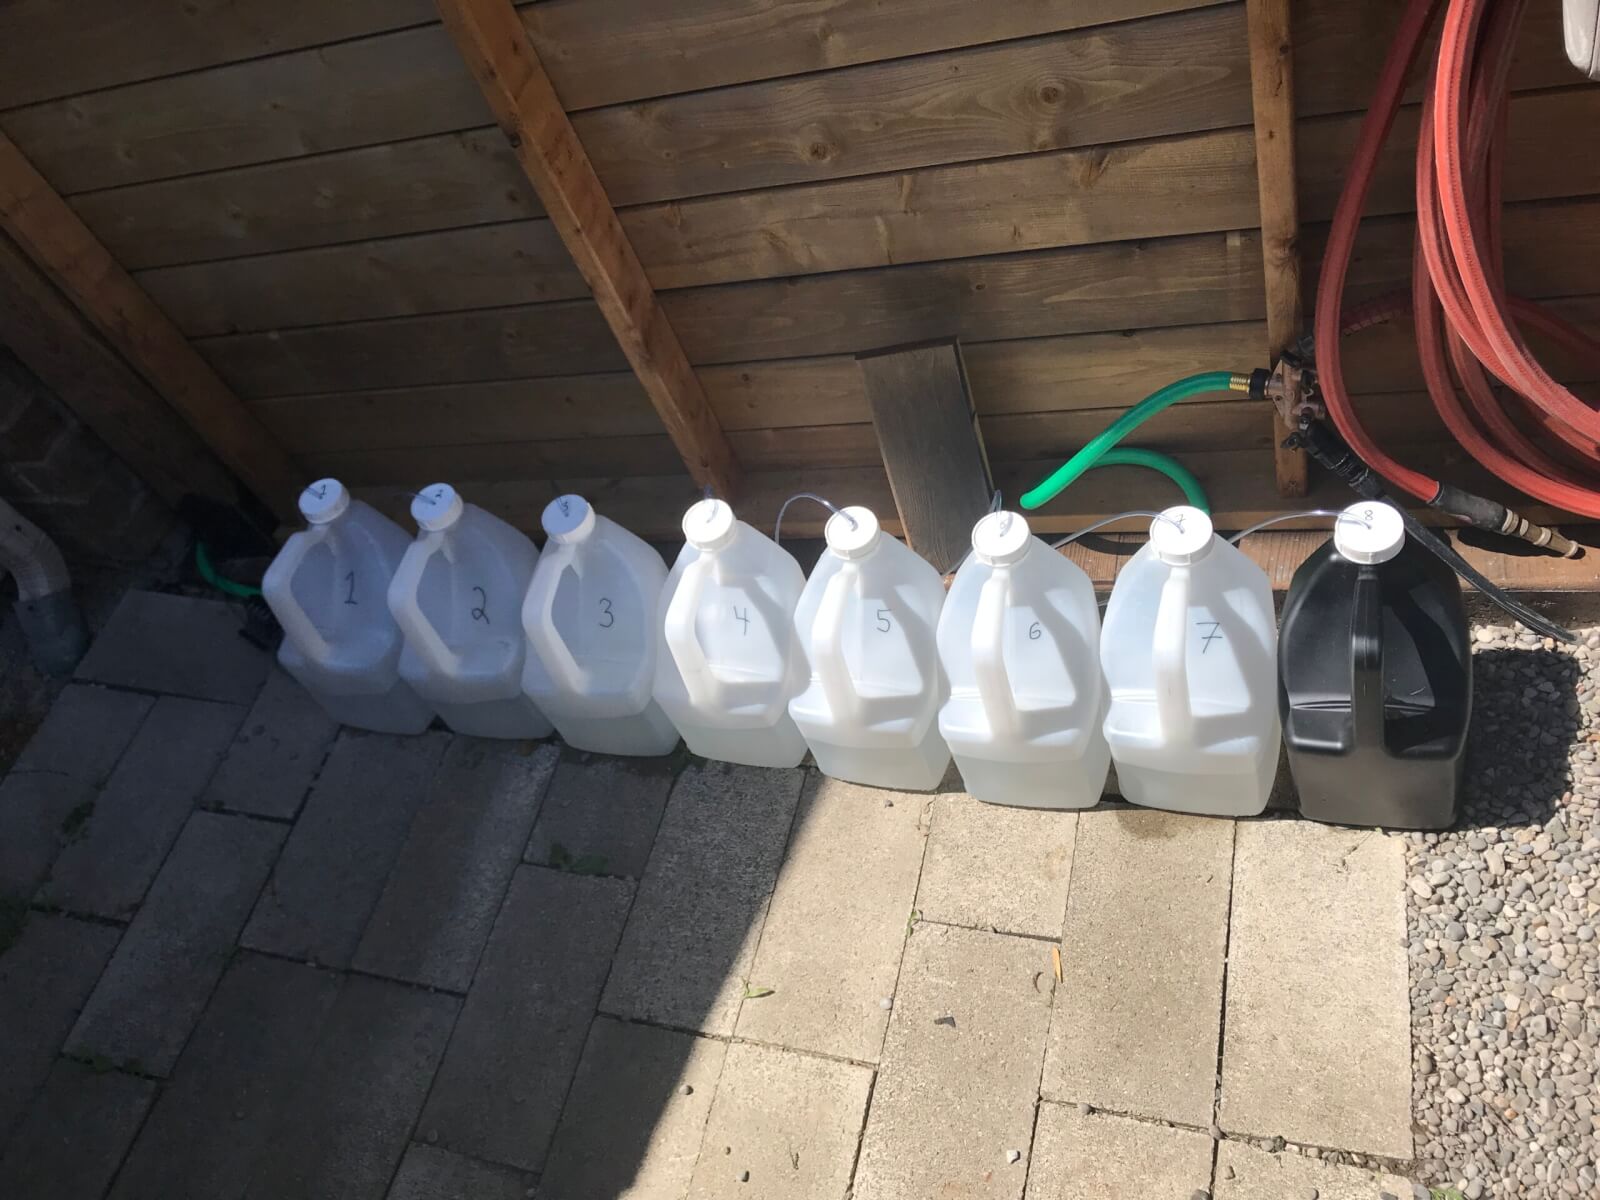
On July 12, jugs were loaded with water and growth media and inoculated with algae. They were bubbled gently for one week to establish a stable algal colony. On July 19, algicides were added, or transferred to shade or black-out conditions. On August 31 (approximately six weeks later), jug contents were gently stirred and filtered through white cloth for qualitative assessment.
Building up algal population for each jug. Note air lines through lids for slow, intermittent bubbling. Algae was not moved to black container or to the shade until after the first week of acclimation.Almost six weeks after algicide was added, jug contents were gently stirred and poured through white cloth to collect algae and establish how easily the liquid passed through.
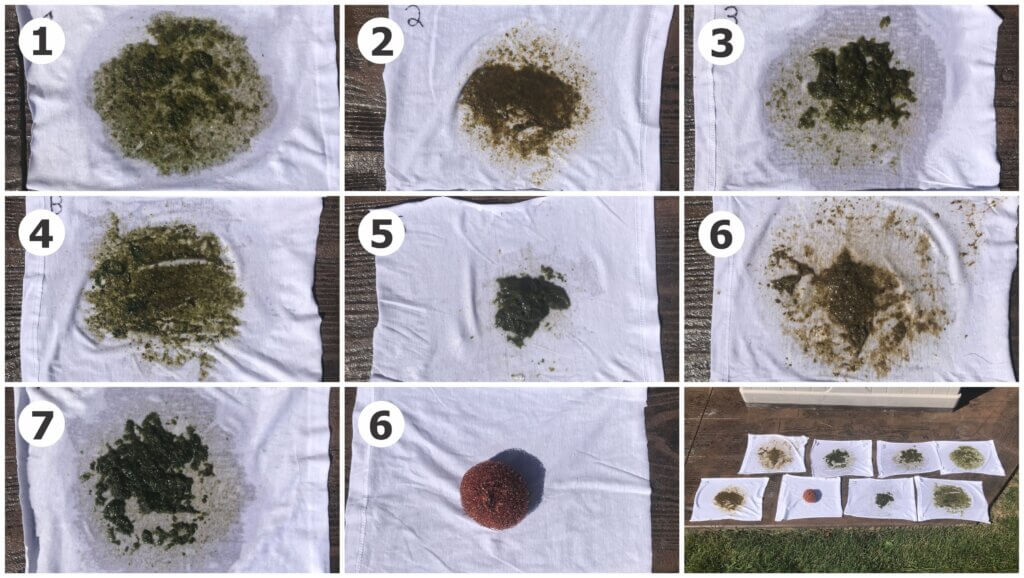
Observations
The results of all seven treatments, plus photos of the copper-coated scour pad.
(1) Control. Liquid poured slowly through cloth. Algae was still alive and healthy. It formed some clumps but was not as thick as other treatments.
(2) Shaded. Liquid poured fast and easily through cloth. Was particulate in texture rather than clumpy or gelatinous. Very little mass and entirely brown, suggesting it was dead.
(3) Household bleach. Liquid poured easily through cloth until the clump of algae sitting at the bottom of the jug came out (i.e., most algae were not suspended). Thick mat of healthy-looking algae (note profile photo #3 below). Much greener and thicker than the control (1).
(4) Black container. Liquid poured fast and easily through cloth. Algae retained a little green coloration (more than the shaded condition (2)) but was particulate and not as healthy as the control (1). We intended for this treatment to exclude all light, but it was still able to enter at the bottom where the jug wasn’t completely painted. This may have kept the algae alive.
In an oversight, the jug was not completely painted. This left a source of light at the bottom edge that may have helped sustain algae.
(5) Ammonia. Very difficult to pour liquid through the cloth (note profile photo #5 below). The only condition where a mat of algae was floating at the top of the jug rather than settled at the bottom. It was healthy, green and thick.
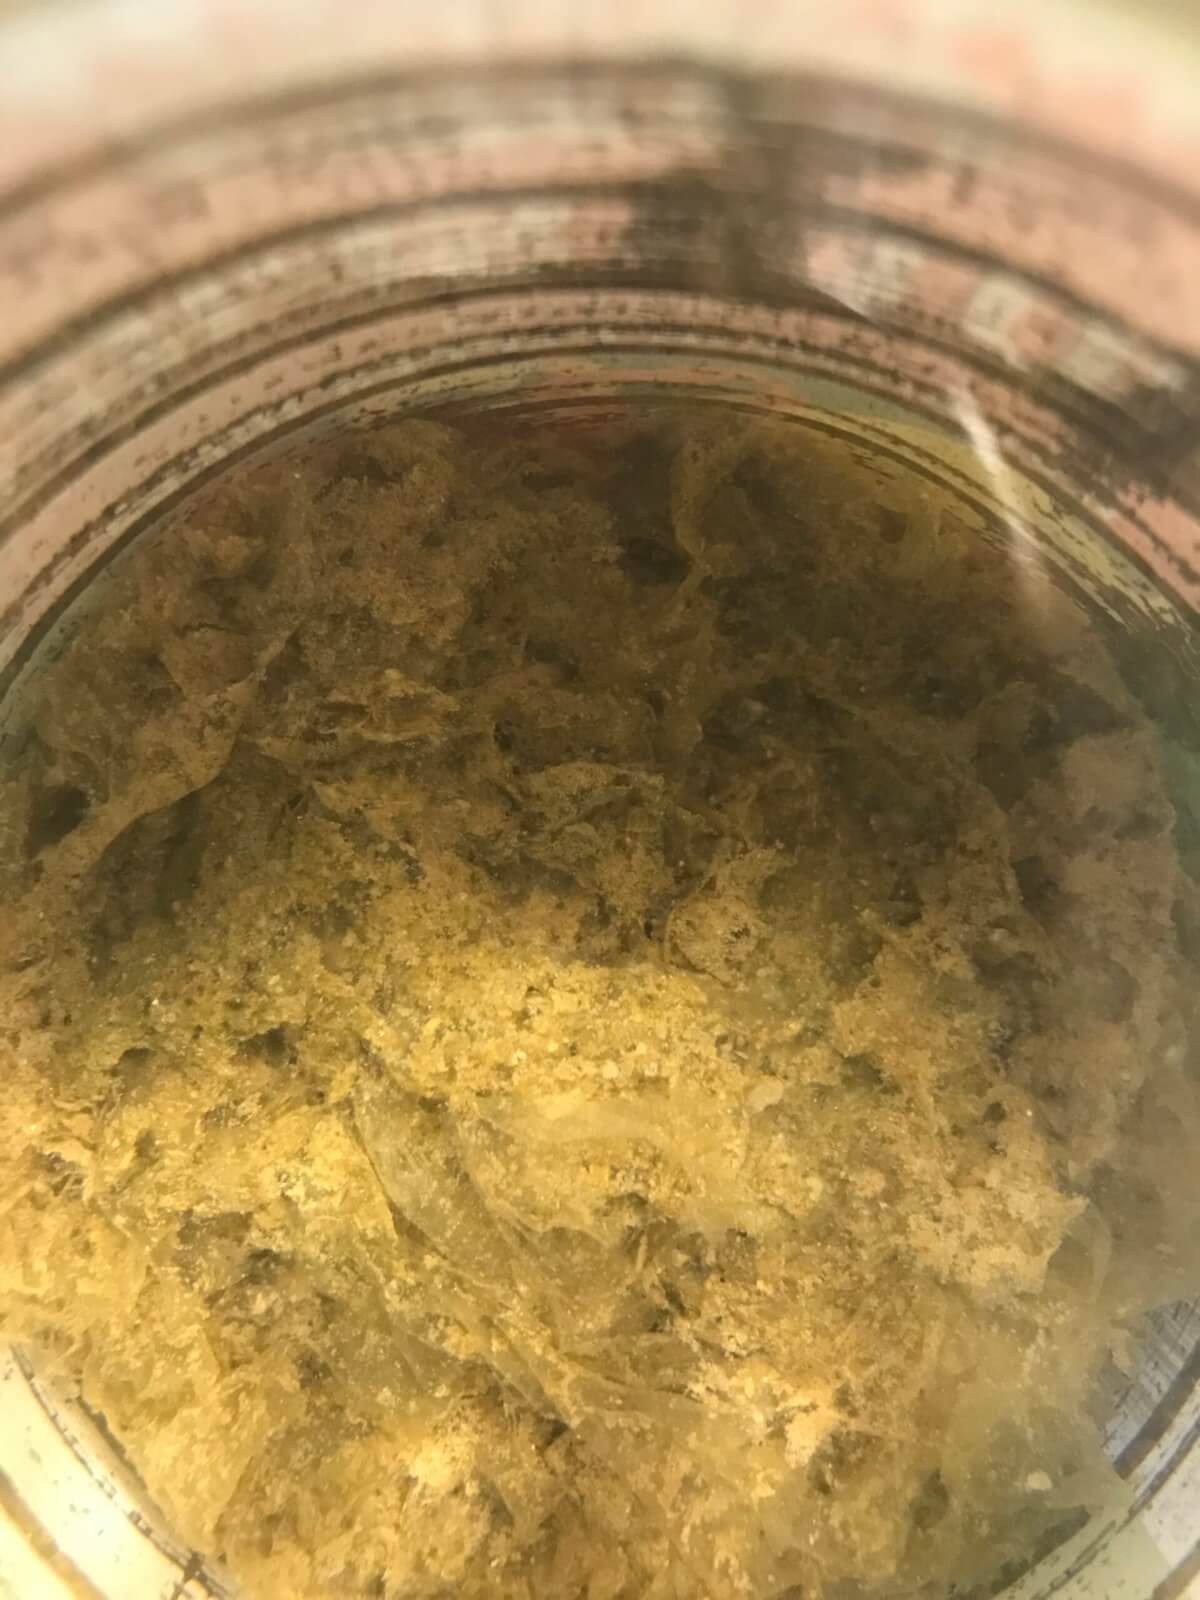
(6) Copper. The most gelatinous of all conditions, the liquid took the longest to pass through the cloth filter. While the algae seemed brown and dead, the gel would be very problematic during sprayer filling and spraying. Note that the copper scouring pad (shown unrinsed) has nothing growing on it.
(7) Bromine. Like the household bleach condition, liquid poured easily until the healthy mat of algae at the bottom of the jug came out (i.e., most algae were not suspended). Note profile photo #7 below.
Profile shots of treatment 3 (Bleach), 5 (Ammonia), and 7 (Bromine).
Spray Efficacy Experiment
Ideally, adjuncts added to carrier water are inert. That means they don’t reduce a herbicide’s effectiveness on susceptible weeds or increase crop injury. For example, hypochlorite (found in bleach and in chlorinated water) reduces the biological effectiveness of low concentrations of isoxaflutole (the active ingredient in herbicides such as Converge and Corvus). However, when added to higher, agriculturally-relevant concentrations, the reduction in efficacy wasn’t considered significant (Lin et al., 2003). Conversely, bromide has been added to certain herbicides to improve performance (Jeschke, 2009).
There’s precious little information about synergistic or antagonistic effects from adding bleach, ammonia, copper or bromine to herbicide carrier water. To learn more, we added each of these adjuncts to the standard rate of glyphosate (900 gae/ha – 0.67 L/ac). Using a CO2-pressurized plot sprayer, the solution was applied to <10 cm tall weeds at 150 L/ha (15 g/ac) in glyphosate tolerant soybean at the 2nd trifoliate stage of growth (Elora Research Station, Ontario).
Visual crop injury was evaluated at 7 and 14 days after application. Weed efficacy was evaluated at 14 and 28 days after application. Soybeans yields were collected using a Wintersteiger plot combine and adjusted to a moisture content of 14%.
Weed Control
All treatments provided excellent control (>90%) of the weeds emerged at the time of application. Table 2 (below) presents the % visual control 28 days after application.
Carrier Treatment (glyphosate 540 g/L at 900 gae/ha or 0.67 L/ac)
Lamb’s-quarter
Green pigweed
Witch grass
Green foxtail
1) Control
0
0
0
0
2) Shaded
100
100
100
100
3) Household bleach
100
100
100
100
3a) Household bleach – added prior to mixing
95
97
100
100
4) Black container
100
100
100
100
5) Ammonia
100
100
100
100
6) Copper-coated scour pad
100
100
100
100
7) Bromine
100
100
100
100
Table 2. Visual control of lamb’s-quarter, green pigweed, witch grass and green pigweed at 28 days after the application of glyphosate 540 g/L at 900 gae/ha mixed with various carrier treatments intended to prevent algae growth. Treatment numbers correspond with the soybean injury and yield image below.
Soybean Injury and Yield
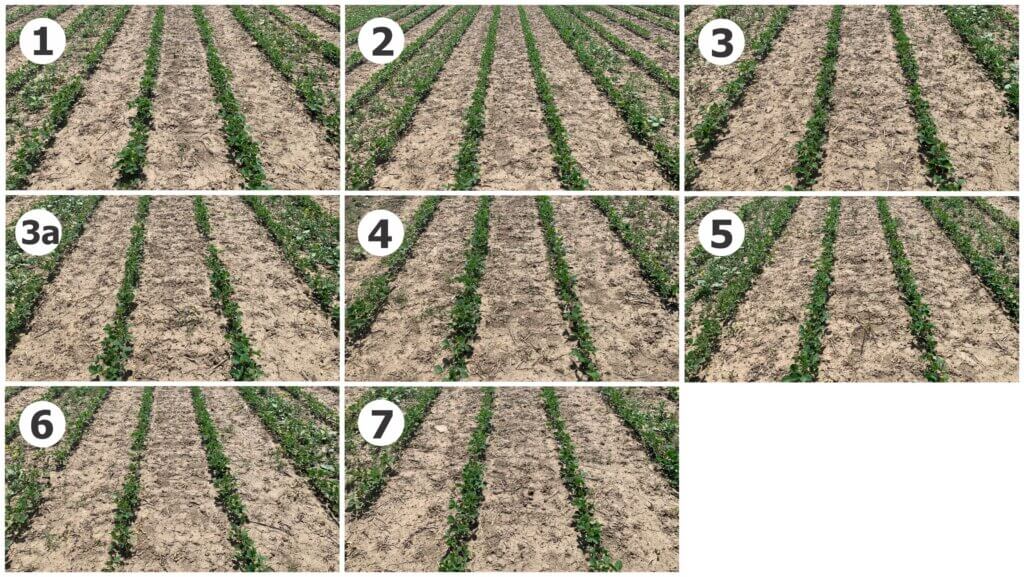
There was no noticeable crop injury from any treatment (figure below) and yields were not significantly different from the control treatment (Table 3). However, when bleach was added prior to mixing, we did observe a trend in reduced soybean yield. We’re unable to explain this observation, but suggest it may be an unrelated issue (such as field variability). There were no obvious signs of crop injury, and the treatment provided excellent weed control.
Photographs of each plot 14 days after application. The number/letter in each inset image corresponds to treatments in Tables 2 and 3.
Carrier Treatment (glyphosate 540 g/L at 900 gae/ha or 0.67 L/ac)
Crop Injury (%)*
Avg. Yield (bu/ac)
Significance**
4) Black container
0
40.0
A
7) Bromine
0
39.6
A
2) Shaded
0
38.1
AB
3) Household bleach
0
37.6
AB
1) Control
0
37
ABC
5) Ammonia
0
36.9
ABC
6) Copper-coated scour pad
0
36.1
BC
3a) Household bleach – added prior to mixing
0
34.0
C
Table 3. Visual control of lamb’s-quarter, green pigweed, witch grass and green pigweed at 28 days after the application of glyphosate 540 g/L at 900 gae/ha mixed with various carrier treatments to prevent algae growth. *7 days after application. **Duncan’s multiple range test. Soybean yields that don’t share a letter in common are significantly different.
Discussion
We elected to use an extreme situation where a single application of algicide was applied to an established, healthy colony. It’s possible that regular applications of algicide in a volume of water with little or no algae could maintain that condition.
A treatment was considered effective if it slowed or halted algal growth, especially if it also degraded algal populations, causing them to become brown, thin, and/or particulate. Once in the spray tank, the shear forces created by circulation should disperse any dead or degraded algal masses, making it easier to pass them through filters and nozzles.
The shade treatment appeared to kill algae as well as cause degradation. Second place went to the black-out treatment, where some light was unfortunately allowed in. This would have continued to fuel photosynthesis in the unpainted portion at the bottom of the jug. Conversely, the black exterior likely raised temperatures above >20 °C, which depresses most algal growth and may have contributed to the degradation.
Copper appeared to kill the algae but also created a gel that would pose problems to filters. Unlikely to be bacterial, as copper is known to suppress bacterial growth, it could have been caused by diatoms; certain invasive species are known to form brown jelly-like material endearingly referred to as “brown snot” or “rock snot”. Alternately, and according to work by J. Rodrigues and R. Lagoa, alginate polysaccharide can form viscous aqueous dispersions (such as gels) in the presence of divalent cations (such as copper).
No treatment appeared to reduce herbicide efficacy or affect crop health. However, unexpectedly, the household bleach added prior to mixing may have reduced soybean yield. Given the limited number of replications and the single plot location, we suspect this was a field effect, unrelated to the treatment.
Take Home
Based on these results, a combination of shade and light-excluding materials (e.g. black paint) would be the ideal approach to algae control. It’s cheap, effective, and doesn’t require periodic management. Buying black tanks is a good choice, or you can paint them. What you should paint them with is a matter of debate and there’s a very good Twitter thread on the subject if you’re interested.
An Aside: Algae in Ponds and Dugouts
We didn’t test this, but the question has come up and the best we can do is share some long-standing farmer wisdom. Some have used Aquashade dye to absorb the photosynthetic wavelengths and reduce algae buildup. Reputedly it is moderately successful. Another option is adding aluminum sulfate to the pond, and with a lot of agitation it should clarify in about 48 hours. Still others have added a few square barley straw bales to the water and found it to work surprisingly well (possibly an allelopathic response). Tie a rope to them and float them in the pond.
Citations
Jeschke, Peter. 2009. The unique role of halogen substituents in the design of modern agrochemicals. Pest Manag Sci, 2010; 66: 10–27
Lin, C.H., Lerch, R.N., Garrett, H.E. and M.F. George. 2003. Degradation of Isoxaflutole (Balance) Herbicide by Hypochlorite in Tap Water. J. Agric. Food Chem. 2003, 51, 8011-8014
This article was co-written with Dr. Sean Westerveld, Ontario Ginseng and Herb Specialist.
An effective ginseng protection program begins with observing the Integrated Pest Management (IPM) process:
diagnose the problem,
monitor the problem,
control the problem, and
monitor the results.
When spraying is warranted, the operator should understand the basics of application technology. This not only includes the equipment, but the effects of changing spraying parameters (such as pressure or carrier volume), the impact of weather conditions (such as wind and relative humidity) and the product being applied (such as correct timing and safety requirements). The operator should also understand how to properly maintain, calibrate and orient the sprayer according to the nature of the target. Finally, monitoring the results requires the operator to respond to changes in the environment and target during application and to consider these factors when evaluating the outcome.
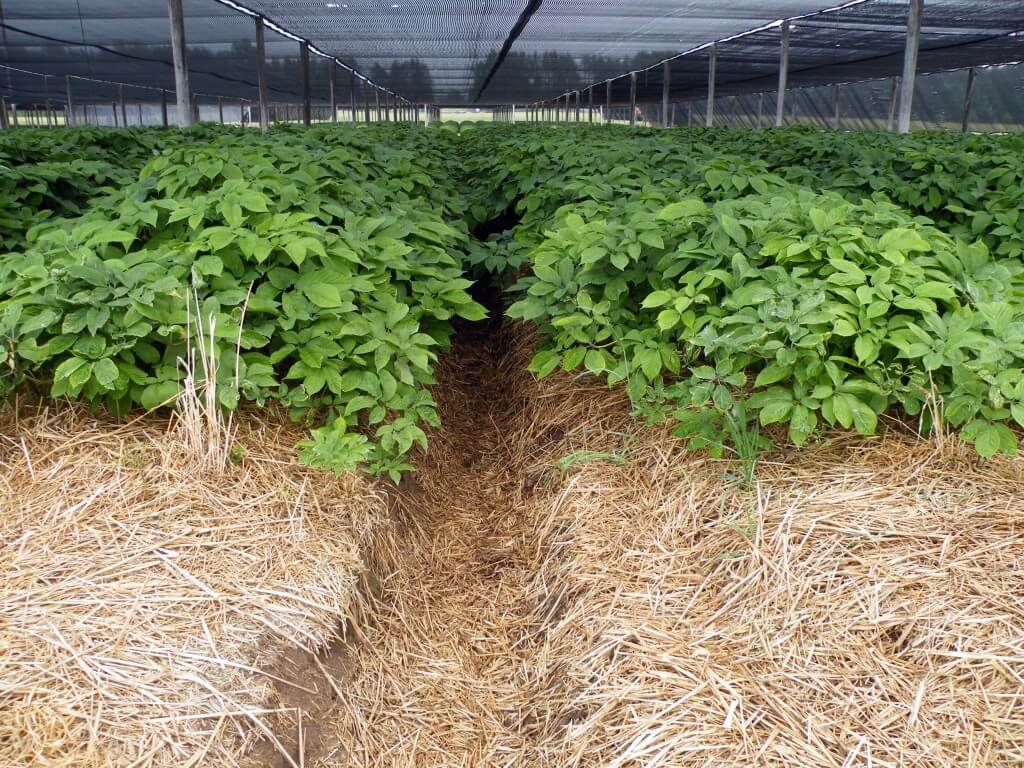
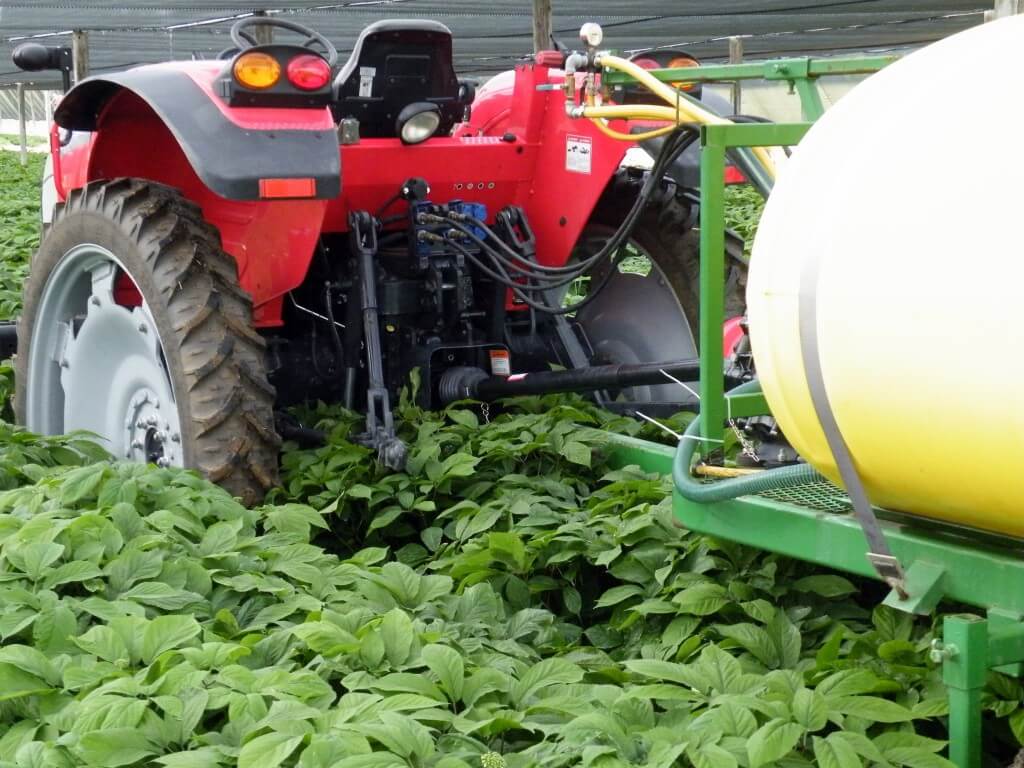
The ginseng garden
This is a four-year old garden, which represents one of the largest, densest ginseng canopies an applicator can spray. The six-foot wide beds in this particular garden are higher than most beds, making sprayer/tractor clearance an issue. It also means the distance-to-target from boom to canopy is less in the middle of the bed than it is nearer the alleys, making it difficult to ensure consistent coverage. Sprayer operators typically drive in the same direction over each bed, “training” the plants to bend in the same direction each time the tractor passes over the surface. This practice, combined with fenders on the tractor wheels, helps to minimize physical damage as the sprayer passes.
Ginseng gardens have high beds.Clearance is an issue in a four year old ginseng garden.
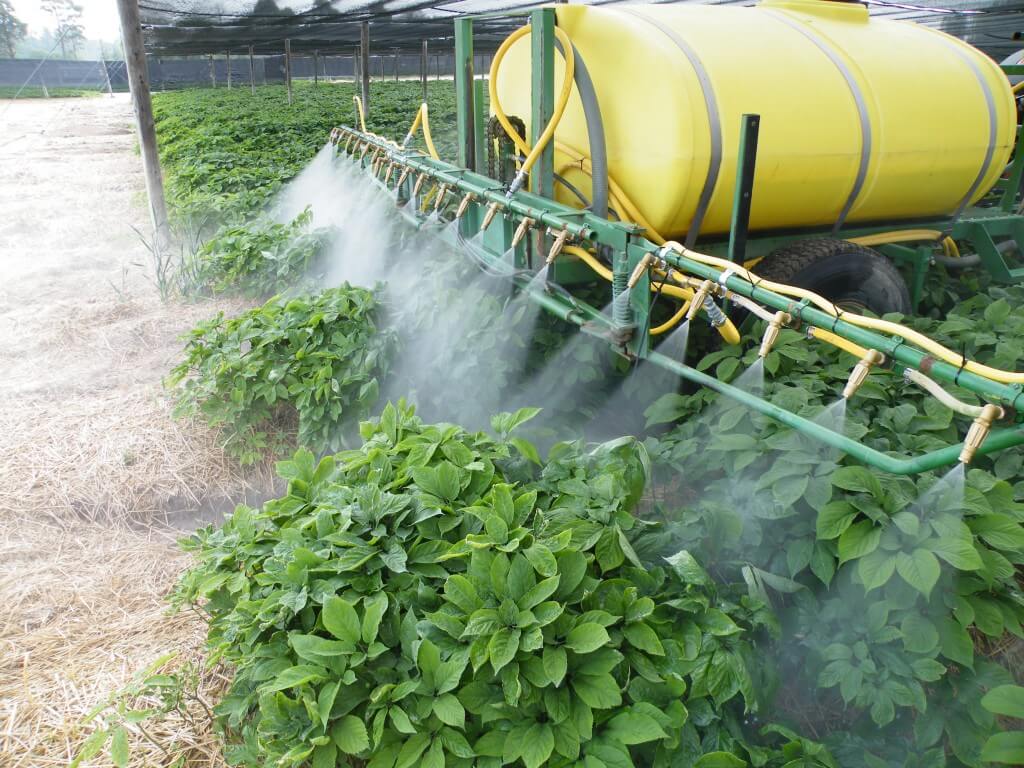
The sprayer
This custom-built sprayer is a fairly standard design for most ginseng operations: Eight nozzles on each wing and nine on the centre boom. Spacing varies but this sprayer is on 11 inch centres, with the outermost nozzles on five inch centres and aimed outward towards the adjacent beds. Given the limited boom height, all nozzles are aimed back about 45 degrees to increase the distance to target and allow for overlap. The angle is critical to prevent gaps in the spray swath, but given the recommended practice of limited overlap for hollow cone nozzles, the 11 inch spacing may be a little shorter than required.
Custom-made ginseng sprayer. A standard design in Ontario.
Spray coverage
There is no hard and fast rule for spraying ginseng. The crop can receive 30 or more applications a year, most of which are fungicide applications. Tip: Monitoring the small plants inside the canopy is a good indicator of overall garden health.
The following lists products available for use in Ontario at the time this article was published. The application target varies for each product, depending on the pest or disease the applicator wishes to control. As such, the application volume should reflect the location of the intended target. For example, a foliar-and-stem application should achieve consistent coverage of all leaf surfaces without incurring run-off. An application intended to reach the crown through the straw will require some run-off down the plant stem and should require a higher volume than a foliar-and-stem application. Many products will become immobilized if they dry onto the straw. Applications are best done to wet straw, followed by irrigation or rainfall to wash the product into the root zone. Applications for diseases like Rhizoctonia generally take place early in the season before the canopy closes, and higher volumes may not be required to achieve root coverage. In order to know how much is required for optimal coverage, read on.
Table 1 – Spray target and relative volume by pest
Pest
Application Target – Specific Product
Garden Age
Relative Volume
Alternaria and/or Botrytis
Foliar and Stem – all products
Seedling – 2nd year
Low
3rd – 4th year
Moderate
Phytophthora Leaf Blight
Foliar and Stem – most products
Seedling
Low
2nd-4th year
Moderate
Foliar – Aiette and Phostrol
All
Low
Phytophthora Root Rot
Root – xylem-mobile root rot products
All
High
Foliar – Aiette and Phostrol
All
Low
Phytophthora Leaf and Root
Root – xylem-mobile root rot products
All
High
Foliar – Aiette and Phostrol
All
High
Cylindrocarpon
Root – all products
All
High
Rhizoctonia
Root – most products
All
High
Root – Quadris
Seedling
High
Pythium
Root – all products
All
High
Aphids
Foliar and Stem/Berries – all products
All
Moderate
Cutworms
Stem – all products
All
Low
Four-Lined Plant Bug
Foliar – all products
All
Moderate
Leafrollers
Foliar and Stem – all products
All
Moderate
Root Lesion Nematodes
Root – all products
All
High
History of the ginseng boom in Ontario
Historically, ginseng sprayer operators used brass hollow cone nozzles to spray ginseng. For reasons that are unclear, many then adopted the Casotti-style sprayer, which used higher volumes and an oscillating nozzle assembly to create a larger swath. This was determined to be overkill for ginseng, and it produced inconsistent coverage.
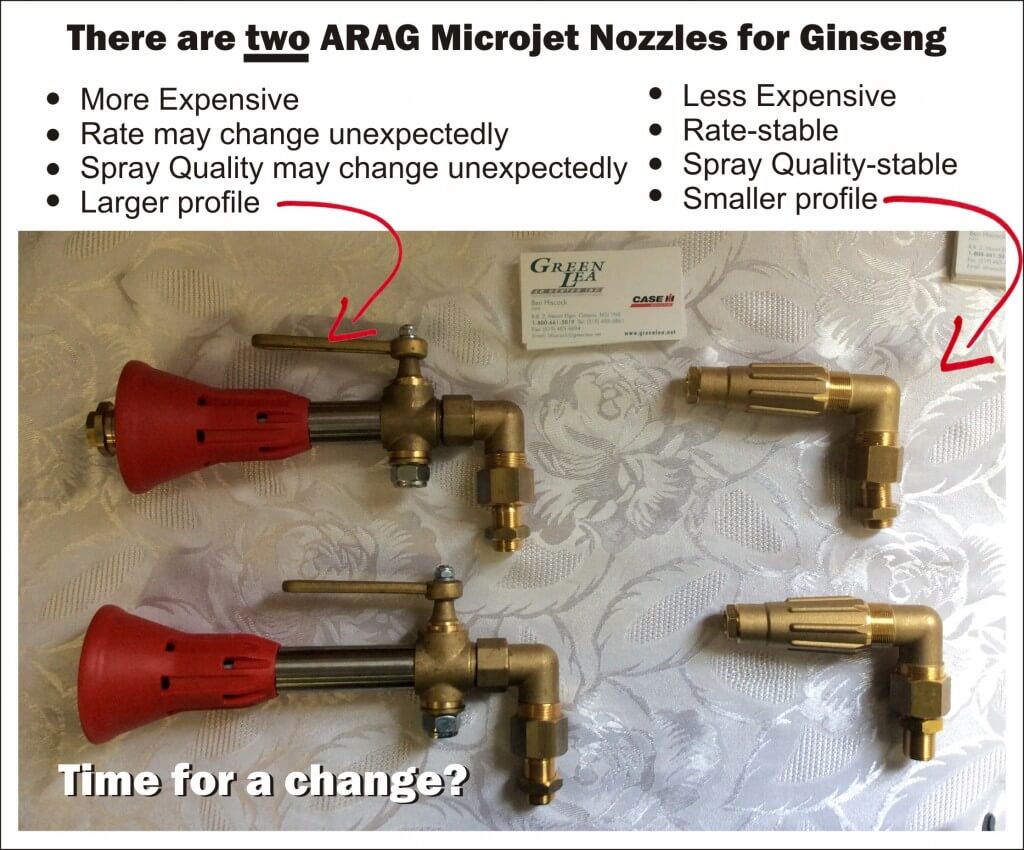
Many growers (sadly, not all) switched back to horizontal booms and began using the Arag microjet assembly. Drop nozzles (aka drop arms, drop booms, drop legs, etc.) were positioned with disc-core hollow cone nozzles behind the wheels to direct spray into the canopy from below.
Later, we demonstrated that the microjet mixing valve was difficult to set accurately, creating outputs +/- 50% the optimal rate. In response, a new variation on the Arag microjet was introduced, with a more reliable rate adjustment and a lower price tag (they are imported from Italy by a single North American distributor). The drop nozzles are absolutely critical for under canopy coverage, and growers have begun suspending them in each alley – not just behind the sprayer wheels. I predict the future boom arrangement will return to hollow cone nozzles, but in the form of molded poly nozzles with ceramic handling and drop nozzles with full cone disc-core assemblies. Air assist would be even better.
Sprayer settings
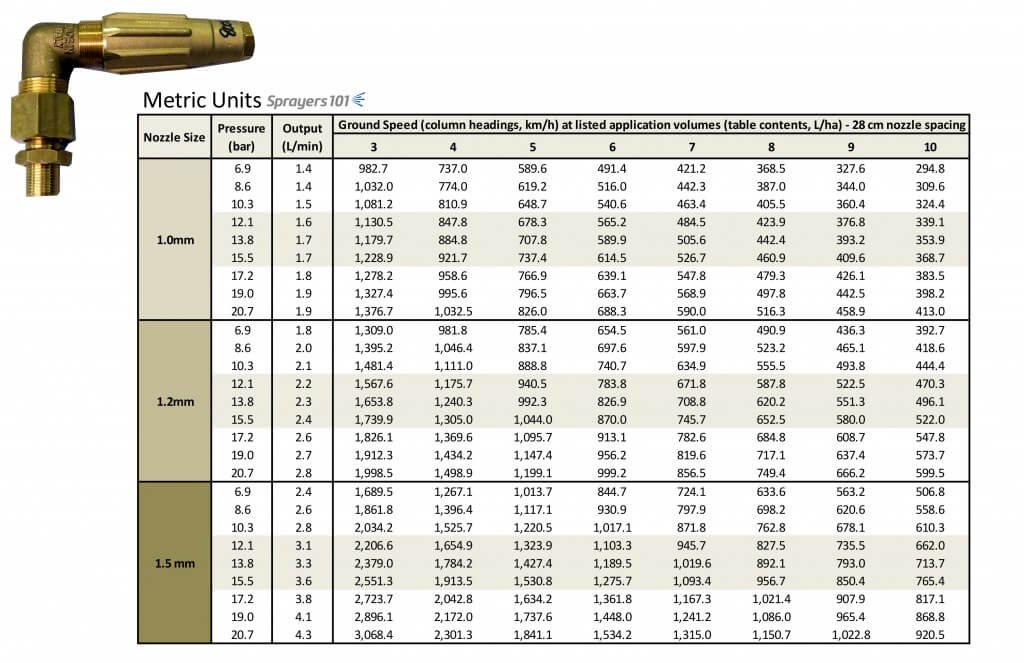
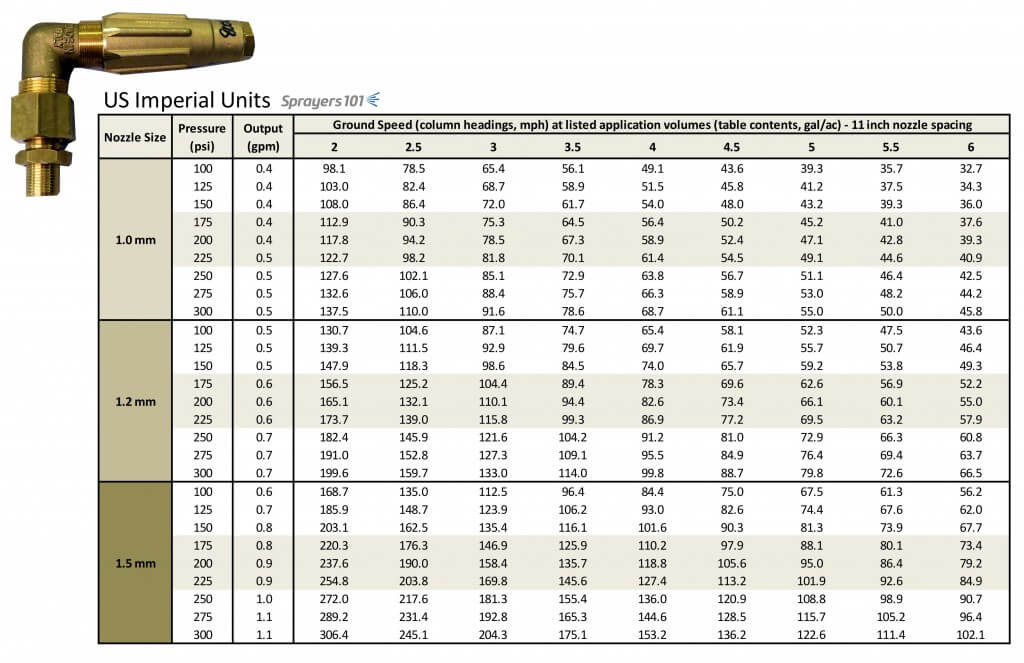
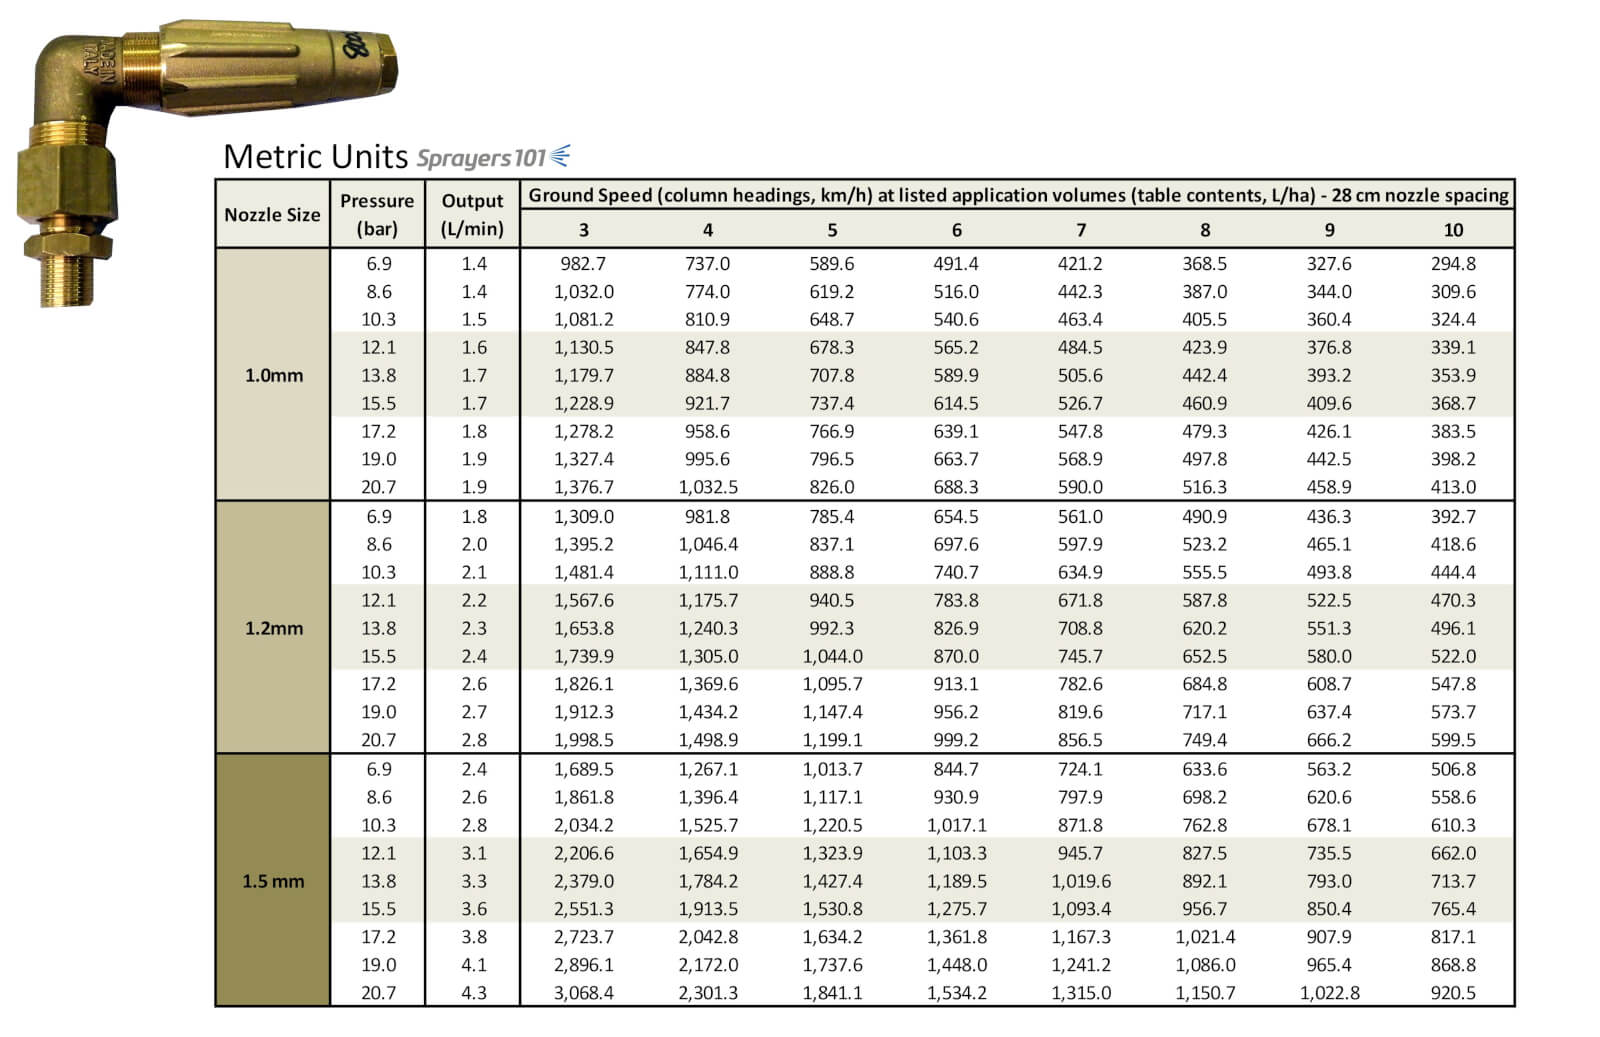
Most operators employ a ground speed of about 5 km/h (3.1 mph), operate at about 13.8 bar (200 psi) with nozzles spaced 25-30.5 cm (10-12”) spraying anywhere from 1,000 L/ha (107 gal./ac.) to 1,686 L/ha (180 gal./ac.). The application volume should reflect the stage of crop growth, the age of the garden and the target in question (see Table 1). Applicators should also consider droplet size (Table 2). This is difficult to control given that the majority use Arag microjets with the 1.5 mm orifice disc. In which case, pressure choice will affect median droplet size, with lower pressures increasing median droplet diameter and vice versa.
Table 2 – The Impact of Droplet Size
Droplet Size
Drops per area
Retention
Canopy Penetration
Drift Potential
Fine
High
High
Low
High
Medium
Moderate
Moderate
Moderate
Moderate
Coarse
Low
Low
High
Low
Two versions of the ARAG Microjet.
The older style Arag microjets with 1.5 mm diameter discs have highly variable outputs. We developed tables listing their rates with the mixing valve handle set in two positions. They can be found here. We have also developed tables for the newer Arag nozzles for the 1.0, 1.2 and 1.5 mm discs based on 28 cm (11”) spacing. They are listed in Metric and U.S. Imperial.
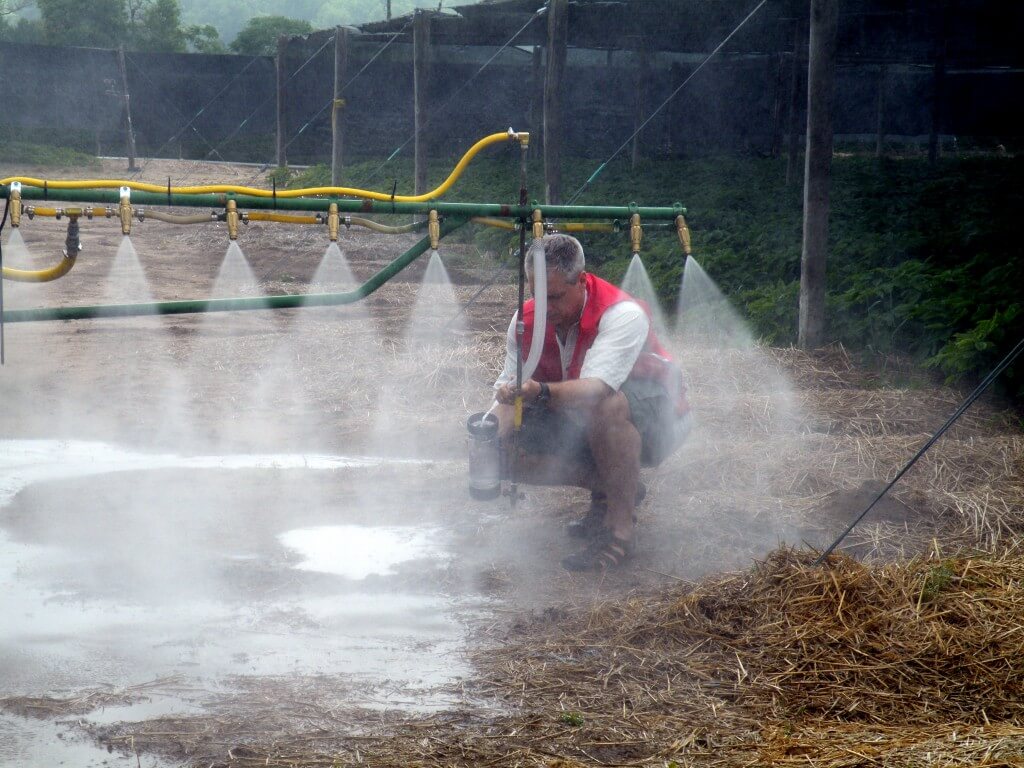
Park the clean sprayer and get the pressure up to the desired level. Using a calibration vessel, perform a timed output test to determine each nozzle rate. I prefer the SpotOn SC-4 and a length of 1” braided line to direct the spray into the vessel. You will get wet, so ensure the water is clean and/or wear appropriate PPE.
Timed output test. Prepare to get very wet. Unless sprayer is sparkling clean, like this one, PPE is a must.
At 200 psi, we took readings from each microjet and found that while they were more consistent than the older model, there was still a lot of variation from tip to tip. This required us to turn the valve on the nozzle to get a more consistent output, then take another reading, and repeat until we liked what we saw. It became tricky to adjust the rate without reducing the hollow cone pattern to a solid stream because only a slight turn of the nozzle was required. Once we had it, we tightened the lock nut and moved to the next nozzle. Table 3 is a record of the procedure.
While calibrating, we noticed some of the nozzles would suddenly appear plugged, or dense lines could be seen in the spray cone indicating something was wrong. We cleaned them to discover bits of plastic from the poly tank. I asked about strainers, but they are not available for the microjets. I asked about in-line filters, but they aren’t rated for 200 psi. Filling the tank with clean water is very important, but even more so with these nozzles.
Table 3 – Calibrating the new Arag microjets
Nozzle Position
Rates in gpm (bold represents final rate)
Nozzle Position
Rates in gpm (bold represents final rate)
1
0.97, 0.96, 0.93
14
0.77, 0.92
2
1.07, 1.07, 1.26, 0.9
15
0.76, 0.8, 0.95
3
1.1, 1.1, 1.1, 0.93
16
0.97, 0.95
4
0.73, 0.92
17
0.73, 1.0, 1.07, 1.0, 0.98
5
0.92, 0.92
18
0.83, 0.94
6
0.94
19
0.77, 1.0, 0.99, 1.1, 1.24, 10.8, 0.93
7
0.88
20
0.77, 0.88
8
0.92
21
0.71, 0.95
9
0.95
22
0.77, 1.07, 1.04, 1.1, 1.27, 1.0
10
0.90
23
1.06, 0.97
11
0.86
24
0.77, 0.97
12
0.76, 0.83, 1.0, 1.0, 1.2, 0.92
25
0.68, 0.95
13
0.77, 0.92
Average output: 0.93 gpm, standard deviation of 0.03 gpm.
Ground speed
Once the nozzles were adjusted, we filled the tank ½ full and measured out 25 m in the bed. We would normally do 50 m, but the row was too short. The sprayer operator drove the course and we measured the time it took to travel the 25 m distance. Pass one took 18.5 seconds and pass two took 18.3 seconds. That’s an average of 18.4, which we then double so it works in the formula = 36.8 s.
( 50 × 3.6 ) ÷ 36.8 s = 4.9 km/h
Adjusting the drop leg nozzles
This sprayer had drops behind the wheels and two more to hang in the adjacent alleys. This is excellent because research has shown considerably improved coverage with directed spray from drop arms. In my mind, these are not optional – they are mandatory!
Drop nozzles in the alleys.
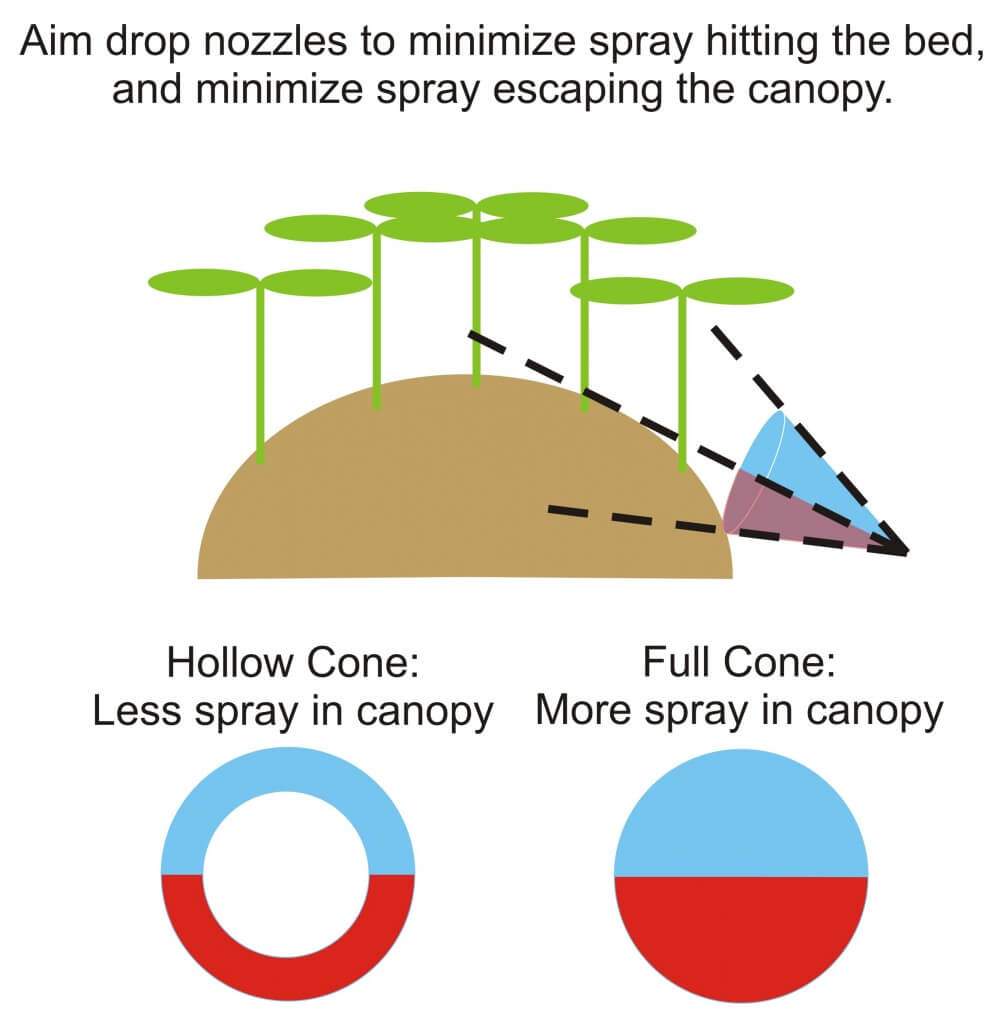
We swapped out the hollow cones we found in those positions for full cone disc and core (D5-DC35). Full cones increase the number of droplets that will clear the raised bed and enter the canopy. When adjusting them, be sure to minimize the portion intercepting the bed, while minimizing the spray escaping up through the canopy. It’s a fine line.
Aiming drop arms in a ginseng garden.
Calculating sprayer output
25 microjets at 200 psi = average of 0.93 gpm = 23.25 gpm 8 × D5-DC35 at 200 psi = 1.4 gpm × 8 = 11.2 gpm That’s ~34.5 gpm for the boom. Ground speed was 4.9 k/hr or ~ 3mph.
GPA = (GPM × 5,940) ÷ (mph ÷ nozzle spacing in inches) GPA = (34.5 gpm x 5,940) ÷ (3.0 mph × 11 inches) GPA = 204,940 ÷ 33 62.1 GPA or about 580 L/ha.
Diagnosing coverage
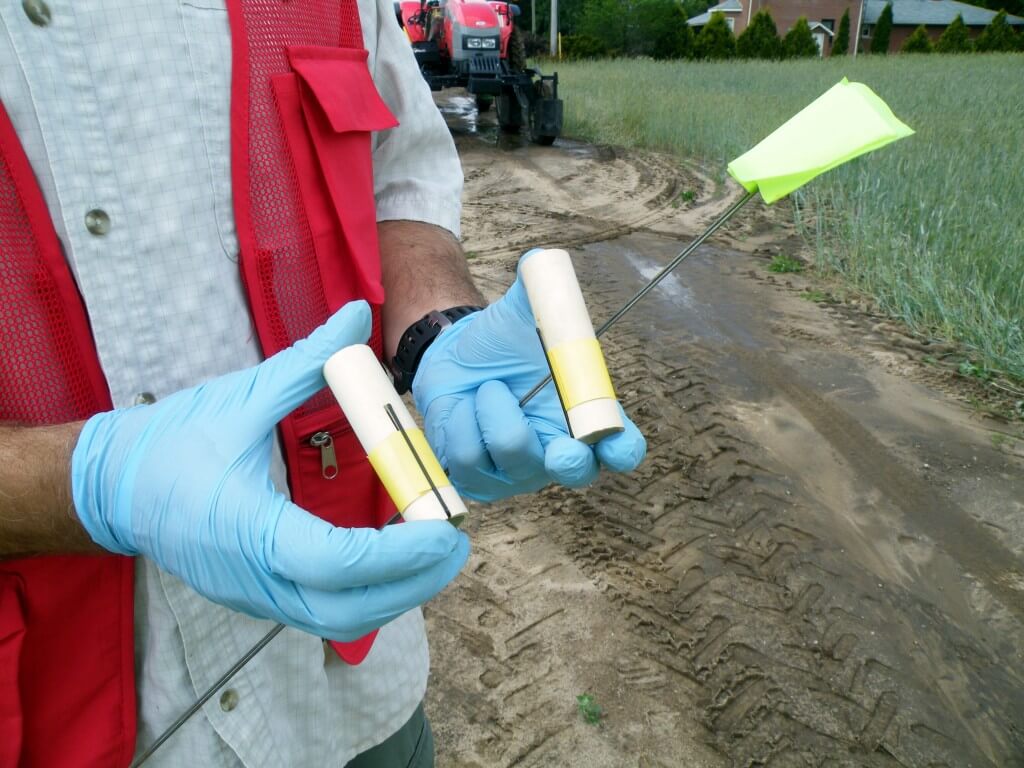
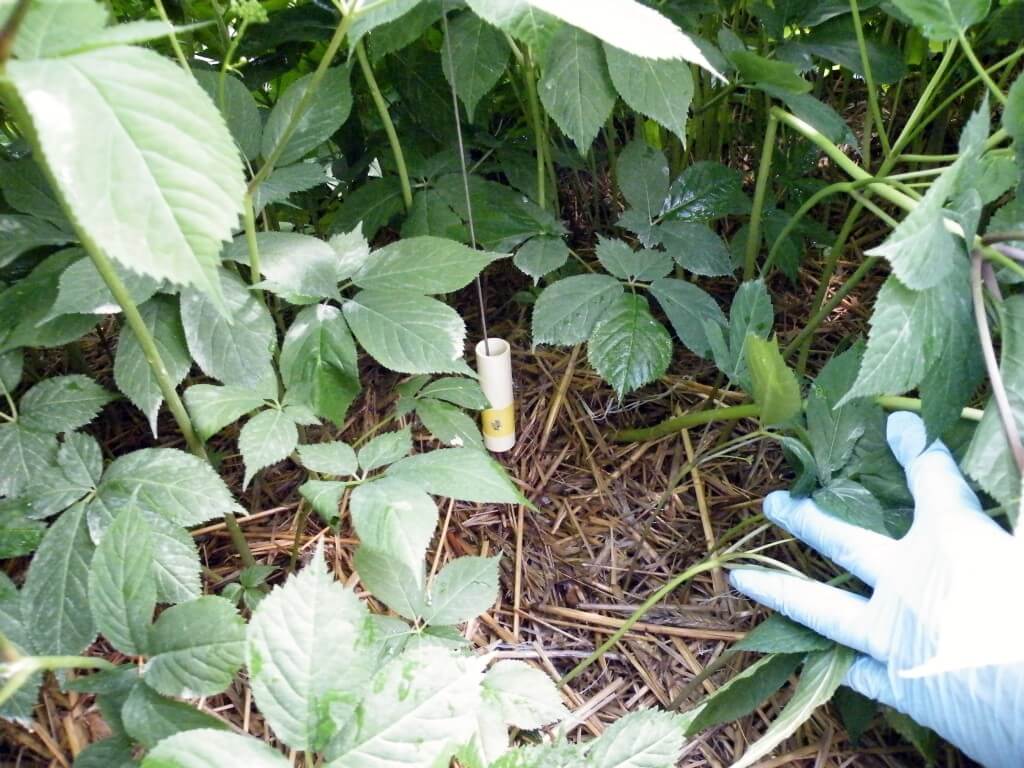
Water sensitive paper, which turns from yellow to blue when contacted by moisture, was placed in the ginseng canopy. Two sets of papers were set out, with four papers in each set. The canopy was still wet with rain, which made placement difficult as the papers would accidentally contact water on the leaves and change colour prematurely.
Water-sensitive paper wrapped around tubes for panoramic coverage.
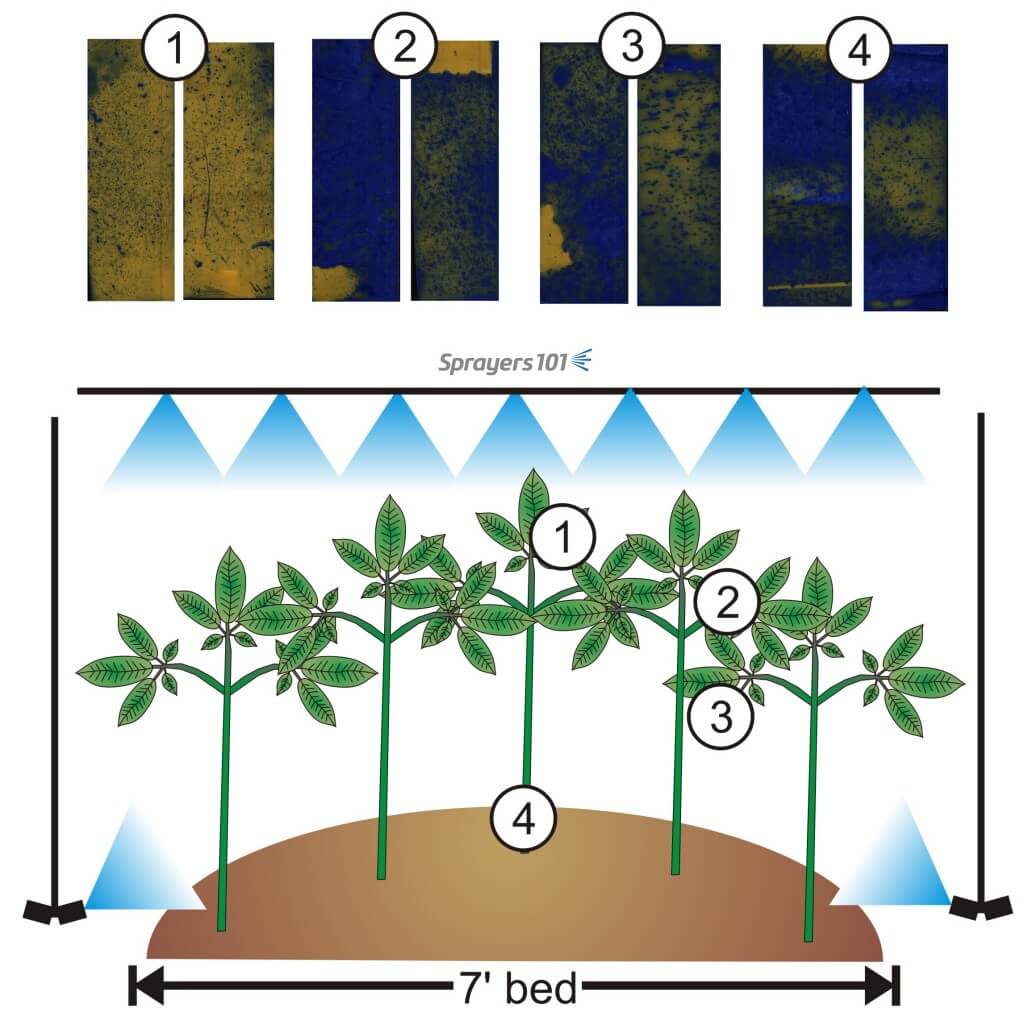
Position#1
Clipped face-down on the underside of leaves at the top of the canopy.
Position#2
Clipped face-up on the upper side of leaves in the middle of the canopy.
Position#3
Clipped face-down on the underside of leaves in the middle of the canopy.
Position#4
Wrapped around a plastic tube and threaded over a wire flag, located at the foot of the plant to give panoramic coverage at the root.
The sprayer passed over the canopy spraying water, and papers were carefully retrieved, allowed to dry and scanned.
Panoramic papers in situ.Flags mark the locations of papers.
Generally, there were no “misses” whatsoever. Position 1 showed excellent coverage, with no indication of run-off and a high droplet count with even distribution. This is ideal for foliar applications, and under-leaf coverage is notoriously difficult to achieve. Positions 2 through 4 showed excessive coverage, with the exception of one of the position 3 papers, which was still adequate.
Example of coverage and paper locations in canopy.
Next steps
Ideally, the operator would drop the pressure by 20 psi increments, reducing output until coverage failed. It is important to note that the operating pressure must never approach the lower end of the nozzle’s recommended pressure range, or the spray quality will be compromised and so will coverage.
Once the coverage is considered a failure, the operator would return to the lowest output that did a good job, and the sprayer is calibrated for that crop (at that stage of growth).
Note that the calibration must be performed for each significantly different crop. With the exception of an early-season drench intended to contact the entire root, an emerging one year old garden would need a very different prescription than a four year old garden with a fully-developed canopy. Plus, the weather conditions will affect coverage, so do not calibrate in conditions you would not normally spray in. Hot and dry and windy conditions produce very different coverage compared to cool, humid and still conditions.
Once the operator knows what each garden requires, they will be able to mix their tanks using the same concentration of carrier to formulated product as they normally use, but likely go further on the tank. It will take some practice before the operator knows how much spray mix is required to finish the job.


