The level of filtration required for any given spray operation depends on the materials sprayed and the nuisance factor: That is, the balance between lost productivity from plugged nozzles and the effort required to address them during rinsing.
There are opportunities to install strainers at the tank opening (usually a basket), the suction-side of the pump, each section line, and behind the nozzles. While we’ve yet to see an operation that uses all four (speciality or field operations), the suction strainer and line strainers are required bare-minimum.
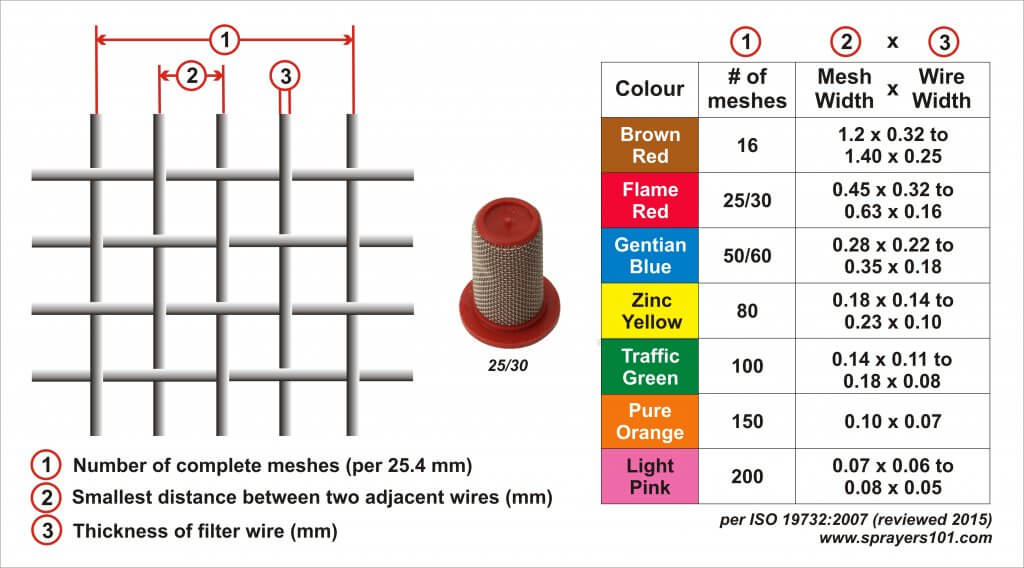
This infographic explains how strainers are classified. Be aware that older strainers may use a different colour code (e.g. 50 mesh used to be red – now it’s blue).
To convert these ratings to actual size exclusion, we look at the Mesh Width (mm). An 80 mesh (yellow) leaves a distance of 0.18 to 0.23 mm between the wires. We can convert Mesh Width from mm to microns by multiplying it by 1,000, giving us 180 – 230 microns.
Each level of filtration should get progressively finer, ending with the nozzle strainers being slightly finer than the nozzle orifice. Nozzle catalogues will often advise you on which strainer is appropriate for the nozzle you are using.
When we ask why operators don’t use nozzle strainers, the response is either “Because they plug” or “It’s one more thing to clean”. Well, if your nozzle strainers are plugging, it’s likely because you have an agitation (see here) or mixing issue (see hereand here) further up the line. They can handle a lot before the spray pattern begins to suffer … but yes, you do have to clean them regularly so they can continue their good work.
Running water through any strainer often fails to remove plugs and debris, which are a source of contamination that can wreak havoc later on. They have to be removed and physically scrubbed during rinsing. We ran a demo to show why this irritating process is still a must-do (here).
If you use an airblast sprayer, you should use slotted (not mesh, which plug too easily) nozzle strainers. Beyond the obvious benefit of preventing plugged nozzles, the strainer shoulder plays a role in keeping the nozzle snug in the nozzle body. Without it, you may need additional gaskets to prevent leaks. Be aware that some nozzle strainer designs can plug a nozzle body. Learn more here.
If you use a field sprayer with clean carrier water, liquid formulations and large nozzles, you may never need nozzle strainers. But, if you’re using a lot of dry formulations, if your agitation is under-powered, or if your fill water is less than pristine (we’ve seen frogs in sprayer tanks) then you might consider them… even if they are a nuisance to clean.
“I’m an organic apple grower with constant nozzle-clogging problems. These problems occur when we use wettable powders such as micronized sulfur and Surround WP. We always premix before adding to the tank through its strainer. Our airblast sprayers have towers and employ mechanical agitation. The nozzle/filter combo is TeeJet TXR8001K Ceramic Conejet Visiflow Hollow Cone spray tips with TeeJet 4514NY10 50-mesh nylon slotted strainers. The nozzle strainers rarely make it through a full tank without having problems. Do I need to add an additional level of filtration or is there something that I’m missing?”
A clogged slotted strainer inside the nozzle body. Note that the inners of the check valve seem clear (a good thing).A clogged slotted strainer.
You can almost feel the frustration. When I receive grower enquiries, I first turn to the library of articles on Sprayers101 as well as the Airblast101 textbook. I was surprised to discover that we didn’t have anything that addressed this issue directly. So, I checked through university extension and industrial resources. Ultimately I couldn’t find what I was looking for, so let’s correct this oversight.
Possible causes
There may not be a single reason for why nozzles plug. It might be a combination of the following factors:
1. Product choice
While any tank mix can create clogs if they prove to be physically incompatible, there are two formulations that have a reputation for clogging nozzles.
Wettable powder (WP) formulations such as micronized sulfur and diatomaceous earth are notorious for clogging nozzles. WPs consist of a finely ground solid active ingredient often combined with wetting and bulking agents to help hold them in a dilute suspension. They tend to be dry products rather than liquids.
In a similar vein, suspension concentrate (SC) formulations also consist of a finely ground solid active ingredient, but this time they are suspended in a liquid and kept dispersed in the sprayer tank by wetting agents, dispersants, and thickeners. These formulations are known as “flowables” or “suspensions”.
By the way, for those thinking he should change products, he already uses Kumulus DF (or Microthiol Disperss), which are reputedly the least troublesome formulations… and smell better than other sulfurs.
2. Mixing practices
Pre-slurries are sometimes prescribed for SCs. I personally feel that pre-slurries create exposure risks and more things to clean, but this opinion is moot in the case of WPs: Micronized sulfur and diatomaceous earth are not soluble. They’re particles that are held in suspension by fluid flow or agitation, so there’s no point in a pre-slurry.
For those readers that cook, consider the corn starch metaphor. You’re making a sauce, and you choose to thicken it with a pre-slurry of corn starch and water. The particles disperse, but do not dissolve, so if you fail to use it immediately they settle to the bottom of the container. They must be forcibly scraped up and resuspended.
3. Agitation
Best practice is to fill the tank at least ½ full of water and engage agitation before you add anything. To extend the cooking metaphor, you want a simmer but not a rolling boil. Once filled, never stop agitating or WPs and SCs will settle and may not resuspend uniformly, if at all.
Your sprayer design may affect matters. Some hydraulic agitation systems flag if they have undersized pumps. If your pump is busy sending flow to the nozzles, it may not have sufficient capacity to run the agitation. When your sprayer is “empty”, is there a thick accumulation at the bottom? You may have insufficient hydraulic agitation. Mechanical (paddle) agitation does not suffer this issue because it is direct-driven off the PTO. Read more here.
4. Clean-out practices
Perhaps plugs are occurring because of the previous tank, not the current tank. WPs can leave a buildup of settled pesticide in the tank, suction strainer and nozzle strainers. If you aren’t diligent about rinsing at the end of each day, products will settle and harden. Micro sulfur particles, for example, are less than 10 µm in diameter and harden into a flakey shell that can break loose and cause plugs.
5. Flow restriction
Several things can restrict flow. Elbows, bends and fittings can increase friction, reducing flow. The greater the distance a fluid needs to travel, the more flow is reduced. The greater the head (a pump’s head is the maximum height that the pump can achieve pumping against gravity), the more flow is reduced. There is an excellent description of this relationship here.
So, if an operator is using nozzles with a particularly small orifice, plus nozzle strainers, on a vertical boom, liquid flow will be reduced. This allows particles to fall out of suspension and settle, forming further restriction to flow and eventually, plugs.
Possible solutions
Now, armed with these potential causes, let’s return to the grower. After some back-and-forth, he clarified that the clogs were a problem, but restricted flow was worse. An operator will stop to clean or replace a plugged nozzle, but may not notice reduced flow. This has the potential to affect several rows as well as leave unsprayed product in the tank.
My first proposal was to increase nozzle size. An ’01 tip is very, very small and even with slotted strainers (as opposed to mesh), that’s a lot of restriction. I suggested recalibrating for larger tip orifices. This is a rather involved process, but options included using every second nozzle (as long as there were no gaps in coverage), and/or dropping pressure, and/or increasing travel speed (as long as the spray still reached the tree top and canopy centre). I shared this Excel outputcalculator to help with the process.
Failing that, we discussed a plumbing project. Section 5.2.1 of Airblast101 describes a way to create a self-cleaning line filter that replaces nozzle strainers. That means instead of climbing a ladder to pull tips off a tower to reach the strainers, all filtration is conveniently located at ground level for easier (and more frequent) cleaning.
The outcome
The grower felt the numbers worked best running orange 02 TXR’s in every second position. He ordered new 50 mesh slotted nozzle strainers. His new operating parameters would be 5 nozzles/side, at 8.2 bar (120 psi) and 5.1 km/h (3.2 mph) for a total 51.5 L/ha (55 gpa). He noted some incompatibility issues running Braglia nozzle bodies (spec on his Rears sprayer), TeeJet TXR’s, TeeJet slotted strainers and TeeJet CP20230 caps. That was an important observation, and you can learn more about it here.
We felt good about this, but while there was an improvement, it didn’t solve the problem. There was still strainer clogging after the first tankload. So, he added inline filters and removed the tip strainers. The result:
“Yesterday I sprayed over 350 pounds (over 1,000 gal) of Surround WP and had no issues. I’m really excited about this new setup – it looks very promising. I’ve attached more pics if you’re interested (I don’t spend a lot of time scrubbing sprayers until after Surround season). Thanks again for all your help in this matter. – Joe Fahey, Peck & Bushel Fruit Company”
A 50 mesh inline filter assembly with a 1/4 turn ball valve for quick flushes.New filter plumbed and secured. Note the anti-rub wrap on the line – always a good idea.The new loadout. 02’s in every second position, with no tip strainers, and a new inline filter on each side of the sprayer.
Fantastic. Thanks to Joe for letting me share this story. Hopefully his experience will help you diagnose and solve any flow or nozzle plugging issues in your own operation.
Happy Spraying.
Epilogue
This article elicited some interesting comments. I’ll share two:
One grower proposed switching from a low profile axial sprayer to an air-shear system (there are a few examples here). In this case, the grower had a European make with hydraulic agitation. The grower re-plumbed theirs by installing a bigger pump and swapping the sparge system with a 3/4″ pipe oriented toward the bottom to sweep it out. When mixing, the agitation valve is left wide open. He says he doesn’t even bother with a tank basket; he dumps the Surround (as much as 2 x 50 pound bags in 1,000 litres) and has no plugging issues.
Another grower with considerable boom-sprayer experience was genuinely surprised this was even an issue. Self-cleaning filters have been commercially available for more than 30 years and most boom sprayers have them. This is a comment on the stagnation of the North American low-profile radial airblast design. Perhaps the long life of these sprayers (sometimes 40 years of service) makes iterative change slow, or perhaps most operators aren’t aware of new features, or perhaps change is a risky proposition in such high-value crops. This is a shame given that the first optic sensors were installed on airblast, not broad acre field sprayers. That comes as a surprise to many. But it seems to have been the exception and not the rule.
Global research into Remotely Piloted Aerial Systems (RPAS) is producing pesticide residue, drift and efficacy data that is helping to inform federal regulatory policy. It is reasonable to assume that Canada will ultimately sanction the use of RPAS for agricultural spraying. The first registered products will likely be fungicides intended for broad acre crops such as soybean, corn, and wheat.
Those considering RPAS for agricultural spraying have expressed interest ranging from general curiosity to high demand. Successful adoption will be contingent on expectation management, which in turn requires education on the functional differences between RPAS and conventional application technologies.
Quadrotor RPAS design dominates the current commercial landscape, with typical models featuring four rotary atomizers and 40 L tanks. There have been improvements in recent years, but these designs continue to suffer from a low rate of productivity (by North American standards for broad acre crops). This is due, in part, to low volumetric capacity and limitations with rotary atomizer design, which result in a debatably short effective swath width. Broadly, “swath width” refers to the minimal span consistently sprayed by a single pass, while “effective” indicates a spray coverage (i.e. deposition pattern and threshold dose) sufficient to achieve the desired result.
Our research efforts have focused on identifying and evaluating variables that influence effective swath width. These include operational settings such as altitude, travel speed, volume applied and nozzle settings. They also include environmental factors such as meteorological conditions, crop morphology, and planting architecture. Establishing a combination of settings that account for these factors will inform operator practices and optimize the balance between RPAS effectiveness and efficiency.
Study Objective
Fusarium head blight is a significant economic threat in wheat. Fungicide application takes place at the T3 stage of development, with the intention of providing panoramic coverage of the wheat head. RPAS is being considered to apply these fungicides.
The pursuit of productivity tempts operators to push operational settings to the point that spray coverage is compromised. This study will use operational settings based on the results of previous work and assign flight speed as the independent variable.
Coverage will be assessed using water sensitive paper (WSP) positioned at the top of the canopy and oriented vertically in four cardinal directions to emulate the circumference of the wheat head. Isolating the resultant coverage in each cardinal direction may provide insight into droplet behaviour within the RPAS spray cloud and perhaps better assess effective swath width.
Coverage from a conventional field sprayer will also be characterized. This represents the current standard and it will provide a basis for comparison.
Materials and Methods
Site
The experiment was conducted at 45939 John Wise Line, St Thomas, Ontario (42.7320746, -81.0879887) on June 1, 2025. Common seed wheat was planted on October 6th, 2024, at 1.8 million seeds/ac on a 19 cm (7.5 in) row spacing. At the time of spraying, wheat was at the T3 stage of development, approximately 0.7 m (2.5 ft) high.
Holder Design
3D-printed holders were designed in Autodesk Fusion. They feature tabs that create a pressure fit (for quick WSP loading and unloading) and a back support (to prevent WSP movement in a downwash) to vertically position 1×3” WSP facing out on four cardinal points (figure 1). 21 poles were positioned on a 1 m spacing, leaving the tops coplanar with the wheat heads for in situ swathing. The square cross-section of the poles corresponded to a square depression in the WSP holder, ensuring the samplers were correctly aligned (figure 2). The gcode file to 3D print your own holders can be downloaded here. We used PLA filament with 3 walls and a 15% rectilinear infill to print 16 holders at a time on a Bambu P1S.
Figure 1. 3D-printed WSP holder slotted onto a pole in the wheat field.Figure 2. Four WSP positioned vertically, facing four cardinal points, at wheat-head depth.
Wind direction is indicated by the direction the wind is coming from, not the direction it’s blowing to. Therefore, a wind blowing in a northern direction is referred to as a southern wind. The WSP holders were aligned east to west, perpendicular to the prevailing southern wind. We established a trampled path ~0.75 m on the downwind side. This left the wheat canopy surrounding the samplers intact while still permitting access to the WSP holders (figure 3).
Figure 3. 21 WSP holders on 1 m spacing with access ~0.75 away.
WSP were given unique serial numbers to identify their position, and pre-loaded into the holders. 170 loaded holders were stored on raised grids inside four shallow plastic bins, arranged in the order they would be used (figure 4). This greatly expedited placement and retrieval, allowing for more repetitions to take place while optimal weather conditions held.
Figure 4. WSP holders arranged in sequence in a storage bin. This allowed the pre-loading of serial numbered WSP prior to the day of the experiment.
Application Method
A DJI Agras T50 RPAS maintained and calibrated by the cooperator was fitted with four rotary atomizers. Previous work has demonstrated that higher rates of flow can have a detrimental effect on the spray quality from rotary atomizers, so distributing the flow over four nozzles was intended to prevent this. The atomizers applied a 250 µm spray over a 7 m swath width (corresponding with route spacing), as selected on the flight controller. Altitude was 3 m above the wheat heads, and flight speed was either 6 or 10 m/s (three repetitions each). Application volume was 50 L/ha, anticipating this to be a future label requirement.
The RPAS flew a racetrack pattern over the samplers (figure 5). It flew with a prevailing tailwind between samplers 14 and 15, and then back with a prevailing headwind between samplers 7 and 8. We employed a DJI RTK-1 base station, which claims 1 cm horizontal accuracy.
Figure 5. Racetrack flight path relative to WSP holders and prevailing wind direction.
The RPAS was given sufficient distance (~40 m before and after the samplers) to reach the target speed, which was confirmed with a screenshot from the flight controller. The RPAS tank (capacity 40 L) contained municipal water with 0.125% v/v of NIS (Ag-Surf II). The level of liquid in the RPAS tank was maintained at 40 L throughout the trial to eliminate the effect of a changing payload.
The field sprayer, maintained and calibrated by the cooperator, was a New Holland SP 275s. It extended the left boom over the samplers from position 1 through to 12 and made a single pass with a prevailing tailwind (three repetitions). It traveled at 4.5 m/s (16 km/h or 10 mph) spraying 187 L/ha (20 gpa) and rough terrain caused the boom height to fluctuate between ~25 cm and ~50 cm above the wheat heads. The nozzles were Greenleaf Technologies TADF 06 (greys) on a 50 cm spacing operated at 50 psi to produce a Coarse spray quality. The tank contained municipal water with 0.125% v/v of NIS (Ag-Surf II).
Trial Procedure
WSP holders were placed just prior to spraying while the RPAS or field sprayer was positioned ~40 m beyond the samplers. When wind conditions were deemed appropriate, a signal was given to initiate spraying. On pass completion, one minute elapsed before initiating collection to permit complete deposition of the spray and drying of the droplets.
Weather Data
Weather data was collected using a Kestrel 3550AG weather meter (Kestrel Instruments) in a vane mount positioned roughly 1 m below RPAS altitude. Data was logged as the RPAS or field sprayer boom passed the samplers (table 1). In the case of the RPAS, there was very little difference between the two passes per repetition, so values were averaged.
Time
Rep and Treatment
Temperature (°C)
Wind Speed (km/h)
Wind Direction
10:21:51
1. RPAS 6 m/s
16.4
3.1
S
10:33:56
2. RPAS 6 m/s
17.7
6.2
S x SW
10:45:50
3. RPAS 6 m/s
18.8
4.0
S x SW
10:55:40
1. RPAS 10 m/s
18.6
2.1
SW
11:06:24
2. RPAS 10 m/s
20.0
0.5
S
11:16:00
3. RPAS 10 m/s
19.2
5.8
S x SW
11:29:54
1. Field Sprayer
21.1
0.0
S
11:41:12
2. Field Sprayer
19.9
1.7
S x SW
11:48:31
3. Field Sprayer
20.2
3.9
S
Table 1. Time and weather conditions for each repetition. Data was captured as the nozzles passed over the holders. Wind direction is indicated by the direction it is coming from.
When the average deposit density from each of the four WSP per holder is added, we have a measure of total panoramic coverage. The mean total panoramic coverage from three repetitions of each treatment is shown in figure 6. For the RPAS treatments, distinct coverage peaks typical of RPAS applications correspond to the flight passes through poles 14-15 and 7-8. There is a slight spray displacement due to an occasional shift to a west wind (i.e. overall coverage shifted towards pole 1). However, the entire spray swath appears to have fallen within the range of the samplers. The back-and-forth flight pattern produced higher coverage at the interface between passes (pole 10) compared the extremes (beyond poles 19 and 3) suggesting some overlap. Deposit density was higher for the slower RPAS flight speed, and RPAS produced a higher deposit density than the field sprayer. Field sprayer coverage data is included for perspective but is generally not referred to unless it has some bearing on the evaluation of the RPAS coverage.
Figure 6. Mean sum deposit in count/cm2 for each treatment. RPAS 6 m/s deposited an average 700 drops/cm2. RPAS 10 m/s deposited an average 400 drops/cm2. The field sprayer deposited an average 280 drops/cm2. r=3. S.E. bars shown. Arrows indicate RPAS flight path and direction.
Swath Width
If the coverage at pole 10 represents the edge of each swath, then a swath width of ~6.0 m can be estimated based on similar coverage at poles 16-17 and 3-4. This is less than the programed value of 7.0 m.
This inference is supported when these averaged values were entered in an Excel-based model that calculates swath width. The model sums deposits from adjacent swaths assuming a racetrack pattern. Threshold coverage is subjective but adhering to the objective of establishing a balance between over- and under-dosing with the lowest possible C.V., we calculated swaths between 5.0 and 6.5 m (table 2).
Treatment
Pole Position
Threshold Coverage (count/cm2)
Under-dose (%)
Over-dose (%)
C.V. (%)
Swath (m)
RPAS 6 m/s
21-10
120
10.4
5.0
18.0
5.5
RPAS 6 m/s
10-1
120
5.7
14.1
26.0
5.0
RPAS 10 m/s
21-10
80
9.1
11.4
25.4
6.0
RPAS 10 m/s
10-1
35
17.2
14.1
43.4
6.5
Table 2. Swath widths calculated from the average cumulative deposit density for each WSP holder.
It was expected that the field sprayer would produce a somewhat trapezoidal coverage pattern, tapering up at pole 12 (boom extreme) and level to pole 1 (sprayer chassis). Instead, note the gradual increase in coverage from pole 12 to 1. This is likely the result of boom yaw, where the boom end rose higher than the point closest to the sprayer. If this degree of coverage represents the industry standard, it is notable that the average boom coverage is either on par with, or considerably less, than that of the RPAS.
Deposit Density
The RPAS was programmed to produce a 250 µm droplet size, while the field sprayer produced Coarse (~218-349 µm) droplets. Smaller stains were produced by the RPAS than the field sprayer (figures 7 and 8), and their circular/oval shape suggest both a smaller droplet volume and a somewhat perpendicular flight path. Droplets produced by the field sprayer left long streaks, which suggest higher droplet volumes and a more parallel flight path.
Figure 7. Typical deposition pattern from a single WSP holder in the centre of the RPAS flight pattern. Considered from the perspective of the RPAS, WSP starting at the top and rotating clockwise are left side, retreat side, right side, and advance side.Figure 8. Typical deposition pattern from a single WSP holder nearer the field sprayer chassis. Considered from the perspective of the field sprayer, WSP starting at the top and rotating clockwise are left side, retreat side, right side, and advance side.
When the overall average coverage is calculated the RPAS at 6 m/s deposited an average 700 drops/cm2 and an average 400 drops/cm2 at 10 m/s. The field sprayer deposited an average 280 drops/cm2. When volume remains constant, smaller droplet diameters produce a greater number of droplets than with larger droplet diameters, so more droplets would be expected from the RPAS. However, the RPAS applied only 50 L/ha while the field sprayer applied 182 L/ha. Therefore, the RPAS distributed a greater density of potentially higher-concentration droplets on each WSP holder compared to the field sprayer. Further, a slower flight speed deposited a higher density of stains than a faster flight speed.
Effect of Travel Speed
The 6 m/s treatment resulted in slightly smaller swath widths (1 m or 15% less) than the 10 m/s treatment. The positive relationship between swath width and flight speed has already been established. The positive relationship between flight speed and off target drift has also been established, which may account for the significantly fewer deposits (almost 50% fewer) in the swath at 10 m/s versus 6 m/s. When a higher deposit density is valued, such as in the case of contact fungicide application, the loss of productivity from a slightly smaller swath width is a reasonable compromise for the superior coverage within that swath.
Coverage by Cardinal Point
North Facing WSP
This side of the WSP holder faced north, away from the prevailing south wind. The RPAS deposited far more on this face when traveling with the wind between poles 14-15, making this side face the RPAS retreat (figure 9). It suggests the RPAS blows down and back, even against a tail wind. This is supported when RPAS returned between poles 7-8 and deposited comparatively less on this face.
Figure 9. Mean sum deposit in count/cm2 for each treatment on north facing WSP. r=3. S.E. bars shown. Arrows indicate RPAS flight path and direction.
RPAS speed may have had an effect. With airblast sprayers, slower travel speeds produce greater dwell times, which increases the distance a droplet travels on a given trajectory. Logically, when flying away from the retreat face, higher speeds would impart a greater forward momentum on a droplet, cancelling out some of the backward momentum (watch a video here). If this were the case, there would be comparatively improved deposit density on the 14-15 pass for slower speeds and reduced coverage between poles 7-8 as it blew past the target. Figure 9 supports this hypothesis.
South Facing WSP
This side of the WSP holder faced south, into the prevailing south wind. Considering the 6 m/s treatment, we see more coverage on the 7-8 pass than the 14-15, because it represents the retreat side of the sprayer (figure 10). The differential is far less on this plane than the north facing (figure 9) because the prevailing wind likely blew spray into the WSP on the 14-15 pass. Nevertheless there is significantly more on 7-8.
Figure 10. Mean sum deposit in count/cm2 for each treatment on south facing WSP. r=3. S.E. bars shown. Arrows indicate RPAS flight path and direction.
This relationship is less clear for the faster 10 m/s treatment. There does tend to be higher deposit on the 14-15 pass as spray was blown into the collectors. However far more was expected on this face for the 7-8 pass as it represents both the retreat face and has the added benefit of wind. Further, there was far less coverage overall when compared to the slower flight speed. We have no explanation for the lack of coverage on the 7-8 pass and can only conclude that higher speeds left droplets airborne and were not conducive to coverage.
West Facing WSP
This side of the WSP holder faced west, into the slight west wind. We see coverage is almost exclusively on those WSP facing the drone (figure 11). In other words, as the RPAS passed between 14-15 and 7-8, coverage was positively skewed from this point. The skewed coverage was evident at both flight speeds, but overall coverage was higher for the slower speed. Once again, we cannot explain why there was significantly reduced coverage on the 10 m/s pass between poles 7-8 except to suggest the spray may have remained airborne.
Figure 11. Mean sum deposit in count/cm2 for each treatment on west facing WSP. r=3. S.E. bars shown. Arrows indicate RPAS flight path and direction.
East Facing WSP
This side of the WSP holder faced east, away from a slight west wind. We see that coverage is almost exclusively on those WSP facing the drone in the upwind direction (figure 12). Overall coverage was slightly higher for the slower speed, but far less overall coverage compared to the west facing samplers (figure 11). This is likely because the light west wind caused spray to displace from pole 21 to pole 1, washing past the back (insensitive) sides of the WSP.
Figure 12. Mean sum deposit in count/cm2 for each treatment on east facing WSP. r=3. S.E. bars shown. Arrows indicate RPAS flight path and direction.
Summary
RPAS can provide par or better panoramic wheat head coverage compared to a conventional ground rig when they are flown using reasonable operational settings in optimal environmental conditions. A moderate flight speed (~6-8 m/s), appropriate altitude (~3 m above wheat heads), and four rotary atomizers producing a Medium-Coarse (~250 um) droplet size can produce an in situ 6 m swath width at 50 L/ha. Higher flight speeds produce a marginally wider swath at the cost of reduced droplet density and increased drift potential.
Assessing coverage using vertical WSP facing four cardinal points has provided further insight into the behaviour of spray from an RPAS. Droplets from any application technology tend to deposit with wind and gravity, but rotor downwash represents an additional variable unique to RPAS. That force, combined with a forward cant of the drone during flight, lead droplets to deposit on vertical surfaces that face the rear (retreat) of the sprayer as well as surfaces that face and intercept spray that radiates laterally from the flight path.
Author’s note: In 2026 we conducted a similar study with the larger, faster T100. The results give additional insight that should be considered.
Drone Spray Canada, Bayer Canada, volunteers Kurtis Pilkington and Natalie, and grower-cooperator Adam Pfeffer are gratefully acknowledged for their contributions to this study.
On May 29, 2015, we launched www.sprayers101.com. Actually, that date is practically correct, but not technically correct. To celebrate our anniversary, I thought I’d share the history of how of we got to where we are today.
2013
On December 21, 2013, I launched www.sprayers101.com… sort of. Back then, the website was different. I’d just developed a classroom -based course called “Airblast101” to teach applicators how to calibrate, operate and maintain their airblast sprayers. The website was a virtual and self-directed version for those that couldn’t attend in person.
Screenshot of a template for the original Sprayers101.com website.
The name “Sprayers101” sounded like a first-year university course, so it seemed an appropriate domain name. I could have called the site “Airblast101” but I had hope that the course might one day expand to include field crop, closed environment and aerial spraying systems. Being generic gave room to grow.
After the launch, I lurked behind the scenes, addicted to Google Analytics (a diagnostic tool that lets us assess how the site was being used). It was a thrill to see a modest number of people around the Great Lakes and in British Columbia use this new resource. But they weren’t using it the way I’d envisioned. It was designed as an online course, so it was assumed the user would start at the first page and read it in order until they reached the end. Instead, they were jumping all over the place.
Users would search for key words to find specific information, and once they had what they wanted, they left. This suggested the audience was more interested in a resource library. They were also interested in bite-sized morsels, not a long-term commitment.
2014
Around this time, I was fortunate to have been in communication with Dr. Tom Wolf. I took a flyer and proposed that we team up to re-create the website from the ground up. I knew it would benefit immensely from his experience as a global authority on application technology. Happily, Tom agreed and he brought an insight and creativity to the project that helped transform it. We worked for the next six months to develop and assemble new content as well as beta test website designs. Then we re-launched.
Mock-up of the new Sprayers101.com concept.
In the 17 months B.T. (Before Tom) I had a total 31,500 page views. Only six months A.T. (After Tom) we gained 70,000 more. We were on to something good. The numbers continued to climb as we added calculators, opinion pieces, research results and invited content from contributing authors.
2015
In 2014 Tom encouraged me to explore social media. By 2015 we were deeply involved in Twitter, using it to learn from farmers, discuss their issues and draw inspiration for some of our articles. Our handles “Nozzle_Guy” and “Spray_Guy” were entirely coincidental – seriously. There was another bump in website use in 2018 when we created “Exploding Sprayer Myths”, which are parody-based educational videos for our companion YouTube channel. Incidentally, we’re still hoping to one day find a legit educational reason to blow up a sprayer.
2021
In July, 2021 we decided to refresh and relaunch the site. Most of the changes addressed stability, improved smart phone access, and allowed us to cross-reference and re-organize content (an ongoing administrative task). We adopted a cleaner look and lost the drop-down menus to focus on a more powerful search engine to help users access the now 250+ articles.
2025
Today, ten years since we reimagined the site, sprayers101.com has grown beyond what might be considered “101”. It receives >250,000 page views annually from users all over the world. Of the 325+ posted articles, our most popular have been viewed more than 20,000 times. We have more than 2,000 subscribers. We’re often contacted by people who tell us how much it has helped their spraying practice, or how it’s been used to train new industrial, agronomic and regulatory staff.
Our original goal was to provide the best information on agricultural spray application, and that remains true today; from humble backpack sprayers and fundamental skills through to drones and autonomous sprayers with optics, prescription maps and algorithms. The site is, and has always been, entirely impartial to preserve the integrity of the content we offer.
Our heartfelt thanks to our readers, to our sponsors, and to our contributing authors.
Happy Spraying.
2026 ADDENDUM
Just for completeness, and given that this article is something of a historical record, we relaunched the website in March of 2026. New features include:
All-new look and feel, including an animated logo
Bulleted, AI-generated summaries
Far better search engine with predicative text and the ability to search titles and tags
As Canadian farmers begin to adopt closed transfer systems (CTS), growing pains are to be expected. Instructions for installation and use are primarily European and field-sprayer centric. We’ve seen precious little in the way of practical advice for incorporating CTS into airblast operations.
This is a “live” article which we’ll update periodically. We encourage readers to contact us and share their observations and experiences (and photos) so we can all learn from them. We’re happy to keep contributions anonymous if that’s preferred.
This article does not intentionally imply any brand preference. Our experience is limited at this point and we are using any information we have access to. As the article grows, so will the combinations of sprayer and CTS. Also, we are not recommending or endorsing any of the following approaches. It’s still unclear if modifying the sprayer is the purview of the manufacturer / dealer of the sprayer or the CTS. At this point, we suspect it’s likely the owner that accepts any responsibility.
Does it matter where the CTS is relative to the sprayer?
If the system is gravity-fed, the coupler, the fill line and the connection to the tank must be higher than the fill level in the tank. Liquid won’t flow uphill unless it’s pushed from behind (pressure) or pulled (suction or siphon). Be aware this means the entire fill line should be above the tank’s fill level; sags will prevent fluid transfer. If we’re observing best practices, the tank should be half-full of water before you start adding products.
If the coupler uses suction from the sprayer itself, or employs a pump, relative height won’t affect filling. In this case it is likely part of a separate transfer system (i.e. not permanently mounted on the sprayer). It might be simple, or part of a larger and more sophisticated affair, but in either case it should be level, stable, and easily accessed without the operator having to reach or squat. Two examples are pictured below.
Here, a CTS is mounted to a hand cart so it can be wheeled into place and then put away. The sprayer provides suction via venturi to pull in the chemistry and a simple garden hose supplies municipal carrier / rinse water. Note the cinder (concrete) block used to stabilize the unit. Simple and effective.Here, a coupler is part of a larger tender system. Carrier / rinse water is pumped from an onboard tank, through the coupler, and then into the sprayer.
How do I plumb the CTS to the sprayer?
If the CTS is mounted directly on the airblast sprayer, it’s typically a smaller, gravity-fed coupler. The rinse / carrier water is often from an external source (e.g. water tank, tower, pond or municipal water), but there are cases where an onboard water source can be used.
Provide Agro has attached a gravity-feed coupler to the secondary tank hatch. This is above the fill line, sealed tightly, and it uses an onboard rinse / carrier water source. If considering cutting into a hatch, be aware of the filter basket or any onboard rinse system. Also, note that letting the lid flop open (or setting it aside) should not damage the coupler itself.No matter the rinse / carrier water source, it should match the manufacturer’s prescribed pressure range (generally between 3 – 6 bar or 45 – 85 psi) and have an anti-backflow device. There is no such device in this photo.
Some have suggested cutting a hole in the tank itself, above the highest possible fill line, and sealing the coupler in place. This is not simple. If you find a flat horizontal surface and you are equipped to cut poly, Fiberglas or steel (listed in ascending order of difficulty), doing so could undermine tank integrity and create potential for leaks. We won’t even entertain what would happen to your sprayer warranty… assuming someone still has one.
If the intent is to couple a fill line to the sprayer, the best approach is to tee a fitting into the suction-side of the sprayer plumbing to draw product in through the pump. Consider accessibility and safety first: Can you safely and easily reach the suction side of the sprayer plumbing? Is the PTO shaft too close for comfort? Will anything stick out past the sprayer that might create a risk of snagging a crop canopy or trellis? If a tee can be plumbed in, will it need to be secured to the chassis in some way to create stability?
There is no easy or universal answer to these questions.
On this sprayer, the only easily-accessed point is between the suction filter and pump. Creating a tee that would accommodate a dry poppet fitting is challenging.In the case of this 3-pt hitch sprayer, there is no simple way to access the suction side of the plumbing. Perhaps a tee could be added and the fitting extended up-and-out from under the chassis. Securing the fitting might require strapping it to the back of the tank, or to a mast of angle iron (or similar) attached to the chassis. Imagination required. Apply within.
As for the fitting, what style is best? A cam lever style fitting will work, but it will leak a volume of liquid when it’s detached. A quarter-turn valve will also be required on the sprayer, and preferably another on at the end of the feed line, so that’s two more valves in play when loading. And, for the sake of safety, best practice would to be to use a cam cap on the sprayer just in case the quarter-turn valve gets snagged and opens. Far safer and more efficient, a dry poppet style fitting will ensure minimal spillage when the hose is disconnected, with no additional valves or caps required.
Finally, what of the fill line itself? We’re seeking confirmation, but we have been told of a situation where the pump suction was sufficient to collapse the feed line. This is why some CTS manufacturers provide the hose and fitting with the units. At minimum, check the CTS manufacturer’s instructions and ensure the hose is rated for the degree of suction created by the pump.
Send us your experiences
And that’s all we have for now. We encourage you to reach out to us with your successes and failure and we’ll update this article for others to learn from.